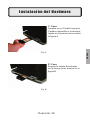
1
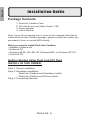
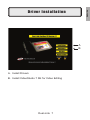
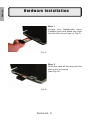
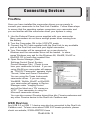
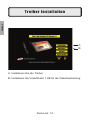
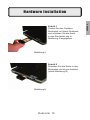
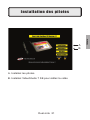
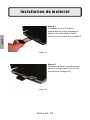
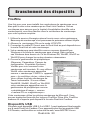
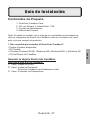
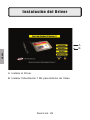
Upgrade to Firewire or USB 2.0
User’s Guide: First Edition
If you have any problems or questions on this product, please call :
ADS Tech
Dual-Link Cardbus
Dual Link Cardbus: Multilingual Manual
Technical Support
562.926.4338
North America Support Hours:
M-F : 8 am - 5 pm, PST
Email : [email protected]
website : www.adstech.com
European Technical Support: +353.61.702042
A letter from the President of ADS ...........................................................4
Introduction ..............................................................................................5
System Requirements .............................................................................5
DLX-181 ..................................................................................................6
Installation Guide ...............................................................................6
Step 1 Driver Installation ............................................................... 7
Step 2 Hardware Installation .........................................................8
Dual-Link Cardbus card Hardware install
Step 3 Connecting Devices ...........................................................9
Step 4 Install VideoStudio 7 SE ...................................................10
Help Resources .....................................................................................10
Installation Manual- German ..................................................................11
Installation Manual- French ....................................................................18
Installation Manual- Spanish ..................................................................25
Service and Warranty ............................................................................ 32
FCC Information .................................................................................... 33
Dual-Link 3
ENGLISH
Ta bl e o f C o n tent
ENGLISH
A Letter from the President of ADS Technologies
“Connect, Create, and Store”
At ADS Technologies, Inc. we bring the best and latest multimedia
technology to your PC. Our products allow you to “Connect, Create
and Store”.
CONNECT with our line of USB 1.1, USB 2.0 and 1394 Host and Hub
devices. Today, external bus technologies such as USB and FireWire/
1394 let you connect hundreds of devices to your PC or MAC. We
have the connectivity solutions that allow you to get the most out of USB
and 1394 technologies.
CREATE audio and video productions with our line of video capture and
editing solutions. We have video editing and MPEG2/DVD Capture and
Authoring solutions to fit everyone’s needs, ranging from the novice level
to the professional level.
STORE that multimedia masterpiece with one of our 1394 storage or
USB 2.0 Storage solutions. Today’s multimedia files are getting larger
and larger. You need solutions that help you easily and cost effectively
store your work; we’ve got those solutions.
More than ever, my goal has been to bring new technologies to the consumer market at affordable prices and with significant value to you, our
customer.
ADS products are easy to use. Most of our products are Plug-and-Play,
easy to install and offer software to help get the best value out of the
hardware product. And if you do need help, we will do our best to
support you. We want every customer to be a happy ADS customer.
The combination of technology innovation, affordability, quality, value
and support has made our products award-winners in the press and at
conventions. More over they are winners with our customers.
I wish to thank you for choosing ADS Technologies and I hope you enjoy
your new multimedia experience.
Sincerely,
Michael McCoy
President
Dual-Link 4
Add 2 FireWire Ports and 2 USB 2.0 Ports to your Notebook!
Use the Dual-Link Cardbus card and Video Studio 7 SE (inlcuded) to transfer
video from your digital camcorder to your PC, edit the video, add titles, effects,
background music and more. Then send your edited video back to your digital
recorder or save it as an MPEG1 File that you can then master to a VCD that
can play on most DVD Players.
FireWire/1394 and USB 2.0 are the latest in high-speed external bus technology.
This means you can instantly connect devices like DV Camcorders or Firewire
Hard Drives to your PC without opening up the case. FireWire offers true plug
and play and hot swapping of devices. Just plug in your digital camcorder,
launch the software and you’re ready to make movies.
Dual Link Features:
• Connect to Digital Camcorders
• Connect the PYRO 1394 WebCam
• Connect to 1394 Hard Drives/USB 2.0 Drives
• Edit video and send out to tape
• Capture still images
• Produce Digital Video Movies or VCD Movies for your DVD Player
• 2 Firewire ports at 400 Mbps/2 USB 2.0 ports at 480 Mbps
• Fully IEEE 1394a and USB 2.0 compliant
• Plug and Play
Requirements:
• Intel Celeron 500MHz or above
• AMD Athlon or Duron (any speed)
• Windows 98SE, Windows 2000, Windows ME, or Windows XP
• Available Cardbus slot
• 64 MB of RAM (128MB or higher Recommended)
• Sound card
• AGP or PCI video card with 4 MB of RAM
• CD-ROM Drive
• 200 MB hard disk space for capture/editing applications
• 4 GB hard disk space (20 minutes of raw DV footage)
Dual-Link 5
ENGLISH
I n t r o du c t i o n
ENGLISH
In s t a l l a t i o n G u i de
Package Contents
1.
2.
3.
4.
Dual-Link Cardbus Card
CD with Drivers and Video Studio 7 SE
Power Adapter
User’s Manual
Note: If you did not receive one or more of the contents listed above
inside the Dual-Link Cardbus package, please contact the vendor you
purchased it from or contact ADS directly.
What you need to install Dual-Link Cardbus:
• Available Cardbus slot
• Notebook PC
• Windows 98 SE, Win ME CD, Windows2000, or Windows XP CD
• Dual-Link CD
Getting Started Using Dual Link PCI Card
INSTALL IN THIS ORDER:
Step 1: Driver Installation
Step 2: Hardware Installation
- Dual-Link Cardbus card Hardware install
- Dual-Link Cardbus card Driver install
Step 3: Connecting Devices
Dual-Link 6
ENGLISH
Driver Installation
A
B
A. Install Drivers
B. Install VideoStudio 7 SE for Video Editing
Dual-Link 7
ENGLISH
Ha r dw a r e I n s t a l la t i o n
Step 1
Locate your Notebook’s open
Cardbus port and place the card
into the slot as you see in Fig. A.
Fig. A
Step 2
Push the card all the way into the
slot until it is secure.
(see Fig. B)
Fig. B
Dual-Link 8
FireWire
Once you have installed the camcorder drivers you are ready to
connect your camcorder to the Dual-Link Cardbus. Follow these steps
to ensure that the operating system recognizes your camcorder and
you are familiar with the camcorder driver your system is using.
1. Use the External Power source supplied with your camcorder.
Many camcorders do not have enough power when running from
the battery.
2. Turn the Camcorder ON to the VCR/VTR mode.
3. Connect the DV Cable supplied with the Dual Link to any available
port on the Dual Link card and your digital camcorder.
4. Your Camcorder will be recognized, as a new device by
Windows and the camcorder driver will be loaded. In some
cases Windows may ask for the Windows 98, WinME, WinXP or
Win2000 CD to load other needed files.
5. Open Device Manager (Start,
Settings,Control Panel, System,
Device Manager Tab). Check to see
how your camcorder is listed. If you are
using Win98 your camcorder will appear
as “1394 DV Camcorder” appears under
“Sound, Video and Game Controllers”.
You are using the Texas Instruments
camcorder driver. If you are using
Win98SE, WinMe, WinXP or Win2000
your camcorder will appear in Device
Manager under “Imaging Device”
and will be listed as a “DV camera or
VCR”. Your camcorder is using the
Microsoft camcorder drivers.
You can also connect Firewire drives/drive kits, Firewire webcams and
any other Firewire device to the Dual-Link Cardbus card.
USB Devices
Any USB 2.0 or USB 1.1 device may also be connected to the Dual-Link
Cardbus card. To learn more about USB 2.0/Firewire products, please
check our website, WWW.ADSTECH.com
Dual-Link 9
ENGLISH
Co n n e c t i n g D e v i c e s
ENGLISH
INSTA L L V i de o S t u d i o 7 S E
1. Connect your camcorder. Turn on to VTR/VCR PLAY Mode.
note: Your Camcorder must be connected and “On”
2. INSTALL Video Studio from Dual-Link CD. Follow the
installation instructions.
3. Re-Boot when the Installation is complete.
4. Run VideoStudio 7 SE. Go to page 16 of this Guide and start a new
project. Make sure your camcorder is turned on to VTR/
VCR MODE and connected to the Dual-Link Cardbus at this time.
Help Resources:
VideoStudio Help - Press “F1” on your keyboard at any time.
VideoStudio User Manual - on Dual-Link CD
ADS website: www.adstech.com
Online Help:
We are constantly adding more information to the Online Help section of our
website. Click the “Support” button on the home page or the “Technical Support”
button on any ADS web page. Click on the
Dual-Link or PYRO - Online Help. Here you will find many answers to commonly asked questions.
Software Updates:
We are constantly updating camcorder drivers, adding utilities or posting bug
fixes or patches in the “Downloads” section of our website. Click the “Support”
button on the home page or the “Technical Support” button on any ADS web
page.
For European Customers Only:
Most of the DV camcorders shipping in Europe only allow for DV OUT but not
DV IN. To fix this, third party companies have provided
hardware to enable the DV INPUT for most DV CAMCORDERS. Please
check these internet links:
• www.datavision.co.uk
• www.lynxdv.com
Resources on the web:
Web page with Dual-Link info: www.price98.freeserve.co.uk
Forum with tips & info for the ADS PYRO & Ulead VS & MS Pro:
http://pub9.ezboard.com/bpyro1394
ADS Tech, Inc. Forum on the WWUG (World Wide User Groups):
www.wwug.com/forums/ads-tech/index.htm
Dual-Link 10
Einleitung ................................................................................................12
Systemanforderungen ............................................................................12
DLX-181 .................................................................................................13
Installationsanleitung ........................................................................ 13
Schritt 1 Treiber Installation ..........................................................14
Schritt 2 Hardware Installation .....................................................15
Schritt 3 Anschluss der Komponenten .........................................16
Schritt 4 VideoStudio 7 SE Installation .........................................17
Dual-Link 11
GERMAN
Ta bl e o f C o n tent
GERMAN
EI NL EI T U NG
Fügen Sie 2 FireWire Anschlüsse und 2 USB 2.0 Anschlüsse
an Ihren Notebook hinzu.
Benutzen Sie die Dual Link Cardbus Karte und Video Studio 7 SE ( enthalten)
zur Videoübertragung von Ihrem digitalen Camcorder zu Ihrem PC, berarbeiten
Sie das Video, fügen Sie Titel hinzu, Effekte, Background Musik und vieles mehr.
Senden Sie dann Ihr bearbeitetes Video zurück zu Ihrem digitalen Recorder oder
speichern Sie es als MPEG1 Datei. Anschliessend können Sie das Video zu
einer VCD erarbeiten die sich auf den meisten DVD Spielern abspielen lässt.
FireWire/1394 und USB 2.0 sind das Neueste in der externen High-Speed Bus
Technologie. Das bedeutet Sie Sie können Vorrichtungen wie DV Camcorder
oder Firewire Festplatten sofort problemlos anschließen. FireWire bietet „Plug
and Play“ und im laufenden Betrieb austauschbarkeit von Komponenten.
Schliessen Sie einfach Ihren digitalen Camcorder an, starten Sie die Software
und Sie sind bereit Filme zu machen.
DUAL Link Eigenschaften:
• Zum Anschluss von digitalen Camcordern
• Zum Anschluss von PYRO 1394 WebCam
• Zum Anschluss von 1394 Festplatten/USB 2.0 Laufwerke
• Bearbeitem Sie Videos und senden Sie es zurück zu Videoband
• Erstellen Sie digitale Filme oder VCD Filme für Ihren DVD Spieler.
• 2 FireWire Anschlüsse @ 400 Mbps/2 USB 2.0 Anschlüsse @ 480 Mbps
• IEEE 1394a und USB 2.0 Kompatibel
• Plug and Play
Systemanforderungen:
• Intel Celeron 500MHz oder neuer
• AMD Athlon or Duron (irgendeine Geschwindigkeit)
• Windows 98 SE, Windows 2000, Windows ME oder Windows XP
• Freier 32 bit Card Bus Anschluss
• 64 MB RAM (128 MB oder mehr empfohlen)
• Soundkarte
• AGP oder PCI Videokarte mit 4 MB RAM
• CD-ROM Laufwerk
• 200 MB Festplattenspeicher zur Aufzeichnung und Bearbeitung
• 4 GB Festplattenspeicher (20 Minuten DV Gesamtlänge)
Dual-Link 12
INSTA L L AT I O NS A NL EI T U NG
1. Dual Link Cardbus Karte
2. CD mit Treiber und Video Studio 7 SE
3. Power Adapter
4. Bedienungsanleitung
Anmerkung: Falls Sie eines oder mehr des Inhaltes nicht bekommen
haben, bitte wenden Sie sich and den Verkäufer oder direct an ADS.
Was Sie zur Installation des Dual-Link Cardbus benötigen:
• Freier Cardbus Anschluss
• Notebook PC
• Windows 98 SE, Win ME CD, Windows 2000 oder Windows XP CD
• Dual-Link CD
Fange Sie an mit Dual-Link PCI Karte
Installieren Sie folgender Massen:
Schritt 1: Treiber Installation
Schritt 2: Hardware Installation
Schritt 3: Anschluss der Komponenten
Dual-Link 13
GERMAN
Packungsinhalt:
GERMAN
Tre i be r I n s t a l l a t i o n
A
B
A. Installieren Sie die Treiber
B. Installieren Sie VideoStudio 7 SE für die Videobearbeitung
Dual-Link 14
Schritt 1
Finden Sie den Cardbus
Steckplatz an Ihrem Notebook
und schieben Sie die Karte
in den Steckplatz wie in
Abbildung A angegeben.
Abbildung A
Schritt 2
Schieben Sie die Karte in den
Steckplatz ein bis sie festsitzt.
(siehe Abbildung B)
Abbildung B
Dual-Link 15
GERMAN
Hardware Installation
Anschl u s s de r K o m p o n e n t e n
GERMAN
FireWire
Sobald Sie die Camcorder Treiber installiert haben, sind Sie bereit,
Ihr Camcorder an den Dual-Link Cardbus anzuschließen. Folgen Sie
diesen Schritten, um sicherzugehen, daß das Betriebssystem Ihr Camcorder erkennt und Sie mit dem Camcorder Treiber vertraut sind, den
Ihr System benutzt.
1. Benutzen Sie das externe Spg. Versorgungsteil, dass mit Ihrem
Camcorder geliefert kommt. Viele Camcorder haben nicht genügend
Power beim Laufen über die Batterie.
2. Schalten Sie den Camcorder ON (AN) zum VCR/VTR Modus.
3. Schliessen Sie das DV Kabel, das mit dem Dual-Link Cardbus
mitgeliefert kommt an irgendeinen vorhandenen Steckplatz auf Karte
und Ihrem digitalen Camcorder an.
4. Ihr Camcorder wird durch Windows als neue Vorrichtung erkannt und
der Camcorder Treiber wird geladen. In einigen Fällen könnte
Windows nach der Windows 98, WinME, WinXP oder Win2000 CD
fragen um andere erforderliche Dateien zu laden.
5. Öffnen Sie den Geräte (Device)
Manager (Start, Settings, Control Panel,
Sytem, Device Manager Tab). Überprüfen
Sie um zu sehen, wie Ihr camcorder
verzeichnet wird. Wenn Sie Win98
benutzen wird Ihr Camcorder als „1394
DV Camcorder“ unter „Sound Video und
Game Controller“ erscheinen. Sie
benutzen Texas Instruments Camcorder
Treiber. Wenn Sie Win98SE, WinME,
WinXP oder Win2000 benutzen wird Ihr
Camcorder unter „Imaging Device“ als
„DV Camera oder VCR (Videorecorder)“
erscheinen. Ihr Camcorder benutzt die
Microsoft Camcorder Treiber.
Sie können auch FireWire Drives/Drive Kits, FireWire Webcams und
irgendein anderes FireWire Gerät an die Dual-Link Cardbus Karte
anchliessen.
USB Geräte
Irgendein USB 2.0 oder USB 1.1 Gerät kann auch an die Dual-Link
Cardbus Karte angeschlossen werden. Um mehr über USB 2.0/FireWire
Produkte zu erfahren, können Sie unsere Webseite besuchen unter
www.ADSTECH.com
Dual-Link 16
1. Schliessen Sie Ihren Camcorder an. Schalten Sie auf VTR/VCR
Play Modus ein.
Bemerkung: Ihr Camcorder muss angeschlossen und eingeschaltet sein.
2. Installieren Sie VideoStudio von der Dual-Link CD. Folgen Sie den
Installations-anweisungen.
3. Laden Sie Ihren Computer erneut wenn die Installation durchgeführt ist.
4. Laden Sie VideoStudio 7 SE. Sehen Sie auf Seite 16 dieser
Gebrauchsanleitung und beginnen Sie ein neues Projekt. Stellen Sie
sicher das Camcorder auf VTR/VCR Modus eingeschaltet und
gleichzeitig an das Dual-Link Cardbus angeschlossen ist.
Dual-Link 17
GERMAN
VideoS t u di o 7 S E I n s t a l l a t i o n
Ta bl e o f C o n tent
Introduction .............................................................................................19
Nécessite ...............................................................................................19
FRENCH
DLX-181 .................................................................................................20
Guide d’installation ........................................................................... 20
étape 1 Installation des pilotes .....................................................21
étape 2 Installation du matériel ....................................................22
étape 3 Branchement des dispositifs ...........................................23
étape 4 Installez VideoStudio 7 SE ..............................................24
Dual-Link 18
I n t r o du c t i o n
Ajoutez 2 ports FireWire et 2 ports USB 2.0 à votre portable.
FireWire/1394 and USB 2.0 sont les derniers high-speed en technologie bus
externe. Ceci signifie que vous pouvez immédiatement relier des dispositifs
comme des caméscope numérique ou Hard Drives FireWire à votre PC sans
ouvrir la prise.FireWire offre Plug and Play et la permutation chaude des
dispositifs. Branche seulement votre caméscope, lancez le logiciel et vous
êtes prêt à faire des films.
Caractéristiques du Dual Link:
• Branchement aux caméscopes numérique
• Branchement au PYRO 1394 WebCam
• Branchement au 1394 Hard Drives/USB 2.0 Drives
• Editez vidéo et renvoyez sur cassette
• Capturez des images still
• Créez des films DV ou des films VCD pour votre joueur DVD
• 2 ports FireWire à 400 Mbps/ 2 ports USB 2.0 à 480 Mbps
• Complètement comforme avec IEEE 1394a et USB 2.0
• Plug and Play
Nécessite:
• Intel Celeron 500 MHz ou plus
• AMD Athlon ou Duron (toute vitesse)
• Windows 98SE, Windows 2000, Windows ME ou Windows XP
• Fente Cardbus disponible
• 64 MB de RAM (128 MB ou plus recommendé)
• Carte de son
• Carte AGP ou PCI video à 4 MB de RAM
• Lecteur CD-ROM
• 200 MB d’espace de disque dur pour les applications de capture et edition.
• 4 GB d’espace de disque dur (20 minutes de vidéo DV)
Dual-Link 19
FRENCH
Utilisez la carte Dual-Link Cardbus et VideoStudio 7 SE (inclus) pour transférer
la vidéo de votre caméscope numérique à votre PC pour éditer la vidéo, pour
ajouter des titres, effets, musique de fond et puis pour envoyer votre vidéo éditée
de nouveau à votre enregistreur numérique ou crée un dossier MPEG1 que vous
pouvez alors maîtriser en VCD que vous pouvez jouer sur la plupart des joueurs
de dvd.
Gu i de d’ i n s t a l l a t i o n
Contenu:
FRENCH
1. Carte Dual-Link Cardbus
2. CD contenant des pilotes et VideoStudio 7 SE
3. Power Adapter
4. Guide d’utilisateur
Note : Si vous n’avez pas reçu un ou plusieurs des contenus énumérés
ci-dessus à l’intérieur de votre paquet Dual-Link Cardbus, veuillez contacter svp le fournisseur ou ADS directement.
Ce que vous avez besoin pour installer le Dual-Link Cardbus:
• Fente Cardbus disponible
• Portable
• Windows 98 SE, CD Win ME , Windows 2000 ou CD Windows XP
• CD Dual- Link
Utilisez votre carte PCI Dual-Link
Installez dans cet ordre:
étape 1: installation des pilotes
étape 2: installation du matériel
étape 3: branchez les dispositifs
Dual-Link 20
A
B
A. Installez les pilotes
B. Installez VideoStudio 7 SE pour éditez la vidéo
Dual-Link 21
FRENCH
Insta l l a t i o n de s p i l o t e s
Insta l l a t i o n du m a t é r i e l
FRENCH
étape 1
Localisez le port Cardbus
disponible de votre portable et
placez la carte dans la fente
comme vous voyez sur l’image A.
image A
étape 2
Poussez la carte complètement
dans la fente jusqu’à ce qu’elle
soit bloqué (images B).
image B
Dual-Link 22
Branch e m e n t d e s di s p o s i t i f s
FireWire
1. Utilisez la source d’énergie externe fournie avec votre caméscope.
Beaucoup de caméscope n’ont pas assez de puissance utilisant la pille.
2. Allumez le caméscope ON sur le mode VCR/VTR.
3. Connectez le cable DV fourni avec le Dual-Link au port disponible sur
la carte Dual-Link et votre caméscope.
4. Votre caméscope sera identifié comme nouveau dispositif par
Windows et le pilote du caméscope sera chargé. Dans certains
cas Windows aura besoin du Cd de Windows 98, WinME, WinXP ou
Win2000 pour charger les autres dossiers nécessaires.
5. Ouvrez le gestionnaire de périphérique
(Démarrer, Paramètres, Paneau de
configuration, Propriétés Système).
Vérifiez pour voir comment votre
caméscope est énuméré. Si vous utilisez
Win98 votre caméscope apparaîtra
comme « caméscope 1394 DV» apparaît
sous « le contrôleur de jeu, video et son ».
Vous utilisez le pilote caméscope de
Texas Instruments. Si vous utilisez
Win98SE, WinME, WinXP ou Win2000
votre caméscope apparaîtra sous le
gestionnaire de périphérique comme
« périphérique d’image », comme
« camera DV ou magnétoscope ».
Votre caméscope utilise les pilotes caméscope de Microsoft. Vous
pouvez également branché les lecteurs FireWire/ Drive Kits, FireWire
webcam et n’importe quel dispositif à la carte Dual-link Cardbus.
Dispositifs USB
N’importe quel dispositifs USB 2.0 et USB 1.1 peut également être branché
sur la carte Dual-Link Cardbus. Pour apprendre plus sur les produits USB
2.0/Firewire, veuillez allez sur notre site de web, www.ADSTECH.com.
Dual-Link 23
FRENCH
Une fois que vous avez installé les conducteurs de caméscope vous
êtes prêt à relier votre caméscope au Dual-Link Cardbus. Suivez
ces étapes pour assurer que le logiciel d’exploitation identifie votre
caméscope et vous êtes familier avec le conducteur de caméscope
que votre système emploie.
Instal l e z V i d e o S t u d i o 7 S E
FRENCH
1. Branchez votre caméscope. Allumez sur mode VTR/VCR PLAY.
Note :Votre caméscope doit être branchez et allumez « ON ».
2. Installez VideoStudio de votre CD Dual-Link. Suivez les instructions
d’installation.
3. Réamorcer quand l’installation est complète.
4. Lancez VideoStudio 7 SE. Allez à la page 16 de ce guide et
commencez un nouveau projet. Assurez-vous que votre caméscope
et allumé sur le mode VTR/VCR et branchez sur le Dual-Link Cardbus.
Dual-Link 24
Ta bl e o f C o n tent
Introducción ............................................................................................26
Requisitos ..............................................................................................26
DLX-181 .................................................................................................27
Guía de Instalación ...........................................................................27
1º. Paso Instalación del Driver ......................................................28
3º. Paso Conectando los Dispositivos ..........................................30
4º. Paso INSTALACIÓN de VideoStudio 7 SE .............................31
Dual-Link 25
SPANISH
2º. Paso Instalación del Hardware ................................................29
I n t r o du c c i ó n
! Agregue 2 puertos del FireWire y 2 puertos del USB 2.0 a su
portátil!
Utilice la tarjeta Dual-Link Cardbus y Video Studio 7 SE (incluido) para transferir
el video de su videocámara digital para su PC, edite el video, agregue títulos,
efectos especiales, música del fondo y más. Envíe su video editado de vuelta
al su grabador digital o guarde como un archivo MPEG1 para después crear un
VCD para ser reproducido en un reproductor de DVD.
SPANISH
Firewire/1394 y USB 2.0 son el últimos en tecnología bus externa de alta velocidad.
Esto significa que usted puede conectar dispositivos como videocámara digital o
disco duro de Firewire externamente a su Portátil. Firewire soporta la tecnología
Plug-and-Play y Hot-Swapping. Solamente enchufe su videocámara digital, lance
el software y estará listo para hacer películas en su Portátil.
Características del Dual Link:
• Conecte con Videocámara Digitales
• Conecte con PYRO 1394 WebCam
• Conecte con Disco Duros de 1394/USB 2.0
• Haga edición de video y envíelo de vuelta a cinta digital
• Capture imágenes
• Produzca Películas digitales o en formato VCD para reproductores de DVD
• 2 puertas de Firewire de 400 Mbps/2 puertas de USB 2.0 de 480 Mbps
• Compatible con padrón IEEE 1394a y USB 2.0
• Plug-and-Play
Requisitos:
• Intel Celeron 500MHz o superior
• AMD Athlon o Duron (500MHz o superior)
• Windows 98SE, Windows 2000, Windows ME, o Windows XP
• Puerta CardBus disponible
• 64 MB de RAM (128MB o superior Recomendable)
• Tarjeta de Sonido
• Tarjeta de video AGP o PCI de 4 MB o superior
• CD-ROM Drive
• 200 MB de disco duro libre para el software de edición/captura
• 4 GB de disco duro (20 minutos de video en formato DV)
Dual-Link 26
Gu í a d e I n s t a l a c i ó n
Contenidos de Paquete
1. Dual-Link Cardbus Card
2. CD con Drivers y VideoStudio 7 SE
3. Fuente de Alimentación
4. Manual del Usuario
? Que necesita para instalar el Dual-Link Cardbus?:
• Puerta Cardbus disponible
• PC Portátil
• CD para Windows 98 SE, Windows ME, Windows2000, o Windows XP
• CD del Dual-Link CardBus
Usando la tarjeta Dual Link CardBus
INSTALE EN ESTA ORDEN:
1º. Paso: Instale el Driver
2º. Paso: Instale el Hardware
Dual-Link Cardbus card Hardware install
3º. Paso: Conectar los Dispositivos
Dual-Link 27
SPANISH
Nota: Si usted no recibió uno o más de los contenidos enumerados arriba en el paquete de Dual-Link CardBus, entre en contacto con vendedor con que compró el producto.
Inst a l a c i ó n de l D r i v e r
SPANISH
A
B
A. Instalar el Driver
B. Instalar VideoStudio 7 SE para Edición de Video
Dual-Link 28
Insta l a c i ó n de l H a r dw a r e
1º. Paso
Localice en su Portátil la puerta
Cardbus disponible y enchufe la
tarjeta en la puerta como mostró
la figura A.
SPANISH
Fig. A
2º. Paso
Empuje la tarjeta firmemente
en la ranura como mostró en la
figura B.
Fig. B
Dual-Link 29
Conect a n do l o s D i s p o s i t i v o s
FireWire
SPANISH
Una vez que haya instalado los drivers de la videocámara digital usted
esta listo para conectar la videocámara a tarjeta Dual-Link Cardbus. Siga
estos pasos para asegurarse de que el sistema operativo reconoce su
videocámara y para que usted es familiar con el driver de su videocámara
digital.
1. Utilice la fuente de energía externa provista de su videocámara digital.
Muchas de las videocámaras no tienen energía suficiente para funcionar
correctamente.
2. Ligue la videocámara al modo VCR/VTR.
3. Conecte el cable DV provisto con su Dual-Link con cualquier puerto
disponible en la tarjeta y su videocámara digital.
4. Su videocámara será reconocido como un nuevo dispositivo en Windows y
el driver será cargado. En algunos casos Windows puede necesitar el CD de
instalación de Windows de acuerdo con la versión de su sistema operacional.
5. Acesse el Gerenciador de Dispositivos y
compruebe si su videocámara esta
enumerada. Si usted tienes Windows 98
su videocámara aparecerá como “1394 DV
Camcorder” debajo de “Controlador de Sonido,
Video y Juego”, usted esta utilizando drivers
de Texas Instruments. Si usted está utilizando
Win98SE, WinME, Win2000 o WinXP su
videocámara aparecerá debajo de
“Dispositivo de Imágenes” y será enumerado
como “DV Camera and VCR”. Usted está
utilizando drivers de Microsoft. Usted también
puede conectar dispositivos Firewire como
disco duro, gabinetes Firewire, Firewire
webcams y otros más.
Dispositivos USB
Cualquier dispositivo USB 2.0 o USB 1.1 puede ser conectado en la
tarjeta Dual-Link Cardbus. Para aprender más sobre productos del
USB 2.0 o Firewire, compruebe nuestro website, WWW.ADSTECH.com.
Dual-Link 30
INSTAL AC I Ó N d e V i d e o S t u di o 7 S E
SPANISH
1. Conecte su videocámara digital. Ligue en modo VTR/VCR.
nota: Su Videocámara debe estar conectado con Dual-Link Cardbus.
2. INSTALE el programa VideoStudio 7 SE del CD Dual-Link Cardbus.
Siga las instrucciones de instalación.
3. Re-empiece su Portátil cuando completa la instalación.
4. Lance el programa VideoStudio 7 SE. Siga las instrucciones en la
pagina 16 y empiece un proyecto nuevo. Verifique que la videocámara
esta en modo VTR/VCR y conectado con la tarjeta Dual-Link Cardbus.
Dual-Link 31
ENGLISH
Service and Warranty:
Service:
If you require assistance with the installation, operation, or application of your ADS
Technologies, Inc. product there are several options available to you as described
in the technical support section of this manual. Your primary source for information
and assistance is always your computer store or computer parts dealer. If your
ADS product needs repair or replacement, contact your dealer for on-site repair
service.
The ADS Technologies technical support and customer service staff can aid in
solving many problems. Our technical support department is available to repair
any ADS Technologies product. You or your dealer must return products to our
factory for repair or warranty replacement.
Return/Replacement:
If you need to return your ADS Technologies product you should return the product
directly to the dealer or store where you purchased the product. Each individual
computer store or dealer sets product returns policies for their customers. ADS
Technologies, Inc. cannot be responsible for the actions or policies set by our
dealers. If you desire to return the product for a refund, you must get the refund
from the dealer or store you purchased the product from. If you purchased the
product directly from ADS please see the “Terms and Conditions of Sale” on the
reverse side of your sales invoice.
Returns to ADS Technologies, Inc. are for repair or warranty replacement only. If
you need to return product to ADS Technologies, Inc. for repair or replacement
you must follow these steps:
1. Call our Technical Support department at (562) 926-4338 in the USA or +35361-702042 in Europe to obtain a Return Merchandise Authorization (RMA) number.
2. The RMA number is valid for 30 days.
3. Ship the product to the ADS factory with the RMA number marked on the inside
and outside of the package. If there is no RMA number on the package or the
RMA number has expired, the shipment will be refused. ADS will not be liable for
lost or mis-shipped products.
4. Replacement product cannot be shipped to you until the defective product has
been
received by ADS.
5. Once the product is received at the factory it will be tested and then repaired or
replaced.
Dual-Link 32
Warranty:
This ADS Technologies, Inc. product comes with a One (1) year hardware warranty. ADS Technologies, Inc. (ADS) warrants this product against defects in material
and workmanship for a period of One (1) year from the date of original purchase
from ADS or an authorized ADS dealer. This warranty applies only to the original
purchase of the product and is not transferable. This warranty does not cover any
incompatibilities due to the user’s computer, hardware, software or other related
system configuration in which the product interfaces. Proof of
purchase will be required before any warranty consideration by ADS occurs.
This warranty does not cover any damage caused by negligence, non-authorized
modifications, or parts installed without prior written permission from ADS.
This warranty does not apply if the product has been damaged by accident,
abuse, or misapplication, nor as a result of service to the product by anyone other
than ADS.
If your ADS product is not in working order, your only recourse is repair or warranty replacement, as described above. UNDER NO CIRCUMSTANCES will ADS
Technologies, Inc. be liable for consequential damages, including but not limited
to any lost savings, lost profits, or any other damages, caused by the use of any
ADS Technologies, Inc. product or inability to use the product, even if the dealer
or ADS Technologies, Inc. has been advised of such liability or other claims. This
includes damage to property and, to the extent permitted by law, damages for personal injury. This warranty is in lieu of all other warranties including implied warranties of merchantability and fitness for a particular purpose.
FCC Information
Federal communications Commission Radio Frequency Interference Statement
Note: This equipment has been tested and found to comply with the limits for a
class B digital device, pursuant to Part 15 of the FCC Rules. These limits are
designed to provide reasonable protection against harmful interference when the
equipment is operated in a residential installation. This equipment generates, uses
and can radiate radio frequency energy and if not installed and used in accordance with the instruction manual may cause harmful interference to radio communications. However, there is no guarantee that interference will not occur in a
particular installation. If this equipment does cause harmful interference to radio
or television reception, which can be determined by turning the equipment off and
on, the user is encouraged to try to correct the interference by one or more of the
following measures:
* Reorient or relocate the receiving antenna
.
* Increase the separation between the equipment and receiver.
Dual-Link 33
ENGLISH
6. Turn around time is approximately one week. A repaired or replacement product
will be shipped back to you.
ENGLISH
* Connect the equipment into an outlet on a circuit different from that to which the
receiver is connected.
* Consult the dealer or an experienced radio TV technician for help.
Notice:
(1) The changes or modifications not expressly approved by the party responsible
for compliance could void the user’s authority to operate the equipment.
(2) Shielded interface cables and AC power cord, if any, must be used in order
comply with the emission li
Dual-Link 34
Technical Support 562.926.4338
North America Support Hours:
M-F : 8 am - 5 pm, PST
Email : [email protected]
website : www.adstech.com
European Technical Support: +353.61.702042
ADS Technologies
North America Office
12627 Hidden Creek Way
Cerritos, CA, 90703
Phone: 562.926.1928
Technical Support: 562.926.4338
Technical Support Hours: M-F 8am-5pm PST
Fax: 562.926.0518
European Office
Shannon Industrial Estate
Shannon Co. Clare, Ireland
Phone: +353.61.702042
Part No. 181-593
www.adstech.com
Dual-Link Cardbus
ADS Tech
If you have any problems or questions on this product, please call :