1
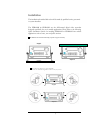
Volume 1 Quick Installation Guide EDR810M/410M 1 EVERFOCUS ELECTRONICS CORPORATION EDR810M / EDR410M Quick Install Guide © 2005 EverFocus Electronics Corp 1801 Highland Ave Phone 626.844.8888 • Fax 626.844.8838 All rights reserved. No part of the contents of this manual may be reproduced or transmitted in any form or by any means without written permission of the Everfocus Electronics Corporation. QuickTime is a registered trademark of the Apple Computer, Inc. Windows is a registered trademark of the Microsoft Corporation in the United States and other countries. Linksys is a registered trademark of the Linksys Corporation. D-Link is a registered trademark of the DLink Corporation. DynDNS is a registered trademark of the DynDNS.org Corporation. Other product and company names mentioned herein may be the trademarks of their respective owners. 2 Safety Warning WARNING TO REDUCE RISK OF FIRE OR ELECTRIC SHOCK, DO NOT EXPOSE THIS APPLIANCE TO RAIN OR MOISTURE. CAUTION DO NOT REMOVE COVER. NO USER SERVICEABLE PARTS INSIDE. REFER SERVICING TO QUALIFIED SERVICE PERSONNEL. Note: This equipment has been tested and found to comply with the limits for a Class A digital device, The changes or modifications not expressly approved by the party responsible for compliance could void the user's authority to operate the equipment. Note: This is a class A product. In a domestic environment this product may cause radio interference In which case the user may be required to take adequate measures. Notice: The information in this manual was current when published. The manufacturer reserves the right to revise and improve its products. All specifications are therefore subject to change without notice. 3 Safety Precautions Refer all work related to the installation of this product to qualified service personnel or system installers. Do not block the ventilation opening or slots on the cover. Do not drop metallic parts through slots.This could permanently damage the appliance. Turn the power off immediately and contact qualified service personnel for service. Do not attempt to disassemble the appliance. To prevent electric shock, do not remove screws or covers. There are no user-serviceable parts inside. Contact qualified service personnel for maintenance. Handle the appliance with care. Do not strike or shake, as this may damage the appliance. Do not expose the appliance to water or moisture, nor try to operate it in wet areas. Do take immediate action if the appliance becomes wet. Turn the power off and refer servicing to qualified service personnel. Moisture may damage the appliance and also cause electric shock. Do not use strong or abrasive detergents when cleaning the appliance body. Use a dry cloth to clean the appliance when it is dirty. When the dirt is hard to remove, use a mild detergent and wipe gently. Do not overload outlets and extension cords as this may result in a risk of shock. Do not operate the appliance beyond its specified temperature, humidity or power source ratings. Do not use the appliance in an extreme environment where high temperature or high humidity exists. Use the appliance at temperature within indoor type DVR for 0oC ~ +40oC and a humidity below 90%. The input power source for this appliance is AC100~240V. 4 fire or electric Safety Precautions Read Instruction — All the safety and operating instructions should be read before the unit is operated. Retain Instructions — The safety and operating instructions should be retained for future reference. Heed Warnings— All warnings on the unit and in the operating instructions should be adhered to. Follow Instructions— All operating and use instructions should be followed. Cleaning— Unplug the unit from the outlet before cleaning. Do not use liquid cleaners or aerosol cleaners. Use a damp cloth for cleaning Attachments—Do not use attachment not recommended by the product manufacturer as they may cause hazards. Water and Moisture—Do not use this unit near water-for example, near a bath tub, wash bowl, kitchen sink, or laundry tub, in a wet basement, near a swimming pool, in an unprotected outdoor installation, or any area which is classified as a wet location. Servicing—Do not attempt to service this unit by yourself as opening or removing covers may expose you to dangerous voltage or other hazards. Refer all servicing to qualified service personnel. Power Cord Protection—Power supply cords should be routed so that they are not likely to be 5 Installation The installations described below should be made by qualified service personnel or system installers. The EDR810M & EDR410M are the full-featured digital video recorders designed specifically for use in mobile applications. Please refer to the following Quick Installation Guide for installing EDR810M or EDR410M into mobile applications such as buses, cars and police cruisers. The DVR can be mounted horizontally (suspend or support mounted). Support Interface EDR410M EDR410M Suspend Interface Show all the possible ways to mount the DVR. Use the two Z-brackets supplied to mount it in any ways shown. EDS Support EDS Suspend 6 Quick Install Guide: 1. Unpack Everything Make sure you have everything you need before you begin the installation. 2. Equipment Required The following tools may help you to complete the installation: •Drill •Screwdrivers •Wire cutters 3. Choosing the Location Choose a location for installation that: •Provides convenient access for installing or removing the hard drive •Allows air to flow around the fan vents. Inadequate or improper air flow can impede proper operation of the unit Avoid any location for installation: •That is subject to high vibration •That is subject to high sunlight levels •That is subject to drenched of the rain •Where passengers can interfere with unit •Next to a heater duct The following table lists the recommended location options. 7 Possible Installation Locations inside the Automobile Vehicle: TOYOTA CAMRY Glove box (inside or underneath) Trunk (Users are suggested to use “suspend” for mounting option) Passenger seat (underneath) Drive seat (between seat and wall) Show the wiring on the wiring harness that connects to the electrical system 8 Possible Installation Locations inside the Automobile Vehicle: Truck Glove box (inside or underneath) Drive seat (between seat and wall) or Passenger seat (underneath) (Users are suggested to use “support” for mounting option) Show the wiring on the wiring harness that connects to the electrical system. (24 V) (5 A) 9 Installing the Camera(s) and Monitor The DVR is typically connected to one camera installed inside the car. Other camera(s) can also be installed in different locations (for example, use the waterproof camera to the outside of vehicle). For installation procedure, refer to the guide that came with the camera(s) you purchased. The Monitor power supply connects from the automotive adapter (cigarette plug) Monitor and cameras must be purchased separately. LCD Monitor LCD Monitor Connect the Camera(s) Connect the power connector from the camera(s) harness into the CAMERA POWER OUT jack on the back panel of the DVR. Connect the primary camera(s) video connector to the CAMERA INPUT and the audio connector to the AUDIO INPUT in the back panel. Adjust the camera(s). After the camera is installed, connect a monitor directly to the camera and observe the image. Make any adjustment if necessary. 10 Hard Disk Drive Installation The first step in installing the hard drive is to insert the hard drive sleeve into the machine. The hard disk drive default setting is initially set to master. The second step is to insert the key provided and turn the tray key to the lock position. If this process is ignored the hard disk drive will not be detected. Follow the previous steps for the second hard drive or second empty sleeve. Please Note: If the Hard Disk Drive is not locked in with the key a system loading screen will keep flashing and the DVR will not go into record mode. This is because the Hard Drive is not being recognized. Figure Shows 2.5“ HDD Final Install Process Once you have completed the basic wiring installation and the hard disk drive installation you are read to turn on the DVR. Simply plug the power source you installed earlier. The POWER LED lights will light up if power is normal. The next step is to set up the menu options for the DVR. 11 EverFocus Electronics Corp. Head Office: 12F, No.79 Sec. 1 Shin-Tai Wu Road, Hsi-Chih, Taipei, Taiwan TEL: +886-2-26982334 FAX: +886-2-26982380 www.everfocus.com.tw USA Office: 1801 Highland Ave. Unit A Duarte, CA 91010, U.S.A. TEL: +1-626-844-8888 FAX: +1-626-844-8838 www.everfocus.com European Office: Albert-Einstein-Strasse 1 D-46446 Emmerich, Germany TEL: 49-2822-9394-0 www.everfocus.de Your EverFocus product is designed and manufactured with high quality materials and components which can be recycled and reused. This symbol means that electrical and electronic equipment, at their end-oflife, should be disposed of separately from your household waste. Please, dispose of this equipment at your local community waste collection/recycling centre China Office: Room 609, Technology Trade Building, Shandgdi Information Industry Base, Haidian District, Beijing,China TEL: +86-10-62971096 FAX: +86-10-62971432 www.everfocus.com.cn Japan Office: 1809 WBG MARIBU East 18F, 2-6 Nakase.Mihama-ku. Chiba city 261-7118, Japan TEL : +81-43-212-8188 FAX : +81-43-297-0081 www.everfocus.com Ihr EverFocus Produkt wurde entwickelt und hergestellt mit qualitativ hochwertigen Materialien und Komponenten, die recycelt und wieder verwendet werden können. Dieses Symbol bedeutet, dass elektrische und elektronische Geräte am Ende ihrer Nutzungsdauer vom Hausmüll getrennt entsorgt werden sollen. P/N: M41MG00300