1
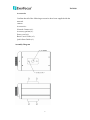
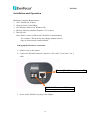
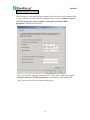
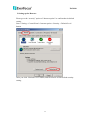
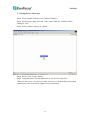
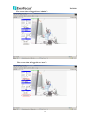
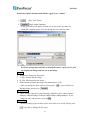
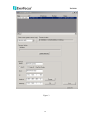
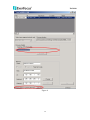
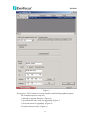
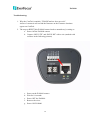
EAN600
EAN600
User’s Manual V2.0
Copyright © EverFocus Electronics Corp,
Release: May 2005
1
EAN600
ntroduction
Product Name : EAN 600 EverFocus Advance Network Cameras
Model Number(s) : EAN600
FCC Notice "Declaration of Conformity Information"
This equipment has been tested and found to comply with the limits for a Class
A digital device, pursuant to part 15 of the FCC Rules. These limits are designed
to provide reasonable protection against harmful interference in a residential
Installation. This equipment generates, uses and can radiate radio frequency
energy and, if not installed and used in accordance with the instructions, may
cause harmful interference to radio communications. However, there is no
guarantee that interference will not occur in a particular installation. If this
equipment does cause harmful interference to radio or television reception, which
can be determined by turning the equipment off and on, the user is encouraged
to try to correct the interference by one or more of the following measures:
- Reorient or relocate the receiving antenna.
- Increase the separation between the equipment and receiver.
- Connect the equipment into an outlet on a circuit different from that to which
the receiver is connected.
- Consult the dealer or an experienced radio/TV technician for help.
Warning: Changes or modifications made to this equipment, not expressly
approved by Toshiba or parties authorized by Toshiba could void the
user's authority to operate the equipment.
This device complies with part 15 of the FCC Rules. Operation is subject to
the following two conditions:
(1) This device may not cause harmful interference, and
(2) this device must accept any interference received, including interference
that may cause undesired operation.
EverFocus Electronics Corp.
12F, No. 79, Sec. 1, Shin-Tai Wu Rd., His-Chi,
Taipei Hsien, Taiwan, R.O.C.
EAN600 complies with BSMI, CE, FCC, UL, and class B of EMC.
3
2
EAN600
TABLE OF CONTENTS
TABLE OF CONTENTS ..............................................................................................3
Introduction....................................................................................................................4
Terms and Trademarks ...............................................................................................4
Accessories ................................................................................................................5
Assembly Diagram.....................................................................................................5
Important Safety Instructions.....................................................................................6
Safety Precautions......................................................................................................8
About the AC adaptor ..............................................................................................12
Installation and Operation............................................................................................14
Setting up the Hardware connection. .......................................................................14
Software configuration: ...........................................................................................15
1. Setup the IP address of your local PC..............................................................15
2.Setting up the Browser. .....................................................................................17
3. Viewing the live video steps ............................................................................18
Detail Description Of Operation When Logged In As “Admin” .............................21
Firmware Upgrade .......................................................................................................24
What is CamTool .....................................................................................................24
How to Upgrade Firmware ......................................................................................27
Step 1 Set network configuration on you local PC. .............................................27
Step 2 Setting up the Hardware connection.........................................................28
Step 3 Choose the correct interface......................................................................31
Step 4 Confirm the firmware’s location...............................................................33
Step 5 Input the password ....................................................................................34
Troubleshooting: ..........................................................................................................38
3
EAN600
Introduction
Thank you for purchasing the EverFocus Advance Network Camera. Before you start
using this camera, read this User's Guide carefully to ensure correct usage. Once you
have finished reading this User's Guide, keep it in a convenient place for future
reference. The design, specifications, software, and User's Guide contents are subject
to change without prior notice. EAN600 A is designed for indoor-use only.
Terms and Trademarks
The term "OS" is used in this manual to indicate operating systems
compatible with this product.
- Windows 2000: Microsoft® Windows® 2000 operating system
- Windows XP: Microsoft® Windows® XP operating system
The formal name of Windows® is Microsoft® Windows® Operating System.
Microsoft® and Windows® are trademarks or registered trademarks of
Microsoft® Corporation in the United States and other countries.
Other product names appearing in this User's Guide may be trademarks or
registered trademarks of their respective holders. JavaTM and all Java-related
logos and trademarks are trademarks or registered trademarks of Sun
Microsystems, Inc. in the United States and other countries.
Introduction
4
EAN600
Accessories
Confirm that all of the following accessories have been supplied with the
network
camera.
Accessories :
Network Camera (x1).
Accessory packet(x1).
Power cord (x1)
Basic User's Guide (x1)
Quick Start Guide (x1)
Assembly Diagram
5
EAN600
Important Safety Instructions
When using this camera, always follow basic safety precautions to reduce the risk
of fire, electric shock, or personal injury.
1. Read and understand all the instructions.
2. Keep the User’s Guide for future reference.
3. Heed all warnings.
4. Follow all the instructions.
5. Wipe off any dust on the camera lens with a lens-
6
EAN600
WARNING
TO REDUCE RISK OF FIRE OR ELECTRIC SHOCK,
DO NOT EXPOSE THIS APPLIANCE TO RAIN OR MOISTURE.
CAUTION
DO NOT REMOVE COVER. NO USER SERVICEABLE PARTS INSIDE.
REFER SERVICING TO QUALIFIED SERVICE PERSONNEL.
Note:
These limits are designed to provide reasonable protection. This equipment
generates, uses and can radiated radio frequency energy and, if not installed and
used in accordance with the instructions, may cause harmful interference to radio
communications. However, there is no guarantee that interference will not occur in
a particular installation If this equipment does cause harmful interference to radio
or television reception, which can be determined by turning the equipment off and
on, the user is encouraged to try to correct the interference by one or more of the
following measures: -Reorient or relocate the receiving antenna.
-Increase these separation between the equipment and receiver.
-Connect the equipment into an outlet on a circuit different from that to which the
receiver is connected.
-Consult the dealer or an experienced radio/TV technician for help.
The changes or modifications not expressly approved by the party responsible for
compliance could void the user's authority to operate the equipment.
Notice:
The information in this manual was current when published. The manufacturer
reserves the right to revise and improve its products. All specifications are therefore
subject to change without notice.
7
EAN600
Safety Precautions
Refer all work related to the installation of this product to qualified service
personnel or system installers.
Do not block the ventilation opening or slots on the cover.
Do not drop metallic parts through slots This could permanently damage the
appliance. Turn the power off immediately and contact qualified service
personnel for service.
Do not attempt to disassemble the appliance To prevent electric shock, do not
remove screws or covers. There are no user-serviceable parts inside. Contact
qualified service personnel for maintenance. Handle the appliance with care. Do
not strike or shake, as this may damage the appliance.
Do not expose the appliance to water or moisture, nor try to operate it in wet areas.
Do take immediate action if the appliance becomes wet. Turn the power off and
refer servicing to qualified service personnel. Moisture may damage the appliance
and also cause electric shock.
Do not use strong or abrasive detergents when cleaning the appliance body. Use a
dry cloth to clean the appliance when it is dirty. When the dirt is hard to remove,
use a mild detergent and wipe gently.
8
EAN600
Do not overload outlets and extension cords as this may result in a risk of fire or
electric shock.
Do not operate the appliance beyond its specified temperature, humidity or power
source ratings. Do not use the appliance in an extreme environment where high
temperature or high humidity exists. Use the appliance at temperature within 0oC ~
+50oC and a humidity below 90%. The input power source for this appliance is
AC90~265V.
The lightning flash with an arrowhead symbol, within an equilateral triangle, is
intended to alert the user to the presence of un-insulated ” dangerous voltage”
within the product’s enclosure that may be of sufficient magnitude to constitute a
risk of electric shock to persons
The exclamation point within an equilateral triangle is intended to alert the user to
presence of important operating and maintenance (servicing)instructions in the
literature accompanying the appliance.
Warning:
To prevent fire or shock hazard, do not expose units not specifically designed for
outdoor use to rain or moisture.
Attention:
Installation should be performed by qualified service personnel only in accordance
with the National Electrical Code or applicable local codes.
9
EAN600
Power Disconnect:
Units with or without ON-OFF switches have power supplied to the unit whenever
the power code is inserted into the power source; however, the unit is operational
only when the ON-OFF switch is in the ON position. The power cord is the main
power disconnect for all units.
External Power Supplies
Use only the recommended power supplies. Power supplies must comply with the
requirement of
the latest version of IEC 60065/CNS 13439. Substitutions may damage the unit or
cause a fire or shock hazard
110V,60Hz Power Cords
110V,60Hz power cords, input and output, must comply with the latest versions of
IEC 60065/CNS 13439
Warning:
Electrostatic-sensitive device. Use proper CMOS/MOSFET handing precautions to
avoid electrostatic discharge.
UNPACKING
Unpack carefully.
This is electronic equipment and should be handled carefully.
Check to ensure that the following items are included;
•
•
•
•
1.
2.
3.
4.
EAN600
User’s manual
Quick Installation Guide
Power Cord
If an item appears to have been damaged in shipment, replace it properly in its
carton and notify the shipper. If any items are missing, notify your Everfocus
10
EAN600
Electronics Corp. Sales Representative or
Customer Service. The shipping carton is the safest container in which the unit may
be transported.
Save it for possible future use.
Service
If the unit ever needs repair service, the customer should contact the nearest
Everfocus Electronics Corp. Service Center for return authorization and shipping
instruction.
Read Instruction---All the safety and operating instructions should be read before
the init is operated
Retain Instructions---The safety and operating instructions should be retained for
future reference.
Heed Warnings—All warnings on the unit and in the operating instructions should
be adhered to.
Follow Instructions—All operating and use instructions should be followed
Cleaning—Unplug the unit from the outlet before cleaning. Do not use liquid
cleaners or aerosol cleaners. Use a damp cloth for cleaning
Attachments—Do not use attachment not recommended by the product
11
EAN600
manufacturer as they may cause hazards.
Water and Moisture—Do not use this unit near water-for example, near a bath tub,
wash bowl, kitchen sink, or laundry tub, in a wet basement, near a swimming pool,
in an unprotected outdoor installation, or any area which is classified as a wet
location.
Servicing—Do not attempt to service this unit yourself as opening or removing
covers may expose you to dangerous voltage or other hazards. Refer all servicing to
qualified service personnel.
Power Cord Protection—Power supply cords should be routed so that they are not
likely to be walked on or pinched by items placed upon or against them, playing
particular attention to cords and plugs, convenience receptacles, and the point
where they exit from the appliance.
Object and Liquid Entry—Never push objects of any kind into this unit through
openings as they may touch dangerous voltage points or short-out parts that could
result in a fire or electric shock, Never spill liquid of any kind on the unit.
About the AC adaptor
Be sure to use only the supplied AC adaptor. Using a different AC adaptor may
cause the camera to malfunction, heat up, or catch fire. Before using the AC
adaptor, carefully read and observes the IMPORTANT SAFETY
INSTRUCTIONS and the notes below.
Do not allow the connectors on the AC adaptor to come into contact with any
other metal object as this may result in short circuit.
To connect the AC adaptor, firmly insert the plug on the end of the cable into
12
EAN600
the AC adaptor jack. Do not insert the plug into other jacks as this may cause a
malfunction.
When removing the connection cable, disconnect the cable by holding its plug.
Do not disconnect the cable by pulling on the cable.
Do not drop the AC adaptor or subject it to strong impact.
Do not use the AC adaptor in hot and humid places.
Do not use the supplied AC adaptor with devices other than this camera.
Temperature increasing on the surface of the adaptor is normal. Before moving
the adaptor to another location, unplug it from the wall outlet, and wait until its
temperature decreases.
Buzzing noises may come from inside. This does not indicate malfunction.
Using the AC adaptor near a radio, TV, or cell phone may cause interference.
Use the adaptor at sufficient distances from these devices.
Specifications
AC adaptor
Power supply: 12 V DC, 500 mA
Rated output: 12 V DC, 500 mA
Operating temperature: 0 to +40
External dimensions: 56 X 68 X 101 mm
13
EAN600
Installation and Operation
Minimum Computer Requirements:
1. CPU: Pentium III or above.
2. Network Card: 10/100 Mbps.
3. OS: Windows 2000 series, Windows XP.
4. Browser: Microsoft Internet Explorer v5.5 or above.
5. DirectX 9.0b.
Note: Please connect to Microsoft’s Web Site for downloading:
For example: (This web site may change without notices.)
http://www.microsoft.com/downloads
Setting up the Hardware connection.
1. Mount a lens to the camera.
2. Connect the EAN600 Network Camera to a PC with a ”Cross-Over” cat. 5
cable.
Ethernet [RJ-45] Connect to your PC
A “Y Cable” Connect to AC Adapter,
Please pay attention to “+” and “-“
3. Power on the EAN600 via plug in the Adapter.
14
EAN600
Software configuration:
Attention: Please install DirectX 9.0b or newer version first
Note: Please connect to Microsoft’s Web Site for downloading:
For example: (This web site may change without notices.)
http://www.microsoft.com/downloads
How to check the current version of DirectX was installed?
Go to “Start”, “Run”, in command line: type “dxdiag”, in a Popup window, you
will see the DirectX version in the location that had been marked at below.
1. Setup the IP address of your local PC.
Please go to “Internet Protocol (TCP/IP) Properties”.
Start > Setting > Control Panel > network and Dial-up Connections > Local Area
Connection > Properties > Internet Protocol (TCP/IP) > Properties
Please fill in those numbers, which at below for setting IP configuration
IP:192.168.1.200
Net Mask:255.255.255.0
15
EAN600
Default Gateway: 192.168.1.1
Those setting are following Ethernet standard. You can fill any value numbers that
you like, but have to follow Ethernet standard. After you into “Internet Protocol
(TCP/IP) Properties” and you will see “Internet Protocol (TCP/IP)
Properties” configuration at below.
After you fill value numbers, and please click ”OK” button. That will complete
“Internet Protocol (TCP/IP) Properties” configuration. After Please click
“OK” button of Local Area Connection Properties.
16
EAN600
2.Setting up the Browser.
Please go to the “security” option of “Internet option” to confirm that in default
setting.
Start > Setting > Control Panel > Internet option > Security > Default Level
button.
After you click “Default Level” button, and IE browser will be default security
setting.
17
EAN600
3. Viewing the live video steps
Step1. Please double click the icon of Internet Explorer.
Step2. Please key in “http://192.168.1.100” on the URL bar. (address will be
change by user)
Step3. Select “admin” and key in “admin”.
Step4. Please Click “Login” button
Step5. Congratulation!! You should be able to see the live image now.
(There are three user’s levels for viewing, and every level has different accessing
right) Please refer to next three figures for your operation.
18
EAN600
The screen shot of logged in as “admin”:
The screen shot of logged in as “user”:
19
EAN600
The screen shot of logged in as “guest”:
In default setting, there are three different passwords for three different login
user names:
USER NAME
PASSWORD
admin
admin
user
user
guest
guest
You can see the red circular mark marks the disable function, which in user level
and guest level.
20
EAN600
Detail Description Of Operation When Logged In As “Admin”
1.
2.
“Play” and ”Pause”.
Single Image Snapshot.
A pop up window will appear and ask user to key-in the file name for
saving this snapshot image. You can change the root, and file name.
It will use system date and time as default file name. A preview box will
also display the image and the size of the image.
(Image)
2. Brightness, Sharpness, Saturation.
3. V. Flip: Vertical flip the image.
4. H. Flip: Horizontal flip the image.
5. Monochrome: Display the image with monochrome color.
(After you setting for those options, please press
, if you want back to
default setting please press
.)
(Target Bitrate)
6. There are nine options for your choosing. (Default is Auto, others options:
64kbps/128kbps/256kbps/512kbps/1Mbps/2Mbps/3Mbps/8Mbps). If you
change bit-rate, and you have to press .
(Recording)
7. Location: Setting up the location of the video files to be saved. (Please press
, if you like to change the file root.)
21
EAN600
8. File Length: Setting up the size of the file to be saved by assigning seconds.
9. Disk Space: Setting up the maximum hard disk space for saving the video
files. If it reach the limitation or the hard disk is less than 500MB, it will loop
through the beginning of the hard disk.
10. Click
to begin recording live video.
(Digital Output)
11. Alarm: Enable or disable alarm option
12. Aux: Enable or disable Aux option.
(Press “On” button for enable. Press “Off” button for disable.)
(System settings)
13. Click “system settings” to go to Admin setting page.
22
EAN600
(System)
14. System Version: System version.
15. Environment: Adjust it depend on the electric frequency in your working
environment. User has three selections for this option.
(Streaming)
16. Video Size: Users have two selection for configuring video size. (640x480
and 320x240)
17. Quality: Please select the quality that you want. (Please pay attention for
your bandwidth). There are two selections for you. (High & Normal)
18. Internet: If you choose Internet connection, please fill the bandwidth value.
19. Local Network: If you choose LAN connection, please select the number of
FPS (maximum frame rate could be 30 FPS), and enable or disable multicast.
(Password)
20. User Name: There are three levels for enter, please choose one of those.
(Please refer to page 20 for level definition)
21. Password: You can change your password here.
(Network) You can configure those configurations here.
22. Name: Please enter new name for EAN600 if you want.
23. IP: Please enter new IP address for EAN600 if you want.
24. NetMask: Please enter new NetMask for EAN600 if you want.
25. Gateway: Please enter correct gateway’s IP address for EAN600 if you want.
26. Control Port: setting the control port, use this setting for configuring the
Virtual Server on your network.
27. Multicast IP: This IP is fixed. (Information)
28. Multicast Port: This port is fixed.
29. MAC Address: This is Ethernet standard for every end point in Network.
: Please click this button, after you configure those options,
which at above.
: Please clock this button, if you like to back to video.
23
EAN600
Firmware Upgrade
EverFocus will release the latest version firmware of EAN600. If you like to update
your EAN600, and please read this chapter before you do.
What is CamTool
Introduction:
CamTool is the program we use to update the firmware of EAN600. Also it can
detect how many EAN600 on the LAN.
After running the utility, user will see Fig1:
Figure 1
24
EAN600
Item description:
1
2
3
4
5
6
7
8
9
10
19
11
15
18
13
14
16
17
25
12
EAN600
Figure 2.
1. Mac: The Mac of EAN600.
2. IP: The IP address of EAN600.
3. Hardware Version: The boot loader version.
4. Firmware Version: The firmware version.
5. Name: The proper name of the EAN600, default is Network Camera.
6. Firmware location: Location of firmware.
7. Select same segment network card: Please select your local PC’s IP address.
8. Update firmware: Please click this button, if you like to upgrade firmware.
9. Name: You can change EAN600’s in here.
10. Static IP: Fixed IP address for EAN600.
11. DHCP: Set EAN600 to be DHCP client.
12. Exit: Out of CamTool.
13. Set: Press Set button, after you configure Network’s option.
14. Change: Real Net Config and EEPROM Config switch.
15. MAC: MAC of EAN600’s information.
16. IP: Please configure IP of EAN600 here.
17. NetMask: Please configure NetMask of EAN600 here.
18. Gateway: Please configure gateway address here.
19. Real Net Config / EEPROM Config switching information.
26
EAN600
How to Upgrade Firmware
Required environment:
A. Crossover Cat. 5 cable
B. Windows 2000 or later
C. Network card on local PC.
D. EAN600.
Please follow those steps, which at below:
Step 1 Set network configuration on you local PC.
Please go to “Internet Protocol (TCP/IP) Properties”.
Start > Setting > Control Panel > network and Dial-up Connections > Local Area
Connection > Properties > Internet Protocol (TCP/IP) > Properties
Please fill in those numbers, which at below for setting IP configuration
IP:192.168.1.200
Net Mask:255.255.255.0
Default Gateway: 192.168.1.1
Those setting are following Ethernet standard. You can fill any value numbers
that you like, but have to follow Ethernet standard. After you into “Internet
Protocol (TCP/IP) Properties” and you will see “Internet Protocol (TCP/IP)
Properties” configuration at below.
27
EAN600
After you fill value numbers, and please click ”OK” button. That will complete
“Internet Protocol (TCP/IP) Properties” configuration. After Please click
“OK” button of Local Area Connection Properties.
Step 2 Setting up the Hardware connection.
Use a cross-over cat.5 cable to connect to your local PC.
Ethernet [RJ-45] Connect to your PC
A “Y Cable” Connect to AC Adapter,
Please pay attention to “+” and “-“
Power on EAN600, and wait about 3 seconds.
28
EAN600
After hardware connection completed, please Double Click the “CamTool”
from your installed path to bring up this upgrading utility.
You should be able to see the CamTool Utility appeared:
29
EAN600
Figure 3
30
EAN600
Step 3 Choose the correct interface
Make sure the Local interface is 192.168.1.200 (Physical connected network
card, please see red mark).
☆ If you see “0.0.0.0” in the box of “select same segment network card”, you do
not have correct connection between your PC and EAN600 camera. Please
double check:
1. EAN600’s power is connect correctly and it’s ON.
2. The Cross-over cat.5 cable is connected correctly.
31
EAN600
Figure 4
32
EAN600
Step 4 Confirm the firmware’s location
Make Sure the firmware (.hex file) is located at the same directory of CamTool
(See the firmware path to confirm, refer to red mark).
Figure 5
33
EAN600
Step 5 Input the password
Click the “Update firmware” to upgrade.(Please see red mark of figure 6)
Input the password (Our Factory default is root or admin, Please refer to figure
7). After you enter password, and wait the EAN600 checking password.
Figure 6
34
EAN600
Figure 7
If the authorization of the password is passed, then the Updating progress bar
should be in action status. (Please see red mark of figure 8) Wait until the
progress bar is completed. (Please see figure 9)
The current progress time should be finish in 30 seconds, and please wait till it
completed. (Please see figure 9)
35
EAN600
Figure 8
36
EAN600
Figure 9
Please press “Exit” button for leaving CamTool and finishing update progress.
The completed process steps are:
1. Starting to upgrade firmware. (Figure 6)
2. System ask the enter code for upgrading. (Figure 7)
3. Network camera is upgrading. (Figure 8)
4. Update firmware Okay. (Figure 9)
37
EAN600
Troubleshooting:
1. Why the CamTool complain “Tf5x0IPCam.hex does not exist”.
Answer: It means it can not find the firmware on the Firmware locations
appear on CamTool.
2. The steps to RESET this EAN600 camera back to manufactory’s setting as:
a. Power Off the EAN600 camera
b. Connect “RS232 TX” and “RS232 RX” with a wire (marked with
red lines in the following pictures)
c.
d.
e.
f.
g.
Power on the EAN600 camera
Wait for 10 seconds
Power OFF the EAN600
Remove the wires
Power ON EAN600
38
EAN600
EverFocus Electronics Corp.
Head Office:
12F, No.79 Sec. 1 Shin-Tai Wu Road,
Hsi-Chi, Taipei, Taiwan
TEL: 886-2-26982334
FAX: 886-2-26982380
http://www.everfocus.com.tw
China Office:
Room 609, Technology Trade Building,
Shandgdi Information Industry Base,
Haidian District, Beijing, China
TEL: 86-10-62973336~9
FAX: 86-10-62971432
http://www.everfocus.com.cn
USA Office:
2445 Huntington Drive, San Marino,
CA 91108, U.S.A.
TEL: 1-626-844-8888
FAX: 1-626-844-8838
http://www.everfocus.com
European Office:
Albert-Einstein-Strasse 1
D-46446 Emmerich, Germany
TEL: 49-2822-9394-0
FAX: 49-2822-939495
http://www.everfocus.de
Japan Office:
1809 WBG Maribu East 18F,
2-6 Nakase.Mihama-ku.
Chiba city 261-7118, Japan
TEL: 81-43-212-8188
FAX: 81-43-297-0081
http://www.everfocus.com
®
EverFocus
39