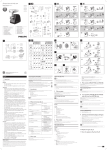
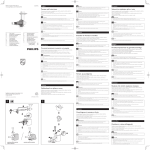
1
Register your product and get support at
www.philips.com/welcome
Meat mincer
HR2726
HR2727
HR2728
English
3
Român
25
47
71
1
Safety system
Electromagnetic elds (EMF)
Recycling
4
4
5
5
2
Introduction
5
3
What’s in the box
6
4
Important
Mince meat
Assemble
Mince meat
Disassemble
Recipe
5
Make sausages
Assemble
Make sausages
Disassemble
Recipe
6
Make kebbe
Assemble
Make kebbe
Disassemble
Recipe
7
Make cookies (HR2728 only)
Assemble
Make cookies
Disassemble
8
Cut vegetables and crush ice
(HR2728 only)
Assemble
Cut vegetables
Crush ice
Disassemble
9
Cleaning and maintenance
Clean
Replace the gear
Store the product
10 Troubleshooting
English
Contents
8
8
9
9
10
10
10
11
12
12
13
13
14
14
14
15
15
16
16
17
17
18
19
19
20
20
21
21
22
EN
3
1 Important
Read these instructions for use carefully before
using the appliance and save them for future
reference.
Danger
• Do not immerse the motor unit in water
nor rinse it under the tap.
• Do not connect the appliance to a timer
switch.
Warning
• Before you connect the appliance to
the power, make sure that the voltage
indicated on the bottom of the appliance
corresponds to the local power voltage.
• If the power cord, the plug, or other parts
are damaged, do not use the appliance.
• If the power cord is damaged, you must
have it replace by Philips, a service center
authorized by Philips, or similarly qualied
person to avoid a hazard.
• This appliance is not intended for use by
persons (including children) with reduced
physical, sensory or mental capabilities,
or lack of experience and knowledge,
unless they have been given supervision or
instruction concerning use of the appliance
by a person responsible for their safety.
• For their safety, do not allow children to
play with the appliance.
• Be very careful when you handle the cutter,
especially when you remove it from the
worm shaft and during cleaning. The cutting
edges are very sharp!
• Before you remove any accessory, switch
the appliance off and unplug it.
• Do not use your ngers or an object
(e.g. a spatula) to push ingredients into
the hopper while the appliance is running.
Only the pushers are to be used for this
purpose.
4
EN
•
Do not insert your ngers in the metal
drum while the appliance is running.
Caution
• The appliance is intended for household
use only.
• Before you connect the appliance to the
mains, make sure that the appliance is
assembled correctly.
• Never use any accessories or parts from
other manufacturers or that Philips does
not specically recommend. If you use
such accessories or parts, your guarantee
becomes invalid.
• Always switch the appliance off by pressing
the / button.
• Do not let the appliance run unattended.
• Do not exceed the maximum operating
time of 10 minutes at all applications.
• Do not use the
button with the plastic
hopper.
• Noise level: Lc = 87 dB [A]
Safety system
This appliance is equipped with overheat
protection. If the appliance overheats, it switches
off automatically. Unplug the appliance and let
it cool down until room temperature. Then, put
the mains plug back into the power outlet and
switch on the appliance again. Please contact
your Philips dealer or an authorized Philips
service center if the overheat protection is
activated too often.
The appliance is also equipped with mechanical
protection. To protect the motor, the plastic
gear has been designed to break if bones or
utensils are fed into the appliance. When this
happens, simply remove the gear and
exchange it.
2 Introduction
This Philips appliance complies with all
standards regarding electromagnetic elds
(EMF). If handled properly and according to the
instructions in this user manual, the appliance is
safe to use based on scientic evidence available
today.
Congratulations on your purchase and welcome
to Philips! To fully benet from the support that
Philips offers, register your product at
www.philips.com.
Recycling
Your product is designed and manufactured
with high quality materials and components,
which can be recycled and reused.
When you see the crossed-out wheel bin
symbol attached to a product, it means the
product is covered by the European Directive
2002/96/EC:
English
Electromagnetic elds (EMF)
With this product, you can
• mince meat
• make sausages
• make kebbe
• make cookies (HR2728 only)
• cut vegetables and grate cheese
(HR2728 only)
• crush ice (HR2728 only)
Never dispose of your product with other
household waste. Please inform yourself about
the local rules on the separate collection of
electrical and electronic products. The correct
disposal of your old product helps prevent
potentially negative consequences on the
environment and human health.
EN
5
3 What’s in the box
a
b
f
e
cd
k
a
•
j
Hopper release button
Press and hold it when you remove
the hopper.
i
h
g
e Power cord
b Motor unit
f Feeding tray
• Plastic for HR2726
• Metal for HR2727 and HR2728
c
g Pusher for the metal hopper
/
•
d
•
6
EN
Switch off or on the appliance.
h Metal hopper
/ Reverse
Press it to reverse the motor. (only
active when the switch is in the “ “
position)
i Extra gear for the worm shaft
j Worm shaft
k Screw ring
English
A
A
A
A
B
B
B
l
m
B
n
o
p
q
A
u
r
B
v
C
D
w
l Grinding discs
• A: Coarse grinding disc
(diameter of 8 mm)
• B: Fine grinding disc
(diameter of 4 mm)
m Cutter/Knife
n Sausage horns
• A: Large sausage horn
(diameter of 22 mm)
• B: Small sausage horn
(diameter of 12 mm)
o Sausage separator
p Kebbe maker
• A: Kebbe separator
• B: Kebbe shaper
t
s
q Cookie maker (for HR2728)
• A: Cookie separator
• B: Cookie shaper
r Pusher for the plastic hopper
(for HR2728)
s Plastic hopper (for HR2728)
t Metal drums (for HR2728)
• A: Coarse grater drum
• B: Fine grater drum
• C: Slicer drum
• D: Ice drum
u Dust cover
v Accessories tray (for HR2726
and HR2727)
w Accessories tray (for HR2728)
EN
7
4 Mince meat
2
Fix the hopper onto the motor unit.
Before you use the appliance for the rst time,
thoroughly clean the parts that come into
contact with food.
Assemble
Unplug this appliance before the assembly.
1) Press and hold the button.
2) Push the hopper towards the motor
unit and turn it anti-clockwise until you
hear a “click”.
1
3
Fix the feeding tray onto the hopper.
4
Connect the power plug to the power
supply.
Assemble the hopper and accessories.
1) Push the worm shaft into the cutter
housing.
2) Fix the cutter onto the worm shaft.
3) Fix the grinding disc onto the worm
shaft and the hopper.
4) Turn the screw ring clockwise to fasten it.
Tip
• Make sure that the projections on the hopper align
with the notches of the motor.
• Never use the cutter in combination with any plastic
accessory.
• Remove the protective cover from the cutter before use.
• Make sure that the cutting edge of the cutter points
outwards.
8
EN
Disassemble
English
Mince meat
Unplug this appliance before the disassembly.
Note
• Never grind bones, nuts, or other hard items.
• Never use frozen meat! Before you grind the meat,
defrost it rst.
• Do not overload the appliance by pushing too much
meat into the hopper.
• Depending on the granularity of minced meat, select
the ne or coarse grinding disc. You can also grind for
more than one time.
1
Put the prepared meat strips (10cm-long,
2cm-thick) on the feeding tray.
2
3
Switch on the appliance.
1
Remove the feeding tray.
2
Remove the hopper.
Use the pusher to gently push the meat
into the cutter housing.
Tip
• Remove bones, gristle, and sinews out of the meat as
much as possible.
• Before your make sausages, mince the meat rst.
(refer to “Make sausages”)
• If the hopper is stuck, switch off the appliance and then
press the
1) Press and hold the button.
2) Turn the hopper clockwise.
button to clear the stuck stuff.
3
Unscrew the screw ring, and then remove
the grinding disc, cutter, and worm shaft.
EN
9
Recipe
Pozharskie Kotleti (Chicken cutlets)
Yield: 4 servings
Ingredients:
• 1 lb chicken breast (or 1 lb readily ground chicken)
• 7-8 oz. plain wheat bread
• 1/2 cup of warm milk
• 6 Tbsp. of unsalted butter
• 1/2 tsp. salt
• 1 pinch of black pepper
• 1/2 cup of bread crumbs, use more if needed
• 1 clove of minced garlic (optional)
• 1 Tbsp. of vegetable oil (optional)
• 4 oz mozzarella or Muenster cheese, cut into
2 inch long, 1/2 inch wide strips (optional)
5 Make sausages
Before you use the appliance for the rst time,
thoroughly clean the parts that come into
contact with food.
Assemble
Unplug this appliance before the assembly.
Directions:
1
2
3
4
5
6
7
8
9
Soak the bread in warm milk for several minutes.
Mince the soaked bread with the ne
grinding disc.
Select the sausage horn for large or small
sausages.
2
Assemble the hopper and accessories.
Mince the chicken with the ne grinding disc.
Mince the mixture of minced bread and chicken.
Add salt and pepper (as well as the minced
garlic if you like) into the mixture, and then
thoroughly mix the ingredients.
Soak your hands in water, and then grab a
portion of the mixture equal to a size between
a golf ball and a tennis ball. Cover a piece of
cheese in the mixture, and shape it into a patty.
Make sure that the cheese is not exposed.
Coat the patty with bread crumbs.
Over medium-low heat, melt the butter,
and then fry the patty on each side for
three minutes, or until it turns golden
brown in the melt butter.
Bake the fried patties in the oven (preheated
at 177°C or 350°F) for 15 minutes.
10 Serve the patties with your favorite side course.
Tip
• Go to www.kitchen.philips.com for more recipes.
10
1
EN
3
Fix the hopper onto the motor unit.
1) Press and hold the button.
2) Push the hopper towards the motor unit and
turn it anti-clockwise until you hear a “click”.
4
Make sausages
English
1) Push the worm shaft into the cutter housing.
2) Fix the sausage separator onto the
worm shaft and the hopper.
3) Fix the sausage horn onto the sausage
separator.
4) Turn the screw ring clockwise to fasten it.
Fix the feeding tray onto the hopper.
1
Soak the sausage skin in lukewarm water
for 10 minutes. Slide the wet skin onto the
sausage horn, and tie a knot near the end. Do
not block the air outlet grooves of the horn.
2
3
4
Put the sausage lling on the feeding tray.
Switch on the appliance.
Push the minced meat gently into the
cutter housing with the pusher.
5
Slowly pull off the skin from the sausage
horn to make the skin fully stuffed.
6
Pinch and twist the skin at desired intervals.
Note
• Make sure that the projections on the hopper align
with the notches of the motor.
• Do not block the air outlet grooves of the sausage horn.
• Do not make the sausages too thick in case the sausage
skin is overstretched.
• Keep the sausage skin wet to prevent it from sticking
5
on the sausage horn.
Connect the power plug to the power supply.
Note
• Make sure that a notch of the sausage separator ts
onto the projection of the cutter housing.
EN
11
Disassemble
3
Unplug this appliance before the disassembly.
1
Unscrew the screw ring, and then remove
the sausage horn, sausage separator, and
worm shaft.
Recipe
Remove the feeding tray.
Sausages
2
Remove the hopper.
Ingredients:
• 10 lb ground pork
• 5 Tbsp. of salt
• 1 Tbsp. of ground white pepper
• 2 Tbsp. of rubbed sage
• 1 tsp. of ginger
• 1 Tbsp. of nutmeg
• 1 Tbsp. of thyme
• 1 pint ice water
• 1 Tbsp. of ground hot red pepper
Directions:
1) Press and hold the button.
2) Turn the hopper clockwise.
12
EN
1
Mince the meat with the coarse grinding
disc.
2
Thoroughly mix the minced meat and
other ingredients.
3
Follow the instructions in the section
“Make sausages” to make your own
sausages.
Tip
• Go to www.kitchen.philips.com for more recipes.
2
Fix the hopper onto the motor unit.
English
6 Make kebbe
Before you use the appliance for the rst time,
thoroughly clean the parts that come into
contact with food.
Assemble
Unplug this appliance before the assembly.
1) Press and hold the button.
2) Push the hopper towards the motor
unit and turn it anti-clockwise until you
hear a “click”.
1
3
Fix the feeding tray onto the hopper.
4
Connect the power plug to the power supply.
Assemble the hopper and accessories.
1) Push the worm shaft into the cutter
housing.
2) Fix the kebbe separator onto the worm
shaft and the hopper.
3) Fix the kebbe shaper onto the kebbe
separator.
4) Turn the screw ring clockwise to fasten it.
Note
• Make sure that the notch of kebbe separator ts onto
the projection of the hopper.
• Make sure that the projections on the hopper align
with the notches of the motor.
EN
13
Make kebbe
1
Put the seasoned minced meat on the
feeding tray.
2
3
Switch on the appliance.
Push the minced meat gently into the
cutter housing with the pusher.
2
Remove the hopper.
1) Press and hold the button.
2) Turn the hopper clockwise.
3
Unscrew the screw ring, then remove the
kebbe shaper, kebbe separator and worm
shaft.
Disassemble
Unplug this appliance before the disassembly.
Recipe
Kebbe
1
Remove the feeding tray.
14
EN
Yield: 5-8 servings
Ingredients:
• Outer casing
• 500g (1lb 2oz) lamb or fat-free
mutton, cut into strips
• 500g (1lb 2oz) bulgur wheat, washed
and drained
• 1 small onion
• Filling
• 400g (10 oz) lamb, cut into strips
• 15ml (1 Tbsp.) oil
• 2 medium onions, nely chopped
• 5-10ml (1-2 tsp.) ground allspice
• 15ml (1 Tbsp.) plain our
• salt and pepper
7 Make cookies
(HR2728 only)
English
Directions:
• Outer casing
1) Mince the meat, wheat, and onion
together with the ne grinding disc.
2) Thoroughly mix the minced ingredients,
and then mince the mixture twice again.
3) Use the kebbe maker to shape the
mixture into kebbe casing.
• Filling
1) Mince the meat with the ne grinding disc.
2) Fry the onion chops until they turn
golden brown.
3) Add the minced meat and other ingredients
in, and then cook for 1-2 minutes.
4) Drain off excessive fat and cool the
lling down.
• Cooking
1) Push some lling into the outer casing,
and then pinch both ends to seal it.
2) Heat the oil for deep frying (190°C,
374°F).
3) Deep fry the kebbe for 3-4 minutes, or
until it turns golden brown.
Before you use the appliance for the rst time,
thoroughly clean the parts that come into
contact with food.
Assemble
Unplug this appliance before the assembly.
1
Assemble the hopper and accessories.
Tip
• Go to www.kitchen.philips.com for more recipes.
1) Push the worm shaft into the cutter
housing.
2) Fix the cookie separator onto the worm
shaft and the hopper.
3) Fix the cookie shaper onto the worm shaft.
4) Turn the screw ring clockwise to fasten it.
EN
15
2
Fix the hopper onto the motor unit.
1) Press and hold the button.
2) Push the hopper towards the motor
unit and turn it anti-clockwise until you
hear a “click”.
3
Make cookies
1
2
3
Fix the feeding tray onto the hopper.
4
Put one strip of dough on the feeding tray.
Switch on the appliance.
Push the dough gently into the cutter
housing with the pusher.
Guide the dough sausage out of the
appliance onto a baking plate. Cut the
sausage into slices or strips, and distribute
them over the baking plate.
Tip
• Align different holes of the cookie shaper with the hole
on the cookie separator to make cookies of different
shapes.
4
Connect the power plug to the power
supply.
Disassemble
Unplug this appliance before the disassembly.
Note
• Make sure that the notch of cookie separator ts onto
the projection of the hopper.
• Make sure that the projections on the hopper align
with the notches of the motor.
16
EN
Remove the feeding tray.
8 Cut vegetables
and crush ice
(HR2728 only)
English
1
Before you use the appliance for the rst time,
thoroughly clean the parts that come into
contact with food.
2
Remove the hopper.
1) Press and hold the button.
2) Turn the hopper clockwise.
3
Unscrew the screw ring, then remove the
cookie shaper, cookie separator and worm
shaft.
Note
• Only use the plastic hopper in combination with the
metal drums and the pusher for plastic hopper.
button during use of the plastic hopper.
• Do not press the
Assemble
Unplug this appliance before the assembly.
EN
17
1
Push the drum into the plastic hopper. Adjust
the drum slightly to fully t it to the gear on
the inner bottom of the plastic hopper.
Cut vegetables
Cut vegetables into pieces or strips that can be
easily pushed into the hopper.
1
2
Switch on the appliance.
Push the vegetables into the hopper.
Tip
• Make sure that the projections on the hopper align
with the notches of the motor.
• You can also grate cheese.
2
Fix the hopper onto the motor unit.
Recipe
Potato pancakes
1) Press and hold the button.
2) Push the hopper towards the motor
unit and turn it anti-clockwise until you
hear a “click”.
3
18
Connect the power plug to the power supply.
EN
Yield: 10 servings
Ingredients:
• 6 medium potatoes (about 2 pounds)
• 2 eggs
• 2 Tbsp. of all-purpose our
• 1/2 tsp. of salt
• 1/4 tsp. of pepper
• 1/2 cup nely chopped onion (optional)
• 1 tsp. of snipped parsley (optional)
Directions:
1
Peel the potatoes, and then grate them
with the ne grater drum.
2
3
Drain off the potato juice.
In a mixing bowl, beat eggs. Stir in our, salt,
pepper, and potato mash (as well as onion
chops and/or parsley if you like).
4
Heat 1/4 inch of oil over medium heat.
Scoop about a round tablespoon of the
mixture into hot oil for each pancake.
5
Press lightly to atten the pancakes.
Fry the pancakes on each side for about
three minutes, or until they turn brown
and crisp.
7
Remove the pancakes from oil with a
slotted spoon, and then drain on paper
towels.
Tip
• Go to www.kitchen.philips.com for more recipes.
Crush ice
1
2
English
6
Switch on the appliance.
Push the broken ice into the hopper.
Disassemble
Unplug this appliance before the disassembly.
Salad Viking
Ingredients:
• 3 medium tomatoes
• 200-250g smoked sausage
• 300g cheese
• 2 cloves of garlic
• 300g mayonnaise
1
Remove the hopper from the motor unit.
Directions:
1
Cut sausages into cubes or strips, and
tomatoes into rings or semi-rings.
2 Grate cheese with the coarse grater drum.
3 Spread a layer of mayonnaise on the plate.
4 Drop a layer of sausage cubes or strips on.
5 Drop a layer of tomato rings or semi-rings on.
6 Squeeze a clove of garlic on the tomato layer.
7 Drop a layer of grated cheese on.
8 Repeat steps 3-6.
9 Smear a layer of mayonnaise.
10 Drop the remaining grated cheese on.
11 Freeze the dish in a refrigerator for 1-2 hours.
1) Press and hold the button.
2) Turn the hopper clockwise.
2
Remove the drum from the hopper.
Tip
• Go to www.kitchen.philips.com for more recipes.
EN
19
9 Cleaning and maintenance
Clean
HR2726,HR2727,
HR2728
HR2726,HR2727
HR2728
HR2726
HR2727
HR2728
20
EN
HR2728
•
•
•
•
•
•
•
Before you use the appliance for the rst
time, thoroughly clean the parts that come
into contact with food.
Before you remove accessories or clean
the motor unit, switch off and unplug the
appliance.
Do not immerse the motor unit in water
nor rinse it under the tap.
Do not clean the metal parts in a
dishwasher.
Clean the main unit with a moist cloth.
Pass pieces of bread through the cutter
housing to remove any meat left.
Wash removable parts with a soft brush in
soapy water, rinse them with clear water,
and then dry them with soft cloth or
tissues immediately.
Lightly brush the metal parts with fat or oil
to prevent rusting.
2
Remove the gear, seal ring and screw from
the worm shaft.
3
Place the seal ring and then the new gear
onto the worm shaft, and fasten it with the
screw.
Tip
• Use a toothpick to remove the remains stuck in the
grinding discs, cookie makers, and metal drums.
Replace the gear
One extra gear is bundled with the product. If
the original gear is broken, replace it with the
extra one.
1
Store the product
Loosen the screw of the gear with a
screwdriver.
•
•
Push the power cord into the integrated
cord storage.
Store the product under dry circumstances
and normal temperature.
EN
21
English
•
10 Troubleshooting
If you need information or if you have a problem, please visit the Philips website at www.philips.com
or contact the Philips Customer Care Centre in your country (you will nd its phone number in the
worldwide guarantee leaet). If there is no Customer Care Centre in your country, turn to your local
Philips dealer.
Problem
The appliance
does not work.
Solution
Make sure that the appliance is plugged in.
Make sure that the switch is in the “ “ position.
If the problem persists, please contact the nearest Philips Consumer Care Centre.
The appliance
The overheat protection switched off the appliance to prevent damage due to
stops work
overheating. If this happens, unplug the appliance and let it cool down. Then plug in
during use.
the appliance and switch it on again.
Make sure that the switch is in the “ “ position.
Make sure that the appliance is plugged in.
Check if any ingredient is blocking the worm shaft. If so, switch off the appliance
button.
and press the
If the problem persists, please contact the nearest Philips Consumer Care Centre.
button. The
No response
Make sure that you switch off the appliance before you press the
button does not work when the switch is in the “ “ position.
when I press the
button.
If the problem persists, please contact the nearest Philips Consumer Care Centre.
The mincing
Make sure that the hopper is assembled correctly (see the chapter “Mince meat”,
result is poor.
the section “Assemble”).
In particular:
Make sure that the cutting edges of the cutter disc point outwards.
Make sure that the notch in the grinding disc ts onto the projection inside the
hopper.
Make sure that the screw ring is xed tight.
If the problem persists, please contact the nearest Philips Consumer Care Centre.
Rattling noise
Make sure that the hopper is assembled correctly (see the section “Assemble”).
In particular:
Make sure that the notch in the separator or grinding disc ts onto the projection
inside the hopper.
If the problem persists, please contact the nearest Philips Consumer Care Centre.
Make sure that the hopper is xed correctly (see the section “Assemble”). To x
The hopper
the hopper correctly, you should hear a “click” sound.
is unstable or
comes out during If the problem persists, please contact the nearest Philips Consumer Care Centre.
use.
22
EN
Solution
The appliance is
unstable during
use.
Make sure that the appliance is placed on a stable and horizontal surface.
Make sure that the feeding tray is xed correctly (see the section “Assemble”).
If the problem persists, please contact the nearest Philips Consumer Care Centre.
No minced meat Make sure that the appliance is plugged in.
comes out.
Make sure that the switch is in the “ “ position.
Make sure that the hopper is assembled correctly (see the section “Assemble”).
If the problem persists, please contact the nearest Philips Consumer Care Centre.
Plastic accessories Make sure that the components are assembled in the right direction (see the
chapter “Cut vegetables and crush ice”, the section “Assemble”).
do not t the
hopper. The
If the problem persists, please contact the nearest Philips Consumer Care Centre.
hopper cannot
be locked.
Cannot remove Make sure that your press and hold the button before you remove the hopper.
the hopper.
Make sure that you turn the hopper clockwise (see the section “Disassemble”).
If the problem persists, please contact the nearest Philips Consumer Care Centre.
Make sure that you use the special pusher for the plastic hopper and not the one
The result
for the metal hopper.
of cutting or
crushing by the
Make sure that you use the right drum (slicer drum for slicing, grater drum for
plastic hopper is grating, ...).
poor.
Make sure that the drums are assembled correctly (see the section “Assemble”).
If the problem persists, please contact the nearest Philips Consumer Care Centre.
The drum comes Make sure that the drum is assembled correctly (see the section “Assemble”).
out during use.
Make sure that no dirt or residue remains behind in the plastic hopper.
If the problem persists, please contact the nearest Philips Consumer Care Centre.
What can I do
One extra gear is bundled with product. If the original gear is broken, replace it
if the gear is
with the extra one (see the section “Replace the gear”).
broken?
EN
23
English
Problem
©2011 Koninklijke Philips Electronics N.V.
All rights reserved.
HR2726_2727_2728_EE_UM_V1.1
3140 035 26691