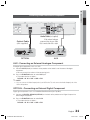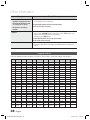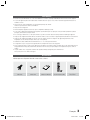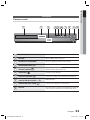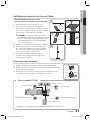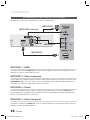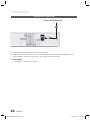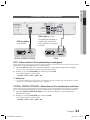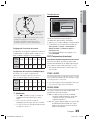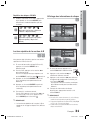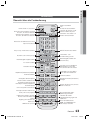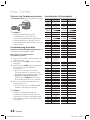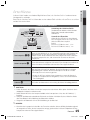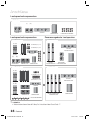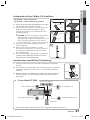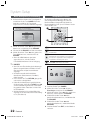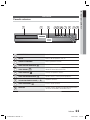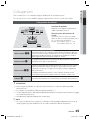
1
HT-D450 HT-D453 HT-D455 Digital Home Entertainment System user manual Imagine the possibilities Thank you for purchasing this Samsung product. To receive more complete service, please register your product at www.samsung.com/register HT-D450-XU-ENG-1228.indd Sec1:1 2011-12-28 5:09:27 Safety Information Safety Warnings TO REDUCE THE RISK OF ELECTRIC SHOCK, DO NOT REMOVE THE COVER(OR BACK). NO USER-SERVICEABLE PARTS ARE INSIDE. REFER SERVICING TO QUALIFIED SERVICE PERSONNEL. CAUTION RISK OF ELECTRIC SHOCK DO NOT OPEN This symbol indicates “dangerous voltage” inside the product that presents a risk of electric shock or personal injury. CAUTION : TO PREVENT ELECTRIC SHOCK, MATCH WIDE BLADE OF PLUG TO WIDE SLOT, FULLY INSERT. WARNING • To reduce the risk of fire or electric shock, do not expose this appliance to rain or moisture. CLASS 1 KLASSE 1 LUOKAN 1 KLASS 1 PRODUCTO This symbol indicates important instructions accompanying the product. LASER PRODUCT LASER PRODUKT LASER LAITE LASER APPARAT LÁSER CLASE 1 CAUTION • Apparatus shall not be exposed to dripping or splashing and no objects filled with liquids, such as vases, shall be placed on the apparatus. • The Mains plug is used as a disconnect device and shall stay readily operable at any time. • This apparatus shall always be connected to an AC outlet with a protective grounding connection. • To disconnect the apparatus from the mains, the plug must be pulled out from the mains socket, therefore the mains plug shall be readily operable. CLASS 1 LASER PRODUCT This Compact Disc player is classified as a CLASS 1 LASER product. Use of controls, adjustments or performance of procedures other than those specified herein may result in hazardous radiation exposure. CAUTION • INVISIBLE LASER RADIATION WHEN OPEN AND INTERLOCKS DEFEATED, AVOID EXPOSURE TO BEAM. Wiring the Main Power Supply Plug (UK Only) IMPORTANT NOTICE The mains lead on this equipment is supplied with a moulded plug incorporating a fuse. The value of the fuse is indicated on the pin face of the plug and if it requires replacing, a fuse approved to BS1362 of the same rating must be used. Never use the plug with the fuse cover removed. If the cover is detachable and a replacement is required, it must be of the same colour as the fuse fitted in the plug. Replacement covers are available from your dealer. If the fitted plug is not suitable for the power points in your house or the cable is not long enough to reach a power point, you should obtain a suitable safety approved extension lead or consult your dealer for assistance. However, if there is no alternative to cutting off the plug, remove the fuse and then safely dispose of the plug. Do not connect the plug to a mains socket as there is a risk of shock hazard from the bared flexible cord. Never attempt to insert bare wires directly into a mains socket. A plug and fuse must be used at all times. IMPORTANT The wires in the mains lead are coloured in accordance with the following code:– BLUE = NEUTRAL BROWN = LIVE As these colours may not correspond to the coloured markings identifying the terminals in your plug, proceed as follows:–The wire coloured BLUE must be connected to the terminal marked with the letter N or coloured BLUE or BLACK. The wire coloured BROWN must be connected to the terminal marked with the letter L or coloured BROWN or RED. WARNING : DO NOT CONNECT EITHER WIRE TO THE EARTH TERMINAL WHICH IS MARKED WITH LETTER E OR BY THE EARTH SYMBOL , OR COLOURED GREEN OR GREEN AND YELLOW. 2 English HT-D450-XU-ENG-1228.indd 2 2011-12-28 5:09:35 Precautions • Ensure that the AC power supply in your house complies with the identification sticker located on the back of your product. • Install your product horizontally, on a suitable base (furniture), with enough space around it for ventilation (7.5~10cm). • Do not place the product on amplifiers or other equipment which may become hot. Make sure the ventilation slots are not covered. • Do not stack anything on top of the product. • Before moving the product, ensure the Disc Insert Hole is empty. • In order to disconnect the product completely from the power supply, remove the AC plug from the wall outlet, especially when left unused for a long period of time. • During thunderstorms, disconnect the AC plug from the wall outlet. Voltage peaks due to lightning could damage the product. • Do not expose the product to direct sunlight or other heat sources. This could lead to overheating and malfunction of the product. • Protect the product from moisture, and excess heat or equipment creating strong magnetic or electric fields (i.e. speakers.). • Disconnect the power cable from the AC supply if the product malfunctions. • Your product is not intended for industrial use. Use of this product is for personal use only. • Condensation may occur if your product or disc has been stored in cold temperatures. If transporting the product during the winter, wait approximately 2 hours until the product has reached room temperature before using. • The batteries used with this product contain chemicals that are harmful to the environment. Do not dispose of batteries in the general household trash. Accessories Check for the supplied accessories below. FUNCTION TV SOURCE POWER RECEIVER DVD SLEEP TV 1 2 4 5 7 8 3 6 9 DSP /EQ 0 MUTE TUNING /CH VOL REPEAT DISC MENU MENU TITLE MENU TOOLS INFO RETURN A EXIT B C D DIMMER GIGA S.VOL AUDIO UPSCALE S/W LEVEL TUNER MEMORY MO/ST USB REC P.BASS Video Cable FM Antenna User manual Remote Control/Batteries (AAA size) Scart Adapter (Europe only) English HT-D450-XU-ENG-1228.indd 3 3 2011-12-28 5:09:35 Safety Information Cautions on Handling and Storing Discs Small scratches on the disc may reduce sound and picture quality or cause skipping. Be especially careful not to scratch discs when handling them. Holding discs • Do not touch the playback side of the disc. • Hold the disc by the edges so that fingerprints will not get on the surface. • Do not stick paper or tape on the disc. Disc Storage • Do not keep in direct sunlight • Keep in a cool ventilated area • Keep in a clean Protection jacket. Store vertically. ✎ NOTE Do not allow the discs to become contaminated with dirt. Do not load cracked or scratched discs. • Manufactured under licence under U.S. Patent Nos: 5,956,674; 5,974,380; 6,487,535 & other U.S. and worldwide patents issued & pending. DTS, the Symbol, & DTS and the Symbol together are registered trademarks & DTS Digital Surround and the DTS logos are trademarks of DTS, Inc. Product includes software. © DTS, Inc. All Rights Reserved. • ABOUT DIVX VIDEO: DivX® is a digital video format created by DivX, Inc. This is an official DivX Certified® device that plays DivX video. Visit www.divx.com for more information and software tools to convert your files into DivX video. ABOUT DIVX VIDEO-ON-DEMAND: This DivX Certified® device must be registered in order to play purchased DivX Video-on-Demand (VOD) movies. To obtain your registration code, locate the DivX VOD section in your device setup menu. Go to vod.divx.com for more information on how to complete your registration. DivX Certified® to play DivX® video, including premium content DivX®, DivX Certified® and associated logos are trademarks of DivX, Inc. and are used under licence. Covered by one or more of the following U.S. patents : 7,295,673; 7,460,668; 7,515,710; 7,519,274 Handling and Storing Discs If you get fingerprints or dirt on the disc, clean it with a mild detergent diluted in water and wipe with a soft cloth. • When cleaning, wipe gently from the inside to the outside of the disc ✎ NOTE Condensation may form if warm air comes into contact with cold parts inside the product. When condensation forms inside the product, it may not operate correctly. If this occurs, remove the disc and let the product stand for 1 or 2 hours with the power on. • The terms HDMI and HDMI High-Definition Multimedia Interface, and the HDMI Logo are trademarks or registered trademarks of HDMI Licensing LLC in the United States and other countries. • This item incorporates copy protection technology that is protected by U.S. patents and other intellectual property rights of Rovi Corporation. Reverse engineering and disassembly are prohibited. Copyright © 2011 Samsung Electronics Co., Ltd. All rights reserved. Licence • Dolby, Pro Logic, and the double-D symbol are registered trademarks of Dolby Laboratories. 4 Copy Protection • Many DVD discs are encoded with copy protection. Because of this, you should only connect your product directly to your TV, not to a VCR. Connecting to a VCR results in a distorted picture from copy-protected DVD discs. English HT-D450-XU-ENG-1228.indd 4 2011-12-28 5:09:36 Contents SAFETY INFORMATION 2 GETTING STARTED 7 CONNECTIONS 15 22 Safety Warnings Precautions Accessories Cautions on Handling and Storing Discs Licence Copyright Copy Protection 7 7 11 11 12 13 Icons that will be used in manual Disc Types and Characteristics Description Front Panel Rear Panel Remote control 15 18 20 21 Connecting the Speakers Connecting the Video Out to your TV Connecting the FM Antenna Connecting Audio from External Components 22 22 23 23 23 23 23 23 24 24 25 25 25 26 26 26 26 26 26 27 27 27 27 27 27 Before Starting (Initial Settings) Setting the Setup menu Display TV Aspect BD Wise Resolution HDMI Format Video Out Signal Audio Speaker Setting DRC (Dynamic Range Compression) AUDIO SYNC HDMI AUDIO User EQ Audio Return Ch. System Initial Settings DivX(R) Registration DivX(R) Deactivation Language Security Parental Rating Change Password Support Product Information ENGLISH SETUP 2 3 3 4 4 4 4 English HT-D450-XU-ENG-1228.indd 5 5 2011-12-28 5:09:36 Contents BASIC FUNCTIONS 28 ADVANCED FUNCTIONS 28 28 29 29 33 35 Disc Playback Audio CD(CD-DA)/MP3/WMA Playback JPEG File Playback Using the Playback Function Sound Mode Listening to Radio 36 36 USB Function USB Recording 37 38 39 Troubleshooting Language code list Specifications 36 OTHER INFORMATION 37 • Figures and illustrations in this User Manual are provided for reference only and may differ from actual product appearance. • An administration fee may be charged if either a. an engineer is called out at your request and there is no defect in the product (i.e. where you have failed to read this user manual) b. you bring the unit to a repair centre and there is no defect in the product (i.e. where you have failed to read this user manual). • The amount of such administration charge will be advised to you before any work or home visit is carried out. 6 English HT-D450-XU-ENG-1228.indd 6 2011-12-28 5:09:37 Make sure to check the following terms before reading the user manual. Icon d B A G D ! ✎ Term Definition DVD This involves a function available with DVD-Video or DVD±R/±RW discs that have been recorded and finalised in Video Mode. CD This involves a function available with a data CD (CD DA, CD-R/-RW). MP3 This involves a function available with CD-R/-RW discs. JPEG This involves a function available with CD-R/-RW discs. DivX CAUTION This involves a function available with MPEG4 discs. (DVD±R/±RW, CD-R/-RW) This involves a case where a function does not operate or settings may be cancelled. NOTE This involves tips or instructions on the page that help each function operate. Shortcut Key This function provides direct and easy access pressing the button on the remote control. Disc Types and Characteristics Region Code The product and the discs are coded by region. These regional codes must match in order for the disc to play. If the codes do not match, the disc will not play. Disc Type DVD-VIDEO Region Code Area 1 The U.S., U.S. territories and Canada 2 Europe, Japan, the Middle East, Egypt, South Africa, Greenland 3 Taiwan, Korea, the Philippines, Indonesia, Hong Kong 4 Mexico, South America, Central America, Australia, New Zealand, Pacific Islands, Caribbean 5 Russia, Eastern Europe, India, most of Africa, North Korea, Mongolia 6 China English HT-D450-XU-ENG-1228.indd 7 Getting Started Icons that will be used in manual 01 Getting Started 7 2011-12-28 5:09:37 Getting Started Disc types that can be played Disc Types & Mark (Logo) Recorded Signals Disc Size 12 cm AUDIO + DVD-VIDEO Max. Playing Time Approx. 240 min. (single-sided) Approx. 480 min. (double-sided) Approx. 80 min. (single-sided) VIDEO 8 cm Approx. 160 min. (double-sided) 12 cm 74 min. 8 cm 20 min. 12 cm - 8 cm - AUDIO AUDIO-CD AUDIO DivX + VIDEO Do not use the following type of discs! • LD, CD-G, CD-I, CD-ROM, DVD-ROM and DVD-RAM discs cannot be played on this product. If such discs are played, a <WRONG DISC FORMAT> message appears on the TV screen. • DVD discs purchased abroad may not play on this product. If such discs are played, a <Wrong Region. Please check Disc.> message appears on the TV screen. Disc Types And Disc Format This product does not support Secure (DRM) Media files. CD-R Discs • Some CD-R discs may not be playable depending on the disc recording device (CD-Recorder or PC) and the condition of the disc. • Use a 650MB/74 minute CD-R disc. Do not use CD-R discs over 700MB/80 minutes as they may not be played back. • Some CD-RW (Rewritable) media, may not be playable. • Only CD-Rs that are properly "closed" can be fully played. If the session is closed but the disc is left open, you may not be able to fully play the disc. 8 CD-R MP3 Discs • Only CD-R discs with MP3 files in ISO 9660 or Joliet format can be played. • MP3 file names should contain no blank spaces or special characters (. / = +). • Use discs recorded with a compression/ decompression data rate greater than 128Kbps. • Only files with the ".mp3" and ".MP3" extensions can be played. • Only a consecutively written multisession disc can be played. If there is a blank segment in the Multisession disc, the disc can be played only up to the blank segment. • If the disc is not closed, it will take longer to begin playback and not all of the recorded files may be played. • For files encoded in Variable Bit Rate (VBR) format, i.e. files encoded in both low bit rate and high bit rate (e.g., 32Kbps ~ 320Kbps), the sound may skip during playback. • A maximum of 500 tracks can be played per CD. • A maximum of 300 folders can be played per CD. CD-R JPEG Discs • Only files with the "jpg" extensions can be played. • If the disc is not closed, it will take longer to start playing and not all of the recorded files may be played. • Only CD-R discs with JPEG files in ISO 9660 or Joliet format can be played. • JPEG file names should be 8 characters or less in length and contain no blank spaces or special characters (. / = +). • Only a consecutively written multisession disc can be played. If there is a blank segment in the multisession disc, the disc can be played only up to the blank segment. • A maximum of 999 images can be stored on a folder. • When playing a Kodak/Fuji Picture CD, only the JPEG files in the picture folder can be played. • Picture discs other than Kodak/Fuji Picture CDs may take longer to start playing or may not play at all. English HT-D450-XU-ENG-1228.indd 8 2011-12-28 5:09:37 01 Getting Started DVD±R/±RW, CD-R/RW Discs • Software updates for incompatible formats are not supported. (Example : QPEL, GMC, resolutions higher than 800 x 600 pixels, etc.) • If a DVD-R/-RW disc has not been recorded properly in DVD Video format, it will not be playable. Supported Formats (DivX) This product only supports the following media formats. If both video and audio formats are not supported, the user may experience problems such as broken images or no sound. Supported Video Formats Format AVI WMV Supported Versions DivX3.11~DivX5.1 V1/V2/V3/V7 Supported Audio Formats Format Bit Rate Sampling Frequency MP3 80~320kbps WMA 56~128kbps AC3 128~384kbps 44.1/48khz DTS 1.5Mbps 44.1khz 44.1khz • DivX files, including audio and video files, created in the DTS format can only support up to 6Mbps. • Aspect Ratio : Although the default DivX resolution is 640x480 pixels, this product supports up to 720x480 pixels. TV screen resolutions higher than 800 will not be supported. • When you play a disc whose sampling frequency is higher than 48khz or 320kbps, you may experience shaking on the screen during playback. • Sections with a high frame rate might not be played while playing a DivX file. • Since this product only provides encoding formats authorized by DivX Networks, Inc., a DivX file created by the user might not play. English HT-D450-XU-ENG-1228.indd 9 9 2011-12-28 5:09:37 Getting Started Notes on USB connection 14) Supported file formats Format Still Picture File name JPG MP3 WMA WMV DivX File extension JPG .JPEG .MP3 .WMA .WMV .AVI Bit rate – 80~320 kbps 56~128 kbps 4Mbps 4Mbps Version – – V8 V1,V2, V3,V7 DivX3.11~ DivX5.1 3) A certain USB/digital camera device, USB card reader is not supported. Pixel 640x480 – – 720x480 4) FAT16 and FAT32 file systems are supported. Sampling Frequency – 44.1kHz 44.1kHz 44.1KHz~ 48KHz Supported devices: USB storage media, MP3 player, digital camera 1) If a folder or file name is longer than 10 characters, it may not properly display or operate. 2) A subtitle file bigger than 300KB may not be properly displayed. Music Movie 5) Photo (JPEG), music (MP3, WMA) and video file should have their names in Korean or English. Otherwise, the file may not played. 6) Connect directly to the product's USB port. Connecting through another cable may raise problems with USB compatibility. 7) Inserting more than one memory device to a multi-card reader may not operate properly. 8) PTP protocol for digital camera is not supported. 9) Do not disconnect USB device during a "Reading" process. 10) Bigger the image resolution, the longer the delay to displaying. 11) DRM applied MP3/WMA or video files downloaded from a commercial site are not played back. 12) External HDD device is not supported. 13) The maximum current supported by the USB port for an external device is 500 mA (at 5V DC). 10 English HT-D450-XU-ENG-1228.indd 10 2011-12-28 5:09:37 01 Getting Started Description Front Panel 1 2 3 4 5 6 7 1 DISC TRAY Insert disc here. 2 DISPLAY Displays the playing status, time, etc. 3 REMOTE CONTROL SENSOR Detects signals from the remote control. 4 OPEN / CLOSE BUTTON ( 5 FUNCTION BUTTON ( 6 STOP BUTTON ( 7 PLAY / PAUSE BUTTON ( 8 VOLUME CONTROL BUTTON ( 9 POWER BUTTON ( 10 USB PORT 8 9 10 Opens and closes the disc tray. ) The mode switches as follows : DVD/CD ➞ D. IN ➞ AUX ➞ USB ➞ FM ) Stops disc playback. ) ) Plays a disc or pauses playback. ) , ) Volume adjustment. Turns the product on and off. Connect here and play files from external USB storage devices such as MP3 players, USB flash memory, etc. English HT-D450-XU-ENG-1228.indd 11 11 2011-12-28 5:09:38 Getting Started Rear Panel 1 2 3 4 5 6 7 VIDEO OUT SPEAKERS OUT DIGITAL AUDIO IN FM ANT HDMI OUT FA NET (Only For Service) OPTICAL SURROUND SUBWOOFER 8 9 SURROUND AUX IN COMPONENT OUT 1 COOLING FAN The fan always revolves when the power is on. Ensure a minimum of 10cm of clear space on all sides of the fan when installing the product. 2 SPEAKERS OUTPUT CONNECTORS Connect the front, center, surround speakers and subwoofer. 3 EXTERNAL DIGITAL OPTICAL IN JACK (DIGITAL AUDIO IN) Use this to connect external equipment capable of digital output. 4 HDMI OUT JACK Using an HDMI cable, connect this HDMI output jack to the HDMI input jack on your TV for the best quality picture. 5 AUX IN JACKS Connect to the 2CH Analog output of an external device (such as a VCR). 6 VIDEO OUT JACK Connect your TV's Video Input jack (VIDEO IN) to the VIDEO OUT jack. 7 COMPONENT OUTPUT JACKS Connect a TV with Component video inputs to these jacks. 8 FA NET (Only for Service) Used for the service repair. 9 FM ANTENNA JACK Connect the FM antenna. 12 English HT-D450-XU-ENG-1228.indd 12 2011-12-28 5:09:38 01 Getting Started Remote control Tour of the Remote Control Turn the product on and off. If you want to change to TV mode, press the TV button. If you want to change to Home Cinema, press the DVD button. Press numeric buttons to operate options. FUNCTION TV SOURCE POWER RECEIVER DVD SLEEP This is mode selection button. or Press to select TV's video mode. Set a Sleep time to shut off the product. TV To open and close the disc tray. 1 2 3 4 5 6 7 8 9 DSP /EQ Select the desired Dolby Pro Logic II audio mode. Select the desired DSP/EQ audio mode. 0 Press to search backwards or forwards. Press to skip backwards or forwards. Press to pause a disc. Press to stop/play a disc. Cut off the sound temporarily. MUTE Adjust the volume. TUNING /CH VOL REPEAT Press this to move to the home menu. DISC MENU MENU TITLE MENU Press to check the disc menu. Used to change the audio/subtitle language, angle etc. Allow access to common functions of the product such as the Photo List. Adjust the brightness of Display. Used to turn on/off GIGA Sound function. Used to adjust the level of the subwoofer. Press to preset FM stations. Allows you to repeat a title, chapter, track or disc. Use this to enter the Title menu. TOOLS INFO RETURN EXIT Select on-screen menu items and change menu value. Return to the previous menu. Search for active FM stations and change channels. Display current disc(file) status. Press this to exit the menu. C D DIMMER A GIGA B S.VOL AUDIO UPSCALE S/W LEVEL TUNER MEMORY MO/ST USB REC P.BASS Select the desired P.BASS or MP3 Enhancement setting. Regulate and stabilize the volume level against a drastic volume change. Used to start USB recording. Select MONO or STEREO for radio broadcasting. English HT-D450-XU-ENG-1228.indd 13 13 2011-12-28 5:09:39 Getting Started Installing batteries in the Remote Control * Battery size: AAA TV Brand Code List Brand Admiral (M.Wards) A Mark Anam AOC Bell & Howell (M.Wards) Place batteries in the remote control so they match the polarity : (+) to (+) and (–) to (–). Always replace both batteries at the same time. Do not expose the batteries to heat or flame. The remote control can be used up to approximately 7 meters in a straight line. Setting the Remote Control You can control certain functions of your TV with this remote control. 2. Press the POWER button to turn on the TV. 3. While holding down the POWER button, enter the code corresponding to your brand of TV. • If there is more than one code listed for your TV in the table, enter one at a time to determine which code works. • Example : For a Samsung TV While holding down the POWER button, use the number buttons to enter 00, 15, 16, 17 and 40. 4. If the TV turns off, the setting is complete. • You can use the TV POWER, VOLUME, CHANNEL, and Numeric buttons (0~9). ✎ NOTE The remote control may not work or some operations may not be possible with some brands of TVs. The remote control will work on a Samsung TV by default. 14 MTC Code 18 01, 15 01, 02, 03, 04, 05, 06, 07, 08, 09, 10, 11, 12, 13, 14 01, 18, 40, 48 NEC 18, 19, 20, 40, 59, 60 Nikei 03 Onking 03 57, 58, 81 Onwa 59, 60 Panasonic Penney 03 Candle 18 Cetronic 03 Philco Citizen 03, 18, 25 Philips Cinema 97 Pioneer Classic 03 Portland 15, 18, 59 Concerto 18 Proton 40 Contec 46 Quasar 06, 66, 67 Coronado 15 03, 05, 61, 82, 83, 84 Radio Shack RCA/ 17, 48, 56, 60, 61, 75 Craig Croslex 62 Proscan Realistic Crown 03 Sampo Curtis Mates 59, 61, 63 Samsung CXC Sanyo Scott 03, 40, 60, 61 Daytron 03 02, 03, 04, 15, 16, 17, 18, 19, 20, 21, 22, 23, 24, 25, 26, 27, 28, 29, 30, 32, 34, 35, 36, 48, 59, 90 40 40 00, 15, 16, 17, 40, 43, 46, 47, 48, 49, 19, 61, 65 Sears 15, 18, 19 Dynasty 03 15, 57, 64 Emerson 03, 15, 40, 46, 59, 61, 64, 82, 83, 84, 85 Fisher 19, 65 Sharp Signature 2000 (M.Wards) Sony 50, 51, 52, 53, 55 03, 40 Daewoo When operating a TV with the remote control 1. Press the TV button to set the remote control to TV mode. Brand 06, 07, 08, 09, 54, 66, 67, 73, 74 18 03, 15, 17, 18, 48, 54, 59, 62, 69, 90 15, 17, 18, 40, 48, 54, 62, 72 63, 66, 80, 91 Brocsonic ✎ NOTE Code 56, 57, 58 18, 59, 67, 76, 77, 78, 92, 93, 94 03, 19 57, 58 Funai 03 Soundesign Futuretech General Electric (GE) 03 06, 40, 56, 59, 66, 67, 68 Spectricon 01 SSS 18 Hall Mark 40 Sylvania Hitachi 15, 18, 50, 59, 69 Symphonic 18, 40, 48, 54, 59, 60, 62 61, 95, 96 Inkel 45 Tatung 06 JC Penny 56, 59, 67, 86 Techwood 18 JVC 70 Teknika 03, 15, 18, 25 KTV 59, 61, 87, 88 TMK 18, 40 KEC 03, 15, 40 Toshiba 19, 57, 63, 71 KMC 15 01, 15, 16, 17, 37, 38, 39, 40, 41, 42, 43, 44 Vidtech 18 Videch 59, 60, 69 18 Wards 15, 17, 18, 40, 48, 54, 60, 64 Yamaha 18 York 40 LG (Goldstar) Luxman Marantz 19, 54, 56, 59, 60, 62, 63, 65, 71 15, 17, 18, 48, 54, 59, 60, 62, 72, 89 40, 54 Yupiteru 03 Matsui 54 Zenith 58, 79 LXI (Sears) Magnavox MGA Mitsubishi/ MGA 18, 40 Zonda 01 18, 40, 59, 60, 75 Dongyang 03, 54 English HT-D450-XU-ENG-1228.indd 14 2011-12-28 5:09:39 02 Connections Connections This section involves various methods of connecting the product to other external components. Before moving or installing the product, be sure to turn off the power and disconnect the power cord. Connecting the Speakers Position of the product SW Place it on a stand or cabinet shelf, or under the TV stand. Selecting the Listening Position The listening position should be located about 2.5 to 3 times the distance of the TV's screen size away from the TV. Example : For 32" TV's 2~2.4m For 55" TV's 3.5~4m Front Speakers ei Center Speaker f hj Surround Speakers Place these speakers in front of your listening position, facing inwards (about 45°) toward you. Place the speakers so that their tweeters will be at the same height as your ear. Align the front face of the front speakers with the front face of the center speaker or place them slightly in front of the center speakers. It is best to install it at the same height as the front speakers. You can also install it directly over or under the TV. Place these speakers to the side of your listening position. If there isn't enough room, place these speakers so they face each other. Place them about 60 to 90cm above your ear, facing slightly downward. the front and center speakers, the surround speakers are used to * Unlike handle mainly sound effects and sound will not come from them all the time. Subwoofer ! g The position of the subwoofer is not so critical. Place it anywhere you like. CAUTION Do not let children play with or near the speakers. They could get hurt if the speaker falls. When connecting the speaker wires to the speakers, make sure that the polarity (+/–) is correct. Keep the subwoofer out of the reach of children so as to prevent them from inserting their hands or alien substances into the duct (hole) of the subwoofer. Do not hang the subwoofer on the wall through the duct (hole). ✎ NOTE If you place a speaker near your TV set, screen colour may be distorted because of the magnetic field generated by the speaker. If this occurs, place the speaker away from your TV set. English HT-D450-XU-ENG-1228.indd 15 15 2011-12-28 5:09:40 Connections Speaker Components HT-D450 (L) (R) (L) FRONT (R) CENTER SURROUND Speaker Components SUBWOOFER SPEAKER CABLE Assembled Speakers HT-D453 HT-D453 (L) (R) SCREW (5×15): 2EA SCREW (4×20): 8EA CENTER SPEAKER CENTER FRONT (L) STAND (R) SURROUND SPEAKER STAND BASE SUBWOOFER CABLE FRONT SPEAKER HT-D455 SURROUND SPEAKER SUBWOOFER HT-D455 (L) (R) SCREW (5×15): 4EA SCREW (4×20): 16EA FRONT STAND (L) (R) CENTER SURROUND CENTER SPEAKER STAND BASE SUBWOOFER FRONT/SURROUND SPEAKER SUBWOOFER SPEAKER CABLE ✎ NOTE Refer to page 17 to install the Speakers on the Tallboy Stand. 16 English HT-D450-XU-ENG-1228.indd 16 2011-12-28 5:09:40 02 Connections Installing the Speakers on the Tallboy Stand * HT-D453 only - Front Speakers * HT-D455 only - Front/Surround Speakers 1. Turn the Stand Base upside-down and connect it to the Stand. 2. Insert small screws (4*20, For connecting Stand & Stand Base) clockwise into the four holes marked using a screwdriver as shown in the illustration. ! CAUTION : When you use a torque screwdriver, be 1 2 Stand Base Stand 3 Speaker careful not to put excessive force. Otherwise, it runs idle or can be damaged. (torque screwdriver- below 15 kg.f.cm) 4 Stand 3. Connect the upper Speaker to the assembled Stand. 4. Insert another large screw (5*15, For connecting Speaker & Stand) clockwise into the hole on the rear of the speaker using a screwdriver. 5. This is the appearance after the speaker is installed. Follow this steps to install other speaker. 5 Connecting The Speakers 1. Press down the terminal tab on the back of the speaker. 2. Insert the black wire into the black terminal (–) and the red wire into the red terminal (+), and then release the tab. 3. Connect the connecting plugs to the back of the product by matching the colours of the speaker plugs to the speaker jacks. Black Red In case of HT-D450 Center Speaker Front Speaker (R) Front Speaker (L) Surround Speaker (R) Surround Speaker (L) Subwoofer * Refer to page 16 for the speakers of HT-D453/D455. English HT-D450-XU-ENG-1228.indd 17 17 2011-12-28 5:10:00 Connections Connecting the Video Out to your TV Choose one of the four methods for connecting to a TV. METHOD 3 (Europe only) SCART IN METHOD 4 (supplied) VIDEO OUT GITAL DIO IN FM ANT HDMI OUT FA NET (Only For Service) TICAL AUX IN COMPONENT OUT Green Blue Red METHOD 2 METHOD 1 METHOD 1 : HDMI Connect an HDMI cable (not supplied) from the HDMI OUT jack on the back of the product to the HDMI IN jack on your TV. METHOD 2 : Component Video If your television is equipped with Component Video inputs, connect a Component video cable(not supplied) from the COMPONENT OUT (Y, PB and PR) jacks on the back of the product to the Component Video Input jacks on your TV. METHOD 3 : Scart (Europe only) If your television is equipped with a SCART input, connect the supplied video cable from the VIDEO OUT jack on the back of the product to the VIDEO jack on the Scart adapter (Europe only), then connect the SCART adapter's jack to the SCART IN jack on your television. METHOD 4 : Composite Video Connect the supplied Video cable from the VIDEO OUT jack on the back of the product to the VIDEO IN jack on your TV. 18 English HT-D450-XU-ENG-1228.indd 18 2011-12-28 5:10:02 02 ! Resolutions available for the HDMI output are 480p(576p), 720p,1080i/1080p. See page 23 for the resolution setting. This product operates in Interlace scan mode 480i(576i) for component/composite output. After making the video connection, set the Video input source on your TV to match the corresponding Video output mode on your product. Turn this product on first before you set the video input source on your TV. See your TV owner's manual for more information on how to select the TV's Video Input source. Connections ✎ NOTE CAUTION Do not connect the unit through a VCR. Video signals fed through VCRs may be affected by copyright protection systems and the picture will be distorted on the television. HDMI FUNCTION HDMI Auto Detection Function If your TV is Samsung TV and it supports CEC function.The product's video output will automatically change to HDMI mode when connecting an HDMI cable while power is on. • HDMI (High Definition Multimedia Interface) • HDMI is an interface that enables the digital transmission of video and audio data with just a single connector. Using HDMI, the product transmits a digital video and audio signal and displays a vivid picture on a TV having an HDMI input jack. • HDMI connection description - HDMI outputs only a pure digital signal to the TV. - If your TV does not support HDCP (High-bandwidth Digital Content Protection), random noise appears on the screen. • What is the HDCP? • HDCP (High-band width Digital Content Protection) is a system for protecting DVD content outputted via HDMI from being copied. It provides a secure digital link between a video source (PC, DVD. etc) and a display device (TV, projector. etc). Content is encrypted at the source device to prevent unauthorized copies from being made. Using Anynet+(HDMI-CEC) Anynet+ is a function that enables you to control other Samsung Devices with your Samsung TV's remote control. Anynet + can be used by connecting this product to a SAMSUNG TV using a HDMI Cable. This is only available with SAMSUNG TV's that support Anynet+. 1. Connect the product to a Samsung TV with an HDMI cable. (See page 18) 2. Set the Anynet+ function on your TV. (See the TV instruction manual for more information.) ✎ NOTE The Anynet+ function supports some buttons of the remote control. Please check the This function is not available if an HDMI cable does not support CEC. Depending on your TV, certain HDMI output resolutions may not work. Please refer to the user’s manual of your TV. logo (If your TV has an logo, then it supports Anynet+ function.) English HT-D450-XU-ENG-1228.indd 19 19 2011-12-28 5:10:04 Connections Connecting the FM Antenna FM Antenna (supplied) VIDEO OUT FM ANT HDMI OUT FA NET (Only For Service) AUX IN COMPONENT OUT 1. Connect the FM antenna supplied to the FM Antenna jack. 2. Slowly move the antenna wire around until you find a location where reception is good, then fasten it to a wall or other rigid surface. ✎ NOTE This product does not receive AM broadcasts. 20 English HT-D450-XU-ENG-1228.indd 20 2011-12-28 5:10:04 02 Connections Connecting Audio from External Components VIDEO OUT SPEAKERS OUT FM ANT White DIGITAL AUDIO IN HDMI OUT FA NET (Only For Service) OPTICAL D SUBWOOFER AUX IN SURROUND Optical Cable (not supplied) COMPONENT OUT Red Audio Cable (not supplied) If the external analogue component has only one Audio Out, connect either left or right. Set-Top Box OPTICAL VCR AUX AUX : Connecting an External Analogue Component Analogue signal components such as a VCR. 1. Connect AUX IN (Audio) on the back of the product to the Audio Out of the external Analogue component. • Be sure to match the colours of the connecting jacks. 2. Press the FUNCTION button to select AUX input. • The mode switches as follows : DVD/CD ➞ D. IN ➞ AUX ➞ USB ➞ FM ✎ NOTE You can connect the Video Output jack of your VCR to the TV, and connect the Audio Output jacks of the VCR to this product. OPTICAL : Connecting an External Digital Component Digital signal components such as a Cable Box/Satellite receiver (Set-Top Box). 1. Connect the DIGITAL AUDIO IN (OPTICAL) on the back of the product to the Digital Output of the external digital component. 2. Press the FUNCTION button to select D. IN. • The mode switches as follows : DVD/CD ➞ D. IN ➞ AUX ➞ USB ➞ FM English HT-D450-XU-ENG-1228.indd 21 21 2011-12-28 5:10:05 Setup Setting the Setup menu Before Starting (Initial Settings) 1. Press the POWER button when it is plugged in TV for the first time. Initial Settings screen will be displayed. The access step may differ depending on the selected menu. The GUI (Graphical User Interface) in this manual may differ, depending on the firmware version. 1 Initial settings > On-Screen Language DISC MENU MENU TITLE MENU Select a language for the on-screen displays TOOLS INFO English 한국어 3 Nederlands Français Deutsch 2 Italiano >Move RETURN " Select A 4 EXIT B C D 2. Press the ▲▼ buttons to select the desired language, then press the ENTER button. 3. Press the ENTER button to select Start button. 4. Press the ▲▼ buttons to select desired TV Aspect, then press the ENTER button. • If the HDMI cable is connected to the product, TV aspect does not appear. 1 MENU BUTTON : Display the home menu. 2 RETURN BUTTON : Return to the previous setup menu. 3 ENTER / DIRECTION BUTTON Move the cursor and select an item. Select the currently selected item. Confirm the setting. ✎ NOTE 4 EXIT BUTTON : Exit the setup menu. If you have not selected a preferred language in the initial settings, you will see a language selection window next time you turn on the product. Your language selection will apply to all menus: On-Screen Menu, Disc Menu, Audio, Subtitle. If you want to move to the previous screen, press the RETURN button. Once you select a menu language, you can change it by pressing the STOP () button on the remote control for more than 5 seconds with no disc inserted. When the Initial Settings screen does not appear, refer to the Initial Settings. (see page 26) Settings Function DVD/CD 1. Press the POWER button. 2. Press the ◄► buttons to select Settings, then press the ENTER button. 3. Press the buttons to select the desired menu, then press the ENTER button. 4. Press the buttons to select the desired sub-menu, then press the ENTER button. 5. Press the buttons to select the desired item, then press the ENTER button. 6. Press the EXIT button to exit the setup menu. 22 English HT-D450-XU-ENG-1228.indd 22 2011-12-28 5:10:07 03 ✎ NOTE You can configure various display options such as the TV Aspect, Resolution, etc. TV Aspect Depending on the type of television you have, you may want to adjust the screen setting. This will optimize the picture quality according to the content (In the DVD disc, etc) that you want to play and the product or your BD Wisecompliant Samsung TV. If you want to change the resolution in BD Wise mode, you must set BD mode to Off in advance. BD Wise will be disabled if the product is connected to a device that does not support BD Wise. Setup Display • 4:3 Pan-Scan Select when you want to see the 16:9 video supplied by the DVD without the black bars on top and bottom, even though you have a TV with a 4:3 ratio screen(extreme left and right portion of the movie picture will be cut off). • 4:3 Letter Box Select when you want to see the total 16:9 ratio screen DVD supplies, even though you have a TV with a 4:3 ratio screen. Black bars will appear at the top and bottom of the screen. • 16:9 Wide You can view the full 16:9 picture on your widescreen TV. Resolution Sets the output resolution of the HDMI video signal. The number in 480p(576p), 720p, 1080i and 1080p indicates the number of lines of video. The i and p indicate interlace and progressive scan, respectively. • 480p(576p) : Outputs 480 lines of progressive video. • 720p : Outputs 720 lines of progressive video. • 1080i : Outputs 1080 lines of interlaced video. • 1080p : Outputs 1080 lines of progressive video. • BD Wise : Automatically sets the optimal resolution when connected via HDMI to a TV with the BD Wise feature. (The BD Wise menu item appears only if BD Wise is set to On.) ✎ NOTE HDMI Format ✎ NOTE If Component or Composite is connected, the resolution supports only 480i(576i). 1080P may not appear depending on TV. When using HDMI, the screen is automatically converted to the 16:9 Wide mode and TV Aspect is deactivated. If a DVD is in the 4:3 ratio, you cannot view it in the wide screen. Since DVD discs are recorded in various image formats, they will look different depending on the software, the type of TV, and the TV aspect ratio setting. BD Wise (Samsung products only) BD Wise is Samsung's latest inter-connectivity feature. When you connect Samsung products with BD-Wise to each other via HDMI, the optimum resolution will be set automatically. You can optimize the colour setting from the HDMI output. Select a connected device Type. • Monitor : Select if connected to a Monitor via HDMI. • TV : Select if connected to a TV via HDMI. Video Out Signal Different countries apply different TV standard. You can select from NTSC or PAL. • NTSC : You can select the NTSC video format • PAL : You can select the PAL video format • On : The original resolution of the DVD disc will be output to the TV direct. • Off : The output resolution will be fixed according to the Resolution previously set, regardless of the resolution of the disc. English HT-D450-XU-ENG-1228.indd 23 23 2011-12-28 5:10:08 Setup Adjusting Front/Surround Bal. You can select between 0 and -6. The volume decreases as you move closer to –6. Audio Speaker Setting Speaker Size You can set the Speaker Size of the Center and Surround Speakers, as well as Test Tone in this mode. Settings Delay Time Speaker Setting Speaker Size ► Sound Edit Delay Time Test Tone mMove Adjusting Center/Surround/Subwoofer Level The volume level can be adjusted in steps from +6dB to –6dB. The sound gets louder as you move closer to +6dB and quieter as you get closer to -6dB. : Off " Select ' Return " Select ' Return • For the Front, the mode is set to Small. • For the Subwoofer, the mode is set to Present. • For the Center and Surround, you can switch the mode to Small or None. - Small : Select this when using the speakers. - None : Select this when no speaker is connected. If the speakers cannot be placed at equal distances from the listening position, you can adjust the delay time of the audio signals from the Center and Surround speakers. You can also set the Test Tone in this mode. Setting up the Speaker Delay Time When 5.1CH Surround Sound is played, you can enjoy the best sound if the distance between you and each speaker is the same. Since the sounds arrive at the listening position at different times depending on the placement of speakers, you can adjust this difference by adding a delay effect to the Center and Surround Speakers. Settings Delay Time Front ✎ NOTE The speaker mode may vary depending on the Dolby Pro Logic and Stereo settings. Center : 00mSEC Surround : 10mSEC Subwoofer Test Tone Sound Edit : Off <Change " Select ' Return mMove " Select ' Return You can adjust the balance and level for each speaker. ✎ NOTE Settings Sound Edit Front Bal. dB L R dB Surround Bal. dB L R dB Center Level dB Surround Level dB SW Level dB The Delay Time menu will be activated only when the 5.1 channel source is played. You can not set Center and Surround in this mode when their Speaker Size is set to None. <Change " Select ' Return mMove " Select ' Return Press the ▲▼ buttons to select and adjust the desired speaker. Press the ◄► buttons to adjust the settings. 24 English HT-D450-XU-ENG-1228.indd 24 2011-12-28 5:10:14 03 Setup Ideal Center Speaker placement Test Tone Settings Speaker Setting Speaker Size Sound Edit Delay Time Test Tone Ideal Surround Speaker placement Place all speakers within this circle. Df: The distance from Front Speaker Dc: The distance from Center Speaker Ds: The distance from Surround Speaker Setting the Center Speaker If the distance of Dc is equal to or longer than the distance of Df in the figure, set the mode as 0ms. Otherwise, change the setting according to the table. Distance between 0.00m 0.34m 0.68m 1.06m 1.40m 1.76m Df and Dc Delay Time 00 ms 01 ms 02 ms 03 ms 04 ms 05 ms mMove : On ► " Select ' Return " Select ' Return Use the Test Tone feature to check the speaker connections. • Press the ◄► buttons to select On. • The test tone will be sent to Front Left ➞ Center ➞ Front Right ➞ Surround Right ➞ Surround Left ➞ Subwoofer in order. To stop the test tone, press the ENTER button. DRC (Dynamic Range Compression) This feature balances the range between the loudest and quietest sounds. You can use this function to enjoy Dolby Digital sound when watching movies at low volume at night. • You can select either Full, 6/8, 4/8, 2/8, off. AUDIO SYNC Setting the Surround Speaker If the distance of Dc is equal to or longer than the distance of Ds in the figure, set the mode as 0ms. Otherwise, change the setting according to the table. Distance between 0.00m 1.06m 2.11m 3.16m 3.62m 5.29m Ds and Dc Delay Time 00 ms 03 ms 06 ms 09 ms 12 ms 15 ms ✎ NOTE With PL II (Dolby Pro Logic II), the delay time may be different for each mode. With AC-3 and DTS, the delay time can be set between 00 and 15mSEC. The Center channel is only adjustable on 5.1 channel discs. Video and audio sync may not match with digital TV. If this occurs, adjust the audio delay time to match the video • You can set the audio delay time between 0 ms and 300 ms. Set it to the optimal status. HDMI Audio The audio signals transmitted over the HDMI Cable can be toggled On/Off. • Off : Video is transmitted over the HDMI connection cable only, and audio is output through the product speakers only. • On : Both video and audio signals are transmitted over the HDMI connection cable, and audio is output through your TV speakers only. English HT-D450-XU-ENG-1228.indd 25 25 2011-12-28 5:10:14 Setup ✎ NOTE System The default setting of this function is HDMI Audio Off. HDMI Audio is automatically down-mixed to 2ch for TV speakers. When HDMI Audio is set to On, PL II /DSP EQ /P.BASS doesn't work. With HDMI AUDIO set to 'On', the volume can be adjusted only using the TV remote control. Initial Settings By using the Initial Settings, you can set the language and TV aspect. ✎ NOTE User EQ You can configure the equalizer settings manually to your preference. If the HDMI cable is connected to the product, TV aspect does not appear and it is set to 16:9 Wide automatically. DivX(R) Registration View DivX(R) VOD Registration Code to purchase Settings User EQ and play DivX(R) VOD content. dB 6 · · · · · · · · · · · · -6 ✎ NOTE 250Hz 600Hz 1kHz 3kHz 6kHz 10kHz 15kHz a Reset > Adjust < Move ' Return mMove " Select ' Return ✎ NOTE This can be also done using the DSP/EQ button. (see page 34) This option is not activated if you select OK.To activate this option, please activate the DivX(R) Deactivation. Even after you reset the system, the settings of DivX Registration will not be reset. DivX(R) Deactivation Select this to get a new registration code. Audio Return Ch. You can enjoy TV sound from the Home Cinema speakers by using just one HDMI cable. • Off : Turn the Audio Return Channel function off. • Auto : Listen to TV sound from the Home Cinema speakers if your TV is compatible with the Audio Return Channel function. ✎ NOTE When Anynet+ (HDMI-CEC) is Off, the Audio Return Channel function is not available. Using an ARC (Audio Return Channel)uncertified HDMI cable may cause a problem in compatibility. ARC function is only available if an ARCcompliant TV is connected. 26 English HT-D450-XU-ENG-1228.indd 26 2011-12-28 5:10:14 03 You can select the language you prefer for on-screen menu, disc menu, etc. OSD Language Disc Menu Select the language for the on-screen displays. Select the language for the disc menu displays. Setup Language Change Password Select Change and enter the 4-digit password to set the parental lock using the number buttons on the remote control. Settings Display Parental Rating : Off Audio Password : Change ► System Language Audio Select the language for disc audio. Security Support Subtitle Select the language for disc subtitles. mMove a To select a language that does not appear in the menu, select OTHERS in the Disc Menu, Audio and Subtitle, and enter the language code of your country (see page 38). a You cannot select OTHERS in the OSD Language menu. ✎ NOTE The selected language will only appear if it is supported on the disc. Security The Parental Lock function works in conjunction with DVDs that have been assigned a rating, which helps you control the types of DVDs that your family watches. There are up to 8 rating levels on a disc. Parental Rating " Select ' Return If you forgot your password 1. Remove the disc. 2. Press and hold the STOP () button on the remote control for 5 seconds or more. All settings will revert to the factory settings. Support Product Information Provide the product information such as Model code, Softrware Version, etc. Select the rating level you want to set. A larger number indicates that the program is intended for adult use only. For example, if you select up to Level 6, discs that contain Level 7, 8 will not play. Enter the password and then press the ENTER button. - The password is set to "0000" by default. - Once the setup is complete, you will be taken to the previous screen. English HT-D450-XU-ENG-1228.indd 27 27 2011-12-28 5:10:14 Basic Functions Disc Playback Audio CD(CD-DA)/MP3/WMA Playback BA 1. Press the OPEN/CLOSE () button. 2. Place a disc gently into the tray with the disc's label facing up. 3. Press the OPEN/CLOSE () button to close the disc tray. Track01 1/17 ✎ NOTE Resume function: When you stop disc play, the product remembers where you stopped, so when you press PLAY button again, it will pick up where you left off. (This function works only with DVDs.) Press the STOP button twice during playback to disable the Resume function. If no buttons are pressed on the product or remote control for more than 3 minutes when the product is in Pause mode, it will change to STOP mode. The initial screen may appear different, depending on the content of the disc. Pirated discs will not play in this product because they violate the CSS(Content Scrambling System: a copy protection system) recommendations. a will appear when an invalid button is pressed. TV Screen Saver/Power Saving Function • If no button input is made for more than 5 minutes in Stop or Play mode, the screen saver will get activated. • If the product is left in the screen saver mode for more than 20 minutes, the power will automatically turn off. (Except during play a music) 28 0:15 / 3:59 Function DVD/CD Repeat Play Mode 1. Insert an Audio CD(CD-DA) or an MP3 Disc into the disc tray. • For an Audio CD, the first track will be played automatically. - Press the #$ buttons to move to the previous/next track. • For the MP3/WMA disc, press the ◄► buttons to select Music, then press the ENTER button. - Press the ▲▼◄► buttons to select a desired file and press the ENTER button. - Press the buttons to move to the previous/next pages. 2. Press the STOP () button to stop playback. ✎ NOTE Some MP3/WMA-CDs may not play, depending on the recording mode. Table of contents of a MP3-CD varies depending on the MP3/WMA track format recorded on the disc. WMA-DRM files cannot be played. English HT-D450-XU-ENG-1228.indd 28 2011-12-28 5:10:15 04 Using the Playback Function Images captured with a digital camera or camcorder, or JPEG files on a PC can be stored on a CD and then played back with this product. Forward/Reverse Search dBAD 1. Insert a JPEG disc on the disc tray. 2. Press the ◄► buttons to select Photo, and then press the ENTER button. Press the buttons for Search Function. 3. Press the ▲▼ buttons to select the folder you want to play, and then press the ENTER button. 4. Press the ▲▼ buttons to select the photo you want to play, and then press the ENTER button. • The selected file will play and slide show will start. • To stop slide show, press the PAUSE () button. • You can view the previous/next file by pressing the ◄,► buttons during the slideshow mode. 1➞2➞3➞4 1➞2➞3➞4 ✎ NOTE No sound is played in search mode. This function is available only for the CD-DA. The playback search produces sound only when searching at 1 and 2 speed. Skipping Scenes/Songs ROOT JPEG 1 dBAD JPEG 2 JPEG 3 642 X 352 Press the #$ buttons. • Each time the button is pressed during playback, the previous or next chapter, track or directory (file) will be played. • You cannot skip chapters consecutively. 2010/01/01 Function DVD/CD Pages Return Slow Motion Play Rotate Function dD G Press the GREEN(B) or YELLOW(C) button during the PAUSE mode. • GREEN(B) Button: Rotate 90° counterclockwise. • YELLOW(C) Button: Rotate 90° clockwise. ✎ NOTE Basic Functions JPEG File Playback The maximum resolutions supported by this product are 5120 x 3480 (or 19.0 MPixel) for standard JPEG files and 2048 x 1536 (or 3.0 MPixel) for progressive image files. Press the PAUSE () button and then button for Slow Motion play. d D 1 ➞2 ➞3 1 ➞2 ➞3 ✎ NOTE No sound is heard during slow playback. Reverse slow playback does not work. English HT-D450-XU-ENG-1228.indd 29 29 2011-12-28 5:10:15 Basic Functions Step Motion Play Using the Title Menu dD Press the PAUSE button repeatedly. • The picture moves forward one frame each time the button is pressed during playback. ✎ NOTE No sound is heard during step motion playback. For DVDs containing multiple titles, you can view the title of each movie. TITLE MENU 1. During playback, press the TITLE MENU button on the remote control. 2. Press the ▲▼◄► buttons to make the desired selection, then press the ENTER button. ✎ NOTE 5 Minute Skip function D During playback, press the ◄,► button. • Playback skips 5 minutes forward whenever you press the ► button. • Playback skips 5 minutes backward whenever you press the ◄ button. ✎ NOTE d Depending on the disc, menu setup items may vary and this menu may not be available. Repeat Playback dBAD DVD/DivX Repeat This function is available only for the DivX that contains time information. You can repeat the title, chapter or the section(A-B Repeat) of the DVD/DivX. Repeat OFF Using the Disc Menu d You can view the menus for the audio language, subtitle language, profile, etc. DISC MENU 1. During playback, press the DISC MENU button on the remote control. 2. Press the ▲▼◄► buttons to make the desired selection, then press the ENTER button. ✎ NOTE Depending on the disc, menu setup items may vary and this menu may not be available. 30 1. During DVD/DivX playback, press the REPEAT button on the remote control. 2. Press the ▲▼ buttons to select a desired repeat mode, then press the ENTER button. REPEAT 3. Press the ▲▼ buttons to select OFF to return to normal play, then press the ENTER button. Z D Title ➞ Chapter ➞ A - ➞ Off Title ➞ Folder ➞ All ➞ Off English HT-D450-XU-ENG-1228.indd 30 2011-12-28 5:10:15 04 Displaying Disc Information 1. During the CD/ MP3 playback, press the REPEAT button repeatedly to select the repeat mode you want. B d Basic Functions CD/MP3 Repeat 1/1 2/20 (Repeat Off Repeat Disc Repeat All Random Repeat Section A-B) 0:05:21 1/1 EN AC3 5.1 1/1 EN A 1/1 (Repeat Off Repeat Track Repeat Dir (Directory) Repeat All Random) Change Select D A-B Repeat Playback dB 1/6 1/1 1/1 EN You can repeatedly play back a designated section of a DVD or CD. Change Select 1. During the DVD disc or CD playback, press the REPEAT button on the remote control. 2. For DVD, press the ▲▼ buttons to select A-. For CD press the REPEAT button repeatedly until appears. 3. Press the ENTER button at the point where you want repeat play to start (A). 4. Press the ENTER button at the point where you want repeat play to stop (B). 5. To return to normal playback, For DVD, press the ▲▼ buttons to select to OFF. For CD, press the REPEAT button to select to . ✎ NOTE The A-B Repeat function does not operate with DivX, MP3 or JPEG discs. TOOLS 1. During playback, press the TOOLS button on the remote control. 2. Press the ▲▼ buttons to select the desired item. 3. Press the ◄► buttons to make the desired setup change and then press the ENTER button. - You may use the number buttons of the remote control to control some items. 4. To make Disc information disappear, press the TOOLS button again. ✎ NOTE If you are playing contents from the tools menu, some functions may not be enabled depending on the disc. You can also select DTS, Dolby Digital or Pro Logic, depending on the disc. Some tools menus may differ depending on discs and files. English HT-D450-XU-ENG-1228.indd 31 31 2011-12-28 5:10:16 Basic Functions TOOLS menu Title( ) : To access the desired title when there is more than one in the disc. For example, if there is more than one movie on a DVD, each movie will be identified as a Title. Chapter( ) : Most DVD discs are recorded in chapters so that you can quickly find a specific chapter. Playing time( ) : Allows playback of the film from a desired time. You must enter the starting time as a reference. The time search function does not operate on some discs. ): Refers to the film's Audio( soundtrack language. A DVD Disc can contain up to 8 audio languages. Subtitle( ): Refers to the subtitle languages available in the disc. You will be able to choose the subtitle languages or, if you prefer, turn them off from the screen. A DVD Disc can contain up to 32 subtitle languages. Angle( ): When a DVD contains multiple angles of a particular scene, you can use the Angle function. 3. Press the ◄► buttons to select the desired subtitle language. • Depending on the languages on a DVD disc, a different subtitle language is selected each time the button is pressed. ✎ NOTE Depending on the disc, the Subtitle and Audio Language functions may not be available. Caption Function D • You must have some experience with video extraction and editing in order to use this feature properly. • To use the caption function, save the caption file (*.smi) in the same file name as that of the DivX media file (*.avi) within the same folder. Example. Root Samsung_007CD1.avi Samsung_007CD1.smi • Up to 100 alphanumeric characters or 50 East Asian characters (2 byte characters such as Korean and Chinese) for the file name. • The subtitle of DivX files are *.smi, *.sub, *.srt over 148 kbyte is not supported. Selecting the Audio Language dD Angle Function d 1. Press the TOOLS button. 2. Press the ▲▼ buttons to select AUDIO ( display. ) This function allows you to view the same scene in different angles. 3. Press the ◄► buttons to select the desired audio language. • Depending on the of languages on a DVD disc, a different audio language is selected each time the button is pressed. 1. Press the TOOLS button. 2. Press the ▲▼ buttons to select ANGLE ( display. ) 3. Press the ◄► buttons to select the desired angle. Selecting the Subtitle Language dD ✎ NOTE The Angle function works only with discs on which multiple angles have been recorded. 1. Press the TOOLS button. 2. Press the ▲▼ buttons to select SUBTITLE ( display. 32 ) English HT-D450-XU-ENG-1228.indd 32 2011-12-28 5:10:21 04 GIGA You can set the time that the Home Cinema will shut itself off. The GIGA Sound Function amplifies bass and improves bass twice as much for you to appreciate powerful real sound. The GIGA Sound feature will be applied only to the subwoofer. Press the SLEEP button. • Each time the button is pressed, the selection changes as follows SLP 10 SLP 20 SLP 30 SLP 60 SLP 90 SLP 120 SLP 150 OFF. Basic Functions SLEEP Press the GIGA button. ✎ NOTE If GIGA Sound is set to 'ON', other sound field effects will not be applied. DIMMER If DOLBY PLII is set to 'ON', the GIGA Sound effect will not be applied. You can adjust the brightness of the display on the main unit. The GIGA Sound works when in 2-channel LPCM mode only. Press the DIMMER button. S.VOL (SMART VOLUME) Sound Mode P.BASS The P.BASS function provides a bass boost to reinforce the low frequencies. The MP3 ENHANCE function provides better sound quality by upscaling the sampling frequency. This will regulate and stabilize the volume level against a drastic volume change when changing S . VOL channels or during a scene transition. Press the S.VOL button. • Each time the button is pressed, the selection changes as follows : SMART VOLUME ON SMART VOLUME OFF Press the P.BASS button. 2 Channel LPCM source POWER BASS ON ➞ POWER BASS OFF MP3 file MP3 ENHANCE ON ➞ POWER BASS ON ➞ POWER BASS OFF S/W LEVEL You can also press the S/W LEVEL button on the remote control and use the ◄ or ► buttons to adjust the level of subwoofer. Press the S/W LEVEL button. ✎ NOTE The P.BASS function is only available with 2 channel LPCM sources such as MP3, DivX, CD and WMA. The P.BASS function does not work with GIGA SOUND or Dolby Pro Logic ll modes. If you press P.BASS in the DSP/EQ mode, the DSP/ EQ mode is automatically shut off and the P. BASS function will be turned on. The MP3 Enhancement function is only available MP3 file. English HT-D450-XU-ENG-1228.indd 33 33 2011-12-28 5:10:22 Basic Functions DSP (Digital Signal Processor)/EQ Dolby Pro Logic II Mode • DSP (Digital Signal Processor) : DSP modes have been designed to simulate different acoustic environments. • EQ : You can select POPS, JAZZ , ROCK, or USER to optimize the sound for the genre of music you are playing. You can select the desired Dolby Pro Logic II audio mode. Press the PL II button. DSP /EQ Press the DSP/EQ button. POPS, JAZZ, ROCK USER Select POP, JAZZ, or ROCK, depending on the genre of music you're listening to. You can enjoy music as you set in “EQ:USER ”. If you press ENTER in the “EQ:USER” menu, you will see a window where you can change the EQ settings to your preference. STUDIO Provides a sense of presence as if in a studio. CLUB Simulates the sound of a dance club with a throbbing bass beat. HALL Provides a clear vocal as if listening in a concert hall. MOVIE Provides the feeling of a movie cinema. CHURCH OFF MUSIC When listening to music, you can experience sound effects as if you are listening to the actual performance. MOVIE Adds realism to the movie soundtrack. PROLOG - A specific speaker(s) may not be output depending on the input signal. MATRIX You will hear multi-channel surround sound. STEREO Select this to listen to sound from the front left and right speakers and the subwoofer only. ✎ NOTE Provides the feeling of being in a grand church. Select this for normal listening. ✎ NOTE The DSP/EQ function is only available in Stereo mode. The DSP/EQ function is not available while playing AC3 signal in 2.1 channel mode. 34 You can listen to a 2CH sound source in 5.1CH surround sound with all speakers active. When selecting Pro Logic II mode, connect your external device to the AUDIO INPUT jacks (L and R) on the product. If you connect to only one of the inputs (L or R), you cannot listen to surround sound. The Pro Logic II function is only available in Stereo mode. The Pro Logic II function is not available while playing AC3 signal in 2.1 channel mode. English HT-D450-XU-ENG-1228.indd 34 2011-12-28 5:10:22 04 Using buttons on the Remote Control 1. Press the FUNCTION button to select FM. 2. Tune in to the desired station. • Preset Tuning 1 : You must first add a desired frequency as a preset. Press the STOP () button to select PRESET and then press the TUNING/CH ( ) button to select the preset station. • Manual Tuning : Press the STOP () button to select MANUAL and then press the TUNING/CH ( ) button to tune in to a lower or higher frequency. • Automatic Tuning : Press the STOP () button to select MANUAL and then press and hold the TUNING/CH ( ) button to automatically search the band. 5. Press the TUNER MEMORY button again. • Press the TUNER MEMORY button before number disappears from the display. • Number disappears from the display and the station is stored in memory. 6. To preset another station, repeat steps 2 to 5. Basic Functions Listening to Radio Setting Mono/Stereo Press the MO/ST button. • Each time the button is pressed, the sound switches between STEREO and MONO. • In a poor reception area, select MONO for a clear, interference-free broadcast. Presetting Stations Example : Presetting FM 89.10 in the memory 1. Press the FUNCTION button to select FM. 2. Press the TUNING/CH ( ) button to select <89.10>. 3. Press the TUNER MEMORY button. • Number flashes on the display. 4. Press the TUNING/CH ( ) buttons to select preset number. • You can select between 1 and 15 presets. English HT-D450-XU-ENG-1228.indd 35 35 2011-12-28 5:10:23 Advanced Functions USB Function USB Recording Playing Media Files using the USB Host Feature While playing CD-DA (Compact Disc Digital Audio) using the USB Recording function or listening to the FM radio or receiving audio source from an external device, you can record the audio source in the USB memory. You can enjoy media files such as pictures, movies and music saved on an MP3 player, USB memory stick or digital camera in high quality video with 5.1 channel sound by connecting the storage device to the USB port of the product. 1. Connect the USB device to your product. Ex) USB recording of CD-DA audio contents 2. Insert the CD-DA disc into the CD tray. 3. Press the USB REC button on the remote control. • To start ripping the current track, press the USB REC button on the remote control while the system is playing a track or stopped temporarily. • To record the entire CD, press and hold the USB REC button on the remote control. - "FULL CD RIPPING" appears on the display and recording starts. 1. Connect the USB device to the USB port on the front panel of the product. 2. Press the FUNCTION button to select USB. • USB appears on the display screen and then disappears. 3. Press the ◄► buttons to select Videos, Photos or Music. - Select a file to play. Safe USB Removal To prevent damage to the memory stored in the USB device, perform safe removal before disconnecting the USB cable. • Press the YELLOW(C) button. - REMOVE will appear on the display. • Remove the USB cable. ✎ NOTE To listen to your music files with 5.1 channel sound, you must set the Dolby Pro Logic II mode to Matrix. (See page 34) Remove the USB cable from the USB port slowly. Otherwise, it may cause damage to the USB port. 36 4. Press the STOP () button to stop recording. • When USB recording of a CD is completed, you will find a new folder named “RECORDING” in the USB drive. The contents will be saved in the folder in the MP3 format. • When USB recording of FM radio or AUX source is completed, you will find a new folder named “TUNER RECORDING or AUX RECORDING” in the USB drive. The contents will be saved in the folder in the MP3 format. NOTE Do not disconnect the USB connection or the power cable during the USB Recording. Otherwise, it may cause damage to the data. To stop USB Recording, press the STOP button and disconnect the USB device after the system stops playing the CD completely. If you disconnect the USB connection during the USB Recording, the system will turn off and you will not be able to delete the recorded file. If you connect the USB device to the system while it is playing a CD, the system stops temporarily and will play again. DTS-CDs cannot be recorded. If the recording duration is less than 5 seconds, a recording file may not be created. USB Recording works only if the USB device is formatted in the FAT file system. (The NTFS file system is not supported.) The audio signal will not be output during USB recording of the CD. When HDMI AUDIO is set to On, the USB Recording function is not supported. ✎ English HT-D450-XU-ENG-1228.indd 36 2011-12-28 5:10:24 06 Other Information Refer to the chart below when this product does not function properly. If the problem you are experiencing is not listed below or if the instruction below does not help, turn off the product, disconnect the power cord, and contact the nearest authorized dealer or Samsung Electronics Service Centre. Symptom Check/Remedy I cannot eject the disc. • Is the power cord plugged securely into the outlet? • Turn off the power and then turn it back on. Playback does not start. • Check the region number of the DVD. DVD discs purchased from abroad may not be playable. • CD-ROMs and DVD-ROMs cannot be played on this product. • Make sure that the rating level is correct. Playback does not start immediately when the Play/Pause button is pressed. • Are you using a deformed disc or a disc with scratches on the surface? • Wipe the disc clean. Sound is not produced. • No sound is heard during fast playback, slow playback, and step motion playback. • Are the speakers connected properly? Is the speaker setup correctly customized? • Is the disc severely damaged? Sound can be heard only from a few speakers and not all 6. • On certain DVD discs, sound is output from the front speakers only. • Check if the speakers are connected properly. • Adjust the volume. • When listening to a CD, radio or TV, sound is output to the front speakers only. Select "PROLOG" by pressing PL II (Dolby Pro Logic II) on the remote control to use all six speakers. Dolby Digital 5.1 CH Surround Sound is not produced. • Is there "Dolby Digital 5.1 CH" mark on the disc? Dolby Digital 5.1 CH Surround Sound is produced only if the disc is recorded with 5.1 channel sound. • Is the audio language correctly set to Dolby Digital 5.1-CH in the information display? The remote control does not work. • Is the remote control being operated within its operation range of angle and distance? • Are the batteries drained? • Have you selected the correct mode (RECEIVER DVD/TV)? • Disc is rotating but no picture is produced. • Picture quality is poor and picture is shaking. • Is the TV power on? • Are the video cables connected properly? • Is the disc dirty or damaged? • A poorly manufactured disc may not be playable. Audio language and subtitles do not work. • Audio language and subtitles will not work if the disc does not contain them. The Disc/Title menu screen does not appear even when the Disc/Title function is selected. • Are you using a disc that does not contain menus? Aspect ratio cannot be changed. • You can play 16:9 DVDs in 16:9 WIDE mode, 4:3 LETTER BOX mode, or 4:3 PAN SCAN mode, but 4:3 DVDs can be seen in 4:3 ratio only. Refer to the DVD disc jacket and then select the appropriate function. English HT-D450-XU-ENG-1228.indd 37 Other Information Troubleshooting 37 2011-12-28 5:10:24 Other Information Symptom Check/Remedy • The product is not working. (Example: The power goes out or the front panel key doesn't work or a strange noise is heard.) • The product is not working normally. The rating level password has been forgotten. Can't receive radio broadcast. • Press and hold the STOP () button on the remote control for longer than 5 seconds with no disc (reset function). Using the RESET function will erase all stored settings. Do not use this unless necessary. • While “NO DISC” message appears on the display of the product, press and hold the remote control's STOP () button for longer than 5 seconds. “INIT” appears on the display and all settings will return to the default values. And then press the POWER button. Using the RESET function will erase all stored settings. Do not use this unless necessary. • Is the antenna connected properly? • If the antenna's input signal is weak, install an external FM antenna in an area with good reception. Language code list Enter the appropriate code number for OTHERS in the Disc Menu, Audio and Subtitle. (See page 27). Code Language Code Language Code Language Code Language Code Language Code Language 1027 Afar 1142 Greek 1239 Interlingue 1345 Malagasy 1482 Kirundi 1527 1028 Abkhazian 1144 English 1245 Inupiak 1347 Maori 1483 Romanian 1528 Tajik Thai 1032 Afrikaans 1145 Esperanto 1248 Indonesian 1349 Macedonian 1489 Russian 1529 Tigrinya 1039 Amharic 1149 Spanish 1253 Icelandic 1350 Malayalam 1491 Kinyarwanda 1531 Turkmen 1044 Arabic 1150 Estonian 1254 Italian 1352 Mongolian 1495 Sanskrit 1532 Tagalog 1045 Assamese 1151 Basque 1257 Hebrew 1353 Moldavian 1498 Sindhi 1534 Setswana 1051 Aymara 1157 Persian 1261 Japanese 1356 Marathi 1501 Sangro 1535 Tonga 1052 Azerbaijani 1165 Finnish 1269 Yiddish 1357 Malay 1502 Serbo-Croatian 1538 Turkish 1053 Bashkir 1166 Fiji 1283 Javanese 1358 Maltese 1503 Singhalese 1539 Tsonga 1057 Byelorussian 1171 Faeroese 1287 Georgian 1363 Burmese 1505 Slovak 1540 Tatar 1059 Bulgarian 1174 French 1297 Kazakh 1365 Nauru 1506 Slovenian 1543 Twi 1060 Bihari 1181 Frisian 1298 Greenlandic 1369 Nepali 1507 Samoan 1557 Ukrainian 1069 Bislama 1183 Irish 1299 Cambodian 1376 Dutch 1508 Shona 1564 Urdu 1066 Bengali; Bangla 1186 Scots Gaelic 1300 Canada 1379 Norwegian 1509 Somali 1572 Uzbek 1067 Tibetan 1194 Galician 1301 Korean 1393 Occitan 1511 Albanian 1581 Vietnamese 1070 Breton 1196 Guarani 1305 Kashmiri 1403 (Afan) Oromo 1512 Serbian 1587 Volapuk 1079 Catalan 1203 Gujarati 1307 Kurdish 1408 Oriya 1513 Siswati 1613 Wolof 1093 Corsican 1209 Hausa 1311 Kirghiz 1417 Punjabi 1514 Sesotho 1632 Xhosa 1097 Czech 1217 Hindi 1313 Latin 1428 Polish 1515 Sundanese 1665 Yoruba 1103 Welsh 1226 Croatian 1326 Lingala 1435 Pashto, Pushto 1516 Swedish 1684 Chinese 1105 Danish 1229 Hungarian 1327 Laothian 1436 Portuguese 1517 Swahili 1697 Zulu 1109 German 1233 Armenian 1332 Lithuanian 1463 Quechua 1521 Tamil 1130 Bhutani 1235 Interlingua 1334 Latvian, Lettish 1481 RhaetoRomance 1525 Tegulu 38 English HT-D450-XU-ENG-1228.indd 38 2011-12-28 5:10:25 06 Other Information Specifications General FM Tuner Weight Dimensions Operating Temperature Range Operating Humidity Range Signal/noise ratio Usable sensitivity Total harmonic distortion HDMI 2.76 Kg 430 (W) x 59 (H) x 249 (D) mm +5°C~+35°C 10 % to 75 % 70 dB 10 dB 0.5 % Reading Speed : 3.49 ~ 4.06 m/sec. Approx. Play Time (Single Sided, Single Layer Disc) : 135 min. Reading Speed : 4.8 ~ 5.6 m/sec. Maximum Play Time : 74 min. Reading Speed : 4.8 ~ 5.6 m/sec. Maximum Play Time : 20 min. 480i(576i) 1 channel : 1.0 Vp-p (75 load) 480i(576i) Y : 1.0 Vp-p (75 load) Pr : 0.70 Vp-p (75 load) Pb : 0.70 Vp-p (75 load) 1080p, 1080i, 720p, 480p(576p) Front speaker output 142W x 2(3) Center speaker output 142W(3) Surround speaker output 141W x 2(3) Subwoofer output 142W(3) Frequency range 20Hz~20KHz S/N Ratio 65dB Channel separation 60dB Input sensitivity (AUX)800mV DVD (Digital Versatile Disc) Disc CD : 12 cm (COMPACT DISC) CD : 8cm (COMPACT DISC) Composite Video Video Output Component Video Video/Audio Amplifier *: Nominal specification - Samsung Electronics Co., Ltd reserves the right to change the specifications without notice. - Weight and dimensions are approximate. - Design and specifications are subject to change without prior notice. - For the power supply and Power Consumption, refer to the label attached to the product. English HT-D450-XU-ENG-1228.indd 39 39 2011-12-28 5:10:25 Other Information HT-D450 Speaker system Speaker Impedance Frequency range Output sound pressure level Rated input Maximum input Dimensions (W x H x D) Weights 5.1ch speaker system Front 3 140Hz~20KHz 86dB/W/M Surround 3 140Hz~20KHz 86dB/W/M Center 3 140Hz~20KHz 86dB/W/M 142W 141W 142W 284W 282W 284W Front : 90 x 141.5 x 68.5 mm Surround : 84 x 104.5 x 68.5 mm Center : 360 x 74.5 x 68.5 mm Subwoofer : 168 x 350 x 285 mm Front: 0.58 Kg, Center : 0.96 Kg Surround : 0.4 Kg, Subwoofer : 3.6 Kg Subwoofer 3 40Hz~160Hz 88dB/W/M 142W 284W HT-D453 Speaker system Speaker Impedance Frequency range Output sound pressure level Rated input Maximum input Dimensions (W x H x D) Weights 5.1ch speaker system Front 3 140Hz~20KHz 86dB/W/M Surround 3 140Hz~20KHz 86dB/W/M Center 3 140Hz~20KHz 86dB/W/M Subwoofer 3 40Hz~160Hz 88dB/W/M 142W 141W 142W 142W 284W 282W 284W 284W Front : 90 x 1200 x 119 mm (stand base : 250 x 250) Surround : 84 x 104.5 x 68.5 mm Center : 360 x 74.5 x 68.5 mm Subwoofer : 168 x 350 x 285 mm Front : 3.68 Kg, Center : 0.96 Kg Surround : 0.4 Kg, Subwoofer : 3.6 Kg HT-D455 Speaker system Speaker Impedance Frequency range Output sound pressure level Rated input Maximum input Dimensions (W x H x D) Weights 40 5.1ch speaker system Front 3 140Hz~20KHz 86dB/W/M Surround 3 140Hz~20KHz 86dB/W/M Center 3 140Hz~20KHz 86dB/W/M Subwoofer 3 40Hz~160Hz 88dB/W/M 141W 142W 142W 142W 282W 284W 284W 284W Front/Surround : 90 x 1200 x 119 mm (stand base : 250 x 250) Center : 360 x 74.5 x 68.5 mm Subwoofer : 168 x 350 x 285 mm Front/Surround : 3.68 Kg, Center : 0.96 Kg Subwoofer : 3.6 Kg English HT-D450-XU-ENG-1228.indd 40 2011-12-28 5:10:25 Contact SAMSUNG WORLD WIDE If you have any questions or comments relating to Samsung products, please contact the SAMSUNG customer care centre. Area ` North America Canada Mexico U.S.A Contact Centre Web Site 1-800-SAMSUNG (726-7864) 01-800-SAMSUNG (726-7864) 1-800-SAMSUNG (726-7864) www.samsung.com www.samsung.com www.samsung.com 0800-333-3733 0800-124-421 / 4004-0000 800-SAMSUNG (726-7864) 01-8000112112 0-800-507-7267 1-800-751-2676 1-800-10-7267 800-6225 1-800-299-0013 800-7919267 1-800-234-7267 00-1800-5077267 800-7267 0-800-777-08 1-800-682-3180 www.samsung.com www.samsung.com www.samsung.com www.samsung.com www.samsung.com www.samsung.com www.samsung.com www.samsung.com www.samsung.com www.samsung.com www.samsung.com www.samsung.com www.samsung.com www.samsung.com www.samsung.com 1-800-SAMSUNG (726-7864) www.samsung.com 0-800-100-5303 www.samsung.com 42 27 5755 0810 - SAMSUNG (7267864, € 0.07/min) - ` Latin America Argentine Brazil Chile Colombia Costa Rica Dominica Ecuador El Salvador Guatemala Honduras Jamaica Nicaragua Panama Peru Puerto Rico Trinidad & Tobago Venezuela Austria Belgium 02-201-24-18 Bosnia Bulgaria Croatia 05 133 1999 07001 33 11 062 SAMSUNG (062 726 7864) 800-SAMSUNG (800-726786) Samsung Zrt., česká organizační složka, Oasis Florenc, Sokolovská394/17, 180 00, Praha 8 70 70 19 70 030 - 6227 515 01 48 63 00 00 01805 - SAMSUNG (726-7864 € 0,14/Min) 06-80-SAMSUNG (726-7864) 800-SAMSUNG (726-7864) +381 0113216899 261 03 710 023 207 777 020 405 888 0900-SAMSUNG (0900-7267864) (€ 0,10/Min) 815-56 480 0 801 1SAMSUNG (172678) / 022-607-93-33 80820-SAMSUNG (726-7864) 1. 08010 SAMSUNG (72678) doar din reţeaua Romtelecom, tarif local 2. 021.206.01.10 - din orice reţea, tarif normal Czech Denmark Finland France Germany Hungary Italia Kosovo Luxemburg Macedonia Montenegro Netherlands Norway Poland Portugal Rumania HT-D450-XU-ENG-1228.indd 41 Slovakia Spain Sweden Contact Centre 0700 Samsung (0700 726 7864) 0800-SAMSUNG (726-7864) 902-1-SAMSUNG (902 172 678) 0771 726 7864 (SAMSUNG) Switzerland 0848-SAMSUNG (7267864, CHF 0.08/min) U.K Eire Lithuania Latvia Estonia 0330 SAMSUNG (7267864) 0818 717100 8-800-77777 8000-7267 800-7267 Uzbekistan Kyrgyzstan Tadjikistan Ukraine 0-800-502-000 www.samsung.com Belarus Moldova 810-800-500-55-500 00-800-500-55-500 www.samsung.com/ be (Dutch) www.samsung.com/ be_fr (French) www.samsung.com www.samsung.com ` Asia Pacific www.samsung.com Russia Georgia Armenia Azerbaijan Kazakhstan Australia New Zealand China 1300 362 603 0800 SAMSUNG (0800 726 786) 400-810-5858 / 010-6475 1880 Hong Kong (852) 3698 4698 India Indonesia www.samsung.com www.samsung.com www.samsung.com Japan Malaysia www.samsung.com Philippines www.samsung.com www.samsung.com www.samsung.com - Singapore Thailand Taiwan Vietnam www.samsung.com www.samsung.com www.samsung.com www.samsung.com www.samsung.com Web Site www.samsung.com www.samsung.com www.samsung.com www.samsung.com www.samsung.com/ch www.samsung.com/ ch_fr/(French) www.samsung.com www.samsung.com www.samsung.com www.samsung.com www.samsung.com ` CIS 8-800-555-55-55 8-800-555-555 0-800-05-555 088-55-55-555 8-10-800-500-55-500 (GSM: 7799) 8-10-800-500-55-500 00-800-500-55-500 8-10-800-500-55-500 ` Europe Albania Area Serbia www.samsung.com www.samsung.com www.samsung.com www.samsung.com www.samsung.com www.samsung.ua www.samsung.com/ ua_ru www.samsung.com www.samsung.com www.samsung.com www.samsung.com/hk www.samsung.com/ hk_en/ 3030 8282 / 1800 110011 / 1800 3000 8282 / 1800 266 8282 0800-112-8888 / 021-5699-7777 0120-327-527 1800-88-9999 1-800-10-SAMSUNG(726-7864) / 1-800-3-SAMSUNG(726-7864) / 1-800-8-SAMSUNG(726-7864) / 02-5805777 1800-SAMSUNG (726-7864) 1800-29-3232 / 02-689-3232 0800-329-999 1 800 588 889 www.samsung.com www.samsung.com www.samsung.com www.samsung.com 8000-4726 08000-726786 800-22273 080 100 2255 800-SAMSUNG (726-7864) 9200-21230 444 77 11 800-SAMSUNG (726-7864) www.samsung.com www.samsung.com www.samsung.com www.samsung.com www.samsung.com www.samsung.com www.samsung.com www.samsung.com 0800-SAMSUNG (726-7864) 0860-SAMSUNG (726-7864 ) www.samsung.com www.samsung.com www.samsung.com www.samsung.com www.samsung.com www.samsung.com www.samsung.com ` Middle East Bahrain Egypt Jordan Morocco Oman Saudi Arabia Turkey U.A.E ` Africa Nigeria South Africa 2011-12-28 5:10:25 Correct disposal of batteries in this product (Applicable in the European Union and other European countries with separate battery return systems.) This marking on the battery, manual or packaging indicates that the batteries in this product should not be disposed of with other household waste at the end of their working life. Where marked, the chemical symbols Hg, Cd or Pb indicate that the battery contains mercury, cadmium or lead above the reference levels in EC Directive 2006/66. If batteries are not properly disposed of, these substances can cause harm to human health or the environment. To protect natural resources and to promote material reuse, please separate batteries from other types of waste and recycle them through your local, free battery return system. Correct Disposal of This Product (Waste Electrical & Electronic Equipment (Applicable in the European Union and other European countries with separate collection systems) This marking on the product, accessories or literature indicates that the product and its electronic accessories (e.g. charger, headset, USB cable) should not be disposed of with other household waste at the end of their working life. To prevent possible harm to the environment or human health from uncontrolled waste disposal, please separate these items from other types of waste and recycle them responsibly to promote the sustainable reuse of material resources. Household users should contact either the retailer where they purchased this product, or their local government office, for details of where and how they can take these items for environmentally safe recycling. Business users should contact their supplier and check the terms and conditions of the purchase contract. This product and its electronic accessories should not be mixed with other commercial wastes for disposal. Code No. AH68-02259B HT-D450-XU-ENG-1228.indd 42 2011-12-28 5:10:25 HT-D450 HT-D453 HT-D455 Système Home cinéma numérique Guide de l'utilisateur Imaginez les possibilités Merci d'avoir acheté ce produit Samsung. Pour obtenir notre service complet, veuillez enregistrer votre produit sur www.samsung.com/register HT-D450-ZF-FR-1228.indd Sec1:1 2011-12-28 5:11:49 Consignes de sécurité Avertissements de sécurité POUR RÉDUIRE LES RISQUES D’ÉLECTROCUTION, NE RETIREZ JAMAIS LE CAPOT (NI L’ARRIÈRE). LES PIÈCES DE CE PRODUIT NE SONT PAS RÉPARABLES PAR L’UTILISATEUR. VEUILLEZ CONTACTER UN TECHNICIEN QUALIFIÉ POUR TOUTE RÉPARATION. ATTENTION RISQUE D’ÉLECTROCUTION NE PAS OUVRIR Ce symbole indique la présence d’une tension dangereuse dans l’appareil, présentant un risque d’électrocution ou de blessures. ATTENTION : AFIN D’ÉVITER TOUT RISQUE D’ÉLECTROCUTION, LA BROCHE LA PLUS LARGE DE LA FICHE DOIT ÊTRE TOTALEMENT INSÉRÉE DANS LE TROU PLUS LARGE. AVERTISSEMENT • Afin de réduire tout risque d’incendie ou d’électrocution, n’exposez jamais cet appareil à la pluie ou à l’humidité. ATTENTION • Évitez toute projection d’eau sur l’appareil et ne posez jamais d’objet contenant un liquide dessus (ex : un vase). • La fiche permet de débrancher l’appareil et doit toujours être facilement accessible. • Cet appareil doit toujours être branché à une prise de courant alternatif reliée à la terre. • Pour débrancher l'appareil, il convient de retirer la fiche de la prise murale, il faut donc que cette dernière soit facilement accessible. 2 CLASS 1 KLASSE 1 LUOKAN 1 KLASS 1 PRODUCTO Ce symbole indique les directives importantes qui accompagnent le produit. LASER PRODUCT LASER PRODUKT LASER LAITE LASER APPARAT LÁSER CLASE 1 PRODUIT LASER DE CLASSE 1 Le lecteur de disque compact est homologué comme produit LASER DE CLASSE 1. L'utilisation des commandes, les réglages ou l'exécution de procédures autres que celles spécifiées ci-dessus peuvent conduire à une exposition à des radiations dangereuses. ATTENTION • DES RAYONS LASER INVISIBLES SONT PRÉSENTS LORSQUE L'APPAREIL EST OUVERT OU QUE LES DISPOSITIFS DE VERROUILLAGE SONT CIRCONVENUS. ÉVITEZ L'EXPOSITION AUX RAYONS. Français HT-D450-ZF-FR-1228.indd 2 2011-12-28 5:11:59 Précautions • Assurez-vous que l'alimentation en c.a. de votre habitation est conforme à la plaque d'identification située au dos de votre appareil. • Posez votre appareil à plat sur un meuble stable en veillant à laisser un espace de 7,5 à 10 cm autour de l'appareil afin d’assurer sa ventilation correcte. • Ne le posez pas sur des amplificateurs ou autre appareil qui risque de chauffer. Veillez à ne pas obstruer les orifices de ventilation. • Ne posez rien sur l’appareil. • Avant de déplacer l’appareil, assurez-vous que le compartiment du disque est vide. • Pour couper complètement l'alimentation de l’appareil, en particulier lorsque vous prévoyez de ne pas l'utiliser pendant une période prolongée, retirez la fiche de la prise murale. • En cas d’orage, retirez la fiche c.a. de la prise murale. Les pointes de tension dues aux éclairs pourraient endommager l’appareil. • N’exposez pas l’appareil à la lumière directe du soleil ni à d’autres sources de chaleur. L’appareil pourrait surchauffer et mal fonctionner. • N’exposez pas l’appareil à l’humidité ni à aucune source de chaleur excessive et éloignez-le des appareils générant des ondes magnétiques ou des champs électriques intenses (ex. : haut-parleurs). • Débranchez le câble d’alimentation de l’alimentation en c.a. en cas de dysfonctionnement. • Cet appareil n’est pas conçu pour un usage industriel. Il est uniquement réservé à un usage privé. • De la condensation peut se former si votre appareil ou votre disque a été entreposé dans un endroit exposé à des températures basses. Si l’appareil doit être transporté pendant l’hiver, attendez environ 2 heures pour qu’il s’adapte à la température de la pièce avant de l’utiliser. • Les piles utilisées avec cet appareil contiennent des produits chimiques dangereux pour l’environnement. Ne les jetez pas avec les ordures ménagères. Accessoires Vérifiez que vous disposez bien des accessoires suivants. FUNCTION TV SOURCE POWER RECEIVER DVD SLEEP TV 1 2 4 5 7 8 3 6 9 DSP /EQ 0 MUTE TUNING /CH VOL REPEAT DISC MENU MENU TITLE MENU TOOLS INFO RETURN A EXIT B C D DIMMER GIGA S.VOL AUDIO UPSCALE S/W LEVEL TUNER MEMORY MO/ST USB REC P.BASS Câble vidéo Antenne FM Guide de l’utilisateur Télécommande/Piles (AAA) Prise Péritel Français HT-D450-ZF-FR-1228.indd 3 3 2011-12-28 5:11:59 Consignes de sécurité Manipulation et rangement des disques - Précautions De petites éraflures sur un disque risquent de réduire la qualité du son et de l’image ou de les faire sauter. Prenez garde à ne pas rayer les disques lorsque vous les manipulez. Manipulation des disques • Ne touchez pas la face de lecture du disque. • Tenez le disque par les tranches afin de ne pas laisser de traces de doigts sur la surface. • Ne collez pas de papier ou de ruban adhésif sur le disque. Rangement des disques • N’exposez pas les disques à la lumière directe du soleil. • Rangez-les dans un endroit frais et aéré. • Rangez-les dans des pochettes propres. Positionnez-les verticalement. ✎ REMARQUE Évitez les salissures sur les disques. N’insérez jamais de disques fendus ou rayés. Manipulation et rangement des disques Si un disque présente des traces de doigts, nettoyez-le à l’aide d’un peu de nettoyant doux dilué dans de l’eau et essuyez avec un chiffon doux. • Lors du nettoyage, essuyez doucement de l’intérieur vers l’extérieur du disque. ✎ REMARQUE De la condensation peut de former lorsque de l’air chaud entre en contact avec des parties froides situées à l’intérieur de l’appareil. En cas de condensation à l’intérieur de l’appareil, celui-ci risque de ne pas fonctionner correctement. Si cela se produit, retirez le disque et attendez une à deux heures en laissant l’appareil sous tension. • Fabriqué sous licence sous les brevets américains Nº : 5 956 674 ; 5 974 380 ; 6 487 535 et autres brevets américains et internationaux émis et en attente. DTS, le symbole, et DTS et le symbole qui lui est associé sont des marques déposées, et les logos DTS Digital Surround et DTS sont des marques déposées de DTS, Inc. Product includes software. © DTS, Inc. Tous droits réservés. • À PROPOS DE VIDÉO DIVX : DivX® est un format vidéo numérique créé par DivX, Inc. Ceci est un appareil DivX Certified® qui lit les vidéos au format DivX. Reportez-vous au site Web à l'adresse www.divx.com pour obtenir plus d’informations et consulter les outils logiciels permettant de convertir les fichiers au format de vidéo DivX. À PROPOS DE LA VIDÉO À LA DEMANDE DIVX : Cet appareil DivX Certified® doit être enregistré pour lire les films vidéo à la demande (VOD) DivX disponibles dans le commerce. Pour générer le code d’enregistrement, il faut accéder à la section DivX VOD dans le menu de configuration de l’appareil. Consultez le site Web vod.divx.com afin d’obtenir de plus amples informations sur les étapes à suivre pour terminer la procédure. DivX Certified® (certifié DivX®) pour lire des vidéos DivX®, y compris des contenus premium. DivX®, DivX Certified® et les logos qui leur sont associés sont des marques déposées de DivX, Inc. et font l’objet d’une licence. Ce format est couvert par un ou plusieurs des brevets américains suivants : 7,295,673 ; 7,460,668 ; 7,515,710 ; 7,519,274 • HDMI, le logo HDMI Logo et High-Definition Multimedia Interface sont des marques commerciales ou déposées de HDMI Licensing LLC aux États-Unis et dans d'autres pays. • Ce produit intègre la technologie de protection contre la copie qui est protégée par les brevets américains et d’autres droits de propriété intellectuelle détenus par Rovi Corporation. Il est interdit de procéder à l’ingénierie inverse ou au désassemblage de l’appareil. Droit d’auteur © 2011 Samsung Electronics Co., Ltd. Tous droits réservés. Licence Protection contre la copie • Dolby, Pro Logic et le symbole représentant deux D sont des marques déposées de Dolby Laboratories. 4 • De nombreux disques DVD sont pourvus de protection contre la copie. Par conséquent, vous devez uniquement brancher votre appareil directement à votre téléviseur, et non à un magnétoscope. Le fait de raccorder l’appareil à un magnétoscope provoque une image déformée avec des disques DVD protégés contre la copie. Français HT-D450-ZF-FR-1228.indd 4 2011-12-28 5:12:00 Table des matières CONSIGNES DE SÉCURITÉ 2 PRISE EN MAIN 7 BRANCHEMENTS 15 22 Avertissements de sécurité Précautions Accessoires Manipulation et rangement des disques - Précautions Licence Droit d’auteur Protection contre la copie 7 7 11 11 12 13 Icones utilisées dans ce guide Types et caractéristiques des disques Description Panneau avant Panneau arrière Télécommande 15 18 20 21 Connexion des enceintes Raccordement de la sortie Video Out à votre téléviseur Connexion de l'antenne FM Raccordement audio des périphériques 22 22 23 23 23 23 23 23 24 24 25 25 25 26 26 26 26 26 26 27 27 27 27 27 27 Avant de commencer (Installation initiale) Réglage du menu Setup Affichage Format d’écran BD Wise Résolution Format HDMI Signal sortie vid. Audio Réglage Haut-Parleurs DRC (Compression dynamique) SYNC. AUDIO AUDIO HDMI EQ utilisateur Canal retour audio Système Installation initiale Enregistrement DivX(R) DivX(R) Désactivation Langue Sécurité Class. parental Mot de passe Assistance Informations sur le produit FRANÇAIS CONFIGURATION 2 3 3 4 4 4 4 Français HT-D450-ZF-FR-1228.indd 5 5 2011-12-28 5:12:01 Table des matières FONCTIONS DE BASE 28 FONCTIONS AVANCÉES 28 28 29 29 33 35 Lecture d’un disque Lecture de CD audio (CD-DA)/MP3/WMA Lecture de fichiers JPEG Utilisation de la fonction de lecture Mode sonore Écoute de la radio 36 36 Fonction USB Enregistrement sur périphérique USB 37 38 39 Dépannage Liste des codes de langue Caractéristiques 36 INFORMATIONS COMPLÉMENTAIRES 37 • Les figures et illustrations de ce manuel d’utilisation sont fournies à titre de référence et peuvent différer de l’apparence réelle de l’appareil. • Des frais d'administration peuvent vous être facturés si a. un technicien intervient à votre demande et que le produit ne comporte aucun défaut (c.-à-d; si vous n'avez pas pris la peine de lire le présent manuel d'utilisation) b. vous amenez le produit dans un centre de réparation alors qu'il ne comporte aucun défaut (c.-à-d; si vous n'avez pas pris la peine de lire le présent manuel d'utilisation). • Le montant de ces frais d'administration vous sera signifié avant la réalisation de toute prestation ou visite à domicile. 6 Français HT-D450-ZF-FR-1228.indd 6 2011-12-28 5:12:01 Assurez-vous de consulter les définitions des termes suivants avant de lire le guide d’utilisation. Icône d B A G D Terme DVD Définition Il s’agit d’une fonction disponible avec les disques DVD-Vidéo ou DVD±R/±RW ayant été enregistrés et finalisés en mode vidéo. Types et caractéristiques des disques Code de région Cet appareil ainsi que les disques sont codés par région. Ces codes régionaux doivent correspondre pour que le disque puisse être lu. Si les codes ne correspondent pas, le disque ne pourra pas être lu. Type de disque Code de région Région CD Il s’agit d’une fonction disponible avec un CD de données (CD DA, CD-R/-RW). 1 États-Unis, territoires des ÉtatsUnis et Canada MP3 Il s’agit d’une fonction disponible avec les disques CD-R/-RW. 2 Europe, Japon, MoyenOrient, Égypte, Afrique du Sud, Groenland 3 Taiwan, Corée, Philippines, Indonésie, Hong Kong JPEG Il s’agit d’une fonction disponible avec les disques CD-R/-RW. 4 Mexique, Amérique du Sud, Amérique centrale, Australie, Nouvelle Zélande, Îles du Pacifique, Caraïbes 5 Russie, Europe de l’Est, Inde, la plupart des pays d’Afrique, Corée du Nord, Mongolie 6 Chine DivX Il s’agit d’une fonction disponible avec les disques MPEG4 (DVD±R/±RW, CDR/-RW). Indique un cas où une fonction ne peut pas être exécutée ou des réglages pourraient être annulés. ! ATTENTION ✎ REMARQUE Conseils ou instructions fournis pour vous aider à exécuter chaque fonction. Touche de raccourci Permet d’accéder directement et facilement à une fonction via la simple pression du bouton de la télécommande spécifié. DVD-VIDEO Français HT-D450-ZF-FR-1228.indd 7 Prise en main Icones utilisées dans ce guide 01 Prise en main 7 2011-12-28 5:12:01 Prise en main Types de disques pouvant être lus Types de disques et marques (logos) Signaux enregistrés Dimensions du disque 12 cm AUDIO + DVD-VIDEO VIDÉO 8 cm Temps de lecture maxi. Environ 240 min. (une face) Environ 480 min. (double face) Environ 80 min. (une face) Environ 160 min. (double face) 12 cm 74 min. 8 cm 20 min. 12 cm - 8 cm - AUDIO CD AUDIO AUDIO DivX + VIDÉO N’utilisez pas les types de disques suivants • Les disques LD, CD-G, CD-I, CD-ROM, DVD-ROM et DVDRAM ne peuvent pas être lus par cet appareil. Si vous essayez de lire ces types de disques, le message <WRONG DISC FORMAT (Format de disque incorrect)> s’affiche sur l’écran du téléviseur. • Les disques DVD achetés à l’étranger risquent de ne pas être lus par cet appareil. Si vous essayez de les lire, le message <Wrong Region. Please check Disc. (Mauvaise région. Vérif. disque.)> s’affiche sur l’écran du téléviseur. Types et formats des disques Cet appareil ne prend pas en charge les fichiers sécurisés (DRM). Disques CD-R • Il est possible que certains disques CD-R ne puissent pas être lus selon l’appareil ayant servi à l’enregistrer (graveur de CD, PC) et l’état du disque. • Utilisez des disques CD-R 650 Mo/74 minutes. N’utilisez pas de disques CD-R de plus de 700 Mo/80 minutes car il est possible qu’ils ne puissent pas être lus. • Il est possible que certains supports CD-RW (réinscriptibles) ne puissent pas être lus. • Seuls les disques CD-R correctement finalisés peuvent être lus intégralement. Si la session est fermée alors que le disque n’est pas finalisé, vous risquez de ne pas pouvoir lire le disque intégralement. 8 Disques MP3 CD-R • Seuls les disques CD-R contenant des fichiers MP3 au format ISO 9660 ou Joliet peuvent être lus. • Les noms des fichiers MP3 ne doivent contenir aucun espace ni caractère spécial (. / = +). • Utilisez des disques enregistrés à une vitesse de compression/décompression supérieure à 128 Kbits/s. • Seuls les fichiers possédant les extensions « mp3 » et « MP3 » peuvent être lus. • Seuls les disques gravés en multisessions consécutives peuvent être lus. Si un disque multisession contient. Un segment vierge, il pourra être lu uniquement jusqu'au segment vierge. • Si un disque n’est pas finalisé, l’appareil mettra plus de temps à démarrer la lecture et il est possible que tous les fichiers enregistrés ne soient pas lus. • Pour les fichiers encodés au format VBR (Variable Bit Rate), c’est-à-dire les fichiers ayant à la fois un débit binaire faible et un débit binaire élevé (ex. : 32 Kbits/s à 320 Kbits/s), le son risque de sauter lors de la lecture. • Un maximum de 500 pistes par CD peut être lu. • Un maximum de 300 dossiers par CD peut être lu. Disques JPEG CD-R • Seuls les fichiers possédant l’extension « jpg » peuvent être lus. • Si un disque n’est pas finalisé, l’appareil mettra plus de temps à démarrer la lecture et il est possible que tous les fichiers enregistrés ne soient pas lus. • Seuls les disques CD-R contenant des fichiers JPEG au format ISO 9660 ou Joliet peuvent être lus. • Les noms des fichiers JPEG doivent contenir 8 caractères maximum et ne comporter aucun espace ni caractère spécial (. / = +). • Seuls les disques gravés en multisessions consécutives peuvent être lus. Si un disque multisession contient un segment vierge, il pourra être lu uniquement jusqu'au segment vierge. • Un maximum de 999 images peut être enregistré dans un dossier. • Lors de la lecture d’un CD d’images Kodak/Fuji, seuls les fichiers JPEG contenus dans le dossier d’images peuvent être lus. • Il est possible que les disques d’images autres que les CD d’images Kodak/Fuji soient plus longs au démarrage de la lecture ou ne soient pas lus du tout. Français HT-D450-ZF-FR-1228.indd 8 2011-12-28 5:12:01 01 • Les mises à jour logicielles pour les formats incompatibles ne sont pas prises en charge. (Exemple : QPEL, GMC, résolution supérieure à 800 x 600 pixels, etc.) • Si un disque DVD-R/-RW n’a pas été enregistré correctement au format DVD Vidéo, il ne pourra pas être lu. • Cet appareil n’acceptant que les formats d’encodage autorisés par DivX Networks, Inc., il est possible qu’un fichier DivX créé par l’utilisateur ne puisse pas être lu. Prise en main DVD±R/±RW, CD-R/-RW Formats pris en charge (DivX) Cet appareil ne prend en charge que les formats de support suivants. Si aucun des formats, vidéo ou audio, n’est pris en charge, l’utilisateur pourrait être privé de son et les images pourraient être médiocres. Formats vidéo pris en charge Format AVI WMV Versions prises en charge DivX3.11~DivX5.1 V1/V2/V3/V7 Formats audio pris en charge Format Débit binaire Fréquence d’échantillonnage MP3 80 à 320 Kbits/s WMA 56 à 128 Kbits/s AC3 128 à 384 Kbits/s 44,1/48 kHz DTS 1,5 Mbits/s 44,1 kHz 44,1 kHz • Les fichiers DivX, y compris les fichiers audio et vidéo, créés au format DTS ne peuvent accepter que 6 Mbits/s maximum. • Format de l’image : bien que la résolution DivX par défaut soit 640x480 pixels, cet appareil peut prendre en charge un format allant jusqu'à 720x480 pixels. Les résolutions d’écran TV supérieures à 800 ne sont pas prises en charge. • Si la fréquence d’échantillonnage de votre disque est supérieure à 48 kHz ou à 320 Kbits/s, vous pouvez percevoir des tremblements à l’écran pendant la lecture. • Les parties ayant un format d’image élevé risquent de ne pas être lues lors de la lecture d’un fichier DivX. Français HT-D450-ZF-FR-1228.indd 9 9 2011-12-28 5:12:02 Prise en main Notes sur la connexion USB Appareils pris en charge : Supports de stockage USB, lecteur MP3, caméra numérique 14) Formats de fichiers pris en charge Format Image fixe Musique Film 1) Affichage ou fonctionnement non garanti pour les dossiers ou fichiers dont le nom excède 10 caractères. Nom de fichier JPG MP3 WMA WMV DivX Extension de fichier JPG .JPEG .MP3 .WMA .WMV .AVI 2) Un fichier de sous-titre supérieur à 300 Ko ne peut pas s’afficher correctement. Débit binaire – 80 à 320 Kbits/s 56 à 128 Kbits/s 4 Mbits/s 4 Mbits/s Version – – V8 V1,V2, V3,V7 DivX3.11~ DivX5.1 Pixel 640x480 – – 720x480 Fréquence d’échantillonnage – 44,1 kHz 44,1 kHz 44,1 kHz à 48 kHz 3) Certains types de périphériques USB, de caméras numériques et de lecteurs de carte USB ne sont toutefois pas pris en charge. 4) Les systèmes de fichiers FAT16 et FAT32 ne sont pas pris en charge. 5) Les fichiers photo (JPEG), musique (MP3, WMA) et vidéo doivent porter des noms en coréen ou en anglais. Autrement, le fichier risque de ne pas être lu. 6) Effectuez la connexion directement au port USB du produit. La connexion via un autre câble peut provoquer des problèmes de compatibilité USB. 7) L’insertion de plusieurs périphériques de mémoire dans un lecteur multicarte peut entraîner un dysfonctionnement. 8) Le protocole PTP pour caméras numériques n’est pas pris en charge. 9) Ne déconnectez pas le périphérique USB durant un processus de « lecture ». 10) Plus la résolution de l’image est élevée, plus lent le délai d'affichage de l'image. 11) Les fichiers MP3/WMA ou vidéo de type DRM téléchargés depuis un site commercial ne sont pas lus par l’appareil. 12) Le périphérique de disque dur externe n’est pas pris en charge. 13) La tension maximale prise en charge par le port USB connecté au périphérique USB externe est de 500 mA (5 V CC). 10 Français HT-D450-ZF-FR-1228.indd 10 2011-12-28 5:12:02 01 Prise en main Description Panneau avant 1 2 3 4 5 6 7 8 1 TIROIR DISQUE Insérez le disque ici. 2 AFFICHAGE Affiche le statut de lecture, l’heure, etc. 3 CAPTEUR DE LA TÉLÉCOMMANDE Détecte les signaux provenant de la télécommande. 4 TOUCHE OUVRIR/FERMER ( Permet d’ouvrir et de fermer le tiroir disque. 5 TOUCHE DE FONCTION ( 6 TOUCHE ARRÊT ( 7 TOUCHE LECTURE/PAUSE ( 8 TOUCHE DE RÉGLAGE DU VOLUME ( 9 TOUCHE DE MISE SOUS TENSION ( 10 PORT USB ) 9 10 mode change dans l’ordre suivant : DVD/CD ➞ D.IN ➞ AUX ➞ USB ➞ FM ) Interrompt la lecture du disque. ) Permet de lire le disque ou de l’interrompre momentanément. ) , ) ) Réglage du volume Permet de mettre l’appareil sous et hors tension. Permet de lire des fichiers contenus sur des périphériques de stockage USB externes tels que des lecteurs MP3, des cartes mémoire flash USB, etc. Français HT-D450-ZF-FR-1228.indd 11 11 2011-12-28 5:12:02 Prise en main Panneau arrière 1 2 3 4 5 6 7 VIDEO OUT SPEAKERS OUT DIGITAL AUDIO IN FM ANT HDMI OUT FA NET (Only For Service) OPTICAL SURROUND SUBWOOFER 8 9 SURROUND AUX IN COMPONENT OUT Le ventilateur reste en activité tant que l'appareil est sous tension. Lors de l’installation de l’appareil, prévoyez un espace d’au moins 10 cm de chaque côté du ventilateur. 1 VENTILATEUR 2 3 CONNECTEURS DE SORTIE DES ENCEINTES PRISE D'ENTRÉE OPTIQUE NUMÉRIQUE EXTERNE (DIGITAL AUDIO IN) 4 PRISE DE SORTIE HDMI (HDMI OUT) À l’aide d’un câble HDMI ; raccordez cette sortie HDMI à la borne d'entrée HDMI de votre téléviseur pour une image optimale. 5 PRISES AUX IN Permet de raccorder la sortie analogique à 2 canaux d'un périphérique (un magnétoscope par exemple). 6 PRISE DE SORTIE VIDÉO (VIDEO OUT) Permet de raccorder la prise de sortie VIDEO OUT de cet appareil à la prise d'entrée VIDEO IN de votre téléviseur. 7 PRISES DE SORTIE VIDÉO COMPOSANTES Permet de raccorder l’appareil aux prises d'entrée vidéo composantes d'un téléviseur. 8 FA NET (Uniquement pour les réparations) Ceci est utilisé pour le service de réparations. 9 PRISE D'ANTENNE FM Permet de brancher l'antenne FM. 12 Permettent de connecter les enceintes avant, centrale et ambiophoniques ainsi que le caisson de graves. Permet de raccorder un appareil périphérique à sortie numérique. Français HT-D450-ZF-FR-1228.indd 12 2011-12-28 5:12:03 01 Prise en main Télécommande Fonctions de la télécommande FUNCTION TV SOURCE POWER Permet de mettre l’appareil sous et hors tension. Si vous voulez basculer en mode téléviseur, appuyez sur le bouton TV. Si vous souhaitez basculer en mode Home cinéma, appuyez sur le bouton DVD. Appuyez sur les touches numériques pour activer les options. RECEIVER DVD SLEEP TV Il s’agit d’une touche de sélection de mode. ou Appuyez pour sélectionner le mode vidéo du téléviseur. Permet de régler l'heure de mise en veille de l'appareil. Permet d’ouvrir et de fermer le tiroir disque. 1 2 3 4 5 6 7 8 9 DSP /EQ Permet de sélectionner le mode audio Dolby Pro Logic II souhaité. Permet de sélectionner le mode audio (DSP ou EQ). 0 Permet de revenir à la piste précédente ou de passer à la suivante. Permet d'arrêter/de démarrer la lecture d'un disque. Permet de revenir en arrière ou d’avancer. Permet d’interrompre momentanément la lecture d'un disque. Permet de couper momentanément le son. MUTE Permet de régler le volume. TUNING /CH VOL REPEAT Appuyez sur ceci pour revenir au menu d’accueil. Permet de consulter le menu du disque. Permet de modifier la langue de doublage/des sous-titres, l’angle, etc. DISC MENU MENU TITLE MENU Autorisez l’accès aux fonctions communes du produit, telles que la Liste de photos. Permet de régler la luminosité de l’affichage. Permet d’activer et de désactiver la fonction GIGA Sound. Permet de régler le niveau du caisson de graves. permet de prérégler les stations FM. Permet de répéter la lecture d’un titre, d’un chapitre, d’une plage ou d’un disque. Permet d’accéder au menu Title. TOOLS INFO RETURN EXIT Permet de sélectionner les options de menu affichées à l’écran et de changer les valeurs de menu. Permet de revenir au menu précédent. Permet de rechercher les stations FM actives et de changer de canaux. Permet d’afficher le statut du disque (ou fichier) en cours de lecture. Permet de quitter le menu. C D DIMMER A GIGA B S.VOL AUDIO UPSCALE S/W LEVEL TUNER MEMORY MO/ST USB REC P.BASS Permet de sélectionner le mode P.BASS ou MP3 Enhancement. Permet de réguler et de stabiliser le volume pour éviter un changement radical de celui-ci. Permet de démarrer l'enregistrement sur le périphérique USB. Permet de sélectionner MONO ou STEREO pour la diffusion de la radio. Français HT-D450-ZF-FR-1228.indd 13 13 2011-12-28 5:12:03 Prise en main Installation des piles dans la télécommande * Type de piles : AAA Liste des codes par marque de téléviseur Marque Admiral (M.Wards) A Mark Anam AOC Bell & Howell (M.Wards) Code Marque 56, 57, 58 MTC Code 18 01, 15 01, 02, 03, 04, 05, 06, 07, 08, 09, 10, 11, 12, 13, 14 01, 18, 40, 48 NEC 18, 19, 20, 40, 59, 60 Nikei 03 Onking 03 57, 58, 81 Onwa 59, 60 Panasonic Penney 03 Candle 18 Cetronic 03 Philco Citizen 03, 18, 25 Philips Cinema 97 Pioneer 06, 07, 08, 09, 54, 66, 67, 73, 74 18 03, 15, 17, 18, 48, 54, 59, 62, 69, 90 15, 17, 18, 40, 48, 54, 62, 72 63, 66, 80, 91 Classic 03 Portland 15, 18, 59 Concerto 18 Proton 40 Contec 46 Quasar 06, 66, 67 Coronado 15 03, 05, 61, 82, 83, 84 Radio Shack RCA/ 17, 48, 56, 60, 61, 75 Craig Croslex 62 Proscan Realistic Crown 03 Sampo Vous pouvez contrôler certaines fonctions de votre téléviseur à l’aide de cette télécommande. Curtis Mates 59, 61, 63 Samsung CXC Sanyo Pour contrôler un téléviseur à l’aide de la télécommande Daewoo Scott 03, 40, 60, 61 Daytron 03 02, 03, 04, 15, 16, 17, 18, 19, 20, 21, 22, 23, 24, 25, 26, 27, 28, 29, 30, 32, 34, 35, 36, 48, 59, 90 40 40 00, 15, 16, 17, 40, 43, 46, 47, 48, 49, 19, 61, 65 Sears 15, 18, 19 Dynasty 03 15, 57, 64 Emerson 03, 15, 40, 46, 59, 61, 64, 82, 83, 84, 85 Fisher 19, 65 Sharp Signature 2000 (M.Wards) Sony 50, 51, 52, 53, 55 03, 40 Brocsonic ✎ REMARQUE Placez les piles dans la télécommande en respectant les polarités : (+) avec (+) et (–) avec (–). Remplacez toujours les deux piles en même temps. N’exposez pas les piles à la chaleur ou à une flamme. La portée de la télécommande est d'environ 7 mètres en ligne droite. Réglage de la télécommande 1. Appuyez sur la touche TV pour régler la télécommande sur le mode TV. 2. Appuyez sur la touche POWER pour allumer le téléviseur. 3. Tout en maintenant la touche POWER enfoncée, saisissez le code correspondant à la marque de votre téléviseur. • Si plusieurs codes correspondant à votre téléviseur figurent dans le tableau, saisissez-les les uns après les autres pour trouver le code approprié. • Exemple : Pour un téléviseur Samsung Tout en maintenant le bouton POWER enfoncé, utilisez les touches numériques pour entrer 00, 15, 16, 17 et 40. 4. Si le téléviseur s’éteint, cela signifie que le réglage est terminé. • Vous pouvez utiliser les touches TV POWER, VOLUME, CHANNEL, MENU ainsi que les touches numériques (0 à 9). ✎ REMARQUE La télécommande peut ne pas fonctionner ou certaines opérations peuvent ne pas être disponibles sur des téléviseurs de certaines marques. Par défaut, la télécommande fonctionne sur les téléviseurs Samsung. 14 18, 59, 67, 76, 77, 78, 92, 93, 94 03, 19 57, 58 Funai 03 Soundesign Futuretech General Electric (GE) 03 06, 40, 56, 59, 66, 67, 68 Spectricon 01 SSS 18 Hall Mark 40 Sylvania Hitachi 15, 18, 50, 59, 69 Symphonic 18, 40, 48, 54, 59, 60, 62 61, 95, 96 Inkel 45 Tatung 06 JC Penny 56, 59, 67, 86 Techwood 18 JVC 70 Teknika 03, 15, 18, 25 KTV 59, 61, 87, 88 TMK 18, 40 KEC 03, 15, 40 Toshiba 19, 57, 63, 71 KMC 15 01, 15, 16, 17, 37, 38, 39, 40, 41, 42, 43, 44 Vidtech 18 Videch 59, 60, 69 18 Wards 15, 17, 18, 40, 48, 54, 60, 64 Yamaha 18 York 40 LG (Goldstar) Luxman Marantz 19, 54, 56, 59, 60, 62, 63, 65, 71 15, 17, 18, 48, 54, 59, 60, 62, 72, 89 40, 54 Yupiteru 03 Matsui 54 Zenith 58, 79 LXI (Sears) Magnavox MGA Mitsubishi/ MGA 18, 40 Zonda 01 18, 40, 59, 60, 75 Dongyang 03, 54 Français HT-D450-ZF-FR-1228.indd 14 2011-12-28 5:12:04 02 Connexions Connexions Cette section décrit différentes méthodes de connexion de l’appareil aux autres périphériques externes. Avant de déplacer ou d'installer l'appareil, assurez-vous de le mettre hors tension et de débrancher le cordon d'alimentation. Connexion des enceintes Position de l’appareil SW Placez-le sur un pied, sur la tablette d'un meuble, ou sous le support du téléviseur. 2,5 à 3 fois la taille de l’écran du téléviseur Choix de la position d'écoute La position d'écoute (distance entre l'utilisateur et le téléviseur) doit être située à environ 2,5 à 3 fois la taille de l'écran du téléviseur. Exemple : Téléviseurs 32" : 2 à 2,4 m Téléviseurs 55" : 3,5 à 4 m Enceintes avant ei f Enceinte centrale Placez ces enceintes devant votre position d'écoute, face vers l'intérieur (environ 45 degrés) et dans votre direction. Placez-les de façon à ce que les haut-parleurs d'aigus soient à la hauteur de vos oreilles. Alignez le devant des enceintes avant avec le devant de l'enceinte centrale ou légèrement plus en avant. Il est préférable de l'installer à la même hauteur que les enceintes avant. Vous pouvez aussi l'installer directement sur ou sous le téléviseur. Placez-les sur les côtés de votre position d'écoute. Si vous manquez d’espace, placez-les face à face. Placez-les à environ 60 à 90 cm au-dessus de vos oreilles, face légèrement vers le bas. Enceintes hj ambiophoniques aux enceintes avant et centrale, les enceintes ambiophoniques * Contrairement sont principalement utilisées pour émettre les effets sonores; elles ne reproduisent pas de son en permanence. Caisson de graves g Son emplacement n’est pas d’une importance cruciale. Vous pouvez le placer où vous voulez. ! ATTENTION Ne laissez pas les enfants jouer avec les enceintes ou à proximité. Ils pourraient se blesser en cas de chute de l’une d’elles. Lorsque vous branchez les fils aux enceintes, assurez-vous de respecter les polarités (+/-). Conservez le caisson de graves hors de portée des enfants afin d'éviter qu'ils ne mettent leurs mains ou des objets dans l’évent (ouverture) du caisson. Ne suspendez pas le caisson de graves au mur par l’évent (ouverture). ✎ REMARQUE Si vous placez une enceinte près de votre téléviseur, la couleur de l’écran peut s’altérer en raison du champ magnétique généré par l’enceinte. Dans ce cas, éloignez l’enceinte. Français HT-D450-ZF-FR-1228.indd 15 15 2011-12-28 5:12:05 Connexions Composants des enceintes HT-D450 (G) (D) AVANT (G) (D) AMBIOPHONIQUE CENTRALE Composants des enceintes CAISSON DE GRAVES CÂBLE D’ENCEINTE Enceintes assemblées HT-D453 HT-D453 (G) (D) VIS (5×15) : x2 VIS (4×20) : x8 ENCEINTE CENTRALE AVANT CENTRALE SOCLE (G) (D) AMBIOPHONIQUE BASE DU SOCLE CÂBLE CAISSON DE D’ENCEINTE GRAVES ENCEINTE AVANT HT-D455 ENCEINTE AMBIOPHONIQUE CAISSON DE GRAVES HT-D455 (G) (D) VIS (5×15) : x4 VIS (4×20) : x16 AVANT SOCLE (G) (D) AMBIOPHONIQUE ENCEINTE CENTRALE CENTRALE BASE DU SOCLE CAISSON DE GRAVES ENCEINTE AVANT/ AMBIOPHONIQUE CAISSON DE GRAVES CÂBLE D’ENCEINTE ✎ REMARQUE Reportez-vous à la page 17 pour installer les enceintes sur un socle Tallboy. 16 Français HT-D450-ZF-FR-1228.indd 16 2011-12-28 5:12:05 02 Connexions Installations des enceintes sur le socle Tallboy * HT-D453 uniquement – Enceintes avant * HT-D455 uniquement – Enceinte avant/ambiophonique 1. Retournez la base du socle et fixez-la au socle. 2. Servez-vous d'un tournevis et insérez de petites vis (4*20, pour la connexion du pied et de la base du pied) dans le sens des aiguilles d'une montre dans les quatre trous marqués, tel qu'indiqué dans l'illustration. ! ATTENTION : Lorsque vous utilisez un tournevis dynamométrique, veillez à ne pas appliquer de force excessive. Vous risqueriez de le faire tourner à vide et de l'endommager. (tournevis dynamométrique - sous les 15 kgp/cm) 3. Installez l’enceinte supérieure sur le support assemblé. 4. À l’aide d’un tournevis, insérez une autre grosse vis (5*15, pour le raccordement de l'enceinte et du pied) dans le trou situé à l’arrière de l’enceinte et vissez-la dans le sens des aiguilles d’une montre. 5. Voici comment se présente le dispositif après l’installation de l'enceinte. Suivez ces étapes pour installer d'autres enceintes. 1 2 Base du socle Socle 3 Enceinte 4 Socle 5 Connexion des enceintes 1. Appuyez sur la languette de la borne située à l’arrière de l'enceinte. 2. Insérez le fil noir dans la borne noire (–) et le fil rouge dans la borne rouge (+), puis relâchez la languette. 3. Branchez les fiches de contact situées à l’arrière de l’appareil en faisant concorder les couleurs des fiches et des prises des enceintes. Noir Rouge Pour le modèle HT-D450 Enceinte centrale Enceinte avant (D) Enceinte avant (G) Enceinte ambiophonique (D) Enceinte ambiophonique (G) Caisson de graves * Reportez-vous à la page 16 pour les enceintes des modèles HT-D453/D455. Français HT-D450-ZF-FR-1228.indd 17 17 2011-12-28 5:12:30 Connexions Raccordement de la sortie Video Out à votre téléviseur Sélectionnez l'une des quatre méthodes de connexion à votre téléviseur. MÉTHODE 3 SCART IN MÉTHODE 4 (fournie) VIDEO OUT GITAL DIO IN FM ANT HDMI OUT FA NET (Only For Service) TICAL AUX IN COMPONENT OUT Vert Blue Rouge MÉTHODE 2 MÉTHODE 1 MÉTHODE 1 : HDMI Connectez la prise de sortie HDMI OUT située à l’arrière de l'appareil à la prise d’entrée HDMI IN de votre téléviseur au moyen du câble HDMI (non fourni). MÉTHODE 2 : Vidéo composant Si votre téléviseur est équipé d’entrées Component Video (Vidéo composant), connectez les prises de sortie COMPONENT OUT (Y, PB et PR) situées à l’arrière de l’appareil aux prises d’entrée Vidéo Composant de votre téléviseur à l’aide d’un câble Vidéo composant (non fourni). MÉTHODE 3 : Péritel Se il televisore è dotato di ingresso SCART, collegare il cavo video fornito tra il connettore VIDEO OUT sul retro del prodotto e il connettore VIDEO sull'adattatore SCART, quindi collegare il connettore dell'adattatore SCART al connettore SCART IN sul televisore. MÉTHODE 4 : Vidéo Composite Connectez la prise de sortie VIDEO OUT située à l’arrière de l'appareil à la prise d’entrée VIDEO IN de votre téléviseur au moyen du câble vidéo fourni. 18 Français HT-D450-ZF-FR-1228.indd 18 2011-12-28 5:12:32 02 Les résolutions disponibles pour la sortie HDMI sont les suivantes : 480p(576p), 720p, 1080i/1080p. Reportez-vous à la page 23 pour le réglage de la résolution. Ce produit fonctionne en mode Balayage entrelacé 480i (576i) pour la sortie composant/composite. Après avoir terminé les raccordements vidéo, réglez la source d'entrée vidéo du téléviseur pour correspondre avec le mode de sortie vidéo de votre appareil. Mettez ce produit sous tension avant de régler la source d’entrée vidéo sur votre téléviseur. Reportez vous au guide d'utilisation de votre téléviseur pour plus de détails concernant le choix de la source d'entrée vidéo. Connexions ✎ REMARQUE ! ATTENTION Les signaux vidéo distribués à travers un magnétoscope peuvent être affectés par des systèmes de protection des droits d'auteur et l'image peut être déformée sur le téléviseur. FONCTION HDMI Fonction de détection HDMI automatique Si vous disposez d'un téléviseur Samsung prenant en charge la fonction CEC, la sortie vidéo du produit basculera automatiquement en mode HDMI en cas de connexion d’un câble HDMI alors que l’appareil est sous tension. • HDMI (High Definition Multimedia Interface) (Interface multimédia haute définition) • L'interface HDMI permet la transmission numérique de données vidéo et audio à l'aide d'une prise unique. Lorsque vous utilisez le HDMI, l'appareil transmet un signal audio et vidéo et affiche une image claire sur un téléviseur disposant d'une prise d'entrée HDMI. • Description du raccordement HDMI - L'interface HDMI transmet uniquement un signal numérique pur au téléviseur. - Si votre téléviseur ne prend pas en charge la technologie HDCP (High-bandwidth Digital Content Protection) (Protection du contenu numérique à large bande passante), des parasites peuvent apparaître à l'écran. • Qu'est-ce que la technologie HDCP ? • HDCP (Protection du contenu numérique à large bande passante) est un système de protection contre la copie du contenu DVD transmis par HDMI. Elle offre un lien numérique sécuritaire entre une source vidéo (ordinateur, DVD, etc.) et un dispositif d'affichage (téléviseur, projecteur, etc.). Le contenu est crypté à la source pour empêcher les copies non autorisées. Utilisation de la fonction Anynet+ (HDMI-CEC) Anynet+ est une fonction qui vous permet de commander les autres appareils Samsung à l’aide de la télécommande de votre téléviseur Samsung. Vous pouvez utiliser la fonction Anynet + en connectant cet appareil à un téléviseur SAMSUNG à l’aide d’un câble HDMI. Uniquement disponible pour les téléviseurs SAMSUNG prenant en charge la fonction Anynet+.) 1. Connectez l'appareil à un téléviseur Samsung à l'aide d'un câble HDMI. (Voir page 18) 2. Réglez la fonction Anynet+ sur votre téléviseur. (Pour de plus amples renseignements, reportez-vous au manuel d’instructions du téléviseur.) ✎ REMARQUE La fonction Anynet+ prend en charge quelques touches de la télécommande. Veuillez vérifier le logo Cette fonction n'est pas disponible si un câble HDMI ne prend pas en charge le CEC. Certaines résolutions de sortie HDMI ne sont pas compatibles avec certains téléviseurs. Veuillez vous reporter au manuel d'utilisation de votre téléviseur. (si votre téléviseur comporte le logo il prend en charge la fonction Anynet+.) Français HT-D450-ZF-FR-1228.indd 19 19 2011-12-28 5:12:34 Connexions Connexion de l'antenne FM Antenne FM (fournie) VIDEO OUT FM ANT HDMI OUT FA NET (Only For Service) AUX IN COMPONENT OUT 1. Connectez l’antenne FM fournie à la prise d'antenne FM. 2. Déplacez lentement le fil de l’antenne jusqu’à ce que vous trouviez un emplacement permettant une bonne réception. Fixez-le ensuite sur le mur ou sur toute autre surface rigide. ✎ REMARQUE Cet appareil ne capte pas les ondes AM. 20 Français HT-D450-ZF-FR-1228.indd 20 2011-12-28 5:12:34 02 Connexions Raccordement audio des périphériques VIDEO OUT SPEAKERS OUT FM ANT Blanc DIGITAL AUDIO IN HDMI OUT FA NET (Only For Service) OPTICAL D SUBWOOFER SURROUND Câble optique (non fourni) Décodeur AUX IN Rouge COMPONENT OUT Câble audio (non fourni) Si le périphérique analogique ne possède qu'une prise de sortie audio, raccordez-la soit à gauche ou à droite. Magnétoscope OPTICAL (PRISES OPTIQUES) AUX AUX : Raccordement d'un périphérique analogique Périphériques à signal analogique tels qu’un magnétoscope. 1. Raccordez AUX IN (Audio) situé à l'arrière de l'appareil à la sortie audio du périphérique analogique. • Assurez-vous de respecter les couleurs des prises de connexion. 2. Appuyez sur la touche FUNCTION pour sélectionner l'entrée AUX. • Le mode change dans l’ordre suivant : DVD/CD ➞ D.IN ➞ AUX ➞ USB ➞ FM ✎ REMARQUE Vous pouvez également raccorder la prise de sortie vidéo de votre magnétoscope au téléviseur et raccorder les prises de sortie audio du magnétoscope à cet appareil. OPTICAL (PRISES OPTIQUES) : Raccordement d’un périphérique numérique Pour le raccordement de périphériques à signal numérique tels que les décodeurs ou les récepteurs satellites : 1. Raccordez DIGITAL AUDIO IN (OPTICAL) situé à l'arrière de l'appareil à la sortie numérique du périphérique numérique. 2. Appuyez sur la touche FUNCTION pour sélectionner D.IN • Le mode change dans l’ordre suivant : DVD/CD ➞ D.IN ➞ AUX ➞ USB ➞ FM Français HT-D450-ZF-FR-1228.indd 21 21 2011-12-28 5:12:35 Configuration Avant de commencer (Installation initiale) 1. Appuyez sur la touche POWER lorsqu'il est connecté sur le téléviseur pour la première fois. L'écran Initial setting (Installation initiale) s’affiche. Initial settings > On-Screen Language Select a language for the on-screen displays Réglage du menu Setup L'étape pour y accéder peut différer en fonction du menu sélectionné. GUI (Interface utilisateur graphique) contenue dans ce manuel peut différer, en fonction de la version du micrologiciel. 1 DISC MENU MENU TITLE MENU English 한국어 TOOLS INFO Nederlands Français 3 Deutsch Italiano >Move " Select 2 RETURN A 2. Appuyez sur les touches ▲▼ pour sélectionner la langue souhaitée, puis sur la touche ENTRÉE. 3. Appuyez sur la touche ENTRÉE pour sélectionner la touche Départ. 4. Appuyez sur les touches ▲▼ pour sélectionner le format d’écran souhaité, puis sur la touche ENTRÉE. • Si le câble HDMI est branché au produit, le format écran n’apparaîtra pas. ✎ REMARQUE Si vous n’avez pas sélectionné de langue préférée dans les paramètres initiaux, une fenêtre de sélection de langue apparaîtra à l’écran lors du prochain démarrage du produit. La sélection de langue s’applique à l’ensemble des menus, comme suit : Menu OSD, Menu Disque, Audio, Sous-titre. Si vous revenez à l'écran précédent, appuyez sur la touche RETURN. Lorsque vous avez sélectionné une langue de menu, vous pouvez la changer en appuyant sur la touche ARRET () située sur la télécommande pendant plus de 5 secondes sans disque. Lorsque l'écran Initial setting (Installation initiale) n'apparaît pas, reportez-vous à Installation initiale. (voir page 26). 22 4 EXIT B C D 1 TOUCHE MENU : Permet d’afficher le menu d'accueil. 2 TOUCHE RETURN : Permet de revenir au menu de configuration. 3 TOUCHE ENTRÉE / DIRECTION Permet de déplacer le curseur et de sélectionner un élément. Permet de sélectionner l'élément actuellement sélectionné. Permet de confirmer le réglage. 4 TOUCHE EXIT : Permet de quitter le menu de configuration. Paramètres Function DVD/CD 1. Appuyez sur la touche POWER. 2. Appuyez sur les touches ◄► pour sélectionner Paramètres, puis sur la touche ENTRÉE. 3. Appuyez sur les touches ▲▼ pour sélectionner le menu souhaité, puis sur la touche ENTRÉE. 4. Appuyez sur les touches ▲▼ pour sélectionner le sous-menu souhaité, puis sur la touche ENTRÉE. 5. Appuyez sur les touches ▲▼ pour sélectionner l'élément souhaité, puis sur la touche ENTRÉE. 6. Appuyez sur la touche EXIT pour quitter le menu de configuration. Français HT-D450-ZF-FR-1228.indd 22 2011-12-28 5:12:37 03 ✎ REMARQUE Vous pouvez configurer diverses options d'affichage telles que le format d’écran, la résolution, etc. Format d’écran En fonction du type de téléviseur que vous possédez, vous pouvez souhaiter ajuster le réglage de l'écran. • 4:3 Recadrage Format sélectionné lorsque vous souhaitez voir une vidéo au format 16:9 émise par le DVD sans avoir les barres noires en haut et en bas, même si vous avez un téléviseur au format d'écran 4:3 (les parties extrêmes gauche et droite des images du film seront tronquées). • 4:3 Boîte aux lettres Format sélectionné lorsque vous souhaitez visionner un DVD en 16:9 alors que votre téléviseur dispose d'un écran 4:3. Des barres noires apparaissent en haut et en bas de l'écran. • 16:9 Large Vous pouvez voir la totalité de l'image 16:9 sur votre téléviseur écran large. Résolution Permet de régler la ré solution de sortie du signal vidéo HDMI. Le nombre dans 480p(576p), 720p, 1080i et 1080p indique le nombre de lignes de la vidéo. Le i et le p indiquent respectivement le balayage entrelacé et le balayage progressif. • • • • • 480p(576p) : génère 480 lignes en vidéo progressive. 720p : génère 720 lignes en vidéo progressive. 1080i : génère 1080 lignes en vidéo entrelacée. 1080p : génère 1080 lignes en vidéo progressive. BD Wise : Permet de régler automatiquement la résolution optimale lors de la connexion via HDMI à un téléviseur avec la fonction BD Wise. (L'élément de menu BD Wise apparaît uniquement si BD Wise est réglé sur ON (Oui).) ✎ REMARQUE ✎ REMARQUE Lorsque vous utilisez une source HDMI, l'écran est commuté automatiquement en mode 16:9 Large et le format d’écran est désactivé. Si un DVD est au format 4:3, vous ne pouvez pas le voir en écran panoramique. Les disques DVD étant enregistrés dans divers formats d'image, ils paraissent différents en fonction du logiciel, du type de téléviseur et du réglage de son format d’écran. BD Wise (Appareils Samsung uniquement) BD Wise est la toute dernière fonction d’interconnexion de Samsung. - Lorsque vous interconnectez les produits Samsung au moyen de BD-Wise via HDMI, la résolution optimale se règle automatiquement. • Oui : La résolution d'origine du disque DVD sera émise en direct sur le téléviseur. • Non : La résolution de sortie sera déterminée en fonction de la résolution précédemment réglée, sans tenir compte de la résolution du disque. La qualité de l’image sera ainsi optimisée en fonction du contenu (sur le disque, DVD, etc.) que vous souhaitez lire et de l’appareil ou de votre téléviseur Samsung compatible BD Wise. Si vous souhaitez changer la résolution en mode BD Wise, vous devez régler au préalable le mode BD sur Off (Désactivé). BD Wise sera désactivé si l’appareil est connecté à un dispositif qui ne prend pas en charge BD Wise. Si Composant ou Composite est connecté, la résolution prend en charge uniquement 480i(576i). En fonction du téléviseur, 1080P peut ne pas apparaître. Format HDMI Vous pouvez optimiser le réglage de la couleur à partir de la sortie HDMI. Sélectionnez un type de périphérique connecté. • Ecran : sélectionné si le raccordement au moniteur est effectué via HDMI. • Tv : sélectionné si le raccordement au téléviseur est effectué via HDMI. Signal sortie vid. Les mêmes normes TV ne s’appliquent pas dans tous les pays. Vous avez le choix entre NTSC et PAL. • NTSC : Vous pouvez sélectionner le format vidéo NTSC • PAL : Vous pouvez sélectionner le format vidéo PAL Français HT-D450-ZF-FR-1228.indd 23 Configuration Affichage 23 2011-12-28 5:12:38 Configuration Réglage des options Avant/Eq. surround Vous pouvez choisir entre 0 et -6. Plus vous vous rapprochez de -6, plus le volume diminue. Audio Réglage Haut-Parleurs Taille des enceintes Vous pouvez régler la taille de l'enceinte du centre, des enceintes arrière ainsi que la tonalité d’essai dans ce mode. Paramètres Réglage Haut-Parleurs Taille haut-parleur ► Réglages des options Centre / Surround / Niv surround Le niveau de volume peut être ajusté par paliers de +6dB à –6dB. Plus vous vous rapprochez de +6 dB, plus le volume augmente. Plus vous vous rapprochez de -6 dB, plus le volume diminue. BAL avant Delai Delai Tonalité d'essai mDéplacer : Non " Sélect. ' Retour " Sélect. ' Retour • Sur les enceintes avant, le mode est réglé sur Petit. • Pour le caisson de graves, le mode est réglé sur Présent. • Sur les enceintes centrale et ambiophoniques, il est possible de basculer entre les modes Petit ou Aucun. - Petit : sélectionnez cette option lorsque vous utilisez les enceintes. - Aucun : sélectionnez cette option lorsque aucune enceinte n’est connectée. ✎ REMARQUE Le mode d'enceinte peut varier en fonction des réglages Dolby Pro Logic et Stéréo Si les enceintes ne peuvent pas être placées à égale distance par rapport à votre position d’écoute, vous avez la possibilité de régler le temps de retard des signaux audio émis depuis les enceintes centrale et ambiophoniques. Dans ce mode, vous pouvez aussi régler l’option Tonalité d'essai. Réglage du temps de propagation des enceintes Lorsque le son ambiophonique 5.1CH est émis, vous pouvez profiter de la meilleure qualité sonore si la distance entre vous et chacune des enceintes est identique. Étant donné que les sons n’arrivent pas tous simultanément au point d'écoute en raison de l’emplacement des enceintes, il est possible de compenser ce phénomène en ajoutant un effet de retard à l’enceinte centrale et aux enceintes ambiophoniques. BAL avant Paramètres Delai Vous pouvez ajuster la balance et le niveau de chaque enceinte. Avant Paramètres BAL avant : 00mSEC Surround : 10mSEC Caisson basses Équilibre avant dB L R dB Eq. surround dB L R dB Niv. centr dB Niv surround dB Niv. grave dB <Changer " Sélect. ' Retour mDéplacer " Sélect. ' Retour Appuyez sur les touches ▲▼pour sélectionner et ajuster l'enceinte souhaitée. Appuyez sur les touches ◄► pour ajuster les réglages. 24 Centre Tonalité d'essai : Non <Changer " Sélect. ' Retour mDéplacer " Sélect. ' Retour ✎ REMARQUE Le menu Temps de propagation sera activé uniquement lorsque la source 5 canaux +1 est lue. Vous ne pouvez pas régler les options Centre et Surround dans ce mode lorsque la fonction Taille hautparleur est spécifiée sur AUCUN. Français HT-D450-ZF-FR-1228.indd 24 2011-12-28 5:12:44 03 Tonalité d'essai Configuration Positionnement idéal de l'enceinte du centre Paramètres Réglage Haut-Parleurs Taille haut-parleur BAL avant Delai Tonalité d'essai Emplacement idéal des enceintes ambiophoniques Il est préférable de placer toutes les enceintes dans ce cercle. Df: distance par rapport à l’enceinte avant. Dc: distance par rapport à l’enceinte du centre. Ds: Distance depuis les enceintes ambiophoniques Réglage de l'enceinte du centre Si la distance Dc est égale ou supérieure à la distance Df représentée sur la figure, réglez le mode sur 0 ms. Sinon, modifiez le réglage en suivant le tableau. Distance entre Df et Dc 0,00m 0,34m 0,68m 1,06m 1,40m 1,76m Temps de 00 ms 01 ms 02 ms 03 ms 04 ms 05 ms ropagation Configuration des enceintes ambiophoniques Si la distance Dc est égale ou supérieure à Ds représentée sur la figure, réglez le mode sur 0 ms. Sinon, modifiez le réglage en suivant le tableau. Distance entre Ds et Dc 0,00m 1,06m 2,11m 3,16m 3,62m 5,29m Temps de 00 ms 03 ms 06 ms 09 ms 12 ms 15 ms ropagation ✎ REMARQUE Avec PL II (Dolby Pro Logic II), le temps de propagation peut être différent pour chaque mode. Avec le son AC-3 et DTS, le temps de propagation peut être réglé entre 00 et 15mSEC. Le canal du centre est ajustable uniquement pour les disques 5 canaux +1. : Oui ► " Sélect. ' Retour mDéplacer " Sélect. ' Retour Utilisez la tonalité d'essai pour vérifier les raccordements des enceintes acoustiques. • Appuyez sur les touches ◄► pour sélectionner Oui. • La tonalité d'essai sera émise dans l'ordre vers Avant gauche ➞ Centre ➞ Avant droite ➞ Ambiance droite ➞ Ambiance gauche ➞ Caisson basses. Pour arrêter la tonalité d'essai, appuyez sur la touche ENTRÉE. DRC (Compression dynamique) Cette fonction équilibre la plage entre les sons les plus forts et les plus faibles. Vous pouvez utiliser cette fonction pour bénéficier du son Dolby Digital lorsque vous visionnez un film à faible volume (ex. : la nuit). • Vous pouvez sélectionner les valeurs Plein, 6/8, 4/8, 2/8, Non. SYNC. AUDIO La synchronisation vidéo et audio peut ne pas concorder avec un téléviseur numérique. Si cela se produit, corrigez ce décalage pour les synchroniser. • Vous pouvez régler le temps de propagation audio entre 0 ms et 300 ms. Réglez-le dans l'état optimal. AUDIO HDMI Les signaux audio transmis par le câble HDMI peuvent être commutés Oui/Non. • Non : La vidéo est transmise par le câble de connexion HDMI uniquement, tandis que l’audio est émis par les enceintes de l'appareil uniquement. • Oui : Les signaux audio et vidéo sont transmis par le câble de connexion HDMI, et le signal audio est émis par les enceintes de votre téléviseur uniquement. Français HT-D450-ZF-FR-1228.indd 25 25 2011-12-28 5:12:44 Configuration ✎ REMARQUE Système Le réglage par défaut de cette fonction est HDMI Audio Off. L’audio HDMI est automatiquement mixé dans les 2 canaux pour les enceintes du téléviseur. Lorsque l’audio HDMI est réglé sur On (activé), les formats sonores PL II /DSP EQ /P.BASS ne fonctionnent pas. Lorsque l'option AUDIO HDMI est spécifiée sur « Oui », le volume ne peut être réglé que via la télécommande du téléviseur. Installation initiale Utilisez l’option Paramètre initial pour régler la langue et le format écran. ✎ REMARQUE EQ utilisateur Vous pouvez configurer les réglages de l’égaliseur manuellement selon vos préférences. Enregistrement DivX(R) Code d'enregistrement View DivX(R) VOD pour acheter et lire le contenu d'un DivX(R) VOD. Paramètres EQ utilisateur dB 6 · · · · · · · · · · · · -6 ✎ REMARQUE 250Hz 600Hz 1kHz 3kHz 6kHz 10kHz 15kHz a Réinit. > Régler < Déplacer ' Retour mDéplacer " Sélect. ' Retour ✎ REMARQUE Si le câble HDMI est connecté au produit, le format du téléviseur n’apparaîtra pas et l’appareil sera réglé automatiquement en mode 16:9 Panoramique. Ceci peut aussi être effectué à l'aide du bouton DSP/EQ. (voir page .34) Canal retour audio Cette option ne sera pas activée si vous sélectionnez OK. Pour activer cette option, veuillez activer l’option DivX(R) Désactivation. Même une fois le système réinitialisé, les paramètres de Enregistrement DivX ne seront pas réinitialisés. DivX(R) Désactivation Sélectionnez ceci pour obtenir un nouveau code d’enregistrement. Vous pouvez apprécier le son du téléviseur via les enceintes du Home cinéma en utilisant un seul câble HDMI. • Non : Permet de désactiver la fonction Canal retour audio. • Auto : Permet d'écouter le son du téléviseur depuis les enceintes du Home cinéma à condition que le téléviseur soit compatible avec la fonction Canal retour audio. ✎ REMARQUE Lorsque l’option Anynet+(HDMI-CEC) est spécifiée sur Désac., la fonction Canal retour audio est indisponible. L'utilisation d'un câble HDMI non certifié ARC (Canal retour audio) peut entraîner des problèmes d'incompatibilité. La fonction ARC (Canal retour audio) n'est disponible qu'en cas de connexion à un téléviseur compatible ARC. 26 Français HT-D450-ZF-FR-1228.indd 26 2011-12-28 5:12:45 03 Vous pouvez sélectionner la langue que vous préférez pour le menu à l'écran, le menu du disque, etc. Language OSD Menu Disque Audio Sous-titres Sélectionnez la langue pour les affichages à l'écran. Sélectionnez la langue pour les affichages du menu du disque. Sélectionnez la langue audio du disque. Sélectionnez la langue pour les soustitres du disque. a Pour sélectionner une autre langue, sélectionnez OTHERS du menu du disque, audio et soustitres, et entrez le code de la langue de votre pays (voir page 38). a Vous ne pouvez pas sélectionner OTHERS (AUTRES)dans le menu de la langue OSD. ✎ REMARQUE La langue sélectionnée apparaîtra uniquement si elle est prise en charge par le disque. Modification du mot de passe Sélectionnez Changer et entrez un mot de passe de 4 chiffres pour régler le verrou parental en utilisant les touches numériques de la télécommande. Configuration Langue Paramètres Affichage Class. parental : Non Audio Mot de passe : Changer ► Système Langue Sécurité Assistance mDéplacer " Sélect. ' Retour Si vous oubliez votre mot de passe 1. Retirez le disque. 2. Appuyez pendant 5 secondes ou plus sur la touche ARRET () située sur la télécommande. Tous les réglages seront ramenés aux réglages d'usine. Assistance Sécurité La fonction de verrou parental agit en liaison avec les DVD auxquels ont été attribué un niveau qui vous aide à contrôler les types de DVD que regarde votre famille. Il y a jusqu'à 8 niveaux d’évaluation sur un disque. Informations sur le produit Indiquez les informations relatives au produit, telles que le code du modèle, la version du logiciel, etc. Class. parental Sélectionnez le niveau d’évaluation que vous souhaitez régler. Un numéro élevé indique que le programme est destiné uniquement aux adultes. Par exemple, si vous sélectionnez jusqu'au niveau 6, les disques contenant le niveau 7, 8 ne seront pas lus. Entrez le mot de passe, puis appuyez sur le bouton ENTRÉE. - Par défaut, le mot de passe est réglé sur « 0000 ». - Une fois la configuration terminée, le système revient sur l’écran précédent. Français HT-D450-ZF-FR-1228.indd 27 27 2011-12-28 5:12:45 Fonctions de base Lecture d’un disque Lecture de CD audio (CD-DA)/MP3/WMA BA 1. Appuyez sur la touche OUVERTURE/ FERMETURE (). 2. Déposez avec précaution le disque sur le plateau, avec l’étiquette du disque sur le dessus. PLAGES 01 1/17 3. Appuyez sur le bouton OUVERTURE/ FERMETURE () pour ouvrir le tiroir du disque. ✎ REMARQUE Fonction Reprise. Lorsque vous arrêtez la lecture d'un disque, l'appareil garde en mémoire où vous l'avez arrêté, ainsi lorsque vous appuyez sur la touche LECTURE à nouveau, il démarre là où la lecture a été interrompue. (Cette fonction ne concerne que les DVD) Appuyez deux fois sur la touche ARRET pendant la lecture pour désactiver la fonction Reprise. Si aucune touche n'est actionnée sur l'appareil ou sur la télécommande pendant plus de 3 minutes lorsque l'appareil est en mode Pause, il passera en mode ARRET. L'écran initial peut apparaître différent, en fonction du contenu du disque. Les disques piratés ne fonctionnent pas dans cet appareil car ils violent les recommandations du CSS (Content Scrambling System : un système de protection contre la copie). a apparaît lorsque vous appuyez sur une touche non valide. Fonction économiseur d'écran TV/ Economiseur d'énergie • Si aucun bouton n’est utilisé pendant plus de 5 minutes en mode Arrêt ou Lecture, l’économiseur d’écran sera activé. • Si le produit reste en mode d’écran de veille pendant plus de 20 minutes, le courant sera automatiquement coupé. (Sauf durant la lecture d’un fichier musical) 28 0:15 / 3:59 Function DVD/CD Repeat Mode Lect. 1. Insérez un CD audio (CD-DA) ou un disque MP3 dans le tiroir du disque. • Pour un CD audio, la première piste sera lue automatiquement. - Appuyez sur les touches #$ pour revenir à la piste précédente/suivante. • Pour un disque MP3/WMA, appuyez sur les touches ◄► pour sélectionner Musique, puis appuyez sur la touche ENTRÉE. - Appuyez sur les touches ▲▼◄► pour sélectionner l'élément souhaité, puis sur la touche ENTRÉE. - Appuyez sur les touches pour revenir aux pages précédentes/suivantes. 2. Appuyez sur la touche ARRET () pour mettre fin à la lecture. ✎ REMARQUE Certains CD MP3/WMA peuvent ne pas être lus, en fonction du mode d'enregistrement. Le tableau du contenu d'un CD MP3 varie en fonction du format de la piste MP3/WMA enregistrée sur le disque. Les fichiers WMA-DRM ne sont pas lus. Français HT-D450-ZF-FR-1228.indd 28 2011-12-28 5:12:45 04 Les images capturées avec un appareil photo numérique ou un caméscope, ou les fichiers JPEG sur un ordinateur peuvent être enregistrés sur un CD et ensuite lus avec cet appareil. 1. Insérez un disque JPEG dans le tiroir disque. 2. Appuyez sur les touches ◄► pour sélectionner les Photos, puis sur la touche ENTRÉE. Recherche avant/arrière dBAD Appuyez sur les touches pour la fonction Recherche. 3. Appuyez sur les touches ▲▼ pour sélectionner le dossier que vous souhaitez lire, puis sur la touche ENTRÉE. 4. Appuyez sur les touches ▲▼ pour sélectionner les photos que vous souhaitez visualiser, puis sur la touche ENTRÉE. • Le fichier sélectionné sera lu et le diaporama démarrera. • Pour arrêter le diaporama, appuyez sur la touche PAUSE (). • Vous pouvez afficher le fichier précédent/ suivant en appuyant sur les boutons ◄,► en mode diaporama. 1➞2➞3➞4 1➞2➞3➞4 ✎ REMARQUE Aucun son ne retentit en mode recherche. Cette fonction est uniquement disponible pour le format CD-DA. La recherche en lecture produit du son uniquement lorsqu’elle est effectuée aux vitesses 1 et 2. Saut de scènes/chansons ROOT dBAD JPEG 1 JPEG 2 JPEG 3 642 X 352 Appuyez sur les touches #$. • Chaque fois que la touche est pressée pendant la lecture, le chapitre, la piste ou le répertoire (fichier) précédent(e) ou suivant(e) sera lu(e). • Vous ne pouvez pas sauter des chapitres consécutifs. 2010/01/01 Function DVD/CD Page Retour Fonction rotation G Appuyez sur la touche VERTE (B) ou JAUNE (C) pendant le mode PAUSE. • Touche VERTE (B) : Permet de pivoter de 90° dans le sens antihoraire. • Touche JAUNE (C) : Permet de pivoter de 90° dans le sens horaire. ✎ REMARQUE Les résolutions maximales prises en charge par l'appareil sont 5120 x 3480 (ou 19.0 MPixel) pour les fichiers standard JPEG et 2048 x 1536 (ou 3.0 MPixel) pour les fichiers d'images progressives. Lecture en vitesse lente dD Appuyez sur la touche PAUSE () puis sur la touche pour une lecture lente. d D 1 ➞2 ➞3 1 ➞2 ➞3 ✎ REMARQUE Aucun son n'est audible pendant la lecture lente. La marche arrière en ralenti ne fonctionne pas. Français HT-D450-ZF-FR-1228.indd 29 Fonctions de base Utilisation de la fonction de lecture Lecture de fichiers JPEG 29 2011-12-28 5:12:46 Fonctions de base Lecture en mode pas à pas Utilisation du menu des titres dD Appuyez sur le bouton PAUSE à plusieurs reprises. • La vidéo avance image par image chaque fois que vous appuyez sur cette touche en cours de lecture. ✎ REMARQUE Aucun son n'est audible pendant la lecture en mode pas à pas. Pour les DVD contenant plusieurs titres, vous pouvez visualiser le titre de chaque film. 1. En cours de lecture, appuyez sur la touche TITLE MENU de la télécommande. TITLE MENU 2. Appuyez sur les touches ▲▼◄► pour effectuer la sélection souhaitée, puis sur la touche ENTRÉE. ✎ REMARQUE Fonction saut de 5 minutes D Appuyez sur la touche ◄,► en cours de lecture. • La lecture saute de 5 minutes en avant lorsque vous appuyez sur la touche ►. • La lecture saute de 5 minutes en arrière lorsque vous appuyez sur la touche ◄. ✎ REMARQUE d Cette fonction est uniquement disponible pour les formats DivX contenant des informations d’heure. Selon le disque, les éléments de configuration du menu peuvent varier et ce menu peut ne pas être disponible. Lecture répétée dBAD Répétition des DVD/DivX Vous pouvez répéter le titre, le chapitre ou la section (répétition A-B) d'un disque DVD/DivX. Répétition Non Utilisation du menu du disque d Vous pouvez visualiser les menus pour la langue audio, la langue des sous-titres, le profil, etc. 1. En cours de lecture, appuyez sur la touche DISC MENU de la télécommande. DISC MENU 2. Appuyez sur les touches ▲▼◄► pour effectuer la sélection souhaitée, puis sur la touche ENTRÉE. ✎ REMARQUE Selon le disque, les éléments de configuration du menu peuvent varier et ce menu peut ne pas être disponible. 30 REPEAT 1. En cours de lecture d'un disque DVD/ DivX, appuyez sur la touche REPEAT de la télécommande. 2. Appuyez sur les touches ▲▼ pour sélectionner le mode de répétition souhaité, puis sur la touche ENTRÉE. 3. Appuyez sur les touches ▲▼ pour sélectionner Non pour revenir à la lecture normale, puis sur la touche ENTRÉE. Z D Titre ➞ Chapitre ➞ A - ➞ Non Titre ➞ Dossier ➞ Tous ➞ Non Français HT-D450-ZF-FR-1228.indd 30 2011-12-28 5:12:46 04 Affichage des informations du disque 1. Pendant la lecture d'un CD/ MP3, appuyez de façon répétée sur la touche REPEAT pour sélectionner le mode de répétition que vous souhaitez. d 1/1 B Fonctions de base Répétition des disques CD/MP3 2/20 0:05:21 (Répéter Non Répéter disque Répéter tout Aléatoire Répéter Section A-B) 1/1 EN AC3 5.1 1/1 EN 1/1 A Changer (Répéter Non Répéter piste Rép répétition (Répertoire répétition) Répéter tout Aléatoire ) Sélect. D Lecture répétée de la section A-B 1/6 1/1 1/1 EN dB Changer Sélect. Vous pouvez relire à plusieurs reprises une section spéciale d’un DVD ou d’un CD. 1. En cours de lecture d'un disque DVD ou CD, appuyez sur la touche REPEAT de la télécommande. 2. Pour les DVD, appuyez sur les touches ▲▼ pour sélectionner A-. Pour les CD appuyez de façon répétée sur la touche REPEAT jusqu'à ce que apparaisse. 3. Appuyez sur la touche ENTRÉE au point où vous souhaitez que la répétition de lecture débute (A). 4. Appuyez sur la touche ENTRÉE au point où vous souhaitez que la répétition de lecture s'arrête (B). 5. Pour revenir à une lecture normale, Pour les DVD, appuyez sur les touches ▲▼ pour sélectionner Non. Pour les CD, appuyez sur la touche REPEAT pour sélectionner . ✎ REMARQUE La fonction de répétition de la section A-B ne prend pas en charge les disques DivX, MP3 ou JPEG. 1. En cours de lecture, appuyez sur la touche TOOLS de la télécommande. 2. Appuyez sur les touches ▲▼pour sélectionner l’élément souhaité. 3. Appuyez sur les touches ◄► pour réaliser le changement de configuration souhaitée, puis sur la touche ENTRÉE. - Vous pouvez utiliser les touches numériques de la télécommande pour contrôler certains éléments. 4. Pour que les informations du disque disparaissent, appuyez de nouveau sur la touche TOOLS. ✎ REMARQUE Si vous lisez le contenu du menu tools, selon le disque, certaines fonctions peuvent ne pas être activées. Vous pouvez également sélectionner DTS, Dolby Digital ou Pro Logic, en fonction du disque. Certains menus tools peuvent différer en fonction des disques et des fichiers. Français HT-D450-ZF-FR-1228.indd 31 TOOLS 31 2011-12-28 5:12:47 Fonctions de base Menu OUTILS Titre ( ) : pour accéder au titre désiré lorsque le disque en comporte plusieurs. ¨Par exemple, s'il y a plusieurs films sur un DVD, chaque film sera identifié par un titre. Chapitre ( ) : la plupart des disques DVD sont enregistrés en chapitres ainsi vous pouvez trouver rapidement un chapitre spécifique. Durée de lecture ( ) : permet la lecture d'un film à partir de l'heure désirée. Vous devez entrer l'heure de départ en tant que référence. La fonction de recherche d'heure n'est pas prise en charge par certains disques. Audio ( ): se rapporte à la langue de la piste sonore du film. Un disque DVD peut contenir jusqu’à 8 langues audio. Sous-titre ( ): se rapporte aux langues des sous-titres disponibles sur le disque. Vous pouvez choisir les langues des soustitres ou, si vous préférez, les effacer de l'écran. Un disque DVD peut contenir jusqu’à 32 langues de sous-titres. Angle ( ): lorsqu’un DVD propose plusieurs angles de vue pour une scène donnée, vous pouvez utiliser la fonction Angle. Sélection de la langue Audio dD 3. Appuyez sur les boutons ◄► pour sélectionner la langue de sous-titres souhaitée. • Selon le nombre de langues que le DVD comprend, vous sélectionnez une langue de sous-titres différente à chaque fois que vous appuyez sur le bouton. ✎ REMARQUE Selon le type de disque, certaines fonctions des langues de sous-titrage et audio peuvent ne pas être disponibles. Fonction de sous-titrage D • Vous devez être familier avec l’extraction vidéo et la mise en forme des données pour pouvoir utiliser correctement cette fonction. • Pour utiliser la fonction de sous-titrage, enregistrer le fichier des sous-titres (*.smi) sous le même nom que le fichier DivX (*.avi), dans le même dossier. Example. Racine Samsung_007CD1.avi Samsung_007CD1.smi • Le nom de fichier peut contenir jusqu'à 100 caractères alphanumériques ou 50 caractères asiatiques (caractères à 2 octets tels le Coréen et le chinois). • Les sous-titres des fichiers DivX *.smi, *.sub, *.srt au-delà de 148 Ko ne sont pas pris en charge. Fonction Angle 1. Appuyez sur la touche TOOLS. d 2. Appuyez sur les boutons ▲▼ pour sélectionner l'affichage AUDIO ( ). 3. Appuyez sur les boutons ◄► pour sélectionner la langue audio souhaitée. • Selon le nombre de langues que le DVD comprend, vous sélectionnez une langue audio différente à chaque fois que vous appuyez sur le bouton. Cette fonction vous permet de visualiser une même scène sous différents angles. Sélection de la langue des sous-titres 3. Appuyez sur les boutons ◄► pour sélectionner l’angle souhaité. dD 1. Appuyez sur la touche TOOLS . 2. Appuyez sur les boutons ▲▼ pour sélectionner l'affichage Sous-titre ( ). 32 1. Appuyez sur la touche TOOLS. 2. Appuyez sur les touches ▲▼ pour sélectionner l'affichage ANGLE ( ). ✎ REMARQUE La fonction Angle ne prend en charge que les disques sur lesquels plusieurs angles ont été enregistrés. Français HT-D450-ZF-FR-1228.indd 32 2011-12-28 5:12:54 04 GIGA Vous pouvez définir l’heure à laquelle le Home cinéma doit automatiquement s’arrêter. La fonction GIGA Sound amplifie les graves et les améliore deux fois plus afin de vous permettre d’apprécier la puissance du son réel. La fonction GIGA Sound s’applique uniquement au caisson de graves. Appuyez sur le bouton SLEEP. • À chaque fois que vous appuyez sur ce bouton, la sélection change comme suit : SLP 10 SLP 20 SLP 30 SLP 60 SLP 90 SLP 120 SLP 150 OFF. Appuyez sur le bouton GIGA. ✎ REMARQUE Si la fonction GIGA Sound est spécifiée sur « OUI », d’autres effets liés au champ acoustique ne seront pas appliqués. Si la fonction DOLBY PLII est spécifiée sur « OUI », l’effet lié à GIGA Sound ne sera pas appliqué. La fonction GIGA Sound (GIGA Sound) fonctionne uniquement en mode LPCM à 2 canaux. DIMMER Vous pouvez régler la luminosité de l'affichage sur l’unité principale. Appuyez sur le bouton DIMMER. Fonctions de base SLEEP Mode sonore S.VOL (CONT. DE VOL. INTELLIGENT) P.BASS L’option P.BASS amplifie les basses afin d’améliorer les fréquences de graves. La fonction OPTIMISEUR MP3 offre une meilleure qualité de son grâce à la mise à l’échelle de la fréquence d’échantillonnage. Cette option permet de régler et de stabiliser le niveau du volume afin d’éviter les changements de niveau importants lorsque vous changez de chaîne ou pendant un changement de scène. S . VOL Appuyez sur la touche S.VOL. Appuyez sur la touche P.BASS. Source à modulation POWER BASS ON ➞ par impulsion et POWER BASS OFF codage linéaire (LPCM) à 2 canaux Fichier MP3 MP3 ENHANCE ON ➞ POWER BASS ON ➞ POWER BASS OFF ✎ REMARQUE La fonction P.BASS n’est compatible qu’avec les sources à modulation par impulsion et codage linéaire (LPCM) à deux canaux (MP3, DivX, CD et WMA). La fonction P.BASS n’est pas compatible avec les modes GIGA SOUND ou Dolby Pro Logic ll. Si vous appuyez sur la touche P.BASS en mode DSP/EQ, ce mode se désactive automatiquement et P. BASS s’active. La fonction d’enrichissement MP3 n'est disponible qu'avec un fichier MP3. • Chaque fois que vous appuyez sur cette touche, la sélection change dans l’ordre suivant : SMART VOLUME ON SMART VOLUME OFF S/W LEVEL Vous pouvez également appuyez sur le bouton S/W LEVEL de la télécommande et utiliser les boutons ◄ ou ► pour régler le niveau du caisson de graves. Appuyez sur le bouton S/W LEVEL. Français HT-D450-ZF-FR-1228.indd 33 33 2011-12-28 5:12:54 Fonctions de base DSP (Traitement du signal numérique)/EQ Mode Dolby Pro Logic ll • DSP (Traitement du signal numérique) : Les modes DSP ont été définis pour simuler différents environnements acoustiques. • EQ : Vous pouvez sélectionner POPS, JAZZ, ROCK ou USER afin d’optimiser le son en fonction du genre de musique que vous écoutez. Vous pouvez sélectionner le mode audio Dolby Pro Logic II souhaité. Appuyez sur la touche MUSIC Lorsque vous écoutez de la musique, vous pouvez tester les effets sonores comme si vous écoutiez la performance réelle. MOVIE Assure un son plus réel à la bande son du film. DSP /EQ Appuyez sur la touche DSP/EQ. PL II. POPS, JAZZ, ROCK Selon le type de musique, vous pouvez sélectionner POPS, JAZZ et ROCK. PROLOG USER Vous pouvez écouter la musique tout en procédant au réglage de l’option « EQ: USER (EQ : UTIL) ». Si vous appuyez sur ENTRÉE sous le menu « EQ:USER (EQ : UTIL) », une fenêtre s'affichera vous autorisant à changer les paramètres EQ selon vos préférences. MATRIX Vous bénéficierez d'un son ambiophonique multi-canaux. Procure la sensation de présence dans un studio. STEREO A sélectionner pour écouter le son des enceintes gauche et droite avant et du caisson de basses uniquement. STUDIO CLUB Simule le son d'un club de danse avec le renforcement des notes de basse. HALL Offre des voix nettes comme dans une salle de concert. MOVIE Procure la sensation d'un film de cinéma. CHURCH Procure le sentiment d'être dans une grande église. OFF A sélectionner pour l'écoute normale. ✎ REMARQUE Vous pouvez écouter une source sonore à 2 canaux en un son surround 5.1 avec toutes les enceintes activées. - Une ou plusieurs enceinte(s) risquent de ne pas émettre de son, selon le signal d’entrée. ✎ REMARQUE Si vous sélectionnez le mode Pro Logic II, connectez votre périphérique aux prises d'entrée d’audio AUDIO INPUT (L et R) de l’appareil. Si vous ne connectez qu'une seule entrée (L ou R), l'écoute du son ambiophonique est impossible. La fonction Pro Logic II n’est disponible qu’en mode Stéréo. La fonction Pro Logic II est indisponible lors de la lecture du signal AC3 en mode 2,1 canaux. La fonction DSP/EQ n’est disponible qu’en mode stéréo. La fonction DSP/EQ est indisponible lors de la lecture du signal AC3 en mode 2,1 canaux. 34 Français HT-D450-ZF-FR-1228.indd 34 2011-12-28 5:12:54 04 Utilisation des touches de la télécommande 1. Appuyez sur la touche FUNCTION pour sélectionner FM. 2. Sélectionnez une station. • Syntonisation préréglée 1 : Vous devez d’abord ajouter une fréquence de votre choix à titre de préréglage. Appuyez sur le bouton ARRÊT () pour sélectionner PRÉRÉGLÉ puis appuyez sur le bouton TUNING/CH ( ) afin de choisir une station préréglée. • Syntonisation manuelle : Appuyez sur le bouton ARRÊT () pour sélectionner MANUEL puis appuyez sur le bouton TUNING/CH ( ) afin de syntoniser une fréquence supérieure ou inférieure. • Automatic Tuning : Appuyez sur le bouton ARRÊT () pour sélectionner MANUEL puis appuyez sur le bouton TUNING/CH ( ) enfoncé afin de rechercher la bande automatiquement. 5. Appuyez à nouveau sur la touche TUNER MEMORY. • Appuyez sur la touche TUNER MEMORY avant que le nombre ne disparaisse de l’écran. • Le nombre disparaît de l’écran et la station est prise en mémoire. 6. Pour prérégler une autre station, répétez les étapes 2 à 5. Fonctions de base Écoute de la radio Réglage Mono/Stéréo Appuyez sur la touche MO/ST. • Chaque fois que vous appuyez sur cette touche, le son est commuté entre STEREO et MONO. • Dans une zone de faible réception, sélectionnez MONO pour une réception claire sans interférence. Préréglage des stations Exemple : Préréglage de FM 89.10 dans la mémoire 1. Appuyez sur la touche FUNCTION pour sélectionner FM. ) pour 2. Appuyez sur la touche TUNING/CH ( sélectionner <89.10>. 3. Appuyez sur la touche TUNER MEMORY. • Le nombre clignote à l'écran. 4. Appuyez sur les touches TUNING/CH ( ) et sélectionnez le nombre préréglé. • Vous pouvez sélectionner entre 1 et 15 présélections. Français HT-D450-ZF-FR-1228.indd 35 35 2011-12-28 5:12:55 Fonctions avancées Fonction USB Lecture des fichiers multimédia en utilisant Vous pourrez profiter de la plupart des fichiers multimédia tels que photos, films et musique enregistrés sur un lecteur MP3, une clé USB ou un caméscope en haute qualité vidéo avec le son 5 canaux +1 en raccordant le périphérique de stockage au port USB de l'appareil. 1. Branchez le périphérique USB sur le port USB situé sur l'avant de l'appareil. 2. Appuyez sur la touche FUNCTION pour sélectionner USB. • USB apparaît brièvement à l’écran de l’afficheur. 3. Appuyez sur les boutons ◄► pour sélectionner les options Vidéos, Photos ou Musique. - Sélectionnez un fichier à lire. Retrait sécuritaire d’un dispositif USB Afin d’éviter d’endommager les données stockées sur le périphérique USB, retirez ce dernier avec précaution avant de débrancher le câble USB. • Appuyez sur la touche JAUNE (C). - REMOVE s’affiche à l’écran. • Retirez le câble USB. ✎ REMARQUE Pour écouter vos fichiers musicaux avec un son 5 canaux +1, vous devez régler le mode Dolby Pro Logic II sur Matrix. (Voir page 34) Retirez lentement le câble USB du port USB. Dans le cas contraire, vous pourriez endommager le port USB. Enregistrement sur périphérique USB Lors de la lecture d'un CD audio à l’aide de la fonction USB Recording (Enregistrement sur périphérique USB) ou de l’audition de la radio FM ou de la réception d’une source audio à partir d’un appareil externe, vous pouvez enregistrer la source audio dans la mémoire USB. Ex) Enregistrement des contenus audio d’un CD audio sur un périphérique USB 1. Connectez le périphérique USB au produit. 2. Insérez le CD audio dans le tiroir du lecteur. 3. Appuyez sur le bouton USB REC de la télécommande. • Pour commencer l’extraction de la piste actuelle, appuyez sur le bouton USB REC de la télécommande tandis que le système lit une piste ou s’est arrêté momentanément. • Pour effectuer l’enregistrement de tout le CD, appuyez sur le bouton USB REC de la télécommande et maintenez-le enfoncé. - Le message « FULL CD RIPPING » apparaît à l’écran et l’enregistrement commence. 4. Appuyez sur le bouton ARRÊT () pour mettre fin à l’enregistrement. • À la fin de l’enregistrement du CD sur le périphérique USB, vous trouverez un nouveau dossier stocké sur le lecteur USB intitulé « RECORDING ». Le contenu est sauvegardé dans le dossier au format MP3. • À la fin de l’enregistrement de la radio FM ou de la source AUX sur le périphérique USB, vous trouverez un nouveau dossier stocké sur le lecteur USB intitulé « TUNER RECORDING » ou « AUX RECORDING ». Le contenu est sauvegardé dans le dossier au format MP3. ✎ REMARQUE 36 Ne déconnectez pas le périphérique USB ou ne débranchez pas le câble d’alimentation pendant l’enregistrement sur le périphérique USB. Cela pourrait endommager les données. Pour arrêter l’enregistrement sur le périphérique USB, appuyez sur le bouton ARRÊT et déconnectez le périphérique USB après que le système ait complètement arrêté la lecture du CD. Si vous déconnectez le périphérique USB pendant l’enregistrement, le système s’éteindra et vous ne pourrez pas supprimer le fichier enregistré. Si vous connectez le périphérique USB au système pendant la lecture d’un CD, le système suspendra la lecture pour la reprendre ultérieurement. Les CD au format DTS ne peuvent pas être enregistrés. Si la durée de l’enregistrement est inférieure à 5 secondes, il est possible que le fichier d’enregistrement ne puisse pas être créé. L’enregistrement USB fonctionne uniquement lorsque le périphérique est formaté selon le système de fichiers FAT. (Le format de fichier NTFS n’est pas pris en charge.) Le signal audio n’est pas émis durant l’enregistrement du CD sur le périphérique USB. Lorsque l’option AUDIO HDMI est réglée sur Act., la fonction Enregistrement sur périphérique USB n’est pas prise en charge. Français HT-D450-ZF-FR-1228.indd 36 2011-12-28 5:12:57 06 Autres informations Reportez-vous au tableau ci-dessous lorsque l'appareil ne fonctionne pas correctement. Si le problème que vous constatez ne figure pas dans la liste ci-dessous ou si les instructions ci-dessous ne vous aident pas, mettez l'appareil hors tension, déconnectez le cordon d'alimentation et contactez le distributeur le plus proche ou le centre de services Samsung Electronics. Problème Vérification/Solution Il m’est impossible d’éjecter le disque. • Le cordon d'alimentation est-il correctement branché dans la prise ? • Coupez l'alimentation puis rétablissez-la. La lecture ne démarre pas. • Vérifiez le code régional du DVD. Les disques DVD achetés à l’étranger sont parfois incompatibles. • Il m’est impossible de lire les CD-ROM et les DVD-ROM sur l'appareil. • Assurez-vous que le niveau d'évaluation est correct. • Utilisez-vous un disque déformé ou un disque ayant subi des rayures en surface ? • Nettoyez le disque. La lecture ne démarre pas immédiatement lorsque les touches Lecture/Pause sont actionnées. Absence de son. Le son n'est généré que par certaines enceintes, pas par les six. Le son ambiophonique Dolby numérique 5 canaux + 1 n'est pas reproduit. La télécommande ne fonctionne pas. • Aucun son n’est produit pendant la lecture accélérée, la lecture lente ou la lecture image par image. • Les enceintes sont-elles raccordées correctement ? La configuration des enceintes a-t-elle été correctement personnalisée ? • Le disque a-t-il été sérieusement endommagé ? • Sur certains disques DVD, le son est uniquement généré par les enceintes avant. • Vérifiez si les enceintes sont correctement connectées. • Réglez le volume. • Pendant l'écoute d'un CD, de la radio ou du téléviseur, le son est uniquement généré par les enceintes avant. Sélectionnez "PROLOG" en appuyant sur PL II (Dolby Pro Logic II) situé sur la télécommande pour utiliser les six enceintes. • Est-ce que le disque comporte la mention "Dolby Digital 5.1 CH" ? Le son ambiophonique Dolby numérique 5 canaux + 1 n'est reproduit que si le disque a été enregistré en conséquence. • Selon l'écran d'information, la langue audio est-elle correctement réglée sur Dolby Digital 5.1-CH ? • La télécommande est-elle utilisée dans les limites de sa portée en matière d’angle et de distance ? • Les piles sont-elles épuisées ? • Avez-vous sélectionné le mode approprié (RECEIVER DVD/TV)? • Le disque tourne mais aucune image n'est produite. • La qualité de l'image est médiocre et l'image tremble. • Le téléviseur est-il sous tension ? • Les câbles de la vidéo sont-ils branchés correctement ? • Le disque est-il sale ou endommagé ? • Si le disque a été médiocrement créé, il peut ne pas être lisible. La langue audio et les sous-titres ne fonctionnent pas. • La langue audio et les sous-titres ne fonctionnent que si le disque les contient. L'écran du menu Disc/Title n'apparaît pas même lorsque la fonction Disc/ Title est sélectionnée. Le format d'écran ne peut pas être modifié. • Utilisez-vous un disque qui ne comporte pas de menu ? • La lecture des DVD 16:9 est possible en mode 16:9 WIDE (16:9 Large), 4:3 LETTER BOX (4/3 Boîte aux lettres) ou 4:3 PAN SCAN (4:3 Panoramique/Balayage) ; en revanche, les DVD 4:3 peuvent être lus au format 4:3 uniquement. Reportez vous à la pochette du disque DVD puis sélectionnez la fonction appropriée. Français HT-D450-ZF-FR-1228.indd 37 Autres informations Dépannage 37 2011-12-28 5:12:57 Autres informations Problème Vérification/Solution • L'appareil ne fonctionne pas. (Exemple : Le courant se coupe, la touche du panneau avant ne fonctionne pas ou un bruit étrange se fait entendre.) • L'appareil ne fonctionne pas normalement. Le mot de passe du niveau d'évaluation a été oublié. • Appuyez pendant 5 secondes ou plus sur la touche ARRÊT () située sur la télécommande en l’absence de disque (fonction de réinitialisation). L'utilisation de la fonction RESET (REINITIALISATION) efface tous les réglages enregistrés. N'utilisez cette fonction que lorsque cela s'avère nécessaire. • Tandis que le message « NO DISC » (PAS DE DISQUE) est affiché à l’écran de l'appareil, maintenez la touche ARRÊT () enfoncée pendant plus de 5 secondes. Le mot « INIT (INITIAL) » s’affiche et tous les réglages reviennent aux valeurs par défaut. Appuyez ensuite sur la touche POWER. L'utilisation de la fonction RESET (REINITIALISATION) efface tous les réglages enregistrés. N'utilisez cette fonction que lorsque cela s'avère nécessaire. La réception des émissions de radio est impossible. • L’antenne est-elle connectée correctement ? • Si le signal d’entrée de l’antenne est faible, installez une antenne FM extérieure à un endroit où la réception sera de meilleure qualité. Liste des codes de langue Entrez le numéro de code approprié pour OTHERS (Autres) du menu du disque, audio et sous-titres. (Voir page 27) Code Langue Code Langue Code Langue Code Langue Code Langue Code Langue 1027 Afar 1142 Greek 1239 Interlingue 1345 Malagasy 1482 Kirundi 1527 1028 Abkhazian 1144 English 1245 Inupiak 1347 Maori 1483 Romanian 1528 Tajik Thai 1032 Afrikaans 1145 Esperanto 1248 Indonesian 1349 Macedonian 1489 Russian 1529 Tigrinya 1039 Amharic 1149 Spanish 1253 Icelandic 1350 Malayalam 1491 Kinyarwanda 1531 Turkmen 1044 Arabic 1150 Estonian 1254 Italian 1352 Mongolian 1495 Sanskrit 1532 Tagalog 1045 Assamese 1151 Basque 1257 Hebrew 1353 Moldavian 1498 Sindhi 1534 Setswana 1051 Aymara 1157 Persian 1261 Japanese 1356 Marathi 1501 Sangro 1535 Tonga 1052 Azerbaijani 1165 Finnish 1269 Yiddish 1357 Malay 1502 Serbo-Croatian 1538 Turkish 1053 Bashkir 1166 Fiji 1283 Javanese 1358 Maltese 1503 Singhalese 1539 Tsonga 1057 Byelorussian 1171 Faeroese 1287 Georgian 1363 Burmese 1505 Slovak 1540 Tatar 1059 Bulgarian 1174 French 1297 Kazakh 1365 Nauru 1506 Slovenian 1543 Twi 1060 Bihari 1181 Frisian 1298 Greenlandic 1369 Nepali 1507 Samoan 1557 Ukrainian 1069 Bislama 1183 Irish 1299 Cambodian 1376 Dutch 1508 Shona 1564 Urdu 1066 Bengali; Bangla 1186 Scots Gaelic 1300 Canada 1379 Norwegian 1509 Somali 1572 Uzbek 1067 Tibetan 1194 Galician 1301 Korean 1393 Occitan 1511 Albanian 1581 Vietnamese 1070 Breton 1196 Guarani 1305 Kashmiri 1403 (Afan) Oromo 1512 Serbian 1587 Volapuk 1079 Catalan 1203 Gujarati 1307 Kurdish 1408 Oriya 1513 Siswati 1613 Wolof 1093 Corsican 1209 Hausa 1311 Kirghiz 1417 Punjabi 1514 Sesotho 1632 Xhosa 1097 Czech 1217 Hindi 1313 Latin 1428 Polish 1515 Sundanese 1665 Yoruba 1103 Welsh 1226 Croatian 1326 Lingala 1435 Pashto, Pushto 1516 Swedish 1684 Chinese 1105 Danish 1229 Hungarian 1327 Laothian 1436 Portuguese 1517 Swahili 1697 Zulu 1109 German 1233 Armenian 1332 Lithuanian 1463 Quechua 1521 Tamil 1130 Bhutani 1235 Interlingua 1334 Latvian, Lettish 1481 RhaetoRomance 1525 Tegulu 38 Français HT-D450-ZF-FR-1228.indd 38 2011-12-28 5:12:58 06 Généralités Syntoniseur FM HDMI 2,76 Kg 430 (L) x 59 (H) x 249 (P) mm +5°C à +35°C 10 % à 75 % 70 dB 10 dB 0,5 % Vitesse de lecture : 3,49 à 4,06 m/s Durée approximative de lecture (Disque simple face, simple couche) : 135 min Vitesse de lecture : 4,8 à 5,6 m/s Durée maximale de lecture : 74 min Vitesse de lecture : 4,8 à 5,6 m/s Durée maximale de lecture : 20 min 480i(576i) 1 canal : 1,0 Vpp (charge de 75 Ω) 480i(576i) Y : 1,0 Vpp (charge de 75 Ω) PR : 0,70 Vpp (charge de 75 Ω) PB : 0,70 Vpp (charge de 75 Ω) 1080p, 1080i, 720p, 480p(576p) Sortie de l’enceinte avant 142W x 2(3Ω) Poids Dimensions Plage de températures de fonctionnement Plage de taux d’humidité de fonctionnement Rapport signal/bruit Sensibilité utilisable Distorsion harmonique totale DVD (Digital Versatile Disc) Disque 12 cm (DISQUE COMPACT) 8cm (DISQUE COMPACT) Vidéo Composite Sortie vidéo Vidéo composant Vidéo/Audio Amplificateur Sortie de l'enceinte du centre 142W(3Ω) Sortie enceinte ambiophonique 141W x 2(3Ω) Sortie du caisson de basses 142W(3Ω) Gamme de fréquences 20 Hz à 20 kHz Rapport signal sur bruit 65dB Séparation des canaux 60dB Autres informations Caractéristiques (AUX) 800 mV *: Caractéristiques nominales - Samsung Electronics Co., Ltd se réserve le droit de modifier les caractéristiques techniques sans avis préalable. - Le poids et les dimensions sont approximatifs. - La conception et les spécifications peuvent être modifiées sans préavis. - Concernant l'alimentation et la consommation électrique, reportez-vous à l'étiquette apposée sur le produit. Sensibilité d'entrée Français HT-D450-ZF-FR-1228.indd 39 39 2011-12-28 5:12:58 Autres informations HT-D450 Système d’enceintes 5+1 canaux Système d'enceintes Enceinte Avant Ambiophonique Centrale Impédance 3 3 3 Gamme de fréquences 140Hz~20KHz 140Hz~20KHz 140Hz~20KHz 86dB/W/M Niveau de pression acoustique de sortie 86dB/W/M 86dB/W/M Entrée nominale 142W 142W 141W 284W Entrée maximale 284W 282W Avant : 90 x 141,5 x 68,5 mm Ambiophonique : 84 x 104,5 x 68,5 mm Dimensions (L x H x P) Centrale : 360 x 74,5 x 68,5 mm Caisson de graves : 168 x 350 x 285 mm Poids Caisson de graves 3 40Hz~160Hz 88dB/W/M 142W 284W Avant: 0,58 Kg, Centrale : 0,96 Kg Ambiophonique : 0,4 Kg, Caisson de graves : 3,6 Kg HT-D453 Système d'enceintes Enceinte Impédance Gamme de fréquences Niveau de pression acoustique de sortie Entrée nominale Entrée maximale Dimensions (L x H x P) Poids Système d’enceintes 5+1 canaux Avant 3 140Hz~20KHz 86dB/W/M Ambiophonique 3 140Hz~20KHz 86dB/W/M Caisson de graves 3 40Hz~160Hz 88dB/W/M Centrale 3 140Hz~20KHz 86dB/W/M 142W 284W 142W 141W 142W 284W 282W 284W Avant : 90 x 1200 x 119 mm (socle : 250 x 250) Ambiophonique : 84 x 104,5 x 68,5 mm Centrale : 360 x 74,5 x 68,5 mm Caisson de graves : 168 x 350 x 285 mm Avant : 3,68 Kg, Centrale : 0,96 Kg Ambiophonique : 0,4 Kg, Caisson de graves : 3,6 Kg HT-D455 Système d'enceintes Enceinte Impédance Gamme de fréquences Niveau de pression acoustique de sortie Entrée nominale Entrée maximale Dimensions (L x H x P) Poids 40 Système d’enceintes 5+1 canaux Avant 3 140Hz~20KHz 86dB/W/M Ambiophonique 3 140Hz~20KHz 86dB/W/M Centrale 3 140Hz~20KHz 86dB/W/M Caisson de graves 3 40Hz~160Hz 88dB/W/M 142W 141W 142W 142W 284W 282W 284W 284W Avant/Ambiophonique : 90 x 1200 x 119 mm (socle : 250 x 250) Centrale : 360 x 74,5 x 68,5 mm Caisson de graves : 168 x 350 x 285 mm Avant/Ambiophonique : 3,68 Kg, Centrale : 0,96 Kg Caisson de graves : 3,6 Kg Français HT-D450-ZF-FR-1228.indd 40 2011-12-28 5:12:58 Comment contacter Samsung dans le monde Si vous avez des suggestions ou des questions concernant les produits Samsung, veuillez contacter le Service Consommateurs Samsung. Contact Center Area ` North America Canada Mexico U.S.A Web Site 1-800-SAMSUNG (726-7864) 01-800-SAMSUNG (726-7864) 1-800-SAMSUNG (726-7864) www.samsung.com www.samsung.com www.samsung.com 0800-333-3733 0800-124-421 / 4004-0000 800-SAMSUNG (726-7864) 01-8000112112 0-800-507-7267 1-800-751-2676 1-800-10-7267 800-6225 1-800-299-0013 800-7919267 1-800-234-7267 00-1800-5077267 800-7267 0-800-777-08 1-800-682-3180 www.samsung.com www.samsung.com www.samsung.com www.samsung.com www.samsung.com www.samsung.com www.samsung.com www.samsung.com www.samsung.com www.samsung.com www.samsung.com www.samsung.com www.samsung.com www.samsung.com www.samsung.com 1-800-SAMSUNG (726-7864) www.samsung.com 0-800-100-5303 www.samsung.com 42 27 5755 0810 - SAMSUNG (7267864, € 0.07/min) - ` Latin America Argentine Brazil Chile Colombia Costa Rica Dominica Ecuador El Salvador Guatemala Honduras Jamaica Nicaragua Panama Peru Puerto Rico Trinidad & Tobago Venezuela Austria Belgium 02-201-24-18 Bosnia Bulgaria Croatia 05 133 1999 07001 33 11 062 SAMSUNG (062 726 7864) 800-SAMSUNG (800-726786) Samsung Zrt., česká organizační složka, Oasis Florenc, Sokolovská394/17, 180 00, Praha 8 70 70 19 70 030 - 6227 515 01 48 63 00 00 01805 - SAMSUNG (726-7864 € 0,14/Min) 06-80-SAMSUNG (726-7864) 800-SAMSUNG (726-7864) +381 0113216899 261 03 710 023 207 777 020 405 888 0900-SAMSUNG (0900-7267864) (€ 0,10/Min) 815-56 480 0 801 1SAMSUNG (172678) / 022-607-93-33 80820-SAMSUNG (726-7864) 1. 08010 SAMSUNG (72678) doar din reţeaua Romtelecom, tarif local 2. 021.206.01.10 - din orice reţea, tarif normal Czech Denmark Finland France Germany Hungary Italia Kosovo Luxemburg Macedonia Montenegro Netherlands Norway Poland Portugal Rumania HT-D450-ZF-FR-1228.indd 41 Slovakia Spain Sweden Contact Center 0700 Samsung (0700 726 7864) 0800-SAMSUNG (726-7864) 902-1-SAMSUNG (902 172 678) 0771 726 7864 (SAMSUNG) Switzerland 0848-SAMSUNG (7267864, CHF 0.08/min) U.K Eire Lithuania Latvia Estonia 0330 SAMSUNG (7267864) 0818 717100 8-800-77777 8000-7267 800-7267 Uzbekistan Kyrgyzstan Tadjikistan Ukraine 0-800-502-000 www.samsung.com Belarus Moldova 810-800-500-55-500 00-800-500-55-500 www.samsung.com/ be (Dutch) www.samsung.com/ be_fr (French) www.samsung.com www.samsung.com ` Asia Pacific www.samsung.com Russia Georgia Armenia Azerbaijan Kazakhstan Australia New Zealand China 1300 362 603 0800 SAMSUNG (0800 726 786) 400-810-5858 / 010-6475 1880 Hong Kong (852) 3698 4698 India Indonesia www.samsung.com www.samsung.com www.samsung.com Japan Malaysia www.samsung.com Philippines www.samsung.com www.samsung.com www.samsung.com - Singapore Thailand Taiwan Vietnam www.samsung.com www.samsung.com www.samsung.com www.samsung.com www.samsung.com Web Site www.samsung.com www.samsung.com www.samsung.com www.samsung.com www.samsung.com/ch www.samsung.com/ ch_fr/(French) www.samsung.com www.samsung.com www.samsung.com www.samsung.com www.samsung.com ` CIS 8-800-555-55-55 8-800-555-555 0-800-05-555 088-55-55-555 8-10-800-500-55-500 (GSM: 7799) 8-10-800-500-55-500 00-800-500-55-500 8-10-800-500-55-500 ` Europe Albania Area Serbia www.samsung.com www.samsung.com www.samsung.com www.samsung.com www.samsung.com www.samsung.ua www.samsung.com/ ua_ru www.samsung.com www.samsung.com www.samsung.com www.samsung.com/hk www.samsung.com/ hk_en/ 3030 8282 / 1800 110011 / 1800 3000 8282 / 1800 266 8282 0800-112-8888 / 021-5699-7777 0120-327-527 1800-88-9999 1-800-10-SAMSUNG(726-7864) / 1-800-3-SAMSUNG(726-7864) / 1-800-8-SAMSUNG(726-7864) / 02-5805777 1800-SAMSUNG (726-7864) 1800-29-3232 / 02-689-3232 0800-329-999 1 800 588 889 www.samsung.com www.samsung.com www.samsung.com www.samsung.com 8000-4726 08000-726786 800-22273 080 100 2255 800-SAMSUNG (726-7864) 9200-21230 444 77 11 800-SAMSUNG (726-7864) www.samsung.com www.samsung.com www.samsung.com www.samsung.com www.samsung.com www.samsung.com www.samsung.com www.samsung.com 0800-SAMSUNG (726-7864) 0860-SAMSUNG (726-7864 ) www.samsung.com www.samsung.com www.samsung.com www.samsung.com www.samsung.com www.samsung.com www.samsung.com ` Middle East Bahrain Egypt Jordan Morocco Oman Saudi Arabia Turkey U.A.E ` Africa Nigeria South Africa 2011-12-28 5:12:58 Elimination des batteries de ce produit (Applicable aux pays de l’Union européenne et aux autres pays européens dans lesquels des systèmes de collecte sélective sont mis en place.) Le symbole sur la batterie, le manuel ou l'emballage indique que les batteries de ce produit ne doivent pas être éliminées en fin de vie avec les autres déchets ménagers. L'indication éventuelle des symboles chimiques Hg, Cd ou Pb signifie que la batterie contient des quantités de mercure, de cadmium ou de plomb supérieures aux niveaux de référence stipulés dans la directive CE 2006/66. Si les batteries ne sont pas correctement éliminées, ces substances peuvent porter préjudice à la santé humaine ou à l'environnement. Afin de protéger les ressources naturelles et d'encourager la réutilisation du matériel, veillez à séparer les batteries des autres types de déchets et à les recycler via votre système local de collecte gratuite des batteries. Les bons gestes de mise au rebut de ce produit (Déchets d’équipements électriques et électroniques) (Applicable dans les pays de l’Union Européenne et dans d’autres pays européens pratiquant le tri sélectif) Ce symbole sur le produit, ses accessoires ou sa documentation indique que ni le produit, ni ses accessoires électroniques usagés (chargeur, casque audio, câble USB, etc.) ne peuvent être jetés avec les autres déchets ménagers. La mise au rebut incontrôlée des déchets présentant des risques environnementaux et de santé publique, veuillez séparer vos produits et accessoires usagés des autres déchets. Vous favoriserez ainsi le recyclage de la matière qui les compose dans le cadre d’un développement durable. Les particuliers sont invités à contacter le magasin leur ayant vendu le produit ou à se renseigner auprès des autorités locales pour connaître les procédures et les points de collecte de ces produits en vue de leur recyclage. Les entreprises et professionnels sont invités à contacter leurs fournisseurs et à consulter les conditions de leur contrat de vente. Ce produit et ses accessoires ne peuvent être jetés avec les autres déchets professionnels et commerciaux. Code No. AH68-02259B HT-D450-ZF-FR-1228.indd 42 2011-12-28 5:12:59 HT-D450 HT-D453 HT-D455 Digitales Heimkino-System Bedienungsanleitung Erleben Sie die Möglichkeiten Danke, dass Sie sich für dieses Produkt von Samsung entschieden haben. Registrieren Sie Ihr Produkt unter folgendem Link, und profitieren Sie von unserem umfassenden Kundenservice: www.samsung.com/register HT-D450-EN-DE-1228.indd Sec1:1 2011-12-28 5:02:54 Sicherheitsinformationen Sicherheitshinweise ZUR VERMEIDUNG VON STROMSCHLÄGEN DARF DIESES GERÄT NICHT GEÖFFNET WERDEN. ES ENTHÄLT KEINE BAUTEILE, DIE VOM BENUTZER GEWARTET ODER REPARIERT WERDEN KÖNNEN. WARTUNGS- UND REPARATURARBEITEN DÜRFEN NUR VON FACHPERSONAL AUSGEFÜHRT WERDEN. ACHTUNG GEFAHR VON STROMSCHLÄGEN NICHT ÖFFNEN Dieses Symbol weist auf eine „gefährliche Netzspannung" im Inneren des Players hin. Es besteht die Gefahr von Stromschlägen und Körperverletzungen. ACHTUNG : UM STROMSCHLÄGE ZU Dieses Symbol weist auf wichtige VERMEIDEN, RICHTEN SIE DEN BREITEN Anweisungen im Begleitmaterial KONTAKTSTIFT DES STECKERS AN DEM zum Produkt hin. BREITEN STECKPLATZ AUS UND STECKEN SIE DEN STECKER VOLLSTÄNDIG EIN. WARNUNG • Schützen Sie das Gerät vor Nässe und Feuchtigkeit, um die Gefahr von Bränden oder Stromschlägen zu verringern. ACHTUNG • Das Gerät darf nicht mit Wasser oder anderen Flüssigkeiten in Berührung kommen. Außerdem dürfen keine mit Flüssigkeiten gefüllten Behälter, wie beispielsweise Vasen, darauf abgestellt werden. • Um das Gerät vom Netz zu trennen, muss der Netzstecker aus der Steckdose gezogen werden. Stellen Sie deshalb sicher, dass Sie den Netzstecker stets leicht erreichen können. • Dieses Gerät darf nur an eine Netzsteckdose mit Schutzerdung angeschlossen werden. • Der Netzstecker sollte jederzeit in Reichweite und zugänglich sein, da er aus der Steckdose entfernt werden muss, um das Gerät vollständig abzuschalten. 2 CLASS 1 KLASSE 1 LUOKAN 1 KLASS 1 PRODUCTO LASER PRODUCT LASER PRODUKT LASER LAITE LASER APPARAT LÁSER CLASE 1 LASERPRODUKT DER KLASSE 1 Dieser CD-Player ist ein LASERPRODUKT DER KLASSE 1. Lesen Sie vor Inbetriebnahme des Geräts die vorliegende Bedienungsanleitung. Bitte beachten Sie alle Sicherheits- und Bedienhinweise. Verwenden Sie das Gerät ausschließlich wie in der Anleitung beschrieben. Auf diese Weise können Sie Ihr neues Gerät von Anfang an optimal nutzen und vermeiden Bedienfehler. ACHTUNG • UNSICHTBARER LASERSTRAHL BEI GEÖFFNETEM GERÄT ODER BESCHÄDIGTER VERRIEGELUNG, KONTAKT MIT LASERSTRAHL VERMEIDEN! Deutsch HT-D450-EN-DE-1228.indd 2 2011-12-28 5:03:02 Vorsichtsmaßnahmen • Stellen Sie sicher, dass die Stromversorgung in Ihrem Haus den auf der Rückseite Ihres Produkts angegebenen Anforderungen entspricht. • Stellen Sie den Player horizontal auf einer geeigneten Unterlage (Möbel) auf, so dass um ihn herum ausreichend Platz (7,5-10 cm) zur Belüftung bleibt. • Stellen Sie das Gerät nicht auf Verstärker oder andere Geräte, die heiß werden können. Achten Sie darauf, dass die Belüftungsöffnungen nicht abgedeckt sind. • Stellen Sie keine Gegenstände auf das Gerät. • Stellen Sie sicher, dass keine Disk eingelegt ist, bevor Sie das Gerät bewegen. • Ziehen Sie zum sicheren Trennen des Geräts von der Stromversorgung den Netzstecker aus der Steckdose, insbesondere, wenn Sie das Gerät längere Zeit nicht nutzen. • Ziehen Sie bei Gewittern das Stromkabel aus der Steckdose. Durch Blitze verursachte Spannungsspitzen können zur Beschädigung des Geräts führen. • Halten Sie das Gerät von direkter Sonneneinstrahlung oder anderen Wärmequellen fern. Andernfalls können Überhitzung und Fehlfunktionen der Anlage auftreten. • Schützen Sie das Produkt vor Feuchtigkeit, übermäßiger Hitze oder Geräten, die starke magnetische oder elektrische Felder erzeugen (z. B. Lautsprecher). • Trennen Sie das Netzkabel bei Fehlfunktionen des Geräts von der Stromversorgung. • Ihr Produkt ist nicht für den gewerblichen Einsatz vorgesehen. Verwenden Sie dieses Produkt nur für den privaten Bereich. • Wenn Sie Ihr Heimkino-System oder eine CD aus dem Kalten ins Warme bringen, kann sich Feuchtigkeit darauf niederschlagen. Warten Sie in solchen Fällen ca. 2 Stunden, bis das Gerät Raumtemperatur erreicht hat, bevor Sie es in Betrieb nehmen. • Die in diesem Produkt verwendeten Batterien enthalten umweltschädliche Chemikalien. Entsorgen Sie die Batterien nicht im Hausmüll sondern über eine entsprechende Sammelstelle (siehe Hinweis am Ende dieses Benutzerhandbuchs). Zubehör Überprüfen Sie, ob die folgenden Teile im Lieferumfang enthalten sind: FUNCTION TV SOURCE POWER RECEIVER DVD SLEEP TV 1 2 4 5 7 8 3 6 9 DSP /EQ 0 MUTE TUNING /CH VOL REPEAT DISC MENU MENU TITLE MENU TOOLS INFO RETURN A EXIT B C D DIMMER GIGA S.VOL AUDIO UPSCALE S/W LEVEL TUNER MEMORY MO/ST USB REC P.BASS Videokabel UKW-Antenne Bedienungsanleitung Fernbedienung/ AAA-Batterien SCART-Buchse Deutsch HT-D450-EN-DE-1228.indd 3 3 2011-12-28 5:03:02 Sicherheitsinformationen Vorsichtsmaßnahmen beim Verwenden und Lagern von Disks Kratzer auf der Disk könnten die Ton- und Bildqualität verringern sowie Sprünge bei der Wiedergabe verursachen. Achten Sie besonders darauf, den Disks bei der Handhabung keine Kratzer zuzufügen. Halten der Disks • Berühren Sie nicht die Wiedergabeseite einer Disk. • Halten Sie die Disk mit den Fingerspitzen am Rand fest, damit keine Fingerabdrücke auf der beschreibbaren Oberfläche zurückbleiben. • Kleben Sie kein Papier oder Klebeband auf die Disk Disk-Lagerung • Setzen Sie die Disk nicht direkter Sonneneinstrahlung aus. • Bewahren Sie die Disk an einem kühlen, gut belüfteten Ort auf. • Bewahren Sie die Disk in einer sauberen Schutzhülle auf. Stellen Sie die Disk vertikal auf. ✎ HINWEIS Achten Sie darauf, dass die Disk nicht verschmutzt wird. Legen Sie keine beschädigten oder zerkratzten Disks ein. Verwenden und Lagern von Disks Wenn sich Fingerabdrücke oder Schmutz auf der Disk befinden, säubern Sie sie mit einem milden Reinigungsmittel und einem weichen Tuch. • Säubern Sie die Disk von innen nach außen. ✎ HINWEIS Wenn kalte Teile des Heimkino-Systems mit warmer Luft in Kontakt kommen, kann sich Feuchtigkeit darauf niederschlagen. Bei Feuchtigkeit innerhalb des Players funktioniert dieses ggf. nicht ordnungsgemäß. Entnehmen Sie in diesem Fall die Disk, und lassen Sie das Gerät mit eingeschalteter Stromversorgung für ein bis zwei Stunden trocknen. Lizenz • Hergestellt unter Lizenz und US-Patentnummern: 5,956,674; 5,974,380; 6,487,535 & sowie anderen in den USA und weltweit ausgestellten und angemeldeten Patenten. DTS, das Symbol, und DTS zusammen mit dem Symbol sind eingetragene Warenzeichen. DTS Digital Sourround und die DTS Logos sind ein Warenzeichen von DTS, Inc. Das Produkt enthält Software. © DTS, Inc. Alle Rechte vorbehalten. • INFOS ZU DIVX VIDEO: DivX® ist ein digitales Videoformat, das von der Firma DivX, Inc. hergestellt wurde. Dieses Gerät ist offiziell von DivX® zertifiziert und gibt DivX-Videodateien wieder. Nähere Informationen und Softwareanwendungen zum Konvertieren Ihrer Videodateien in DivX Videos finden Sie unter www.divx.com. INFOS ZU DIVX VIDEO-ON-DEMAND: Dieses DivX®-zertifizierte Gerät muss registriert werden, damit gekaufte Video-OnDemand-Filme (VOD) wiedergegeben werden können. Um den Registrierungscode zu erhalten, gehen Sie auf den DivX VODBereich im Setup-Menü Ihres Geräts. Besuchen Sie vod.divx. com, um mehr Informationen über die Vervollständigung Ihrer Registrierung zu erhalten. DivX Certified® für die Wiedergabe von DivX® Video, einschließlich gebührenpflichtiger Inhalte DivX®, DivX Certified® und die dazugehörigen Logos sind Handelsmarken der DivX, Inc. und werden unter Lizenz verwendet. Durch eines oder mehrere der folgenden US-Patente geschützt: 7,295,673; 7,460,668; 7,515,710; 7,519,274 • HDMI, das HDMI Logo und High-Definition Multimedia Interface sind in den USA und anderen Ländern Handelsmarken oder registrierte Handelsmarken der HDMI Licensing LLC. • Dieses Gerät nutzt eine durch U.S. Patente und andere Schutzund Urheberrechte geschützte Kopierschutztechnologie der Rovi Corporation. Reverse Engineering und Disassemblierung sind verboten. Copyright © 2011 Samsung Electronics Co., Ltd. Alle Rechte vorbehalten. Kopierschutz • Dolby", Pro Logic" und das Doppel-D-Symbol sind ein registriertes Warenzeichen von Dolby Laboratories. 4 • Viele DVDs sind mit einem Kopierschutz versehen. Daher sollten Sie Ihre Anlage unbedingt direkt an das Fernsehgerät und nicht an einen Videorekorder anschließen. Der Anschluss an einen Videorekorder löst bei einer mit einem Kopierschutz versehenen DVD Bildstörungen aus. Deutsch HT-D450-EN-DE-1228.indd 4 2011-12-28 5:03:03 Inhalt SICHERHEITSINFORMATIONEN 2 ERSTE SCHRITE 7 ANSCHLÜSSE 15 22 4 4 4 Sicherheitshinweise Vorsichtsmaßnahmen Zubehör Vorsichtsmaßnahmen beim Verwenden und Lagern von Disks Lizenz Copyright Kopierschutz 7 7 11 11 12 13 Symbole in dieser Bedienungsanleitung Merkmale der einzelnen Disks Beschreibung Vorderseite des Geräts Rückseite des Geräts Fernbedienung 15 18 20 21 Lautsprecher anschließen Fernsehgerät anschließen UKW-Antenne anschließen Andere Audiogeräte anschließen 22 22 23 23 23 23 23 23 24 24 25 25 25 26 26 26 26 26 26 27 27 27 27 27 27 Bevor Sie beginnen (Ersteinstellung) Setup-Menü einstellen Anzeige TV-Bildformat BD Wise Auflösung HDMI-Format Video Ausgangssignal Audio Lautsprech Ereinstellung DRC (Dynamic Range Compression) Audio-Sync HDMI AUDIO Benutzer-EQ Audioausgabekanal System Ersteinstellung DivX(R)-Registrierung DivX(R) Deaktivierung Sprache Sicherheit Kindersicherung Passwort ändern Unterstützung Produktinformationen DEUTSCH SYSTEM-SETUP 2 3 3 4 Deutsch HT-D450-EN-DE-1228.indd 5 5 2011-12-28 5:03:04 Inhalt GRUNDFUNKTIONEN 28 ZUSATZFUNKTIONEN 28 28 29 29 33 35 Disks wiedergeben Audio-CDs und MP3/WMA-Disks wiedergeben JPEG-Dateien wiedergeben Wiedergabefunktion verwenden Tonmodus UKW-Radio hören 36 36 USB-Funktion verwenden USB Aufnahme 37 38 39 Fehlerbehebung Sprachcode-Liste Technische Daten 36 SONSTIGE INFORMATIONEN 37 • Abbildungen und Illustrationen in diesem Handbuch dienen nur als Beispiel und können vom Aussehen des Produkts abweichen. • Verwaltungskosten werden abgerechnet, wenn a. Auf Ihren Wunsch ein Ingenieur zu Ihnen geschickt wird, und es liegt kein Defekt des Geräts vor (d.h. wenn Sie dieses Benutzerhandbuch nicht gelesen haben) b. Sie das Gerät in eine Reparaturwerkstatt bringen, und es liegt kein Defekt des Geräts vor (d.h. wenn Sie dieses Benutzerhandbuch nicht gelesen haben). • Der abgerechnete Betrag wird Ihnen mitgeteilt, ehe irgendwelche Arbeiten oder Kundenbesuche ausgeführt werden. 6 Deutsch HT-D450-EN-DE-1228.indd 6 2011-12-28 5:03:04 Informieren Sie sich vor dem Lesen der Bedienungsanleitung über die nachstehenden Begriffe. Symbol d B A G D ! ✎ Begriff Erklärung DVD Hier handelt es sich um eine Funktion, die bei DVD-Video oder DVD±R/±RW zur Verfügung steht, die im Videomodus beschrieben und fixiert wurden. CD Hier handelt es sich um eine Funktion, die bei Daten-CDs (CD DA, CD-R/-RW) zur Verfügung steht. MP3 Hier handelt es sich um eine Funktion, die bei CD-R/-RW mit MP3-Dateien zur Verfügung steht. JPEG Hier handelt es sich um eine Funktion, die bei CD-R/-RW mit JPEG-Dateien zur Verfügung steht. DivX Hier handelt es sich um eine Funktion, die bei MPEG4Disks zur Verfügung steht. (DVD±R/±RW, CD-R/-RW) ACHTUNG Hierbei liegt ein Fall vor, in dem eine Funktion nicht ordnungsgemäß arbeitet oder in dem ein Einstellungsvorgang abgebrochen wurde. HINWEIS Verweist auf Tipps oder Anweisungen auf der Seite, die beim korrekten Ablauf von Funktionen helfen. Schnellzugriff Zum direkten Zugriff auf eine Funktion durch Drücken der Taste auf der Fernbedienung. Merkmale der einzelnen Disks Regionalcode Das Heimkino-Gerät und die DVDs sind nach Regionen codiert. Für die Wiedergabe müssen diese Codes zusammenpassen. Wenn dies nicht der Fall ist, kann die Disk nicht wiedergegeben werden. Disktyp Regionalcode DVDVIDEO Region 1 USA, US-Territorien und Kanada 2 Europa, Japan, Naher Osten, Ägypten, Südafrika, Grönland 3 Taiwan, Korea, Philippinen, Indonesien, Hongkong 4 Mexiko, Südamerika, Mittelamerika, Australien, Neuseeland, Pazifische Inseln, Karibik 5 Russland, Osteuropa, Indien, die meisten afrikanischen Länder, Nordkorea, Mongolei 6 China Deutsch HT-D450-EN-DE-1228.indd 7 Erste Schritte Symbole in dieser Bedienungsanleitung 01 Erste Schritte 7 2011-12-28 5:03:04 Erste Schritte Abspielbare Disktypen Disktyp & DiskKennzeichnung Aufnahmesignale Größe (Logo) 12 cm AUDIO + ca. 240 Minuten (einseitig) ca. 480 Minuten (doppelseitig) ca. 80 Minuten (einseitig) VIDEO DVD-VIDEO Maximale Spieldauer 8 cm ca. 160 Minuten (doppelseitig) 12 cm 74 Minuten 8 cm 20 Minuten 12 cm - 8 cm - AUDIO AUDIO-CD AUDIO DivX + VIDEO Folgende Disktypen nicht verwenden! • LD, CD-G, CD-I, CD-ROM, DVD-ROM und DVD-RAM können mit diesem Heimkino-System nicht wiedergegeben werden. Sollten derartige Disks in das Gerät eingelegt werden, wird die Meldung <WRONG DISC FORMAT (FALSCHES DISKFORMAT)> auf dem Bildschirm angezeigt. • Im Ausland gekaufte DVDs können möglicherweise mit diesem Produkt nicht wiedergegeben werden.Sollten derartige DVDs in das Gerät eingelegt werden, wird die Meldung <Wrong Region. Please check Disc. (Falsche Region. Bitte Disk überprüfen.)> auf dem Bildschirm angezeigt. Disktypen und Diskformat Dieses Produkt unterstützt keine Mediendateien, die durch DRM (Digital Rights Management) geschützt sind. CD-RW • Einige CD-R-Disks können in Abhängigkeit vom Aufnahmegerät (CD-Rekorder oder PC) oder vom Zustand der Disk evtl. nicht abgespielt werden. • Verwenden Sie CD-R mit 650 MB/74 Minuten Speicherkapazität. Verwenden Sie keine CD-R mit über 700 MB/80 Minuten Kapazität, weil sie möglicherweise nicht wiedergegeben werden können. • Einige (wiederbeschreibbare) CD-RW-Disks werden möglicherweise nicht wiedergegeben. 8 • Nur ordnungsgemäß "abgeschlossene" CD-R können vollständig wiedergegeben werden. Wenn die Sitzung abgeschlossen wurde, ohne jedoch auch die Disk abzuschließen, kann die Disk evtl. nicht vollständig abgespielt werden. CD-R-Disks mit MP3-Dateien • Nur CD-R mit MP3-Dateien in den Formaten ISO 9660 oder Joliet können wiedergegeben werden. • Der Name der MP3-Dateien darf keine Leerzeichen und Sonderzeichen (. / = +) enthalten. • Verwenden Sie Disks, die mit einer Datenkompression/dekompression von mehr als 128 kbit/s aufgenommen wurden. • Nur Dateien mit den Dateinamenserweiterungen „.mp3“ und „.MP3“ können wiedergegeben werden. • Nur eine durchgehend beschriebene Multisession-CD kann wiedergegeben werden. Wenn die Multisession-Disk ein leeres Segment enthält, erfolgt die Wiedergabe nur bis zu dem leeren Segment. • Wenn die Disk beim Brennen nicht abgeschlossen wurde, wird der Start der Wiedergabe verzögert, und eventuell werden nicht alle aufgezeichneten Dateien wiedergegeben. • Bei Dateien, die im VBR-Format (variable Bitraten) sowohl mit niedrigen als auch mit höheren Bitraten (z. B. von 32 kbit/s bis 320 kbit/s) beschrieben wurden, kann der Ton bei der Wiedergabe stottern. • Pro CD können maximal 500 Titel wiedergegeben werden. • Pro CD können maximal 300 Ordner wiedergegeben werden. CD-R-Disks mit JPEG-Dateien • Nur Dateien mit der Erweiterung „.jpg“ können wiedergegeben werden. Wenn die Disk beim Brennen nicht abgeschlossen wurde, wird der Start der Wiedergabe verzögert, und eventuell werden nicht alle aufgezeichneten Dateien wiedergegeben. • Nur CD-R mit JPEG-Dateien in den Formaten ISO 9660 oder Joliet können wiedergegeben werden. • Die JPEG-Dateinamen sollten aus maximal 8 Zeichen bestehen und keine Leer- oder Sonderzeichen (. / = +) enthalten. • Nur eine durchgehend beschriebene Multisession-CD kann wiedergegeben werden. Wenn die Multisession-Disk ein leeres Segment enthält, erfolgt die Wiedergabe nur bis zu diesem Segment. • In einem Ordner können maximal 999 Bilder gespeichert werden. • Bei der Wiedergabe von Kodak/Fuji Picture CDs können nur die JPEG-Dateien im Bildordner wiedergegeben werden. • Bei allen anderen Disks außer Kodak/Fuji Picture CDs, kann sich der Start der Wiedergabe verzögern, oder die Wiedergabe überhaupt nicht erfolgen. Deutsch HT-D450-EN-DE-1228.indd 8 2011-12-28 5:03:05 01 Erste Schritte DVD±R/±RW und CD-R/RW • Softwareaktualisierungen für inkompatible Formate werden nicht unterstützt. (Beispiel: QPEL, GMC, höhere Auflösung als 800 x 600 Pixel, usw.) • Wenn eine DVD-R/-RW nicht korrekt im DVDVideoformat aufgenommen wurde, kann sie nicht wiedergegeben werden. Unterstützte Formate (DivX) Dieses Produkt unterstützt ausschließlich die nachfolgend aufgeführten Medienformate. Sollten weder das Video- noch das Audioformat unterstützt werden, wird der Film möglicherweise fehlerhaft bzw. ohne Ton wiedergegeben. Unterstützte Videoformate Format Unterstützte Versionen AVI WMV DivX3.11~DivX5.1 V1/V2/V3/V7 Unterstützte Audioformate Format Bitrate SamplingFrequenz MP3 80~320 kbit/s WMA 56~128 kbit/s AC3 128~384 kbit/s 44,1/48 kHz DTS 1,5 Mbit/s 44,1 kHz 44,1 kHz • DivX-Dateien einschließlich Audio- und Videodateien, die im DTS-Format erstellt wurden, werden nur bis 6 Mbit/s unterstützt. • Seitenverhältnis : Obwohl die Standard-DivX-Auflösung 640x480 Pixel ist, unterstützt dieses Produkt bis zu 720 x 480 Pixel. Höhere TV-Bildschirmauflösungen als 800 werden nicht unterstützt. • Bei der Wiedergabe von Disks mit einer SamplingFrequenz von mehr als 48 kHz oder 320 kbit/s kann das Bild bei der Wiedergabe am Bildschirm zittern. • Abschnitte mit einer hohen Bildfrequenz werden bei der Wiedergabe einer DivX-Datei ggf. nicht abgespielt. • Da das Produkt nur von DivX Networks, Inc. autorisierte Codierformate unterstützt, werden vom Benutzer erstellte DivX-Dateien möglicherweise nicht wiedergegeben. Deutsch HT-D450-EN-DE-1228.indd 9 9 2011-12-28 5:03:05 Erste Schritte Notizen zum USB-Anschluss Unterstützte Geräte: USB-Speichermedien, MP3Player, Digitalkamera 1) Werden nicht unterstützt wenn ein Ordner oder eine Datei mehr als 10 Zeichen enthält. 2) Eine Untertiteldatei größer als 300 KB kann möglicherweise nicht ordnungsgemäß angezeigt werden. 3) Einige USB-/Digital Kamerageräte oder USBKartenleser werden nicht unterstützt. 4) FAT16 und FAT32 -Dateisysteme werden unterstützt. 5) Foto (JPEG), Musik (MP3) und Video-Dateien sollten in Koreanisch oder Englisch benannt werden. Andernfalls kann die Datei möglicherweise nicht wiedergeben. 6) Schließen Sie direkt am USB-Anschluss des Produkts an. Ein zusätzliche Kabelanschluss kann USBKompatibilitätsprobleme verursachen. 7) Das Einlegen von mehreren Speichergeräten an Ihren Multi-Kartenleser mag nicht eiwandfrei funktionieren. 8) PTP-Protokoll für digitale Kamera wird nicht unterstützt. 9) Entfernen Sie das USB-Gerät während eines „Lade“Vorgangs nicht. 10) Je größer die Bildauflösung, desto länger die Verzögerungszeit bei der Anzeige. 11) DRM-geschützte MP3/WMA- oder Video -Dateien die auf kommerziellen Webseiten heruntergeladen sind, werden nicht abgespielt. 12) Externe Festplatte wird nicht unterstützt. 14) Unterstützte Dateiformate Format Foto Musik Film Dateiname JPG MP3 WMA WMV DivX Dateierweiterung JPG .JPEG .MP3 .WMA .WMV .AVI Bitrate – 80~320 kbit/s 56~128 kbit/s 4 Mbit/s 4 Mbit/s Version – – V8 V1,V2, V3,V7 DivX3.11~ DivX5.1 Pixel 640x480 – – 720x480 SamplingFrequenz – 44,1kHz 44,1kHz 44,1 kHz - 48 kHz 13) Der maximale unterstützte Stromaufnahme eines an den USB-Anschluss angeschlossenen externen Geräts beträgt 500 mA (bei 5V Gleichstrom). 10 Deutsch HT-D450-EN-DE-1228.indd 10 2011-12-28 5:03:05 01 Erste Schritte Beschreibung Vorderseite des Geräts 1 2 3 4 5 6 7 8 9 10 1 DISKFACH Disk hier einlegen. 2 DISPLAY Zeigt den Wiedergabe-Status, die Uhrzeit usw. an. 3 FERNBEDIENUNGSSENSOR Erkennt die Signale der Fernbedienung. 4 TASTE ZUM ÖFFNEN UND SCHLIESSEN DES DISKFACHS ( ) Zum Öffnen und Schließen des Diskfachs. 5 FUNKTIONSTASTE ( Beim Drücken dieser Taste wechselt der Modus folgendermaßen: DVD/CD ➞ D.IN ➞ AUX ➞ USB ➞ FM 6 STOPPTASTE ( 7 TASTE WIEDERGABE/PAUSE ( 8 LAUTSTÄRKETASTEN ( , ) Zum Einstellen der Lautstärke. 9 EIN-/AUSSCHALTTASTE ( ) Schaltet das Heimkino-System ein/aus. 10 USB-ANSCHLUSS ) Beendet die Wiedergabe einer Disk. ) ) Spielt eine Disk ab oder hält die Wiedergabe an. Zum Anschließen von USB-Speichergeräten wie MP3-Player oder USBFlash-Speicher und zum Wiedergeben von Dateien von den USB-Geräten. Deutsch HT-D450-EN-DE-1228.indd 11 11 2011-12-28 5:03:05 Erste Schritte Rückseite des Geräts 1 2 3 4 5 6 7 VIDEO OUT SPEAKERS OUT DIGITAL AUDIO IN FM ANT HDMI OUT FA NET (Only For Service) OPTICAL SURROUND SUBWOOFER 8 9 SURROUND AUX IN COMPONENT OUT 1 LÜFTER Der Lüfter ist ständig in Betrieb, wenn das Gerät eingeschaltet ist. Beim Aufstellen des Geräts ist ein Abstand von mindestens 10 cm auf allen Seiten des Lüfters einzuhalten. 2 LAUTSPRECHER ANSCHLÜSSE Für den Anschluss der Front-, Center- und Surround-Lautsprecher sowie des Subwoofers. 3 EXTERNER DIGITALER OPTISCHER EINGANG (DIGITAL AUDIO IN) Zum Anschließen zusätzlicher Geräte mit digitalem Ausgang. 4 HDMI-AUSGANG (HDMI OUT) Zum Anschließen an ein Fernsehgerät mit HDMI-Eingang über ein HDMIKabel; mit diesem Anschluss wird eine optimale Bildqualität erzielt. 5 AUX-EINGANG Zum Anschließen zusätzlicher Geräte mit analogem 2 Kanal-Audioausgang (z. B. Videorekorder). 6 VIDEOAUSGANG (VIDEO OUT) Zum Anschließen an den Videoeingang (VIDEO IN) eines Fernsehgeräts. 7 KOMPONENTENAUSGANG (COMPONENT OUT) Zum Anschließen an ein Fernsehgerät mit Component-Videoeingang. 8 FA NET (Nur für Service Zwecke) Wird für Servicereparaturen verwendet. 9 UKW-ANTENNENEINGANG (FM ANT) Zum Anschließen einer UKW-Antenne. 12 Deutsch HT-D450-EN-DE-1228.indd 12 2011-12-28 5:03:06 01 Erste Schritte Fernbedienung Übersicht über die Fernbedienung FUNCTION TV SOURCE POWER Heimkino-Gerät ein-/ausschalten. Wenn Sie in den TV-Modus wechseln möchten, die TV-Taste drücken. Wenn Sie zum Heimkino wechseln möchten, die DVD-Taste drücken. Drücken Sie die Nummerntasten, um die Optionen zu bedienen. RECEIVER DVD SLEEP TV Funktion auswählen. oder TV-Videomodus auswählen. Legen Sie die Zeit fest, zu der sich das Heimkino-System automatisch ausschalten soll. Diskfach öffnen/schließen. 1 2 3 4 5 6 7 8 9 DSP /EQ Dolby ProLogic II-Audiomodus auswählen. 0 DSP/EQ-Audiomodus wählen. In Rückwärts- oder Vorwärtsrichtung suchen. Rückwärts oder vorwärts springen. Diskwiedergabe unterbrechen (Pausenmodus). Diskwiedergabe stoppen/starten. Ton stumm schalten. MUTE Lautstärke einstellen. TUNING /CH VOL REPEAT Hauptmenü (Gerätemenü) aufrufen. DISC MENU MENU TITLE MENU Diskmenü aufrufen. Wiedergabe-/Untertitelsprache einstellen, Winkel auswählen usw. Auf häufig verwendete Funktionen des Geräts (z. B. Fotoliste) zugreifen. Helligkeit des Displays einstellen. Ein-/Ausschalten der GIGA Sound Funktion. Regelung der Lautstärke des Subwoofers. UKW-Sender speichern. Wiedergabe von Titel, Kapitel, Track oder Disk wiederholen. Titelmenü aufrufen. TOOLS INFO Auswahltasten: Menüoptionen und Einstellungen auswählen; Eingabetaste: Auswahl bestätigen. Zum vorherigen Menü zurückkehren. Automatisch nach verfügbaren UKW-Sendern suchen und zwischen Sendern umschalten. Aktuellen Diskstatus (Dateistatus) anzeigen. Drücken Sie diese Taste, um das Menü zu verlassen. RETURN A EXIT C D DIMMER GIGA B S.VOL AUDIO UPSCALE S/W LEVEL TUNER MEMORY MO/ST USB REC P.BASS Bassverstärker bzw. MP3Optimierung auswählen. Lautstärke bei starker Lautstärkeänderung regeln und stabilisieren. Starten der USB-Aufnahme MONO- oder STEREO-Modus für Radiosendungen auswählen. Deutsch HT-D450-EN-DE-1228.indd 13 13 2011-12-28 5:03:07 Erste Schritte Batterien in die Fernbedienung einsetzen * Batteriegröße: AAA Herstellercodes für Fernsehgeräte Marke Admiral (M.Wards) A Mark Anam ✎ HINWEIS Setzen Sie die Batterien polrichtig in die Fernbedienung ein: (+) zu (+) und (-) zu (-). Tauschen Sie stets beide Batterien gleichzeitig aus. Halten Sie die Batterien von Hitze und Feuer fern. Die Fernbedienung hat eine Reichweite von bis zu ca. 7 Metern Luftlinie. Fernbedienung einrichten Sie können mit dieser Fernbedienung bestimmte Funktionen Ihres Fernsehgeräts steuern. Wenn Sie das Fernsehgerät mit der Fernbedienung steuern 1. Drücken Sie die Taste TV, um die Fernbedienung in den TV-Modus zu setzen. 2. Drücken Sie die Taste POWER um das Fernsehgerät einzuschalten. 3. Halten Sie die Taste POWER gedrückt, und geben Sie den Code für die entsprechende Marke Ihres Fernsehgeräts ein. • Wenn in der Tabelle mehr als ein Code für Ihr Fernsehgerät angegeben ist, geben Sie die Codes nacheinander ein, um herauszufinden, welcher passt. • Beispiel: Für ein Samsung-Fernsehgerät Halten Sie die Taste POWER gedrückt, und geben Sie mit den Zifferntasten 00, 15, 16, 17 und 40 ein. 4. Wenn das Fernsehgerät ausgeschaltet wird, ist die Einstellung abgeschlossen. • Sie können nun die Tasten TV POWER, VOLUME, CHANNEL und die Zifferntasten verwenden . ✎ HINWEIS Bei einigen Fernsehgerätemarken kann die Fernbedienung eventuell nicht funktionieren oder einige Funktionen können nicht ausgeführt werden. Die Fernbedienung funktioniert mit allen SamsungFernsehgeräten. 14 AOC Bell & Howell (M.Wards) Code Marke 56, 57, 58 MTC Code 18 01, 15 01, 02, 03, 04, 05, 06, 07, 08, 09, 10, 11, 12, 13, 14 01, 18, 40, 48 NEC 18, 19, 20, 40, 59, 60 Nikei 03 Onking 03 57, 58, 81 Onwa 59, 60 Panasonic Penney 03 Candle 18 Cetronic 03 Philco Citizen 03, 18, 25 Philips Cinema 97 Pioneer 06, 07, 08, 09, 54, 66, 67, 73, 74 18 03, 15, 17, 18, 48, 54, 59, 62, 69, 90 15, 17, 18, 40, 48, 54, 62, 72 63, 66, 80, 91 Classic 03 Portland 15, 18, 59 Concerto 18 Proton 40 Contec 46 Quasar 06, 66, 67 Coronado 15 03, 05, 61, 82, 83, 84 Radio Shack RCA/ 17, 48, 56, 60, 61, 75 Craig Croslex 62 Proscan Realistic Crown 03 Sampo Curtis Mates 59, 61, 63 Samsung CXC Sanyo Scott 03, 40, 60, 61 Daytron 03 02, 03, 04, 15, 16, 17, 18, 19, 20, 21, 22, 23, 24, 25, 26, 27, 28, 29, 30, 32, 34, 35, 36, 48, 59, 90 40 40 00, 15, 16, 17, 40, 43, 46, 47, 48, 49, 19, 61, 65 Sears 15, 18, 19 Dynasty 03 15, 57, 64 Emerson 03, 15, 40, 46, 59, 61, 64, 82, 83, 84, 85 Fisher 19, 65 Sharp Signature 2000 (M.Wards) Sony 50, 51, 52, 53, 55 03, 40 Brocsonic Daewoo 18, 59, 67, 76, 77, 78, 92, 93, 94 03, 19 57, 58 Funai 03 Soundesign Futuretech General Electric (GE) 03 06, 40, 56, 59, 66, 67, 68 Spectricon 01 SSS 18 Hall Mark 40 Sylvania Hitachi 15, 18, 50, 59, 69 Symphonic 18, 40, 48, 54, 59, 60, 62 61, 95, 96 Inkel 45 Tatung 06 JC Penny 56, 59, 67, 86 Techwood 18 JVC 70 Teknika 03, 15, 18, 25 KTV 59, 61, 87, 88 TMK 18, 40 KEC 03, 15, 40 Toshiba 19, 57, 63, 71 KMC 15 01, 15, 16, 17, 37, 38, 39, 40, 41, 42, 43, 44 Vidtech 18 Videch 59, 60, 69 18 Wards 15, 17, 18, 40, 48, 54, 60, 64 Yamaha 18 York 40 LG (Goldstar) Luxman Marantz 19, 54, 56, 59, 60, 62, 63, 65, 71 15, 17, 18, 48, 54, 59, 60, 62, 72, 89 40, 54 Yupiteru 03 Matsui 54 Zenith 58, 79 LXI (Sears) Magnavox MGA Mitsubishi/ MGA 18, 40 Zonda 01 18, 40, 59, 60, 75 Dongyang 03, 54 Deutsch HT-D450-EN-DE-1228.indd 14 2011-12-28 5:03:07 02 Anschlüsse Anschlüsse In diesem Kapitel werden verschiedene Möglichkeiten erläutert, das Heimkino-Gerät mit anderen externen Komponenten zu verbinden. Bevor Sie das Heimkino-Gerät installieren oder an einer anderen Stelle aufstellen, müssen Sie es ausschalten und den Netzstecker ziehen. Lautsprecher anschließen Aufstellung des Heimkino-Geräts SW 2,5 bis 3 Mal größer als der Bildschirm Platzieren Sie das Heimkino-Gerät auf einem Regal, einer Kommode oder unter dem Fernsehtisch. Auswahl der Hörposition Wählen Sie Ihre Hörposition in einem Abstand zum Fernsehgerät, welcher der 2,5 bis 3-fachen Größe des Bildschirms entspricht. Beispiel: Bei einem 32-Zoll-Monitor etwa 2 - 2,4 m Bei einem 55-Zoll-Monitor etwa 3,5 - 4 m Front-Lautsprecher ei Center-Lautsprecher f hj Surround-Lautsprecher Platzieren Sie diese Lautsprecher vor Ihrer Hörposition, so dass sie nach innen zeigen (in einem Winkel von ca. 45°) und auf Sie ausgerichtet sind. Platzieren Sie die Lautsprecher so, dass die Hochtöner sich auf einer Höhe mit Ihren Ohren befinden. Richten Sie die Vorderseite der Front-Lautsprecher an der Vorderseite des Center-Lautsprechers aus, oder versetzen Sie sie etwas vor die CenterLautsprecher. Dieser wird am besten auf gleicher Höhe wie die Front-Lautsprecher installiert. Sie können ihn aber auch direkt über oder unter dem Fernsehgerät installieren. Stellen Sie die Rücklautsprecher seitlich von Ihrer Hörposition auf. Falls dafür der Platz nicht ausreicht, platzieren Sie die Rücklautsprecher einander gegenüberliegend. Platzieren Sie die Rücklautsprecher 60 bis 90 cm über Ihrem Kopf, leicht nach unten ausgerichtet. als die Front- und der Center-Lautsprecher sorgen die Surround* Anders Lautsprecher hauptsächlich für Klangeffekte, so dass sie nicht fortwährend Töne wiedergeben. Subwoofer ! g Die Position des Subwoofers ist nicht wichtig. Sie können ihn beliebig platzieren. ACHTUNG Achten Sie darauf, dass Kinder nicht mit den Lautsprechern oder in deren Nähe spielen. Sie können durch umkippende Lautsprecher verletzt werden. Stellen Sie beim Anschluss der Lautsprecherkabel an den Lautsprechern sicher, dass die Polarität (+/ -) korrekt ist. Halten Sie den Subwoofer außerhalb der Reichweite von Kindern. Verhindern Sie, dass Kinder ihre Hände oder Fremdkörper in die Schallöffnung des Subwoofers einführen. Hängen Sie den Subwoofer nicht an der Schallöffnung an der Wand auf. ✎ HINWEIS Wenn Sie einen Lautsprecher in der Nähe des Fernsehers aufstellen, können die Bildschirmfarben aufgrund des magnetischen Feldes, das der Lautsprecher erzeugt, gestört werden. In diesem Fall platzieren Sie den Lautsprecher weiter vom Fernsehgerät entfernt. Deutsch HT-D450-EN-DE-1228.indd 15 15 2011-12-28 5:03:08 Anschlüsse Lautsprecherkomponenten HT-D450 (L) (R) (L) FRONT (R) CENTER SURROUND Lautsprecherkomponenten SUBWOOFER LAUTSPRECHERKABEL Zusammengebaute Lautsprecher HT-D453 HT-D453 (L) (R) SCHRAUBE (5×15): 2 St. SCHRAUBE (4×20): 8 St. CENTERLAUTSPRECHER FRONT (L) CENTER STANDFUSS (R) LS-KABEL SURROUND BODENPLATTE FRONTLAUTSPRECHER SUBWOOFER HT-D455 SURROUND LAUTSPRECHER SUBWOOFER HT-D455 (L) (R) SCHRAUBE (5×15): 4 St. CENTERLAUTSPRECHER SCHRAUBE (4×20): 16 St. FRONT STANDFUSS (L) (R) CENTER SURROUND BODENPLATTE SUBWOOFER FRONT-/SURROUNDLAUTSPRECHER SUBWOOFER LAUTSPRECHERKABEL ✎ HINWEIS Weitere Informationen über die Tallboy-Fuß-Installation finden Sie auf Seite 17. 16 Deutsch HT-D450-EN-DE-1228.indd 16 2011-12-28 5:03:08 02 Anschlüsse Lautsprecher auf dem Tallboy-Fuß installieren * Nur HT-D453 – Front-Lautsprecher * Nur HT-D455 – Front-/Surround-Lautsprecher 1. Drehen Sie die Unterseite der Bodenplatte nach oben und montieren Sie sie auf dem Standfuß. 2. Setzen Sie kleinen Schrauben (4*20, zum Anschließen der Bodenplatte und Stehfuß) im Uhrzeigersinn in die vier markierten Bohrungen mit einem Schraubenzieher wie in der Abbildung gezeigt. 1 2 Bodenplatte Stand 3 Lautsprecher ! ACHTUNG : Wenn Sie einen Drehmoment-Schraubendreher verwenden, achten Sie bitte darauf keine übermäßige Kraft anzuwenden. Andernfalls kann es leer laufen oder zu Beschädigungen kommen. (Drehmoment-Schraubendreher – 15 Kgf/cm, wie unten gezeigt. 3. Befestigen Sie den zusammengebauten Standfuß am oberen Lautsprecher. 4. Setzen Sie eine größere Schraube im Loch auf der Rückseite der Lautschprecher (5*15, zum Anschließen des Lautschprechers und Stehfuß) im Uhrzeigersinn, mithilfe eines Schraubenziehers. 5. Dies ist das Aussehen nachdem der Lautschprecher installiert wurde. Wiederholen Sie diesen Schritt für die weitere Lautschprecher-Montage. 4 Stand 5 Lautsprecher anschließen (Fortsetzung) 1. Drücken Sie die Anschlusslasche an der Rückseite des Lautsprechers herunter. 2. Führen Sie das schwarze Kabel in den schwarzen Anschluss (-) bzw. das rote Kabel in den roten Anschluss (+) ein. Lassen Sie die Lasche dann wieder los. Schwarz Rot 3. Beachten Sie beim Anschließen der Lautsprecher an der Rückseite des Heimkino-Gerätes, dass die Farben der Stecker denen der Buchsen entsprechen. Für das Modell HT-D450 Center-Lautsprecher Front-Lautsprecher (R) Front-Lautsprecher (L) Surround Lautsprecher (L) Surround Lautsprecher (R) Subwoofer * Weitere Informationen zu den HT-D453/D455-Lautsprechern finden Sie auf Seite 16. Deutsch HT-D450-EN-DE-1228.indd 17 17 2011-12-28 5:03:32 Anschlüsse Fernsehgerät anschließen Wählen Sie eine von vier Methoden für den Anschluss an ein Fernsehgerät aus. METHODE 3 SCART IN METHODE 4 (mitgeliefert) VIDEO OUT GITAL DIO IN FM ANT Grün HDMI OUT FA NET (Only For Service) TICAL AUX IN Blau Rot COMPONENT OUT METHODE 2 METHODE 1 METHOD 1 : HDMI Verbinden Sie den Ausgang HDMI OUT an der Rückseite des Heimkino-Geräts über ein HDMI-Kabel (nicht mitgeliefert) mit dem HDMI-Eingang des Fernsehgeräts. METHOD 2 : Component Video Falls Ihr Fernsehgerät über einen Component-Videoeingang verfügt, verbinden Sie den Ausgang COMPONENT OUT (Buchsen Y, PB und PR) an der Rückseite des Heimkino-Geräts über ein ComponentVideokabel (nicht mitgeliefert) mit den entsprechenden Buchsen des Component-Videoeingangs am Fernsehgerät. METHODE 3 : Scart Falls Ihr Fernsehgerät über einen SCART-Eingang verfügt, schließen Sie der mitgelieferte Videokabel der VIDEO OUT-Buchse an der Rückseite des Heimkino-Systems an die VIDEO-Buchse des SCART-Stecker, verbinden Sie anschließend den SCART IN-Stecker mit dem entsprechenden SCART-IN-Buchse Ihres Fernsehgeräts. METHOD 4 : Composite Video Verbinden Sie mit Hilfe des beiliegenden Videokabels die VIDEO OUT (VIDEO-AUSGANGS-) Buchse an der Rückseite des Hauptgeräts mit der VIDEO IN (VIDEO-EINGANGS-) Buchse Ihres Fernsehgeräts. 18 Deutsch HT-D450-EN-DE-1228.indd 18 2011-12-28 5:03:34 02 Folgende Auflösungen sind für die HDMI-Übertragung verfügbar: 480p (576p), 720p, 1080i/1080p. Informationen über die Auflösungseinstellung finden Sie auf Seite 23. Über den Component/Composite-Ausgang gibt das Gerät Signale im Interlace Scan-Modus 480i (576i) aus. Nach dem Herstellen der Videoverbindung müssen Sie an Ihrem Fernsehgerät die die Videoeingangsquelle des Fernsehgeräts auswählen, an den Sie das Heimkino-Gerät angeschlossen haben. Schalten Sie zuerst dieses Heimkino-Gerät ein, bevor Sie die Videoeingangsquelle an Ihrem Fernsehgerät einstellen. Informationen, wie Sie die Videoeingangsquelle an Ihrem Fernsehgerät auswählen, finden Sie im Benutzerhandbuch des Fernsehgeräts. Anschlüsse ✎ HINWEIS ! ACHTUNG Verbinden Sie das Heimkino-System nicht über einen Videorekorder. Videosignale, die über Videorekorder empfangen werden, können durch Urheberschutzsysteme beeinträchtigt werden, wodurch das Bild am Fernsehgerät verzerrt erscheint. HDMI-FUNKTION Automatische HDMI-Erkennung Wenn Sie über ein Samsung Fernsehgerät verfügen, das die CEC-Funktion unterstützt, wird die Ausgabe des Videosignals automatisch in den HDMI-Modus eingestellt, wenn bei eingeschaltetem Gerät ein HDMI-Kabel angeschlossen wird. • HDMI (High Definition Multimedia Interface - Hochauflösende Multimedia-Schnittstelle) • HDMI ist eine Schnittstelle für die digitale Übertragung von Video- und Audiodaten über einen einzigen Anschluss. Das Heimkino-Gerät liefert mit Hilfe von HDMI ein digitales Bild- und Tonsignal, das von einem Fernsehgerät mit HDMIEingang in klaren Bildern wiedergegeben werden kann. • Beschreibung der HDMI-Verbindung - HDMI sendet ein rein digitales Signal an das Fernsehgerät. - Wenn das Fernsehgerät HDCP (High-bandwidth Digital Content Protection) nicht unterstützt, wird nur ein weißes Rauschen auf dem Bildschirm angezeigt. • Was ist HDCP? • HDCP (High-bandwidth Digital Content Protection (Verschlüsselungssystem)) ist ein Kopierschutzverfahren für DVDInhalte, die über HDMI ausgegeben werden. Es ermöglicht eine sichere digitale Verbindung zwischen einer Videoquelle (PC, DVD usw.) und einem Anzeigegerät (Fernsehgerät, Projektor usw.). Der Inhalt wird im Quellgerät verschlüsselt, um unberechtigtes Kopieren zu verhindern. Anynet+ (HDMI-CEC) verwenden Anynet+ ist eine Funktion, die Ihnen die Möglichkeit bietet, andere Samsung AV-Geräte mit Ihrer TV-Fernbedienung von Samsung zu steuern. Sie können die Funktion Anynet+ verwenden, indem Sie dieses Heimkino-Gerät mit einem HDMIKabel an ein Samsung Fernsehgerät anschließen. Diese Funktion ist nur verfügbar, wenn Sie ein mit Anynet+ kompatibles SAMSUNG-Fernsehgerät verwenden. 1. Schließen Sie das Heimkino-Gerät mit einem HDMI-Kabel an ein Samsung-Fernsehgerät an. (Siehe Seite 18.) 2. Konfigurieren der Anynet+-Funktion Ihres Fernsehgeräts. (Weitere Informationen hierzu finden Sie in der Bedienungsanleitung Ihres Fernsehgeräts.) ✎ HINWEIS Einige Fernbedienungstasten werden von Anynet+ unterstützt. Diese Funktion steht nicht zur Verfügung, wenn das HDMI-Kabel CEC nicht unterstützt. Je nach Fernsehgerät stehen für den HDMI-Ausgang bestimmte Auflösungen möglicherweise nicht zur Verfügung. Informationen dazu finden Sie in der Bedienungsanleitung Ihres Fernsehgeräts. Überprüfen Sie, ob Ihr Fernsehgerät das Logo aufweist (Wenn das Logo vorhanden ist, wird die Anynet+-Funktion unterstützt). Deutsch HT-D450-EN-DE-1228.indd 19 19 2011-12-28 5:03:36 Anschlüsse UKW-Antenne anschließen UKW-Antenne (mitgeliefert) VIDEO OUT FM ANT HDMI OUT FA NET (Only For Service) AUX IN COMPONENT OUT 1. Verbinden Sie die mitgelieferte UKW-Antenne mit dem UKW-Antennenanschluss. 2. Bewegen Sie den Antennendraht langsam hin und her, bis Sie einen guten Empfang haben. Befestigen Sie den Draht an der Wand oder einer anderen festen Fläche. ✎ HINWEIS Dieses Heimkino-Gerät empfängt keine MW-Übertragungen. 20 Deutsch HT-D450-EN-DE-1228.indd 20 2011-12-28 5:03:36 02 Anschlüsse Andere Audiogeräte anschließen VIDEO OUT SPEAKERS OUT DIGITAL AUDIO IN FM ANT HDMI OUT FA NET Weiß (Only For Service) OPTICAL D SUBWOOFER AUX IN SURROUND Optisches Kabel (nicht mitgeliefert) Set-Top Box COMPONENT OUT Rot Audiokabel (nicht mitgeliefert) Falls das anzuschließende analoge Gerät nur über einen Audioausgang verfügt, schließen Sie entweder L oder R von AUX IN 2 an. VIDEOREKORDER OPTISCH AUX AUX : Analoge Geräte anschließen Ein Beispiel für eine analoge Signalkomponente ist ein Videorekorder. 1. Verbinden Sie den Eingang AUX IN (Audio) auf der Rückseite des Heimkino-Geräts mit dem Audioausgang der externen analogen Komponente. • Achten Sie darauf, dass die Farben der Steckverbinder übereinstimmen. 2. Wählen Sie mit der Taste FUNCTION den Eingang AUX aus. • Der Modus wechselt folgendermaßen: DVD/CD ➞ D.IN ➞ AUX ➞ USB ➞ FM ✎ HINWEIS Sie können den Videoausgang Ihres Videorekorders mit dem Fernsehgerät und die Audioausgänge des Videorekorders mit dem Heimkino-Gerät verbinden. OPTISCH : Digitale Geräte anschließen Digitale Signalkomponenten sind z. B. Set-Top-Boxen (für Kabel- oder Satellitenempfang). 1. Verbinden Sie den Eingang DIGITAL AUDIO IN (OPTICAL) auf der Rückseite des Geräts mit dem digitalen Ausgang des anzuschließenden digitalen Geräts. 2. Wählen Sie mit der Taste FUNCTION die Option D.IN aus. • Der Modus wechselt folgendermaßen: DVD/CD ➞ D.IN ➞ AUX ➞ USB ➞ FM Deutsch HT-D450-EN-DE-1228.indd 21 21 2011-12-28 5:03:38 System-Setup Setup-Menü einstellen Bevor Sie beginnen (Ersteinstellung) 1. Schließen Sie das Gerät an das Fernsehgerät an und drücken Sie die Taste POWER. Wenn das Gerät das erste Mal an ein Fernsehgerät angeschlossen ist, wird das Startmenü angezeigt. Initial settings > On-Screen Language Select a language for the on-screen displays Die Schritte zur Einstellung eines Menüs sind vom jeweiligen Menü abhängig. Die in diesem Benutzerhandbuch dargestellte GUI (Grafische Benutzeroberfläche) kann je nach Firmware-Version unterschiedlich sein. 1 DISC MENU English MENU TITLE MENU TOOLS INFO 한국어 Nederlands 3 Français Deutsch Italiano 2 >Move RETURN A 2. Wählen Sie mit den Tasten ▲▼ die gewünschte Sprache aus, und drücken Sie die EINGABE. 3. Drücken Sie die EINGABE, um Start auszuwählen. 4. Wählen Sie mit den Tasten ▲▼ das gewünschte Fernsehbildformat aus, und drücken Sie die EINGABE. Wenn das HDMI-Kabel mit dem Gerät angeschlossen ist, steht die Funktion Fernsehbildschirmformat nicht zur Verfügung. ✎ HINWEIS Wenn Sie unter Ersteinstellung keine bevorzugte Sprache eingestellt haben, wird beim nächsten Start des Geräts ein Sprachauswahlfenster angezeigt. Ihre Sprachauswahl wird für alle Menüs übernommen. Bildschirmmenü, Disk Menü, Audio, Untertitel Durch Drücken der Taste RETURN gelangen Sie zurück in das vorherige Menü. Haben Sie eine Menüsprache gewählt, können Sie diese ändern, indem Sie die STOPP taste () auf der Fernbedienung mindestens 5 Sekunden lang gedrückt halten. Dabei darf sich keine Disk im Gerät befinden. Wird das Startmenü nicht auf dem Bildschirm angezeigt, lesen Sie im Abschnitt "Ersteinstellung" nach. (siehe Seite 26) 22 4 EXIT " Select B C D 1 TASTE MENU: Zum anzeigen des hauptmenüs. 2 TASTE RETURN: Zum vorherigen Setup-Menü zurückkehren. 3 EINGABE und RICHTUNG Auswahltasten: zum auswählen von einstellungen und optionen. eingabetaste: zum bestätigen der ausgewählten einstellung oder option. 4 TASTE EXIT: Zum verlassen des menüs. Einstellungen Function DVD/CD 1. Drücken Sie die Taste POWER. 2. Wählen Sie mit den Tasten ◄ ► die Option, Einstellungen und drücken Sie die EINGABE. 3. Wählen Sie mit den Tasten ▲▼ das gewünschte Menü aus, und drücken Sie die EINGABE. 4. Wählen Sie mit den Tasten ▲▼ das gewünschte Untermenü aus, und drücken Sie die EINGABE. 5. Wählen Sie mit den Tasten ▲▼ die gewünschte Option aus, und drücken Sie die EINGABE. 6. Drücken Sie die Taste EXIT, um das Menü zu verlassen. Deutsch HT-D450-EN-DE-1228.indd 22 2011-12-28 5:03:40 03 Sie können verschiedene Displayoptionen, z. B. Fernsehbildformat, Auflösung usw. konfigurieren. TV-Bildformat • Aus : Die Ausgabeauflösung wird entsprechend der vorher eingestellten Auflösung, unabhängig von der Auflösung der Disk, beibehalten. ✎ HINWEIS Sie haben die Möglichkeit, die Bildschirmeinstellungen je nach Art Ihres verwendeten Fernsehgeräts anzupassen. • 4:3 Passend Selbst wenn Sie ein Fernsehgerät mit Bildformat 4:3 verwenden, können Sie mit dieser Einstellung eine DVD im Breitbildformat 16:9 ansehen. Die schwarzen Bildschirmleisten oben und unten fallen weg (dabei wird der äußere rechte und linke Rand abgeschnitten). • 4:3 Normal Mit dieser Einstellung können Sie selbst auf einem Fernsehgerät mit Bildformat 4:3 eine DVD im Breitbildformat 16:9 ansehen. Am oberen und unteren Bildschirmrand ist dann jeweils ein schwarzer Balken zu sehen. • 16:9 Breit Mit dieser Einstellung können Sie das volle Breitbildformat 16:9 auf einem Breitbildfernsehgerät sehen. ✎ HINWEIS Bei der Verwendung von HDMI wechselt der Bildschirm automatisch in den 16:9-Breitbildmodus und die Funktion TV Aspect (TV-Bildformat) ist nicht aktiv. Wenn eine DVD das 4:3-Format aufweist, können Sie die DVD nicht im Breitbildformat anschauen. Da DVDs mit verschiedenen Bildformaten aufgenommen werden, unterscheidet sich die Wiedergabe je nach Software, Fernsehgerät und eingestelltem TV-Bildformat. BD Wise (Nur bei Samsung Produkten) Dadurch wird die Bildqualität entsprechend dem Inhalt (der Disk, DVD usw.), den Sie wiedergeben möchten, und entsprechend dem BD Wisekompatiblen Samsung Fernsehgerät optimiert. Wenn Sie die Auflösung im BD Wise-Modus ändern möchten, müssen Sie BD Wise bereits vorher auf Off (Aus) setzen. BD Wise wird deaktiviert, wenn das Heimkino-Gerät an ein Gerät angeschlossen ist, das BD Wise nicht unterstützt. Auflösung Mit dieser Option wird die Ausgabeauflösung des HDMIVideosignals festgelegt. Die Zahlenangaben 480p (576p), 720p, 1080i und 1080p beziehen sich auf die Anzahl der Zeilen in einem Videobild. Das i und das p stehen für interlace scan (Zeilensprungverfahren) bzw. progressive scan (progressive Abtastung). • 480p(576p) : Gibt Videobilder (progressive Abtastung) mit 480 Zeilen aus. • 720p : Gibt Videobilder (progressive Abtastung) mit 720 Zeilen aus. • 1080i : Gibt Videobilder (Zeilensprungverfahren) mit 1080 Zeilen aus. • 1080p : Gibt Videobilder (progressive Abtastung) mit 1080 Zeilen aus. • BD Wise : Bei Anschluss an das Fernsehgerät über HDMI wird mit der Funktion BD Wise automatisch die optimale Auflösung eingestellt. (Der Menüpunkt BD Wise erscheint nur, wenn BD Wise auf Ein gesetzt wurde.) ✎ HINWEIS Bei Anschluss über Component- oder CompositeAusgang, wird die Auflösung auf 480i (576i) beschränkt. Je nach Fernsehgerät erscheint 1080P möglicherweise nicht. HDMI-Format Sie können die Farbeinstellung am HDMI-Ausgang optimieren. Wählen Sie einen angeschlossenen Gerätetyp aus. • Monitor : Bei Anschluss an einen Bildschirm über HDMI. • TV : Bei Anschluss an ein TV-Gerät über HDMI. BD Wise ist eine neue Funktion von Samsung, die beim Verbinden von Samsung Geräten zum Einsatz kommt. Wenn Sie Samsung Produkte mit BD-Wise über HDMI miteinander verbinden, wird automatisch die beste Auflösung eingestellt. Video Ausgangssignal • Ein : Die Originalauflösung der DVD wird direkt auf dem Fernsehgerät ausgegeben. • NTSC : Sie können das NTSC-Videoformat einstellen. • PAL : Sie können das PAL-Videoformat einstellen. Verschiedene Länder verwenden verschiedene TVStandards. Es kann zwischen NTSC und PAL ausgewählt werden. Deutsch HT-D450-EN-DE-1228.indd 23 System-Setup Display 23 2011-12-28 5:03:41 System-Setup Audio Lautsprech Ereinstellung Lautsprechergröße Sie können in diesem Modus die Größe der Center- und Rücklautsprecher und auch den Testton festlegen. Einstellungen Lautsprech Ereinstellung Lautsprechergröße ► BAL vorn Verzögerun Gszeit Testton mBeweg. Einstellen von Bal. vorne/Surr.-Abgl. Sie können einen Wert zwischen 0 und -6 auswählen. Die Lautstärke nimmt ab, je weiter sich der Wert -6 nähert. Einstellen der Lautstärke des Center/Surround/ Subwoofer Lautsprechers Die Lautstärke kann stufenweise von +6 dB bis -6 dB geregelt werden. Der Ton wird lauter, je weiter sich die Einstellung +6 dB nähert und leiser, je weiter sie sich -6 dB nähert. Verzögerungszeit : Aus " Wählen ' Zurück " Wählen ' Zurück • Für die Front Lautsprecher ist der Modus auf Klein eingestellt. • Für den Subwoofer ist der Modus auf Present eingestellt. • Für den Center- und die Surround-Lautsprecher kann zwischen den Einstellungen Klein oder Keine gewählt werden. - Klein: Diese Einstellung wählen, wenn Lautsprecher angeschlossen sind. - Kein: Diese Einstellung wählen, wenn keine Lautsprecher angeschlossen sind. HINWEIS Der Lautsprechermodus kann sich je nach Dolby Pro Logic und Stereo-Einstellungen unterscheiden. ✎ Wenn die Lautsprecher nicht im gleichen Abstand von der Hörposition aufgestellt werden können, lässt sich für die Center- und Surround-Lautsprecher eine Verzögerung des Audiosignals einstellen. In diesem Modus kann auch der Test Ton eingestellt werden. Lautsprecher-Verzögerungszeit einstellen Wenn der 5.1CH Surround Sound wiedergegeben wird, können Sie die beste Klangqualität genießen, wenn der Abstand zwischen Ihnen und jedem Lautsprecher gleich groß ist. Je nach Platzierung der Lautsprecher ist der Ton an verschiedenen Orten im Raum zeitversetzt zu hören. Um diese Unterschiede auszugleichen, können Sie für den Ton des Center-und der SurroundLautsprecher einen Verzögerungseffekt einstellen. Einstellungen Verzögerungszeit BAL vorn Vorderseite Sie können die Lautsprecherbalance und den Lautsprecherpegel für jeden Lautsprecher einzeln anpassen. Center : 00mSEC Surround : 10mSEC Subwoofer Testton : Aus Einstellungen BAL vorn Bal. vorne dB L R dB Surr.-Abgl. dB L R dB Mittenpeg. dB Anp. Surrou. dB SW-Pegel dB <Ändern " Wählen ' Zurück mBeweg. " Wählen ' Zurück Drücken Sie die Tasten ▲▼, um die gewünschte Option auszuwählen und anzupassen. Drücken Sie die Tasten ◄►, um die Einstellungen anzupassen. 24 <Ändern " Wählen ' Zurück mBeweg. " Wählen ' Zurück ✎ HINWEIS Das Verzögerungszeitmenü ist nur dann aktiviert, wenn eine 5.1 Kanal-Audioquelle wiedergegeben wird. Sie können Center und Surround in diesem Modus nicht einstellen, wenn deren Lautsprechergröße auf KEIN eingestellt ist. Deutsch HT-D450-EN-DE-1228.indd 24 2011-12-28 5:03:48 03 System-Setup Ideale Aufstellung der Center-Lautsprecher Testton Einstellungen Lautsprech Ereinstellung Lautsprechergröße BAL vorn Verzögerun Gszeit Testton Ideale Aufstellung der SurroundLautsprecher Alle Lautsprecher sollten möglichst innerhalb dieses Kreises aufgestellt werden. Df: Entfernung zum Front-Lautsprecher Dc: Entfernung zum Center-Lautsprecher Ds: Entfernung zum Surround-Lautsprecher Center-Lautsprecher einstellen Ist die Entfernung Dc gleich oder länger als die Entfernung Df in der Abbildung, stellen Sie den Modus auf 0 ms.Andernfalls ändern Sie die Einstellung laut Tabelle. Df um ... größer als Dc 0,00m 0,34m 0,68m 1,06m 1,40m 1,76m Verzögerungszeit 00 ms 01 ms 02 ms 03 ms 04 ms 05 ms mBeweg. : Ein ► " Wählen ' Zurück " Wählen ' Zurück Überprüfen Sie mit der Funktion Testton die Lautsprecheranschlüsse. • Wählen Sie mit den Tasten ◄► die Option Ein. • Der Testton wird in dieser Folge ausgegeben: Vorne Links Center Vorne Rechts Surround Rechts Surround Links Subwoofer. • Um den Testton zu beenden, drücken Sie die EINGABE. DRC (Dynamic Range Compression) Mit dieser Funktion wird der Bereich zwischen größter und kleinster Lautstärke geregelt. Mithilfe dieser Funktion kommen Sie auch dann in den Genuss von Dolby Digital Sound, wenn Sie sich spät abends Filme mit niedriger Lautstärke ansehen. • Sie können entweder Voll, 6/8, 4/8, 2/8 oder Aus auswählen Einstellen der Surround-Lautsprecher Ist die Entfernung Dc gleich oder größer als die Entfernung Ds in der Abbildung, stellen Sie den Modus auf 0 ms. Andernfalls ändern Sie die Einstellung laut Tabelle. Ds um ... größer als Dc 0.00m 1.06m 2.11m 3.16m 3.62m 5.29m Verzögerungszeit 00 ms 03 ms 06 ms 09 ms 12 ms 15 ms ✎ HINWEIS Bei PL II (Dolby Pro Logic II), kann u. U. die Verzögerungszeit für jeden Modus verschieden sein. Bei AC-3 und DTS kann die Verzögerungszeit auf Werte zwischen 00 und 15 ms eingestellt werden. Der Center-Kanal kann nur bei Disks mit 5.1Sound angepasst werden. AUDIO-SYNC In Verbindung mit einem Digitalfernseher stimmt die Ton-Bild-Synchronisation möglicherweise nicht. Passen Sie in diesem Fall die Audio-Verzögerungszeit an, so dass der Ton zum Bild passt. • Sie können eine Audio-Verzögerungszeit zwischen 0 ms und 300 ms einstellen. Stellen Sie die AudioVerzögerungszeit auf den optimalen Status. HDMI AUDIO Sie können einstellen, ob der Ton über das HDMIKabel übertragen wird oder nicht. • Aus : Es wird nur das Videosignal über das HDMIVerbindungskabel gesendet. Die Audioausgabe erfolgt ausschließlich über die Lautsprecher des Heimkino-Geräts. • Ein: Sowohl Video- als auch Audiosignale werden über das HDMI-Verbindungskabel gesendet. Die Audioausgabe erfolgt nur über die Lautsprecher Ihres TV-Geräts. Deutsch HT-D450-EN-DE-1228.indd 25 25 2011-12-28 5:03:48 System-Setup ✎ HINWEIS System Die Standardeinstellung dieser Funktion ist HDMI Audio Aus. HDMI Audio wird automatisch als 2-Kanalton für die TVLautsprecher abgemischt. Wenn HDMI AUDIO auf Ein gesetzt ist, funktionieren PL II /DSP EQ /P.BASS nicht. Wenn HDMI AUDIO auf 'Ein' gestellt ist, kann die Lautstärke nur über die Fernbedienung des Fernsehers geregelt werden. Ersteinstellung Mithilfe der Werkeinstellungen, können Sie Sprache und Fernsehbildformat einstellen. ✎ HINWEIS Benutzer-EQ Sie können die Equilizereinstellungen an Ihre Vorlieben anpassen. DivX(R)-Registrierung Zeigen Sie den DivX(R) VOD-Registrierungscode an, um DivX(R) VOD-Inhalte zu erwerben und wiederzugeben. Einstellungen Benutzer-EQ dB 6 · · · · · · · · · · · · -6 ✎ HINWEIS 250Hz 600Hz 1kHz 3kHz 6kHz 10kHz 15kHz a Zurücks. > Einst. < Beweg. ' Zurück mBeweg. " Wählen ' Zurück ✎ HINWEIS Wenn das HDMI-Kabel an das Heimkino-Gerät angeschlossen ist, steht das Fernsehbildformat nicht zur Verfügung und wird automatisch auf 16:9 eingestellt. Die Einstellungen können ebenfalls mit Hilfe der DSP/EQ Taste vorgenommen werden. (Siehe Seite 34) Diese Option wird nicht aktiviert, wenn Sie OK auswählen. Um diese Option zu aktivieren, müssen Sie DivX(R)-Deaktivierung aktivieren. Auch wenn Sie das System zurücksetzen, geht die DivX Registrierung nicht verloren. DivX(R) Deaktivierung Wählen Sie diese Option, um einen neuen Registriercode zu erhalten. Audioausgabekanal Um den Ton des Fernsehgeräts über die Heimkino Lautsprecher genießen zu können, benötigen Sie nur ein HDMI-Kabel. • Aus : Schaltet den Audioausgabekanal aus. • Auto : Wenn Ihr Fernsehgerät mit der Audioausgabekanal Funktion kompatibel ist, hören Sie den Ton des Fernsehgeräts über die Heimkinolautsprecher. ✎ HINWEIS Wenn Anynet+ (HDMI-CEC) auf Aus eingestellt ist, steht die Audioausgabekanal Funktion nicht zur Verfügung. Wenn Sie ein HDMI-Kabel ohne ARC (Audio Return Channel) Zertifikat verwenden (ohne Unterstützung der Audioausgabekanal Funktion) kann dies zu Kompatibilitätsproblemen führen. Die ARC-Funktion ist nur verfügbar, wenn ein ARC-fähiges Fernsehgerät angeschlossen ist. 26 Deutsch HT-D450-EN-DE-1228.indd 26 2011-12-28 5:03:49 03 Sie können die Sprache auswählen, in der das Bildschirmmenü, Diskmenü usw. angezeigt werden soll. Passwort ändern Wählen Sie Ändern and geben Sie mit den Zifferntasten der Fernbedienung ein 4stelliges Passwort ein. System-Setup Sprache Einstellungen Wählen Sie eine Sprache für die OSD-Sprache Textanzeige. Wählen Sie eine Sprache für das Disc-Menü Diskmenü. Wählen Sie eine Sprache für die Audio Wiedergabe der Disk. Wählen Sie eine Sprache für die Untertitel Untertitel der Disk. a Um eine nicht im Menü angezeigte Sprache einzustellen, wählen Sie für die Option Disc-Menü, Audio oder Untertitel die Einstellung Others (Andere) und geben den Sprachcode der gewünschten Sprache ein (siehe Seite 38). a Die Einstellung Others (Andere) steht für OSD-Sprache nicht zur Verfügung. ✎ HINWEIS Die ausgewählte Sprache wird nur dann verwendet, wenn sie von der Disk unterstützt wird. Sicherheit Anzeige Sicherungsstufe : Aus Audio Passwort : Ändern ► System Sprache Sicherheit Unterstützung mBeweg. " Wählen ' Zurück Falls Sie Ihr Passwort vergessen haben 1. Nehmen Sie die Disk aus dem Gerät. 2. Halten Sie die STOPP taste () auf der Fernbedienung 5 Sekunden oder länger gedrückt. Alle Einstellungen werden auf die werkseitigen Standardeinstellungen zurückgesetzt. Unterstützung Produktinformationen Zum Anzeigen der Produktinformationen z.B. Modellcode, Softwareversion usw. Die Kindersicherung (Parental Lock) funktioniert in Verbindung mit DVDs, denen eine bestimmte Alterseinstufung zugewiesen wurde. Dies hilft Ihnen, die Kontrolle über die Art der Filme zu behalten, die sich Ihre Familie ansieht. Das Bewertungssystem umfasst 8 verschiedene Stufen. Sicherungsstufe Wählen Sie die Sicherungsstufe aus, die Sie einstellen möchten. Je höher die Stufe, desto schärfer ist die Alterseinstufung Wenn Sie beispielsweise Stufe 6 auswählen, werden Disks mit Stufe 7 und 8 nicht wiedergegeben. Geben Sie das Kennwort ein, und drücken Sie die EINGABE. - Die Standardeinstellung für das Kennwort ist „0000“. - Sobald die Einstellungen abgeschlossen sind, wird wieder der vorherige Bildschirm angezeigt. Deutsch HT-D450-EN-DE-1228.indd 27 27 2011-12-28 5:03:49 Grundfunktionen Disk wiedergeben Audio-CDs und MP3/WMA-CDs wiedergeben 1. Drücken Sie die Taste ÖFFNEN/SCHLIESSEN (). BA 2. Legen Sie vorsichtig eine Disk mit der bedruckten Seite nach oben ein. 3. Drücken Sie die Taste ÖFFNEN/SCHLIESSEN (), um das Diskfach zu schließen. Track01 1/17 ✎ HINWEIS Fortsetzungsfunktion: Wenn Sie die Wiedergabe anhalten, speichert das Gerät die aktuelle DiskPosition. Durch erneutes Drücken der WIEDERGABE wird die Wiedergabe an dieser Stelle fortgesetzt. (Diese Funktion ist nur bei DVDs verfügbar.) Drücken Sie während der Wiedergabe die STOPP taste zweimal, um die Fortsetzungsfunktion zu deaktivieren. Wenn sich das Gerät im Pause-Modus befindet und länger als 3 Minuten am Heimkino-Gerät oder auf der Fernbedienung keine Taste gedrückt wird, wird in den STOPP-Modus gewechselt. Der Startbildschirm richtet sich nach dem Diskinhalt und mag unterschiedlich erscheinen. Raubkopien werden mit diesem Gerät nicht wiedergegeben, weil dadurch die CSS-Vorgaben (Content Scrambling System: ein Kopierschutzsystem) verletzt werden. a Das Symbol zeigt einen ungültigen Tastendruck an. TV-Bildschirmschoner/Energiesparfunktion • Wenn im Stop- oder Wiedergabemodus für mehr als 5 Minuten keine Taste betätigt wird, wird der Bildschirmschoner eingeschaltet. • Wenn sich der Player länger als 20 Minuten im Bildschirmschonermodus befindet, wird er automatisch ausgeschaltet. (Außer bei Musikwiedergabe) 0:15 / 3:59 Function DVD/CD 1. Legen Sie eine Audio-CD (CD-DA) oder eine MP3Disk in das Diskfach ein. • Von einer Audio-CD wird der erste Titel automatisch abgespielt. - Drücken Sie die Tasten #$, um zum vorigen/nächsten Titel zu gelangen. • Bei einer MP3/WMA-Disk wählen Sie mit den Tasten ◄► die Option Musik, dann drücken Sie die EINGABE. - Wählen Sie mit den Tasten ▲▼◄► die gewünschte Datei aus, und drücken Sie die EINGABE. - Drücken Sie die Tasten, um zu den vorherigen/nächsten Seiten zu gelangen. 2. Drücken Sie die STOPP (), um die Wiedergabe zu beenden. ✎ HINWEIS 28 Repeat Wdg.-Modus Je nach Aufnahmemodus können manche MP3-/ WMA-CDs möglicherweise nicht wiedergegeben werden. Das Inhaltsverzeichnis einer MP3-CD hängt vom Format der aufgenommenen MP3-/WMA-Titel ab. WMA-DRM-Dateien werden nicht wiedergegeben. Deutsch HT-D450-EN-DE-1228.indd 28 2011-12-28 5:03:49 04 Mit einer digitalen Kamera oder einem Camcorder aufgenommene Bilder oder JPEG-Dateien von einem Computer können auf einer CD gespeichert werden und anschließend mit dem Heimkino-Gerät wiedergegeben werden. 1. Legen Sie eine JPEG-Disk in das Diskfach ein. 2. Wählen Sie mit den Tasten ◄► die Option Foto aus, und drücken Sie dann die EINGABE. 3. Wählen Sie mit den Tasten ▲▼ den gewünschten Ordner für die Wiedergabe aus, und drücken Sie dann die EINGABE. 4. Wählen Sie mit den Tasten ▲▼ das gewünschte Foto für die Wiedergabe aus, und drücken Sie dann die EINGABE. • Die ausgewählte Datei wird wiedergegeben und die Diashow startet. • Um die Diashow anzuhalten, drücken Sie die PAUSE (). • Sie können die vorherige/nächstei Datei sehen, indem Sie im Diashowmodus die Tasten ◄,► drücken. Suchlauf vorwärts/rückwärts dBAD Drücken Sie die Tasten für die Suchfunktion. 1➞2➞3➞4 1➞2➞3➞4 ✎ HINWEIS Im Suchmodus erfolgt keine Tonwiedergabe. Diese Funktion steht nur für Digital Audio CDs zur Verfügung. Während des Bildsuchlaufs wird der Ton nur bei den Suchgeschwindigkeiten 1 und 2 wiedergegeben. Überspringen von Szenen/Liedern ROOT dBAD JPEG 1 JPEG 2 JPEG 3 642 X 352 Drücken Sie die Tasten #$. • Bei jedem Drücken der Taste während der Wiedergabe wird das vorherige/nächste Kapitel oder Verzeichnis (Datei) bzw. der vorherige/ nächste Titel abgespielt. • Ein aufeinanderfolgendes Überspringen von Kapiteln ist nicht möglich. 2010/01/01 Function DVD/CD Seite Zurück Rotationsfunktion Wiedergabe in Zeitlupe G Drücken Sie im Pausenmodus die Taste GRÜN (B) oder GELB (C). • Taste GRÜN (B): Drehen Sie das Bild 90° gegen den Uhrzeigersinn • Taste GELB (C): Drehen Sie das Bild 90° im Uhrzeigersinn. ✎ HINWEIS Die vom Gerät unterstützte maximale Auflösung beträgt 5120 x 3480 (oder 19,0 MPixel) für Dateien mit JPEG-Standard und 2048 x 1536 (oder 3,0 MPixel) für progressive Bilddateien. dD Drücken Sie die PAUSE () und danach die Taste für die Zeitlupenwiedergabe. d D 1 ➞2 ➞3 1 ➞2 ➞3 ✎ HINWEIS Im Zeitlupenmodus erfolgt keine Tonwiedergabe. Zeitlupenwiedergabe rückwärts ist nicht möglich. Deutsch HT-D450-EN-DE-1228.indd 29 Grundfunktionen Wiedergabefunktion verwenden JPEG-Dateien wiedergeben 29 2011-12-28 5:03:50 Grundfunktionen Einzelbildwiedergabe Titelmenü verwenden dD Drücken Sie wiederholt die PAUSE. • Jedes Mal, wenn Sie während der Wiedergabe diese Taste drücken, wird das jeweils nächste Einzelbild angezeigt. ✎ HINWEIS D Drücken Sie während der Wiedergabe die Taste ◄,►. • Bei jedem Drücken der Taste ►, macht die Wiedergabe einen 5-Minuten-Sprung vorwärts. • Bei jedem Drücken der Taste ◄, macht die Wiedergabe einen 5-Minuten-Sprung rückwärts. ✎ HINWEIS Bei DVDs mit mehreren Titeln werden alle Filmtitel angezeigt. 1. Drücken Sie während der Wiedergabe die Taste TITLE MENU auf der Fernbedienung. TITLE MENU 2. Wählen Sie mit den Tasten ▲▼◄► die gewünschte Option aus, und drücken Sie die EINGABE. Bei der Einzelbildwiedergabe erfolgt keine Tonwiedergabe. Funktion 5-Minuten-Sprung d Diese Funktion steht nur für DivX zur Verfügung, die eine Zeitinformation beinhalten. ✎ HINWEIS Die Menüeinstellungspunkte können je nach Disk variieren. Möglicherweise ist dieses Menü nicht verfügbar. Wiedergabe wiederholen dBAD DVD/DivX wiederholen Sie können einen Titel, ein Kapitel oder einen Abschnitt (A-B-Wiederholen) einer DVD/DivX wiederholen. Diskmenü verwenden Wiederhol. AUS d Sie können die Menüs für die Wiedergabesprache, Untertitelsprache, Profile usw. anzeigen. 1. Drücken Sie während der Wiedergabe die Taste DISC MENU auf der Fernbedienung. DISC MENU 2. Wählen Sie mit den Tasten ▲▼◄► die gewünschte Option aus, und drücken Sie die EINGABE. ✎ HINWEIS Die Menüeinstellungspunkte können je nach Disk variieren. Möglicherweise ist dieses Menü nicht verfügbar. 30 1. Drücken Sie während der DVD/DivXWiedergabe die Taste REPEAT auf der Fernbedienung. 2. Wählen Sie mit den Tasten ▲▼ den gewünschten Wiederholmodus aus, und drücken Sie die EINGABE. REPEAT 3. Wählen Sie mit den Tasten ▲▼ AUS aus, um den Wiederholmodus wieder auszuschalten, und drücken Sie danach die EINGABE. Z D Titel ➞ Kapitel ➞ A - ➞ Aus Titel ➞ Ordner ➞ Alle ➞ Aus Deutsch HT-D450-EN-DE-1228.indd 30 2011-12-28 5:03:50 04 Anzeige von Diskinformationen 1. Drücken Sie während der CD/ MP3Wiedergabe wiederholt die Taste REPEAT, um den gewünschten Wiederholmodus auszuwählen. B dD 1/1 2/20 (Wiederholung Aus Disk wiederholen Alle wiederholen Zufallswiedergabe Abschnitt A-B wiederholen) 0:05:21 1/1 EN AC3 5.1 1/1 EN 1/1 Ändern A Grundfunktionen CD/MP3 wiederholen (Wiederholung Aus Titel wiederholen Verz. wiederholen (Verzeichnis) Alle wiederholen Zufallswiedergabe) Wählen D Abschnitt A-B festlegen und wiederholen 1/6 1/1 1/1 EN dB Ändern Wählen Sie können einen Abschnitt auf einer DVD oder CD festlegen und wiederholt wiedergeben. 1. Drücken Sie während der Wiedergabe einer DVD oder CD die Taste REPEAT auf der Fernbedienung. 2. Drücken Sie bei DVDs die Tasten ▲▼ um Aauszuwählen. Drücken Sie bei CDs wiederholt die Taste REPEAT bis das Symbol erscheint. 3. Drücken Sie die EINGABE, um den Punkt zu markieren, an dem die Wiederholung starten soll (A). 4. Drücken Sie die EINGABE, um den Punkt zu markieren, an dem die Wiederholung stoppen soll (B). 5. Um zur normalen Wiedergabe zurückzukehren, drücken Sie bei DVDs die Tasten ▲▼ um AUS auszuwählen. Bei CDs drücken Sie die Taste REPEAT, um auszuwählen. ✎ HINWEIS Die A-B-Wiederholungsfunktion steht nicht bei DivX-, MP3- oder JPEG-Disks zur Verfügung. 1. Drücken Sie während der Wiedergabe die Taste TOOLS auf der Fernbedienung. TOOLS 2. Wählen Sie mit den Tasten ▲▼ den gewünschten Menüpunkt. 3. Wählen Sie mit den Tasten ◄► die gewünschte Einstellung, und drücken Sie anschließend die EINGABE. - Sie können mit den Zifferntasten auf der Fernbedienung einige Optionen steuern. 4. Drücken Sie die Taste TOOLS erneut, um Diskinformation auszublenden. ✎ HINWEIS Wenn Sie Inhalte über das Tools-Menü abspielen, sind abhängig vom Datenträger manche Funktionen möglicherweise nicht verfügbar. Je nach Art der Disk können Sie auch DTS, Dolby Digital oder Pro Logic auswählen. Einige Tools-Menüs können sich je nach Disks und Dateien unterscheiden. Deutsch HT-D450-EN-DE-1228.indd 31 31 2011-12-28 5:03:52 Grundfunktionen TOOLS-Menü Titel ( ): Zum Auswählen des gewünschten Titels auf einem Datenträger, auf dem sich mehrere Titel befinden. Zum Beispiel: wenn sich mehr als ein Film auf einer DVD befindet, wird jeder Film als Titel erkannt. Kapitel ( ): DVDs werden meistens kapitelweise aufgenommen. So können bestimmte Kapitel leicht gefunden werden. Wiedergabezeitpunkt ( ): Ermöglicht die Wiedergabe eines Films ab einer bestimmten Stelle (Wiedergabezeitpunkt). Sie müssen die gewünschte Startzeit als Referenz eingeben. Bei einigen Datenträgern funktioniert die zeitbezogene Suchfunktion nicht. Audio ( ): Zeigt den Soundtrack (Wiedergabesprache) des Films an. Eine DVD kann bis zu 8 verschiedene Audiosprachen enthalten. Untertitel ( ): Zeigt die auf der Disk verfügbaren Untertitelsprachen an. Sie können eine Sprache auswählen oder die Untertitel vom Bildschirm ausblenden. Eine DVD kann bis zu 32 verschiedene Untertitelsprachen enthalten. Winkel ( ): Wenn eine Szene einer DVD aus mehreren Kamerawinkeln aufgenommen wurde, können Sie diese mit der Winkel-Funktion auswählen. Wiedergabesprache wählen dD 1. Drücken Sie die Taste TOOLS. 2. Wählen Sie mit den Tasten ▲▼ AUDIO ( aus. ✎ HINWEIS Die Funktion zur Auswahl von Wiedergabe- und Untertitelsprache ist möglicherweise nicht bei allen Disktypen verfügbar. Untertitelfunktion D • Für die ordnungsgemäße Verwendung dieser Funktion müssen Sie über Erfahrung in der Videoextraktion und -bearbeitung verfügen. • Speichern Sie für die Verwendung der Untertitelfunktion die Untertiteldatei (*.smi) mit dem gleichen Dateinamen wie die DivX-Datei (*.avi) im gleichen Ordner ab. Beispiel. Hauptverzeichnis Samsung_007CD1.avi Samsung_007CD1.smi • Der Dateiname für die Untertiteldatei kann aus bis zu 100 alphanumerischen oder 50 ostasiatischen Zeichen (2-Byte-Zeichen, wie in Koreanisch und Chinesisch) bestehen. • Die Untertitel von DivX-Dateien sind: *.smi, *.sub, *.srt, über 148 kbyte wird nicht unterstützt. Winkel-Funktion ) 3. Mit Hilfe der ◄► Tasten Sie die gewünschte Audiosprache einstellen. • Je nachdem, welche Sprachen auf einer DVD zur Verfügung stehen, wird bei jedem Drücken der Taste eine andere AudioSprache ausgewählt. Untertitelsprache wählen dD 1. Drücken Sie die Taste TOOLS. 3. Wählen Sie mit den ◄► Tasten die gewünschte Untertitelsprache aus. • Je nachdem, welche Sprachen auf einer DVD zur Verfügung stehen, wird bei jedem Drücken der Taste eine andere Untertitelsprache ausgewählt. d Mit dieser Funktion können Sie dieselbe Szene aus verschiedenen Winkeln ansehen. 1. Drücken Sie die Taste TOOLS. 2. Wählen Sie mit den Tasten ▲▼ WINKEL ( ) aus. 3. Wählen Sie mit Hilfe der ◄► Tasten den gewünschten Winkel aus. ✎ HINWEIS Diese Funktion steht nur für Disks mit MultiWinkel-Aufnahmen zur Verfügung. 2. Wählen Sie mit den Tasten ▲▼ UNTERTITEL ( ) aus. 32 Deutsch HT-D450-EN-DE-1228.indd 32 2011-12-28 5:03:57 04 GIGA Es kann die Zeit eingestellt werden, nach der sich das Gerät automatisch ausschaltet. Die GIGA Sound Funktion verstärkt den Bass und verdoppelt ihn, damit Sie einen kraftvollen, realitätsnahen Klang zu erleben können. Die GIGA Sound Funktion betrifft nur die Klangwiedergabe über den Subwoofer. Drücken Sie die Taste SLEEP. • Durch wiederholtes Drücken der Taste ändert sich die Auswahl wie folgt: SLP 10 SLP 20 SLP 30 SLP 60 SLP 90 SLP 120 SLP 150 OFF. Drücken Sie die GIGA Taste. ✎ HINWEIS DIMMER Wenn GIGA Sound auf 'Ein' gestellt ist, stehen andere Klangeffekte nicht zur Verfügung. Mit dieser Funktion können Sie die Helligkeit des Displays einstellen. Wenn DOLBY PLII auf 'Ein' gestellt ist, steht der GIGA Klangeffekt nicht zur Verfügung. GIGA Sound funktioniert nur im Stereo LPCM Modus. Drücken Sie die Taste DIMMER. Grundfunktionen SLEEP Tonmodus S.VOL (INTELLIGENTE LAUTSTÄRKE) P.BASS Mit der Funktion P.BASS können tiefe Töne bzw. niedrige Frequenzen verstärkt werden. Die Funktion MP3 ENHANCE (MP3 optimieren) bietet bessere Klangqualität, indem die Sampling-Frequenz angehoben wird. Drücken Sie die Taste P.BASS. 2-Kanal LPCMQuelle POWER BASS ON ➞ POWER BASS OFF MP3-Datei MP3 ENHANCE ON ➞ POWER BASS ON ➞ POWER BASS OFF ✎ HINWEIS Die Funktion P.BASS ist nur bei 2-Kanal-LPCMDatenquellen wie MP3, DivX, CD oder WMA verfügbar. Die P.BASS Funktion kann nicht zusammen mit dem GIGA SOUND oder Dolby Pro Logic II Modus aktiviert werden. Wenn Sie im DSP/EQ-Modus P.BASS drücken, wird der DSP/EQ-Modus automatisch beendet und die Funktion P.BASS aktiviert. Die Funktion MP3 ENHANCE (MP3 optimieren) ist nur für MP3-Dateien verfügbar. Durch diese Funktion wird die Lautstärke bei einer drastischen Lautstärkeänderung, z. B. durch das Umschalten auf einen anderen Kanal oder durch einen Szenenwechsel, geregelt und S . VOL stabilisiert. Drücken Sie die Taste S.VOL. • Durch wiederholtes Drücken der Taste ändert sich die Einstellung wie folgt: SMART VOLUME ON SMART VOLUME OFF S/W PEGEL Sie können ebenfalls die S/W LEVEL Taste auf der Fernbedienung drücken und mit Hilfe der ◄ oder ► Taste den Pegel des Subwoofers einstellen. Drücken Sie die S/W LEVEL Taste. Deutsch HT-D450-EN-DE-1228.indd 33 33 2011-12-28 5:03:57 Grundfunktionen DSP (Digital Signal Processor)/EQ Dolby Pro Logic II-Modus • DSP (Digital Signal Processor): Mit DSP-Modi können verschiedene akustische Umgebungen simuliert werden. • EQ : Sie können zwischen POPS, JAZZ, ROCK oder USER (BENUTZER) auswählen, um den Ton an das wiedergegebene Musikgenre anzupassen. DSP /EQ Sie können den gewünschten Dolby Pro Logic II-Audiomodus auswählen. Drücken Sie die Taste MUSIC Drücken Sie die Taste DSP/EQ. MOVIE PL II. Gibt Klangeffekte beim Musikhören so wieder, als wären Sie bei einer Vorstellung. Für eine besonders wirklichkeitsnahe Tonwiedergabe bei Filmen. Sie können eine 2-Kanal-Tonquelle in 5.1CH Surround Sound mit allen aktivierten Lautsprechern zuhören. POPS, JAZZ, ROCK Abhängig vom Musikgenre können Sie POPS, JAZZ oder ROCK auswählen. PROLOG USER Sie können den Klang, mit dem Sie Musik genießen wollen unter "EQ:USER" einstellen. Wenn Sie im Menü "EQ:USER" Eingabetaste drücken, erscheint ein Fenster, in dem Sie die EQ Einstellungen an Ihre Vorlieben anpassen können. - Ein bestimmter Lautsprecher kann je nach dem Eingangssignal möglicherweise nicht ausgegeben werden. MATRIX Liefert Mehrkanal-Surround-Sound. Vermittelt den Klangeindruck eines Studios. STEREO Die Wiedergabe erfolgt nur über den vorderen linken und rechten Lautsprecher sowie über den Subwoofer. STUDIO CLUB Simuliert den Sound eines Danceclubs mit einem schlagenden Bass-Beat. HALL Bietet eine helle Klangstimme wie in einer Konzerthalle. MOVIE Bietet das Gefühl als wäre man im Kino anwesend. CHURCH OFF Vermittelt den Eindruck, in einer großen Kirche zu sein. Zum Auswählen für normalen Klang. ✎ HINWEIS ✎ HINWEIS Wenn Sie den Modus Pro Logic II verwenden möchten, schließen Sie Ihr externes Gerät an die Buchsen L und R des Audioeingangs am Heimkino-Gerät an. Wenn Sie die Verbindung nur über eine Buchse (L oder R) herstellen, hören Sie keinen Raumklang. Die Funktion Pro Logic II steht nur im StereoModus zur Verfügung. Die Pro Logic II Funktion steht bei der Wiedergabe von AC3 Signalen im 2.1 Kanalmodus nicht zur Verfügung. Die DSP/EQ Funktion steht nur im Stereo Modus zur Verfügung. Die DSP/EQ Funktion steht bei der Wiedergabe von AC3 Signalen im 2.1 Kanalmodus nicht zur Verfügung. 34 Deutsch HT-D450-EN-DE-1228.indd 34 2011-12-28 5:03:58 04 Mithilfe der Tasten auf der Fernbedienung 1. Wählen Sie mit der Taste FUNCTION die Option FM aus. 2. Stellen Sie den gewünschten Sender ein. • Gespeicherter Sender 1 : Sie müssen zuerst die Frequenz des gewünschten Senders speichern. Drücken Sie die STOPP () Taste, um PRESET auszuwählen und anschließend die TUNING/CH ( ) Taste, um den voreingestellten Sender auszuwählen. • Manuelle Sendersuche : Drücken Sie die STOPP () Taste, um MANUAL auszuwählen und anschließend die TUNING/CH ( ) Taste, um einen auf einer höheren oder niedrigeren Frequenz ausgestrahlten Sender auszuwählen. • Automatische Sendersuche : Drücken Sie die STOPP () Taste, um MANUAL auszuwählen und anschließend die TUNING/CH ( ) Taste, um das Frequenzband automatisch zu durchsuchen. 5. Drücken Sie die Taste TUNER MEMORY erneut. • Drücken Sie die Taste TUNER MEMORY, solange der Programmplatz noch im Display angezeigt wird. • Dann wird die Anzeige des Programmplatzes im Display ausgeblendet und der Sender ist gespeichert. 6. Wiederholen Sie für die Programmierung weiterer Sender die Schritte 2 bis 5. Grundfunktionen Radio hören Einstellen des Mono/Stereo-Modus Drücken die Taste MO/ST. • Bei jedem Drücken der Taste wird der Klang zwischen STEREO und MONO umgeschaltet. • An Orten mit geringer Empfangsleistung wählen Sie MONO für einen klaren, rauschfreien Empfang. Sender programmieren Beispiel: UKW-Frequenz 89.10 speichern. 1. Wählen Sie mit der Taste FUNCTION die Option FM aus. ) die 2. Stellen Sie mit den Tasten TUNING/CH ( Frequenz <89.10> ein. 3. Drücken Sie die Taste TUNER MEMORY. • Eine Zahl blinkt auf dem Display. 4. Drücken Sie die Tasten TUNING/CH ( ), um den Programmplatz für die Speicherung auszuwählen. • Sie können bis zu 15 Sender speichern. Deutsch HT-D450-EN-DE-1228.indd 35 35 2011-12-28 5:03:59 Zusatzfunktionen USB-Funktion Mediendateien über den USBHost-Anschluss wiedergeben Sie können Mediendateien wie Bilder, Filme und Musik, die Sie auf einem MP3-Player, einem USBSpeichergerät oder einer Digitalkamera gespeichert haben, mit dem Heimkino-Gerät in guter Qualität wiedergeben. Verbinden Sie dafür das Speichermedium mit dem USB-Anschluss des Heimkino-Systems. 1. Schließen Sie das USB-Gerät an den USBAnschluss an der Vorderseite des HeimkinoSystems an. 2. Wählen Sie mit der Taste FUNCTION die Option USB aus. • Auf dem Display wird kurz USB angezeigt. 3. Drücken Sie die ◄► Tasten, um Videos, Musik oder Foto auszuwählen. - Wählen Sie eine Datei für die Wiedergabe. USB Aufnahme Während Sie CD-DA (Compact Disc Digital Audio) abspielen, einen UKW-Sender hören oder Audiosignale über ein externes Gerät empfangen, können Sie die Audioquelle mit Hilfe der USB Aufnahme Funktion auf einem USB-Speicher speichern. Beisp.: USB-Aufnahme einer Audio-CD-DA 1. Schließen Sie das USB-Gerät an Ihr Gerät an. 2. Legen Sie die Audio-CD in die CD-Lade ein. 3. Drücken Sie die USB REC Taste auf der Fernbedienung. • Um den aktuellen Titel zu kopieren, die Taste REC auf der Fernbedienung drücken, während das System gerade ein Lied wiedergibt oder vorübergehend gestoppt wurde. • Um alle Titel auf der CD zu kopieren, die USB REC Taste auf der Fernbedienung gedrückt halten. - Es wird "FULL CD RIPPING" auf dem Display angezeigt und die Aufnahme startet. 4. Drücken Sie die Taste STOPP () Taste, um die Aufnahme zu beenden. • Wenn die USB Aufnahme einer CD abgeschlossen ist, erscheint ein neuer Ordner mit dem Namen "RECORDING" auf dem USB-Laufwerk. Der Inhalt wird im MP3-Format in dem Ordner gespeichert. • Wenn die USB Aufnahme einer Radiosendung oder über den AUX-Anschluss abgeschlossen ist, erscheint ein neuer Ordner mit dem Namen "TUNER RECORDING" bzw. "AUX RECORDING" auf dem USB-Laufwerk. Der Inhalt wird im MP3-Format in dem Ordner gespeichert. ✎ HINWEIS USB-Gerät sicher entfernen Um die gespeicherten Daten auf Ihrem USB-Gerät nicht zu beschädigen, müssen Sie das Gerät sicher entfernen, bevor Sie das USB-Kabel abziehen. • Drücken Sie die Taste GELB (C). - Die Anzeige REMOVE wird im Display eingeblendet. • Entfernen Sie das USB-Kabel. ✎ HINWEIS Wenn Sie Ihre Musikdateien über das HeimkinoSystem im 5.1-Kanal-Klang hören möchten, stellen Sie den Dolby Pro Logic II-Modus auf Matrix. (Siehe Seite 34) Entfernen Sie das USB-Kabel langsam vom USB-Anschluss. Andernfalls kann den USBAnschluss beschädigt werden. 36 Unterbrechen Sie während der USB Aufnahme nicht die USB-Verbindung oder die Stromversorgung. Andernfalls können Daten beschädigt werden. Um die USB-Aufnahme anzuhalten, die STOPP Taste drücken und entfernen Sie das USB-Gerät, nachdem das System die CD-Wiedergabe vollständig angehalten hat. Wenn Sie die USB-Verbindung während der USBAufnahme trennen, schaltet sich das System aus und Sie können die aufgenommene Datei nicht löschen. Wenn Sie das USB-Gerät während der Wiedergabe einer CD an das System anschließen, hält das System die Wiedergabe vorübergehend an und setzt sie anschließend fort. DTS-CDs können nicht kopiert werden. Wenn die Aufnahmedauer weniger als 5 Sekunden beträgt, wird keine Datei erstellt. Die USB-Aufnahme ist nur möglich, wenn das USB-Gerät mit dem FAT-Dateisystem formatiert ist. (Das NTFSDateisystem wird nicht unterstützt.) Das Audiosignal wird während der USB-Aufnahme einer CD nicht wiedergegeben. Wenn HDMI AUDIO auf Ein gestellt ist, wird die USBAufnahme Funktion nicht unterstützt. Deutsch HT-D450-EN-DE-1228.indd 36 2011-12-28 5:04:00 06 Sonstige Informationen Ziehen Sie die folgende Tabelle zu Rate, wenn das Gerät nicht ordnungsgemäß funktioniert. Wenn das bei Ihnen auftretende Problem nicht aufgeführt ist oder die u. a. Anweisungen zu keiner Lösung führen, schalten Sie das Gerät aus, ziehen Sie das Netzkabel aus der Steckdose, und wenden Sie sich an einen autorisierten Händler vor Ort oder an den Samsung-Kundendienst. Problem Überprüfen/Beheben Die Disk wird nicht ausgegeben. • Ist der Netzstecker an eine Steckdose angeschlossen? • Schalten Sie das Gerät aus und wieder ein. Die Wiedergabe startet nicht. • Überprüfen Sie den Regionalcode der DVD. Im Ausland gekaufte DVDs werden möglicherweise nicht abgespielt. • CD-ROMs und DVD-ROMs können mit diesem Heimkino-System nicht wiedergegeben werden. • Vergewissern Sie sich, dass die Einstellung zur Alterseinstufung korrekt ist. • Verwenden Sie eine verformte oder zerkratzte Disk? • Reinigen Sie die Disk. Die Wiedergabe startet nicht sofort, wenn die Taste Wiedergabe/Pause gedrückt wird. Es wird kein Ton wiedergegeben. Es wird nur über einige der 6 Lautsprecher ein Ton ausgegeben. Kein Dolby Digital 5.1-KanalRaumklang wird erreicht. Die Fernbedienung funktioniert nicht. • Die Disk dreht sich, es wird jedoch kein Bild angezeigt. • Die Bildqualität ist schlecht, und das Bild ist instabil. Wiedergabe- und Untertitelsprache können nicht ausgewählt werden. Der Disk/Titel-Menü-Bildschirm wird nicht angezeigt, obwohl die Disk/ Titel-Funktion ausgewählt ist. Das Bildformat kann nicht geändert werden. • Während der schnellen und langsamen Wiedergabe sowie bei der Einzelbildwiedergabe wird kein Tonsignal wiedergegeben. • Sind die Lautsprecher korrekt angeschlossen? Sind die Lautsprechereinstellungen korrekt? • Ist die Disk schwer beschädigt? • Bei bestimmten DVDs wird der Ton nur für die Front-Lautsprecher ausgegeben. • Überprüfen Sie, ob die Lautsprecher korrekt angeschlossen sind. • Stellen Sie die Lautstärke ein. • Wenn Sie eine CD oder Radio hören bzw. fernsehen, wird der Ton nur für die vorderen Lautsprecher ausgegeben. PL II (Dolby Sie können die Option „PROLOG“ auswählen, indem Sie die Taste Pro Logic II) auf der Fernbedienung drücken, um all 6 Lautsprecher zu verwenden. • Ist die Disk mit „Dolby Digital 5.1 CH“ gekennzeichnet? Dolby Digital 5.1-KanalRaumklang wird nur erreicht, wenn die Disk mit 5.1-Kanal-Klang aufgenommen wurde. • Ist die Audio-Sprache in der Informationsanzeige korrekt als Dolby Digital 5.1-CH eingestellt? • Wird die Fernbedienung innerhalb der Betriebsreichweite und mit dem richtigen Winkel zum Gerät verwendet? • Sind die Batterien leer? • Haben Sie den richtigen Modus gewählt (RECEIVER DVD/TV)? • Ist das Fernsehgerät eingeschaltet? • Sind die Videokabel korrekt angeschlossen? • Ist die Disk verschmutzt oder beschädigt? • Eine Disk mit Fabrikationsfehlern kann ggf. nicht korrekt wiedergegeben werden.\ • Nicht alle Disks enthalten mehrere Wiedergabe- oder Untertitelsprachen. • Verwenden Sie eine Disk, die keine Menüs enthält? • Sie können 16:9-DVDs in den Formaten 16:9-BREITBILD-Modus, 4:3-LETTER BOX-Modus oder 4:3PAN SCAN-Modus wiedergeben, aber 4:3-DVDs können nur im Format 4:3 wiedergegeben werden. Prüfen Sie die Beschriftung der DVD-Hülle, und wählen Sie die entsprechende Funktion aus. Deutsch HT-D450-EN-DE-1228.indd 37 Sonstige Informationen Fehlerbehebung 37 2011-12-28 5:04:01 Sonstige Informationen Problem Überprüfen/Beheben • Das Heimkino-System funktioniert nicht. (Beispiel: Es erfolgt keine Stromzufuhr oder die Tasten an der Gerätevorderseite funktionieren nicht oder es ist ein komisches Geräusch zu hören.) • Das Gerät funktioniert nicht einwandfrei. Das Kennwort, das zur Einstellung der Alterseinstufung erforderlich ist, wurde vergessen. Ich kann keine Radiosendungen empfangen. • Halten Sie die STOPP () auf der Fernbedienung für mindestens 5 Sekunden gedrückt, ohne dass eine Disk eingelegt ist (Wiederherstellungsfunktion). Bei Verwendung der RESET-Funktion (Wiederherstellungsfunktion) gehen alle gespeicherten Einstellungen verloren. Verwenden Sie diese Funktion nur, wenn dies erforderlich ist. •Wenn die Meldung „NO DISC“ auf der Anzeige des Geräts erscheint, halten Sie die STOPP () auf der Fernbedienung länger als 5 Sekunden gedrückt. Auf dem Bildschirm erscheint „INIT”, und alle Einstellungen werden auf die Werkseinstellungen zurückgesetzt. Drücken Sie danach die Taste POWER. Bei Verwendung der RESET-Funktion gehen alle gespeicherten Einstellungen verloren. Verwenden Sie diese Funktion nur, wenn dies erforderlich ist. • Ist die Antenne richtig angeschlossen? • Installieren Sie bei einem schwachen Antennensignal eine externe UKW-Antenne an einem Ort mit gutem Empfang. Sprachcode-Liste Geben Sie für die Optionen Disc-Menü, Audio und Untertitel den Sprachcode der gewünschten Sprache ein. (Siehe Seite 27). Code Sprache Code Sprache Code Sprache Code Sprache Code Sprache Code Sprache 1027 Afar 1142 Greek 1239 Interlingue 1345 Malagasy 1482 Kirundi 1527 1028 Abkhazian 1144 English 1245 Inupiak 1347 Maori 1483 Romanian 1528 Tajik Thai 1032 Afrikaans 1145 Esperanto 1248 Indonesian 1349 Macedonian 1489 Russian 1529 Tigrinya 1039 Amharic 1149 Spanish 1253 Icelandic 1350 Malayalam 1491 Kinyarwanda 1531 Turkmen 1044 Arabic 1150 Estonian 1254 Italian 1352 Mongolian 1495 Sanskrit 1532 Tagalog 1045 Assamese 1151 Basque 1257 Hebrew 1353 Moldavian 1498 Sindhi 1534 Setswana 1051 Aymara 1157 Persian 1261 Japanese 1356 Marathi 1501 Sangro 1535 Tonga 1052 Azerbaijani 1165 Finnish 1269 Yiddish 1357 Malay 1502 Serbo-Croatian 1538 Turkish 1053 Bashkir 1166 Fiji 1283 Javanese 1358 Maltese 1503 Singhalese 1539 Tsonga 1057 Byelorussian 1171 Faeroese 1287 Georgian 1363 Burmese 1505 Slovak 1540 Tatar 1059 Bulgarian 1174 French 1297 Kazakh 1365 Nauru 1506 Slovenian 1543 Twi 1060 Bihari 1181 Frisian 1298 Greenlandic 1369 Nepali 1507 Samoan 1557 Ukrainian 1069 Bislama 1183 Irish 1299 Cambodian 1376 Dutch 1508 Shona 1564 Urdu 1066 Bengali; Bangla 1186 Scots Gaelic 1300 Canada 1379 Norwegian 1509 Somali 1572 Uzbek 1067 Tibetan 1194 Galician 1301 Korean 1393 Occitan 1511 Albanian 1581 Vietnamese 1070 Breton 1196 Guarani 1305 Kashmiri 1403 (Afan) Oromo 1512 Serbian 1587 Volapuk 1079 Catalan 1203 Gujarati 1307 Kurdish 1408 Oriya 1513 Siswati 1613 Wolof 1093 Corsican 1209 Hausa 1311 Kirghiz 1417 Punjabi 1514 Sesotho 1632 Xhosa 1097 Czech 1217 Hindi 1313 Latin 1428 Polish 1515 Sundanese 1665 Yoruba 1103 Welsh 1226 Croatian 1326 Lingala 1435 Pashto, Pushto 1516 Swedish 1684 Chinese 1105 Danish 1229 Hungarian 1327 Laothian 1436 Portuguese 1517 Swahili 1697 Zulu 1109 German 1233 Armenian 1332 Lithuanian 1463 Quechua 1521 Tamil 1130 Bhutani 1235 Interlingua 1334 Latvian, Lettish 1481 RhaetoRomance 1525 Tegulu 38 Deutsch HT-D450-EN-DE-1228.indd 38 2011-12-28 5:04:01 06 Sonstige Informationen Technische Daten Allgemein UKW-EMPFÄNGER Gewicht 2,76 kg Abmessungen 430 (B) x 59 (H) x 249 (T) mm Betriebstemperaturbereich +5°C~+35°C Zulässiger Luftfeuchtigkeitsbereich 10 % bis 75 % Signal/Rauschabstand 70 dB Verwendbare Empfindlichkeit 10 dB Klirrfaktor (Total Harmonic Distortion) 0,5 % DVD (Digital Versatile Disc Disk 12 cm (Compact Disc) CD: 8 cm (Compact Disc) Composite Video Lesegeschwindigkeit: 3,49 bis 4,06 m/s Spieldauer (Einseitig, Single Layer Disc): 135 Min. Lesegeschwindigkeit: 4,8 bis 5,6 m/s Maximale Spieldauer: 74 Min. Lesegeschwindigkeit: 4,8 bis 5,6 m/Sek. Maximale Spieldauer: 20 Min. 480i(576i) 1 Kanal: 1,0 Vss (75 Ω) 480i(576i) Videoausgang Component Video Y: 1,0 Vss (75 Ω) PR: 0,70 Vss (75 Ω) PB: 0,70 Vss (75 Ω) Video/Audio HDMI 1080p, 1080i, 720p, 480p(576p) Verstärker Ausgangsleistung der Front-Lautsprecher Ausgangsleistung des Center-Lautsprechers Ausgangsleistung der Surround Lautsprecher Ausgangsleistung des Subwoofers Frequenzbereich Signal/Rauschabstand Kanaltrennung Eingangsempfindlichkeit 2 x 142 W (3 ) 142 W (3 ) 2 x 141 W (3 ) 142 W (3 ) 20 Hz ~ 20 kHz 65 dB 60 dB (AUX) 800 mV *: Nominalwert - Samsung Electronics Co., Ltd behält sich das Recht auf unangekündigte Änderungen vor. - Gewicht und Abmessungen können von den Angaben abweichen. - Änderungen der technischen Daten und des Geräte-Designs vorbehalten. - Die technischen Daten zur benötigten Netzspannung finden Sie auf dem Typenschild am Produkt. Deutsch HT-D450-EN-DE-1228.indd 39 39 2011-12-28 5:04:01 Sonstige Informationen HT-D450 Lautsprechersystem Lautsprecher Impedanz Frequenzbereich Schalldruck Nenneingangsspannung Maximale Eingangsspannung Abmessungen (B x H x T) Gewicht 5.1-Lautsprechersystem Front 3 140Hz~20KHz 86dB/W/M Surround 3 140Hz~20KHz 86dB/W/M Center 3 140Hz~20KHz 86dB/W/M 142W 141W 142W 284W 282W 284W Front : 90 x 141,5 x 68,5 mm Surround : 84 x 104,5 x 68,5 mm Center : 360 x 74,5 x 68,5 mm Subwoofer : 168 x 350 x 285 mm Front: 0,58 Kg, Center : 0,96 Kg Surround : 0,4 Kg, Subwoofer : 3,6 Kg Subwoofer 3 40Hz~160Hz 88dB/W/M 142W 284W HT-D453 Lautsprechersystem Lautsprecher Impedanz Frequenzbereich Schalldruck Nenneingangsspannung Maximale Eingangsspannung Abmessungen (B x H x T) Gewicht 5.1-Lautsprechersystem Front 3 140Hz~20KHz 86dB/W/M Surround 3 140Hz~20KHz 86dB/W/M Center 3 140Hz~20KHz 86dB/W/M Subwoofer 3 40Hz~160Hz 88dB/W/M 142W 141W 142W 142W 284W 282W 284W 284W Front : 90 x 1200 x 119 mm (Ständerfuß : 250 x 250) Surround : 84 x 104,5 x 68,5 mm Center : 360 x 74,5 x 68,5 mm Subwoofer : 168 x 350 x 285 mm Front : 3,68 Kg, Center : 0,96 Kg Surround : 0,4 Kg, Subwoofer : 3,6 Kg HT-D455 Lautsprechersystem Lautsprecher Impedanz Frequenzbereich Schalldruck Nenneingangsspannung Maximale Eingangsspannung Abmessungen (B x H x T) Gewicht 40 Front 3 140Hz~20KHz 86dB/W/M 5.1-Lautsprechersystem Surround Center 3 3 140Hz~20KHz 140Hz~20KHz 86dB/W/M 86dB/W/M Subwoofer 3 40Hz~160Hz 88dB/W/M 141W 142W 142W 142W 282W 284W 284W 284W Front/Surround : 90 x 1200 x 119 mm (Ständerfuß : 250 x 250) Center : 360 x 74,5 x 68,5 mm Subwoofer : 168 x 350 x 285 mm Front/Surround : 3,68 Kg, Center : 0,96 Kg Subwoofer : 3,6 Kg Deutsch HT-D450-EN-DE-1228.indd 40 2011-12-28 5:04:01 Kontakt zu Samsung Falls Sie Fragen oder Anregungen zu Samsung-Produkten haben, wenden Sie sich bitte an den SamsungKundendienst. Hotline Region ` North America Canada Mexico U.S.A Website 1-800-SAMSUNG (726-7864) 01-800-SAMSUNG (726-7864) 1-800-SAMSUNG (726-7864) www.samsung.com www.samsung.com www.samsung.com 0800-333-3733 0800-124-421 / 4004-0000 800-SAMSUNG (726-7864) 01-8000112112 0-800-507-7267 1-800-751-2676 1-800-10-7267 800-6225 1-800-299-0013 800-7919267 1-800-234-7267 00-1800-5077267 800-7267 0-800-777-08 1-800-682-3180 www.samsung.com www.samsung.com www.samsung.com www.samsung.com www.samsung.com www.samsung.com www.samsung.com www.samsung.com www.samsung.com www.samsung.com www.samsung.com www.samsung.com www.samsung.com www.samsung.com www.samsung.com 1-800-SAMSUNG (726-7864) www.samsung.com 0-800-100-5303 www.samsung.com 42 27 5755 0810 - SAMSUNG (7267864, € 0.07/min) - ` Latin America Argentine Brazil Chile Colombia Costa Rica Dominica Ecuador El Salvador Guatemala Honduras Jamaica Nicaragua Panama Peru Puerto Rico Trinidad & Tobago Venezuela Austria Belgium 02-201-24-18 Bosnia Bulgaria Croatia 05 133 1999 07001 33 11 062 SAMSUNG (062 726 7864) 800-SAMSUNG (800-726786) Samsung Zrt., česká organizační složka, Oasis Florenc, Sokolovská394/17, 180 00, Praha 8 70 70 19 70 030 - 6227 515 01 48 63 00 00 01805 - SAMSUNG (726-7864 € 0,14/Min. dt. Festnetz, max. € 0,42/Min. über Mobilfunk) 06-80-SAMSUNG (726-7864) 800-SAMSUNG (726-7864) +381 0113216899 261 03 710 023 207 777 020 405 888 0900-SAMSUNG (0900-7267864) (€ 0,10/Min) 815-56 480 0 801 1SAMSUNG (172678) / 022-607-93-33 80820-SAMSUNG (726-7864) 1. 08010 SAMSUNG (72678) doar din reţeaua Romtelecom, tarif local 2. 021.206.01.10 - din orice reţea, tarif normal Czech Denmark Finland France Germany Hungary Italia Kosovo Luxemburg Macedonia Montenegro Netherlands Norway Poland Portugal Rumania HT-D450-EN-DE-1228.indd 41 Slovakia Spain Sweden Hotline 0700 Samsung (0700 726 7864) 0800-SAMSUNG (726-7864) 902-1-SAMSUNG (902 172 678) 0771 726 7864 (SAMSUNG) Switzerland 0848-SAMSUNG (7267864, CHF 0.08/min) U.K Eire Lithuania Latvia Estonia 0330 SAMSUNG (7267864) 0818 717100 8-800-77777 8000-7267 800-7267 Uzbekistan Kyrgyzstan Tadjikistan Ukraine 0-800-502-000 www.samsung.com Belarus Moldova 810-800-500-55-500 00-800-500-55-500 www.samsung.com/ be (Dutch) www.samsung.com/ be_fr (French) www.samsung.com www.samsung.com ` Asia Pacific www.samsung.com Russia Georgia Armenia Azerbaijan Kazakhstan Australia New Zealand China 1300 362 603 0800 SAMSUNG (0800 726 786) 400-810-5858 / 010-6475 1880 Hong Kong (852) 3698 4698 India Indonesia www.samsung.com www.samsung.com www.samsung.com Japan Malaysia www.samsung.com Philippines www.samsung.com www.samsung.com www.samsung.com - Singapore Thailand Taiwan Vietnam www.samsung.com www.samsung.com www.samsung.com www.samsung.com www.samsung.com Website www.samsung.com www.samsung.com www.samsung.com www.samsung.com www.samsung.com/ch www.samsung.com/ ch_fr/(French) www.samsung.com www.samsung.com www.samsung.com www.samsung.com www.samsung.com ` CIS 8-800-555-55-55 8-800-555-555 0-800-05-555 088-55-55-555 8-10-800-500-55-500 (GSM: 7799) 8-10-800-500-55-500 00-800-500-55-500 8-10-800-500-55-500 ` Europe Albania Region Serbia www.samsung.com www.samsung.com www.samsung.com www.samsung.com www.samsung.com www.samsung.ua www.samsung.com/ ua_ru www.samsung.com www.samsung.com www.samsung.com www.samsung.com/hk www.samsung.com/ hk_en/ 3030 8282 / 1800 110011 / 1800 3000 8282 / 1800 266 8282 0800-112-8888 / 021-5699-7777 0120-327-527 1800-88-9999 1-800-10-SAMSUNG(726-7864) / 1-800-3-SAMSUNG(726-7864) / 1-800-8-SAMSUNG(726-7864) / 02-5805777 1800-SAMSUNG (726-7864) 1800-29-3232 / 02-689-3232 0800-329-999 1 800 588 889 www.samsung.com www.samsung.com www.samsung.com www.samsung.com 8000-4726 08000-726786 800-22273 080 100 2255 800-SAMSUNG (726-7864) 9200-21230 444 77 11 800-SAMSUNG (726-7864) www.samsung.com www.samsung.com www.samsung.com www.samsung.com www.samsung.com www.samsung.com www.samsung.com www.samsung.com 0800-SAMSUNG (726-7864) 0860-SAMSUNG (726-7864 ) www.samsung.com www.samsung.com www.samsung.com www.samsung.com www.samsung.com www.samsung.com www.samsung.com ` Middle East Bahrain Egypt Jordan Morocco Oman Saudi Arabia Turkey U.A.E ` Africa Nigeria South Africa 2011-12-28 5:04:02 Korrekte Entsorgung der Batterien dieses Produkts (In den Ländern der Europäischen Union und anderen europäischen Ländern mit einem separaten Altbatterie-Rücknahmesystem) Die Kennzeichnung auf der Batterie bzw. auf der dazugehörigen Dokumentation oder Verpackung gibt an, dass die Batterie zu diesem Produkt nach seiner Lebensdauer nicht zusammen mit dem normalen Haushaltsmüll entsorgt werden darf. Wenn die Batterie mit den chemischen Symbolen Hg, Cd oder Pb gekennzeichnet ist, liegt der Quecksilber-, Cadmium- oder Blei-Gehalt der Batterie über den in der EGRichtlinie 2006/66 festgelegten Referenzwerten. Wenn Batterien nicht ordnungsgemäß entsorgt werden, können sie der menschlichen Gesundheit bzw. der Umwelt schaden. Bitte helfen Sie, die natürlichen Ressourcen zu schützen und die nachhaltige Wiederverwertung von stofflichen Ressourcen zu fördern, indem Sie die Batterien von anderen Abfällen getrennt über Ihr örtliches kostenloses Altbatterie-Rücknahmesystem entsorgen. Korrekte Entsorgung von Altgeräten (Elektroschrott) (In den Ländern der Europäischen Union und anderen europäischen Ländern mit einem separaten Sammelsystem) Die Kennzeichnung auf dem Produkt, Zubehörteilen bzw. auf der dazugehörigen Dokumentation gibt an, dass das Produkt und Zubehörteile (z. B. Ladegerät, Kopfhörer, USB-Kabel) nach ihrer Lebensdauer nicht zusammen mit dem normalen Haushaltsmüll entsorgt werden dürfen. Entsorgen Sie dieses Gerät und Zubehörteile bitte getrennt von anderen Abfällen, um der Umwelt bzw. der menschlichen Gesundheit nicht durch unkontrollierte Müllbeseitigung zu schaden. Helfen Sie mit, das Altgerät und Zubehörteile fachgerecht zu entsorgen, um die nachhaltige Wiederverwertung von stofflichen Ressourcen zu fördern. Private Nutzer wenden sich an den Händler, bei dem das Produkt gekauft wurde, oder kontaktieren die zuständigen Behörden, um in Erfahrung zu bringen, wo sie das Altgerät bzw. Zubehörteile für eine umweltfreundliche Entsorgung abgeben können. Gewerbliche Nutzer wenden sich an ihren Lieferanten und gehen nach den Bedingungen des Verkaufsvertrags vor. Dieses Produkt und elektronische Zubehörteile dürfen nicht zusammen mit anderem Gewerbemüll entsorgt werden. HT-D450-EN-DE-1228.indd 42 2011-12-28 5:04:02 HT-D450 HT-D453 HT-D455 Sistema Home Entertainment digitale manuale utente Immagina le possibilità Grazie per avere acquistato questo prodotto Samsung. Per ricevere un servizio più completo, registrare il prodotto all'indirizzo www.samsung.com/register HT-D450-ZF-IT-1228.indd Sec1:1 2011-12-28 5:13:29 Informazioni sulla sicurezza Avvertenze per la sicurezza PER RIDURRE IL RISCHIO DI SCOSSE ELETTRICHE, NON RIMUOVERE IL COPERCHIO (O LA PARTE POSTERIORE). ALL'INTERNO NON VI SONO PARTI RIPARABILI DALL'UTENTE. PER LA MANUTENZIONE RIVOLGERSI AL PERSONALE DI ASSISTENZA QUALIFICATO ATTENZIONE RISCHIO DI SCOSSE ELETTRICHE NON APRIRE Questo simbolo indica la presenza di "tensione pericolosa" all'interno del prodotto, che comporta il rischio di scosse elettriche o lesioni. ATTENZIONE : PER EVITARE SCOSSE ELETTRICHE, INSERIRE A FONDO LO SPINOTTO PIÙ LARGO DELLA SPINA NELLA RELATIVA PRESA. AVVERTENZA • Per ridurre il rischio di incendio o di scosse elettriche, non esporre questo apparecchio alla pioggia o all'umidità. ATTENZIONE • Non schizzare o sgocciolare liquidi sull'apparecchio e non porre su di esso oggetti contenenti liquidi, come ad esempio vasi. • Poiché la presa di rete viene utilizzata per scollegare l'apparecchio, deve essere facilmente accessibile in qualsiasi momento. • Questa apparecchiatura deve essere sempre collegata a una presa di rete con collegamento a terra. • Per scollegare l'apparecchio dalla corrente è necessario estrarre la spina dalla presa; perciò la presa dovrà essere facilmente accessibile. Questo simbolo indica istruzioni importanti che accompagnano il prodotto. CLASS 1 LASER PRODUCT KLASSE 1 LASER PRODUKT LUOKAN 1 LASER LAITE KLASS 1 LASER APPARAT PRODUCTO LÁSER CLASE 1 PRODOTTO LASER DI CLASSE 1 Questo lettore CD è classificato come prodotto LASER DI CLASSE 1. L'utilizzo di comandi, regolazioni o funzioni che si riferiscono a procedure diverse da quelle specificate può provocare l'esposizione a radiazioni pericolose. ATTENZIONE • UN RAGGIO LASER INVISIBILE VIENE EMESSO NEL CASO IN CUI L'APPARECCHIO VENGA APERTO CON IL SISTEMA DI INTERBLOCCO NON FUNZIONANTE IN MODO CORRETTO, O ESCLUSO. EVITARE LA DIRETTA ESPOSIZIONE AL RAGGIO LASER. “Questo apparecchio è fabbricato in conformità al D.M. 28.08.95 N. 548 ed in particolare a quanto specificato nell’art. 2, comma 1” 2 Italiano HT-D450-ZF-IT-1228.indd 2 2011-12-28 5:13:34 Precauzioni • Verificare che le caratteristiche degli alimentatori CA presenti in casa corrispondano all'etichetta di identificazione posta sul retro del prodotto. • Installare il prodotto orizzontalmente, su un supporto adeguato (mobile), verificando che vi sia spazio sufficiente per una corretta ventilazione (7,5 - 10 cm). • Non sistemare il prodotto su amplificatori o altri dispositivi che potrebbero diventare caldi. Assicurarsi che le aperture di ventilazione non siano coperte. • Non appoggiare oggetti sopra il prodotto. • Prima di spostare il prodotto, verificare che non contenga nessun disco. • Per scollegare completamente il prodotto dall'alimentazione, staccare la spina di alimentazione dalla presa a muro, in particolare quando non viene usato per un lungo periodo di tempo. • Durante i temporali, scollegare la spina di alimentazione dalla presa. I picchi di alta tensione provocati dai fulmini potrebbero danneggiare il prodotto. • Non esporre il prodotto alla luce diretta del sole o altre fonti di calore. Questo potrebbe condurre a surriscaldamento e malfunzionamento del prodotto. • Tenere il prodotto lontano da fonti di umidità e calore eccessivo e da apparecchi che generano un forte campo magnetico o elettrico (ad es. diffusori). • In caso di malfunzionamento del prodotto, scollegare il cavo di alimentazione dalla presa di corrente. • Il prodotto non è destinato all'uso industriale. Questo prodotto è destinato esclusivamente all'uso personale. • Se il prodotto o il disco vengono conservati a basse temperature, potrebbe formarsi condensa. In inverno, se si trasporta il prodotto, attendere circa 2 ore prima di utilizzarlo, in modo che ritorni a temperatura ambiente. • Le batterie utilizzate con questo prodotto contengono sostanze chimiche dannose per l'ambiente. Non smaltirle con i comuni rifiuti domestici. Accessori Controllare di seguito gli accessori forniti. FUNCTION TV SOURCE POWER RECEIVER DVD SLEEP TV 1 2 4 5 7 8 3 6 9 DSP /EQ 0 MUTE TUNING /CH VOL REPEAT DISC MENU MENU TITLE MENU TOOLS INFO RETURN A EXIT B C D DIMMER GIGA S.VOL AUDIO UPSCALE S/W LEVEL TUNER MEMORY MO/ST USB REC P.BASS Cavo video Antenna FM Manuale utente Telecomando / batterie (formato AAA) Jack Scart Italiano HT-D450-ZF-IT-1228.indd 3 3 2011-12-28 5:13:34 Informazioni sulla sicurezza Precauzioni per la manipolazione e la conservazione dei dischi I graffi sui dischi, anche piccoli, possono ridurre la qualità dell'audio e dell'immagine o far "saltare" i dischi. Prestare particolare attenzione a non graffiare i dischi. Manipolazione dei dischi • Non toccare il lato di riproduzione del disco. • Tenere il disco per i bordi, senza toccare la superficie con le dita. • Non incollare carta o nastro adesivo sui dischi. Conservazione dei dischi • Non conservare alla luce diretta del sole • Conservare in un luogo fresco e ventilato • Conservare in una custodia di protezione pulita. Conservare in posizione verticale. ✎ NOTA Non sporcare i dischi. Non caricare dischi crepati o graffiati. Manipolazione e conservazione dei dischi Se sul disco sono presenti impronte o sporcizia, pulirlo con un detergente delicato diluito in acqua e asciugarlo con un panno morbido. • Pulire i dischi strofinando delicatamente dall'interno all'esterno ✎ NOTA Il contatto di aria calda con le parti fredde all'interno del prodotto può provocare condensa. Se si forma condensa all'interno, il prodotto potrebbe non funzionare correttamente. In questo caso, rimuovere il disco e lasciare il prodotto acceso per una o due ore, senza eseguire alcuna operazione. Licenza • Dolby, Pro Logic e il simbolo della doppia D sono marchi registrati di Dolby Laboratories. 4 • Prodotto su licenza, brevetti U.S.A. n.: 5,956,674; 5,974,380; 6,487,535 e altri brevetti U.S.A. e mondiali registrati e in attesa di registrazione. DTS, il simbolo, e DTS e il simbolo insieme sono marchi registrati e DTS Digital Surround e il logo DTS sono marchi di DTS, Inc. Software incluso nel prodotto. © DTS, Inc. Tutti i diritti riservati. • INFORMAZIONI SUI VIDEO DIVX: DivX® è un formato video digitale creato da DivX, Inc. Questo è un dispositivo ufficiale certificato DivX® che riproduce video DivX. Per ulteriori informazioni e per gli strumenti software per la conversione dei file in video DivX, visitare il sito www.divx.com. INFORMAZIONI SUI DIVX VIDEO ON DEMAND: Questo dispositivo certificato DivX® deve essere registrato per consentire la riproduzione dei film DivX video on demand (VOD) acquistati. Per ottenere il codice di registrazione, individuare la sezione DivX VOD nel menu di impostazione del dispositivo. Visitare il sito vod.divx.com per ulteriori informazioni su come completare la registrazione. DivX Certified® per riprodurre video DivX®, compresi i contenuti premium DivX®, DivX Certified® e i logo associati sono marchi di DivX, Inc. e sono utilizzati su licenza. Protetto da uno o più dei seguenti brevetti USA: 7,295,673; 7,460,668; 7,515,710; 7,519,274 • HDMI, il logo HDMI e High-Definition Multimedia Interface sono marchi o marchi registrati di HDMI Licensing LLC negli Stati Uniti e in altri Paesi. • Questo prodotto è dotato di una tecnologia di protezione dalla copia tutelata da alcuni brevetti U.S.A. e da altri diritti di proprietà intellettuale di Rovi Corporation. Sono vietati il reverse engineering o lo smontaggio. Copyright © 2011 Samsung Electronics Co., Ltd. Tutti i diritti riservati. Protezione contro la copia • Molti dischi DVD sono codificati con una protezione contro la copia. Per questo motivo, il prodotto deve essere collegato direttamente al televisore, non a un videoregistratore. Con i dischi DVD protetti contro la copia, il collegamento a un videoregistratore produce un'immagine distorta. Italiano HT-D450-ZF-IT-1228.indd 4 2011-12-28 5:13:35 Indice INFORMAZIONI SULLA SICUREZZA 2 OPERAZIONI PRELIMINARI 7 COLLEGAMENTI 15 22 Avvertenze per la sicurezza Precauzioni Accessori Precauzioni per la manipolazione e la conservazione dei dischi Licenza Copyright Protezione contro la copia 7 7 11 11 12 13 Icone utilizzate nel manuale Tipi di dischi e caratteristiche Descrizione Pannello anteriore Pannello posteriore Telecomando 15 18 20 21 Collegamento dei diffusori Collegamento dell'uscita video al televisore Collegamento dell'antenna FM Collegamento dell'audio da apparecchi esterni 22 22 23 23 23 23 23 23 24 24 25 25 25 26 26 26 26 26 26 27 27 27 27 27 27 Operazioni preliminari (impostazioni iniziali) Impostazione del menu di configurazione Display Formato del televisore BD Wise Risoluzione Formato HDMI Segn. uscita video Audio Impostazione Diffusori DRC (compressione del livello audio) SINC. AUDIO HDMI AUDIO EQ utente Canale rit. audio Sistema Impostazioni iniziali Registrazione DivX(R) DivX(R) Disattivazione Lingua Sicurezza Livello Blocco Cambio password Supporto Informazioni sul prodotto ITALIANO CONFIGURAZIONE 2 3 3 4 4 4 4 Italiano HT-D450-ZF-IT-1228.indd 5 5 2011-12-28 5:13:35 Indice FUNZIONI DI BASE 28 FUNZIONI AVANZATE 28 28 29 29 33 35 Riproduzione di un disco Riproduzione di CD audio (CD-DA)/MP3/WMA Riproduzione di file JPEG Utilizzo della funzione di riproduzione Modo audio Radio 36 36 Funzione USB Registrazione USB 37 38 39 Risoluzione dei problemi Elenco codici lingue Specifiche 36 ALTRE INFORMAZIONI 37 • Le figure e le illustrazioni del presente Manuale utente sono fornite soltanto come riferimento. Possono differire rispetto all'aspetto effettivo del prodotto. • Può essere richiesto un rimborso nel caso in cui a. l'uscita del tecnico in seguito a una chiamata non rileva difetti nel prodotto (per es. nel caso l'utente abbia omesso di leggere il presente manuale) b. l'utente ha portato l'unità presso un centro di riparazione che non rileva difetti nel prodotto (per es. nel caso l'utente abbia omesso di leggere il presente manuale). • L'importo di tale rimborso verrà comunicato all'utente prima di eseguire una visita a domicilio o un eventuale intervento di manutenzione. 6 Italiano HT-D450-ZF-IT-1228.indd 6 2011-12-28 5:13:36 Prima di leggere il manuale utente, tener presente le seguenti indicazioni. Icona Termine Definizione d DVD Indica una funzione disponibile per i dischi DVD-Video o DVD±R/±RW registrati e finalizzati in modo Video. CD Indica una funzione disponibile per i CD di dati (CD DA, CD-R/RW). MP3 Indica una funzione disponibile per i dischi CD-R/-RW. B A G JPEG D DivX Tipi di dischi e caratteristiche Codice regionale Il prodotto e i dischi sono codificati in base alla regione. Per poter riprodurre un disco, i codici regionali devono corrispondere. Se i codici non corrispondono, il disco non viene riprodotto. Tipo di disco Indica una funzione disponibile per i dischi CD-R/-RW. Indica una funzione disponibile per i dischi MPEG4. (DVD±R/ ±RW, CD-R/-RW) Codice regionale Area 1 USA, territori USA e Canada 2 Europa, Giappone, Medio Oriente, Egitto, Sudafrica, Groenlandia 3 Taiwan, Corea, Filippine, Indonesia, Hong Kong DVD-VIDEO 4 Indica una situazione in cui una funzione non è attiva o in cui è possibile che le impostazioni vengano annullate. Messico, America del Sud, America centrale, Australia, Nuova Zelanda, Isole del Pacifico, Caraibi 5 Russia, Europa orientale, India, maggior parte dei Paesi africani, Corea del Nord, Mongolia 6 Cina ! ATTENZIONE ✎ NOTA Indica un suggerimento o un'istruzione nella pagina che aiutano a comprendere il funzionamento dell'unità. Tasto di scelta rapida Consente un accesso diretto e facile alla funzione premendo l'apposito tasto sul telecomando. Italiano HT-D450-ZF-IT-1228.indd 7 Operazioni preliminari Icone utilizzate nel manuale 01 Operazioni preliminari 7 2011-12-28 5:13:36 Operazioni preliminari Dischi CD-R MP3 Tipi di dischi riproducibili Tipi di dischi e Segnali Dimensioni marchio (logo) registrati disco Tempo di riproduzione max Circa 240 min. 12 cm AUDIO (doppio lato) + DVD-VIDEO (lato singolo) Circa 480 min. Circa 80 min. VIDEO 8 cm (lato singolo) Circa 160 min. (doppio lato) 12 cm 74 min. 8 cm 20 min. 12 cm - 8 cm - AUDIO CD AUDIO AUDIO DivX + VIDEO Non utilizzare i seguenti tipi di dischi! • I dischi LD, CD-G, CD-I, CD-ROM, DVD-ROM e DVDRAM non possono essere riprodotti con questo prodotto. Se vengono riprodotti dischi di questi tipi, sul televisore appare il messaggio <WRONG DISC FORMAT (FORMATO DISCO ERRATO)>. • I dischi DVD acquistati all'estero potrebbero non essere riproducibili su questo prodotto. Se vengono riprodotti questi dischi, sul televisore appare il messaggio <Wrong Region. Please check Disc (Area errata. Controllare disco)>. Tipi e formati di dischi Questo prodotto non supporta i file multimediali protetti da DRM. Dischi CD-R • Alcuni dischi CD-R potrebbero non essere riproducibili, a seconda del dispositivo con cui sono stati registrati (masterizzatori CD o PC) e delle condizioni. • Utilizzare un CD-R da 650 MB/74 minuti. Non utilizzare CD-R superiori a 700 MB/80 minuti, perché potrebbero non essere riprodotti. • Alcuni CD-RW (riscrivibili) potrebbero non essere riprodotti. • Solo i CD-R che sono stati "chiusi" correttamente possono essere riprodotti integralmente. Se la sessione è stata chiusa, ma il disco è rimasto aperto, potrebbe non essere possibile riprodurre il disco integralmente. 8 • Possono essere riprodotti solo i dischi CD-R con file MP3 in formato ISO 9660 o Joliet. • I nomi dei file MP3 non devono contenere spazi vuoti o caratteri speciali (. / = +). • Utilizzare dischi registrati con una compressione/ decompressione superiore a 128 Kbps. • Possono essere riprodotti soltanto i file con estensione ".mp3" e ".MP3". • Possono essere riprodotti solo i dischi multisessione a scrittura consecutiva. I dischi multisessione che contengono spazi vuoti possono essere riprodotti solo fino al segmento vuoto. • Se il disco non viene chiuso, l'avvio della riproduzione richiederà un tempo maggiore e potrebbero non venir riprodotti tutti i file registrati. • In caso di file codificati in formato VBR (Variable Bit Rate), per esempio file codificati in bit rate sia bassi sia alti (32 ~ 320 Kbps), durante la riproduzione potrebbero verificarsi interruzioni dell'audio. • Possono essere riprodotte al massimo 500 tracce per ogni CD. • Possono essere riprodotte al massimo 300 cartelle per ogni CD. Dischi CD-R JPEG • Possono essere riprodotti solo i file con estensione ". jpg". • Se il disco non viene chiuso, l'avvio della riproduzione richiederà un tempo maggiore e potrebbero non venir riprodotti tutti i file registrati. • Possono essere riprodotti solo i dischi CD-R con file JPEG in formato ISO 9660 o Joliet. • I nomi dei file JPEG non devono essere composti da più di 8 caratteri e non devono contenere spazi vuoti o caratteri speciali (. / = +). • Possono essere riprodotti solo i dischi multisessione a scrittura consecutiva. I dischi multisessione che contengono spazi vuoti possono essere riprodotti solo fino al segmento vuoto. • In ogni cartella è possibile archiviare un massimo di 999 immagini. • Quando si riproduce un Picture CD Kodak/Fuji, è possibile visualizzare solo i file JPEG contenuti nella cartella Pictures. • I dischi di immagini diversi dai Picture CD Kodak/Fuji potrebbero avere tempi di avvio più lunghi o addirittura non essere riproducibili. Italiano HT-D450-ZF-IT-1228.indd 8 2011-12-28 5:13:36 01 Operazioni preliminari Dischi DVD±R/±RW, CD-R/RW • Gli aggiornamenti software per i formati incompatibili non sono supportati. (esempio: QPEL, GMC, risoluzione superiore a 800 x 600 pixel, ecc.) • I dischi DVD-R/-RW non registrati correttamente in formato DVD Video non possono essere riprodotti. Formati supportati (DivX) Questo prodotto supporta soltanto i formati indicati di seguito. Se non sono supportati né il formato video né quello audio, possono verificarsi problemi quali immagini distorte o assenza dell'audio. Formati video supportati Formato AVI WMV Versioni supportate DivX3.11~DivX5.1 V1/V2/V3/V7 Formati audio supportati Formato Bit rate Frequenza di campionatura MP3 80~320 kbps WMA 56~128 kbps AC3 128~384 kbps 44,1/48 khz DTS 1,5 Mbps 44,1 khz 44,1 khz • I file DivX, compresi i file audio e video, creati in formato DTS possono supportare solo fino a 6 Mbps. • Formato: anche se la risoluzione predefinita dei DivX è 640x480 pixel, questo prodotto supporta fino a 720x480 pixel. Le risoluzioni superiori a 800 non sono supportate. • Quando si riproduce un disco con una frequenza di campionamento superiore a 48 khz o 320 kbps, lo schermo può tremare durante la riproduzione. • Le sezioni con una frequenza di fotogrammi elevata potrebbero non venire riprodotte durante la riproduzione di un file DivX. • Poiché questo prodotto fornisce soltanto i formati di decodifica autorizzati da DivX Networks, Inc., i file DivX creati dall'utente potrebbero non essere riproducibili. Italiano HT-D450-ZF-IT-1228.indd 9 9 2011-12-28 5:13:37 Operazioni preliminari Appunti sul collegamento USB 14) Formati file supportati Formato Immagine ferma Nome del file JPG MP3 WMA WMV DivX Estensione file JPG .JPEG .MP3 .WMA .WMV .AVI 2) I file di sottotitoli più grandi di 300KB non possono essere visualizzati correttamente. Bit rate – 80~320 kbps 56~128 kbps 4Mbps 4Mbps 3) Non sono supportati certi dispositivi USB o foto/ videocamere digitali e lettori di schede USB. Versione – – V8 V1,V2, V3,V7 DivX3.11~ DivX5.1 Pixel 640x480 – – 720x480 Frequenza di campionatura – 44,1kHz 44,1kHz 44,1KHz ~ 48KHz, Dispositivi supportati: Supporti di memorizzazione USB, lettori MP3, foto/videocamere digitali 1) Se il nome di una cartella o di un file è più lungo di 10 caratteri, è possibile che si verifichino problemi di visualizzazione o di funzionamento. 4) I file system FAT16 e FAT32 sono supportati. 5) I file di foto (JPEG), musica (MP3, WMA) e video devono avere un nome coreano o inglese. Altrimenti il file non può essere riprodotto. Musica Filmato 6) Effettuare il collegamento direttamente alla porta USB del prodotto. Se si utilizza un altro cavo per il collegamento possono verificarsi problemi di compatibilità USB. 7) Se si inserisce più di un dispositivo di memoria in un lettore multischeda, possono verificarsi problemi di funzionamento. 8) Il protocollo PTP per la foto/videocamera digitale non è supportato. 9) Non scollegare il dispositivo USB durante il processo di "lettura". 10) Più la risoluzione dell'immagine è elevata, più il ritardo nella visualizzazione è lungo. 11) I file MP3/WMA o video con DRM scaricati da siti commerciali non sono riprodotti. 12) Il dispositivo HDD esterno non è supportato. 13) La corrente massima supportata dalla porta USB per un dispositivo esterno è di 500 mA (a 5V CC). 10 Italiano HT-D450-ZF-IT-1228.indd 10 2011-12-28 5:13:37 01 Pannello anteriore 1 3 2 4 5 6 7 1 VANO DEL DISCO Inserire il disco qui. 2 DISPLAY Mostra lo stato di riproduzione, l'ora, etc. 3 SENSORE TELECOMANDO Rileva i segnali del telecomando. 4 TASTO DI APERTU RA/CHIUSURA ( 5 TASTO FUNZIONE ( 6 TASTO DI ARRESTO ( 7 TASTO DI RIPRODUZIONE/PAUSA ( 8 TASTO DI REGOLAZIONE DEL VOLUME ( 9 TASTO DI ACCENSIONE ( 10 PORTA USB 8 9 10 Apre e chiude il vano del disco. ) I modi vengono selezionati nella sequenza seguente: DVD/CD ➞ D.IN ➞ AUX ➞ USB ➞ FM ) Interrompe la riproduzione del disco. ) ) Riproduce un disco o mette in pausa la riproduzione. ) , ) Regolazione del volume. Accende e spegne il prodotto. È possibile collegare e riprodurre file da dispositivi di memorizzazione USB esterni come lettori MP3, memorie flash USB, ecc. Italiano HT-D450-ZF-IT-1228.indd 11 Operazioni preliminari Descrizione 11 2011-12-28 5:13:37 Operazioni preliminari Pannello posteriore 1 2 3 4 5 6 7 VIDEO OUT SPEAKERS OUT DIGITAL AUDIO IN FM ANT HDMI OUT FA NET (Only For Service) OPTICAL SURROUND SUBWOOFER 8 9 SURROUND AUX IN COMPONENT OUT 1 VENTOLA DI RAFFREDDAMENTO La ventola è sempre in funzione quando l'apparecchio è acceso. Durante l'installazione del prodotto, verificare che su tutti i lati della ventola ci siano almeno 10cm di spazio libero. 2 CONNETTORI DI USCITA DEI DIFFUSORI Collegare i diffusori anteriore, centro, surround e subwoofer. 3 CONNETTORE DI INGRESSO OTTICO DIGITALE ESTERNO (DIGITAL AUDIO IN) Per collegare un dispositivo esterno con uscita digitale. 4 CONNETTORE HDMI OUT Utilizzando un cavo HDMI, collegare questo terminale di uscita HDMI al terminale di ingresso HDMI del televisore per la migliore qualità dell'immagine. 5 CONNETTORI AUX IN Per il collegamento all'uscita analogica 2CH di un dispositivo esterno (come ad esempio un videoregistratore). 6 CONNETTORE VIDEO OUT Collegare il jack di ingresso video del televisore (VIDEO IN) al connettore VIDEO OUT. 7 CONNETTORI DI USCITA VIDEO COMPONENT Per collegare un televisore con ingressi video Component a questi connettori. 8 RETE FA (Solo Per L'assistenza) Usata per la riparazione manutenzione. 9 CONNETTORE ANTENNA FM Per collegare l'antenna FM. 12 Italiano HT-D450-ZF-IT-1228.indd 12 2011-12-28 5:13:37 01 Descrizione del telecomando FUNCTION TV SOURCE POWER Accende e spegne il prodotto. Per passare al modo TV, premere il tasto TV. Per passare all'Home Cinema, premere il tasto DVD. Premere i tasti numerici per attivare le opzioni. RECEIVER DVD SLEEP TV 1 2 3 4 5 6 7 8 Tasto di selezione del modo. o Premere per selezionare il modo video del televisore. Operazioni preliminari Remote Telecomando Impostare un'ora di disattivazione per spegnere il prodotto. Per aprire e chiudere il vano del disco. 9 DSP /EQ Selezionare il modo audio Dolby Pro Logic II desiderato. Selezionare il modo audio DSP/EQ desiderato. 0 Premere per cercare avanti o indietro. Premere per saltare in avanti o all'indietro. Premere per arrestare/riprodurre un disco. Disattiva temporaneamente l'audio. Premere per mettere in pausa un disco. MUTE Regola il volume. TUNING /CH VOL REPEAT Premere questo per passare al menu della pagina iniziale. DISC MENU MENU TITLE MENU Premere per aprire il menu del disco. Per cambiare la lingua dell'audio/dei sottotitoli, l'angolazione, ecc. Permette di accedere alle funzioni comuni del prodotto, come Lista foto. TOOLS INFO RETURN EXIT C D DIMMER A GIGA B S.VOL AUDIO UPSCALE S/W LEVEL TUNER MEMORY MO/ST USB REC Regola la luminosità del display. Per attivare/disattivare la funzione GIGA Sound (GIGA Sound). Per regolare il livello del subwoofer. Premere per selezionare le stazioni FM. Permette di ripetere un titolo, un capitolo, una traccia o un disco. Per accedere al menu Title (Titolo). Selezionare e cambiare le voci del menu a video. Ritorna al menu precedente. Cerca le stazioni FM attive e cambia canale. P.BASS Mostra lo stato del disco (o file) corrente. Premere questo tasto per uscire dal menu. Selezionare il modo P.BASS o MP3 Enhancement desiderato. Regola e stabilizza il volume in modo che non possa cambiare improvvisamente. Per avviare la registrazione USB. Selezionare MONO o STEREO per la trasmissione radio. Italiano HT-D450-ZF-IT-1228.indd 13 13 2011-12-28 5:13:38 Operazioni preliminari Inserimento delle batterie nel telecomando Elenco codici marche TV Marca * Tipo batterie: AAA Admiral (M.Wards) A Mark Anam AOC Bell & Howell (M.Wards) Inserire le batterie nel telecomando rispettando la polarità: (+) con (+) e (–) con (–). Sostituire sempre tutte le batterie insieme. Non esporre le batterie a fonti di calore o fiamme libere. Il telecomando ha una portata di circa 7 metri in linea d'aria. Impostazione del telecomando Il telecomando consente di controllare determinate funzioni del televisore. Per comandare il televisore con il telecomando 1. Premere il tasto TV per impostare il telecomando sul modo TV. 2. Premere il tasto di ACCENSIONE per accendere il televisore. 3. Tenendo premuto il tasto di ACCENSIONE, inserire il codice corrispondente alla marca del proprio televisore. • Se nella tabella sono riportati più codici per il proprio televisore, inserirne uno per volta per individuare quello giusto. • Esempio: Per un televisore Samsung Tenendo premuto il tasto di ACCENSIONE, usare i tasti numerici per inserire i codici 00, 15, 16, 17 e 40. 4. Se il televisore si spegne, l'impostazione è terminata. • È possibile utilizzare i tasti di ACCENSIONE del televisore, VOLUME, CANALE e i tasti numerici (0~9). ✎ NOTA È possibile che il telecomando non funzioni o non possa eseguire certi comandi con alcuni tipi di TV. Per impostazione predefinita, il telecomando funziona con televisori Samsung. 14 Marca 56, 57, 58 MTC Codice 18 01, 15 01, 02, 03, 04, 05, 06, 07, 08, 09, 10, 11, 12, 13, 14 01, 18, 40, 48 NEC 18, 19, 20, 40, 59, 60 Nikei 03 Onking 03 57, 58, 81 Onwa 59, 60 Panasonic Penney 03 Candle 18 Cetronic 03 Philco Citizen 03, 18, 25 Philips Cinema 97 Pioneer 06, 07, 08, 09, 54, 66, 67, 73, 74 18 03, 15, 17, 18, 48, 54, 59, 62, 69, 90 15, 17, 18, 40, 48, 54, 62, 72 63, 66, 80, 91 Classic 03 Portland 15, 18, 59 Concerto 18 Proton 40 Contec 46 Quasar 06, 66, 67 Coronado 15 03, 05, 61, 82, 83, 84 Radio Shack RCA/ 17, 48, 56, 60, 61, 75 Craig Croslex 62 Proscan Realistic Crown 03 Sampo Curtis Mates 59, 61, 63 Samsung CXC Sanyo Scott 03, 40, 60, 61 Daytron 03 02, 03, 04, 15, 16, 17, 18, 19, 20, 21, 22, 23, 24, 25, 26, 27, 28, 29, 30, 32, 34, 35, 36, 48, 59, 90 40 40 00, 15, 16, 17, 40, 43, 46, 47, 48, 49, 19, 61, 65 Sears 15, 18, 19 Dynasty 03 15, 57, 64 Emerson 03, 15, 40, 46, 59, 61, 64, 82, 83, 84, 85 Fisher 19, 65 Sharp Signature 2000 (M.Wards) Sony 50, 51, 52, 53, 55 03, 40 Brocsonic ✎ NOTA Codice Daewoo 18, 59, 67, 76, 77, 78, 92, 93, 94 03, 19 57, 58 Funai 03 Soundesign Futuretech General Electric (GE) 03 06, 40, 56, 59, 66, 67, 68 Spectricon 01 SSS 18 Hall Mark 40 Sylvania Hitachi 15, 18, 50, 59, 69 Symphonic 18, 40, 48, 54, 59, 60, 62 61, 95, 96 Inkel 45 Tatung 06 JC Penny 56, 59, 67, 86 Techwood 18 JVC 70 Teknika 03, 15, 18, 25 KTV 59, 61, 87, 88 TMK 18, 40 KEC 03, 15, 40 Toshiba 19, 57, 63, 71 KMC 15 01, 15, 16, 17, 37, 38, 39, 40, 41, 42, 43, 44 Vidtech 18 Videch 59, 60, 69 18 Wards 15, 17, 18, 40, 48, 54, 60, 64 Yamaha 18 York 40 LG (Goldstar) Luxman Marantz 19, 54, 56, 59, 60, 62, 63, 65, 71 15, 17, 18, 48, 54, 59, 60, 62, 72, 89 40, 54 Yupiteru 03 Matsui 54 Zenith 58, 79 LXI (Sears) Magnavox MGA Mitsubishi/ MGA 18, 40 Zonda 01 18, 40, 59, 60, 75 Dongyang 03, 54 Italiano HT-D450-ZF-IT-1228.indd 14 2011-12-28 5:13:39 02 Collegamenti Collegamenti Questa sezione illustra vari metodi per collegare il prodotto ad altri componenti esterni. Prima di spostare o installare il prodotto, spegnere l'apparecchio e staccare il cavo di alimentazione. Collegamento dei diffusori Posizione del prodotto SW 2,5 - 3 volte il formato del televisore Sistemarlo su un supporto, sul ripiano di un mobile o nel mobile sotto la TV. Determinazione della posizione di ascolto La posizione di ascolto deve essere situata, rispetto al televisore, ad una distanza pari a circa 2,5 - 3 volte il formato del televisore. Esempio : Per un televisore da 32" 2 - 2,4 m Per un televisore da 55" 3,5 - 4 m Diffusori anteriori ei Diffusore centrale f hj Diffusori surround Posizionare questi diffusori davanti alla posizione di ascolto; devono essere rivolti verso l'interno (di circa 45°), in direzione dell'ascoltatore. Posizionare i diffusori in modo che i tweeter si trovino all'altezza dell'orecchio dell'ascoltatore. Allineare la parte frontale dei diffusori anteriori con la parte frontale del diffusore centrale o disporli leggermente più avanti rispetto al diffusore centrale. Si consiglia di posizionarlo alla stessa altezza dei diffusori anteriori. Può essere posizionato anche sopra o sotto il televisore. Posizionare questi diffusori ai lati della posizione di ascolto. Se non vi è spazio sufficiente, posizionare i diffusori in modo che siano rivolti l'uno verso l'altro. Posizionarli a circa 60-90 cm sopra l'orecchio dell'ascoltatore, leggermente rivolti verso il basso. differenza dei diffusori anteriori e centro, i diffusori surround servono * Aprincipalmente per gestire gli effetti sonori; non emettono sempre suoni. Subwoofer g La posizione del subwoofer non è molto rilevante. Posizionarlo dove si preferisce. ! ATTENZIONE Non lasciar giocare i bambini con i diffusori o nelle loro vicinanze. La caduta di un diffusore potrebbe provocare lesioni. Per collegare i cavi dei diffusori ai diffusori, rispettare la polarità (+/ –). Tenere il subwoofer lontano dalla portata dei bambini per impedire che mettano le mani o introducano oggetti nel condotto (foro) dello stesso. Non appendere il subwoofer alla parete dal condotto (foro). ✎ NOTA Se si colloca un diffusore vicino al televisore, i colori dello schermo potrebbero apparire distorti a causa del campo magnetico generato dal diffusore. Se ciò si verifica, allontanare il diffusore dal televisore. Italiano HT-D450-ZF-IT-1228.indd 15 15 2011-12-28 5:13:39 Collegamenti Composizione dei diffusori HT-D450 (L) (R) (L) ANTERIORI (R) SURROUND CENTRALE Composizione dei diffusori SUBWOOFER CAVI DIFFUSORI Diffusori montati HT-D453 HT-D453 (L) (R) VITI (5×15): X 2 VITI (4×20): X 8 DIFFUSORE CENTRALE ANTERIORI (L) SUPPORTI CENTRALE (R) SURROUND CAVI BASI SUPPORTI SUBWOOFER DIFFUSORI DIFFUSORI ANTERIORI HT-D455 DIFFUSORE SURROUND SUBWOOFER HT-D455 (L) (R) VITI (5×15): X 4 DIFFUSORE CENTRALE VITI (4×20): X 16 ANTERIORI SUPPORTI (L) (R) CENTRALE SUBWOOFER SURROUND BASI SUPPORTI DIFFUSORI ANTERIORI / SURROUND SUBWOOFER CAVI DIFFUSORI ✎ NOTA Vedere a pagina 17 per installare i diffusori sul supporto a colonna. 16 Italiano HT-D450-ZF-IT-1228.indd 16 2011-12-28 5:13:40 02 Collegamenti Installazione dei diffusori sul supporto a colonna * Solo HT-D453 - Diffusori anteriori * Solo HT-D455 - Diffusori anteriori/ surround 1. Capovolgere la base del supporto e collegarla al supporto. 2. Utilizzando un cacciavite, inserire le viti piccole (4*20, per fissare il supporto all'apposita base) in senso orario nei quattro fori marcati, come mostrato nella figura. ! ATTENZIONE : Quando si utilizza un cacciavite 1 2 Base supporto Supporto 3 Diffusore dinamometrico, prestare attenzione a non esercitare una forza eccessiva. Altrimenti, gira a vuoto o si rischia di danneggiarlo. (cacciavite dinamometrico – inferiore a 15 kg.f.cm) 3. Collegare il diffusore superiore al supporto montato. 4. Servendosi di un cacciavite, inserire un’altra vite grande (5*15, per collegare il diffusore al supporto) in senso orario nel foro sulla parte posteriore del diffusore. 5. Questo è il risultato, dopo aver installato il diffusore. Seguire questi passi per installare gli altri diffusori. 4 Supporto 5 Collegamento dei diffusori 1. Premere verso il basso la linguetta del morsetto sul retro del diffusore. 2. Inserire il filo nero nel morsetto nero (–) e il filo rosso nel morsetto rosso (+), quindi rilasciare la linguetta. 3. Collegare le spine sul retro del prodotto facendo corrispondere i colori delle spine con quelli dei connettori. Nero Rosso Per il modello HT-D450 Diffusore centrale Diffusore anteriore (R) Diffusore anteriore (L) Diffusore Surround (R) Diffusore Surround (L) Subwoofer * Vedere a pagina 16 per i diffusori di HT-D453/D455. Italiano HT-D450-ZF-IT-1228.indd 17 17 2011-12-28 5:14:04 Collegamenti Collegamento dell'uscita video al televisore Selezionare uno dei quattro metodi per il collegamento a un televisore. METODO 3 SCART IN METODO 4 (fornito) VIDEO OUT GITAL DIO IN FM ANT HDMI OUT FA NET (Only For Service) TICAL AUX IN COMPONENT OUT Verde Blu Rosso METODO 2 METODO 1 METODO 1: HDMI Collegare un cavo HDMI (non fornito) tra il connettore HDMI OUT nella parte posteriore del prodotto e il connettore HDMI IN del televisore. METODO 2: Video Component Se il televisore è dotato di ingressi video Component, collegare un cavo video Component (non fornito) tra i connettori COMPONENT OUT (Y, PB e PR) sul retro del prodotto e i connettori di ingresso video Component del televisore. METODO 3: Scart Se il televisore è dotato di ingresso SCART, collegare il cavo video fornito tra il connettore VIDEO OUT sul retro del prodotto e il connettore VIDEO sull'adattatore SCART, quindi collegare il connettore dell'adattatore SCART al connettore SCART IN sul televisore. METODO 4: Video composito Collegare il cavo video fornito tra il connettore VIDEO OUT nella parte posteriore del prodotto e il connettore VIDEO IN sul televisore. 18 Italiano HT-D450-ZF-IT-1228.indd 18 2011-12-28 5:14:06 02 Le risoluzioni disponibili per l'uscita HDMI sono 480p (576p), 720p,1080i/1080p. Vedere a pagina 23 per l'impostazione della risoluzione. Questo prodotto opera in modo scansione interlacciata 480i(576i) per l'uscita Component/composita. Dopo aver eseguito il collegamento video, impostare la sorgente di ingresso video del televisore in modo che corrisponda al modo di uscita video del prodotto. Accendere questo prodotto prima di impostare la sorgente di ingresso video sul televisore. Per ulteriori informazioni su come selezionare la sorgente di ingresso video del televisore consultare il manuale del televisore. Collegamenti ✎ NOTA ! ATTENZIONE Non collegare l'unità attraverso un videoregistratore. I segnali video inviati dai videoregistratori potrebbero essere influenzati da sistemi di protezione del copyright, facendo risultare distorta l'immagine sul televisore. FUNZIONE HDMI Funzione di rilevamento automatico HDMI Se il televisore è un TV Samsung e supporta funzioni CEC, l'uscita video del prodotto passa automaticamente al modo HDMI se si collega un cavo HDMI mentre l'apparecchio è acceso. • HDMI (interfaccia multimediale ad alta definizione) • HDMI è un'interfaccia che consente la trasmissione di dati audio e video digitali usando un solo connettore. Se il televisore dispone di un connettore di ingresso HDMI, questa interfaccia consente al prodotto di trasmettere un segnale audio e video digitale e di visualizzare sul televisore un'immagine vivida. • Descrizione del collegamento HDMI - HDMI trasmette al televisore solo un segnale digitale puro. - Se il televisore non supporta la funzione HDCP (High-bandwidth Digital Content Protection), l'immagine a video appare disturbata. • Che cosa è l'HDCP? • HDCP (High-band width Digital Content Protection) è un sistema di protezione da copia dei contenuti dei DVD trasmessi attraverso HDMI. Fornisce un collegamento digitale sicuro tra una sorgente video (PC, DVD, ecc.) e un dispositivo di visualizzazione (TV, proiettore, ecc.). Il contenuto viene crittografato sul dispositivo di origine per impedire che vengano prodotte copie non autorizzate. Utilizzo di Anynet+ (HDMI-CEC) Anynet+ è una funzione che può essere utilizzata per comandare altri dispositivi Samsung utilizzando il telecomando di un televisore Samsung. La funzione Anynet+ può essere utilizzata collegando questo prodotto ad un televisore SAMSUNG mediante un cavo HDMI. Questa possibilità è disponibile soltanto con i televisori SAMSUNG che supportano Anynet+. 1. Collegare il prodotto a un televisore Samsung con un cavo HDMI. (Vedere a pagina 18) 2. Impostare la funzione Anynet+ sul televisore. (Per ulteriori informazioni, consultare il manuale di istruzioni del televisore). ✎ NOTA La funzione Anynet+ supporta alcuni tasti del telecomando. Questa funzione non è disponibile se un cavo HDMI non supporta CEC. Su alcuni televisori, alcune risoluzioni di uscita HDMI potrebbero non essere utilizzabili. Consultare il manuale utente del televisore. Verificare la presenza del logo (se il televisore ha il logo , significa che supporta la funzione Anynet+). Italiano HT-D450-ZF-IT-1228.indd 19 19 2011-12-28 5:14:08 Collegamenti Collegamento dell'antenna FM Antenna FM (fornita) VIDEO OUT FM ANT HDMI OUT FA NET (Only For Service) AUX IN COMPONENT OUT 1. Collegare l'antenna FM fornita al connettore antenna FM. 2. Muovere lentamente il filo dell'antenna finché non si trova una posizione con una buona ricezione, quindi fissarlo a un muro o a un'altra superficie rigida. ✎ NOTA Questo prodotto non riceve le trasmissioni AM. 20 Italiano HT-D450-ZF-IT-1228.indd 20 2011-12-28 5:14:08 02 Collegamenti Collegamento dell'audio da apparecchi esterni VIDEO OUT SPEAKERS OUT FM ANT Bianco DIGITAL AUDIO IN HDMI OUT FA NET (Only For Service) OPTICAL D SUBWOOFER AUX IN SURROUND Cavo ottico (non fornito) Set-Top Box COMPONENT OUT Rosso Cavo audio (non fornito) Se il componente analogico esterno ha una sola uscita audio, collegarlo a sinistra o a destra. VCR OTTICO AUX AUX : Collegamento di un componente analogico esterno Componenti con segnale analogico come un videoregistratore. 1. Collegare AUX IN (Audio) nella parte posteriore del prodotto all'uscita audio del componente analogico esterno. • Assicurarsi che i colori dei connettori corrispondano. 2. Premere il tasto FUNCTION per selezionare l'ingresso AUX. • I modi vengono selezionati nella sequenza seguente: DVD/CD ➞ D.IN ➞ AUX ➞ USB ➞ FM ✎ NOTA È possibile collegare il connettore di uscita video del videoregistratore al televisore e collegare i connettori di uscita audio del videoregistratore a questo prodotto. OTTICO : Collegamento di un componente digitale esterno Per apparecchi con segnale digitale come ad es. ricevitore per TV via cavo/ricevitore satellitare (Set-Top Box). 1. Collegare DIGITAL AUDIO IN (OPTICAL) sul retro del prodotto all'uscita digitale del componente digitale esterno. 2. Premere il tasto FUNCTION per selezionare D.IN • I modi vengono selezionati nella sequenza seguente: DVD/CD ➞ D.IN ➞ AUX ➞ USB ➞ FM Italiano HT-D450-ZF-IT-1228.indd 21 21 2011-12-28 5:14:10 Configurazione Operazioni preliminari (impostazioni iniziali) 1. Al primo collegamento con il televisore, premere il tasto di ACCENSIONE. Viene visualizzata la schermata di configurazione iniziale. Initial settings > On-Screen Language Select a language for the on-screen displays Impostazione del menu di configurazione Il passo da eseguire per accedere può variare a seconda del menu selezionato. La GUI (interfaccia utente grafica) di questo manuale potrebbe non corrispondere a quanto qui riportato. Ciò dipende dalla versione del firmware. 1 DISC MENU MENU TITLE MENU English 한국어 Nederlands TOOLS INFO RETURN EXIT Français Deutsch 3 Italiano >Move " Select 2. Premere i tasti ▲ ▼ per selezionare la lingua desiderata, quindi premere il tasto INVIO. 3. Premere il tasto INVIO per selezionare il pulsante Start. 4. Premere i tasti ▲▼ per selezionare il formato desiderato per il televisore, quindi premere il tasto INVIO. Se al prodotto è collegato il cavo HDMI, il formato del televisore non appare. ✎ NOTA Nel caso non sia stata selezionata una lingua preferita nelle impostazioni iniziali, all'accensione del prodotto viene visualizzata una finestra di selezione della lingua. La selezione della lingua si applica a tutti i menu: Menu a video, Disc Menu (Menu Disco), Audio (Audio), Subtitle (Sottotitolo). Per tornare alla schermata precedente, premere il pulsante RETURN. Una volta selezionata la lingua per il menu, è possibile cambiarla premendo il tasto di ARRESTO () sul telecomando per almeno 5 secondi senza nessun disco inserito. Se la schermata Initial Setting (Impostazione iniziale) non viene visualizzata, vedere Impostazione iniziale. (Vedere a pagina 26) 2 A B C 4 D 1 TASTO MENU : Visualizza il menu principale. 2 TASTO RETURN : Ritorna al menu di configurazione precedente. 3 TASTO INVIO / DIREZIONE Spostare il cursore e selezionare una voce. Selezionare la voce evidenziata. Confermare l'impostazione. 4 TASTO EXIT : Esce dal menu di configurazione. Impostazioni Function DVD/CD 1. Premere il tasto di ACCENSIONE. 2. Premere i tasti ◄► per selezionare Impostazioni, quindi premere il tasto INVIO. 3. Premere i tasti ▲▼ per selezionare il menu desiderato, quindi premere il tasto INVIO. 4. Premere i tasti ▲▼ per selezionare il sottomenu desiderato, quindi premere il tasto INVIO. 5. Premere i tasti ▲▼ per selezionare la voce desiderata, quindi premere il tasto INVIO. 6. Premere il tasto EXIT per uscire dal menu di configurazione. 22 Italiano HT-D450-ZF-IT-1228.indd 22 2011-12-28 5:14:12 03 ✎ NOTA È possibile configurare diverse opzioni per il display, quali formato, risoluzione, ecc. Formato del televisore Per alcuni tipi di televisore, è possibile che si desideri regolare l'impostazione dello schermo. • 4:3 Pan-Scan Selezionare questa opzione se si desidera vedere il formato video 16:9 fornito dal DVD senza le fasce nere in basso e in alto anche se si ha un televisore con formato 4:3 (le porzioni all'estrema destra e all'estrema sinistra dell'immagine verranno tagliate). • 4:3 Letter Box Selezionare questa opzione per utilizzare il massimo rapporto larghezza/ altezza 16:9 fornito dal DVD anche se si usa un televisore con un rapporto 4:3. In cima e in fondo alla schermata appaiono fasce nere. • 16:9 Wide È possibile visualizzare l'intera immagine in 16:9 sul televisore panoramico. Risoluzione Imposta la risoluzione di uscita del segnale video HDMI. Il numero di 480p (576p), 720p, 1080i e 1080p indica il numero di linee del video. “i” e “p” indicano rispettivamente la scansione interlacciata e progressiva. • • • • • 480p(576p) : 480 linee a scansione progressiva. 720p : 720 linee a scansione progressiva. 1080i : 1080 linee a scansione interlacciata. 1080p : 1080 linee a scansione progressiva. BD Wise : imposta automaticamente la risoluzione ottimale quando è connesso ad un televisore attraverso HDMI con la funzione BD Wise. (La voce di menu BD Wise viene visualizzata solo se BD Wise è impostato su On). ✎ NOTA ✎ NOTA Quando si utilizza la funzione HDMI, il televisore passa automaticamente a 16:9 Wide e il formato viene disattivato. Se un DVD è in formato 4:3, non è possibile vederlo in formato panoramico. Poiché i dischi DVD sono registrati in vari formati, saranno diversi a seconda del software, del tipo di televisore e dell'impostazione del formato dello schermo. BD Wise (Solo prodotti Samsung) BD Wise è la funzione di interconnettività Samsung di ultima generazione. Quando i prodotti Samsung con BD-Wise vengono collegati tra loro tramite HDMI, viene impostata automaticamente la risoluzione ottimale. • Si : la risoluzione originale del disco DVD viene inviata direttamente al televisore. • No : la risoluzione di uscita sarà stabilita in base alla risoluzione impostata in precedenza, indipendentemente da quella del disco. Questo ottimizzerà la qualità dell'immagine in funzione del contenuto (del disco, del DVD, ecc.) da riprodurre e del prodotto o del televisore Samsung compatibile con BD Wise. Se si vuole cambiare la risoluzione in modo BD Wise, si deve prima impostare BD su Off. La funzione BD Wise (BD Wise) viene disattivata se il prodotto è collegato a un dispositivo che non la supporta. Se è collegato un cavo Component o composito, la risoluzione supporta solo 480i(576i). 1080P potrebbe non essere compatibile con alcuni televisori. Formato HDMI È possibile ottimizzare l'impostazione colore dall'uscita HDMI. Selezionare il tipo di dispositivo collegato. • Monitor : selezionare in caso di collegamento a un monitor tramite HDMI. • TV : selezionare in caso di collegamento al televisore tramite HDMI. Segn. uscita video Paesi diversi applicano standard TV diversi. È possibile selezionare i formati NTSC o PAL. • NTSC : È possible selezionare il formato video NTSC • PAL : È possible selezionare il formato video PAL Italiano HT-D450-ZF-IT-1228.indd 23 Configurazione Display 23 2011-12-28 5:14:13 Configurazione Regolazione bil. ant./surround È possibile selezionare un valore compreso tra 0 e -6. Il volume diminuisce più ci si avvicina a -6. Audio Impostazione Diffusori Dimensione altoparl. In questa modalità è possibile impostare le dimensioni dei diffusori centrale, posteriori e anche il tono di test. Impostazioni Impostazione Diffusori Dimensione altoparl. ► BAL Ant. Tempo Ritardo Se i diffusori non possono essere collocati a uguale distanza dalla posizione di ascolto, è possibile regolare il ritardo dei segnali audio dei diffusori centro e surround.È anche possibile impostare il tono di test in questo modo. Tempo Ritardo Test Tone Regolazione del livello dei diffusori centro/surround/ subwoofer Il livello del volume può essere regolato tra +6dB e –6dB. Il livello dell'audio aumenta più ci si avvicina a +6dB e si abbassa più ci si avvicina a -6dB. : No " Seleziona ' Ritorna mSposta " Seleziona ' Ritorna • Per i diffusori anteriori, il modo è impostato su Picco.. • Per il subwoofer, il modo è impostato su Ora. • Per i diffusori centro e posteriori è possibile selezionare i modi Picco. o Ness.. - Picco. : selezionare questa opzione per utilizzare i diffusori. - Ness. : selezionare questa opzione quando non è collegato nessun diffusore. Impostazione del ritardo dei diffusori Per la riproduzione di audio surround a 5.1 canali, l'effetto migliore si ottiene se la distanza tra l'utente e ogni diffusore è la stessa. Dato che i suoni arrivano nella posizione di ascolto in tempi diversi a seconda della collocazione dei diffusori, è possibile regolare questa differenza aggiungendo un effetto di ritardo ai diffusori centro e surround. Impostazioni Tempo Ritardo ✎ NOTA Fronte Il modo diffusori può variare a seconda delle impostazioni Dolby Pro Logic e Stereo. Centro : 00mSEC Surround : 10mSEC Subwoofer Test Tone : No BAL Ant. <Cambia " Seleziona ' Ritorna mSposta " Seleziona ' Ritorna È possibile regolare il bilanciamento e il livello di ogni diffusore. Impostazioni BAL Ant. Bilan. ant. dB L R dB Bil.surround dB L R dB Liv. Cent. dB Liv.surround dB Liv. SW dB ✎ NOTA Il menu Delay Time (Tempo ritardo) viene attivato solo quando viene riprodotta la sorgente a 5.1 canali. Non è possibile impostare Centro e Surround in questo modo quando le dimensioni di tali diffusori sono impostate su Ness.. <Cambia " Seleziona ' Ritorna mSposta " Seleziona ' Ritorna Premere i tasti ▲▼ per selezionare e regolare il diffusore desiderato. Premere i tasti ◄► per regolare le impostazioni. 24 Italiano HT-D450-ZF-IT-1228.indd 24 2011-12-28 5:14:20 03 Configurazione Posizione ideale del diffusore centro Test Tone Impostazioni Impostazione Diffusori Dimensione altoparl. BAL Ant. Tempo Ritardo Test Tone Posizione ideale del diffusore surround È preferibile posizionare tutti i diffusori all'interno di questo cerchio. Df: distanza dal diffusore anteriore Dc: distanza dal diffusore centro Ds: Distanza dal diffusore surround Impostazione del diffusore centrale Se la distanza Dc è uguale o superiore alla distanza Df nella figura, impostare il modo su 0 ms. In caso contrario cambiare l'impostazione secondo la tabella. Distanza tra Df e Dc 0,00m 0,34m 0,68m 1,06m 1,40m 1,76m Ritardo 00 ms 01 ms 02 ms 03 ms 04 ms 05 ms : Si ► " Seleziona ' Ritorna mSposta " Seleziona ' Ritorna Utilizzare la funzione Tono di test per controllare i collegamenti dei diffusori. • Premere i tasti ◄► per selezionare Si. • Il tono di test verrà inviato in sequenza ai diffusori Anteriore sinistro ➞ Centro ➞ anteriore destro ➞ Surround destro ➞ Surround sinistro ➞ Subwoofer. Per arrestare il tono di test, premere il tasto INVIO. DRC (compressione del livello audio) Questa funzione permette il bilanciamento tra i suoni più alti e quelli più bassi. Questa funzione permette di apprezzare l'audio Dolby Digital quando si guardano film a basso volume di notte. • È possibile selezionare Pieno, 6/8, 4/8, 2/8 o No. Impostazione del diffusore surround SINC. AUDIO Se la distanza Dc è uguale o superiore alla distanza Ds nella figura, impostare il modo su 0 ms. In caso contrario cambiare l'impostazione secondo la tabella. La sincronizzazione audio e video potrebbe non corrispondere con la TV digitale. Se si verifica questo inconveniente, regolare il ritardo dell'audio per sincronizzarlo con il video. Distanza tra Df e Ds 0,00m 1,06m 2,11m 3,16m 3,62m 5,29m Ritardo 00 ms 03 ms 06 ms 09 ms 12 ms 15 ms ✎ NOTA Con PL II (Dolby Pro Logic II), il ritardo potrebbe essere diverso per ogni modo. AC-3 e DTS, il ritardo può essere impostato tra 00 e 15 mSEC. Il canale centrale è regolabile solo sui dischi a 5.1 canali. • È possibile impostare un ritardo dell'audio compreso tra 0 ms e 300 ms. Impostarlo al livello ottimale. AUDIO HDMI I segnali audio trasmessi tramite il cavo HDMI possono essere attivati o disattivati. • No : il video è trasmesso solo tramite il cavo di collegamento HDMI e l'audio viene emesso solo tramite i diffusori del prodotto. • Si : i segnali sia video sia audio vengono trasmessi tramite il cavo di collegamento HDMI, e l'audio viene emesso solo tramite gli altoparlanti del televisore. Italiano HT-D450-ZF-IT-1228.indd 25 25 2011-12-28 5:14:20 Configurazione ✎ NOTA System L'impostazione predefinita di questa funzione è HDMI Audio Off. HDMI Audio viene convertito automaticamente in 2 canali per gli altoparlanti del televisore. Quando HDMI Audio è impostato su On, PL II / DSP EQ /P.BASS non funzionano. Impostando AUDIO HDMI su "Si", è possibile regolare il volume solo utilizzando il telecomando del televisore. Impostazione iniziale Utilizzando le impostazioni iniziali, è possibile impostare la lingua e il formato TV. ✎ NOTA Se il cavo HDMI è collegato al prodotto, il formato TV non appare e viene impostato automaticamente su 16:9 Wide. EQ utente È possibile configurare le impostazioni di equalizzazione manualmente in base alle proprie preferenze. Vedere il codice di registrazione DivX(R) VOD per acquistare e riprodurre contenuti DivX(R) VOD. Impostazioni EQ utente dB 6 · · · · · · · · · · · · -6 ✎ NOTA 250Hz 600Hz 1kHz 3kHz 6kHz 10kHz 15kHz a Reset > Regola < Sposta ' Ritorna mSposta " Seleziona ' Ritorna ✎ NOTA Registrazione DivX(R) Questo può essere fatto anche utilizzando il tasto DSP/EQ. (Vedere a pagina 34) Questa opzione non è attivata se si seleziona OK (OK). Per attivare questa opzione, attivare la disattivazione DivX(R). Le impostazioni di registrazione DivX non vengono ripristinate quando si riavvia il sistema. DivX(R) Disattivazione Selezionare questa opzione per ottenere un nuovo codice di registrazione. Canale rit. audio È possibile sentire l'audio del televisore dai diffusori dell'Home Cinema utilizzando un unico cavo HDMI. • No : Disattivare la funzione Canale rit. audio. • Auto : Ascoltare l'audio del televisore dai diffusori dell'Home Cinema se il televisore è compatibile con la funzione Canale rit. audio. ✎ NOTA Quando Anynet+ (HDMI-CEC) è su Disatt., la funzione Canale rit. audio non è disponibile. L'uso di un cavo HDMI non certificato ARC (Audio Return Channel-Canale rit. audio) può causare problemi di compatibilità. La funzione ARC (Audio Return ChannelCanale rit. audio) è disponibile solo se è collegato un televisore compatibile ARC. 26 Italiano HT-D450-ZF-IT-1228.indd 26 2011-12-28 5:14:21 03 È possibile selezionare la lingua preferita per il menu a video, il menu del disco, ecc. Cambia Password. Selezionare Cambia e inserire la password di 4 cifre per impostare la protezione bambini utilizzando i tasti numerici sul telecomando. Configurazione Lingua LINGUA OSD Selezionare la lingua per l'OSD. Impostazioni Menu Disco Audio Sottotitolo Selezionare la lingua per il menu del disco. Selezionare la lingua per l'audio del disco. Selezionare la lingua per i sottotitoli del disco. Display Livello Blocco : Disattivo Audio Password ✎ NOTA La lingua selezionata appare solo se è supportata dal disco. Sicurezza La funzione di protezione bambini funziona in combinazione con i DVD a cui è stata assegnata una classificazione per indicare i tipi di DVD adatti per tutta la famiglia. Esistono 8 livelli di classificazione per i dischi. ► Lingua Sicurezza Supporto mSposta a Per selezionare un'altra lingua, selezionare OTHERS (ALTRO) per Disc Menu (Menu Disco), Audio (Audio) e Subtitle (Sottotitolo), quindi inserire il codice della lingua del proprio Paese (vedere a pagina 38). a Non è possibile selezionare OTHERS (ALTRO) nel menu OSD Language (Lingua OSD). : Cambia Sistema " Seleziona ' Ritorna Se non si ricorda la password 1. Rimuovere il disco. 2. Tenere premuto il tasto di ARRESTO () sul telecomando per almeno 5 secondi. Tutte le impostazioni vengono riportate ai valori predefiniti. Supporto Informazioni prodotto Fornire le informazioni sul prodotto, quali il codice del modello, la versione software, ecc. Livello Blocco Selezionare il livello di blocco desiderato. I numeri più grandi indicano programmi riservati agli adulti. Ad esempio, se se seleziona fino al livello 6, i dischi che contengono i livelli 7 o 8 non vengono riprodotti. Immettere la password e quindi premere il tasto INVIO. - Per impostazione predefinita la password è "0000". - Una volta completata l'impostazione, si torna alla schermata precedente. Italiano HT-D450-ZF-IT-1228.indd 27 27 2011-12-28 5:14:21 Funzioni di base Riproduzione di un disco Riproduzione di CD audio (CD-DA)/MP3/WMA BA 1. Premere il tasto di APERTURA/CHIUSURA (). 2. Inserire delicatamente un disco nel vano, con l'etichetta rivolta verso l'alto. 3. Premere il tasto APERTURA/CHIUSURA () per chiudere il vano del disco. TRACCIA 01 1/17 ✎ NOTA Funzione di ripresa della riproduzione: quando si arresta la riproduzione del disco, il prodotto ricorda il punto dell'interruzione; così, quando si preme di nuovo il tasto di RIPRODUZIONE, la riproduzione riprende da dove è stata interrotta. (Questa funzione è disponibile soltanto per i DVD). Premere il tasto di ARRESTO due volte durante la riproduzione per disattivare la funzione di ripresa della riproduzione. Quando il prodotto è in pausa, se non si preme nessun tasto sul prodotto o sul telecomando per più di 3 minuti, passa al modo di Arresto. La schermata iniziale può essere diversa a seconda del contenuto del disco. I dischi piratati non vengono riprodotti da questo prodotto perché violano il CSS (Content Scrambling System: sistema di protezione contro la copia). a viene visualizzato quando viene premuto un tasto non valido. Funzione di salvaschermo TV/risparmio energia • Se in modo di arresto o di riproduzione non viene premuto nessun tasto per più di 5 minuti si attiva il salvaschermo. • Se il salvaschermo viene lasciato in funzione per oltre 20 minuti, l'unità si spegne automaticamente. (Tranne durante la riproduzione di musica) 28 0:15 / 3:59 Function DVD/CD Repeat Modo Ripr. 1. Inserire un CD audio (CD-DA) o un disco MP3 nel vano del disco. • Per i CD audio, la prima traccia viene riprodotta automaticamente. - Premere i tasti #$ per passare alla traccia precedente/successiva. • Per i dischi MP3/WMA, premere i tasti ◄► per selezionare Musica, quindi premere il tasto INVIO. - Premere i tasti ▲▼◄► per selezionare il file desiderato, quindi premere il tasto INVIO. - Premere i tasti per passare alle pagine precedenti/successive. 2. Premere il tasto di ARRESTO () per arrestare la riproduzione. ✎ NOTA A seconda del modo di registrazione, alcuni CD MP3/WMA potrebbero non essere riprodotti. Il sommario dei CD MP3 varia a seconda del formato delle tracce MP3/WMA registrate sul disco. I file WMA-DRM non possono essere riprodotti. Italiano HT-D450-ZF-IT-1228.indd 28 2011-12-28 5:14:21 04 Utilizzo della funzione di riproduzione Le immagini riprese con una fotocamera o una videocamera e i file JPEG memorizzati su PC possono essere copiati su CD e riprodotti con questo prodotto. Ricerca avanti/indietro dBAD 1. Inserire un disco JPEG nel vano del disco. 2. Premere i tasti ◄► per selezionare Foto, quindi premere il tasto INVIO. Premere i tasti per la funzione di ricerca. 3. Premere i tasti ▲▼ per selezionare la cartella da riprodurre, quindi premere il tasto INVIO. 4. Premere i tasti ▲▼ per selezionare la foto da riprodurre, quindi premere il tasto INVIO. • Il file selezionato viene riprodotto e viene avviata la proiezione delle diapositive. • Per arrestare la proiezione delle diapositive, premere il tasto di PAUSA () . • Per visualizzare i file precedenti/successivi, premere i tasti ◄, ► nel modo presentazione. Funzioni di base Riproduzione di file JPEG 1➞2➞3➞4 1➞2➞3➞4 ✎ NOTA Nel modo di ricerca non viene emesso nessun suono. Durante la ricerca della riproduzione viene emesso un suono solo a velocità 1 e 2. Questa funzione è disponibile solo per il CD-DA. Salto di scene/canzoni ROOT JPEG 1 dBAD JPEG 2 JPEG 3 642 X 352 Premere i tasti #$. • Ogni volta che si premono questi tasti durante la riproduzione, vengono riprodotti il capitolo, la traccia o la cartella (file) precedenti o successivi. • Non è possibile saltare capitoli consecutivamente. 2010/01/01 Function DVD/CD Pagina Ritorna Funzione di rotazione Riproduzione al rallentatore G Premere i tasti VERDE (B) o GIALLO (C) in modo PAUSA. • Tasto VERDE (B): ruota di 90° in senso antiorario. • Tasto GIALLO (C) : ruota di 90° in senso orario. ✎ NOTA Le risoluzioni massime supportate da questo prodotto sono 5120 x 3480 (o 19.0 MPixel) per i file JPEG standard e 2048 x 1536 (o 3.0 MPixel) per i file di immagini progressive. dD Premere il tasto PAUSA () e quindi il tasto per la riproduzione al rallentatore. d D 1 ➞2 ➞3 1 ➞2 ➞3 ✎ NOTA Non si sente alcun suono durante la riproduzione rallentata. La riproduzione rallentata all'indietro non funziona. Italiano HT-D450-ZF-IT-1228.indd 29 29 2011-12-28 5:14:22 Funzioni di base Riproduzione fotogramma per fotogramma dD Premere ripetutamente il tasto PAUSA . • L'immagine avanza di un fotogramma ogni volta che si preme questo tasto durante la riproduzione. ✎ NOTA L'audio non è disponibile durante la riproduzione fotogramma per fotogramma. Utilizzo del menu dei titoli d Per i DVD che contengono più titoli, è possibile visualizzare il titolo di ogni filmato. 1. Durante la riproduzione, premere il tasto TITLE MENU sul telecomando. TITLE MENU 2. Premere i tasti ▲▼◄► per effettuare la selezione desiderata, quindi premere il tasto INVIO. ✎ NOTA Funzione di salto di 5 minuti D Durante la riproduzione, premere i tasti ◄,►. • La riproduzione salta 5 minuti in avanti ogni volta che si preme il tasto ►. • La riproduzione salta 5 minuti all'indietro ogni volta che si preme il tasto ◄. Ripetizione della riproduzione dBAD Ripetizione DVD/DivX È possibile ripetere il titolo, il capitolo o la sezione (ripetizione A-B) del DVD/DivX. ✎ NOTA Su alcuni dischi, le voci di impostazione del menu potrebbero variare e questo menu potrebbe non essere disponibile. Questa funzione è disponibile solo per DivX contenenti informazioni sull'ora. Ripeti No Utilizzo del menu del disco d È possibile visualizzare i menu per la lingua dell'audio, la lingua dei sottotitoli, il profilo, ecc. 1. Durante la riproduzione, premere il tasto DISC MENU sul telecomando. DISC MENU 2. Premere i tasti ▲▼◄► per effettuare la selezione desiderata, quindi premere il tasto INVIO. ✎ NOTA Su alcuni dischi, le voci di impostazione del menu potrebbero variare e questo menu potrebbe non essere disponibile. 30 1. Durante la riproduzione DVD/DivX, premere il tasto REPEAT sul telecomando. 2. Premere i tasti ▲▼ per selezionare il modo di ripetizione desiderato, quindi premere il tasto INVIO. REPEAT 3. Premere i tasti ▲▼ per selezionare No per ritornare alla riproduzione normale, quindi premere il tasto INVIO. Z D Titolo ➞ Capitolo ➞ A - ➞ No Titolo ➞ Cartella ➞ Tutto ➞ No Italiano HT-D450-ZF-IT-1228.indd 30 2011-12-28 5:14:22 04 Visualizzazione delle informazioni sul disco 1. Durante la riproduzione CD/ MP3, premere il tasto REPEAT ripetutamente per selezionare il modo di ripetizione desiderato. B d Funzioni di base Ripetizione CD/MP3 1/1 2/20 (Ripeti disattivato Ripeti disco Ripeti tutto Casuale Ripeti sezione A-B) 0:05:21 1/1 EN AC3 5.1 1/1 EN A (Ripeti disattivato Ripeti traccia Directory di ripetizione (Directory) Ripeti tutto Casuale) 1/1 Cambia Seleziona D Ripetizione della riproduzione A-B dB 1/6 È possibile riprodurre ripetutamente una determinata sezione di un DVD o di un CD. 1/1 1/1 EN Cambia Seleziona 1. Durante la riproduzione di un disco DVD o CD, premere il tasto REPEAT sul telecomando. 2. Per i DVD, premere i tasti ▲▼ per selezionare A-. Per i CD premere ripetutamente il tasto REPEAT finché non appare . 3. Premere il tasto INVIO nel punto in cui si desidera che inizi la ripetizione della riproduzione (A). 4. Premere il tasto INVIO nel punto in cui si desidera interrompere la ripetizione della riproduzione (B). 5. Per tornare al modo di riproduzione normale, Per i DVD, premere i tasti ▲▼ per selezionare OFF. Per i CD, premere il tasto REPEAT per selezionare . ✎ NOTA La funzione di ripetizione A-B non funziona con i dischi DivX, MP3 o JPEG. 1. Durante la riproduzione, premere il tasto TOOLS sul telecomando. TOOLS 2. Premere i tasti ▲▼ per selezionare la voce desiderata. 3. Premere i tasti ◄► per apportare le modifiche desiderate alle impostazioni, quindi premere il tasto INVIO. - È possibile utilizzare i tasti numerici sul telecomando per controllare alcune voci. 4. Per far scomparire le informazioni sul disco, premere di nuovo il tasto TOOLS. ✎ NOTA Se si stanno riproducendo contenuti dal menu degli strumenti, su alcuni dischi è possibile che alcune funzioni non siano abilitate. È anche possibile selezionare DTS, Dolby Digital o Pro Logic, a seconda del disco. Alcuni menu degli strumenti potrebbero differire a seconda dei dischi e dei file. Italiano HT-D450-ZF-IT-1228.indd 31 31 2011-12-28 5:14:24 Funzioni di base Menu TOOLS Titolo( ) : Per accedere al titolo desiderato quando sul disco è presente più di un titolo. Se ad esempio un DVD contiene più di un filmato, ognuno di essi viene identificato come Titolo. Capitolo( ) : La maggior parte dei dischi DVD è registrata in capitoli in modo che si possa trovare rapidamente un capitolo specifico. Tempo di riproduzione( ) : Consente di riprodurre un filmato a partire dall'ora desiderata. È necessario inserire l'ora di inizio come riferimento. La funzione di ricerca dell'ora non funziona su alcuni dischi. Audio( ): Indica la lingua del film. Un disco DVD può contenere fino a 8 lingue per l'audio. ): Indica le lingue dei Sottotitolo( sottotitoli disponibili nel disco. È possibile scegliere la lingua dei sottotitoli oppure disattivarli. Un disco DVD può contenere fino a 32 lingue dei sottotitoli. Angolo( ): È possibile utilizzare questa funzione quando un DVD contiene più angolazioni per una determinata scena. Selezione della lingua dell'audio dD 3. Premere i tasti ◄► per selezionare la lingua desiderata per i sottotitoli. • A seconda delle lingue presenti su un disco DVD, viene selezionata una lingua per i sottotitoli diversa ogni volta che si preme il tasto. ✎ NOTA Su alcuni dischi le funzioni di lingua dei sottotitoli e dell'audio potrebbero non essere disponibili. Funzione Didascalie D • È necessario avere un po' di esperienza di estrazione e editing di video per usare questa funzione correttamente. • Per utilizzare la funzione Didascalie, salvare il file con le didascalie (*.smi) con lo stesso nome del file DivX (*.avi) e nella stessa cartella. Esempio. Radice Samsung_007CD1.avi Samsung_007CD1.smi • Per il nome del file è possibile utilizzare fino a 100 caratteri alfanumerici o 50 caratteri dell'Asia orientale (caratteri a 2 byte come il coreano e il cinese). • I sottotitoli dei file DivX *.smi, *.sub, *.srt oltre 148 kbyte non sono supportati. Funzione Angolo d 1. Premere il tasto TOOLS. 2. Premere i tasti ▲▼ per selezionare AUDIO ( ). 3. Premere i tasti ◄► per selezionare la lingua audio desiderata. • A seconda delle lingue presenti su un DVD, viene selezionata una lingua audio diversa ogni volta che si preme il tasto. Selezione della lingua dei sottotitoli dD Questa funzione consente di visualizzare la stessa scena da angolazioni diverse. 1. Premere il tasto TOOLS. 2. Premere i tasti ▲▼ per selezionare ANGOLO ( ). 3. Premere i tasti ◄► per selezionare l'angolo desiderato. ✎ NOTA La funzione Angolo funziona soltanto con i dischi su cui sono state registrate più angolazioni. 1. Premere il tasto TOOLS. 2. Premere i tasti ▲▼ per selezionare SOTTOTITOLI ( ). 32 Italiano HT-D450-ZF-IT-1228.indd 32 2011-12-28 5:14:30 04 GIGA È possibile impostare l'ora in cui il sistema home cinema si spegnerà da solo. La funzione GIGA Sound amplifica i bassi e raddoppia la loro potenza consentendo di apprezzare un suono effettivamente più potente. La funzione GIGA Sound viene applicata solo al subwoofer. Premere il tasto SLEEP. • Ogni volta che si preme questo tasto, la selezione cambia nella sequenza indicata di seguito: SLP 10 SLP 20 SLP 30 SLP 60 SLP 90 SLP 120 SLP 150 OFF. Preme il tasto GIGA. ✎ NOTA Se GIGA Sound è impostato su "ON", gli altri effetti campo audio non saranno applicati. Se DOLBY PLII è impostato su "ON", non viene applicato l'effetto audio GIGA. Il suono GIGA si ottiene solo in modo LPCM a 2 canali. DIMMER È possibile regolare la luminosità dello schermo sull'unità principale. Premere il tasto DIMMER. Modo audio P.BASS La funzione P.BASS amplifica i bassi per potenziare le frequenze basse. La funzione MP3 ENHANCE fornisce una qualità acustica migliore effettuando l'upscaling della frequenza di campionatura. Premere il tasto P.BASS. Sorgente LPCM a 2 canali BASSI ATTIVATI ➞ BASSI DISATTIVATI File MP3 INTENSIF MP3 ATT ➞ BASSI ATTIVATI ➞ BASSI DISATTIVATI ✎ NOTA La funzione P.BASS è disponibile solo con le sorgenti LPCM a 2 canali come MP3, DivX, CD e WMA. La funzione P.BASS (P.BASS) non funziona con i modi GIGA SOUND (GIGA SOUND) o Dolby Pro Logic ll (Dolby Pro Logic ll). Se si preme P.BASS nel modo DSP/EQ, il modo DSP/ EQ si disattiva automaticamente e subentra la funzione P.BASS. La funzione di intensificazione MP3 è disponibile solo per i file MP3. S.VOL (SMART VOLUME, VOLUME INTELLIGENTE) Questa funzione regola e stabilizza il livello del volume in modo che non possa cambiare improvvisamente in caso di cambio di canale o di passaggio di scena. S . VOL Premere il tasto S.VOL. • Ogni volta che si preme questo tasto, la selezione cambia nella sequenza indicata di seguito: VOLUME SMART ATT VOLUME SMART DISAT S/W LEVEL È anche possibile premere il tasto S/W LEVEL sul comando e per utilizzare i tasti ◄ o ► per regolare il livello del subwoofer. Premere il tasto S/W LEVEL. Italiano HT-D450-ZF-IT-1228.indd 33 Funzioni di base SLEEP 33 2011-12-28 5:14:30 Funzioni di base DSP (Digital Signal Processor)/EQ Modo Dolby Pro Logic II • DSP (Digital Signal Processor): I modi DSP sono stati progettati per simulare diversi ambienti acustici. • EQ: È possibile selezionare POPS, JAZZ, ROCK o USER per ottimizzare l'audio in base al genere di musica che si sta ascoltando. È possibile selezionare il modo audio Dolby Pro Logic II desiderato. Premere il tasto PL II. DSP /EQ Premere il tasto DSP/EQ. POPS, JAZZ, ROCK A seconda del genere musicale, si può scegliere tra POPS, JAZZ e ROCK. USER È possibile ascoltare musica con le impostazioni di "EQ:UTENTE". Premendo INVIO nel menu "EQ: UTENTE", viene visualizzata una finestra dove è possibile cambiare le impostazioni EQ secondo le proprie preferenze. STUDIO CLUB Simula il suono di una discoteca con bassi martellanti. HALL Riproduce l'effetto di trovarsi in una sala concerti. MOVIE Crea la sensazione di trovarsi al cinema. Dà la sensazione di trovarsi in una grande chiesa. OFF Selezionare questa opzione per un ascolto normale. ✎ NOTA La funzione DSP/EQ è disponibile solo in modo Stereo. La funzione DSP/EQ non è disponibile durante la riproduzione di un segnale AC3 in modo 2.1 canali. 34 MOVIE Conferisce maggiore realismo all'audio del film. PROLOG Riproduce la sensazione di trovarsi in uno studio. CHURCH MUSIC Durante l'ascolto di musica, è possibile sentire gli effetti sonori come se si stesse assistendo a un'esibizione dal vivo. È possibile ascoltare una sorgente audio a 2 canali con audio surround a 5.1 canali con tutti i diffusori attivati. - Uno o più diffusori potrebbero non emettere l'audio a seconda del segnale d'ingresso. MATRIX Permette di ascoltare un audio surround multicanale. STEREO Selezionare questa opzione per ascoltare l'audio soltanto dai diffusori anteriori destro e sinistro e dal subwoofer. ✎ NOTA Per la selezione del modo Pro Logic II, collegare il dispositivo esterno ai connettori AUDIO IN (L e R) sul prodotto. Se si collega un solo ingresso (L o R), non è possibile ascoltare l'audio surround. La funzione Pro Logic II è disponibile solo nel modo Stereo. La funzione Pro Logic II non è disponibile durante la riproduzione di un segnale AC3 in modo 2.1 canali. Italiano HT-D450-ZF-IT-1228.indd 34 2011-12-28 5:14:31 04 Utilizzo dei tasti del telecomando 1. Premere il tasto FUNCTION per selezionare FM. 2. Selezionare la stazione desiderata. 5. Premere di nuovo il tasto TUNER MEMORY. • Premere il tasto TUNER MEMORY prima che il numero scompaia dal display. • Il numero scompare dal display e la stazione viene memorizzata in memoria. 6. Per memorizzare un'altra stazione, ripetere i passi da 2 a 5. Funzioni di base Radio • Sintonizzazione preimpostata 1 : È necessario innanzitutto aggiungere una frequenza preimpostata desiderata. Premere il tasto di ARRESTO () per selezionare PREDEFINITO e quindi premere il tasto TUNING/CH ( ) per selezionare la stazione preimpostata. • Sintonizzazione manuale : Premere il tasto di ARRESTO () per selezionare MANUALE e quindi premere il tasto TUNING/CH ( ) per sintonizzare a una frequenza inferiore o superiore. • Sintonizzazione automatica : Premere il tasto di ARRESTO () per selezionare MANUALE e quindi tenere premuto il tasto TUNING/CH ( ) per cercare automaticamente la banda. Impostazione mono/stereo Premere il tasto MO/ST. • Ogni volta che si preme il tasto, l'audio passa da STEREO a MONO e viceversa. • Nelle zone con scarsa ricezione, selezionare MONO per una trasmissione chiara e priva di interferenze. Memorizzazione delle stazioni Esempio: Memorizzazione di FM 89.10 1. Premere il tasto FUNCTION per selezionare FM. 2. Premere il tasto TUNING/CH ( ) per selezionare <89.10>. 3. Premere il tasto TUNER MEMORY. • Il numero lampeggia sul display. 4. Premere i tasti TUNING/CH ( ) per selezionare il numero in cui memorizzare la stazione. • È possibile scegliere un numero compreso tra 1 e 15. Italiano HT-D450-ZF-IT-1228.indd 35 35 2011-12-28 5:14:32 Funzioni avanzate Funzione USB Riproduzione di file multimediali utilizzando la funzione Host USB Collegando il dispositivo di memorizzazione alla porta USB del prodotto, è possibile riprodurre file multimediali come immagini, video e brani musicali salvati su un lettore MP3, su una Memory Stick USB o in una foto/videocamera digitale con qualità video elevata e sistema audio a 5.1 canali. 1. Collegare il dispositivo USB alla porta USB sul pannello anteriore del prodotto. 2. Premere il tasto FUNCTION per selezionare USB. • USB appare sulla schermata di visualizzazione e poi scompare. 3. Premere i tasti ◄► per selezionare i Video, le Foto e le Musica desiderati. - Selezionare un file da riprodurre. Rimozione sicura del dispositivo USB Prima di scollegare il cavo USB eseguire la rimozione sicura del dispositivo USB, per evitare di danneggiare la memoria integrata al suo interno. • Premere il tasto GIALLO (C). - Sul display appare REMOVE. • Rimuovere il cavo USB. ✎ NOTA Per ascoltare i file musicali con l'audio a 5.1 canali, è necessario impostare il modo Dolby Pro Logic II su Matrix (Matrice). (Vedere a pagina 34) Rimuovere lentamente il cavo USB dalla porta USB. In caso contrario, potrebbe provocare danni alla porta USB. Registrazione USB Durante la riproduzione di CD-DA (Compact Disc Digital Audio) con la funzione di registrazione USB oppure durante l'ascolto della radio FM o la ricezione di una sorgente audio da un dispositivo esterno, è possibile registrare la sorgente audio nella memoria USB. Es.) registrazione USB di contenuti audio CD-DA 1. Collegare il dispositivo USB al prodotto. 2. Inserire il disco CD-DA nel vano CD. 3. Premere il tasto USB REC sul telecomando. • Per avviare il rippaggio della traccia corrente, premere il tasto USB REC sul telecomando mentre il sistema sta riproducendo una traccia o è momentaneamente in pausa. • Per registrare l'intero CD, tenere premuto il tasto USB REC sul telecomando. - Sul display viene visualizzato FULL CD RIPPING (RIPPAGGIO CD COMPLETO) e viene avviata la registrazione. 4. Premere il tasto di ARRESTO () per arrestare la registrazione. • Quando la registrazione USB del CD è completa, viene creata una nuova cartella nell'unità USB chiamata "RECORDING" (REGISTRAZIONE). I contenuti vengono salvati nella cartella in formato MP3. • Quando la registrazione USB della radio FM o della sorgente AUX è completa, viene creata una nuova cartella nell'unità USB chiamata "TUNER RECORDING (REGISTRAZIONE TUNER) o AUX RECORDING (REGISTRAZIONE AUX)". I contenuti vengono salvati nella cartella in formato MP3. ✎ NOTA 36 Non scollegare la connessione USB o il cavo di alimentazione durante la registrazione USB, altrimenti si possono danneggiare i dati. Per interrompere la registrazione USB, premere il tasto di ARRESTO e scollegare il dispositivo USB dopo che il sistema ha terminato la riproduzione del CD. Se si scollega il collegamento USB durante la registrazione USB, il sistema si spegne e non sarà possibile eliminare il file registrato. Se si collega il dispositivo USB al sistema durante la riproduzione di un CD, il sistema si arresta temporaneamente e la riproduzione viene riavviata. Non è possibile registrare dischi DTS-CD. Se la durata di registrazione è inferiore a 5 secondi, non è possibile creare un file registrato. La registrazione USB funziona soltanto se il dispositivo USB è formattato nel file system FAT. (il file system NTFS non è supportato). Durante la registrazione USB del CD non viene emesso il segnale audio. Quando Audio HDMI è impostato su On, la funzione di registrazione USB non è supportata. Italiano HT-D450-ZF-IT-1228.indd 36 2011-12-28 5:14:33 06 Altre informazioni Se il prodotto non funziona correttamente, consultare la tabella che segue. Se il problema non è elencato nella tabella o se le istruzioni fornite non portano a una soluzione, spegnere il prodotto, scollegare il cavo di alimentazione e contattare il rivenditore autorizzato più vicino o il Centro di assistenza di Samsung Electronics. Sintomo Controlli/rimedi Non si riesce ad estrarre il disco. • Il cavo di alimentazione è ben collegato alla presa? • Spegnere l'unità, quindi riaccenderla. La riproduzione non si avvia. • Controllare il codice regionale del DVD. È possibile che i DVD acquistati all'estero non siano riproducibili. • I CD-ROM e i DVD-ROM non possono essere riprodotti con questo prodotto. • Assicurarsi che il livello di blocco sia corretto. La riproduzione non si avvia immediatamente quando viene premuto il tasto di riproduzione/pausa. • Il disco è deformato o ha la superficie graffiata? • Pulire il disco. L'audio non viene riprodotto. • Non si sente l'audio durante la riproduzione veloce, la riproduzione rallentata e la riproduzione fotogramma per fotogramma. • I diffusori sono collegati correttamente? La configurazione dei diffusori è personalizzata correttamente? • Il disco è gravemente danneggiato? L'audio viene emesso soltanto da alcuni dei diffusori, non da tutti e 6. • Per alcuni dischi DVD, il suono viene emesso soltanto dai diffusori anteriori. • Controllare se i diffusori sono collegati correttamente. • Regolare il volume. • Durante l'ascolto di un CD, della radio o della TV, l'audio viene emesso soltanto dai diffusori anteriori. Selezionare "PROLOG" premendo PL II (Dolby Pro Logic II) sul telecomando per usare tutti e sei i diffusori. Non viene prodotto l'audio Dolby Digital 5.1 CH Surround. • Il disco reca il marchio "Dolby Digital 5.1 CH"? Il suono Dolby Digital 5.1 CH Surround viene prodotto soltanto se il disco è registrato con un audio a 5.1 canali. • La lingua audio è impostata correttamente su Dolby Digital 5.1-CH? Il telecomando non funziona. • Il telecomando viene utilizzato con un'angolazione e una distanza comprese nella sua portata? • Le batterie sono scariche? • Il modo (RECEIVER DVD/TV) è stato selezionato correttamente? • Il disco gira, ma non viene riprodotta nessuna immagine. • Il televisore è acceso? • I cavi video sono collegati correttamente? • Il disco è sporco o danneggiato? • I dischi di scarsa qualità potrebbero non essere riproducibili. • La qualità dell'immagine è scarsa e l'immagine trema. La lingua dell'audio e i sottotitoli non funzionano. Il menu del disco/titolo non appare neanche quando viene selezionata la funzione disco/titolo. Il formato non può essere cambiato. • La lingua dell'audio e i sottotitoli non funzionano se il disco non li contiene. • Si sta usando un disco che non contiene menu? • È possibile riprodurre i DVD 16:9 in modo 16:9 WIDE, 4:3 LETTER BOX o 4:3 PAN SCAN, ma i DVD 4:3 possono essere visti soltanto in formato 4:3. Selezionare la funzione appropriata in base alla copertina del disco DVD. Italiano HT-D450-ZF-IT-1228.indd 37 Altre informazioni Risoluzione dei problemi 37 2011-12-28 5:14:34 Altre informazioni Sintomo Controlli/rimedi • Il prodotto non funziona. (esempio: L'apparecchio si spegne, il tasto del pannello anteriore non funziona o si sentono strani rumori). • Il prodotto non funziona normalmente. Non si ricorda la password del livello di protezione bambini. La radio non funziona. • Tenere premuto il tasto di ARRESTO () sul telecomando per almeno 5 secondi senza nessun disco inserito (funzione di reset). Utilizzando la funzione RESET vengono cancellate tutte le impostazioni memorizzate. Utilizzarla solo in caso di necessità. • Mentre sul display del prodotto è visualizzato il messaggio "NO DISC (NESSUN DISCO)", tenere premuto il tasto di ARRESTO () del telecomando per almeno 5 secondi. Sul display viene visualizzato "INIT(INIZ.)" e tutte le impostazioni ritornano ai valori predefiniti. Quindi premere il tasto di ACCENSIONE. Utilizzando la funzione RESET vengono cancellate tutte le impostazioni memorizzate. Utilizzarla solo in caso di necessità. • L'antenna è collegata correttamente? • Se il segnale d'ingresso dell'antenna è debole, installare un'antenna FM esterna in un'area con una buona ricezione. Elenco codici lingue Inserire il codice appropriato per OTHERS (ALTRO) di Disc Menu (Menu Disco), Audio (Audio) e Subtitle (Sottotitolo). (Vedere a pagina 27). Codice Lingua Codice Lingua Codice Codice Lingua 1027 Afar 1142 Greek 1239 Interlingue Lingua 1345 Codice Malagasy Lingua 1482 Codice Kirundi Lingua 1527 Tajik 1028 Abkhazian 1144 English 1245 Inupiak 1347 Maori 1483 Romanian 1528 Thai 1032 Afrikaans 1145 Esperanto 1248 Indonesian 1349 Macedonian 1489 Russian 1529 Tigrinya 1039 Amharic 1149 Spanish 1253 Icelandic 1350 Malayalam 1491 Kinyarwanda 1531 Turkmen 1044 Arabic 1150 Estonian 1254 Italian 1352 Mongolian 1495 Sanskrit 1532 Tagalog 1045 Assamese 1151 Basque 1257 Hebrew 1353 Moldavian 1498 Sindhi 1534 Setswana 1051 Aymara 1157 Persian 1261 Japanese 1356 Marathi 1501 Sangro 1535 Tonga 1052 Azerbaijani 1165 Finnish 1269 Yiddish 1357 Malay 1502 Serbo-Croatian 1538 Turkish 1053 Bashkir 1166 Fiji 1283 Javanese 1358 Maltese 1503 Singhalese 1539 Tsonga 1057 Byelorussian 1171 Faeroese 1287 Georgian 1363 Burmese 1505 Slovak 1540 Tatar 1059 Bulgarian 1174 French 1297 Kazakh 1365 Nauru 1506 Slovenian 1543 Twi 1060 Bihari 1181 Frisian 1298 Greenlandic 1369 Nepali 1507 Samoan 1557 Ukrainian 1069 Bislama 1183 Irish 1299 Cambodian 1376 Dutch 1508 Shona 1564 Urdu 1066 Bengali; Bangla 1186 Scots Gaelic 1300 Canada 1379 Norwegian 1509 Somali 1572 Uzbek 1067 Tibetan 1194 Galician 1301 Korean 1393 Occitan 1511 Albanian 1581 Vietnamese 1070 Breton 1196 Guarani 1305 Kashmiri 1403 (Afan) Oromo 1512 Serbian 1587 Volapuk 1079 Catalan 1203 Gujarati 1307 Kurdish 1408 Oriya 1513 Siswati 1613 Wolof 1093 Corsican 1209 Hausa 1311 Kirghiz 1417 Punjabi 1514 Sesotho 1632 Xhosa 1097 Czech 1217 Hindi 1313 Latin 1428 Polish 1515 Sundanese 1665 Yoruba 1103 Welsh 1226 Croatian 1326 Lingala 1435 Pashto, Pushto 1516 Swedish 1684 Chinese 1105 Danish 1229 Hungarian 1327 Laothian 1436 Portuguese 1517 Swahili 1697 Zulu 1109 German 1233 Armenian 1332 Lithuanian 1463 Quechua 1521 Tamil 1130 Bhutani 1235 Interlingua 1334 Latvian, Lettish 1481 RhaetoRomance 1525 Tegulu 38 Italiano HT-D450-ZF-IT-1228.indd 38 2011-12-28 5:14:35 06 Generale Sintonizzatore FM HDMI 2,76 kg 430 (W) x 59 (H) x 249 (D) mm +5°C~+35°C 10% fino al 75% 70 dB 10 dB 0.5 % Velocità di lettura: 3,49 ~ 4,06 m/sec. Tempo approssimativo di riproduzione (Single Sided, Single Layer): 135 min. Velocità di lettura: 4,8 ~ 5,6 m/sec. Tempo massimo di riproduzione: 74 min. Velocità di lettura: 4,8 ~ 5,6 m/sec. Tempo massimo di riproduzione: 20 min. 480i(576i) 1 canale: 1.0 Vp-p (carico 75 Ω) 480i(576i) Y: 1.0 Vp-p (carico 75 Ω) PR: 0.70 Vp-p (carico 75 Ω) PB: 0.70 Vp-p (carico 75 Ω) 1080p, 1080i, 720p, 480p(576p) Uscita diffusore anteriore 142W x 2(3Ω) Uscita diffusore centrale 142W(3Ω) Uscita diffusore surround 141W x 2(3Ω) Uscita Subwoofer 167W(3Ω) Gamma di frequenze 20Hz~20KHz Rapporto S/N 65dB Separazione canali 60dB Peso Dimensioni Temperatura di esercizio Umidità di esercizio Rapporto segnale/rumore Sensibilità utile Distorsione armonica totale DVD (Digital Versatile Disc) Dischi CD: 12 cm (COMPACT DISC) CD: 8 cm (COMPACT DISC) Video composito Uscita video Video Component Video/Audio Amplificatore Altre informazioni Specifiche (AUX)800 mV *: Specifica nominale - Samsung Electronics Co., Ltd si riserva il diritto di modificare le specifiche senza preavviso. - Peso e dimensioni sono approssimativi. - Design e specifiche sono soggetti a modifiche senza preavviso. - Per l’alimentazione elettrica e il consumo di corrente, consultare l’etichetta apposta al prodotto. Sensibilità di ingresso Italiano HT-D450-ZF-IT-1228.indd 39 39 2011-12-28 5:14:35 Altre informazioni HT-D450 Sistema di diffusori 5.1 canali Sistema di diffusori Diffusori Anteriori Centrale Surround Impedenza 3 3 3 Gamma di frequenze 140Hz~20KHz 140Hz~20KHz 140Hz~20KHz Livello di pressione sonora di uscita 86dB/W/M 86dB/W/M 86dB/W/M Ingresso nominale 142W 141W 142W Ingresso massimo 284W 282W 284W Anteriori : 90 x 141,5 x 68,5 mm Surround : 84 x 104,5 x 68,5 mm Dimensioni (L x A x P) Centrale : 360 x 74,5 x 68,5 mm Subwoofer : 168 x 350 x 285 mm Anteriori: 0,58 Kg, Centrale : 0,96 Kg Pesi Surround : 0,4 Kg, Subwoofer : 3,6 Kg Subwoofer 3 40Hz~160Hz 88dB/W/M 142W 284W HT-D453 Sistema di diffusori Diffusori Impedenza Gamma di frequenze Livello di pressione sonora di uscita Ingresso nominale Ingresso massimo Dimensioni (L x A x P) Pesi Sistema di diffusori 5.1 canali Anteriori 3 140Hz~20KHz 86dB/W/M Surround 3 140Hz~20KHz 86dB/W/M Centrale 3 140Hz~20KHz 86dB/W/M Subwoofer 3 40Hz~160Hz 88dB/W/M 142W 141W 142W 142W 284W 282W 284W 284W Anteriori : 90 x 1200 x 119 mm (base supporto : 250 x 250) Surround : 84 x 104,5 x 68,5 mm Centre : 360 x 74,5 x 68,5 mm Subwoofer : 168 x 350 x 285 mm Anteriori : 3,68 Kg, Centrale : 0,96 Kg Surround : 0,4 Kg, Subwoofer : 3,6 Kg HT-D455 Sistema di diffusori Diffusori Dimensioni (L x A x P) Pesi 40 Sistema di diffusori 5.1 canali Anteriori 3 Impedenza 140Hz~20KHz Gamma di frequenze Livello di pressione sonora di uscita 86dB/W/M Ingresso nominale 142W Ingresso massimo 284W Surround 3 140Hz~20KHz 86dB/W/M Centrale 3 140Hz~20KHz 86dB/W/M Subwoofer 3 40Hz~160Hz 88dB/W/M 141W 282W 142W 142W 284W 284W Anteriori/Surround : 90 x 1200 x 119 mm (base supporto : 250 x 250) Centrale : 360 x 74,5 x 68,5 mm Subwoofer : 168 x 350 x 285 mm Anteriori/Surround : 3,68 Kg, Centrale : 0,96 Kg Subwoofer : 3,6 Kg Italiano HT-D450-ZF-IT-1228.indd 40 2011-12-28 5:14:35 Contatta SAMSUNG WORLD WIDE Se avete commenti o domande sui prodotti Samsung, contattate il Servizio Clienti Samsung. Contact Center Area ` North America Canada Mexico U.S.A Web Site 1-800-SAMSUNG (726-7864) 01-800-SAMSUNG (726-7864) 1-800-SAMSUNG (726-7864) www.samsung.com www.samsung.com www.samsung.com 0800-333-3733 0800-124-421 / 4004-0000 800-SAMSUNG (726-7864) 01-8000112112 0-800-507-7267 1-800-751-2676 1-800-10-7267 800-6225 1-800-299-0013 800-7919267 1-800-234-7267 00-1800-5077267 800-7267 0-800-777-08 1-800-682-3180 www.samsung.com www.samsung.com www.samsung.com www.samsung.com www.samsung.com www.samsung.com www.samsung.com www.samsung.com www.samsung.com www.samsung.com www.samsung.com www.samsung.com www.samsung.com www.samsung.com www.samsung.com 1-800-SAMSUNG (726-7864) www.samsung.com 0-800-100-5303 www.samsung.com 42 27 5755 0810 - SAMSUNG (7267864, € 0.07/min) - ` Latin America Argentine Brazil Chile Colombia Costa Rica Dominica Ecuador El Salvador Guatemala Honduras Jamaica Nicaragua Panama Peru Puerto Rico Trinidad & Tobago Venezuela Austria Belgium 02-201-24-18 Bosnia Bulgaria Croatia 05 133 1999 07001 33 11 062 SAMSUNG (062 726 7864) 800-SAMSUNG (800-726786) Samsung Zrt., česká organizační složka, Oasis Florenc, Sokolovská394/17, 180 00, Praha 8 70 70 19 70 030 - 6227 515 01 48 63 00 00 01805 - SAMSUNG (726-7864 € 0,14/Min) 06-80-SAMSUNG (726-7864) 800-SAMSUNG (726-7864) +381 0113216899 261 03 710 023 207 777 020 405 888 0900-SAMSUNG (0900-7267864) (€ 0,10/Min) 815-56 480 0 801 1SAMSUNG (172678) / 022-607-93-33 80820-SAMSUNG (726-7864) 1. 08010 SAMSUNG (72678) doar din reţeaua Romtelecom, tarif local 2. 021.206.01.10 - din orice reţea, tarif normal Czech Denmark Finland France Germany Hungary Italia Kosovo Luxemburg Macedonia Montenegro Netherlands Norway Poland Portugal Rumania HT-D450-ZF-IT-1228.indd 41 Slovakia Spain Sweden Contact Center 0700 Samsung (0700 726 7864) 0800-SAMSUNG (726-7864) 902-1-SAMSUNG (902 172 678) 0771 726 7864 (SAMSUNG) Switzerland 0848-SAMSUNG (7267864, CHF 0.08/min) U.K Eire Lithuania Latvia Estonia 0330 SAMSUNG (7267864) 0818 717100 8-800-77777 8000-7267 800-7267 Uzbekistan Kyrgyzstan Tadjikistan Ukraine 0-800-502-000 www.samsung.com Belarus Moldova 810-800-500-55-500 00-800-500-55-500 www.samsung.com/ be (Dutch) www.samsung.com/ be_fr (French) www.samsung.com www.samsung.com ` Asia Pacific www.samsung.com Russia Georgia Armenia Azerbaijan Kazakhstan Australia New Zealand China 1300 362 603 0800 SAMSUNG (0800 726 786) 400-810-5858 / 010-6475 1880 Hong Kong (852) 3698 4698 India Indonesia www.samsung.com www.samsung.com www.samsung.com Japan Malaysia www.samsung.com Philippines www.samsung.com www.samsung.com www.samsung.com - Singapore Thailand Taiwan Vietnam www.samsung.com www.samsung.com www.samsung.com www.samsung.com www.samsung.com Web Site www.samsung.com www.samsung.com www.samsung.com www.samsung.com www.samsung.com/ch www.samsung.com/ ch_fr/(French) www.samsung.com www.samsung.com www.samsung.com www.samsung.com www.samsung.com ` CIS 8-800-555-55-55 8-800-555-555 0-800-05-555 088-55-55-555 8-10-800-500-55-500 (GSM: 7799) 8-10-800-500-55-500 00-800-500-55-500 8-10-800-500-55-500 ` Europe Albania Area Serbia www.samsung.com www.samsung.com www.samsung.com www.samsung.com www.samsung.com www.samsung.ua www.samsung.com/ ua_ru www.samsung.com www.samsung.com www.samsung.com www.samsung.com/hk www.samsung.com/ hk_en/ 3030 8282 / 1800 110011 / 1800 3000 8282 / 1800 266 8282 0800-112-8888 / 021-5699-7777 0120-327-527 1800-88-9999 1-800-10-SAMSUNG(726-7864) / 1-800-3-SAMSUNG(726-7864) / 1-800-8-SAMSUNG(726-7864) / 02-5805777 1800-SAMSUNG (726-7864) 1800-29-3232 / 02-689-3232 0800-329-999 1 800 588 889 www.samsung.com www.samsung.com www.samsung.com www.samsung.com 8000-4726 08000-726786 800-22273 080 100 2255 800-SAMSUNG (726-7864) 9200-21230 444 77 11 800-SAMSUNG (726-7864) www.samsung.com www.samsung.com www.samsung.com www.samsung.com www.samsung.com www.samsung.com www.samsung.com www.samsung.com 0800-SAMSUNG (726-7864) 0860-SAMSUNG (726-7864 ) www.samsung.com www.samsung.com www.samsung.com www.samsung.com www.samsung.com www.samsung.com www.samsung.com ` Middle East Bahrain Egypt Jordan Morocco Oman Saudi Arabia Turkey U.A.E ` Africa Nigeria South Africa 2011-12-28 5:14:35 Corretto smaltimento delle batterie del prodotto (Applicabile nei paesi dell’Unione Europea e in altri paesi europei con sistemi di conferimento differenziato delle batterie.) Il marchio riportato sulla batteria o sulla sua documentazione o confezione indica che le batterie di questo prodotto non devono essere smaltite con altri rifiuti domestici al termine del ciclo di vita. Dove raffigurati, i simboli chimici Hg, Cd o Pb indicano che la batteria contiene mercurio, cadmio o piombo in quantità superiori ai livelli di riferimento della direttiva UE 2006/66. Se le batterie non vengono smaltite correttamente, queste sostanze possono causare danni alla salute umana o all'ambiente. Per proteggere le risorse naturali e favorire il riutilizzo dei materiali, separare le batterie dagli altri tipi di rifiuti e riciclarle utilizzando il sistema di conferimento gratuito previsto nella propria area di residenza. Corretto smaltimento del prodotto (rifiuti elettrici ed elettronici) (Applicabile nell’Unione Europea e in altri paesi europei con sistema di raccolta differenziata) Il marchio riportato sul prodotto, sugli accessori o sulla documentazione indica che il prodotto e i relativi accessori elettronici (quali caricabatterie, cuffia e cavo USB) non devono essere smaltiti con altri rifiuti domestici al termine del ciclo di vita. Per evitare eventuali danni all'ambiente o alla salute causati dall'inopportuno smaltimento dei rifiuti, si invita l'utente a separare il prodotto e i suddetti accessori da altri tipi di rifiuti e di riciclarli in maniera responsabile per favorire il riutilizzo sostenibile delle risorse materiali. Gli utenti domestici sono invitati a contattare il rivenditore presso il quale è stato acquistato il prodotto o l'ufficio locale preposto per tutte le informazioni relative alla raccolta differenziata e al riciclaggio per questo tipo di materiali. Gli utenti aziendali sono invitati a contattare il proprio fornitore e verificare i termini e le condizioni del contratto di acquisto. Questo prodotto e i relativi accessori elettronici non devono essere smaltiti unitamente ad altri rifiuti commerciali. Code no. AH68-02337F (01) HT-D450-ZF-IT-1228.indd 42 2011-12-28 5:14:36