1
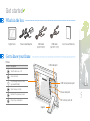
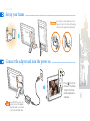
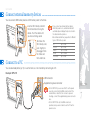
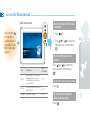
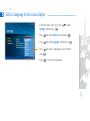
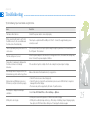
Digital photo frame
User manual
Click
Contents
Safety precautions
Get started
Play a slideshow
Browse and manage photos
SPF-87H
SPF-107H
Customize clock settings
Customize settings
Appendix
Index
Read this manual thoroughly for proper
use and maintenance instructions.
The images and screen shots used in this manual are from the SPF-87H.
Contents
Instructional icons
Safety precautions........................... 3
Before you start, familiarize yourself with the icons you will
see in this manual:
Get started. ...................................... 5
Caution - situations that could cause
damage to your device or other
equipment
Note - notes, usage tips, or additional
information
[
]
Square brackets - device keys; for
example: [ ] (represents the Power key)
©2009 SAMSUNG ELECTRONICS CO., LTD.
•• It is strictly forbidden to copy or use any parts of this mamual
witrout permission from SAMSUNG ELECTRONICS CO., LTD
•• Product specifications or contents of this manual may be
changed without prior notice due to upgrade of product
functions.
What’s in the box .................................. 5
Get to know your frame ........................ 5
Set up your frame ................................. 6
Connect the adapter and turn
the power on . ....................................... 6
Connect external memory devices ........ 7
Connect to a PC ................................... 7
Access the Main menus ........................ 8
Select a language for
the screen display ................................. 9
Transfer photos from a PC .................. 10
Play a slideshow. ........................... 11
Select a memory device for
a slideshow ......................................... 11
Select a view mode for a slideshow . ... 12
Select slideshow effects ...................... 13
Use slideshow menus ......................... 14
Browse and manage photos. ........ 15
Browse photos . .................................. 15
Copy photos ....................................... 16
Delete photos ..................................... 17
Use photo menus ............................... 18
Customize clock settings. ............. 19
Customize settings. ....................... 20
Options menus ................................... 20
Preference menus ............................... 21
Update/Reset menus .......................... 22
Appendix. ....................................... 23
Use as a PC mini-monitor ................... 23
Firmware update ................................. 24
Troubleshooting .................................. 25
Specifications . .................................... 27
Correct disposal of the frame .............. 27
Regulatory Compliance Statements .... 28
Contact information of
SAMSUNG WORLDWIDE ................... 33
Index . ................................................. 37
Safety precautions
WARNING:
•• TO PREVENT ELECTRIC SHOCK, DO NOT OPEN OR REMOVE THE COVER OR BACK OF THE FRAME. THERE ARE NO
USER-SERVICEABLE PARTS INSIDE. ALLOW ONLY QUALIFIED PERSONNEL TO SERVICE THIS FRAME.
•• TO PREVENT FIRE, KEEP THIS FRAME AWAY FROM ALL OPEN FLAMES, SUCH AS CANDLES, AT ALL TIMES.
•• The slots and openings in the frame provide needed
ventilation. To ensure reliable operation and prevent
overheating, these openings must not be blocked or
covered:
•• Do not overload wall outlets, extension cords, or
adaptors beyond their intended capacity, as this may
result in fire or electrical shock.
•• Do not place the frame near or on sources of heat, such
as radiators, or in direct sunlight.
•• During electrical storms or when the frame will be
unattended and unused for extended periods of time,
unplug the frame from the wall. This will prevent damage
to the frame from electrical surges.
-- Do not cover the slots or openings.
-- Do not block the slots or openings by placing the frame on
soft surfaces, such as beds, sofas, or rugs.
-- Do not place the frame in an enclosed space, such as a
bookcase or cabinet, without proper ventilation.
•• Do not allow the frame to come in contact with water.
Do not place the frame near sources of water, such as
bathtubs or sinks, or where water or other liquids may
splash or drip on the frame. If the frame gets wet,
unplug the frame immediately and contact the dealer or
an authorized service center.
•• Route all power supply cords away from traffic areas
and other objects so that they are not likely to be
stepped on or pinched by items placed on or against
them. Ensure that wires are not twisted or pinched at
plug ends or adapter connections.
•• Before connecting the power cord, make sure that the
voltage designation of the frame corresponds to the
local electrical supply.
3
Safety precautions
•• Never insert any metal objects into the open parts of this
frame, as this may result in electrical shock.Ensure that
the power cord is completely plugged in when using this
frame. Grasp the plug firmly when removing the power
cord and never touch the power cord with wet hands.
•• If you notice any unusual operation, such as unusual
sounds or burning smells coming from the frame,
unplug it immediately and contact the dealer or an
authorized service center.
•• It is not recommended to install the frame in a location
where it will be exposed to heavy dust, high or low
temperatures, high humidity, or chemical substances or
where it operates continuously.
•• Do not drop the frame or subject the frame to any
strong impacts. If the frame is damaged, disconnect the
power cord and contact a dealer or an authorized
service center.
•• Always unplug the power cord when cleaning the frame.
Use only a soft, dry cloth to wipe frame. Do not expose
the frame to any chemicals, such as waxes, benzene,
alcohol, thinners, insecticides, air fresheners, lubricants,
or detergents, as these may damage the frame’s finish
and void your warranty.
•• Use only properly grounded plugs and outlets when
connecting this frame. Improper grounding may cause
electrical shock or damage to equipment.
•• Keep this frame and all accessories out of the reach of
children.
•• Do not install the frame in unstable locations, such as
improperly mounted shelves, angled surfaces, or where
the frame may be exposed to vibration.
4
Get started
What’s in the box
Digital frame
Power cable/Adapter
USB cable
(for SPF-87H)
USB cable
(for SPF-107H)
User manual/Warranty
Get to know your frame
Buttons
USB cable port
Button Description
Turn the frame on or off
Access menus
Scroll through menus or items
(up/down/left/right)
USB memory device port
Select menus or items
Power cable port
Return to the previous screen
SD memory card slot
Play or stop a slideshow
Support
5
Get started
Set up your frame
Do not put too much pressure on the
support or force it to rotate in the wrong
direction. The support may be broken.
Connect the adapter and turn the power on
Press [ ] to turn the
frame on. The photos
stored in the frame
will be displayed in a
slideshow.
For an SPF-87H, you do not
need to connect the adapter
when the frame is connected
to a PC with the USB cable.
6
Get started
Connect external memory devices
You can connect USB memory devices or SD memory cards to the frame.
Insert an SD memory card with
the metal contacts facing the
device. Push the cord in until
you hear a clicking sound.
Connect to a PC
To remove the
SD memory card,
push it lightly to
disengage it from
the frame and
then slide it out.
•• If you connect an external memory device
while the power is on, a slideshow will start
automatically and display the photos stored in
the external memory device.
•• Recommended memory capacities for different
types of SD memory cards
SD
microSD
miniSD
SDHC
microSDHC
Up to 2 GB
Up to 2 GB
Up to 256 MB
Up to 16 GB
Up to 8 GB
You can download photos (p. 10) or use the frame as a mini-monitor by connecting to a PC.
Example: SPF-87H
USB connector
Supplementary power connector
•• For the SPF-87H, you can use the PC as the power
source by connecting the USB connector, but if the
screen blinks or does not turn on due to a power
shortage, connect the supplementary power connector
also.
•• For the SPF-107H, only the USB connector is
provided, and you are not able to use the PC as the
power source.
7
Get started
Access the Main menus
hen the Photo or Clock menu
W
is selected
Main menu screen
11 Press [
22 Press [
Press and hold [ ]
for more than 2
seconds or press it
repeatedly until the
Main menu screen
appears.
].
/ ] or [ / ] to select the
menu you want, and then press
[ ].
hen the Settings menu is
W
selected
Item
Description
More
information
Photo
Browse photos stored in the
internal memory or on an
external memory device and
access options.
p. 15
Clock
Set the current time and select
a time format.
p. 19
Settings
Customize settings.
p. 20
Press [ / ] or [ / ] to select the
menu you want, and then press
[ ].
To go back to the previous step
Press [
].
o switch to the slideshow
T
while browsing photos
Press [
].
8
Get started
Select a language for the screen display
11 In the Main menu screen (p. 8), press [
Settings, and then press [
22 Press [
33 Press [
44 Press [
/ ] to select
].
/ ] to select Options, and then press [
].
/ ] to select Language, and then press [
].
/ ] to select a language you want, and then
press [ ].
55 Press [
] to switch to the slideshow.
9
Get started
Transfer photos from a PC
To transfer photos from a PC
11 Connect the frame to a PC with the supplied USB cable. (p. 7)
When the frame is turned off, connect it to the PC first and then
turn it on.
22 Press [
/ ] to select Mass Storage/Mini-Monitor, and
then press [ ].
•• The frame will be recognized as a removable disk.
•• Some photos are embedded on the frame by
default. When there is not enough memory,
delete the photos.
•• If the photos have high resolution, memory
space will be limited and the preview will play
slowly. See p. 16 for instructions on copying and
automatically resizing your photos.
•• If the USB connection mode window does not
appear when you connect the frame to a PC,
select Activate USB Communication in
Settings Options. (p. 20)
If you connect the frame to a PC while using it as a mini-monitor
(p. 23), you need to switch to Mass Storage mode by using the
Frame Manager program. For more information, refer to the user
manual of the Frame Manager.
33 Copy photos from the PC to the frame.
•• The frame recognized as a removable disk will be displayed as
SPF-87H or SPF-107H on the PC. Open the disk of the
corresponding model in My Computer and copy the photos.
To disconnect the frame from a PC
Press [ ] after copying is done or disconnect the USB cable
from the frame.
Do not disconnect the USB cable while the photos are being
copied, as this could result in loss of data and/or damage to the
frame.
10
Play a slideshow
Select a memory device for a slideshow
When there is an external memory device (SD memory card or USB memory device) connected, you can select the source of
photos to play in a slideshow in the Photo menu.
Memory capacity
(free space/total space)
To select a memory device
11 In the Main menu screen (p. 8), press [
and then press [
/ ] to select Photo,
].
22 Press [
/ ] to select one of the following memory devices,
and then press [ ].
If you turn the frame on, the embedded photos
stored in the internal memory will be displayed in
a slideshow.
Item
Description
Frame memory
Internal memory
SD
SD memory card (external)
USB
USB memory device (external)
To pause or resume playing the slideshow
Press [
] during a slideshow.
11
Play a slideshow
Select a view mode for a slideshow
You can display a clock or calendar on a slideshow, or display multiple photos on one screen in a slideshow.
View modes
To select a view mode
11 Press [
22 Press [
▲ Photo & Clock
/ ] to select Slideshow Mode, and then press
].
[
▲ Single
] during a slideshow.
33 Press [
] repeatedly to select the view mode.
], the view mode changes (Single →
•• Each time you press [
Photo & Clock → Photo & Calendar → Multiview 1 →
Multiview 2).
44 When you are finished, press [
▲ Photo & Calendar
▲ Multiview1
OR
Press [
mode.
▲ Multiview2
].
] repeatedly during a slideshow to select a view
•• Set the current time before displaying the clock or calendar. (p. 19)
•• In Photo & Calendar mode, you can press [ / ] to view the next or
previous month.
•• During a slideshow, press [ / ] to view the next or previous photo.
12
Play a slideshow
Select slideshow effects
You can select a transition effect, speed, and play mode for a slideshow.
To select slideshow effects
11 Press [
22 Press [
] during a slideshow.
/ ] to select Slideshow Settings, and then
press [ ].
33 Press [
/ ] to select one of the following menus, and then
press [ ].
Item
Description
Transition
Select a transition effect (No Effect, Fade, Blind, Cross
Comb, Mosaic, Checker, Dissolve, Wipe, Extend, Silk,
Corner Transition, Wheel, Ellipse, Random).
Speed
Select a slideshow speed (Fast, Normal, Slow).
Play mode
•• All Photos: Play all photos in order
•• Photos in Folder: Play all photos in the selected folder in
order
•• Shuffle all photos: Play all photos in a random order
•• Shuffle photos in folder: Play all photos in the selected
folder in a random order
•• Repeat one photo: Repeat the selected photo
44 Press [
55 Press [
/ ] to select an option, and then press [
] to switch to the slideshow.
].
13
Play a slideshow
Use slideshow menus
You can use slideshow menus to control a slideshow and adjust the slideshow settings.
To use slideshow menus
11 Press [
22 Press [
press [
] during a slideshow.
/ ] to select one of the following menus, and then
].
Item
Stop / Start
Slideshow
Slideshow Mode
Slideshow
Settings
Brightness
Rotate
Zoom
Aspect Ratio
Delete
Set as
Background
33 Press [
44 Press [
Description
Pause or resume the slideshow
Select a view mode (p. 12)
Select a transition effect or speed or play mode (p. 13)
Adjust the brightness of the screen
Rotate the selected photo (90˚, 180˚, 270˚)
Zoom in on a selected photo (X2, X4)
•• Original Fit: Display photos in original size. When a
photo is larger than the screen, it will be adjusted to fit
the screen in the same ratio
•• Auto Fit: Resize photos to fit the screen
•• Fit to Width: Resize photos to fit the screen width
Delete the selected photo
Set a photo as a background image on the Main menu
screen.
/ ] or [ / ] to select an option, and then press [
] to switch to the slideshow.
14
].
Browse and manage photos
You can browse, copy, or delete photos stored in internal memory and external memory devices.
Browse photos
External memory device indicator
( :USB memory device, : SD memory card)
11 In the Main menu screen (p. 8), press [
File name
and size
22 Press [
Current file number/
total number of files
and then press [
/ ] to select Photo,
].
/ ] to select a memory device (Frame memory,
SD, USB), and then press [ ].
33 Press [
/ ] or [ / ] to browse photos.
To view photos in a folder, select the folder, and then press [
].
44 Press [
] or [ ] to view a slideshow beginning with the
currently selected photo.
15
Browse and manage photos
Copy photos
After connecting an external memory device (SD momory card or USB memory device) to the frame, you can copy photos
from the external memory device to the frame and vice-versa.
To copy photos
11 Select the photo you want to copy, and then press [
].
•• To copy all photos in a folder, select the folder.
22 Press [
/ ] to select Copy, and then press [
].
•• To copy all photos in the selected folder (subfolders not included),
select Copy all files.
33 Press [
/ ] to select a memory location, and then press [
Copying will begin.
•• Photos copied to the frame will be automatically
resized to be optimal for the screen. To copy the
photos in their original sizes, select Original Size
in Settings → Options → Frame Memory
Copy. (p. 20)
•• The resized photos will have lower resolution
compared to the original photos, but with smaller
file sizes, you can store more photos.
].
Example: To copy photos from a USB memory device to the
internal memory,
11 In the Main menu screen (p. 8), press [
and then press [
/ ] to select Photo,
].
22 Select USB in the Photo menu, and select the photos you want.
33 Press [ ].
44 Press [ / ] to select Copy, and then press [ ].
55 Press [ / ] to select Frame Memory, and then press [ ].
16
Browse and manage photos
Delete photos
11 In the Main menu screen (p. 8), press [
and then press [
/ ] to select Photo,
].
22 Select the photo you want to delete, and then press [
].
To delete all photos in a folder, select the folder.
33 Press [
/ ] to select Delete, and then press [ ].
To delete all photos in the selected folder (subfolders not
included), select Delete All Files.
44 Press [
/ ] to select Yes, and then press [
be deleted.
55 Press [
]. Photos will
] on the pop-up window.
To delete a photo during a slideshow
11 Press [
] when the photo you want to delete is displayed
during a slideshow.
22 Press [
33 Press [
/ ] to select Delete, and then press [
/ ] to select Yes, and then press [
].
].
17
Browse and manage photos
Use photo menus
11 Press [
22 Press [
] while browsing photos.
/ ] to select one of the following menus, and then
press [ ].
When you select a folder,
Example: Photo set as a background image
Item
Description
Open
Open the selected folder
Copy
Copy the selected folder to another memory device
Delete
Delete the selected folder (p. 17)
When you select a photo,
Item
Description
Start slideshow
Play a slideshow
Copy
Copy the selected photo to another memory device
(p. 16)
Copy All Files
Copy all photos in the selected folder (subfolders not
included) to another memory device (p. 16)
Delete
Delete the selected photo (p. 17)
Delete All Files
Delete all photos in the selected folder (subfolders not
included) (p. 17)
Set as
Background
Set the selected photo as a background image on the
Main menu screen
18
Customize clock settings
You can use the clock menus to set the current time and select a clock type.
To customize clock settings
11 In the Main menu screen (p. 8), press [
and then press [
22 Press [
33 Press [
press [
▲ Clock & Calandar
[
].
/ ] to select one of the following menus, and then
].
Item
Description
Date and Time
Set the current date and time
Time Format
Select how time is displayed (12 hours, 24 hours)
Date Format
Select how dates are displayed (YYYY/MM/DD, MM/
DD/YYYY, DD/MM/YYYY)
Clock Type
Select the clock type (Digital, Clock & Calendar)
44 Press [
▲ Digital
/ ] to select Clock,
].
/ ] to select an option you want, and then press
].
For Date and Time, press [ / ] to select the option you want
and press [ / ] to set the value.
19
Customize settings
You can use Settings menus to define frame settings according to your preferences.
Options menus
11 In the Main menu screen (p. 8), press [
Settings and then press [
22 Press [
33 Press [
/ ] to select
].
/ ] to select Options, and then press [
].
/ ] to select one of the following menus, and then
press [ ].
Item
Description
Language
Select a language for the display (p. 9)
Brightness
Adjust the brightness of the screen
Auto Fit Portrait
Photo
•• On: Display portrait photos in reduced sizes to fit to the
screen
•• Off: Display portrait photos in their original sizes
Frame Memory
Copy
•• Original Size: Copy photos in their original sizes
•• Resized: Copy photos in reduced sizes for optimal
resolution on the screen
Activate USB
Communication
Select a USB mode to be activated when the frame is
connected to a PC
•• Mass Storage/Mini-Monitor: Use the frame as a
removable disk or supplementary monitor
•• Digital Photo Frame: Use the frame as a digital photo
frame. (For SPF-87H, when you want to use the PC as
a power source.)
44 Press [
/ ] or [ / ] to select an option, and then press [
20
].
Customize settings
Preference menus
11 In the Main menu screen (p. 8), press [
Settings and then press [
22 Press [
33 Press [
/ ] to select
].
/ ] to select Preference, and then press [
].
/ ] to select one of the following menus, and then
press [ ].
Item
Description
Select a mode to be activated when the frame is turned on
•• Home: Start with the Main menu
Starting Mode
•• Last Mode: Start with the mode you used last
•• Slideshow: Start with a slideshow
Screen Saver
Select a screensaver (Slideshow/Clock) to display when
the frame is not used for a certain period of time (about 10
minutes)
Home
Background
Select an image to display on the Main menu screen
•• Default: Display the default image
•• Custom: Display an image you have previously selected
Auto Picture
On/Off
44 Press [
Set the time for the screen to turn on or off automatically
(for example, you can set the screen to turn off when you
go to sleep or turn on when you wake up in the morning)
21
When the screen is off, press any button except
for [ ] to turn it back on again.
/ ] or [ / ] to select an option, and then press [
].
Customize settings
Update/Reset menus
11 In the Main menu screen (p. 8), press [
Settings, and then press [
22 Press [
33 Press [
/ ] to select
].
/ ] to select Update/Reset, and then press [
].
/ ] to select one of the following menus, and then
press [ ].
Item
Description
Firmware Update
Update the firmware (you need to copy firmware files
to the internal memory first)
Reset Settings
Reset all menu options to the default settings
(except for the time and language settings)
Product
Information
Display the model name and firmware version
44 Press [
/ ] or [ / ] to select an option, and then
press [ ].
22
Appendix
Use as a PC mini-monitor
You can use the frame as a mini-monitor (supplementary monitor). Install the Frame Manager program on your PC and connect
the frame to the PC. For more information, visit the Samsung Electronics webpage (http://www.samsung.com/) and search for
SPF-87H or SPH-107H.
Before use
•• Read the Frame Manager User Manual to install the program properly.
•• Use the USB cable provided with the frame.
•• Do not use the frame as a primary monitor. The screen may not work
properly.
•• Only the [ ], [
], [ / ] and [ ] buttons are active when you use
the frame as a mini-monitor.
•• If you have moved a program icon or window to the secondary monitor,
move it back to the primary monitor after use.
•• The frame may not function properly with some video cards. In this case,
set the hardware acceleration to None.
ystem requirements for using the frame
S
as a mini-monitor
•• OS: Windows XP SP2, Vista (32bit)
•• USB: Extended Host Controller (EHCT) for USB 2.0
•• RAM: 256 MB or more
•• CPU: 2.4G Hz or more
To set the hardware acceleration to None,
1. Right-click on the Windows desktop, and select Properties.
2. W
hen the Display Properties window appears, select Settings > Advanced >
Troubleshoot > Hardware acceleration and drag the indicator to None.
•• For Windows Vista, the Aero effect may not function while using the frame
as a mini-monitor and some videos may not play on the frame.
23
Appendix
Firmware update
Download the latest firmware from the Samsung Electronics webpage and update your frame.
11 Visit http://www.samsung.com and search for SPF-87H or
SPF-107H.
22 Follow the on-screen instructions to download the firmware.
33 Connect the external memory device (SD memory card or
USB memory device) to the PC.
44 Copy the latest firmware you have downloaded to the
external memory device.
•• While the update is in progress,
-- Do not disconnect the external device (SD memory
card or USB memory device) from the frame.
-- Do not press any buttons.
-- Do not insert any other memory cards.
-- Do not turn off the frame.
•• You can check whether or not the firmware is
updated to the latest version in Settings →
Update/Reset → Product Information.
55 Disconnect the external memory device from the PC and
then connect it to the frame.
66 In the Main menu screen (p. 8), press [
Settings and then press [
/ ] to select
].
77 Press [ / ] to select Update/Reset and then press [
88 Select Firmware Update and then press [ ].
].
•• Firmware is updated.
99 When the update is done, turn off the frame, remove the
external memory device (SD memory card or USB memory
device), and turn back on the frame.
24
Appendix
Troubleshooting
Try the following if you have trouble using the frame.
Issue
Resolution
The frame will not turn on.
Check if the power cable is connected properly.
When connecting the frame to a PC with
the USB connector, the screen blinks and
the frame turns off automatically.
There may be a problem with the USB port of the PC. Connect the supplementary power
connector as well.
There is light leaking along the border of the
clock screen.
If the screen is black, there may be light showing through the panel due to the characteristics of
the LCD panel. This is normal.
The time setting is not correct.
When the power adapter is disconnected for a long period of time, the current time settings may
be lost. Connect the power adapter at all times.
It takes time for an image to display when
the frame is turned on or during a
slideshow.
If the resolution of a photo is high or the file size is large it may take longer to display.
Even though there is free space left on the
internal memory, photos will not copy there.
Make a folder inside the internal memory to copy photos.
External devices (USB memory device or
SD memory card) do not function properly.
•• Check if the devices are connected properly.
•• Check if the photos stored in the external memory devices are in JPEG format. Corrupted or
damaged files will not display.
•• The device may not be supported by the frame. Try another device.
Portrait photos display in a landscape
orientation.
Check if Auto Fit Portrait Photo is On in Settings → Options.
JPEG photos do not play.
•• JPEG photos saved in Progressive or CMYK modes will not display.
•• JPEG photos edited by image editors (e.g., Photoshop or Paintshop) may not display properly.
Save photos in JPEG format after editing on a PC and play the slideshow again.
25
Appendix
troubleshooting (continued)
Issue
Resolution
Some photos will not display in a
slideshow.
Your frame can read up to 4,000 photos. Photos exceeding this limit will not display in a
slideshow.
The sizes of photos change when rotate
the photos.
Photos will change size automatically fit the screen according to the degree of rotation
(90˚, 270˚).
The proportion of a photo is not correct.
During a slideshow, press [
The clock displays on the screen even
when Photo & Clock view mode is not
selected.
Check if Screen Saver is set to Clock in Settings → Preference.
The preview plays slowly.
When there are many photos or large file sizes, the preview may be slow.
Even when there is only one photo on the
memory card or the slideshow is paused,
the slideshow effect is applied to the photo.
The effect is applied to protect the panel.
In what order are the photos displayed on a
memory card?
The photos are arranged by file names, in the order of number – upper case letter – lower case
letter. The maximum recognized length of a file name is 25 characters.
The slideshow will not start automatically.
Check if Starting Mode is set to Slideshow in Settings → Preference. (p. 21)
I activated the Auto Picture On/Off feature,
but the screen does not turn on
automatically.
•• Check if the current time is set correctly.
•• If you have pressed [ ] to turn the frame off when the Auto Picture On/Off feature is
activated, the screen does not turn on automatically. The screen turns on automatically only
when the screen was turned off automatically via the Off Time setting.
I want to reset the frame.
Select Reset Settings in Settings → Update/Reset.
The frame is not recognized as a removable
disk when connected to a PC with the USB
cable.
There are 2 USB connectors for the SPF-87H. When only the supplementary power connector
(DV 5V) is connected, the frame will not be recognized as a removable disk. Connect the USB
). (p. 7)
connector also (
] and select Aspect Ratio → Original Fit.
26
Appendix
Specifications
Model name
Panel
SPF-87H
SPH-107H
Type
8” TFT LCD
10” TFT LCD
Resolution
800 x 480
1024 x 600
File formats
JPEG (Progressive and CMYK formats not supported)
Built-in memory
1GB
USB
Host (USB 1.1) / Device (USB 2.0)
Power
General
Rating
External DC 12V
Consumption
On: 5.2 W / Off: less than 1 W
On: 5.9 W / Off: less than 1 W
Dimension (W x H x D)
236.0 mm x 159.4 mm x 23.0 mm
280.0 mm x 188.0 mm x 23.0 mm
Weight
500 g
600 g
* The design of the product may vary according to the model. Specifications are subject to change without notice.
* This device is a class B digital apparatus.
Correct disposal of the frame
Dispose of the product according to local regulations and applicable laws.
27
Appendix
Regulatory Compliance Statements
Your Samsung product compliance class is marked in the user manual.
•• Federal Communications Commission (FCC) - USA
•• Industry Canada Equipment Standard for Digital Equipment (ICES-003) - Canada
•• Voluntary Control Council for Interference (VCCI) - Japan
•• Bureau of Standards Metrology and Inspection (BSMI) - Taiwan
•• Ministry of Information and Communication (MIC) - Republic of Korea
•• Italian Post Ministry (Homologation) - Italy
FCC Class B Notice
This device complies with part 15 of the FCC Rules. Operation is subject to the following two conditions:
1. This device may not cause harmful interference, and
2. This device must accept any interference received, including interference that may cause undesired operation.
This equipment has been tested and found to comply with the limits for a Class B digital device, pursuant to Part 15 of the FCC Rules.
These limits are designed to provide reasonable protection against harmful interference in a residential installation. This equipment
generates, uses and can radiate radio frequency energy and, if not installed and used in accordance with the instructions, may cause
harmful interference to radio communications. However, there is no guarantee that interference will not occur in a particular installation.
If this equipment does cause harmful interference to radio or television reception, which can be determined by turning the equipment off
and on, the user is encouraged to try to correct the interference by one or more of the following measures:
•• Reorient or relocate the receiving antenna.
•• Increase the separation between the equipment and receiver.
•• Connect the equipment into an outlet on a circuit different from that to which the receiver is connected.
•• Consult the dealer or an experienced radio/TV technician for help.
28
Appendix
Regulatory Compliance Statements (continued)
User Information
Changes or modifications not expressly approved by the party responsible for compliance could void the user’s authority to
operate the equipment. If necessary, consult with your dealer or an experienced radio/television technician for additional
suggestions. You may find the booklet called “How to Identify and Resolve Radio/TV Interference Problems” helpful. This
booklet was prepared by the Federal Communications Commission. It is available from the U.S. Government Printing Office.
Washington, DC 20402, Stock Number 004-000-00345-4.
The party responsible for product compliance:
SAMSUNG ELECTRONICS CO., LTD.
America QA Lab of Samsung
3351 Michelson Drive
Suite #290, Irvine, CA 92612 USA
Warning
User must use shielded signal interface cables to maintain FCC compliance for the product. Provided with this monitor is a
detachable power supply cord with IEC320 style terminations. It may be suitable for connection to any UL listed personal
computer with similar configuration. Before making the connection, make sure the voltage rating of the computer convenience
outlet is the same as the monitor and that the ampere rating of the computer convenience outlet is equal or exceeds the
monitor voltage rating. For 120-volt applications, use only UL listed detachable power cords with NEMA configuration 5-15P
type (parallel blades) plug caps. For 240-volt applications use only UL listed detachable power supply cords with NEMA
configuration 6-15P type (tandem blades) plug caps. This television receiver provides display of television closed captioning in
accordance with Section 15.119 of the FCC rules. (TV broadcast receivers with picture screens 13 inches or larger in diameter
models only)
ICES-003 Class B Notice - Avis NMB-003, Classe B
This Class B digital apparatus complies with Canadian standard ICES-003.
Cet appareil numérique de la classe B est conforme à la norme NMB-003 du Canada.
29
Appendix
Regulatory Compliance Statements (continued)
VCCI Class B Notice
この装置は、情報処理装置等電波障害自主規制協議(VCCI)の基準に基づくクテスB情報技術装置です。
この装置は、家庭環境で使用することを目的としていますが、この装置がラジオやテレビジョン受信機に近接して 使用されると、
受信障害を引き起こすことがあります。
取扱説明書に従って正しい取り扱いをして下さい。
警告使用者
這是甲類資訊類產品,在居住環境中使用時,可能會造成射頻幹擾,在這種情況下,
使用者會被要求採取某些適當的對策。
European Notice (Europe Only)
Products with the CE marking comply with the EMC Directive (2004/108/EC) and the Low Voltage
Directive (2006/95/EC) issued by the Commission of the European Community.
Compliance with these directives implies conformity to the following European Norms:
•• EN55022: Radio Frequency Interference
•• EN55024: Electromagnetic Immunity of Information Technology Equipment
•• EN61000-3-2: Power Line Harmonics
•• EN61000-3-3: Voltage Fluctuations
•• EN55013: Radio disturbance characteristics of broadcast receivers and associated equipments
•• EN55020: Electromagnetic immunity of broadcast receivers and associated equipments
30
Appendix
Regulatory Compliance Statements (continued)
Italian Homologation Notice
Questo apparecchio e fabbricato in conformita al D.M.28.08.95 n.548
ed in particolare a quanto specificato nell Art.2, comma 1.
Questo apparecchio e fabbricato nella U.E. in conformita al D.M.28.08.95 n.548
Art.2, comma 1 ed al D.M.26.03.92 Art.1
-. For products produced in countries outside the European Community
Questo apparecchio e fabbricato in conformita al D.M.28.08.95 n.548
ed in particolare a quanto specificato nell Art.2, comma 1.
-. For products produced in the European Community
Questo apparecchio e fabbricato nella U.E. in conformita al D.M.28.08.95 n.548
Art.2, comma 1 ed al D.M.26.03.92 Art.1
Russia Only - PCT Notice
Mercury Statement ( USA only)
Contains Mercury, Dispose According to Local, State or Federal Laws
31
Appendix
Regulatory Compliance Statements (continued)
Wiring the Mains Power Supply Plug (UK Only)
IMPORTANT NOTICE
The mains lead on this equipment is supplied with a moulded plug incorporating a fuse. The value of the fuse is indicated on
the pin face of the plug and, if it requires replacing, a fuse approved to BSI1362 of the same rating must be used.
Never use a plug with the fuse cover omitted if the cover is detachable. If a replacement fuse cover is required, it must be of
the same colour as the pin face of the plug. Replacement covers are available from your dealer.
If the fitted plug is not suitable for the power points in your house or the cable is not long enough to reach a power point, you
should obtain a suitable safety-approved extension lead or consult your dealer for assistance. However, if there is no alternative
but to cut off the plug, remove the fuse and then safely dispose of the plug.
Do NOT connect the plug to a mains socket as there is a risk of shock hazard from the bared flexible cord.
IMPORTANT
The wires in the mains lead are coloured in accordance with the following code:
BLUE - NEUTRAL; BROWN - LIVE
As these colours may not correspond to the coloured markings identifying the terminals in your plug,
proceed as follows :
The wire coloured BLUE must be connected to the terminal marked with the letter N or coloured BLUE or BLACK. The wire
coloured BROWN must be connected to the terminal marked with the letter L or coloured BROWN or RED.
WARNING:
DO NOT CONNECT EITHER WIRE TO THE EARTH TERMINAL, WHICH IS MARKED WITH THE LETTER E OR BY THE
EARTH SYMBOL , OR COLOURED GREEN OR GREEN AND YELLOW.
32
Appendix
Contact information of SAMSUNG WORLDWIDE
If you have any questions or comments relating to Samsung products, please contact
Region
North America
Country
Web Site
1-800-SAMSUNG (726-7864)
www.samsung.com/ca
MEXICO
01-800-SAMSUNG (726-7864)
www.samsung.com/mx
U.S.A
1-800-SAMSUNG (726-7864)
www.samsung.com/us
0800-333-3733
www.samsung.com/ar
BRAZIL
0800-124-4214004-0000
www.samsung.com/br
CHILE
800-SAMSUNG (726-7864)
www.samsung.com/cl
ARGENTINA
Latin America
Contact Center
CANADA
COLOMBIA
01-8000112112
www.samsung.com.co
COSTA RICA
0-800-507-7267
www.samsung.com/latin
ECUADOR
1-800-10-7267
www.samsung.com/latin
EL SALVADOR
800-6225
www.samsung.com/latin
GUATEMALA
1-800-299-0013
www.samsung.com/latin
HONDURAS
800-7919267
www.samsung.com/latin
1-800-234-7267
www.samsung.com/latin
00-1800-5077267
www.samsung.com/latin
800-7267
www.samsung.com/latin
PUERTO RICO
1-800-682-3180
www.samsung.com/latin
REP. DOMINICA
1-800-751-2676
www.samsung.com/latin
1-800-SAMSUNG (726-7864)
www.samsung.com/latin
0-800-100-5303
www.samsung.com/latin
JAMAICA
NICARAGUA
PANAMA
TRINIDAD & TOBAGO
VENEZUELA
33
Appendix
Contact information of SAMSUNG WORLDWIDE (continued)
Region
Country
Web Site
0810 - SAMSUNG (726-7864) (€ 0.07/min)
www.samsung.com/at
BELGIUM
02 201 2418
www.samsung.com/be (Dutch)
www.samsung.com/be_fr (French)
800 - SAMSUNG (800-726786)
www.samsung.com/cz
CZECH REPUBLIC
DENMARK
Europe
Contact Center
AUSTRIA
Samsung Zrt., česká organizační složka, Oasis Florenc, Sokolovská394/17, 180 00, Praha 8
8 - SAMSUNG (7267864)
www.samsung.com/dk
EIRE
0818 717 100
www.samsung.com/ie
FINLAND
30 - 6227 515
www.samsung.com/fi
FRANCE
01 4863 0000
www.samsung.com/fr
GERMANY
01805 - SAMSUNG (726-7864) (€ 0,14/Min)
www.samsung.de
HUNGARY
06-80-SAMSUNG (726-7864)
www.samsung.com/hu
800-SAMSUNG (726-7864)
www.samsung.com/it
02 261 03 710
www.samsung.com/lu
0900-SAMSUNG (726-7864) (€ 0,10/Min)
www.samsung.com/nl
NORWAY
3 - SAMSUNG (726-7864)
www.samsung.com/no
POLAND
0 801 1SAMSUNG (1-726-78)022-607-93-33
www.samsung.com/pl
PORTUGAL
80820-SAMSUNG (726-7864)
www.samsung.com/pt
SLOVAKIA
0800-SAMSUNG (726-7864)
www.samsung.com/sk
902 - 1 - SAMSUNG (902-1726-678)
www.samsung.com/es
075 - SAMSUNG (726-7864)
www.samsung.com/se
0848 - SAMSUNG (726-7864) (CHF 0.08/min)
www.samsung.com/ch
0845 SAMSUNG (726-7864)
www.samsung.com/uk
ITALIA
LUXEMBURG
NETHERLANDS
SPAIN
SWEDEN
SWITZERLAND
U.K
34
Appendix
Contact information of SAMSUNG WORLDWIDE (continued)
Region
Country
KAZAKHSTAN
8-10-800-500-55-500
www.samsung.com/kz_ru
KYRGYZSTAN
00-800-500-55-500
LITHUANIA
RUSSIA
TADJIKISTAN
UKRAINE
UZBEKISTAN
8000-7267
www.samsung.com/lv
8-800-77777
www.samsung.com/lt
8-800-555-55-55
www.samsung.ru
8-10-800-500-55-500
8-800-502-0000
www.samsung.ua
8-10-800-500-55-500
www.samsung.com/kz_ru
1300 362 603
www.samsung.com/au
800-810-5858
400-810-5858
010-6475 1880
www.samsung.com/cn
3698-4698
www.samsung.com/hk
INDIA
3030 8282
1800 110011
1800 3000 8282
www.samsung.com/in
INDONESIA
0800-112-8888
www.samsung.com/id
JAPAN
0120-327-527
www.samsung.com/jp
MALAYSIA
1800-88-9999
www.samsung.com/my
0800 SAMSUNG (0800-726-786)
www.samsung.com/nz
AUSTRALIA
CHINA
HONG KONG
Asia Pacific
Web Site
www.samsung.com/ee
LATVIA
CIS
Contact Center
800-7267
ESTONIA
NEW ZEALAND
35
Appendix
Contact information of SAMSUNG WORLDWIDE (continued)
Region
Asia Pacific
(continued)
Country
Contact Center
PHILIPPINES
www.samsung.com/ph
SINGAPORE
1800-SAMSUNG (726-7864)
www.samsung.com/sg
0800-329-999
www.samsung.com/tw
THAILAND
1800-29-323202-689-3232
www.samsung.com/th
VIETNAM
1 800 588 889
www.samsung.com/vn
TAIWAN
MIDDLE EAST & AFRICA 0860-SAMSUNG (726-7864)
Middle East &
Africa
Web Site
1-800-10-SAMSUNG (726-7864)
1-800-3-SAMSUNG (726-7864)
02-5805777
TURKEY
U.A.E
www.samsung.com/za
444 77 11
www.samsung.com/tr
800-SAMSUNG (726-7864)
8000-4726
www.samsung.com/ae
36
Appendix
Index
A
H
aspect ratio, 14
home background, 21
B
L
brightness, 14
language, 9
buttons, 5
C
M
Main menus, 8
Clock
clock type, 19
date and time, 19
date format, 19
time format, 19
connect
external memory devices, 7
PC, 7
F
firmware upgrade, 24
Frame Manager, 23
play mode, 13
specifications, 27
product disposal, 27
product information, 22
supplementary power
connector, 7
R
T
reset, 22
troubleshooting, 25
reset settings, 22
U
resized, 16, 20
mass storage, 10
rotate, 14
USB connector, 7
mini-monitor, 23
S
V
O
screensaver, 21
view mode, 12
slideshow
Z
original size, 16, 20
P
PC requirements, 23
photo
browse photos, 15
copy photos, 16
delete photos, 17
transfer photos, 10
aspect ratio, 14
brightness, 14
delete, 14
mode, 14
rotate, 14
set as background, 14
settings, 14
speed, 13
zoom, 14
zoom, 14
37