1
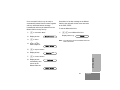
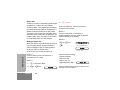
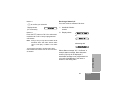
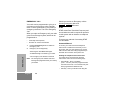
M
GP388/GP388R
6864110B99-B
CONTENTS
Computer Software Copyrights . . . . . . . 3
Product Safety and RF
Exposure Compliance . . . . . . . . . . . . . . . . 4
Radio Overview . . . . . . . . . . . . . . . . . . . . 5
Operation and Control Functions . . . . . . . . 6
Radio Controls . . . . . . . . . . . . . . . . . . . 6
Programmable Buttons . . . . . . . . . . . . . 6
Keypad Keys . . . . . . . . . . . . . . . . . . . . 10
Keypad Lock/Unlock . . . . . . . . . . . . . . 10
Menu Keys . . . . . . . . . . . . . . . . . . . . . . . . 11
Menu Navigation Chart . . . . . . . . . . . . 12
LCD Display and Icons . . . . . . . . . . . . 13
Audio Signal Tones . . . . . . . . . . . . . . . 14
Getting Started . . . . . . . . . . . . . . . . . . . . 16
Battery Information. . . . . . . . . . . . . . . . . .
Battery Care and Tips . . . . . . . . . . . . .
Battery Label . . . . . . . . . . . . . . . . . . . .
Recycling or Disposal of Batteries . . .
Charging the Battery . . . . . . . . . . . . . .
Accessory Information . . . . . . . . . . . . . . .
Attaching the Battery. . . . . . . . . . . . . .
16
16
18
19
19
20
20
20
21
21
22
22
23
23
23
24
25
25
25
Radio Calls . . . . . . . . . . . . . . . . . . . . . . . 26
Selective Calls . . . . . . . . . . . . . . . . . . . . .
Making a Selective Call . . . . . . . . . . .
Receiving a Selective Call . . . . . . . . .
Contact List . . . . . . . . . . . . . . . . . . . . . . .
Keypad Edit . . . . . . . . . . . . . . . . . . . .
Missed Calls . . . . . . . . . . . . . . . . . . . .
Status Call . . . . . . . . . . . . . . . . . . . . .
Making a Status Call. . . . . . . . . . . . . .
Receiving a Status Call . . . . . . . . . . .
Emergency call . . . . . . . . . . . . . . . . . . . .
DTMF. . . . . . . . . . . . . . . . . . . . . . . . . . . .
Automatic/Manual. . . . . . . . . . . . . . . .
Permanent DTMF Mode . . . . . . . . . . .
1
26
26
26
27
28
29
32
32
33
34
34
34
37
English
CONTENTS
Safety . . . . . . . . . . . . . . . . . . . . . . . . . . . . 4
Removing the Battery . . . . . . . . . . . . .
Attaching the Antenna . . . . . . . . . . . .
Removing the Antenna . . . . . . . . . . . .
Radio Operation . . . . . . . . . . . . . . . . . . .
Turning the Radio On or Off . . . . . . . .
Radio On Message. . . . . . . . . . . . . . .
Adjusting the Radio’s Volume. . . . . . .
Selecting a Radio Channel . . . . . . . . .
Sending a Call . . . . . . . . . . . . . . . . . .
Receiving a Call . . . . . . . . . . . . . . . . .
Cancelling a Call. . . . . . . . . . . . . . . . .
Ending a Call . . . . . . . . . . . . . . . . . . .
CONTENTS
Utilities . . . . . . . . . . . . . . . . . . . . . . . . . . 39
DTMF . . . . . . . . . . . . . . . . . . . . . . . . . . . . 39
Scan . . . . . . . . . . . . . . . . . . . . . . . . . . . . . 39
Starting or Stopping Scan . . . . . . . . . . . . 39
Using the Scan Button . . . . . . . . . . . . 39
Using the Menu . . . . . . . . . . . . . . . . . . 40
Priority Channel . . . . . . . . . . . . . . . . . . . . 40
Talkback. . . . . . . . . . . . . . . . . . . . . . . . . . 40
Deleting a Nuisance Channel. . . . . . . . . . 41
Adding a Deleted Nuisance Channel Back into
the Scan List . . . . . . . . . . . . . . . . . . . . . . 41
Using the Scan Button . . . . . . . . . . . . 41
Using the Menu . . . . . . . . . . . . . . . . . . 41
Call forward . . . . . . . . . . . . . . . . . . . . . . . 41
Using the Call Forward Button . . . . . . 41
Using the Menu . . . . . . . . . . . . . . . . . . 42
talkaround . . . . . . . . . . . . . . . . . . . . . . . . 42
Using the Talkaround Button. . . . . . . . 42
Using the Menu . . . . . . . . . . . . . . . . . . 43
Whisper . . . . . . . . . . . . . . . . . . . . . . . . . . 43
Using the Whisper Button . . . . . . . . . . 43
Using the Menu . . . . . . . . . . . . . . . . . . 44
Lone Worker. . . . . . . . . . . . . . . . . . . . . . . 44
Using the Lone Worker Button . . . . . . 44
Using the Menu . . . . . . . . . . . . . . . . . . 45
Power Level . . . . . . . . . . . . . . . . . . . . . . . 45
English
2
Using the Power Level Button . . . . . . 45
Using the Menu . . . . . . . . . . . . . . . . . 46
Companding . . . . . . . . . . . . . . . . . . . . . . 46
Using the Companding Button . . . . . . 46
Using the Menu . . . . . . . . . . . . . . . . . .47
Backlight . . . . . . . . . . . . . . . . . . . . . . . . . 47
Using the Backlight Button . . . . . . . . . 47
Using the Menu . . . . . . . . . . . . . . . . . 48
voice operated transmit (VOX) . . . . . . . . 48
Stun/Unstun . . . . . . . . . . . . . . . . . . . . . . . 49
Radio Information . . . . . . . . . . . . . . . . . 50
To access Radio Information . . . . . . . 50
COMPUTER SOFTWARE
COPYRIGHTS
COMPUTER SOFTWARE
COPYRIGHTS
The Motorola products described in this
manual may include copyrighted Motorola
computer programs stored in semiconductor
memories or other media. Laws in the United
States and other countries preserve for
Motorola certain exclusive rights for
copyrighted computer programs, including, but
not limited to, the exclusive right to copy or
reproduce in any form the copyrighted
computer program. Accordingly, any
copyrighted Motorola computer programs
contained in the Motorola products described
in this manual may not be copied, reproduced,
modified, reverse-engineered, or distributed in
any manner without the express written
permission of Motorola.
Furthermore, the purchase of Motorola
products shall not be deemed to grant either
directly or by implication, estoppel, or
otherwise, any license under the copyrights,
patents or patent applications of Motorola,
except for the normal non-exclusive license to
use that arises by operation of law in the sale
of a product.
3
English
SAFETY
PRODUCT SAFETY AND RF
EXPOSURE COMPLIANCE
!
Caution
Before using this product, read
the operating instructions for
safe usage contained in the
Product Safety and RF
Exposure booklet enclosed
with your radio.
ATTENTION!
SAFETY
This radio is restricted to occupational use only to
satisfy FCC RF energy exposure requirements.
Before using this product, read the RF energy
awareness information and operating instructions
in the Product Safety and RF Exposure booklet
enclosed with your radio (Motorola Publication part
number 6864117B25) to ensure compliance with
RF energy exposure limits.
English
4
For a list of Motorola-approved antennas,
batteries, and other accessories, visit the following
web site which lists approved accessories:
http://www.motorola.comgovernmentandenterprise
RADIO OVERVIEW
RADIO OVERVIEW
This user guide covers the operation of the
GP388 and GP388R Professional Portable
Radio.
Top Button
Rotary Knob
LED Indicator
On-Off / Volume Knob
Microphone
Push to Talk Button
(PTT)
Side Button 1
(Programmable)
Side Button 2
(Programmable)
LCD Display
Menu Keys
Keypad
5
English
RADIO OVERVIEW
OPERATION AND CONTROL FUNCTIONS
Radio Controls
The numbers below refer to the illustrations on
the inside front cover.
1.
Rotary Knob
Used as a channel selector and for multifunction scrolling.
2.
On-Off / Volume Knob
Used to turn the radio on or off, and to adjust
the radio’s volume.
3.
Push to Talk Button (PTT)
Press and hold down this button to talk, release
it to listen.
4.
Side Button 1 (Programmable)
Recommended for Monitor/ Call Cancel Button.
5.
Side Button 2 (Programmable)
6.
Top Button (programmable)
Recommended as Emergency button.
7.
LED Indicator
Green: Successful power up.
Green Flashing: Radio scanning.
Red: Radio transmitting.
Red Flashing: Channel busy - when receiving.
Yellow: Radio called.
Yellow Flashing: Radio call reminder alert.
English
6
Red Flashing: Low battery warning - when
transmitting.
8.
Microphone
9.
LCD Display (1 Line)
10. Menu Keys
11. Keypad
12. Antenna
13. Accessory Connector
Connects headsets, remote speaker/
microphones and other accessories. Replace
attached dust cap when not in use.
Programmable Buttons
Several of your radio buttons can be programmed
(by Customer Programming Software CPS) to
activate the radio features.
The following table shows the features that can be
assigned to the Top button and Side Buttons 1 and 2.
Description
Monitor/Cancel
Monitor allows user to select between signalling
squelch, carrier squelch and unsquelch, and to
suspend scan when landed on a channel in scan
mode.
Cancel allows user to cancel current incoming or
outgoing call.
Radio Call
To make an individual or group selective call.
Missed Call List
Allows user direct access into the Missed Call List
menu feature.
Contact List
Allows user direct access into Contact List menu
feature.
Status List
Allows user direct access into Status List menu
feature.
Channel
Allows user direct access into the Channel mode.
The rotary knob (1) is set to increment/decrement
the channel number.
Scan On/Off
To toggle between start and stop of the scan
operation.
7
RADIO OVERVIEW
Feature
English
RADIO OVERVIEW
Feature
English
Description
Nuisance Delete
To delete a nuisance (unwanted) channel when
scanning, with exception of priority channel, last
channel in scan list and home channel.
Power Level
To toggle the radio’s transmit power level between
High and Low.
Talkaround On/Off
To talk directly with another radio without going
through a system or despatcher.
Emergency
Activates emergency alarm sequence.
Lone Worker
To identify user as a lone worker. Radio enters
emergency sequence unless user responds, when
prompted, by pressing any radio button.
Call Forward
To transfer calls automatically to another radio if
user is unable to take the call.
Whisper
To increase the gain of the radio microphone to
allow user to speak quietly.
Companding On/
Off
To toggle between compression/expansion of audio
signal and normal audio signal.
Keypad Lock
On/Off
Allows user to lock/unlock menu keys and keypad
keys.
8
Description
DTMF
To place the keypad into permanent DTMF live dial
mode.
Backlight
To toggle the display/keypad backlight on and off.
9
RADIO OVERVIEW
Feature
English
RADIO OVERVIEW
Keypad Keys
1
4
7
*
Keypad Lock/Unlock
2
5
8
0
3
6
9
#
These keys are used when dialling a phone number,
making a radio call, or for numeric channel
selection.
On your radio there is a keypad lock feature which
allows you to lock the keypad keys and menu keys
to eliminate accidental key presses.
Press the keypad lock button to lock the keys, the
display icon L will be lit and the display will show:
Lock Keypad
After 2 seconds the radio returns to the IDLE
STATE.
Press the keypad lock button again to unlock the
keys when the icon will be extinguished and the
display will show:
Unlock Keypad
The radio will then return to the IDLE STATE.
Keypad Unlock may be performed during a call, to
allow menu access to the contact list, status list and
scan on/off features.
English
10
Menu Keys
Up
x
+
c
d
e
f
Left
Down
Right
RADIO OVERVIEW
Menu/
Exit
Menu/Select Key c
Used to enter the Menu Mode. When you are in the
Menu Mode, this key is also used to make menu
selections.
Note: When the radio is in the IDLE STATE,
pressing any of the six menu keys causes
the radio to enter the Menu mode.
Exit Key x
Used to move up to the next higher Menu level.
When the top level menu is selected, this key is
used to exit the Menu Mode.
Up Key +
Used for scrolling when in Menu Mode.
Down Key e
Used for scrolling when in Menu Mode.
Right Key f
Used as More key to provide additional information.
Left Key d
Used as a destructive backspace key when editing.
11
English
RADIO OVERVIEW
Menu Navigation Chart
c
(Refer to Menu Navigation guidelines—
+ e
Missed
Calls
select/
ID
status/
voice/
Contact
List
Status
Channel
Utilities
Radio
Information
select/
enter ID
select/
enter ID
select/
enterID
Channel No.
+ e
+ e
Scan
DTMF
Call Forward
Talkaround
Whisper
Lone Worker
Companding
Backlight
SW Version
CP Version
SW Part No.
CP Part No.
Menu Navigation
c to enter Menu Mode.
on/off
+ e
high/low
Power Level
+ or e to scroll through the
c to select Menu item.
+ or e to scroll through
sub-list.
x to return to previous menu
level.
c to select sub-menu item.
English
12
LCD Display and Icons
Symbol
L
Keypad Lock Indicator
On indicates that the keypad and menu
keys are locked. Off indicates unlocked.
P
Battery Level Indicator
Shows the remaining charge in your battery,
based on how many bars are displayed.
Flashing, indicates flat battery.
D
DTMF Indicator
Indicates DTMF is enabled.
Q
Missed Call Indicator
On indicates call in list.
Off indicates no calls in list.
Flashing, indicates new call in list.
J
Talkaround Indicator
Indicates talkaround enabled.
Name and Description
A
XPAND™ Indicator
Indicates that your radio has the
companding feature activated.
B
Power Level Indicator
“L” lights when your radio is configured to
transmit in Low Power. “H” lights when your
radio is configured to transmit in High
Power.
C
Monitor Indicator
On indicates carrier squelch.
Off indicates signalling squelch.
H
Scan Indicator
Indicates that you are scanning. The dot is
lit during priority scan mode.
Name and Description
! Timer
Shows the call time.
13
English
RADIO OVERVIEW
Displays channel, menu, and radio status
information. The top two screen rows show
radio status indicator symbols, explained in the
table below:
Symbol
RADIO OVERVIEW
Audio Signal Tones
High pitched tone
Tone
Low pitched tone
Signal
Radio self-test OK.
Power up Fail
Radio self-test fail.
Button/
Keypad Error
Button/keypad key/
menu key press not
permitted.
Engaged
Channel busy or not
permitted to transmit.
Call Failed
Call failed to connect.
Force Monitor
Radio must monitor
channel before transmission permitted.
Button
Feature
Enable
Any option button
pressed to enable a
feature.
Button
Feature
Disable
Any option button
pressed to disable a
feature.
Group Call
Radio receives a
Group Call.
14
Signal
Description
Individual Call
Radio receives an
Individual Call.
Call
Reminder
Reminder of
unanswered call.
TOT Pre-Alert
Warns of expiry of
time out timer.
Monitor Alert
Alerts to change of
squelch.
Scan Start
Radio starts
scanning.
Scan Stop
Radio stops
scanning.
Priority Call
Decode
Radio detects a
priority call.
Priority
Channel
Radio landed on the
priority channel.
Lone Worker
Reminds lone worker
to respond.
Low
Battery
Battery below receive
threshold level.
Hardware
Error
Hardware error, tone
continues until valid
operation.
Description
Power up OK
English
Tone
Signal
Description
Channel Free
Beep
Indicates current
channel is free.
Incoming
Emergency
Alert
Indicates an
emergency situation.
Keypad
Acknowledge
Confidence tone
when any key
pressed.
Ringtones
English/French/
General
RADIO OVERVIEW
Tone
Incoming calls (high
tones), outgoing calls
(low tones).
15
English
GETTING STARTED
•
Charging a hot battery (above 35°C) results in
reduced discharge capacity, affecting the
performance of the radio. Motorola rapid-rate
battery chargers contain a temperature-sensing
circuit to ensure that the battery is charged
within these temperature limits.
This product is powered by a lithium-ion
rechargeable battery.
•
The following battery tips will help you obtain the
highest performance and longest cycle life from
your Motorola rechargeable battery.
New batteries can be stored up to two years
without significant cycle loss. Store new/unused
batteries in a cool dry area.
•
Batteries which have been in storage should be
charged overnight.
•
Charge your new battery overnight (14-16 hrs)
before using it to obtain maximum battery
capacity and performance.
•
Do not return fully charged batteries to the
charger for an “extra boost”. This action will
significantly reduce cycle life.
•
Charging in non-Motorola equipment may lead
to battery damage and void the battery warranty.
•
•
When charging a battery that is attached to the
radio, turn the radio off to ensure a full charge.
Do not leave your radio and battery in the
charger when not charging. Continuous charging
will shorten battery life. (Do not use your charger
as a radio stand.)
•
The battery should be at about 25°C (room
temperature) whenever possible. Charging a
cold battery (below 10°C) may result in leakage
of electrolyte and ultimately, in failure of the
battery.
•
For optimum battery life and operation use only
Motorola brand chargers. They were designed to
operate as an integrated energy system.
BATTERY INFORMATION
GETTING STARTED
Battery Care and Tips
English
16
Battery chargers will charge only the Motorola
authorized batteries listed below; other batteries
will not charge.
Table 1: IP54 Radio Battery List
Part No.
Description
Table 2: IP67 Radio Battery List
Part No.
Description
Slim Li-Ion, 1000 mAh,
7.5 V Battery (IP54)
PMNN4073_
Li-Ion FM IP67 Standard
Battery
JMNN4024_R
High Capacity Li-Ion,
1320 mAh, 7.5 V Battery
(IP54)
PMNN4074_
Li-Ion Non-FM IP67
Standard Battery
JMNN4025_R
NiMH, 700 mAh, 7.5 V
FM Approved Battery
(IP54)
GETTING STARTED
JMNN4023_R
Do not use IP54 batteries with IP67 radio.
17
English
Note: IP67 water submersible radios MUST be
fitted with Motorola authorized IP67 batteries
to ensure proper functionality.
GETTING STARTED
Warning:When charging a IP67 battery, make sure
that the IP67 battery (or IP67 battery with
IP67 radio) is not wet prior to placing in the
charger.
Warning:The battery charger is not waterproof. For
your safety and proper operation of the
charger, IP67 radios MUST be dry prior to
placing in the battery charger for charging.
Do NOT operate the charger, when your
hands are wet or while holding a wet IP67
radio. Do NOT touch the battery contacts,
when your hands are wet. Do NOT put the
battery into water, as this may cause the
IP67 metal contacts to corrode.
English
18
Battery Label
IP67
Recycling or Disposal of Batteries
Charger LED
Status
Motorola endorses and encourages the recycling
of all re-chargeable batteries. Contact your local
Motorola dealer for further information.
Red
Battery is charging
Green
Battery is fully charged
Charging the Battery
Flashing Red *
Battery is unchargeable
If a battery is new, or its charge level is very low,
you will need to charge the battery before you
can use it in your radio.
Flashing Yellow
Charger is getting ready to charge
Flashing Green
Battery is 90% charged
Note: Batteries are shipped uncharged from the
factory. New batteries could prematurely
indicate full charge, charge a new battery for
14-16 hrs before initial use.
Battery is damaged. Please contact your dealer.
1.
Place the radio with the battery attached, or the
battery alone, in the charger.
2.
The charger’s LED indicates the charging
progress.
19
English
GETTING STARTED
The P icon flashes when the battery is flat and
the hardware error tone will sound. This icon will
only appear when a genuine Motorola battery is
used.
*
ACCESSORY INFORMATION
GETTING STARTED
Attaching the Battery
Removing the Battery
Slots
1.
2.
Fit the extensions at the bottom of the battery
into the slots at the bottom of the radio’s body.
Press the top part of the battery towards the
radio until you hear a click.
English
20
1.
Turn off the radio, if it is turned on.
2.
Slide the battery latches, on both sides of the
battery, downwards.
3.
Pull the top part of the battery away from the
radio’s body, and remove the battery.
Removing the Antenna
1.
Align the threaded end of the antenna with the
radio’s antenna connector.
1.
2.
Turn the antenna clockwise to fasten it.
Turn the antenna counterclockwise until you
can remove it.
21
English
GETTING STARTED
Attaching the Antenna
GETTING STARTED
DRAINING WATER FROM THE IP67 GP388R
SPEAKER
RADIO OPERATION
Turning the Radio On or Off
ON
Note: If you accidentally drop your GP366R radio
into water, pick up the radio, and gently tap
the radio (as shown above) to remove the
water from the speaker grille and
microphone port before using it.
Note: Do not submerge your radio for any longer
than 30 minutes and no deeper than 1
metre. If these limits are exceeded then your
radio could be permanently damaged.
English
22
OFF
•
To turn the radio on, turn the On-Off/Volume
Control knob clockwise.
•
To turn the radio off, turn the On-Off/Volume
Control knob counterclockwise until you hear a
click.
Radio On Message
At power up the radio will display a message
customised by your dealer, e.g.:
Radio On
After this text has been displayed, the radio perform
a self test routine. On completion of a successful
self test the radio will display:
Channel
Ready
Note: If your radio fails the self test routine consult
your dealer.
Adjusting the Radio’s Volume
•
Turn the On-Off/Volume Control knob to adjust
the volume level.
Selecting a Radio Channel
Your radio offers up to 255 channels, however some
may not be programmed. Check with your dealer for
more information.
Note: The rotary knob default is channel mode.
The keypad default is programmable and may
be set to channel mode.
There are two ways to enter channel mode:
Method 1
Press the Channel Mode direct access button, if
programmed by your dealer.
Method 2
1
c to enter Menu Mode
2
+ or e until:
3
c to select
4
Display shows e.g.:
Channel
Chan: 05
Note: After a short period of inactivity the radio
returns to the IDLE STATE.
Once in channel mode, there are three ways to
select a channel:
Method 1
23
English
GETTING STARTED
This may be a number or an alias and will be the
channel currently selected by the rotary channel
selector. Alternatively, if required the radio may
display a message customised by your dealer, e.g.
Before selecting a channel ensure your radio is in
channel mode.
Turn the rotary knob (1) clockwise or
counterclockwise until you reach the desired
channel indicated on the display.
Sending a Call
1.
Select the desired radio channel.
2.
Press the PTT button and speak clearly into the
microphone.Your mouth should be 2.5 to 5 cm
away from the microphone.
3.
When transmitting, the red indicator will light
continuously.
4.
Release the PTT button to listen.
Method 2
1
+ or e until:
Channel Number
or
Alias
GETTING STARTED
2
c to confirm your selection.
Display shows:
(for 2 seconds)
Selected
Method 3
1
2
Enter the desired
channel number
from the keypad,
e.g. 05:
When the channel is free, the Channel Free beep
will sound, and you can make a call.
CH: 05
c to confirm your selection.
Display shows:
(for 2 seconds)
Selected
Note: The keypad can’t be used to enter the channel
number during a call or whilst the radio is in a scan.
English
24
Your radio may be configured for ‘Transmit Inhibit’
under certain conditions (e.g. when the channel is in
use by others) in which case, the channel busy tone
will sound when you press the PTT or call button to
indicate that transmission is inhibited.
If your radio is equipped with a transmit time out
will
timer (TOT), a warning tone
sound a few seconds before the transmission is cut
off. Your radio may be programmed to inhibit
retransmission within a preset time.
Receiving a Call
1.
Turn your radio on and adjust the volume level.
2.
Switch to the desired radio channel.
3.
If, at any time, a call is received you will hear
the call at the volume level you have set.
Note: The system may have a limited call time and
the call may be terminated automatically if
this call time is exceeded.
GETTING STARTED
Cancelling a Call
At any time while setting up a call it may be cancelled
by pressing the Monitor/Call Cancel button.
The call timer can also cancel a call.
Ending a Call
A call should always be ended by pressing the
Monitor/Call Cancel button.
25
English
RADIO CALLS
To answer the call:
SELECTIVE CALLS
1.
Press the PTT button or Call button.
Making a Selective Call
2.
The call will terminate automatically when the
conversation has ended or press the Monitor
button.
You can make a selective call to a particular radio,
known as an individual call, or a group of radios,
known as a group call.
You can make calls by using the Contact List, the
Missed Calls List or Manual Dialling.
Receiving a Selective Call
When you receive a selective call, you will hear
either,
an individual call alert tone
,
RADIO CALLS
or a group call alert tone
.
The LED Indicator will light (yellow) and the
display will show the alias (name) or number
(address) of the calling radio e.g.
Display shows:
English
26
Addr: 234
Your radio has a call timer which shows the
time used on an incoming or outgoing selective
call
e.g.
Display shows:
01:22
CONTACT LIST
When the radio is in the IDLE state or during a call,
the contact list may be used to give access to up to
255 preprogrammed numbers accessed via the
menu.
Depending on the way your radio is programmed,
the radio will display either the alpha alias (name) or
the number to be dialled.
Once in the Contact List, there are three ways to
choose the desired address:
Method 1
Turn the rotary knob (1) clockwise or
counterclockwise until you reach the desired
address indicated on the display.
Method 2
There are two ways to enter the Contact List:
+ or e until:
Method 1
Press the Contact List direct access button, if
programmed by your dealer.
f
Method 2
1
c to enter Menu Mode.
2
+ or e until:
3
c to select
Alpha Alias
Number
Method 3 (Manual Dialling)
Enter the desired
address from the
keypad, e.g. 0574:
Contact List
ADDR: 0574
RADIO CALLS
27
English
Once the desired address is displayed, there are
two methods to select the address:
1
d or f
Once
(to select
number)
1234567
2
d Again
(to delete last
digit)
123456
For Numbers, eg:
1234567
3
d Once
(to delete last
digit)
123456
4
Enter new
numbers
5
PTT button to make radio call.
Method 1
c to confirm your selection.
Display shows:
(for 2 seconds)
Selected
RADIO CALLS
Method 2
Press the PTT button or Call 1-4 to select
address and make the call.
Call 1-4 are pre-programmed call buttons.
Note: During a call you may enter the contact list
as described above and make another call
to a third party, or initiate a new call. In either
case the call may be a voice or status call.
Keypad Edit
If the radio is displaying a Contact List number, a
Keypad Dialled number or a Status number, the last
digit may be deleted by:
For Aliases, eg:
English
28
Jack
12345699
Note: The edited number is not saved at the end of
the call in the contact list, but is saved in the
last number redial.
To view the calls in the list via the menu:
Missed Calls
If a call remains unanswered, the call will be
stored by the radio, provided that Missed Calls
has been programmed into your radio.
Up to ten calls can be stored. If the same radio
calls more than once, only the most recent call
is stored. When ten calls have been stored by
the radio, depending on the radio
programming, the eleventh call received may
overwrite the first or not be stored by the radio.
When a new call has been stored by the radio,
the Missed Call icon Q will flash and the
display will show the alias (name) or number
(address) of the last calling radio e.g:
234
1
c to enter Menu Mode.
2
Display shows:
3
c to select
4
+ or e to
scroll list:
Missed Calls
Addr: Alias
Note: In the Missed Calls list some alpha alias/
numbers may contain a suffix S, which
indicates a status message associated with
the call.
When the Missed Calls list has been read and
any missed calls retained, the Missed Call icon
will be illuminated.
RADIO CALLS
The Missed Call List can be entered directly by
pressing the Missed Call button (if
programmed) when the radio is in the IDLE
STATE or via the menu.
If using the Missed Call button, follow the
procedures from step 3 below.
29
English
Example:
1
Display shows
You can call back to any number in the Missed
Call list by:
Reception
S
1
If the displays shows S there is a status
message associated with the call.
f
Addr: Alias
Displays message e.g.
On Break
f again
Displays status
number e.g.
2
PTT button or c or # to make the
call.
3
After the call is set-up, press PTT button
and talk with your mouth 2.5-5 cm from
microphone. Release PTT to listen.
4
The call will terminate automatically when
the conversation has ended or press the
Monitor/Cancel button.
Status 04
f again
Display shows
RADIO CALLS
Reception
English
30
S
+ or e until
desired number is
displayed:
On a successful call set- up, the entry is
automatically deleted from the stack together
with any associated status message.
Unanswered calls may be deleted from the
Missed Call list at any time by :
1
c to enter Menu Mode.
2
Display shows:
3
c to select
4
+ or e to
select entry in list:
x to request deletion.
6
Display shows:
7
c to confirm deletion.
8
Display shows
momentarily, then
returns to the
Missed Calls list:
To exit the Missed Call List:
1
Missed Calls
xx to exit Missed Call List.
Display shows e.g.:
Ready
Note: The calls in the list are not deleted when the
radio is turned off.
Addr: Alias
Delete? 4/ 6
RADIO CALLS
5
On deletion of the last message in the Missed
Calls list, the radio will exit the menu and return
to the IDLE STATE.
Deleted
Addr: Alias
31
English
Status Call
A status is a code for transmitting prearranged
messages, e.g. status “05” may indicate
“Return to Base”. The prearranged messages
and associated code digits are contained in a
Status List which contains up to 255 entries.
This list is used for both incoming calls, when
the status of the calling radio is displayed, and
outgoing calls, when your status is sent either
to a requesting radio or to other radios.
Making a Status Call
When the radio is in the IDLE state or during a
call, the status list may be used to select a
status message to reply to a calling radio or
send your status to another radio.
3
c to select
Once in the Status List, there are three ways to
choose the desired status:
Method 1
Turn the rotary knob (1) clockwise or
counterclockwise until you reach the desired
status indicated on the display.
Method 2
+ or e until:
f
RADIO CALLS
Method 2
1
c to enter Menu Mode.
2
+ or e until:
(e.g. 04)
English
32
Method 3 (Manual Dialling)
Enter the desired
status from the
keypad, e.g. 04:
(digit range 00 to 999)
Status
(e.g On Break)
Number
There are two ways to enter the Status List:
Method 1
Press the Status List direct access button, if
programmed by your dealer.
Message Alias
Stat: 04
Once the desired status is displayed, there are two
methods to select the status:
Receiving a Status Call
Method 1
Your radio receives a Status Call when:
c to confirm your selection.
Display shows:
(for 2 seconds)
Selected
Method 2
Press the PTT button or Call 1-4 to select and
make the call. Call 1-4 are pre-programmed
call buttons.
Note: During a call you may enter the status list as
described above and make another status
call to a third party or initiate a new status
call.
To send status message to another radio, select
radio Alias/ID from Contact List via menu and send
as detailed.
1
Individual Call alert
sounds
2
Display shows:
Stat: On Break
or
Stat: 04
alternating with
Alias/Number
33
English
RADIO CALLS
Where Status message “04” / “On Break” is
example status message. Note that status
number (04) only will be displayed if
associated message is not programmed into
your radio. Alias/Number is the name or
number of the calling radio.
EMERGENCY CALL
Your radio can be programmed to give you a
one-button quick access to call a particular
radio or centre (predefined by your dealer) in
emergency situations. This is the Emergency
Call.
When you make an Emergency call, your radio
goes into an Emergency state, which can be
programmed to:
•
continually receive speech,
•
the radio can receive and transmit.
1.
Press the Emergency button to initiate an
Emergency call.
2.
Emergency can be stopped by:
•Switching the radio Off and On again.
RADIO CALLS
•A reset message is received by your radio.
•The emergency time duration is reached.
Note: The emergency time duration and reset
message are programmed into your radio by
your dealer.
English
34
Should you receive an Emergency call the
incoming emergency alert tone
will sound.
DTMF
DTMF means Dual Tone Multi Frequency and
is used when the radio is required to operate in
a radio system with an interface to telephone
systems.
There are two methods of accessing DTMF
Live Dial Mode:
Automatic/Manual
To do this, your radio must send a telephone
interconnect to a station that connects you to a
phone line. After you have finished your call, the
radio sends a clear down call (if programmed) to
shutdown the connection to the phone line.
Sending the Telephone Interconnect Call
Your radio can be programmed to send the
interconnect call in one of the following ways:
•
automatically - when a call button
(Call 1 - 4 or PTT) has been programmed with
the interconnect call, or a contact list entry has
been programmed for DTMF access.
•
manually - when you dial the code using the
keypad.
If in doubt, please contact your dealer or network
manager for further information.
To initiate a DTMF call with Automatic
Telephone Interconnect Call
1 Press dedicated Call Button (Call 1-4 or
PTT), you will hear a tone sequence.
Display icon lit:
D
2 Wait for call to be set up when you will
hear a dial tone.
Display shows:
4 Once the radio has connected to the
called number, you can begin the
conversation. Even though this is a phone
call, your conversation mimics a radio
call, that means that both parties speak in
turn, i.e. press the PTT to talk, release to
listen.
5 To end the call press the Monitor Button
or change channel when the clear down
call is sent automatically from your radio
to shutdown the phone line.
Enter Digits
3 Enter desired phone number, taking care
not to press the PTT.
Note: Each DTMF digit is transmitted
instantly.
RADIO CALLS
Display shows
entered digits:
8116
35
English
To initiate a DTMF call with Manually
Dialled Telephone Interconnect Call
1 Enter the interconnect call from the
keypad, you will hear a tone sequence.
Display shows
e.g.
122
2 Press dedicated Call Button (PTT or Call
1-4)
Display icon lit:
D
3 Wait for call to be set up when you will
hear a dial tone.
RADIO CALLS
Display shows:
Enter Digits
4 Enter desired phone number, taking care
not to press the PTT.
Note: Each DTMF digit is transmitted
instantly.
Display shows
entered digits:
English
36
8116
5 Once the radio has connected to the
called number, you can begin the
conversation. Even though this is a phone
call, your conversation mimics a radio
call, that means that both parties speak in
turn, i.e. press the PTT to talk, release to
listen.
6 To end the call press the Monitor Button
or change channel when the clear down
call is sent automatically from your radio
to shutdown the phone line.
Note: The radio starts a programmable timer the
moment both parties stop transmitting
(talking). If the time-out timer expires, the
radio will end the phone call.
Permanent DTMF Mode
Press the pre-programmed DTMF button once, to
put the keypad into permanent DTMF live dial mode.
Press the DTMF button again to disable the DTMF
live dial. The radio then returns to the IDLE STATE
and select calls can be made.
Alternatively, use the DTMF menu option to
enable or disable permanent DTMF Mode.
Note: Permanent DTMF mode is not available in
scan or during a call.
Using the DTMF Button
1.
Press the DTMF button to switch on permanent
DTMF Mode when the feature enable alert will
sound, the display icon D is lit and the display
will show:
DTMF Mode On
2.
DTMF Mode Off
1
Ensure radio is in IDLE STATE.
2
c to enter Menu Mode.
3
+ or e until:
4
c to select
5
+ or e until:
6
c to select
Utilities
DTMF Mode
Display shows
current status e.g. :
Off
7
+ or e until:
On
8
c to select:
On
Display shows:
(for 2 seconds)
9
Selected
RADIO CALLS
Press the DTMF button again to switch off
permanent DTMF Mode when the feature
disable alert will sound, the display icon D is
extinguished and the display will show:
Using the Menu
Radio exits menu
mode and display
shows e.g.:
Chan: 05
37
English
To initiate a DTMF call in permanent live
dial
1 Enter the interconnect call from the
keypad, you will hear a tone sequence.
Display shows
e.g.
122
2 Wait for call to be set up when you will
hear a dial tone.
Display shows:
Enter Digits
3 Enter desired phone number, taking care
not to press the PTT.
RADIO CALLS
Note: Each DTMF digit is transmitted
instantly.
Display shows
entered digits:
English
38
8116
4 Once the radio has connected to the
called number, you can begin the
conversation. Even though this is a phone
call, your conversation mimics a radio
call, that means that both parties speak in
turn, i.e. press the PTT to talk, release to
listen.
5 To end the call press the Monitor Button
or change channel when the clear down
call is sent automatically from your radio
to shutdown the phone line.
UTILITIES
DTMF
DTMF means Dual Tone Multi Frequency and
is used when the radio is required to operate in
a radio system with an interface to telephone
systems.
You can switch On or Off Permanent DTMF
Mode by using a pre-programmed DTMF
button or via the menu, please refer to page
34.
STARTING OR STOPPING SCAN
You can start or stop a scan operation by using
a pre-programmed Scan button or via the
menu, either when the radio is in the IDLE
STATE or when in a call.
Using the Scan Button
1.
Press the Scan button to start scanning. The
scan start alert tone
will sound
and the display icon G lit .
2.
Press the Scan button again to stop scanning.
The scan stop alert tone
will
sound and the display icon G is
extinguished.
SCAN
You can monitor several channels in order to
receive any call that is transmitted on any of
these channels. Sixteen different channels can
be programmed into each scan list. Each
channel can share the same scan list or have
different scan lists assigned to them.
Once the radio’s scan operation is activated
and the radio detects a call coming through a
39
English
UTILITIES
The utilities described below are programmed
into your radio by your dealer and are
accessible either via a programmable button or
via the menu.
channel in its scan list, it switches to that
channel for you to receive the call.
UTILITIES
Using the Menu
1
Ensure radio is in IDLE STATE, or in a
call.
2
c to enter Menu Mode.
3
+ or e until:
4
c to select
5
+ or e until:
6
c to select
Utilities
Scan
Display shows
current status e.g. :
Off
7
+ or e until:
On
8
c to select
Display shows:
(for 2 seconds)
9
Selected
Chan: 05
40
PRIORITY CHANNEL
A scan list may contain a priority channel. This
means that a particular channel (for example, a
commonly used channel) may be checked
more frequently than other channels in the list
during a scan operation. Priority channels are
programmed into your radio scan lists by your
dealer, however when a priority channel is
included in a scan list, the scan icon changes
from G to H.
TALKBACK
Radio exits menu
mode and display
shows e.g.:
English
The scan start alert tone will sound, the display
icon G will be lit and the LED indicator will
blink green during a scan operation. When a
call on a channel is detected the LED will stop
blinking and the channel number will be
displayed.
If the programmable Talkback option is set, you
can respond to any calls received during the
scan operation by pressing the PTT button
before the programmed hang-time ends. Check
with your dealer for details.
DELETING A NUISANCE CHANNEL
1.
Select Scan Off. Your radio will stop scanning,
the scan stop alert tone will sound, the display
icon G and the LED indicator will be
extinguished.
3.
Select Scan On. Your radio will re-start
scanning, the scan start alert tone will sound,
the display icon G will be lit , the LED
indicator will blink green and the scan list will
contain all programmed channels.
While the radio is on the Nuisance Channel,
press and hold the Nuisance Delete button
until you hear the scan start alert tone.
2. Release the Nuisance Delete button.
Note: You cannot perform a Nuisance Channel
Delete on a priority channel or if there is only
one remaining channel in the scan list.
ADDING A DELETED NUISANCE CHANNEL
BACK INTO THE SCAN LIST
CALL FORWARD
You can call forward calls to your radio to
another radio if you are unable to take calls or
are away from your radio.
Using the Scan Button
You can switch On or Off Call Forward by
using a pre-programmed Call Forward button
or via the menu.
1.
Press the Scan button to stop scanning. The
scan stop alert tone will sound.
Using the Call Forward Button
2.
Press the Scan button again to re-start
scanning. The scan start alert tone will sound,
and the scan list will contain all programmed
channels.
Using the Menu
1.
Follow the instructions for selecting Scan On/
Off via the menu
1.
Press the Call Forward button to switch on
Call Forward, when the feature enable alert
will sound and the display will show:
Forwarded On
2.
Press the Call Forward button again to switch
off Call Forward when the feature disable alert
41
English
UTILITIES
If a channel continually generates unwanted calls/
noise (a “nuisance” channel), you can temporarily
remove it from the scan list by performing a
Nuisance Channel Delete operation:
2.
will sound and the display will show:
UTILITIES
Forwarded Off
Using the Menu
1
Ensure radio is in IDLE STATE.
2
c to enter Menu Mode.
3
+ or e until:
4
c to select
5
+ or e until:
6
c to select
Utilities
Call Forward
Off
7
+ or e until:
On
8
c to select
9
42
You can switch On or Off Talkaround by using
a pre-programmed Talkaround button or via
the menu.
Using the Talkaround Button
Selected
Press the Talkaround button to switch on
Talkaround when the feature enable alert will
sound, the display icon J is lit and the display
will show:
Talkaround On
2.
Radio exits menu and returns to IDLE STATE.
English
In your communications network, you may be using
a system to cover a larger area than is possible with
your radio. However, you can communicate with
another radio within your radio’s range without
going through the system by using the Talkaround
feature. This is especially useful when the system is
down.
1.
Display shows
current status e.g. :
Display shows:
(for 2 seconds)
TALKAROUND
Press the Talkaround button again to switch
off Talkaround when the feature disable alert
will sound, the display icon J is extinguished
and the display will show:
Talkaround Off
WHISPER
1
Ensure radio is in IDLE STATE.
2
c to enter Menu Mode.
Whisper allows you to talk quietly into the radio
microphone when making a call, by increasing
the gain of the radio microphone.
3
+ or e until:
4
c to select
5
+ or e until:
6
c to select
Utilities
Talkaround
Display shows
current status e.g. :
Off
7
+ or e until:
On
8
c to select
Display shows:
(for 2 seconds)
9
Selected
You can switch On or Off Whisper by using a
pre-programmed Whisper button or via the
menu.
Using the Whisper Button
1.
Press the Whisper button to switch
Whisper on, when the feature enable alert will
sound and the display will show:
Whisper On
2.
Press the Whisper button again to switch
Whisper off, when the feature disable alert will
sound and the display will show:
Whisper Off
Radio exits menu
mode and display
shows e.g.:
Chan: 05
43
English
UTILITIES
Using the Menu
UTILITIES
Using the Menu
LONE WORKER
1
Ensure radio is in IDLE STATE.
The Lone Worker feature enables you to work
alone with added safety.
2
c to enter Menu Mode.
3
+ or e until:
You can switch On or Off Lone Worker by
using a pre-programmed Lone Worker button
or via the menu.
4
c to select
5
+ or e until:
6
c to select
Utilities
Using the Lone Worker Button
Whisper
Display shows
current status e.g. :
Off
7
+ or e until:
On
8
c to select
Display shows:
(for 2 seconds)
9
1.
Lone Wkr On
•
•
Selected
2.
Radio exits menu
mode and display
shows e.g.:
44
You will be reminded at intervals that Lone
Worker is switched on by a high pitched alert
tone (Lone Worker Reminder) being sounded.
Press any button to respond and cancel the
alert, if you do not the radio will enter the
Emergency state.
Press the Lone Worker button again to switch
Lone Worker off, when the feature disable alert
will sound and the display will show:
Lone Wkr Off
Chan: 05
English
Press the Lone Worker button to switch Lone
Worker on, when the feature enable alert will
sound and the display will show:
3.
You may also switch off Lone Worker by
changing the channel or switching radio off
and on again.
POWER LEVEL
1
Ensure radio is in IDLE STATE.
2
c to enter Menu Mode.
3
+ or e until:
4
c to select
You can transmit your calls at different transmit
power levels. A higher level means you can
reach a radio that is farther away. A lower power
level conserves battery power. Use the high
power setting only when necessary, to conserve
battery life.
5
+ or e until:
6
c to select
Utilities
Lone Worker
Using the Power Level Button
Display shows
current status e.g. :
Off
7
+ or e until:
On
8
c to select
Display shows:
(for 2 seconds)
9
You can switch between high and low power
levels by using a pre-programmed Power
Level button or via the menu.
1.
Press the Power Level button to switch to high
power when the feature enable alert will
sound, the display icon H is lit and the display
will show:
High Power
Selected
Radio exits menu
mode and display
shows e.g.:
2.
Press the Power Level button again to switch
to low power when the feature disable alert
will sound, the display icon L is lit and the
display will show:
Low Power
Chan: 05
45
English
UTILITIES
Using the Menu
UTILITIES
Using the Menu
COMPANDING
1
Ensure radio is in IDLE STATE.
2
c to enter Menu Mode.
3
+ or e until:
4
c to select
5
+ or e until:
Companding is a collective term to define
compressing the audio signal on transmission
and expanding the audio signal on reception.
The overall effect is to reduce noise in the
received signal, giving you crisper, clearer
audio clarity. Companding should only be used
when other radios in your system have the
same companding feature available.
6
c to select
Utilities
Power Level
Display shows
current status e.g. :
Low
7
+ or e until:
High
8
c to select
Display shows:
(for 2 seconds)
9
You can switch On or Off Companding by
using a pre-programmed Companding button
or via the menu.
Using the Companding Button
1.
Selected
Companding On
2.
Radio exits menu
mode and display
shows e.g.:
Chan: 05
Press the Companding button to switch
Companding on, when the feature enable alert
will sound, the display icon A is lit and the
display will show:
Press the Companding button again to switch
Companding off, when the feature disable alert
will sound, the display icon A extinguished
and the display will show:
Companding Off
English
46
BACKLIGHT
1
Ensure radio is in IDLE STATE.
2
c to enter Menu Mode.
3
+ or e until:
4
c to select
Backlight illuminates the radio display, keypad
and menu navigation keys.
Your radio can be programmed to have the
backlight permanently on, permanently off or a
timed period, when any new information being
displayed, causes the backlight to remain on
for 10 seconds.
5
+ or e until:
6
c to select
Utilities
Companding
Display shows
current status e.g. :
Off
7
+ or e until:
On
8
c to select
Display shows:
(for 2 seconds)
9
You can switch On or Off the Backlight by
using a pre-programmed Backlight button or
via the menu.
Using the Backlight Button
1.
Press the Backlight button to switch
Backlight on, when the feature enable alert will
sound and the display will show:
or Backlight Tmd
Selected
Radio exits menu
mode and display
shows e.g.:
2.
Backlight On
Press the Backlight button again to switch
Backlight off, when the feature disable alert
will sound and the display will show:
Backlight Off
Chan: 05
47
English
UTILITIES
Using the Menu
UTILITIES
Using the Menu
9
1
Ensure radio is in IDLE STATE.
2
c to enter Menu Mode.
3
+ or e until:
4
c to select
5
+ or e until:
6
c to select
7
Chan: 05
Utilities
Backlight
Display shows
current status e.g. :
Off
+ or e until:
On
or
Timed
8
c to select e.g.:
Display shows:
(for 2 seconds)
Timed
Selected
VOICE OPERATED TRANSMIT (VOX)
When the VOX headset/microphone is
connected, your radio may be used with
hands-free operation.
The VOX feature intelligently senses
background noise, so that it adapts
automatically to the noise level in the
environment in which you are working.
To start the VOX feature:
1.
Connect the VOX headset onto the
accessory connector of the radio.
2.
Switch On the radio.
You can disable the VOX feature by pressing
the PTT button on the radio. This allows you to
use the VOX headset but you must press the
radio PTT to transmit.
To re-enable the VOX feature:
1.
English
48
Radio exits menu
mode and display
shows e.g.:
Switch the radio Off and On again with the
headset connected to the accessory
connector
or,
2.
UTILITIES
Change channel with the VOX headset
connected.
STUN/UNSTUN
For added security and to avoid abuse of the
radio system in which you operate, a feature
known as Stun/Unstun is included in your
radio.
This feature can only be activated by your
system manager or administrator.
For example, if your radio is stolen and is being
used illegally, your system administrator can
send a signal which will stun the radio making
it incapable of being used. This feature is also
useful if the system is being abused by a user
who is not complying with the correct
communications protocol.
The radio can only be unstunned, i.e. returned
to operational use, by an unstun signal sent
from the system administrator or returning the
radio for reprogramming.
49
English
RADIO INFORMATION
5
+ or e until:
or
RADIO
To enable you and your dealer/system
administrator to establish, quickly, the software
and radio parameters programmed into your
radio, a feature known as Radio Information
can be accessed via the menu.
On selection of Radio Information, your radio
display will indicate:
•
Software (SW) version
•
Codeplug (CP) version
•
Software (SW) part number
•
Codeplug (CP) part number
or
SW Part No
or
6
7
c to select e.g.:
SW Version
Display shows e.g. :
D02.00.01
x to return to
SW Version
previous menu level:
1
Ensure radio is in IDLE STATE.
2
c to enter Menu Mode.
3
+ or e until:
4
c to select
50
CP Version
CP Part No
To access Radio Information
English
SW Version
Radio Info
8
+ or e for
further selections
following steps
6 and 7:
SW Version
or
CP Version
or
SW Part No
or
CP Part No
9
x x to exit
RADIO
menu mode , display
shows e.g.:
Chan: 05
51
English
RADIO
English
52
All Rights Reserved.
Motorola Technology Sdn. Bhd. (Company No. 455657-H).
Plot 2, Bayan Lepas Technoplex Industrial Park,
Mukim 12, S.W.D.
11900 Penang, Malaysia.
Printed in Malaysia.
MOTOROLA and the Stylized M Logo are registered in the U.S. Patent and
Trademark Office. All other product or service names are the property of their
respective owners.
© 2006 by Motorola, Inc.
All rights reserved.
6864110B99
6864110B99-B