1
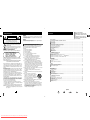
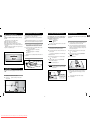
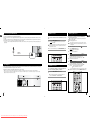
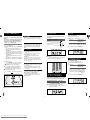
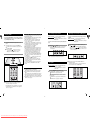
MP3 PLAYER DOCKING
MICRO COMPONENT
CD/MP3/WMA-CD/CD-R/RW
PLAYBACK
MM-X5
Instruction Manual
Downloaded From Disc-Player.com Samsung Manuals
Safety Warnings
GB
CAUTION
RISK OF ELECTRIC SHOCK.
DO NOT OPEN
CAUTION: TO REDUCE THE RISK OF ELECTRIC SHOCK,
DO NOT REMOVE COVER (OR BACK)
NO USER-SERVICEABLE PARTS INSIDE
REFER SERVICING TO QUALIFIED SERVICE PERSONNEL
This symbol indicates that dangerous voltage
consisting a risk of electric shock is present
within this unit.
This symbol indicates that there are important
operating and maintenance instructions in the
literature accompanying this unit.
Thank you for buying this
SAMSUNG micro component system.
Please take time to read these instructions.
They will allow you to operate your
system with ease and take full advantage of its features.
Contents
WARNING
• To reduce the risk of fire or electric shock, do not expose this appliance to rain or moisture.
• To prevent injury, this apparatus must be securely attached to the floor/wall in accordance
with the installation instructions.
CAUTION
• Apparatus shall not be exposed to dripping or splashing and no objects filled with liquids,
such as vases, shall be placed on the apparatus.
Important Safety Instructions
Read these operating instructions carefully before using the
unit. Follow all the safety instructions listed below. Keep
these operating instructions handy for future
reference.
1) Read these instructions.
CLASS 1 LASER PRODUCT
2) Keep these Instructions.
This Compact Disc player is classified as a CLASS 1 LASER product.
3) Heed all warnings.
CLASS 1 LASER PRODUCT
4) Follow all instructions.
KLASSE 1 LASER PRODUKT
5) Do not use this apparatus near water.
LUOKAN 1 LASER LAITE
6) Clean only with dry cloth.
KLASS 1 LASER APPARAT
7) Do not block any ventilation openings. Install in
PRODUCTO LASER CLASE 1
accordance with the manufacturer’s instructions.
Use of controls, adjustments or performance of
8) Do not install near any heat sources such as
procedures other than those specified herein may result in hazradiators, heat registers, stoves, or other apparatus
(including amplifiers) that produce heat.
ardous radiation exposure.
CAUTION : INVISIBLE LASER RADIATION WHEN OPEN AND INTER9) Do not defeat the safety purpose of the polarized or
LOCKS DEFEATED, AVOID EXPOSURE TO BEAM.
grounding-type plug. A polarized plug has two blades
with one wider than the other. A grounding type plug has
This product satisfies FCC regulations when shielded cables and
two blades and a third grounding prong. The wide blade
connectors are used to connect the unit to other equipment. To preor the third prong are provided for your safety. If the provent electromagnetic interference with electric appliances, such as
vided plug does not fit into your outlet, consult an electriradios and televisions, use shielded cables and connectors for concian for replacement of the obsolete outlet.
nections.
10) Protect the power cord from being walked on or pinched
FCC NOTE (for U.S.A):
particularly at plugs, convenience
This equipment has been tested and found to comply with the limits
receptacles, and the point where they exit from the
for a Class B digital device, pursuant to Part 15 of the FCC Rules.
apparatus.
These limits are designed to provide reasonable protection against
11)
Only use attachment/accessories specified by the manuharmful interference in a residential installation.
facturer.
This equipment generates, uses and can radiate radio frequency
energy and, if not installed and used in accordance with the instruc12) Use only with the cart, stand, tripod,
tions, may cause harmful interference to radio communications.
bracket, or table specified by the manHowever, there is no guarantee that interference will not occur in a
ufacturer, or sold with the apparatus.
particular installation.
When a cart is used, use caution when
If this equipment does cause harmful interference to radio or televimoving the cart/apparatus combination
sion reception, which can be determined by turning the equipment
to avoid injury from tip-over.
off and on, the user is encouraged to try to correct the interference
13) Unplug this apparatus during lightning storms or when
by one or more of the following measures:
unused for long periods of time.
• Reorient or relocate the receiving antenna.
14) Refer all servicing to qualified service personnel.
• Increase the separation between the equipment and receiver.
Servicing is required when the apparatus has been dam• Connect the equipment into an outlet on a circuit different from that
aged in any way, such as power-supply cord or plug is
to which the receiver is connected.
damaged, liquid has been spilled or objects have fallen
• Consult the dealer or an experienced radio/TV technician for help.
into the apparatus, the apparatus has been exposed to
Caution: FCC regulations state that any unauthorized changes or
rain or moisture, does not operate
modifications to this equipment may void the user's authornormally, or has been dropped.
ity to operate it.
SAFETY WARNINGS .......................................................................................................................................................... 2
INSTALLING YOUR MICRO COMPONENT SYSTEM
Top Panel View ..............................................................................................................................................................4
Front Panel View ............................................................................................................................................................4
Remote Control ..............................................................................................................................................................5
Rear Panel View ............................................................................................................................................................5
Where to Install Your Micro Component System............................................................................................................6
Connecting your System to the Power Supply ..............................................................................................................6
Inserting Remote Control Batteries ................................................................................................................................6
Connecting to an External Source ..................................................................................................................................7
iPod Connection..............................................................................................................................................................7
Connecting the FM Antenna ..........................................................................................................................................8
Cooling Fan ....................................................................................................................................................................8
DEMO Function ..............................................................................................................................................................9
DIMMER Function ..........................................................................................................................................................9
Setting the Clock ............................................................................................................................................................9
MP3/WMA-CD/CD-PLAYER
To play the CD/MP3/WMA-CD ......................................................................................................................................10
Selecting a Track ..........................................................................................................................................................11
Searching for a Specific Music Passage on a CD/MP3/WMA-CD ................................................................................11
Repeating One or All Tracks on the CD........................................................................................................................11
Repeating One or All Tracks on the MP3/WMA-CD Disc ............................................................................................11
USING USB
Playing USB ..................................................................................................................................................................12
To use high speed search ............................................................................................................................................13
To repeat ......................................................................................................................................................................13
Selecting a Track from a USB Device ..........................................................................................................................13
TUNER
Searching for and Storing Radio Stations ....................................................................................................................14
Selecting a Stored(preset) Station ................................................................................................................................14
Improving Radio Reception ..........................................................................................................................................14
OTHER FUNCTIONS
Timer Function ..............................................................................................................................................................15
Cancelling the Timer......................................................................................................................................................15
EQ Function ..................................................................................................................................................................16
DNSe Function ............................................................................................................................................................16
ECO Mode Function ....................................................................................................................................................16
MUTE Function..............................................................................................................................................................17
Setting the System to Switch off Automatically ............................................................................................................17
Connecting Headphones ..............................................................................................................................................17
RECOMMENDATIONS FOR USE
Safety Precautions ........................................................................................................................................................18
Cleaning Your Micro Component System ....................................................................................................................18
Precautions When Using Compact Discs......................................................................................................................19
Troubleshooting ............................................................................................................................................................19
Technical Specifications ................................................................................................................................................20
Supported USB Devices....................................................................................................................................................21
Warranty ........................................................................................................................................................................22
Symbols
2
Downloaded From Disc-Player.com Samsung Manuals
Press
Push
Important
Note
3
GB
TOP Panel View
Remote Control
GB
GB
11
1
2
AUX/APPLE button
TUNER button
CD button
USB button
10
3
4
8
5
7
DEMO/DIMMER
POWER button
9
EJECT button
DEMO/DIMMER button
Number(0~9) buttons
MO/ST button
6
1. HEADPHONE JACK CONNECTOR
6. SLEEP
2. USB
7.
3. iPod JACK
8. EQ
4. SEARCH FUNCTION /VOLUME CONTROL
9.
BUTTONS
PLAY OR STOP BUTTON
TUNER MEMORY
TUNER MEMORY/SET button
DNSe button
Skip button
EJECT
REPEAT
SET
DNSe
EQ
REPEAT button
EQ button
Play/Pause button
DNSe
Stop button
SEARCH buttons
10. FUNCTION
11. AUX IN
5. STANDBY/ON/ECO
VOLUME button
TUNING button
FRONT Panel View
MUTE button
TIMER ON/OFF button
SLEEP button
TIMER/CLOCK button
1
2
3
Rear Panel View
3. BUILT IN SPEAKERS
1. CD DOOR
2. WINDOW DISPLAY
Accessories
Remote Control
(AH59-01787J)
FM Antenna
(AH42-00017A)
iPod cradle
(AH63-01529A,AH63-01530A,AH6301531A,AH63-01532A,AH63-01539A)
User Manual
(AH68-01952M)
iPod cradle’s feature
AH63-01529A
AH63-01530A
AH63-01531A
1-Generation NANO
2-Generation NANO
AH63-01532A
5-Generation:iPod 30G,60G
5-Generation:iPod 60G,80G
AH63-01539A
iPhone
4
Downloaded From Disc-Player.com Samsung Manuals
FM Antenna Connector Terminal
5
Where to Install Your
Micro Component System
GB
To take full advantage of your new micro component system,
follow these installation instructions before connecting
the unit.
Install the system on a flat, stable surface.
Never place this unit on carpeting.
Never place this unit in an outdoor area.
For ventilation purposes,maintain an open space of
approximately 6 inches (15 cm) on the sides and rear of
the system.
Make sure that you have enough room to open the compact disc compartment easily.
Inserting Remote Control Batteries
Insert or replace remote control batteries when you:
Purchase the micro component system
Find that the remote control is no longer operating correctly
When replacing the batteries, use a new set of batteries and never mix alkaline and manganese batteries.
1
2
3
GB
The auxiliary input can be used to take advantage of
the sound quality of your micro component system
when listening to other sources.
Examples: A television
A DVD player
A VCR
To connect to the external source, the source must
have an audio output.
Place your thumb on the position marked
on the
battery compartment cover (rear of the remote control) and pull the cover in the direction of the arrow.
Insert two AAA, LR03 or equivalent batteries, taking
care to respect the polarities:
+ on the battery against + in the battery
compartment
– on the battery against – in the battery
compartment
Replace the cover by sliding it back until it clicks into
position.
Connecting your System to the
Power Supply
1
Set the system to standby mode and disconnect it
and the external source from the AC outlet.
2
Connect the audio cable to the rear of the micro component system.
For optimum sound quality, do not invert the right
and left channels.
3
Plug the system back into the AC outlet and press
(
) to switch it on.
4
Select the AUX source by pressing FUNCTION.
Result: AUX is displayed.
5
Switch the external source on.
Plug the power cord into an AC outlet.
2
Press the (
) button to switch your micro component system on.
6
Downloaded From Disc-Player.com Samsung Manuals
You can listen to the audio from an iPod through the
main unit.
1
Set the system to standby mode and disconnect it
and the external source from the AC outlet.
2
Choose the appropriate iPod adapter and place into
the micro component system.Place the iPod into the
adapter and connect the iPod player to the top of the
micro component system.
3
Plug the system back into the AC outlet and press
(
) to switch it on.
4
Select the iPod source by pressing FUNCTION.
Result: Apple is displayed.
5
Switch the iPod on.
Example: You can watch a film on your DVD Player
and take advantage of stereo sound this
unit provides.
When the unit is powered on and you connect an
iPod MP3 player, the unit will charge your iPod's
battery.
The power cord must be plugged into an 120V AC wall
outlet.
1
iPod Connection
Connecting to an External Source
Audio Cable
If the external analog
component has only
one Audio Out, connect
either left or right.
iPod is registered trade mark of Apple
Computer,Inc.
7
Connecting the FM Antenna
GB
DEMO Function
Setting the Clock
How to connect a COAXIAL TYPE antenna.
Connect a 75Ω antenna to the FM antenna terminal.
Plug the connector on the supplied FM antenna supplied into the coaxial socket (75Ω) marked FM on the rear of the
system.
Follow the instructions given on Page 14 to tune into a radio station, and determine the best position for the antenna.
If reception is poor, you may need to install an outdoor antenna.
To do so, connect an outdoor FM antenna to the FM socket on the rear of the system using a 75Ω coaxial cable (not
supplied).
You can view various functions available on your system.
1
Press the DEMO/DIMMER button.
Result: The available functions are listed in turn on
the display.
All these functions are described in detail in this booklet. For instructions on how to use them, refer to the
appropriate sections.
2
To cancel this function, press DEMO/DIMMER again.
Your system is equipped with a clock which allows
you to turn your system on and off automatically.
You should set the clock:
When you first purchase the micro component system
After a power failure
After unplugging the unit
For each step, you have a few seconds to set the
required options. If you exceed this time, you must
start again.
1
2
Switch the system on by pressing (
3
Press SET.
Result: The hour flashes.
4
To...
).
Press TIMER/CLOCK twice.
Result: CLOCK is displayed.
Press...
Increase the hours
Decrease the hours
DEMO/DIMMER
5
When the correct hour is displayed, press SET.
Result: The minutes flash.
6
To...
Press...
Increase the minutes
Decrease the minutes
Cooling Fan
7
DIMMER Function
The cooling fan dissipates the heat generated inside the unit so that the unit can be operated normally. The cooling fan
is activated automatically to supply cool air to the unit.
Please observe the following cautions for your safety.
• Make sure the unit is well-ventilated. If the unit has poor ventilation, the temperature inside the unit could rise and may damage it.
• Do not obstruct the cooling fan or ventilation holes. (If the cooling fan or ventilation holes are covered with a newspaper or cloth, heat may
build up inside the unit and fire may result.)
You can adjust the brightness of the display depending on the surrounding lighting conditions.
1
When the correct time is displayed, press SET.
Result: "TIMER" appears in the display.
The current time is now set.
You can display the time, even when you are using
another function, by pressing TIMER/CLOCK once.
DEMO/DIMMER
Press the DEMO/DIMMER button twice.
Your selection switches each time the button is
pressed: DIMMER ➞ DIMMER OFF.
1
TUNER MEMORY
REPEAT
SET
3,5,7
2 DNSe
EQ
DEMO/DIMMER
4,6
4,6
2
8
Downloaded From Disc-Player.com Samsung Manuals
9
GB
Repeating One or All Tracks
on the CD
Selecting a Track
To play the CD/MP3/WMA-CD
GB
GB
What is WMA?
You can play 5 or 3 1/2 Inch compact discs without an
adapter.
WMA means Windows Media Audio, the global
standard for audio signal compression technology.
This unit has been designed to playback the following
CDs: Audio CD, CD-R, CD-RW and MP3/WMA-CD.
What is MP3?
1
2
MP3 means MPEG1 Layer 3, the global standard for
audio signal compression technology. It uses digital
compression technology to compress original sound
data by up to 12 times without sound quality degradation.
3
The unit will playback files created in MP3
format (Mpeg1.Layer3) with *.mp3 as their
extension.
Depending on the recording mode,some
MP3/WMA-CDs may not play.
Playback will be impossible for MP2 or
22KHz files.
ID3*tags can be shown on the display in English.
*An MP3 file can contain file information called
“ID3 Tag ” where its album name, performer, rack
title, etc. are recorded.
once
Current track
once
Previous track
twice
Track of your choice
or
the
appropriate
number of
times.
To pause playback temporarily, press √» button.
Press (√») again to continue playing the disc.
If the unit is paused for more than 3 minutes,it will
automatically change for STOP.
Press the STOP ( ) button when you have finished.
2
To cancel this function, press REPEAT again.
REPEAT
SET
1,2
DNSe
You also can use the number buttons to select
the track.
Press the number buttons to choose the track that
you want and then press SET button.
.
EQ
Repeating One or All Tracks
on the MP3/WMA-CD Disc
You can repeat indefinitely:
A specific track on a MP3/WMA-CD disc.
All tracks on the MP3/WMA-CD disc selected.
1
TUNER MEMORY
EQ
Searching for a Specific Music
Passage on a CD/MP3/WMA-CD
When listening to a CD/MP3/WMA-CD, you can quickly
search for a specific music passage within a track.
To repeat...
Press Repeat on the
remote control one or
more times until...
The current track indefinitely RPT ONE is displayed
All tracks
RPT ALL is displayed
The folder
RPT DIR is displayed
Play the tracks in random order
RPT RDM is
displayed
REPEAT
SET
SET
Regarding the playback of CD-R/RW
If you have not recorded or edited a CDR(Recordable) or CD-RW(Rewritable)
properly,the disc may not play in this unit.
The unit will take longer to read a CD-RW
than a regular CD.
Press Repeat on the
remote control one or
more times until...
The current track indefinitely REP ONE is displayed
All tracks
REPEAT ALL is displayed
EQ
DNSe
5
To repeat...
TUNER MEMORY
DNSe
How many MP3 files can be stored on a CD-R or CD-RW disc
The maximum capacity of one CD-R or CD-RW
disc is 740MB.
Normally, an MP3 file has a capacity of 4MB,
therefore approximately 180 files can be stored
on a single disc.
1
SET
Adjust the volume.
Press the VOLUME + or – button of the main unit.
The volume level can be adjusted as follows
:VOL MIN,VOL 1- VOL 29,and VOL MAX.
4
File Compatibility
You can repeat indefinitely:
A specific track on a compact disc.
All tracks on the compact disc selected.
To start playback at the beginning of the... Press...
Next track
Continued use of irregular shape CDs (heart-shape,
octagonal, etc.) can damage the unit.
Load your disc in the compartment, with the label on
the disc facing upwards.
Select the MP3/CD function by pressing FUNCTION
button.
Your CD Player will take a few minutes to scan
through all the tracks recorded on a particular
MP3/WMA-CD
The English name of the song may be indicated on
the display only if directly downloaded from a PC or
if the purchased MP3/WMA-CD is sorted according
to titles(directory).
(Other languages besides English may not be indicated.)
The English name of the track may not be indicated
depending on the characteristics of the MP3/WMACD.
You can select the track you wish to listen to when a
disc is playing.
2
To cancel this function, press REPEAT again.
TUNER MEMORY
REPEAT
SET
4
3
To search through the tracks...
2
5
When you press the EJECT button ,more than 1
minute later,the Disc will automatically load.
10
Downloaded From Disc-Player.com Samsung Manuals
Press down...
1,2
DNSe
EQ
Forwards
Backwards
During Playback,you can select the playback speed
for 2X,4X,8X and 32X times normal speed.
It is recommended that you turn the volume down
before using this function.
11
Please be aware of the following before using USB.
Playing USB
GB
You can play MP3/WMA files by connecting to various
external USB storage devices such as USB flash memory or HDD(Hard Disc drives).
1
Connect the external USB storage device to your
player.
2
Select USB function by pressing the USB button.
The first track of the first directory plays automatically.
To stop playing
Press the Stop ( ) button to stop playing.
Press the Stop ( ) button once to stop,
and press the button twice to remove.
1
Some external USB storage device may not be compatible with this player.
With external HDD, FAT format can be played,
however,the NTFS format can not.
With USB 2.0 HDD, connect to a separate power
source. If it’s not connected to a separate power
source, it may not work.
If memory of an external USB storage device is
segmented into several parts, MP3 files of only
the first hard disk drive can be played.
Up to four directories can be played.
DRM applied files are not played.
Digital Rights Management: Technology and service
that protect the profit and rights of copyright owners
by disallowing unauthorized use of digital contents.
Even if the file name ends with .mp3, the file does
not play if actual file format is MPEG layer 1 or 2.
Disconnect the external USB storage device
only in safe removal mode(“USB REMOVE” display ON/OFF). Otherwise, the internal file may
be damaged.
Press the Stop ( ) button more than 2 times
to get into the safe removal mode.
If you want to play files in the safe removal
mode, disconnect and reconnect the external
USB storage device.
Do not use a USB hub as it will not be recognized.
Up to 20 letters of MP3/WMA file name will be
shown.
2
DEMO/DIMMER
TUNER MEMORY
REPEAT
SET
DNSe
EQ
To use high speed search
GB
Before you begin!
Press the
,
button.
Whenever you press the button, you can search
backward or forward 2X,4X,8X and 32X times
normal speed.
You can select an MP3 file during the play or when it
stopped.
Before you begin!
Connect the external USB storage
device to your player.
Select the USB function by using the
USB button.
If you want to move the next/previous(track), press
the
,
button .
It moves the next/previous file within the directory.
If you press the
,
button more times than the
number of the files in the directory, it will move over
to the next directory.
DNSe
During fast playback,sound is heard only at 2X
speed,and not at 4X,8X,and 32X speeds.
EQ
You also can use the number buttons to
select the track.
To repeat
Press the number buttons to choose the track that
you want and then press the SET button.
Delay
Do not connect a USB charging device to the
USB connection port on the player, because it
may cause damage to the product.
Connect the external USB storage
device to your player.
Select the USB function by using the
USB button.
You can search the desired section quickly during the
play
Before you begin!
When selecting the USB function,file reading
(READ-IN) may take several minutes.
When playing a USB device,there may be a delay
when advancing to the next track,especially with
HDD.
The operation time of external USB storage devices
will vary;even when they are of the same capacity.
If the external USB storage device supports only
USB VER1.1 and the access speed is slow,the
file may not property.
Selecting a Track from a USB Device
Connect the external USB storage
device to your player.
Select USB function by using the
USB button.
Press the REPEAT button during the play.
REPEAT ONE : repeat play one track only.
REPEAT DIR : repeat play the folder.
REPEAT RANDOM : play the tracks in random
order.(A track that has already been played may be
played again.)
REPEAT ALL : repeat play the entire directories.
REPEAT OFF : repeat play is turned off.
TUNER MEMORY
TUNER MEMORY
REPEAT
SET
SET
DNSe
EQ
REPEAT
SET
DNSe
EQ
The USB function of this product does not support
all USB devices.For information on the supported
devices,see page 21.
12
Downloaded From Disc-Player.com Samsung Manuals
13
Searching for and Storing Radio Stations
GB
2
1
2
Switch the system on by pressing (
2,3
The timer enables you to switch the system on or off
at specific times.
2
).
Example: You wish to wake up to music every morning.
DEMO/DIMMER
To listen to the Radio.
TUNER MEMORY
SET
SET
a Press the TUNER button.
b. Tune in to the desired station.
Automatic Tuning 1: When the
or
button is pressed,stations you have preset are
selected.
Automatic Tuning 2: Press and hold the
or
button to automatically search for active broadcasting stations.
Manual Tuning:Briefly press the
or
button to increase or decrease the frequency incrementally.
Main Unit
a Press the Function button to select the TUNER.
b Select a broadcast station.
Automatic Tuning 1: Press the STOP( ( ) button to select<PRESET> and then press the
or
button to select a station you’ve preset.
Automatic Tuning 2: Press the STOP( ( ) button to select<MANUAL> and then press and hold the
or
button to automatically search the
station.
Manual Tuning : Press the STOP( ( ) button
to select<MANUAL> and then briefly press the
or
button to tune in to a lower or higher frequency.
DNSe
If you no longer want the system to be switched on or
off
automatically, you must cancel the timer.
EQ
2,3
8
Press SET to confirm the timer.
9
Press (
Result:
) to set the system to standby mode.
is displayed to the left of the time, indicating that the timer has been set. The system
will switch on and off automatically at the
required times.
If the timer switch on and off times are identical,
the word ERROR is displayed.
Before setting the timer, check that the current time
is correct.
For each step, you have a few seconds to set the
desired option. If you exceed the time, you must
start again.
2,3
DEMO/DIMMER
1,9
Selecting a Stored (preset)Station
You can listen to a stored radio station as follows:
1
2
Switch the system on by pressing (
3
Select the radio station as follows.
To listen to ...
Press ...
).
1
2
3
Press the TUNER button on the remote control.
Stored station
or
button to select the
4
desired preset section.
2
To store(Preset) stations in Memory.
a Press the TUNER button.
or
buttons on the top panel or
b Pressing
or
buttons on the remote control to
increase or decrease the frequency respectively.
To scroll through the frequencies faster when
searching manually, hold down the
or
buttons.
The automatic search procedure may stop on
a frequency that does not correspond to a
radio station. If this happens, use the manual
search mode.
c Press TUNER MEMORY.
Result: The current station NO is displayed for a
few seconds.
d Pressing
or
buttons on the remote control to assign a program
number .
e Press TUNER MEMORY to store the radio station.
Result: The current station NO is no longer displayed and the station is stored.
f To store any other radio frequencies required,
repeat Steps b to e.
The SET function can be used to assign a new station to an existing program number.
REPEAT
3
Remote Control
3
Timer Function
1
You can store up to:
30 FM stations
DEMO/DIMMER
1
Switch the system on by pressing (
).
Press TIMER/CLOCK until TIMER is displayed.
TUNER MEMORY
REPEAT
SET
Press SET.
Result: ON TIME is displayed (instead of the equalizer symbols) for a few seconds, followed by
any switch-on time already set; you can set
the timer switch-on time.
3,4,5,6,7,8
DNSe
Set the timer switch-on time.
a Set the hour by pressing or
button.
b Press SET.
Result: The minutes flash.
c Set the minutes by pressing or
button.
d Press SET.
Result: OFF TIME is displayed (instead of the
equalizer symbols) for a few seconds, followed by any switch-off time already set;
you can now set the timer switch-off time.
EQ
4,5,6,7
4,5,6,7
2
SET
DNSe
EQ
3
5
3
Improving Radio Reception
You can improve the quality of radio reception by:
Rotating the FM antenna
If reception from a specific FM radio station is poor,
press MONO/ST.
to switch from stereo mode to mono. The quality of
the sound will be improved.
14
Downloaded From Disc-Player.com Samsung Manuals
Set the timer switch-off time.
a Set the hour by pressing or
button.
b Press SET.
Result: The minutes flash.
c Set the minutes by pressing or
button.
d Press SET.
Result: VOL XX is displayed, where XX corresponds to the volume already set.
6
Press or
button to adjust the volume level and
press SET.
Result: The source to be selected is displayed.
7
Press or
button to select the source to be
played when the system switches on.
If you select...
You must also...
TUNER (radio)
a Press SET.
b Select a preset station by
pressing
TUNER MEMORY
SET
REPEAT
MP3/CD (compact disc)
USB
or
Cancelling the Timer
After having set the timer, it will start automatically as
shown by the TIMER indication on the display. If you
no longer wish to use the timer, you must cancel it.
You can stop the timer at any time (system on or in
standby mode).
To...
Press TIMER ON/OFF...
Cancel the timer
Once.
Result:
is no longer displayed.
Restart the timer
Twice.
Result:
is displayed again.
ON/OFF
.
Load a compact disc.
connect usb.
15
GB
EQ Function
GB
Your micro component system is equipped with a preset equalizer that allows you to choose the most
appropriate
balance between treble and bass frequencies, according to the type of music you are listening to.
Press EQ button until the required option is selected.
Result: Press the button repeatedly to select “
PASS➞POPS➞ JAZZ ➞CLASSIC ➞ ROCK ”.
ECO Mode Function
Connecting Headphones
MUTE Function
You can save power consumption while the unit is
turned off(on standby)
To activate the ECO mode,Press the
STANDBY/ON/ECO button while the unit is turned
off(on standby).
When ECO is activated,the DEMO mode will not
work.
You can turn the sound off temporarily on your system.
Example: You wish to answer a telephone call.
1
Press MUTE (
2
To switch the sound back on (at the same volume as
before), press MUTE again or the VOLUME buttons.
).
You can connect a set of headphones to your micro
component system so that you can listen to music
without disturbing other people in the room. The headphones must have a 3.5ø plug or an appropriate
adapter.
Connect the headphones to the PHONES jack on the top
panel.
Result: The loudspeakers are no longer used to output the
sound.
Prolonged use of headphones at a high volume may
damage your hearing.
Setting the System to Switch off
Automatically
DNSe Function
Your compact system is equipped with the DNSe
function.
use this function you can select an appropriate
sound effect for music.
Press DNSe button until the required option is selected.
Result: Press the button repeatedly to select “
PASS➞STUDIO➞ STAGE➞CONCERT ”.
While listening to a compact disc , you can set the
system to switch off automatically
Example: You wish to go to sleep to music.
1
90
2
60 MIN
15 MIN
45 MIN
30 MIN
At any time, you can:
Check the remaining time by pressing SLEEP.
Change the remaining time by repeating Steps
1 and 2.
3
Downloaded From Disc-Player.com Samsung Manuals
MIN
Press SLEEP one or more times to indicate how long
the system should continue playing before it switches
off:
90 MIN
OFF
What is DNSe?
Digital Natural Sound Engine(DNSe) is a sound effect
function developed by Samsung.It provides various sound
settings to enhance the type of music you’re listening to.
16
Press SLEEP button until the option is selected .
Result: The following indications are displayed:
To cancel SLEEP function, press SLEEP more times
until OFF is display.
17
GB
Cleaning Your Micro Component
System
Safety Precautions
GB
The following diagrams illustrate the precautions to be
taken when using or moving your micro component
system.
To obtain the best possible results from your micro
component system, you must clean the following elements regularly:
The outer casing
The compact disc player
Always unplug the system from the wall outlet:
Before cleaning it
If you are not going to be using it for a long
time
Ambient operating conditions:
Ambient temperature 41°F-95°F
Humidity 10-75%
Do not expose the unit to direct
sunlight or other heat sources.
This could lead to overheating
and malfunction of the unit.
Outer Casing
Clean the outer casing regularly using a soft cloth and a
light detergent. Do not use abrasive powders, liquids or
aerosol cleaners. Never let any liquids get into the system.
Compact Disc Player
Do not place potted plants or vases
on top of the unit. Moisture entering
the unit could lead to dangerous
electric shock and can cause equipment damage. In such events immediately disconnect the main plug
from the outlet.
During thunderstorms, disconnect the main plug from
the outlet voltage peaks
due to lightning could damage the unit.
VOLUME
UP
1
Before playing a compact disc, clean it with a special
CD cleaning agent. Do not use the same cleaning
agents as for vinyl LP records.
Carefully wipe the disc from the center outward.
2
Regularly clean the player with a special cleaning disc
(available from your local dealer).
If you will not be using the remote control for a long
time, remove the batteries to prevent corrosion.
Do not be use this system in an excessively dusty
environment or subject it to shock or extreme
heat(close to heating appliances or in direct sunlight
ect).
If the unit emits an unpleasant odor when in use,
unplug it from the power supply and contact a
Samsung authorized service center.
DOWN
Remove the batteries from the
remote control, if not used for any
extended period.Leaking batteries
can cause serious damage to the
remote control.
When using headphones, take care
not to listen at excessive volumes.
Extended use of headphones at
high volumes may lead to hearing
damage.
Do not place heavy items on the
power cord.If the power cord is
damaged it may lead to equipment damage(fire hazard) and
may cause an electric shock.
Do not remove any equipment
panels. The inside of the unit
contains live components, which
cause electric shock.
18
Downloaded From Disc-Player.com Samsung Manuals
Precautions When Using Compact
Discs
Handle your compact discs with care. Always hold them
by the edges to avoid leaving fingerprints on the shiny
surface.
When you have finished playing a compact disc, always
put it back in its case.
Do not fix paper or adhesive tape to the discs and do
not write on the label.
Clean them with a special-purpose cloth.
Store your compact discs in a clean place, out of direct
sunlight, where they will not be exposed to high temperatures.
Always use compact discs marked
.
Troubleshooting
It always takes a little time to become familiar with a
new player.
If you have any of the problems listed below, try the
solutions given. They may save you the time and
inconvenience of an unnecessary service call.
Problem
The system does not
work
COMPACT
DIGITAL AUDIO
G
E
N There is no sound
E
R
A
L
Checks/Explanation
• The power cord is not correctly
plugged into a wall socket or the
wall socket is not switched on.
• The remote control batteries need
replacing or the polarity is incorrect..
• The
button has not been
pressed.
• The volume has been completely
turned down.
• The correct function (TUNER,
MP3/WMA-CD/CD, AUX) has not
been selected.
• You have connected a set of earphones.
• The MUTE button has bee
pressed.
The Timer does not work • The timer has been stopped by
pressing TIMER ON/OFF.
The unit does not work,
even after following the
Troubleshooting steps
above.
• Press the STOP ( )button for 5
seconds to reset the unit.
• Press the STOP ( )button for 5
seconds with No disc in the unit to
reset the unit.
• The CD function has not been
selected.
• The disc has been inserted face
The compact disc player down or is either dirty or scratched.
C does not start playing
• The laser sensor is dirty or dusty.
D
• The system has not been installed
on a flat, horizontal surface.
• Condensation has formed in the
player; leave the system in a
warm, airy room for at least one
hour.
Reception is poor or no
radio stations are
R
received at all
A
D
I
O
• The TUNER function has not been
selected.
• The radio frequency has not been
correctly selected.
• The antenna has been disconnected or is not facing the right way.
Turn it until you find the best orientation.
• You are in a building that blocks
radio waves; you must use an outside antennal.
If the above guidelines do not allow you to solve the problem,
take a note of:
The model and serial numbers, normally printed on the rear
of the system
Your warranty details
A clear description of the problem
Then contact your local dealer or SAMSUNG authorized service.
19
GB
Technical Specifications
Supported USB Devices
GB
GB
SAMSUNG strives to improve its products at all times. Both the design specifications and these user instructions
are thus subject to change without notice.
Digital Camera
RADIO
FM
Product
Signal/noise ratio
55 dB
Usable sensitivity
10 dB
Total harmonic distortion
0.8 %
COMPACT DISC PLAYER
Frequency range
20 Hz - 20 KHz (± 1 dB)
Signal/noise ratio
70 dB (at 1 KHz) with filter
Distortion
0.2 % (at 1 KHz)
Channel separation
45 dB
Disc sizes
Diameter: 5 or 3 1/2 inches. Thickness: 0.05 inches
AMPLIFIER
Output power(4 Ω)
10 W/CH (total harmonic distortion : 10%)
Channel separation
45 dB
Signal/noise ratio
72 dB
GENERAL
Power Requirements
Power Consumption
AC 120V ~ 60Hz
30W
Weight
7.93 lbs
Dimensions
15.9 (W) x 7.0(H) x 5.8(D) inches
20
Downloaded From Disc-Player.com Samsung Manuals
Finepix-F810
Finepix-F610
Finepix-f450
Finepix S7000
Finepix A310
KD-310Z
Finecam SL300R
Finecam SL400R
Finecam S5R
Finecam Xt
Dimage-Z1
Dimage Z1
Dimage X21
Coolpix4200
Coolpix4300
Coolpix 2200
Coolpix 3500
Coolpix 3700
Coolpix 4100
Coolpix 5200
Stylus 410 digital
300-digital
U300
X-350
C-760
C-5060
X1
U-mini
Lumix-FZ20
DMC-FX7GD
Lumix LC33
LUMIX DMC-F1
Optio-S40
Optio-S50
Optio 33LF
Optio MX
Digimax-420
Digimax-400
Sora PDR-T30
Coolpix 5900
Coolpix S1
Coolpix 7600
DMC-FX7
Dimage Xt
AZ-1
USB Flash Disk
Company
Type
Fuji
Fuji
Fuji
Fuji
Fuji
Konica
Kyocera
Kyocera
Kyocera
Kyocera
Minolta
Minolta
Minolta
Nikon
Nikon
Nikon
Nikon
Nikon
Nikon
Nikon
Olympus
Olympus
Olympus
Olympus
Olympus
Olympus
Olympus
Olympus
Panasonic
Panasonic
Panasonic
Panasonic
Pentax
Pentax
Pentax
Pentax
Samsung
Samsung
Toshiba
Nikon
Nikon
Nikon
Panasonic
Minolta
Olympus
Digital Camera
Digital Camera
Digital Camera
Digital Camera
Digital Camera
Digital Camera
Digital Camera
Digital Camera
Digital Camera
Digital Camera
Digital Camera
Digital Camera
Digital Camera
Digital Camera
Digital Camera
Digital Camera
Digital Camera
Digital Camera
Digital Camera
Digital Camera
Digital Camera
Digital Camera
Digital Camera
Digital Camera
Digital Camera
Digital Camera
Digital Camera
Digital Camera
Digital Camera
Digital Camera
Digital Camera
Digital Camera
Digital Camera
Digital Camera
Digital Camera
Digital Camera
Digital Camera
Digital Camera
Digital Camera
Digital Camera
Digital Camera
Digital Camera
Digital Camera
Digital Camera
Digital Camera
Product
Cruzer Micro
Cruzer Mini
Cruzer Mini
SONY Micro Vault
FLEX DRIVE
AnyDrive
XTICK
Micro Mini
iFlash
LG
RiDATA
Company
Type
Sandisk
Sandisk
Sandisk
Sony
Serotech
A.L tech
LG
Iomega
Imation
XTICK(M)
EZDrive
USB 2.0 USB Flash Drive 128M
USB 2.0 128M
USB 2.0 256M
USB 2.0 64MB
USB 2.0 32MB
USB 2.0 128MB
USB 2.0 128M
USB 2.0 128M
USB 2.0 64M
USB 2.0 64M
USB 2.0 64M
MP3 Player
Product
Company
Type
Creative MuVo NX128M
Iriver H320
YH-920
YP-T7
YP-MT6
YP-T6
YP-53
YP-ST5
YP-T5
YP-60
YP-780
YP-35
YP-55
iAUDIO U2
iAUDIO G3
iAudio M3
SI-M500L
H10
YP-T5 VB
YP-53
Creative
Iriver
Samsung
Samsung
Samsung
Samsung
Samsung
Samsung
Samsung
Samsung
Samsung
Samsung
Samsung
Cowon
Cowon
Cowon
Sharp
Iriver
Samsung
Samsung
128 MB MP3 Player
20G HDD MP3 Player
20G HDD MP3 Player
MP3 Player
MP3 Player
MP3 Player
MP3 Player
MP3 Player
MP3 Player
MP3 Player
MP3 Player
MP3 Player
MP3 Player
MP3 Player
MP3 Player
HDD MP3 Player
256MB MP3 Player
MP3 Player
MP3 Player
256MB MP3 Player
USB External HDD
Product
MOMOBAY UX-2
Company
Type
Dvico
USB 2.0
21
Contact SAMSUNG WORLD WIDE
Warranty
If
you have any questions or comments relating to Samsung products,
please contact the SAMSUNG customer care center.
LIMITED WARRANTY TO ORIGINAL PURCHASER
This SAMSUNG brand product, as supplied and distributed by Samsung Electronics America, Inc. (SAMSUNG) and delivered new, in the original
carton to the original consumer purchaser, is warranted by SAMSUNG against manufacturing defects in materials and workmanship for a limited
warranty period of:
One (1) Year Parts and Labor*
(*90 Days Parts and Labor for Commercial Use)
This limited warranty begins on the original date of purchase, and is valid only on products purchased and used in the United States. To receive
warranty service, the purchaser must contact SAMSUNG for problem determination and service procedures. Warranty service can only be
performed by a SAMSUNG authorized service center. The original dated bill of sale must be presented upon request as proof of purchase to
SAMSUNG or SAMSUNG's authorized service center. Transportation of the product to and from the service center is the responsibility of the
purchaser.
SAMSUNG will repair or replace this product, at our option and at no charge as stipulated herein, with new or reconditioned parts or products if
found to be defective during the limited warranty period specified above. All replaced parts and products become the property of SAMSUNG and
must be returned to SAMSUNG. Replacement parts and products assume the remaining original warranty, or ninety (90) days, whichever is
longer.
SAMSUNG’s obligations with respect to software products distributed by SAMSUNG under the SAMSUNG brand name are set forth in the
applicable end user license agreement. Non-SAMSUNG hardware and software products, if provided, are on an “AS IS” basis. Non-SAMSUNG
manufacturers, suppliers, publishers, and service providers may provide their own warranties.
This limited warranty covers manufacturing defects in materials and workmanship encountered in normal, and except to the extent otherwise
expressly provided for in this statement, noncommercial use of this product, and shall not apply to the following, including, but not limited to:
damage which occurs in shipment; delivery and installation; applications and uses for which this product was not intended; altered product or
serial numbers; cosmetic damage or exterior finish; accidents, abuse, neglect, fire, water, lightning or other acts of nature; use of products,
equipment, systems, utilities, services, parts, supplies, accessories, applications, installations, repairs, external wiring or connectors not supplied
and authorized by SAMSUNG, or which damage this product or result in service problems; incorrect electrical line voltage, fluctuations and
surges; customer adjustments and failure to follow operating instructions, cleaning, maintenance and environmental instructions that are covered
and prescribed in the instruction book; product removal or reinstallation; reception problems and distortion related to noise, echo, interference or
other signal transmission and delivery problems. SAMSUNG does not warrant uninterrupted or error-free operation of the product.
THERE ARE NO EXPRESS WARRANTIES OTHER THAN THOSE LISTED AND DESCRIBED ABOVE, AND NO WARRANTIES WHETHER
EXPRESS OR IMPLIED, INCLUDING, BUT NOT LIMITED TO, ANY IMPLIED WARRANTIES OF MERCHANTABILITY OR FITNESS FOR A
PARTICULAR PURPOSE, SHALL APPLY AFTER THE EXPRESS WARRANTY PERIODS STATED ABOVE, AND NO OTHER EXPRESS
WARRANTY OR GUARANTY GIVEN BY ANY PERSON, FIRM OR CORPORATION WITH RESPECT TO THIS PRODUCT SHALL BE BINDING ON SAMSUNG. SAMSUNG SHALL NOT BE LIABLE FOR LOSS OF REVENUE OR PROFITS, FAILURE TO REALIZE SAVINGS OR
OTHER BENEFITS, OR ANY OTHER SPECIAL, INCIDENTAL OR CONSEQUENTIAL DAMAGES CAUSED BY THE USE, MISUSE OR
INABILITY TO USE THIS PRODUCT, REGARDLESS OF THE LEGAL THEORY ON WHICH THE CLAIM IS BASED, AND EVEN IF SAMSUNG
HAS BEEN ADVISED OF THE POSSIBILITY OF SUCH DAMAGES. NOR SHALL RECOVERY OF ANY KIND AGAINST SAMSUNG BE
GREATER IN AMOUNT THAN THE PURCHASE PRICE OF THE PRODUCT SOLD BY SAMSUNG AND CAUSING THE ALLEGED DAMAGE.
WITHOUT LIMITING THE FOREGOING, PURCHASER ASSUMES ALL RISK AND LIABILITY FOR LOSS, DAMAGE OR INJURY TO PURCHASER AND PURCHASER’S PROPERTY AND TO OTHERS AND THEIR PROPERTY ARISING OUT OF THE USE, MISUSE OR INABILITY
TO USE THIS PRODUCT SOLD BY SAMSUNG NOT CAUSED DIRECTLY BY THE NEGLIGENCE OF SAMSUNG. THIS LIMITED WARRANTY SHALL NOT EXTEND TO ANYONE OTHER THAN THE ORIGINAL PURCHASER OF THIS PRODUCT, IS NONTRANSFERABLE AND
STATES YOUR EXCLUSIVE REMEDY.
Some states do not allow limitations on how long an implied warranty lasts, or the exclusion or limitation of incidental or consequential damages,
so the above limitations or exclusions may not apply to you. This warranty gives you specific legal rights, and you may also have other rights
which vary from state to state.
To obtain warranty hardware service, please contact SAMSUNG at:
Samsung Electronics America, Inc.
105 Challenger Road Ridgefield Park, NJ 07660-0511
1-800-SAMSUNG (726-7864) and www.samsung.com
22
Downloaded From Disc-Player.com Samsung Manuals
23
THIS APPLIANCE IS MANUFACTURED BY:
If you have any questions or comments relating to Samsung products,
please contact the SAMSUNG customer care center.
Samsung Electronics America, Inc.
1-800-SAMSUNG (7267864)
www.samsung.com
Downloaded From Disc-Player.com Samsung Manuals