1
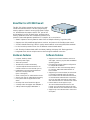
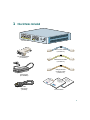
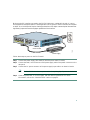
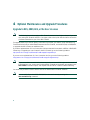
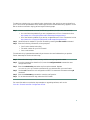
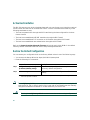
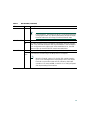
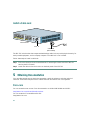
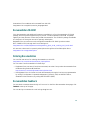
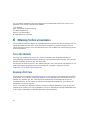
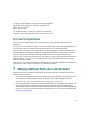
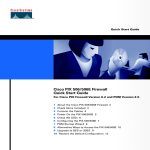
Quick Start Guide
Cisco PIX 501 Firewall
1
Check Items Included
2
Installing the PIX 501
3
Configuring the PIX 501
4
Optional Maintenance and Upgrade Procedures
The PIX 501 delivers enterprise-class security for small
CISCO PI
X 501
offices and telecommuters in a reliable, plug-and-play
security appliance. Ideal for securing high-speed “always
on” broadband environments, the PIX 501, part of the
world-leading Cisco PIX Firewall Series, provides robust
security capabilities, small office networking features, and
powerful remote management capabilities in a compact, all-in-one solution:
FIRE
WAL
L
POWER
VPN TUN
NEL
LINK/ACT
1
2
3
4
61271
About the Cisco PIX 501 Firewall
100 MBPS
• Stateful inspection security based on state-of-the-art Adaptive Security Algorithm (ASA)
• Supports over 100 predefined applications, services, and protocols for flexible access control
• Virtual Private Networking (VPN) for secure remote network access using IKE/IPSec standards
• In-line intrusion protection from over 55 different network-based attacks
• URL filtering of outbound web traffic via industry-leading, third-party URL filtering products
• Integrated switch allows multiple users to share a single broadband connection
Hardware Features
•
•
•
•
•
•
•
•
•
•
•
•
2
Compact, desktop chassis
External power supply
133-MHz processor
16-MB RAM, 8-MB Flash memory
1 10/100-Mbps Ethernet interface for an
outside connection to the Internet (port 0)
Integrated 4-port 10/100-Mbps Ethernet
switch for inside private LAN
(ports 1 through 4)
Serial console port for administrative access
Security lock slot for added physical security
Front panel LEDs for appliance and link
status
60-Mbps clear text firewall throughput
4.5-Mbps VPN throughput AES-128/SHA-1
3-Mbps VPN throughput 3DES/SHA-1
Software Features
• Supports PIX Firewall software Version 6.1
and higher, a secure, purpose-built embedded
operating system
• Includes plug-and-play default configuration
for simplified installation
• Includes Cisco PIX Device Manager (PDM)
for intuitive, web-based administration of
PIX Firewalls
• Supports up to 10 active hosts (an active host
is one that has passed traffic through the
PIX Firewall in the last xlate timeout seconds,
or has reserved an authentication connection),
up to 50 users with optional 50-user license,
and unlimited users for unlimited user license
• Internal DHCP server supports up to
32 DHCP address leases with the 10-user
license; up to 128 with the optional 50-user
license, and 256 for the unlimited user license
• Supports up to 10 remote access or site-to-site
VPN peers
1 Check Items Included
4
3
POWER
2
1
0
PIX 501
CONSOL
E
3.3V 4.5
A
Blue console cable
(72-1259-01)
PC terminal adapter
(74-0495-01)
Yellow Ethernet cable
(72-1482-01)
Orange Ethernet
Crossover cable
(72-3515-01)
Power supply
(341-0008-01)
Cis
Pr Fire co P
od w IX
uc all
tC
D
Cable
(US shown)
(72-0259)
CoSafe
m t
Gu pliay an
ide nc d
e
Qu PIX
Guick S 501
ide tar
t
Documentation
3
2 Installing the PIX 501
PIX 501
Computer or other
network device
Yellow
Ethernet
cable
4
3
2
1
0
PO
WE
R
CO
NS
OLE
3.3
V
4.5
A
Orange
Ethernet
cable
Laptop computer
DSL/Cable/ISDN
modem
Internet
61277
Printer
Power
adapter
Follow these steps to connect the cables:
Step 1
Place the chassis on a flat, stable surface. The chassis is not rack mountable.
Step 2
Connect Port 0, the outside Ethernet port, to the public network, that is, the Internet:
a. Use the yellow Ethernet cable (72-1482-01) to connect the device to a switch or hub.
b. Use the orange Ethernet crossover cable (72-3515-01) to connect the device to a
cable/DSL/ISDN modem.
Step 3
Connect your PC or other network devices with an Ethernet cable to one of the four switched
inside ports (numbered 1 through 4).
Note
Make sure that one of the PCs has TCP/IP installed and is configured to obtain an IP address
automatically through DHCP. Installing TCP/IP and configuring DHCP allows the PC to
communicate with the PIX 501 and the Internet as well as run the PDM Startup Wizard.
4
Make sure the PC interface connected to the PIX 501 inside port, numbered 1 through 4, is set to
autonegotiate for best performance. If autonegotiate is not an option for the PC interface, set the speed
to either 10 or 100 Mbps half duplex. Setting the interface to full duplex causes a duplex mismatch that
significantly impacts the total throughput capabilities of the interface.
4
3
POWER
2
1
0
CONSOL
E
3.3V 4.5
A
71331
Cisco PIX 501
Power supply
Follow these steps to power on the PIX Firewall:
Step 1
Connect the power supply (341-0008-01) with the power cable (72-0259).
Step 2
Connect the small, round connector of the power supply cable to the power connector on the
rear panel.
Step 3
Connect the AC power connector of the power supply input cable to an electrical outlet.
Note
Step 4
The PIX 501 does not have a power switch. Completing Step 3 powers on the device.
Check the power LED, if it is solid green, then the device is powered on. For more
information, refer to the “Check the LEDs” section on page 12.
5
3 Configuring the PIX 501
The PIX 501 comes with a factory default configuration that meets the needs of most broadband
networking environments. The factory default configuration on the PIX 501 protects your inside
network from any unsolicited traffic. It is configured to use DHCP on the outside interface to acquire its
IP address. A default DHCP server address pool is included for hosts on the inside interface.
By default, the PIX Firewall denies all inbound traffic through the outside interface. Based on your
network security policy, you should consider configuring the PIX Firewall to deny all ICMP traffic to
the outside interface, or any other interface you deem necessary, by entering the icmp command. The
icmp command controls responses to ICMP traffic that is directed at one of the PIX Firewall interfaces.
If no ICMP control list is configured, then the PIX Firewall will respond to all ICMP requests received
on any interface (including the outside interface).
For more information about the icmp command, refer to the Cisco PIX Firewall Command Reference.
Instances in which it might be necessary to change or make additional changes to the default
configuration include the following:
• To create administrative and Telnet passwords
Note
We highly recommend that you change the administrative and Telnet passwords from
their default settings (no password) to secure the administration of your PIX Firewall.
• To configure Point-to-Point Protocol over Ethernet (PPPoE) or a static IP address for an outside
interface
• To configure VPN and Auto Update features
The PIX 501 contains an integrated configuration utility
called Cisco PIX Device Manager (PDM). PDM is a web
browser-based configuration tool designed to help you set
up, configure, and monitor the PIX Firewall. PDM is
preinstalled on the PIX 501. To access PDM, make sure
JavaScript and Java are enabled in your web browser. Refer
to the Cisco PIX Device Manager Installation Guide for
more information on the operating system and web
browser environments supported by PDM.
6
PDM Version 2.0 and higher releases include a Startup Wizard for initial configuration. Follow these
steps to use the Startup Wizard:
Step 1
If you have not already done so, use an Ethernet cable to connect your PC to one of the four
switched inside ports (numbered 1 through 4) on the rear panel of the PIX Firewall.
Note
Step 2
Ethernet1 interface in the PIX 501 is the internal interface connecting the
PIX Firewall to the four switched inside ports with a fixed speed of 100 Mbps full
duplex. The PIX Firewall automatically negotiates the inside interface speed, and this is
not configurable.
Configure your PC to use DHCP (to receive an IP address automatically from the
PIX Firewall) or assign a static IP address to your PC by selecting an address outside of the
192.168.1.0 network.
Note
The inside interface of the PIX Firewall is assigned 192.168.1.1, so choose a different
IP address.
Step 3
Check the LINK LED to verify that your PC has basic connectivity to the PIX Firewall on one
of the inside ports (numbered 1 through 4). When connectivity occurs, the LINK LED on the
front panel of the PIX Firewall lights up solid green.
Step 4
To access the Startup Wizard, use a PC connected to one of the PIX Firewall switch ports and enter
the URL https://192.168.1.1/startup.html into your browser.
Note
Remember to add the “s” to “https” or the connection fails. HTTPS (HTTP over SSL)
provides a secure connection between your browser and the PIX Firewall that you are
using PDM to configure or monitor.
Step 5
Leave both the userword and password boxes empty. Press Enter.
Step 6
Accept the certificates and follow the instructions in the Startup Wizard. For online Help,
click the Help button at the bottom of the Startup Wizard window.
7
4 Optional Maintenance and Upgrade Procedures
Upgrade to DES, 3DES/AES, or the User Licenses
Note
The following instructions apply to PIX Firewall Version 6.2 and higher releases. If you are
not running PIX Firewall Version 6.2 or higher, refer to the Quick Start Guide for the version
of software installed on your Cisco PIX Firewall.
To upgrade features you did not specify at the time of purchase, you need to use an activation key.
The activation key lets you add software features to the PIX Firewall, such as DES (Free) or 3DES/AES,
or upgrade the user license at an additional cost.
If you are a registered user of Cisco Connection Online and would like to obtain a DES or a 3DES/AES
license key, or upgrade your user license for the PIX Firewall, go to the following website:
http://www.cisco.com/cgi-bin/Software/FormManager/formgenerator.pl
If you are not a registered user of Cisco Connection Online, go to the following website:
http://www.cisco.com/pcgi-bin/Software/FormManager/formgenerator.pl
Note
If you are unable to access this form because you do not have a CCO login, send an e-mail to
[email protected]. In the e-mail include the PIX Firewall serial number, as it appears in the
show version command output, and request a 56-bit DES or a 168-bit 3 DES license key.
You must also purchase or have a service contract to download PIX Firewall software.
Note
8
You can verify if you have DES, 3DES/AES, or the user license by entering the
show activation-key command.
To obtain an activation key, you need a Product Authorization Key, which you can purchase from
your Cisco account representative. After obtaining the Product Authorization Key, register it on the
web to obtain an activation key by performing the following steps:
Step 1
Connect a web browser to one of the following websites (the URLs are case-sensitive):
• Go to the following website if you are a registered user of Cisco Connection Online:
http://www.cisco.com/cgi-bin/Software/FormManager/formgenerator.pl
• Go to the following website if you are not a registered user of Cisco Connection Online:
http://www.cisco.com/pcgi-bin/Software/FormManager/formgenerator.pl
Step 2
Obtain the serial number for your PIX Firewall by entering the show version command.
Step 3
Enter the following information, when prompted:
• Your Product Authorization Key
• The serial number for your PIX Firewall
• Your e-mail address
The activation key is generated automatically and sent to the e-mail address that you provide.
Follow these steps to use the activation key:
Step 1
Ensure that the image in Flash memory and the running image are the same.
Step 2
From the command-line interface (CLI) enter the configure terminal command to start
configuration mode.
Step 3
Enter the activation-key activation-key-four-tuple command. Replace
activation-key-four-tuple with the activation key you obtained with your new license.
Step 4
Use the exit command to exit configuration mode. This command is the same as the quit
command.
Step 5
Enter the write memory command to save the configuration.
Step 6
To use the new activation key, reboot the PIX Firewall.
For more information on activation key examples or upgrading software, refer to the
Cisco PIX Firewall and VPN Configuration Guide.
9
Active Host Limitation
The PIX 501 supports up to 32 DHCP address leases with a 10-user license, up to 128 with an optional
50-user license, and 256 with an unlimited user license. A host is considered active when any of the
following statements are true:
• The host has passed traffic through the PIX Firewall during the time configured for the xlate
timeout interval
• The host has an established NAT/PAT translation through the PIX Firewall
• The host has an established TCP connection or UDP session through the PIX Firewall
• The host has an established user authentication through the PIX Firewall
Refer to the System Properties>Advanced>Timeouts online Help topic within PDM for the default
inactivity timeout values associated with each of the preceding bulleted items.
Restore the Default Configuration
You can restore your configuration back to the factory default values in one of the following ways:
• You can start the Startup Wizard at: https://192.168.1.1/startup.html
• Enter the following CLI commands:
Command
Description
Step 1
configure factory-default [inside
ip address [address_mask]] 1
Erases the running configuration and replaces it with
the factory default configuration.
Step 2
write memory
Writes the factory default configuration to Flash
memory.
1.
Note
Caution
10
If the optional inside IP address and address mask are specified, the factory-default configuration will
reflect the specified IP address.
The config factory-default command considers both licensing and platform in creating DHCP
pool sizes of 32, 128, or 253 for the PIX 501. A user with an unlimited license can manually
change the IP address and netmask to increase the DHCP pool size to 256.
Entering the config factory-default command erases the current running configuration.
Refer to the following website for detailed command information and configuration examples:
http://www.cisco.com/univercd/cc/td/doc/product/iaabu/pix/pix_sw/v_63/cmdref/index.htm
The Cisco TAC website is available to all customers who need technical assistance. To access the TAC
website, go to:
http://www.cisco.com/tac
Alternative Ways to Access the PIX 501
4
3
61391
You can access the CLI for administration using the console port on the PIX Firewall. To do so, you
must run a serial terminal emulator on a PC or workstation.
POWER
2
1
0
CONSOL
E
Blue console cable
3.3V 4.5
A
Cisco PIX 501
PC terminal adapter
(74-0495-01)
Follow these steps to connect a console for local administrative access:
Step 1
Plug one end of the PC terminal adapter (74-0495-01) into a standard 9-pin PC serial port.
Step 2
Plug one end of the blue console cable (72-1259-01) into the PC terminal adapter.
Step 3
Plug the other end of the blue console cable into the Console port.
Step 4
Configure the PC terminal emulation software or terminal for 9600 baud, 8 data bits, no
parity, and 1 stop bit.
11
For information on how to access the PIX Firewall configuration mode, refer to the “Accessing
Configuration Mode” section in Chapter 1, “Getting Started” of the Cisco PIX Firewall and VPN
Configuration Guide.
You can also access the CLI using SSH/Telnet to the PIX Firewall. By default, SSH/Telnet access is not
permitted. Use PDM or the console to configure SSH/Telnet access to the PIX Firewall. To Telnet to
the PIX Firewall from the outside perimeter of the PIX Firewall, configure an outside IP address and
IPSec for a secure Telnet session. Refer to the Cisco PIX Firewall and VPN Configuration Guide for
more information about how to use the CLI.
Check the LEDs
LINK/ACT
POWER
CISCO PIX 501
100 MBPS
VPN TUNNEL
0
1
2
3
4
61392
F I R E W A L L
The LINK/ACT LED indicators on the front panel of the PIX Firewall are normally solid green when
a link is established and flashing green when the ports are active. Each inside Ethernet interface
(numbered 1 through 4) has two LEDs to indicate the operating speed and that the physical link is
established.
Note
If all LEDs are operating as expected (see Table 1), this concludes the hardware installation.
Table 1
PIX 501 LEDs
LED
State
Description
POWER
Green
The device is powered on.
Off
The device is powered off.
LINK/ACT
Flashing Network activity, such as Internet access, is present.
green
Green
12
The correct cable is in use, and the connected equipment has power.
Table 1
LED
PIX 501 LEDs (continued)
State
Description
Off
No link is established.
Tip
VPN TUNNEL Green
100 MBPS
If the LINK/ACT LED does not light up, you might be using the
wrong type of cable. Try replacing the yellow (straight-through)
Ethernet cable with the orange (crossover) Ethernet cable.
One or more IKE/IPSec VPN tunnels are active.
Off
No VPN tunnels are active. The default configuration does not include a
VPN. Thus, the VPN tunnel LED will only be enabled if a VPN is added to
your configuration and a VPN tunnel is then established. Also, the LED
does not light up when PPTP/L2TP tunnels are established.
Green
The interface is autonegotiated at 100-Mbps half or full duplex.
Flashing The interface is functioning at 10-Mbps half or full duplex.
green
Note
With PIX Firewall Version 6.3, the PIX 501 outside interface
(port 0) can autonegotiate to 10/100-Mbps half of full duplex,
but does not provide an external LED indicating 100 Mbps
operation. You must use PDM or the PIX CLI to verify the speed
and duplex setting of the interface.
13
Install a Cable Lock
4
3
POWER
2
1
0
CONSOL
E
3.3V 4.5
A
61394
Cisco PIX 501
Lock slot
Cable lock
(not included)
The PIX 501 includes a slot that accepts standard desktop cable locks to provide physical security for
small portable equipment, such as a laptop computer. The cable lock is not included.
Follow these steps to install a cable lock:
Step 1
Follow the directions from the manufacturer for attaching the other end of the cable for
securing the PIX Firewall.
Step 2
Attach the cable lock to the lock slot on the back panel of the PIX 501.
5 Obtaining Documentation
Cisco provides several ways to obtain documentation, technical assistance, and other technical
resources. These sections explain how to obtain technical information from Cisco Systems.
Cisco.com
You can access the most current Cisco documentation on the World Wide Web at this URL:
http://www.cisco.com/univercd/home/home.htm
You can access the Cisco website at this URL:
http://www.cisco.com
14
International Cisco websites can be accessed from this URL:
http://www.cisco.com/public/countries_languages.shtml
Documentation CD-ROM
Cisco documentation and additional literature are available in a Cisco Documentation CD-ROM
package, which may have shipped with your product. The Documentation CD-ROM is updated
regularly and may be more current than printed documentation. The CD-ROM package is available
as a single unit or through an annual or quarterly subscription.
Registered Cisco.com users can order a single Documentation CD-ROM (product number
DOC-CONDOCCD=) through the Cisco Ordering tool:
http://www.cisco.com/en/US/partner/ordering/ordering_place_order_ordering_tool_launch.html
All users can order annual or quarterly subscriptions through the online Subscription Store:
http://www.cisco.com/go/subscription
Ordering Documentation
You can find instructions for ordering documentation at this URL:
http://www.cisco.com/univercd/cc/td/doc/es_inpck/pdi.htm
You can order Cisco documentation in these ways:
• Registered Cisco.com users (Cisco direct customers) can order Cisco product documentation from
the Networking Products MarketPlace:
http://www.cisco.com/en/US/partner/ordering/index.shtml
• Nonregistered Cisco.com users can order documentation through a local account representative
by calling Cisco Systems Corporate Headquarters (California, USA) at 408 526-7208 or,
elsewhere in North America, by calling 800 553-NETS (6387).
Documentation Feedback
You can submit comments electronically on Cisco.com. On the Cisco Documentation home page, click
Feedback at the top of the page.
You can send your comments in e-mail to [email protected].
15
You can submit comments by using the response card (if present) behind the front cover of your
document or by writing to the following address:
Cisco Systems
Attn: Customer Document Ordering
170 West Tasman Drive
San Jose, CA 95134-9883
We appreciate your comments.
6 Obtaining Technical Assistance
For all customers, partners, resellers, and distributors who hold valid Cisco service contracts, the Cisco
Technical Assistance Center (TAC) provides 24-hour, award-winning technical support services,
online and over the phone. Cisco.com features the Cisco TAC website as an online starting point for
technical assistance.
Cisco TAC Website
The Cisco TAC website (http://www.cisco.com/tac) provides online documents and tools for
troubleshooting and resolving technical issues with Cisco products and technologies. The Cisco TAC
website is available 24 hours a day, 365 days a year.
Accessing all the tools on the Cisco TAC website requires a Cisco.com user ID and password. If you
have a valid service contract but do not have a login ID or password, register at this URL:
http://tools.cisco.com/RPF/register/register.do
Opening a TAC Case
The online TAC Case Open Tool (http://www.cisco.com/tac/caseopen) is the fastest way to open P3
and P4 cases. (Your network is minimally impaired or you require product information). After you
describe your situation, the TAC Case Open Tool automatically recommends resources for an
immediate solution. If your issue is not resolved using these recommendations, your case will be
assigned to a Cisco TAC engineer.
For P1 or P2 cases (your production network is down or severely degraded) or if you do not have
Internet access, contact Cisco TAC by telephone. Cisco TAC engineers are assigned immediately to P1
and P2 cases to help keep your business operations running smoothly.
16
To open a case by telephone, use one of the following numbers:
Asia-Pacific: +61 2 8446 7411 (Australia: 1 800 805 227)
EMEA: +32 2 704 55 55
USA: 1 800 553-2447
For a complete listing of Cisco TAC contacts, go to this URL:
http://www.cisco.com/warp/public/687/Directory/DirTAC.shtml
TAC Case Priority Definitions
To ensure that all cases are reported in a standard format, Cisco has established case priority
definitions.
Priority 1 (P1)—Your network is “down” or there is a critical impact to your business operations. You
and Cisco will commit all necessary resources around the clock to resolve the situation.
Priority 2 (P2)—Operation of an existing network is severely degraded, or significant aspects of your
business operation are negatively affected by inadequate performance of Cisco products. You and
Cisco will commit full-time resources during normal business hours to resolve the situation.
Priority 3 (P3)—Operational performance of your network is impaired, but most business operations
remain functional. You and Cisco will commit resources during normal business hours to restore
service to satisfactory levels.
Priority 4 (P4)—You require information or assistance with Cisco product capabilities, installation, or
configuration. There is little or no effect on your business operations.
7 Obtaining Additional Publications and Information
Information about Cisco products, technologies, and network solutions is available from various
online and printed sources.
• The Cisco Product Catalog describes the networking products offered by Cisco Systems, as well
as ordering and customer support services. Access the Cisco Product Catalog at this URL:
http://www.cisco.com/en/US/products/products_catalog_links_launch.html
• Cisco Press publishes a wide range of networking publications. Cisco suggests these titles for new
and experienced users: Internetworking Terms and Acronyms Dictionary, Internetworking
Technology Handbook, Internetworking Troubleshooting Guide, and the Internetworking Design
Guide. For current Cisco Press titles and other information, go to Cisco Press online at this URL:
http://www.ciscopress.com
17
• Packet magazine is the Cisco quarterly publication that provides the latest networking trends,
technology breakthroughs, and Cisco products and solutions to help industry professionals get the
most from their networking investment. Included are networking deployment and troubleshooting
tips, configuration examples, customer case studies, tutorials and training, certification
information, and links to numerous in-depth online resources. You can access Packet magazine at
this URL:
http://www.cisco.com/go/packet
• iQ Magazine is the Cisco bimonthly publication that delivers the latest information about Internet
business strategies for executives. You can access iQ Magazine at this URL:
http://www.cisco.com/go/iqmagazine
• Internet Protocol Journal is a quarterly journal published by Cisco Systems for engineering
professionals involved in designing, developing, and operating public and private internets and
intranets. You can access the Internet Protocol Journal at this URL:
http://www.cisco.com/en/US/about/ac123/ac147/about_cisco_the_internet_protocol_journal.htm
• Training—Cisco offers world-class networking training. Current offerings in network training are
listed at this URL:
http://www.cisco.com/en/US/learning/index.html
18
19
Corporate Headquarters
Cisco Systems, Inc.
170 West Tasman Drive
San Jose, CA 95134-1706
USA
www.cisco.com
Tel: 408 526-4000
800 553-NETS (6387)
Fax: 408 526-4100
European Headquarters
Cisco Systems International BV
Haarlerbergpark
Haarlerbergweg 13-19
1101 CH Amsterdam
The Netherlands
www-europe.cisco.com
Tel: 31 0 20 357 1000
Fax: 31 0 20 357 1100
Americas Headquarters
Cisco Systems, Inc.
170 West Tasman Drive
San Jose, CA 95134-1706
USA
www.cisco.com
Tel: 408 526-7660
Fax: 408 527-0883
Asia Pacific Headquarters
Cisco Systems, Inc.
Capital Tower
168 Robinson Road
#22-01 to #29-01
Singapore 068912
www.cisco.com
Tel: +65 6317 7777
Fax: +65 6317 7799
Cisco Systems has more than 200 offices in the following countries. Addresses, phone numbers, and fax numbers are listed on the
Cisco Web site at www.cisco.com/go/offices
Argentina • Australia • Austria • Belgium • Brazil • Bulgaria • Canada • Chile • China PRC • Colombia • Costa Rica • Croatia • Czech Republic • Denmark • Dubai, UAE
Finland • France • Germany • Greece • Hong Kong SAR • Hungary • India • Indonesia • Ireland • Israel • Italy • Japan • Korea • Luxembourg • Malaysia • Mexico
The Netherlands • New Zealand • Norway • Peru • Philippines • Poland • Portugal • Puerto Rico • Romania • Russia • Saudi Arabia • Scotland • Singapore • Slovakia
Slovenia • South Africa • Spain • Sweden • Switzerland • Taiwan • Thailand • Turkey • Ukraine • United Kingdom • United States • Venezuela • Vietnam • Zimbabwe
CCIP, CCSP, the Cisco Arrow logo, the Cisco Powered Network mark, Cisco Unity, Follow Me Browsing, FormShare, and StackWise are trademarks of Cisco Systems, Inc.;
Changing the Way We Work, Live, Play, and Learn, and iQuick Study are service marks of Cisco Systems, Inc.; and Aironet, ASIST, BPX, Catalyst, CCDA, CCDP, CCIE, CCNA,
CCNP, Cisco, the Cisco Certified Internetwork Expert logo, Cisco IOS, the Cisco IOS logo, Cisco Press, Cisco Systems, Cisco Systems Capital, the Cisco Systems logo,
Empowering the Internet Generation, Enterprise/Solver, EtherChannel, EtherSwitch, Fast Step, GigaStack, Internet Quotient, IOS, IP/TV, iQ Expertise, the iQ logo, iQ Net
Readiness Scorecard, LightStream, MGX, MICA, the Networkers logo, Networking Academy, Network Registrar, Packet, PIX, Post-Routing, Pre-Routing, RateMUX, Registrar,
ScriptShare, SlideCast, SMARTnet, StrataView Plus, Stratm, SwitchProbe, TeleRouter, The Fastest Way to Increase Your Internet Quotient, TransPath, and VCO are registered
trademarks of Cisco Systems, Inc. and/or its affiliates in the U.S. and certain other countries.
All other trademarks mentioned in this document or Web site are the property of their respective owners. The use of the word partner does not imply a partnership relationship between Cisco
and any other company. (0304R)
Copyright © 2003 Cisco Systems, Inc.
All rights reserved.
Printed in the USA on recycled paper containing 10% postconsumer waste.
78-15169-01 Rev. BO