1
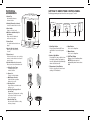
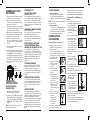
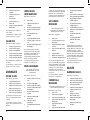
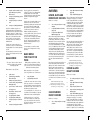
INSTRUCTION
BOOKLET
Cuisinart® Vertical Rotisserie
CVR-1000C
For your safety and continued enjoyment of this product, always read the instruction book carefully before using.
IB-8463-CAN
IMPORTANT
SAFEGUARDS
When using an electrical appliance, basic
precautions should always be followed to
reduce the risk of fire, electric shock, and
personal injury, including the following:
1.Read all instructions.
2. Do not touch hot surfaces. Use
handles or knobs.
3. Use this appliance only as described
in this manual. Other uses not
recommended may cause fire,
electric shock or personal injury.
4. This product is intended for
household use only.
5. To protect against electric shock, do
not immerse unit, plug or cord in
water or spray with liquids.
6. Close supervision is necessary when
any appliance is used by or near
children.
7. Unplug from the outlet when not in
use, when moving from one location
to another, and before cleaning. Allow
to cool before putting on or taking off
parts.
8. To disconnect the appliance, grip the
plug and pull it from the wall outlet.
Never pull by the cord.
9. Do not operate the appliance in the
presence of explosives and/or
flammable fumes.
10. Do not place on or near a hot gas or
electric burner, or in a heated oven.
11. Do not operate the appliance with a
damaged cord or plug, if the product
malfunctions, or if it is dropped or
damaged in any manner. Return
appliance to the nearest authorized
service facility for examination, repair
or adjustment.
12. The use of attachments not
recommended by the manufacturer
may be hazardous.
13. Do not use outdoors.
14. Do not let cord hang over edge of
table or counter, or touch hot
surfaces.
15. Extreme caution must be used when
moving appliance containing hot oil
or other hot liquids.
16. Use extreme caution when removing
tray or disposing of hot grease.
17. Do not clean with metal scouring
pads. Pieces can break off the pad
and touch electrical parts, creating a
risk of electric shock.
18. Place the unit on a dry level surface.
19. Do not operate if the housing is
removed or damaged.
20. A loose fit between the AC outlet
(receptacle) and plug may cause
overheating and a distortion of the
plug. Contact a qualified electrician to
replace loose or worn outlet.
21. This appliance is designed to be
freestanding only, and should not be
recessed or built in (fully recessed).
22. Locate the unit away from direct
sunlight and sources of heat (stove,
heater, radiator, etc.). Direct sunlight
will affect/alter the outside colour of
the appliance.
WARNING: To reduce the risk of fire,
electric shock or personal injury,
unplug or disconnect the appliance
from the power supply before servicing.
SAVE THESE
INSTRUCTIONS
FOR HOUSEHOLD
USE ONLY
SPECIAL CORD SET
INSTRUCTIONS
A short power supply cord is provided
to reduce the risks resulting from
becoming entangled in or tripping over
a longer cord. Longer extension cords
are available and may be used if care is
exercised in their use. If a long
extension cord is used, the marked
electrical rating of the extension cord
must be at least as great as the
electrical rating of the appliance, and
the longer cord should be arranged so
that it will not drape over the counter
top or tabletop where it can be tripped
over or pulled on by children.
CONTENTS
Important Safeguards . . . . . . . . . . . . . . 2
Special Cord Set Instructions . . . . . . . . 3
Introduction . . . . . . . . . . . . . . . . . . . . . . 3
Features and Accessories . . . . . . . . . . . 4
Control Panel . . . . . . . . . . . . . . . . . . . . . 5
Assembling Your Rotisserie . . . . . . . . . 6
Operating Instructions . . . . . . . . . . . . . . 6
Cooking with Accessories . . . . . . . . . . . 7
Cleaning . . . . . . . . . . . . . . . . . . . . . . . . 8
Warranty . . . . . . . . . . . . . . . . . . . . . . . 27
INTRODUCTION
NOTICE
This appliance has a polarized plug (one
blade is wider than the other). To reduce
the risk of electric shock, this plug will
fit into a polarized outlet only one way. If
the plug does not fit fully into the outlet,
reverse the plug. If it still does not fit,
contact a qualified electrician. Do not
modify the plug in any way.
Cuisinart is about to change the way
you cook some of your favorite foods.
Once you vertically rotisserie your first
chicken, you’ll never go back! Juices
get locked in and fat drains off.
Designed to efficiently cook and evenly
brown everything from roasts to
vegetables to shish kebabs, this is a
countertop cooker you are going to
love.
WARNING
RISK OF FIRE OR ELECTRIC SHOCK
DO NOT OPEN
WARNING: TO REDUCE THE RISK OF FIRE OR ELECTRIC SHOCK,
DO NOT REMOVE COVER (OR BACK)
NO USER-SERVICEABLE PARTS INSIDE
REPAIR SHOULD BE DONE BY AUTHORIZED SERVICE PERSONNEL ONLY
FEATURES &
Accessories
GETTING TO KNOW YOUR CONTROL PANEL
1
Detailed programming and use instructions are on pages 6, 7 and 8.
1. Vented Top
Automatically releases
heat and steam.
2. Heating Element (not shown)
Located on back wall of interior.
HOUR
3. Door Handle
Stays cool to the touch.
MIN
5 4
5. Control Panel
See details and instructions on
page 5.
425 450
LIGHT
START
STOP
2
1
TEMP
TIME
3
4. Wide Base with Nonslip Feet
(not shown)
Keeps rotisserie balanced
and securely in place.
6
3
5
1. Start/Stop Button
Press to turn rotisserie On. Press
and hold for 2 seconds to power
Off.
6. Interior Light (not shown)
Allows you to view food as
it cooks.
7. Chrome Insert
Reflects heat for more even cooking;
remove to make interior of rotisserie
easy to clean.
2. Interior Light Button
Press button to turn on light to view
food while cooking. Press again to
turn off. Light turns off automatically
when rotisserie turns off.
8. Versatile Rotisserie Accessories
All accessories are dishwasher safe.
a. Vertical Poultry Tower
A healthy way to roast
a whole chicken.
325 350 400
7
8a
3. Temperature Control Button
Press to select from 5 preset heat
settings. LED indicators.
4. Hour Button
Use to set cooking time.
5. Minute Button
Use to set cooking time.
6. LCD Time Display
Displays 3-hour countdown timer.
NOTE: Rotisserie shuts off
automatically when timer reaches
0:00.
b. Skewer Set
Perfect for shish kebabs.
c. Multi Purpose Basket
Holds fish and vegetables
firmly as they cook.
d. Roasting Rack
Keeps roasts moist and tender
as they cook.
e. Rotating Tray Support Rack
(not shown)
Supports the drip tray and cooking
accessories. Rotates to ensure
food cooks evenly.
8b
8c
8d
8f
f. Nonstick Drip Tray
Catches fat for healthier cooking
and easy cleanup.
Assembling your
rotisserie
1. Place your Vertical Rotisserie on a flat
surface that is not heat-sensitive.
2. Be sure rotisserie is at least 2 to 4
inches (5 cm to 10 cm) away from the
wall or any other object.
3. Slide the chrome insert into the guides
behind the heating element, located on
the back wall of the rotisserie.
4. Open the door and place the rotating
tray support rack over the drive shaft,
located on the rotisserie deck.
5. Place food on proper cooking
accessory, as directed in the “Cooking
with Accessories” section starting on
page 7.
6. Centre the assembled accessory rack
on the drip tray.
7. Carefully lift the drip tray and place it in
the oven on the revolving tray support
rack. NOTE: The drive shaft must be
properly aligned with the impression on
the underside of the drip tray or the tray
will not rotate correctly. When the tray
silps onto the shaft, it will sit evenly on
the rack.
Drive Shaft
Rotating Tray
Support Rack Drip Tray
Cooking with
countdown timer
(maximum: 3 hours)
Set cooking time by gently pressing the
Hour and Minute buttons. Hold the Minute
button down to scroll through the digits,
or press and release to advance one digit
at a time. Selected time will appear in the
LCD display.
Cooking in manual mode
(no time selected)
You can cook in your rotisserie without
setting the timer. Simply select a
temperature, as directed above, and
press Start. Oven will automatically shut
off after 4 hours.
adjusting or starting
the countdown timer
during the cooking cycle
You can adjust time during a timed
cooking cycle, or set the timer during a
manual cooking cycle. Simply press Hour
and Minute buttons until the desired time
appears in the LCD display. Oven will
automatically shut off when time has
elapsed.
To begin cooking
Touch the Start/Stop control. LED will
illuminate to indicate power is on and
cooking has begun. The electronic
countdown timer will immediately begin
to count down cooking time in the LCD
window.
power outage feature
operating
instructions
Setting cooking
temperature
1. Check the cooking temperature
recommended in your recipe.
2. Gently touch the TEMP button until the
LED illuminates under your preferred
setting – 325°F (160°C), 350°F (180°C),
400°F (200°C), 425°F (220°C) or 450°F
(230°C).
NOTE: If no temperature is selected,
rotisserie will not operate.
A convenient “memory” feature allows
unit to automatically resume cooking at
the time and temperature selected if
power is interrupted for 30 seconds or
less.
Pause feature
Press Start/Stop button to pause the
countdown timer. Both heater and motor
will turn off, and the remaining time will
flash in the LCD display. To resume
cooking at the temperature selected and
continue countdown, press Start/Stop
button again. If button is not pushed
within 30 minutes, selected settings will
be cancelled and the timer will display
0:00.
to end cooking
1. Automatic Shutoff
When selected time has elapsed,
the LCD will display "0:00" and the
heating element and motor will turn off.
NOTE: Five short beeps will sound when
rotisserie turns off.
2. Manual Shutoff
To turn the oven off anytime during the
cooking cycle, press and hold Stop
button for two seconds. The heating
element and motor will turn off.
cooking with
accessories
Cooking with the Poultry Tower
1. Prepare a whole chicken with
marinade or other flavourings.
2. Truss the chicken:
To ensure roasts and poultry cook
evenly, firmly tie with butcher’s twine
or string before cooking. To tie (truss)
your chicken, follow
a
instructions below:
a. Cut a piece of string
about 4 to 5 times
the length of the
b
chicken.
b. Place the middle
of the string under
the tail.
c. Wrap the string
c
around the end of
each drumstick and
pull the legs
together, crossing
strings over each
d
other. Be sure to
leave the lower cavity
open.
d. Turn the chicken over
and tie the string
across the
wings to hold
them in place.
e. Trim string if
necessary.
3. Place the prepared bird on the poultry
tower, with the neck at the top.
4. Place the poultry tower onto the drip
tray and into the Vertical Rotisserie.
Do not add water to the drip tray!
Cooking with the Multipurpose
Basket
1. Lay the basket flat on a tray or
countertop, and gently press the
clasps together that
extend from the top of
the basket door.
Remove the door and
set it aside.
2. Place food into the basket.
3. Set the door in the
basket guides at the
base of the basket.
Choose the bracket
position that will hold
the food firmly in place
without crushing it.
4. Squeeze the clasps to lock the door
into place.
5. Place the roasting
rack, which will hold
the basket, on the drip
tray.
6. Put the basket with
food onto the roasting rack, as
directed below:
a. Stand basket up, with clasps on top.
b. Centre the basket over
the rack, in between
the rack’s four
vertical prongs.
c. Lower the basket onto
the rack, guiding two
of the prongs through
the two rings on the
back of the basket.
d. Slip the other two prongs into the
small, square slotted openings on the
base of the basket.
7. Lift the drip tray carefully and place it,
the roasting rack and the filled basket
into the Vertical Rotisserie.
Cooking with the Skewers
CLEANING
1. Put the poultry tower
onto the drip tray.
1. U
nplug your Vertical Rotisserie and
let it cool.
2. Take the roasting
rack and place it
upside down on the
poultry tower.
3. Put any combination
of meats, vegetables
or fruits onto the
skewers.
4. Hook the loaded
skewers onto the
rings, evenly
distributing the
weight.
5. Lift the drip tray
carefully, and place
the assembled
skewers into the Vertical Rotisserie.
Cooking with the Roasting Rack
1. Place the roasting rack on the drip
tray.
2. Centre the meat
vertically over the
rack, with the thickest
part on top, and slide
it down until it rests
firmly on the stand.
3. Place the assembly
into the Vertical
Rotisserie.
NOTE: When the meat is removed from
the rotisserie, allow it to sit for 5 to 10
minutes before carving. This allows
juices to settle into the meat and
produces a more moist roast
INTERIOR LIGHT
The interior display light can be turned
on to allow you to keep an eye on the
food as it’s cooking. Press the Light
button on the control panel to turn light
on, and press again to turn the light off.
Light will go off automatically when
cooking cycle is complete.
2. Wash all accessories in hot soapy
water with a mild detergent and towel
dry, or place them in the dishwasher
to clean.
3. Never use abrasive or strong
household cleaners which will
damage the finish of the accessories.
4. To clean the base, inside and
outside, and interior oven walls, use
a damp cloth or sponge.
5. Any other servicing should be
performed by an authorized service
representative.
Recipe Book
RECIPES
Middle Eastern Spiced Chicken
and Vegetable Kebabs . . . . . . . . 19
Spice Rubs
Spice Rubs
Marinated Shrimp and
Roasted Tomatoes . . . . . . . . . . . 19
Five Spice Powder
Five Spice Powder . . . . . . . . . . . 11
Jerk Seasoning . . . . . . . . . . . . . . 11
Rotisserie Scallops with
Lemon Herb Butter . . . . . . . . . . . 20
Curry Powder . . . . . . . . . . . . . . . 11
Sausage, Peppers and Onions . . 20
Middle Eastern Rub . . . . . . . . . . . 11
Baby Back Ribs . . . . . . . . . . . . . . 20
Cajun Rub . . . . . . . . . . . . . . . . . . 12
Brie Stuffed Beef Filets
with Herb Crust . . . . . . . . . . . . . . 21
Marinades
Swordfish with Salsa Verde . . . . . 21
Hoisin Glaze . . . . . . . . . . . . . . . . 12
Salmon with Chermoula Marinade 22
Lemon Dijon Herb Marinade . . . . 12
Five Spice Chicken Wings . . . . . 22
Simple Marinade . . . . . . . . . . . . . 12
Side Dishes
Soy Ginger Marinade . . . . . . . . . 13
Roasted Asparagus . . . . . . . . . . . . 22
Chermoula Marinade . . . . . . . . . . 13
Roasted Corn Medallions . . . . . . 23
Sauces
Roasted Garlic . . . . . . . . . . . . . . . 23
Barbecue Sauce . . . . . . . . . . . . . 13
Herb Roasted Potatoes . . . . . . . . 23
Salsa Verde . . . . . . . . . . . . . . . . . 14
Desserts
Brines
Grilled Pound Cake with Sweetened
Whipped Cream and Berries . . . . 24
Basic Brine for Poultry or Pork . . 14
Entrées
Lemon, Dijon and
Herb Roast Chicken . . . . . . . . . . . 15
Cajun Rubbed Roast Chicken . . . 15
Hoisin Glazed Roast Chicken . . . 15
Cornish Hens with
Simple Marinade . . . . . . . . . . . . . 16
Stuffed Cornish Hens,
Moroccan Style . . . . . . . . . . . . . . 16
Roasted Garlic and Herb Crusted
Beef Tenderloin . . . . . . . . . . . . . . 17
Herb Roasted Leg of Lamb . . . . . 17
Curried Chicken Kebabs . . . . . . . 18
Asian-Style Tofu Kebabs . . . . . . . 18
Maple Glazed Peaches . . . . . . . . 24
This traditional Chinese seasoning blend
has a unique flavour – use sparingly
though, as a little does go a long way.
Makes about 3 tablespoons (45 ml).
1
pod star anise
2 teaspoons (10 ml) Szechuan
peppercorns (may use black
peppercorns)
½
teaspoon (2 ml) fennel seed
½
teaspoon (2 ml) whole cloves
1
1-inch (2.5 cm) piece cinnamon
stick
Combine all ingredients in the grinding
bowl of the Cuisinart® Spice & Nut
Grinder. Pulse spices 2 to 3 times and
then process until completely ground,
about 40 to 50 seconds.
Use immediately or contain in a sealed
glass jar. Store in a dry, cool place.
Use immediately or contain in a sealed
glass jar. Store in a dry, cool place.
Curry Powder
Curry powder is actually a blend of many
different ground spices. The possibilities
of spice combinations are endless.
Here is one option.
Makes about 5 tablespoons (75 ml).
2
tablespoons (30 ml)
whole coriander
2
tablespoons (30 ml)
black peppercorns
2
teaspoons (10 ml) whole cumin
1
teaspoon (5 ml)
cardamom seeds
¼
teaspoon (1 ml) mustard seeds
¼
teaspoon (1 ml) fennel seeds
2 to 3 small, dried red chiles,
stems removed
1
teaspoon (5 ml) turmeric
1
teaspoon (5 ml) ground ginger
Makes about ½ cup (125 ml).
¼
teaspoon (1 ml) whole cloves
5
Place the coriander, peppercorns, cumin,
cardamom, mustard seeds, fennel seeds,
and chiles in a dry skillet over low heat.
Roast the seeds slowly until they begin to
pop; be careful not to burn them.
Jerk Seasoning
scallions, cut into 1-inch
(2.5 cm) pieces
1Scotch bonnet chili, seeded
(or 2 jalapeño peppers, halved,
seeded and cut into 1-inch
[2.5 cm] pieces)
3
garlic cloves
2
tablespoons (30 ml) ground
allspice
½
teaspoon (2 ml) ground cloves
1
teaspoon (5 ml) ground
cinnamon
½
teaspoon (2 ml) ground nutmeg
½teaspoon (2 ml) freshly ground
black pepper
1
teaspoon (5 ml) fresh thyme
½
teaspoon (2 ml) sea or
kosher salt
Place the scallions, Scotch bonnet chili
and garlic in the work bowl of a Cuisinart®
Mini Chopper fitted with the chopping
blade. Pulse to chop and then process
10
until finely chopped. Add the remaining
ingredients and process until fully
combined.
Place all in the grinding bowl of the
Cuisinart® Spice & Nut Grinder. Add the
turmeric, ginger, and cloves. Process
spices together until completely ground,
about 30 seconds.
Use immediately or contain in a sealed
glass jar. Store in a dry, cool place.
Middle Eastern Rub
Only six ingredients, this spice rub
adds a lot of flavour to any dish.
Makes about 2½ teaspoons (13 ml).
¾
teaspoon (3.75 ml) ground
cumin
11
¼
teaspoon (1 ml) ground
coriander
½
teaspoon (2 ml) ground
cinnamon
½
Lemon Dijon
Herb Marinade
Makes about ¾ cup (175 ml).
pinch cayenne
teaspoon (2 ml) sea or
kosher salt
¼teaspoon (1 ml) freshly ground
black pepper
Place all ingredients in a small bowl.
Stir to combine.
Use immediately or contain in a sealed
glass jar. Store in a dry, cool place.
Cajun Rub
Makes about 2 tablespoons (30 ml).
2
teaspoons (10 ml) sea salt
1
teaspoon (5 ml) cayenne
1½
teaspoons (7 ml) paprika
1
teaspoon (5 ml) garlic powder
4
garlic cloves
2
tablespoons (30 ml) fresh
rosemary
2
teaspoons (10 ml) fresh thyme
1½
teaspoons (7 ml) fresh lemon
zest
½
cup (125 ml) Dijon-style
mustard
¼
1
1-inch (2.5 cm) piece peeled
fresh ginger
¹∕ ³cup (75 ml) pitted whole
kalamata olives, finely
chopped
½
cup (125 ml) reduced-sodium
soy sauce
2
teaspoons (10 ml) Dijon-style
mustard
¼
cup (50 ml) tahini
2
tablespoons (30 ml) honey
¼
cup extra (50 ml) virgin olive oil
Makes about ²∕ ³ cup (150 ml).
1
teaspoon (5 ml) sea or kosher
salt
½
teaspoon (2 ml) paprika
1
teaspoon (5 ml) garlic powder
garlic cloves, finely chopped
In a mixing bowl stir together the hoisin,
honey, soy, ginger and garlic until well
combined.
Use immediately or contain in a sealed
glass jar. Store in refrigerator if not using
right away.
12
½teaspoon (2 ml) freshly ground
black pepper
1½
1½
½
cup (75 ml) fresh lemon juice
garlic cloves
Makes about ¾ cup (125 ml).
2
¹∕ ³
1
This marinade can be used on
almost anything, but works really
well with poultry.
1
cup (50 ml) fresh parsley,
roughly chopped
2
Hoisin Glaze
1 tablespoon (15 ml) peeled
fresh ginger, finely chopped
¼
teaspoon (5 ml) sea or kosher
salt
Simple Marinade
tablespoons (30 ml) soy sauce
cup (175 ml) fresh cilantro,
roughly chopped
cup (50 ml) balsamic vinegar
Use immediately or contain in a sealed
glass jar. Store in a dry, cool place.
2
¾
cup (250 ml) extra virgin
olive oil
If not using immediately, store in the
refrigerator in a sealed glass jar.
2 tablespoons (30 ml) honey
x ½-inch (5 x 1.25 cm) strips
2
lemon peel, white pith removed
1
Place all ingredients in a small bowl. Stir
to combine.
cup (125 ml) Hoisin sauce
4
Makes about 1 cup (250 ml).
½teaspoon (2 ml) dry mustard
½
This Asian-inspired marinade
complements the Tofu and Vegetable
Kebabs (pages 18 & 19) nicely.
teaspoon (5 ml) red pepper
flakes
tablespoons (30 ml) white wine
vinegar
1teaspoon (5 ml) freshly ground
black pepper
MARINADES
Soy Ginger
Marinade
1
2
Place the garlic, herbs and zest in the
work bowl of a Cuisinart® Mini Chopper
fitted with the chopping blade. Pulse to
chop and then process until finely
chopped. Add the remaining ingredients
and process until fully combined.
½teaspoon (2 ml) white pepper
Combine salt, spices, brown sugar and
vinegar in a small mixing bowl. Gradually
whisk in the olive oil until completely
combined. If not using immediately, store
in the refrigerator in a sealed glass jar.
teaspoon (5 ml) powdered
mustard
tablespoons (25 ml) light
brown sugar
tablespoons (25 ml)
cider vinegar
cup (125 ml) extra virgin olive
oil
Place the garlic and ginger in the work
bowl of a Cuisinart® Mini Chopper fitted
with the chopping blade. Pulse to roughly
chop. Add the soy sauce, mustard, tahini
and honey. Process until combined.
Slowly add the olive oil through the
recessed area on the cover. Process until
homogenous.
If not using immediately, store in the
refrigerator in a sealed glass jar.
Chermoula
Marinade
This zesty Moroccan marinade is a great
match for grilled fish and seafood.
Makes about 1½ cups (375 ml).
6
garlic cloves
1
teaspoon (5 ml) paprika
¾
teaspoon (3.75 ml) kosher salt
½teaspoon (2 ml) freshly ground
black pepper
1
teaspoon (5 ml) ground
coriander
½
teaspoon (2 ml) ground cumin
Place the garlic in the work bowl of a
Cuisinart® Mini Chopper fitted with the
chopping blade. Pulse to finely chop. Add
the paprika, salt, pepper, coriander,
cumin, red pepper flakes and lemon peel.
Pulse until a paste forms. Transfer mixture
to a small bowl. Add the cilantro, parsley,
lemon juice and vinegar. Slowly whisk in
the olive oil. Add the olives.
If not using immediately, store in the
refrigerator in a sealed glass jar.
SAUCES
Barbecue Sauce
Makes about 3 cups (750 ml).
1
tablespoon (15 ml) olive oil
4
garlic cloves, finely chopped
½
large onion, finely chopped
2
cups (500 ml) ketchup
2
tablespoons (30 ml) molasses
3
tablespoons (45 ml) cider
vinegar
2
tablespoons (30 ml)
Worcestershire sauce
2
tablespoons (30 ml) pure
maple syrup
1
tablespoon (15 ml) honey
mustard
13
2chipotle chiles in adobo sauce, plus 2 tablespoons (30 ml)
adobo sauce
¼teaspoon (1 ml) freshly ground
black pepper
½
teaspoon (2 ml) sea or kosher
salt
1½
teaspoons (7 ml) Liquid Smoke
Heat oil in a medium saucepan over
medium heat until hot and shimmering.
Add garlic and onion; sauté until soft and
translucent, about 5 to 7 minutes. Add
remaining ingredients and stir to combine.
Bring sauce to a boil and then reduce
heat to a simmer. Let sauce simmer
uncovered, about 30 to 40 minutes, or
until thickened.
Transfer sauce to the work bowl of a
Cuisinart® Food Processor fitted with the
chopping blade. Process until completely
smooth.
Use immediately or contain in a sealed
glass jar. Store in refrigerator if not using
right away.
Salsa Verde
This “green” salsa is a classic sauce in
Mexican cooking. It works well with
fish and poultry alike.
Makes about 2½ cups (625 ml).
4
garlic cloves
1
pound (500 g) tomatillos,
husks removed
2
tablespoons (30 ml) olive oil
2serrano chiles (may substitute
with jalapeños)
6
green onions, cut into 1-inch
(2.5 cm) pieces
½
small onion, cut into 1-inch
(2.5 cm) pieces
¹∕ ³
cup (75 ml) fresh cilantro
¼
cup (50 ml) fresh lime juice
1
teaspoon (5 ml) sea or kosher
salt
¼
teaspoon (1 ml) ground cumin
14
Place the garlic in the work bowl of a
Cuisinart® Food Processor fitted with the
chopping blade. Pulse until roughly
chopped. Remove the garlic and add the
tomatillos and pulse until chopped.
Reserve.
Heat the olive oil in a large skillet set over
medium heat. Once the oil is hot and
shimmering, add the garlic and sauté until
just softened. Add the tomatillos (with
juices) and let cook for about 8 minutes,
or until a strong simmer is achieved.
While the tomatillos and garlic are
cooking, add the chiles, green onions and
onion to the work bowl of the food
processor. Pulse to roughly chop. Add the
cooked garlic and tomatillos (with their
juices) to the chopped vegetables and
add the remaining ingredients. Process
until homogenous.
Use immediately or contain in a sealed
glass jar. Store in refrigerator if not using
right away.
Basic Brine
for Poultry or
Pork
Brining poultry or pork before cooking
adds a lot of extra moisture and flavour to
your cooked food. For even more flavour,
add herbs to the brining solution.
Makes enough for one 4 to 5 pounds
(1.8 to 2 kg) chicken or two Cornish hens*.
ENTRÉES
Lemon, Dijon and
Herb Roast Chicken
Makes 4 to 6 servings.
1
3½- to 4½-pound (1.6 to 1.8 kg)
chicken
1recipe Basic Brine for Poultry
(page 14)
1recipe Lemon Dijon Herb
Marinade (page 12)
Rinse chicken and pat dry inside and out
with paper towels; place on a cutting
board. Prepare Basic Brine according to
instructions. Be sure to rinse the chicken
well after brining and pat dry. Add the
Lemon Dijon Herb Marinade to a 1-gallon
(3.8 L) re-sealable bag. Place the chicken
in the bag with the marinade and make
sure that the marinade fully coats the
chicken. Place the sealed bag with the
marinating chicken in the refrigerator for
2 to 4 hours. After the time has elapsed,
remove the chicken from the bag and
truss the chicken well with butcher’s
twine.
Place the dressed and trussed chicken on
the provided poultry tower fitted in the
drip tray. Place in the Cuisinart® Vertical
Rotisserie and set the temperature to
400°F (200°C). Set the timer for 1 hour
and 15 minutes. Check the temperature
after one hour – the internal temperature
should register 175°F (80°C) for the light
meat and 180°F (85°C) for the dark meat.
8
cups (2 L) water
1
cup (250 ml) kosher salt
Let chicken rest for 15 minutes; carve and
serve.
Combine the water and salt in a mixing
bowl large enough to accommodate the
chicken. Whisk the water and salt together
and add the chicken. If the chicken is not
fully submerged, add more water.
Nutritional information per serving:
Calories 670 (62% from fat) • carb. 7g •
pro. 56g • fat 45g • sat. fat 13g • chol. 270g •
sod. 1050mg • calc. 42mg • fiber 0g
Cover and refrigerate 3 to 4 hours. Do not
over-brine or the meat will be too salty and
it will alter the texture of the final product.
*If brining pork loin, use ¹∕ ³ cup (75 ml)
kosher salt, 2 tablespoons (30 ml) sugar,
8 cups (2 L) warm water. If the pork is not
fully emerged, add more water. Cover and
refrigerate 2 to 3 hours.
Cajun Rubbed
Roast Chicken
Makes 4 to 6 servings.
1
3½- to 4½-pound (1.6 to 1.8 kg)
chicken
1recipe Basic Brine for Poultry
(page 14)
1
recipe Cajun Rub (page 12)
Rinse chicken and pat dry inside and out
with paper towels; place on a cutting
board. Prepare Basic Brine according to
instructions. Be sure to rinse the chicken
well after brining and pat dry. Add the
Cajun Rub to a 1-gallon (3.3 L) re-sealable
bag. Place the chicken in the bag with the
rub and make sure that the rub fully coats
the chicken. Place the sealed bag with the
seasoned chicken in the refrigerator for 2
to 4 hours. After the time has elapsed,
remove the chicken from the bag and
truss the chicken well with butcher’s
twine.
Place the dressed and trussed chicken on
the provided poultry tower fitted in the
drip tray. Place in the Cuisinart® Vertical
Rotisserie and set the temperature to
400°F (200°C). Set the timer for 1 hour
and 15 minutes. Check the temperature
after one hour – the internal temperature
should register 175°F (80°C) for the light
meat and 180°F (85°C) for the dark meat.
Let chicken rest for 15 minutes; carve and
serve.
Nutritional information per serving:
Calories 450 (40% from fat) • carb. 1g •
pro. 65g • fat 19g • sat. fat 5g • chol. 190mg •
sod. 950mg • calc. 32mg • fiber 0g
Hoisin Glazed
Roast Chicken
Makes 4 to 6 servings.
1
3½- to 4½-pound (1.6 to 1.8 kg)
chicken
1recipe Basic Brine for Poultry
(page 14)
½
teaspoon (2 ml) kosher salt
½teaspoon (2 ml) freshly ground
black pepper
1
recipe Hoisin Glaze (page 12)
Rinse chicken and pat dry inside and out
with paper towels; place on a cutting
board. Prepare Basic Brine according to
instructions. Be sure to rinse the chicken
well after brining and pat dry. Sprinkle the
salt and pepper all over the chicken,
including the cavity. Add half of the Hoisin
Glaze to a 1-gallon (3.3 L) re-sealable bag.
15
Place the chicken in the bag with glaze,
make sure glaze fully coats the chicken.
Place the sealed bag with seasoned
chicken in the refrigerator for 2 to 4 hours.
After the time has elapsed, remove
chicken from the bag and truss well with
butcher’s twine.
Place dressed and trussed chicken on
provided poultry tower fitted in the drip
tray. Place in the Cuisinart® Vertical
Rotisserie and set temperature to 400°F
(200°C). Set timer for 1 hour and 15
minutes. After 40 minutes have elapsed,
carefully open the rotisserie door and
brush Hoisin Glaze on the chicken while it
is rotating. Continue to brush glaze on the
chicken every 10 minutes. Check
temperature after one hour – the internal
temperature should register 175°F (80°C)
for light meat and 180°F (85°C) for dark
meat.
Let chicken rest for 15 minutes; carve and
serve.
Nutritional information per serving:
Calories 740 (56% from fat) • carb. 23g •
pro. 57g • fat 46g • sat. fat 13g • chol. 225mg •
sod. 890mg • calc. 35mg • fiber 0g
Place the dressed and trussed hens on
the roasting rack fitted in the drip tray –
they should be positioned so the backs of
the hens (the meatiest part) are facing out.
Place in the Cuisinart® Vertical Rotisserie
and set the temperature to 350°F (180°C).
Set the timer for 1 hour. Check the
temperature after 45 minutes – the
internal temperature should register 175°F
(80°C) for the light meat and 180°F (85°C)
for the dark meat.
Let the hens rest for 15 minutes; carve and
serve.
Nutritional information per serving:
Calories 390 (64% from fat) • carb. 5g •
pro. 29g • fat 27g • sat. fat 7g • chol. 170mg •
sod. 640mg • calc. 20mg • fiber 0g
Stuffed Cornish
Hens, Moroccan
Style
Makes 4 servings.
2
Cornish hens
1recipe Basic Brine for Poultry
(page 14)
Cornish Hens with
Simple Marinade
2
Makes 4 servings.
3tablespoons (45 ml) unsalted
butter or olive oil, divided
2
garlic cloves
½medium onion, cut into 1-inch
(2.5 cm) pieces
Place the garlic and onion in the work
bowl of a Cuisinart® Mini Chopper fitted
with the chopping blade. Pulse to roughly
chop. Heat a medium sauté pan over
medium heat. Add 1½ tablespoons (25 ml)
of the butter or olive oil to the hot pan.
Once the butter/oil is hot and shimmering,
add the garlic and onion. Sauté until
softened, about 6 minutes. Transfer to a
small mixing bowl. Add the spices, salt,
apricots, honey and pistachios; stir to
combine. Evenly divide the mixture and
stuff the cavity of each Cornish hen. Truss
the hens well with butcher’s twine.
Place the stuffed and trussed hens on the
roasting rack fitted in the drip tray – they
should be positioned so the backs of the
hens (the meatiest part) are facing out.
Brush the hens with the reserved butter/
oil. Place in the Cuisinart® Vertical
Rotisserie and set the temperature to
350°F (180°C). Set the timer for 1 hour.
Check the temperature after 45 minutes –
the internal temperature should register
175°F (80°C) for the light meat and 180°F
(85°C) for the dark meat.
Let the hens rest for 15 minutes; carve
and serve.
Nutritional information per serving:
Calories 390 (64% from fat) • carb. 5g • pro. 29g
• fat 27g • sat. fat 7g • chol. 170mg • sod. 640mg
• calc. 20mg • fiber 0g
Roasted Garlic
and Herb Crusted
Beef Tenderloin
1
teaspoon (5 ml) ground cumin
1recipe Basic Brine for Poultry
(page 14)
1½
teaspoons (7 ml) ground
coriander
Makes 8 servings.
1
½
teaspoon (5 ml) ground
cardamom
1
head roasted garlic (page 23)
¼
teaspoon (1 ml) sea or kosher
salt
Cornish hens
recipe Simple Marinade
(page 12)
Rinse Cornish hens and pat dry inside
and out with paper towels; place on a
cutting board. Prepare Basic Brine
according to instructions. Be sure to rinse
the hens well after brining and pat dry.
Add the Simple Marinade to a 1-gallon
(3.8 L) re-sealable bag. Place the Cornish
hens in the bag with the marinade and
make sure that the marinade fully coats
the hens. Place the sealed bag with the
marinating hens in the refrigerator for 2 to
4 hours. After the time has elapsed,
remove the hens from the bag and truss
them well with butcher’s twine.
16
1
teaspoon (5 ml) sea or kosher
salt
½
cup (125 ml) chopped dried
apricots
1
tablespoon (15 ml) honey
¼
cup (1 ml) pistachios
Rinse Cornish hens and pat dry inside
and out with paper towels; place on a
cutting board. Prepare Basic Brine
according to instructions. Be sure to rinse
the hens well after brining and pat dry.
¼teaspoon (1 ml) freshly ground
black pepper
1
teaspoon (5 ml) fines herbes
1tablespoon (15 ml) panko
(Japanese-style breadcrumbs)
1
tablespoon (15 ml) extra virgin
olive oil
2¼pounds (1 kg) trimmed beef
tenderloin roast (preferably
top cut)
Place the roasted garlic, salt, pepper,
fines herbes and panko in the work bowl
of a Cuisinart® Mini Chopper or Food
Processor fitted with the chopping blade.
Process until well combined. With the
chopper/processor running, add the oil in
a slow and steady stream. Process until
combined.
Rinse the beef and pat dry with paper
towels.
Evenly spread the roasted garlic mixture
all over the beef. Tie the beef to ensure
even cooking. Place beef on the roasting
rack fitted in the drip tray, with the smaller
end of the beef on the bottom of the rack.
Place in the Cuisinart® Vertical Rotisserie
and set the temperature to 350°F (180°C).
Set the timer for 1 hour and 15 minutes.
Check the roast after 60 minutes – the
internal temperature should read 140°F
(60°C) for medium rare. Let meat rest
10 to 15 minutes before slicing.
Nutritional information per serving:
Calories 230 (50% from fat) • carb. 2g •
pro. 27g • fat 13g • sat. fat 5g • chol. 85mg •
sod. 135mg • calc. 43mg • fiber 0g
Herb Roasted
Leg of Lamb
Makes 8 to 10 servings.
2 to 3 garlic cloves
1
tablespoon (15 ml) fresh
rosemary
2
tablespoons (30 ml) fresh
parsley
1
tablespoon (15 ml) fresh thyme
1½
ounces (43 g) Parmesan
½cup (125 ml) panko (Japanesestyle breadcrumbs)
¾
teaspoon (3.75 ml) sea or
kosher salt, divided
¾teaspoon (3.75 ml) freshly
ground black pepper, divided
3
tablespoons (45 ml) olive oil
1small boneless leg of lamb,
butterflied, approximately
2¹∕ ³ pounds (1 kg)
Place the garlic cloves, rosemary, parsley,
and thyme in the work bowl of a
Cuisinart® Food Processor fitted with the
17
chopping blade. Pulse until all are finely
chopped. Add the Parmesan and pulse
again until the cheese is chopped. Pulse
in the breadcrumbs, ¼ teaspoon (1 ml) of
salt, and ¼ teaspoon (1 ml) of pepper.
With the machine running, add the olive
oil through the feed tube until the mixture
comes together.
Lay the lamb out cut side up; evenly
spread the herb mixture over the surface
of the lamb. Fold the sides of the lamb in
and then roll the lamb. Secure well with
butcher’s twine and tie in 1- to 2-inch (2.5
to 5 cm) intervals. Season the outside of
the lamb with the reserved salt and
pepper.
Place the lamb on the roasting rack fitted
in the drip tray, with the smaller end of the
lamb on the bottom of the rack. Place in
the Cuisinart® Vertical Rotisserie and set
the temperature to 400°F (200°C). Set the
timer for 50 minutes. Check the lamb after
40 minutes – internal temperature should
be 140°F (60°C) for medium rare.
Allow roast to rest for at least 10 minutes
before slicing.
Nutritional information per serving:
Calories 310 (69% from fat) • carb. 3g •
pro. 21g • fat 23g • sat. fat 9g • chol. 75mg •
sod. 290 mg • calc. 60mg • fiber 0g
Curried Chicken
Kebabs
Treat yourself to this mildly spicy
Indian specialty. It pairs well with a
side of basmati rice.
Makes 4 servings.
1½pounds (750 g) boneless,
skinless chicken breasts, cut
into 2-inch (5 cm) pieces
2
tablespoons (30 ml) Curry
Powder (page 11)
¼
cup (40 ml) coconut milk
½
cup (125 ml) nonfat plain
yogurt
Rinse chicken and pat dry with paper
towels; place in a bowl. Put the curry
powder, coconut milk and yogurt in a
large mixing bowl; blend until fully
combined. Cover the bowl with plastic
wrap; let marinate in the refrigerator for 3
to 4 hours. After the time has elapsed,
18
remove the chicken and thread onto the
provided skewers. Hang the skewers on
the roasting rack as instructed (page 8).
Place in the Cuisinart® Vertical Rotisserie
and set the temperature to 350°F (180°C).
Set the timer for 25 minutes. Internal
temperature should read 175°F. (80°C)
Nutritional information per serving:
Calories 240 (20% from fat) • carb. 4g •
pro. 41g • fat 5g • sat. fat 3g • chol. 100mg •
sod. 135mg • calc. 58mg • fiber 0g
Asian-Style Tofu
Kebabs
The Soy Ginger Marinade is a
wonderful complement to the tofu
and mixed vegetables.
Makes 4 servings.
7 to 8ounces (200 - 230 g) extra firm
tofu, cut into 2-inch (5 cm)
pieces
4ounces (115 g) eggplant, cut
into 1-inch (2.5 cm) pieces
1large bell pepper, cut into
1-inch (2.5 cm) pieces
8small mushrooms (1 to 2
inches [2.5 to 5 cm] in
diameter)
1
recipe Soy Ginger Marinade
(page 13)
Place all of the ingredients in a large
mixing bowl. Very gently toss to combine.
Cover the bowl with plastic wrap; let
marinate in the refrigerator for 1 to 2
hours. After the time has elapsed, thread
the tofu and vegetables onto the provided
skewers, starting with a pepper, then
eggplant, tofu, mushroom, another
eggplant, and ending with another
pepper. Hang the skewers on the roasting
rack as instructed (page 8).
Place in the Cuisinart Vertical Rotisserie
and set the temperature to 450°F (230°C).
Set the timer for 30 minutes. Kebabs are
done when the vegetables begin to
brown.
®
Middle Eastern
Spiced Chicken and
Vegetable Kebabs
Marinated Shrimp
and Roasted
Tomatoes
Makes 4 servings.
Makes 4 servings.
¾pound (375 g) skinless,
boneless chicken, cut into
2-inch (5 cm) pieces
²∕ ³pound (300 g) large shrimp,
deveined and rinsed well
(do not remove the shells)
1medium bell pepper, cut into
1-inch (2.5 cm) pieces
2
garlic cloves, crushed
1
scallion, chopped
6ounces (170 g) winter squash,
cut into 1-inch (2.5 cm) pieces
¼
cup (50 ml) chopped fresh
parsley
8small mushrooms (1 to 2
inches [2.5 to 5 cm] in
diameter)
¼
cup (50 ml) chopped fresh mint
¼
cup (50 ml) chopped fresh
cilantro
¼
cup (50 ml) olive oil
1
2½
tablespoons (40 ml) fresh lime
juice
tablespoon (15 ml) extra virgin
olive oil
1
recipe Middle Eastern Rub
(page 11)
Rinse the chicken and pat dry with paper
towels. Place in a large mixing bowl and
toss with the vegetables, oil, lime juice
and rub. Cover the bowl with plastic wrap;
let marinate in the refrigerator for 1 to 2
hours. After the time has elapsed, thread
the chicken and vegetables onto the
provided skewers, starting with a pepper,
then squash, chicken, mushroom, and
ending with another pepper.
Hang the skewers on the roasting rack as
instructed (page 8).
Place in the Cuisinart® Vertical Rotisserie
and set the temperature to 400°F (200°C).
Set the timer for 40 minutes, or until
chicken is thoroughly cooked and
vegetables begin to brown.
Nutritional information per serving:
Calories 510 (53% from fat) • carb. 18g •
pro. 43g • fat 31g • sat. fat 5g • chol. 100mg •
sod. 650mg • calc. 73mg • fiber 4g
½teaspoon (2 ml) sea or kosher
salt
¼teaspoon (1 ml) freshly ground
black pepper
1
teaspoon (5 ml) lemon zest
16
cherry tomatoes
Toss the shrimp with all of the ingredients
together in a large mixing bowl. Cover the
bowl with plastic wrap; let marinate in the
refrigerator for about 1 hour. After the
time has elapsed, thread the shrimp and
tomatoes, alternately, onto the provided
skewers.
Hang the skewers on the roasting rack as
instructed (page 8).
Place in the Cuisinart® Vertical Rotisserie
and set the temperature to 450°F (230°C).
Set the timer for 16 to 18 minutes, or until
shrimp are opaque and thoroughly
cooked.
Nutritional information per serving:
Calories 90 (42% from fat) • carb. 4g •
pro. 9g • fat 5g • sat. fat 1g • chol. 65mg •
sod. 340mg • calc. 41mg • fiber 1g
Nutritional information per serving:
Calories 330 (60% from fat) • carb. 24g •
pro. 12g • fat 24g • sat. fat 3g • chol. 0mg •
sod. 1200mg • calc. 130mg • fiber 3g
19
Rotisserie
Scallops with
Lemon Herb Butter
The butter makes this dish rich and
luxurious, but if you’re looking for a lighter
meal, substitute extra virgin olive oil for
the butter and serve on the side.
Makes 4 servings.
2
tablespoons (30 ml) fresh
lemon juice
¾
teaspoon (3.75 ml) sea or
kosher salt
½teaspoon (2 ml) freshly ground
black pepper
2
tablespoons (30 ml) extra
virgin olive oil
16sea scallops (about 2 pounds
[1 kg]), rinsed well and patted
dry
7tablespoons (105 ml) unsalted
butter, room temperature and
cut into ½-inch (1.25 cm)
pieces
¹∕ ³
1
cup (75 ml) fresh parsley
teaspoon (5 ml) lemon zest
In a small bowl, whisk the lemon juice
together with the salt and pepper.
Gradually whisk in the olive oil. Place the
scallops in a large mixing bowl and toss
with the lemon juice mixture. Cover the
bowl with plastic wrap; let marinate in the
refrigerator for about 1 hour. After the
time has elapsed, thread the scallops
onto the provided skewers.
Hang the skewers on the roasting rack as
instructed (page 8).
Place in the Cuisinart® Vertical Rotisserie
and set the temperature to 450°F (230°C).
Set the timer for 16 minutes, or until
scallops are opaque and thoroughly
cooked.
While the scallops are cooking, place the
butter, parsley and lemon zest in the work
bowl of a Cuisinart® Mini Chopper fitted
with the chopping blade. Process until
thoroughly combined; reserve.
To serve, place the scallops on a serving
20
tray and dot with the lemon herb butter.
You can also melt the butter and serve as
a dipping sauce or drizzle over the top of
the scallops.
Nutritional information per serving:
Calories 440 (59% from fat) • carb. 7g •
pro. 39g • fat 29g • sat. fat 14g • chol. 130mg •
sod. 910mg • calc. 69mg • fiber 0g
Sausage, Peppers
and Onions
Makes 4 servings.
2bell peppers (mixed colors)
cut in 1-inch (2.5 cm) pieces
1
onion, cut into 1-inch (2.5 cm)
pieces
¼
cup (50 ml) olive oil
½
teaspoon (1 ml) sea or kosher
salt
¼teaspoon (1 ml) freshly ground
black pepper
4
hot Italian sausages, halved
In a mixing bowl, toss the peppers and
onion with olive oil, salt and pepper.
Thread onto the skewers, starting with a
pepper, then onion, following with half a
piece of the sausage, and then finishing
with another piece each of the pepper
and onion.
Hang the skewers on the roasting rack as
instructed (page 8).
Place in the Cuisinart® Vertical Rotisserie
and set the temperature to 400°F (200°C).
Set the timer for 30 minutes, cooking until
the vegetables are well browned and the
sausages are cooked through.
Nutritional information per serving:
Calories 540 (82% from fat) • carb. 8g •
pro. 17g • fat 50g • sat. fat 15g • chol. 85mg •
sod. 1090mg • calc. 33mg • fiber 2g
Pour the water into a large stockpot.
Place the ribs in the water; bring to a boil
over medium-high heat. Once water has
reached a boil, reduce to medium-low;
simmer for 45 minutes to 1 hour.
Remove the ribs from the pot and pat dry.
Place the roasting rack in the drip tray.
Carefully pierce the ribs onto the rack and
then invert onto the poultry tower (similar
to assembling the unit for the skewers).
Using four of the skewers, pierce through
the ribs to provide extra support, and
hook to the top of the rack as you would
for assembling skewers.
Brush liberally with the Barbecue Sauce;
place in the Cuisinart® Vertical Rotisserie
and set the temperature to 325°F (160°C).
Set the timer for 45 minutes.
Very carefully open the door of the
rotisserie and brush with the reserved
Barbecue Sauce every 10 minutes – note:
the ribs will continue to rotate while
brushing to ease the process.
Serve immediately.
Nutritional information per serving
Calories 760 • (67% from fat) • carb. 26g •
pro. 38g • fat 56g • sat. fat 20g • chol. 185mg •
sod. 1810mg • calc. 108mg • fiber 0g
Brie Stuffed Beef
Filets with Herb
Crust
The filets take only 25 minutes to cook,
making this a perfect weeknight treat
for your family.
cup (250 ml) Barbecue Sauce
(page 13)
Carefully remove the filets from the
basket. Let meat rest for 5 to 10 minutes
before serving.
Nutritional information per serving
Calories 560 (75% from fat) • carb. 1g •
pro. 34g • fat 47g • sat. fat 19g • chol. 135mg •
sod. 460mg • calc. 0mg • fiber 0g
Swordfish with
Salsa Verde
Makes 4 servings.
1
tablespoon (15 ml) herbes de
Provence
½
teaspoon (2 ml) sea or kosher
salt
2beef tenderloin filets, about
8 ounces (230 g) each
1
Place in the Cuisinart® Vertical Rotisserie
and set the temperature to 400°F (200°C).
Set the timer for 25 minutes (for medium
rare).
1recipe Salsa Verde (page 14),
divided
Makes 4 servings.
quarts (3.79 L) water
Place stuffed filets in the provided basket
with the slit part of the filets facing up
when cooking. Assemble as instructed
(page 7). Place the basket on the roasting
rack assembly fitted in the drip tray.
1
Baby Back Ribs
1rack baby back ribs
(about 2 pounds [1 kg])
Using a sharp knife, cut a horizontal slit in
the side of one filet; carefully cut into the
centre to create a pocket – do not cut all
the way through to the sides. Repeat for
the other filet. Place ½ ounce (15 g) of the
cheese in each pocket – press the open
sides together tightly. Drizzle the filets
with the olive oil and rub in to coat
completely and evenly. Sprinkle the herb
mixture on both sides and press into the
filet. Refrigerate for 20 to 30 minutes
before grilling. (Filets may be prepared up
to 8 hours ahead and refrigerated.)
Makes 2 servings.
¼teaspoon (1 ml) freshly ground
black pepper
4
Place the herbes de Provence, salt and
pepper in a small bowl. Stir to blend;
reserve.
1ounce (30 g) Brie, cold, cut into
2 equal pieces
½
tablespoon (7 ml) extra virgin
olive oil
pound (500 g) swordfish
lime wedges (for serving)
Rinse the swordfish and pat dry with
paper towels. Place in a glass baking dish
and pour ½ cup (125 ml) of the Salsa
Verde over the fish to cover completely.
Cover the dish with plastic wrap; marinate
in the refrigerator for about 30 minutes.
Remove fish and wrap well in foil. Place
wrapped fish in the provided basket.
Assemble basket as instructed (page 7)
and place on the roasting rack assembly
fitted in the drip tray.
21
Place in the Cuisinart® Vertical Rotisserie
and set the temperature to 450°F (230°C).
Set the timer for 40 minutes.
Five Spice
Chicken Wings
Carefully remove the wrapped fish from
the basket; transfer to a serving platter.
Serve with the reserved Salsa Verde.
Makes 6 servings.
Nutritional information per serving
Calories 250 (45% from fat) • carb. 11g •
pro. 24g • fat 13g • sat. fat 3g • chol. 45mg •
sod. 640mg • calc. 36mg • fiber 3g
Salmon with
Chermoula
Marinade
Makes 4 servings.
1
pound (500 g) salmon filet
1recipe Chermoula Marinade
(page 13), divided
Rinse the salmon and pat dry with paper
towels. Place in a glass baking dish and
pour ½ cup (125 ml) of the Chermoula
Marinade over the fish to cover
completely. Cover the dish with plastic
wrap; marinate in the refrigerator for about
1 hour.
Remove fish and wrap well in foil. Place
wrapped fish in the provided basket.
Assemble basket as instructed (page 7)
and place on the roasting rack assembly
fitted in the drip tray.
Place in the Cuisinart® Vertical Rotisserie
and set the temperature to 450°F (230°C).
Set the timer for 40 minutes.
Carefully remove the wrapped fish from
the basket; transfer to a serving platter.
Serve with the reserved marinade.
Nutritional information per serving:
Calories 680 ( 83% from fat) • carb. 6g •
pro. 23g • fat 63g • sat. fat 9g • chol. 60mg •
sod. 590mg • calc. 58mg • fiber 2g
1¾
pounds (790 g) chicken wings
1
tablespoon (15 ml) olive oil
1recipe Five Spice Powder
(page 11)
nonstick cooking spray
Place the wings in a 1 gallon (3.8 L)
re-sealable plastic bag. Add oil and make
sure that the wings are evenly coated.
Add Five Spice Powder and seal the bag.
Gently shake the bag to make sure that
spice powder is fully covering the wings.
Refrigerate for 3 to
4 hours.
Coat the provided basket with nonstick
cooking spray. Place seasoned wings in
the prepared basket; assemble as
instructed (page 7) and place on the
roasting rack assembly fitted in the drip
tray.
Place in the Cuisinart® Vertical Rotisserie
and set temperature to 350°F (180°C). Set
the timer for 40 minutes.
Carefully remove the wings; serve
immediately.
Nutritional information per serving
Calories 310 (69% from fat) • carb. 0g •
pro. 24g • fat 23g • sat. fat 6g • chol. 100mg •
sod. 95mg • calc. 16mg • fiber 0g
SIDE DISHES
Roasted Asparagus
Line the basket with foil. Place seasoned
asparagus in the lined basket – make sure
that foil is fully lining the bottom of the
basket (where the spears stand) so the
asparagus do not fall out during cooking.
Assemble as instructed (page 7) and
place on the roasting rack assembly fitted
in the drip tray.
Place in the Cuisinart® Vertical Rotisserie
and set temperature to 450°F (230°C). Set
timer for 10 minutes.
Serve warm or at room temperature.
Nutritional information per serving
Calories 100 (75% from fat) • carb. 4g •
pro. 3g • fat 9g • sat. fat 2g • chol. 0mg •
sod. 270mg • calc. 28mg • fiber 2g
Roasted Corn
Medallions
An easy way to make “grilled” corn.
Makes 4 servings.
4ears corn on the cob, shucked
and cut into 1- to 1½-inch
(2.5 to 5 cm) thick rounds
6tablespoons (90 ml) olive oil or
unsalted butter, melted
pinch kosher salt, or to taste
pinch freshly ground black
pepper, or to taste
Toss corn medallions with olive oil or
butter and a pinch of salt and pepper.
Reserve the oil/butter remaining in the
bowl.
Making asparagus in the rotisserie basket
imparts a lightly sweet flavour to them.
Thread corn onto the provided skewers.
Hang the skewers on the roasting rack as
instructed (page 8).
Makes 6 servings.
Place in the Cuisinart® Vertical Rotisserie
and set temperature to 350°F (180°C). Set
the timer for 30 minutes. After 15 minutes,
carefully open the rotisserie door and
brush with reserved oil/butter while corn
is rotating.
1½
pounds (750 g) asparagus,
trimmed
¼
cup (50 ml) extra virgin olive oil
¾
teaspoon (3.75 ml) kosher salt
¼teaspoon (1 ml) freshly ground
black pepper
22
Toss the asparagus with olive oil, salt and
pepper.
Corn is done when the top edges begin to
brown.
Serve immediately.
Nutritional information per serving:
Calories 260 (71% from fat) • carb. 17g •
pro. 3g • fat 22g • sat. fat 3g • chol. 0mg •
sod. 45mg • calc. 2mg • fiber 2g
Roasted Garlic
Roasted garlic is a great addition to a lot
of dishes – we like it paired with our beef
tenderloin.
Yields about 1 cup (250 ml) roasted garlic.
4heads garlic, ½ to 1 inch
(2.5 to 5 cm) cut off tops
(to just expose cloves)
2
tablespoons (30 ml) extra
virgin olive oil
½
teaspoon (2 ml) sea or kosher
salt
Drizzle olive oil equally into each head of
garlic; sprinkle with the salt.
Wrap garlic heads together in foil; load
into the provided basket and assemble
onto roasting rack, as instructed (page 7).
Place in the Cuisinart® Vertical Rotisserie
and set temperature to 450°F (230°C). Set
timer for 1 hour.
Carefully (foil and garlic will be hot)
remove from the basket. Squeeze the
garlic cloves out into a bowl. If not using
immediately, store in a sealed jar in the
refrigerator up to one month.
Nutritional information per serving:
Calories 20 (53% from fat) • carb. 2g •
pro. 0g • fat 1g • sat. fat 0g • chol. 0mg •
sod. 45mg • calc. 11mg • fiber 0g
Herb Roasted
Potatoes
Makes 4 to 5 servings.
1
garlic clove
1
tablespoon (15 ml) fresh
rosemary
1½pounds (750 g) small red
potatoes, quartered
3
tablespoons (45 ml) extra
virgin olive oil
23
½
teaspoon (2 ml) kosher salt
Sweetened Whipped Cream:
pinch freshly ground black
pepper
¾
cup (175 ml) heavy cream,
chilled
3
tablespoons (45 ml)
confectioners’ sugar
1
teaspoon (5 ml) pure vanilla
extract
Place garlic and rosemary in the work
bowl of a Cuisinart® Mini Chopper fitted
with chopping blade. Pulse 5 times to
roughly chop; reserve.
In a large mixing bowl, toss potatoes with
oil to coat. Add the reserved garlic and
rosemary, salt and pepper. Stir to coat.
Thread potatoes equally onto the
provided skewers. Hang skewers on the
roasting rack as instructed (page 8).
Place in the Cuisinart Vertical Rotisserie
and set temperature to 450°F (230°C). Set
timer for 45 minutes.
®
Serve hot or at room temperature.
Nutritional information per serving
Calories 170 (44% from fat) • carb. 22g •
pro. 3g • fat 9g • sat. fat 1g • chol. 0mg •
sod. 220mg • calc. 16mg • fiber 2g
DESSERTS
Grilled Pound Cake
with Sweetened
Whipped Cream
and Berries
In a medium mixing bowl, toss
strawberries and blueberries with sugar
and salt. Let fruit macerate while
preparing the rest of the dessert.
Brush the pound cake with melted butter.
Load into the provided basket and
assemble on the roasting rack, as
instructed (page 7).
Place in the Cuisinart® Vertical Rotisserie
and set temperature to 450°F (230°C). Set
the timer for 12 minutes.
2cups (500 ml) strawberries,
hulled and sliced
1
cup (250 ml) blueberries
2
tablespoons (30 ml) granulated
sugar
pinch sea or kosher salt
²∕ ³pound (300 g) purchased
pound cake, halved and cut to
fit into the rotisserie basket
2 to 3tablespoons (30 to 45 ml)
unsalted butter, melted
24
Thread peach halves onto skewers
(2 halves per skewer, threaded vertically).
Hang skewers on the roasting rack as
instructed (page 8).
Place in Cuisinart® Vertical Rotisserie and
set temperature to 450°F (230°C). Set
timer for 20 minutes.
When peaches are finished cooking,
carefully remove from skewers. Reserve
juices in the drip pan.
To serve: Place grilled peaches on a
platter. Drizzle reserved juices over top.
Nutritional information per serving
Calories 180 (56% from fat) • carb. 19g •
pro. 1g • fat 11g • sat. fat 8g • chol. 30mg •
sod. 135mg • calc. 16mg • fiber 1g
While the pound cake is cooking, prepare
sweetened whipped cream.
In a chilled mixing bowl, add cream,
confectioners’ sugar and vanilla. Using a
Cuisinart® Hand Mixer, whip the cream to
medium-stiff peaks. Reserve.
To assemble: Place grilled pound cake in a
shallow casserole dish. Top with sweetened
whipped cream and then finish with the
macerated berries.
Nutritional information per serving:
Calories 240 (53% from fat) • carb. 26g •
pro. 2g • fat 14g • sat. fat 7g • chol. 50mg •
sod. 140mg • calc. 37mg • fiber 1g
A great dessert for the summer months,
and it only takes 15 minutes.
Makes 10 servings.
In a large mixing bowl, combine syrup,
butter and salt. Add peaches and toss to
coat.
Maple Glazed
Peaches
To make this simple fruit dish even more
decadent, serve with vanilla ice cream.
Makes 4 servings.
3
tablespoons (45 ml) pure
maple syrup
¼
cup (50 ml) unsalted butter,
melted
¼
teaspoon (1 ml) sea or kosher
salt
4
medium peaches, halved and
pitted
25
NOTES
WARRANTY
Limited Three-Year Warranty
We warrant that this Cuisinart product will be
free of defects in material or workmanship under
normal home use for 3 years from the date of
original purchase.
This warranty covers manufacturer’s defects
including mechanical and electrical defects. It
does not cover damage from consumer abuse,
unauthorized repairs or modifications, theft,
misuse, or damage due to transportation or
environmental conditions. Products with removed
or altered identification numbers will not be
covered.
Note: We recommend you use a traceable,
insured delivery service for added protection.
Cuisinart will not be held responsible for in-transit
damage or for packages that are not delivered to
us.
To order replacement parts or accessories, call
our Customer Service Centre at
1-800-472-7606.
For more information, please visit our website at
www.cuisinart.ca
This warranty is not available to retailers or other
commercial purchasers or owners.
If your Cuisinart product should prove to be
defective within the warranty period, we will repair
it or replace it if necessary.
For warranty purposes, please register your
product online at www.cuisinart.ca to facilitate
verification of the date of original purchase or
keep your original receipt for the duration of the
limited warranty.
If the appliance should become defective within
the warranty period, do not return the appliance to
the store. Please contact our Customer Service
Centre:
Toll-free phone number: 1-800-472-7606
Address: Cuisinart Canada
100 Conair Parkway
Woodbridge, Ont.
L4H 0L2
Email: consumer_Canada@
conair.com
Model:
CVR-1000C
To facilitate the speed and accuracy of your
return, please enclose:
• $10.00 for shipping and handling of the
product (cheque or money order)
• Return address and phone number
• Description of the product defect
• Product date code*/copy of original proof of
purchase
• Any other information pertinent to the product’s
return
* Product date code can be found on the
underside of the base of the product. The
product date code is a 4 or 5 digit number.
Example, 90630 would designate year, month &
day (2009, June 30th).
26
27
Stand Mixers
Ustensiles
de cuisson
Cookware
Mélangeurs
Blenders
Grilles-pain fours
Toaster Ovens
Robots
culinaires
Food
Processors
Cafetières
Any trademarks or service marks of third
parties used herein are the trademarks or
service marks of their respective owners.
©2009 Cuisinart
Cuisinart® is a registered
trademark of Cuisinart
100 Conair Parkway,
Woodbridge, Ont
L4H 0L2
Printed in China
www.cuisinart.ca
09CC12242
www.cuisinart.ca
Try some of our other countertop appliances and cookware, and Savor the Good Life™.
Cuisinart offers an extensive assortment of top quality products to make life in the kitchen easier than ever.
Coffeemakers
Batteurs
sur socle
Cuisinart offre une vaste gamme de produits de grande qualité qui facilitent la vie dans la cuisine comme jamais
auparavant. Essayez nos autres appareils de comptoir et ustensiles de cuisson, et savourez la bonne vieMC.
www.cuisinart.ca
©2009 Cuisinart
Cuisinart® est une marque de commerce
déposée de Cuisinart
100 Conair Parkway,
Woodbridge, Ont L4H 0L2
Imprimé en Chine
Centre d’appel des consommateurs :
[email protected]
1-800-472-7606
Toute autre marque de commerce ou marque
de service mentionnée aux présentes sont
les marques de commerce ou marques de
service de leurs propriétaires respectifs.
www.cuisinart.ca
09CC12242