1
System Software Installation Guide
Please read this first.
Thank you for choosing the Yamaha PM1DV2K Software Upgrade Kit.
PM1DV2K is a software package that upgrades the PM1D system software and extends the capabilities of the system by
adding a variety of functions in response to numerous user requests.
Please read this installation guide thoroughly before using the software so you can take full advantage of the PM1DV2K for
a long period of time.
Special Notices
• The software and this installation guide are the exclusive
copyrights of Yamaha Corporation.
• Use of the software and this installation guide is governed by
the Software Licensing Agreement which the purchaser fully
agrees to upon breaking the seal of the software packaging.
(Carefully read the agreement at the end of this installation
guide before installing the software.)
• Copying of the software or reproduction of this installation
guide in whole or in part by any means is expressly forbidden
without the written consent of the manufacturer.
• Copying of the commercially available music sequence data
and/or digital audio files is strictly prohibited except for your
personal use.
• Yamaha makes no representations or warranties with regard
to the use of the software and documentation and cannot be
held responsible for the results of the use of this installation
guide and the software.
• This disc is a CD-ROM. Do not attempt to play the disc on an
audio CD player. Doing so may result in irreparable damage
to your audio CD player.
• The screen displays as illustrated in this installation guide are
for instructional purposes, and may appear somewhat
different from the screens which appear on your computer.
• Future upgrades of application and system software and any
changes in specifications and functions will be announced
separately.
• Specifications and descriptions in this installation guide are
for information purposes only. Yamaha Corp. reserves the
right to change or modify specifications at any time without
prior notice. Since specifications may not be the same in every
locale, please check with your Yamaha dealer.
• The company names and product names in this installation
guide are the trademarks or registered trademarks of their
respective companies.
Contents
About the Package............................................... 2
Package Contents ......................................................... 2
Contents of the CD-ROMs.......................................... 2
Contents of Manuals.................................................... 2
Updating the firmware and CS1D screen
software ............................................................. 2
Before you use the PM1D system................................ 2
System Requirements................................................... 2
About the version checking function.......................... 3
System update procedure ............................................ 4
Updating the firmware
(CS1D/DSP1D(-EX)/AI8/AO8/DIO8)..................... 4
Updating the CS1D screen software ........................... 6
Installing the license ............................................ 7
System Requirements................................................... 7
Installation Procedure.................................................. 7
Direct installation......................................................... 8
Indirect installation.................................................... 10
Direct De-authorization ............................................ 11
Indirect De-authorization ......................................... 12
Error Message List.............................................. 13
Troubleshooting ................................................ 14
SOFTWARE LICENSE AGREEMENT..................... 15
Yamaha Professional Audio web site:
http://www.yamahaproaudio.com/
PM1D V2 System Software Installation Guide
1
Updating the firmware
and CS1D screen software
About the Package
Package Contents
The package contains the following items. Please confirm that all
items are included before you start using the software.
• One CD-ROM
• Three manuals
Contents of the CD-ROMs
• Firmware and CS1D screen software updater
This is an application and data for updating the firmware of each
component and the CS1D screen software to V2.
• Installer (System Software Installer)
This is an installer for authorizing the software that was updated
to V2.
• PM1D Manager
PM1D Manager is an application program that provides an
environment equivalent to the CS1D on your computer. For
details on installing and using PM1D manager, refer to the
PM1D Manager owner’s manual.
• Yamaha USB-MIDI Driver
This driver enables the computer and the CS1D to communicate
with each other via their USB ports. This is not used for
updating the system software.
See the PM1D Manager Owner’s Manual for more information
on installing drivers.
• Owner’s Manual (PDF format)
These provide the same content as the paper manuals, in PDF
format.
NOTE: Adobe Reader (available free of charge) must be installed in
your computer in order to view the PDF manual. If you don’t have
Adobe Reader, use the weblink given below to open the Adobe
Corporation website, and download Adobe Reader.
http://www.adobe.com
Contents of Manuals
System Software Installation Guide (this guide)
First, check the package contents, system requirements, and
procedure for installing the system software.
PM1D Version 2 Supplementary Manual
This explains the changes in system software version 2.
PM1D Manager Owner’s Manual
This explains installation and use of PM1D Manager.
2
Before you install the license for the system software, you must
use the following procedure to update all software to V2.
Before you use the PM1D system
PM1D system contains software that allows the CS1D/DSP1D(EX)/AI8/AO8/DIO8 (subsequently referred to as “the
components”) to operate independently. Thus, all software must
be updated to the same version to ensure consistency. If you fail to
perform this step, the CS1D’s version checking function will
detect the inconsistency, and the system will not start up correctly.
Since it is possible that the various components are not running
the same software version (due to different dates of purchase, or
any other reason), you must use the included CD-ROM to update
the entire system before using the system for the first time.
Once you have updated the entire system to the same version,
subsequent updates are not necessary. However if you add a new
unit, or use a new CD-ROM to update, you must once again
update the entire system.
• You must use the included CD-ROM to update the
entire system. After updating the system, you must
execute INITIALIZE ALL MEMORIES. If you fail to
perform the update or initialization, operation is not
guaranteed. For details on INITIALIZE ALL
MEMORIES, refer to “Initializing memories” within the
Reference Manual (Software).
• If your CS1D was shipped from the factory with the V2
system software, it will not have a product ID. Please
note that in this case, if you change from V2 to an earlier
version, you won’t be able to return to V2 (i.e., you won’t
be able to install the V2 license). If you are unable to
return to V2, you will have to purchase a PM1DV2K
upgrade kit.
System Requirements
The following system is required in order to perform the update.
• An IBM PC/AT compatible computer with a Pentium II
233 MHz processor and 64 MB of memory or better.
(Pentium II 350 MHz and 128 MB of memory is
recommended.)
NOTE:
• Depending on your hardware or OS, system requirements may be
greater than listed above.
• If you are using a notebook computer, system requirements may
be greater than listed above as the minimum. Also,
communication may become unstable due to the power
management settings in the Windows Control Panel, or due to
power management settings specific to notebook CPUs (e.g.,
SpeedStep (Intel Corporation), PowerNow! (AMD Corporation),
or LongRun (Transmeta Corporation)). Please disable these
power management settings and use your computer with its power
supply adaptor connected.
• For the latest version of the software and details on operating
requirements, please refer to the following URL.
http://www.yamahaproaudio.com/
PM1D V2 System Software Installation Guide
• Internet Explorer 4.0 or later
• Display capability of 800 x 600 pixels (SVGA, High Color) or
better
• 10 MB or more free hard disk space
• Mouse
• CD-ROM drive
• Serial port
• RS-232C cable (cross-connected)
• One ATA-compliant PCMCIA Type II PC Flash Storage card
(subsequently referred to as “memory card”)
• A device with a PCMCIA Type II card slot (A system that
allows the files from the CD-ROM to be copied to the
memory card)
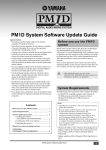
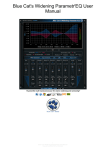
About the version checking function
The CS1D screen software contains a function that checks
whether the software of all components is a valid combination of
versions. If there is a combination of different versions, or if any
component has malfunctioned, the VERSION CHECK popup
window will appear when the CS1D starts up. This will not
appear if all components are correct. This version check function
is explained below.
2
1
3
4
5
6
8
L
M
N
L Component name or firmware name
M Firmware version display field for L
N Result of test
Of these fields, lines displayed in white characters indicate
the version of that entire component. Lines displayed in
smaller characters of gray provide details on firmware
versions of individual CPUs within the component. Of these,
fields M and N may be of the following types.
• Field M display list
x.xx
(numeric)
Firmware version
NO REPLY
CPU within the component does not respond
--------
Board not installed in the DSP1D(-EX)
DIFF.
Board is incorrectly inserted in the DSP1D(-EX)
• Field N display list
9
A
B
C
D
E
F
G
H
I
J
K
7
Version display fields 4 through K convey the following
information.
J
K
Checking result message field
OK button (may not be displayed in some cases)
PM1D SYSTEM SOFTWARE version display field
CS1D screen software version display field
CS1D firmware version display field
ENGINE A DSP1D(-EX) firmware version display field
ENGINE A INPUT UNIT firmware version display field
ENGINE A OUTPUT UNIT firmware version display field
ENGINE B DSP1D(-EX) firmware version display field
ENGINE B INPUT UNIT firmware version display field
ENGINE B OUTPUT UNIT firmware version display field
OK
Normal
----
Not connected (normal)
NG
Illegal firmware version within the component or
no response from CPU within the component
OLD
Old version
NEW
New version
DIFF
Illegal combination of versions
The above test results are summarized, and a message is
shown in 1. If this popup window appears, refer to the
following explanation and resolve the reason for the
problem.
[Results other than OK]
If there is a problem with other than the firmware that
operates the controls of the CS1D and the INPUT UNIT /
OUTPUT UNIT, the OK button 2 will not appear.
In this case, it will be impossible to perform any screen
operations or use any of the controls, and thus impossible to
control the system.
Since correct operation cannot be guaranteed in such a state,
please remove the cause of the problem. The system will not
recover until the cause is removed.
If there is a problem with the firmware that operates the
controls of the CS1D and the INPUT UNIT / OUTPUT UNIT,
the OK button 2 will appear.
Click the OK button, and the system will forcibly be started up,
ignoring the faulty component or faulty portion of the
component.
At this time, a popup window will appear to inform you which
component is being ignored, and the following limitations will
apply. However, the correctly functioning components will
operate, allowing you to control the remaining portions of the
system.
PM1D V2 System Software Installation Guide
3
INPUT/OUTPUT UNIT section
INPUT UNIT not OK
Only that unit is muted, and will not be
controllable
OUTPUT UNIT not OK
Only that unit is muted, and will not be
controllable
Updating the firmware (CS1D/
DSP1D(-EX)/AI8/AO8/DIO8)
You will use the PM1DLOAD software to update the firmware of
each component. The basic procedure and the update method
for each firmware is explained below.
CONSOLE section
INPUT01-12 not OK
INPUT block (CS1D lower left) inoperable
INPUT13-24 not OK
INPUT block (CS1D upper left) inoperable
INPUT25-36 not OK
INPUT block (CS1D lower right) inoperable
INPUT37-48 not OK
INPUT block (CS1D upper right) inoperable
INSEL not OK
SELECTED INPUT CHANNEL block
inoperable
MAS1 not OK
MIX OUTPUT / DCA GROUP block inoperable
MAS2 not OK
MIX OUTPUT / DCA GROUP block inoperable
OUTSEL not OK
SELECTED OUTPUT CHANNEL block,
SCENE MEMORY block, MASTER block, LCD
FUNCTION ACCESS block, USER DEFINE
block, STEREO OUTPUT block, Data entry
block (except for track pad and left/right
switches) inoperable
METER not OK
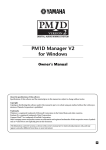
[Explanation of each screen in PM1DLOAD]
Mode Select screen
1
2
A “Write via serial port” mode
You must select this.
B “Write board directly” mode
Do not select this.
METER BRIDGE block will not function
Main screen
The system will recover from these limitations when you remove
the cause of the problem and turn on the power of the CS1D
once again.
3
7
8
5
4
NOTE:
• These problems can normally be solved by executing the system
update described below. However, if problems remain after this is
done, please contact Yamaha service.
• If there is a problem with a unit, please check whether there is a
faulty connection for the D-Sub half-pitch 68-pin cable. The unit
will not function correctly if a pin is bent or not inserted.
9
6
J
System update procedure
When updating the system, you must perform the update and
installation for all components. Using the procedure described
below, perform the firmware update and the CS1D screen
software update.
Scene data etc. that you created using this system must be
backed up on a memory card before you perform the update.
The internal data will be lost when you perform the update
procedure.
For details on how to save data to a memory card, refer to
the Reference Manual (Software).
K
L
C [Setup] menu
Serial Port
select the computer’s serial port (only ports
1–9 are supported) to use
Connection Point
select the serial port (only ports 1–9 are
supported) to use on the PM1D system
Fonts
change the display font
D Target select menu ...................specify the component to be
written
E Overall version .........................indicates the version to be
written (overall version)
F Writing target check boxes ......check boxes select writing
target
G ROM version field ....................indicates the currentlywritten version
H File version field .......................indicates the version to be
written
I [GetVer.] button .......................obtains the ROM version
4
PM1D V2 System Software Installation Guide
J [Write] button ..........................initiates firmware writing for
• When updating the AI8/AO8, you must observe the
restrictions listed below. If you fail to observe these, it
may be impossible to perform the update.
– The port connected to the 68-pin cable used for the
update must match the port selected by the select
switch of the unit.
– If the firmware is blank (the 7-segment display of the
AI8/AO8 indicates 88), make sure that the above
condition is met, and then turn on the power.
However, you must do this for each unit immediately
before updating it.
• When updating the DIO8 via the DSP1D, you must
observe the following restriction. If you fail to observe
this, it may be impossible to perform the update.
– Connect OUTPUT A of the DIO8 to one of the
INPUT ports of the DSP1D.
all items checked in the
writing check boxes 6
K [ALL] button.............................check all writing check boxes
6
L [CLEAR] button .......................uncheck all writing check
boxes 6
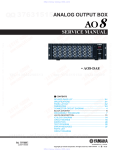
[Using PM1DLOAD]
1
Depending on the target that is being updated,
the firmware is sent over the following routes
from the computer (PC). Connect an RS-232C
cable (cross connected) or a D-Sub half-pitch 68pin cable to provide the appropriate route, and
turn on the power.
• CS1D update
CS1D
2
Before you perform the update, you must exit all
other software and memory-resident programs.
3
Insert the included CD-ROM into your CD-ROM
drive, and choose the [Start] menu item [Run...].
4
In the input field, type
D:\LOADER\PM1DLOAD.EXE (if the CD-ROM
drive is drive D: on your computer), and click OK.
5
Start up PM1DLOAD, and when the mode select
screen appears, select Host I/F 1 and click OK.
PC
RS-232C
• DSP1D-EX/DSP1D update
DSP1D-EX/
DSP1D
PC
RS-232C
NOTE: The update cannot be performed if you select Card Direct 2
in the Mode Select screen.
• AI8/AO8 update
DSP1D-EX/
DSP1D
PC
AI8/AO8
RS-232C
D-Sub 68pin
1
2
3
4
5
6
7
6
When the PM1DLOAD update software starts,
select the serial port (only ports 1–9 are
supported) of your computer in the Serial Port
field of the [Setup] menu 3.
7
In the [Setup] menu 3 Connection Point field,
specify the destination that you connected in
step 1.
This setting is ignored in the case of the DIO8 (Direct), and
need not be set.
8
From the target select menu 4, select the
components that you want to update.
9
Click the [GetVer.] button 9. The current
firmware version for each component will be
displayed. Compare the ROM version field 7 and
File version field 8 of the list, and add a check
mark for all lines that have different versions.
8
• DIO8 update (via DSP1D)
DSP1D-EX/
DSP1D
PC
DIO8
RS-232C
D-Sub 68pin
I/O UNIT ID
PORT B SELECTOR
5-8
1-4
POWER
ON/ OFF
• DIO8 (Direct) update
PC
DIO8
RS-232C
I/O UNIT ID
PORT B SELECTOR
5-8
1-4
POWER
ON/ OFF
• Scene data etc. that you created using this system must be
backed up to a memory card before you perform the
update. Power-off all speaker amps, set all output
volumes to the minimum position, and do not input any
audio signals.
• If any components not shown above and not related to
the update are connected, turn off their power.
NOTE:
• If the firmware has been erased, the version will not be displayed.
You must add a check mark in this case as well.
• In some cases, the version of the AO8 cannot be obtained from
port B, but if you have made connections and settings in
accordance with the restrictions given earlier, you will be able to
write the update.
10
Click the [Write] button J. Updating of the items
you checked in step 9 will begin.
Once you initiate the writing process even once, the screen
of the CS1D will indicate “If loading is completed, Please
re-start.”
PM1D V2 System Software Installation Guide
5
NOTE: When updating the AI8/AO8 or DIO8 via the DSP1D, the
restrictions listed in 1 may mean that some units cannot be updated.
(In this case, a message will inform you that a unit was skipped.)
11
When the update is completed, turn the power of
the updated components off and then on once
again.
12
Click the [GetVer.] button 9. Verify that the ROM
version field 7 and the File version field 8 are
now the same for each updated item.
If the ROM version cannot be obtained, or if the versions
do not match, the update was not successful. Please repeat
the procedure from step 9.
Updating the CS1D screen software
To update the CS1D screen software, you will use one memory
card, and copy the files from CD-ROM via the memory card
into the CS1D. Before you perform this procedure, you must
complete the firmware update described in the preceding
section.
1
You will need to provide a commercially-available
memory card and a system that is able to read this
card (e.g., a notebook computer that has a
PCMCIA Type II slot).
Turn off the power of the CS1D.
2
Insert the formatted memory card into your
computer.
For details on how to format the card, refer to the manual
of your computer or card.
13
Repeat steps 1–12 until all components have been
updated.
14
After updating the CS1D screen software
described in the section that follows, re-start all
components once again.
3
Insert the included CD-ROM into your CD-ROM
drive, and from “My Computer,” open the CDROM drive.
15
Verify that the VERSION CHECK popup window
does not appear when the CS1D starts up, and
that you are able to use the system normally.
Then close PM1DLOAD, and you are finished with
the procedure.
4
Open the CS1DAPP folder, and from the [Edit]
menu, choose [Select all]. Next, choose [Copy]
from the same [Edit] menu.
5
From “My Computer,” open the drive of the
memory card you inserted.
6
7
From the [Edit] menu, choose [Paste].
8
Insert the memory card into the CS1D’s PC ATA
STORAGE CARD slot A or B, and turn on the
power of the CS1D.
The normal start-up title screen will not appear, and the
CS1D will be in update mode.
9
When “START?” appears in the screen, use the
track pad to click the OK button.
If you click the CANCEL button at this time, the CS1D will
stop operating. Remove the card, and restart the CS1D.
10
When the screen indicates “COPY OK,” remove
the card and restart the CS1D.
11
Execute the INITIALIZE ALL MEMORIES operation.
For details on initializing the memory, refer to the
Reference Manual (Software).
NOTE: If the update was unsuccessful, a popup window will inform
you that VERSION CHECK failed. Check the settings and
connections, and perform the update once again from step 1.
While the update is in progress, never power-off the system
or connect/disconnect cables. If the update was interrupted,
turn off the power of each component, wait for five seconds,
turn the power on again, and perform the update again.
When the copy operation has been completed,
remove the memory card.
For details on removing the card, refer to the manual of
your computer or memory card.
• Insert only one memory card in the PC ATA STORAGE
CARD slot. If you simultaneously insert another card
into the other vacant slot, the update may not occur
correctly.
• If you updated the entire system, you must execute
INITIALIZE ALL MEMORIES. Operation cannot be
guaranteed if you fail to initialize the memories. For
details, refer to the Reference Manual (Software).
6
PM1D V2 System Software Installation Guide
Installing the license
System Requirements
In order to install the license (to authorize the software that was
upgraded to V2), you’ll need a computer and Internet access as
described below.
NOTE:
• You can de-authorize the license of the installed system software,
then install it on another CS1D. However, you will be unable to
use the de-authorized CS1D until you re-install or re-authorize
the software.
• Note that if your CS1D was shipped from the factory with the V2
system software, it will not have a product ID; this means that if
you de-authorize the software, you won’t be able to reinstall
(authorize) it again.
NOTE: Some operating systems may have to satisfy other
requirements in addition to those described below.
OS:
Computer:
Memory:
Hard disk:
Display:
Other
requirements:
Windows 98SE, Me, 2000, XP Home Edition,
XP Professional
PC that features a RC-232C port and an Intel
Pentium or Celeron-family processor of 433
MHz or higher
128 MB or more
Available space of 10 MB or more
1024 x 768 pixels, 256 colors or more
(High Color 16-bit or more recommended)
Access to Internet,
Internet Explorer 5.0 or higher
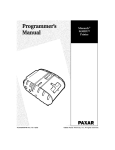
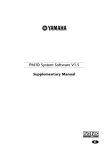
Installation Procedure
Choose one of the following two installation procedures (direct
installation or indirect installation) depending on your system
environment. In most cases, choose the direct installation
procedure (i.e., installing by accessing the Internet from your
computer).
Registration
code &
PRODUCT ID
Registration
code
2
1
Internet
RS-232C
CS1D
4
Computer
Access
key
3
Access
key
Authentication
server
Direct installation
(Accessing the Internet from your computer)
Registration code
1
RS-232C
CS1D
4
Access
key
Computer #1
Registration
code &
PRODUCT ID
2
Internet
Computer #2
PRODUCT ID
This is a number unique to each software package. This number
is required to obtain the access key. It is printed on a label on the
CD-ROM case.
Registration code
This is a number unique to each CS1D. This number is required
to obtain the access key. It is automatically created from the data
inside your console.
Access key
This is required to install the license. You must obtain the access
key from the authentication server via the Internet using the
PRODUCT ID and registration code.
NOTE: If you lose the registration code or access key, you can obtain
them again. You will need the PRODUCT ID to do so. Be sure to
keep the PRODUCT ID in a safe place after installation.
Installation Notes
• The software can be installed on only one CS1D.
• You will be responsible for the entire installation procedure.
• Installing the software will erase all user memories in the CS1D
and initialize all settings. Be sure to back up important data
before installation.
• Before you install, you must update the firmware of all
components and the CS1D screen software to V2.
• During the installation procedure, do not turn off the power to the
PW1D, remove the cables, or operate the computer in a way not
instructed in this manual. Otherwise, the CS1D may malfunction.
• If the installation process fails due to a defective cable etc., powercycling the PW1D will make it start up not in normal operating
mode but with the VERSION CHECK popup screen. In this case,
replace the cable and try the installation again.
• If a second installation attempt fails and the CS1D does not
operate properly, consult your Yamaha dealer.
• Exit or quit all open application programs before you start
installation. During installation, do not execute other programs or
activate a window.
• If the computer sleeps in energy saving mode, data transmission to
the CS1D may be stopped. Cancel such modes to prevent the
computer from falling asleep.
3
Access
key
Authentication
server
Indirect installation
(Accessing the Internet from another computer)
* The numbers in the illustrations above indicate the sequence
of the installation procedure.
PM1D V2 System Software Installation Guide
7
Direct installation
6
Double-click “PM1DUpgrade.exe” in the Upgrade
folder.
The installer window opens.
7
Select [Authorize], then click [Next].
The following window opens.
8
Select [Get access key from authentication server],
then click [Next].
The following window opens.
If you can access the Internet directly from your computer,
follow the steps below to install the software. See page 10 if you
access the Internet from a different computer.
The installation procedure will initialize data in the user
memories in the CS1D. Be sure to back up important data
using memory card. (Refer to the CS1D Owner’s Manual.)
NOTE: If an error message appears, refer to the Error Message list on
page 13.
1
Start the computer and check to see if the
following steps are complete.
• Connecting the computer and the CS1D using a D-sub
9-pin cross-cable
• Accessing the Internet from the computer
• Backing up the data in the user memories in the CS1D
(See the CS1D Owner’s Manual.)
• Updating the firmware of each component and the
CS1D screen software to V2
2
Power-on the PW1D, and when the opening
screen appears in the CS1D’s display, press and
hold down the left/right switches located below
the track pad.
Continue holding down the switches until the display
indicates MEMORY INITIALIZATION.
3
Click the AUTHORIZE/DE-AUTHORIZE button.
The display will indicate “Authorization/De-authorization
preparation was completed.”
4
Insert the included CD-ROM into the CD-ROM
drive.
5
Locate the Upgrade folder on the CD-ROM, then
copy the folder onto the hard disk.
Do not run the installer directly from the CD-ROM drive.
8
PM1D V2 System Software Installation Guide
9
10
11
Select [Create registration code], then click [Next].
The COM port setting window opens.
13
Make sure that you are prepared to access the
Internet, then click [Next].
The computer connects to the authentication server and
obtains the access key.
14
When the access key is obtained, the following
window opens:
15
Select [Write access key in console now], then
click [Next].
The COM port setting window opens.
16
Select the COM port specified in Step 9, then click
[Next].
A dialog box indicating the installation progress will
appear, and installation will begin.
17
When the installation is complete, the following
window opens.
Select the COM port (only COM1–4 are supported)
to which the CS1D is connected, and click [Next].
The “Connecting to the console...” message appears and
the registration code is created.
Enter the PRODUCT ID number printed on the
label on the CD-ROM case, then click [Next].
The following window opens.
When installation is completed, the following screen will
appear in the CS1D’s display.
NOTE: Keep the PRODUCT ID in a safe place after you enter the
number. Even if you lose the registration code or access key, you can
install the software using the PRODUCT ID.
12
Select [Connect to the authentication server on
the Internet and get access key now], then click
[Next].
The window indicates “To get access key, get ready to
connect to the Internet and click [Next].”
PM1D V2 System Software Installation Guide
9
18
Select [Start online user registration], then click
[Finish].
The browser starts and the user registration page opens.
User registration entitles you to additional information and
support.
19
Turn off the power to the PW1D, then turn it on.
The CS1D starts in normal mode.
The following window opens.
The installation is now complete.
Indirect installation
If you access the Internet from another computer (#2), not from
the computer (#1) connected to the CS1D, follow the steps
below to install the software.
18
Click [Read from file] to read the text file saved in
Step 13.
If you wrote down the ID and code on a piece of paper,
enter the ID and code from the keyboard.
NOTE: If an error message appears, refer to the Error Message list on
page 13.
19
Follow Steps 1 through 11 (on page 8) using computer #1, then
proceed with the following.
Make sure that the correct PRODUCT ID and
registration code are displayed, then click [Next].
The window indicates “To get access key, get ready to
connect to the Internet and click [Next].”
20
Make sure that you are prepared to access the
Internet, then click [Next].
The computer connects to the authentication server and
obtains the access key.
21
When the access key is obtained, the following
window opens:
22
Select [Save access key to write into console
later.], then click [Next].
The following window opens.
The installation procedure will initialize data in the user
memories in the CS1D. Be sure to back up important data
using memoroy card. (Refer to the CS1D Owner’s Manual.)
12
13
Select [Save registration code to get access key
later.], then click [Next].
The following window opens.
Click [Save in file] to save the PRODUCT ID and
registration code as a text file.
You can also write down the ID and code on a piece of
paper.
14
Copy the text file to the computer (#2) that has
access to the Internet.
Follow the steps below on computer #2.
15
Insert the included CD-ROM into the CD-ROM
drive on computer #2, locate the Upgrade folder
on the CD-ROM, then copy the folder onto the
hard disk.
16
Double-click “PM1DUpgrade.exe” in the Upgrade
folder.
The installer window opens.
17
Select [Authorize], [Get access key from
authentication server], then [Have already created
registration code], then click [Next].
10
PM1D V2 System Software Installation Guide
23
Click [Save in file] to save the access key as a text
file.
You can also write down the access key displayed on the
screen.
24
Copy the saved text file to the computer (#1) that
is connected to the CS1D.
Follow the steps below on computer #1.
25
Start the installer, select [Authorize], then [Have
already obtained access key], then click [Next].
The following window opens.
NOTE: After the installation is complete, the registration code and
access key will become invalid. To avoid problems that may occur
during re-installation, after the installation is complete, delete the
text files that contain the registration code and access key.
31
Turn off the power to the PW1D, then turn it on.
The CS1D starts in normal mode.
The installation is now complete.
Direct De-authorization
If you wish to move the license from one CS1D to another, you
must first de-authorize the license on the current console. If you
can access the Internet directly from your computer, follow the
steps below to de-authorize the software. See page 12 if you
access the Internet from a different computer.
Follow Steps 1 through 6 (on page 8) for direct installation, then
proceed with the following.
26
Click [Read from file] to read the text file saved in
Step 23.
27
Make sure that the correct access key is displayed,
then click [Next].
The COM port setting window opens.
28
Make sure that the COM ports specified in Step 9
are selected, then click [Next].
A dialog box indicating the installation progress will
appear, and installation will begin.
29
When the installation is complete, the following
window opens.
30
Remove the check mark from the [Start online
user registration] check box, then click [Finish].
We recommend that you access the following web page
from a computer connected to the Internet and register the
product. User registration entitles you to additional
information and support.
http://www.yamahaproaudio.com/register/
7
Select [De-authorize], then click [Next].
The following window opens.
8
Select [Create unregistration code], then click
[Next].
The following window opens.
9
Enter the PRODUCT ID, then click [Next].
The COM port setting window opens.
PM1D V2 System Software Installation Guide
11
10
Select the COM port (only COM1–4 are
supported) to which the CS1D is connected, and
click [Next].
The “Connecting to the console...” message is displayed
and the unregistration code is created.
11
Select [Connect to the authentication server and
start deauthorizing now], then click [Next].
The “Start de-authorizing” message is displayed.
12
Make sure that you are prepared to access the
Internet, then click [Next].
The computer connects to the authentication server and
de-authorizes the license.
13
When de-authorization is complete, the following
window opens.
The de-authorization is now complete. You can now install the
license on another console.
12
Indirect De-authorization
If you wish to move the license from one console to another, you
must first de-authorize the license on the current console. If you
access the Internet from another computer (#2), not from the
computer (#1) connected to the console, follow the steps below
to de-authorize the software.
Follow Steps 1 through 10 (on page 11) for direct deauthorization, then proceed with the following.
11
Select [Save unregistration code to de-authorize
later.], then click [Next].
The following window opens.
12
Click [Save in file] to save the PRODUCT ID and
unregistration code as a text file.
You can also write down the ID and code on a piece of
paper.
13
Copy the text file to the computer (#2) that has
access to the Internet.
Follow the steps below on computer #2.
14
Insert the included CD-ROM into the CD-ROM
drive on computer #2, locate the Upgrade folder
on the CD-ROM, then copy the folder onto the
hard disk.
15
Double-click “PM1DUpgrade.exe” in the Upgrade
folder.
The installer window opens.
16
Select [De-authorize], then [Have already created
unregistration code], then click [Next].
The following window opens.
PM1D V2 System Software Installation Guide
17
18
19
20
Click [Read from file] to read the text file saved in
Step 12.
If you wrote down the PRODUCT ID and unregistration
code on a piece of paper, enter the ID and code from the
keyboard.
Error Message List
Input errors
Make sure that the correct PRODUCT ID and
unregistration code are displayed, then click
[Next].
The “Start de-authorizing” message is displayed.
• PRODUCT ID is wrong.
Make sure that you are prepared to access the
Internet, then click [Next].
The computer connects to the authentication server and
de-authorizes the license.
• Access key is wrong.
→ Make sure that you have entered the correct PRODUCT ID,
registration code, unregistration code, or access key.
When de-authorization is complete, the following
window opens.
• Registration code is wrong.
• Unregistration code is wrong.
• Content of the file is not correct data.
→ Make sure that the text file contains the registration code,
unregistration code, or access key. The file may have been
corrupted. Save the file again.
Errors in connection to the console
• Unable to connect to the console.
→ Make sure that the PW1D is powered-on, and that it is
connected to the CS1D via a D-sub 9-pin cross-cable. If the
CS1D is in normal mode, power-cycle the PW1D, and when
the CS1D’s display shows the opening screen, press and hold
down the left/right switches located below the track pad to
start up in MEMORY INITIALIZATION mode. If the above
situation does not apply, power-cycle the PW1D, and try
starting up the installer again.
When de-authorization is completed, the following screen
will appear in the CS1D’s display.
• Unable to initialize license management information in
console.
• Failed to create registration code.
→ Install the license again.
• Unable to initialize license management information in
console.
→ Make sure that you are installing the license in the CS1D for
which you obtained the registration code, then try to install
again.
• Access key cannot be written to console.
→ Make sure that the PRODUCT ID and access key are correct,
then try to install again.
The de-authorization is now complete. You can now install the
software on another CS1D.
• Cannot delete access key from console. It is not the
PRODUCT ID used for getting access key. Check
PRODUCT ID and retry de-authorization.
→ Make sure that the same PRODUCT ID was used to obtain
the access key, then try to de-authorize again.
• Cannot delete access key from console. Because this
access key is protected, cannot delete it from console.
→ You cannot de-authorize this access key.
PM1D V2 System Software Installation Guide
13
Errors in connection to the authentication
server
• Unable to connect to the authentication server.
→ Make sure that the computer is connected to the Internet.
The authentication server may be very busy now. Try to
connect to the server later.
• Access key cannot be issued because the PRODUCT ID is
wrong.
• Access key cannot be issued because registration code is
wrong.
→ Make sure that the PRODUCT ID or the registration code is
correct, then try to install again.
• New access key cannot be issued because this PRODUCT
ID has already issued access key.
→ The license for this PRODUCT ID has already been used on
a different CS1D. If you wish to install the license in another
CS1D, you must de-authorize the license on the current
CS1D. When you de-authorize the license on the current
CS1D, you will be unable to use that CS1D until you reinstall or re-authorize the license on that console.
Troubleshooting
Q: The computer does not communicate with the
CS1D.
A: This installer does not support installation via a USB
connection. Please use a D-sub 9-pin cross-cable to make
connections before you begin the process.
A: If there is no problem with the settings described above, turn
off and on the power to the CS1D.
Q: The computer cannot access the
authentication server.
A: Make sure that the computer is connected to the Internet.
A: You must select in Internet Explorer [Tools → Internet
Options... → Advanced], then select one or more of “Use
SSL 2.0,” “Use SSL 3.0,” and “Use TSL 1.0.” (One or more
have already been selected as the default setting.)
Q: The access key, registration code,
unregistration code, or PRODUCT ID is
incorrect.
• Unable to de-authorize because unregistration code is
not in agreement with the information when access key
was issued.
A: The code is different for each CS1D and each software
package. Make sure that you are entering the correct code
for the correct CS1D and correct package.
• Cannot de-authorize as unregistration code is wrong.
→ Make sure that the unregistration code is correct, then try to
de-authorize the software again.
Q: You lost the access key.
• De-authorization is not required as access key has not
been issued for this PRODUCT ID.
→ Check the PRODUCT ID that was used to install the license,
then try to de-authorize the license again.
A: You can obtain the access key again. Check the PRODUCT
ID printed on the label on the CD-ROM case, then try to
install the license again.
Q: The CS1D does not respond or operate
correctly.
A: Consult your Yamaha dealer.
Error Messages on the Console
• “Please grant authority”
→ The access key has not been written. After the installation or
authorization is complete, you can use the system software.
Q: You wish to install the license in a different
CS1D.
A: You can de-authorize the license of the installed system
software, then install it on another CS1D. However, you will
be unable to use the de-authorized CS1D until you re-install
or re-authorize the license.
Q: You wish to update the system software to the
latest version.
A: Check the following Yamaha website:
http://www.yamahaproaudio.com/
14
PM1D V2 System Software Installation Guide
SOFTWARE LICENSE AGREEMENT
PLEASE READ THIS SOFTWARE LICENSE AGREEMENT
("AGREEMENT") CAREFULLY BEFORE USING THIS SOFTWARE. YOU ARE ONLY PERMITTED TO USE THIS SOFTWARE
PURSUANT TO THE TERMS AND CONDITIONS OF THIS
AGREEMENT. THIS AGREEMENT IS BETWEEN YOU (AS AN
INDIVIDUAL OR LEGAL ENTITY) AND YAMAHA CORPORATION ("YAMAHA").
BY breaking the seal of this package YOU ARE AGREEING TO BE
BOUND BY THE TERMS OF THIS LICENSE. If you do not agree
with the terms, do not install, copy, or otherwise use this software.
1. GRANT OF LICENSE AND COPYRIGHT
Yamaha hereby grants you the right to use one copy of the software
program(s) and data (“SOFTWARE”) accompanying this Agreement. The term SOFTWARE shall encompass any updates to the
accompanying software and data. The SOFTWARE is owned by
Yamaha and/or Yamaha’s licensor(s), and is protected by relevant
copyright laws and all applicable treaty provisions. While you are
entitled to claim ownership of the data created with the use of
SOFTWARE, the SOFTWARE will continue to be protected under
relevant copyrights.
• You may use the SOFTWARE on a single console.
• You may make one copy of the SOFTWARE in machine-readable
form for backup purposes only, if the SOFTWARE is on media
where such backup copy is permitted. On the backup copy, you
must reproduce Yamaha’s copyright notice and any other proprietary legends that were on the original copy of the SOFTWARE.
• You may permanently transfer to a third party all your rights in
the SOFTWARE, provided that you do not retain any copies and
the recipient reads and agrees to the terms of this Agreement.
2. RESTRICTIONS
• You may not engage in reverse engineering, disassembly, decompilation or otherwise deriving a source code form of the
SOFTWARE by any method whatsoever.
• You may not reproduce, modify, change, rent, lease, or distribute
the SOFTWARE in whole or in part, or create derivative works of
the SOFTWARE.
• You may not electronically transmit the SOFTWARE from one
computer to another or share the SOFTWARE in a network with
other computers.
• You may not use the SOFTWARE to distribute illegal data or data
that violates public policy.
• You may not initiate services based on the use of the SOFTWARE
without permission by Yamaha Corporation.
Copyrighted data, including but not limited to MIDI data for
songs, obtained by means of the SOFTWARE, are subject to the
following restrictions which you must observe.
• Data received by means of the SOFTWARE may not be used for
any commercial purposes without permission of the copyright
owner.
• Data received by means of the SOFTWARE may not be duplicated, transferred, or distributed, or played back or performed for
listeners in public without permission of the copyright owner.
• The encryption of data received by means of the SOFTWARE may
not be removed nor may the electronic watermark be modified
without permission of the copyright owner.
3. TERMINATION
This Agreement becomes effective on the day that you receive the
SOFTWARE and remains effective until terminated. If any copyright law or provisions of this Agreement is violated, the Agreement
shall terminate automatically and immediately without notice from
Yamaha. Upon such termination, you must immediately destroy the
licensed SOFTWARE, any accompanying written documents and all
copies thereof.
4. LIMITED WARRANTY ON MEDIA
As to SOFTWARE sold on tangible media, Yamaha warrants that the
tangible media on which the SOFTWARE is recorded will be free
from defects in materials and workmanship under normal use for a
period of fourteen (14) days from the date of receipt, as evidenced
by a copy of the receipt. Yamaha’s entire liability and your exclusive
remedy will be replacement of the defective media if it is returned to
Yamaha or an authorized Yamaha dealer within fourteen days with a
copy of the receipt. Yamaha is not responsible for replacing media
damaged by accident, abuse or misapplication. TO THE FULLEST
EXTENT PERMITTED BY LAW, YAMAHA EXPRESSLY DISCLAIMS ANY IMPLIED WARRANTIES ON THE TANGIBLE
MEDIA, INCLUDING THE IMPLIED WARRANTIES OF MERCHANTABILITY AND FITNESS FOR A PARTICULAR PURPOSE.
5. DISCLAIMER OF WARRANTY ON SOFTWARE
You expressly acknowledge and agree that use of the SOFTWARE is
at your sole risk. The SOFTWARE and related documentation are
provided "AS IS" and without warranty of any kind. NOTWITHSTANDING ANY OTHER PROVISION OF THIS AGREEMENT,
YAMAHA EXPRESSLY DISCLAIMS ALL WARRANTIES AS TO
THE SOFTWARE, EXPRESS, AND IMPLIED, INCLUDING BUT
NOT LIMITED TO THE IMPLIED WARRANTIES OF MERCHANTABILITY, FITNESS FOR A PARTICULAR PURPOSE AND
NON-INFRINGEMENT OF THIRD PARTY RIGHTS. SPECIFICALLY, BUT WITHOUT LIMITING THE FOREGOING,
YAMAHA DOES NOT WARRANT THAT THE SOFTWARE WILL
MEET YOUR REQUIREMENTS, THAT THE OPERATION OF
THE SOFTWARE WILL BE UNINTERRUPTED OR ERROR-FREE,
OR THAT DEFECTS IN THE SOFTWARE WILL BE CORRECTED.
6. LIMITATION OF LIABILITY
YAMAHA’S ENTIRE OBLIGATION HEREUNDER SHALL BE TO
PERMIT USE OF THE SOFTWARE UNDER THE TERMS
HEREOF. IN NO EVENT SHALL YAMAHA BE LIABLE TO YOU
OR ANY OTHER PERSON FOR ANY DAMAGES, INCLUDING,
WITHOUT LIMITATION, ANY DIRECT, INDIRECT, INCIDENTAL OR CONSEQUENTIAL DAMAGES, EXPENSES, LOST
PROFITS, LOST DATA OR OTHER DAMAGES ARISING OUT OF
THE USE, MISUSE OR INABILITY TO USE THE SOFTWARE,
EVEN IF YAMAHA OR AN AUTHORIZED DEALER HAS BEEN
ADVISED OF THE POSSIBILITY OF SUCH DAMAGES. In no
event shall Yamaha’s total liability to you for all damages, losses and
causes of action (whether in contract, tort or otherwise) exceed the
amount paid for the SOFTWARE.
7. THIRD PARTY SOFTWARE
Third party software and data ("THIRD PARTY SOFTWARE") may
be attached to the SOFTWARE. If, in the written materials or the
electronic data accompanying the Software, Yamaha identifies any
software and data as THIRD PARTY SOFTWARE, you acknowledge and agree that you must abide by the provisions of any
Agreement provided with the THIRD PARTY SOFTWARE and that
the party providing the THIRD PARTY SOFTWARE is responsible
for any warranty or liability related to or arising from the THIRD
PARTY SOFTWARE. Yamaha is not responsible in any way for the
THIRD PARTY SOFTWARE or your use thereof.
• Yamaha provides no express warranties as to the THIRD PARTY
SOFTWARE. IN ADDITION, YAMAHA EXPRESSLY DISCLAIMS ALL IMPLIED WARRANTIES, INCLUDING BUT
NOT LIMITED TO THE IMPLIED WARRANTIES OF MERCHANTABILITY AND FITNESS FOR A PARTICULAR
PURPOSE, as to the THIRD PARTY SOFTWARE.
• Yamaha shall not provide you with any service or maintenance as
to the THIRD PARTY SOFTWARE.
• Yamaha is not liable to you or any other person for any damages,
including, without limitation, any direct, indirect, incidental or
consequential damages, expenses, lost profits, lost data or other
damages arising out of the use, misuse or inability to use the
THIRD PARTY SOFTWARE.
8. GENERAL
This Agreement shall be interpreted according to and governed by
Japanese law without reference to principles of conflict of laws. Any
dispute or procedure shall be heard before the Tokyo District Court
in Japan. If for any reason a court of competent jurisdiction finds
any portion of this Agreement to be unenforceable, the remainder of
this Agreement shall continue in full force and effect.
9. COMPLETE AGREEMENT
This Agreement constitutes the entire agreement between the parties with respect to use of the SOFTWARE and any accompanying
written materials and supersedes all prior or contemporaneous
understandings or agreements, written or oral, regarding the subject
matter of this Agreement. No amendment or revision of this Agreement will be binding unless in writing and signed by a fully
authorized representative of Yamaha.
PM1D V2 System Software Installation Guide
15
For details of products, please contact your nearest Yamaha
representative or the authorized distributor listed below.
Pour plus de détails sur les produits, veuillez-vous adresser à Yamaha ou
au distributeur le plus proche de vous figurant dans la liste suivante.
NORTH AMERICA
CANADA
Yamaha Canada Music Ltd.
135 Milner Avenue, Scarborough, Ontario,
M1S 3R1, Canada
Tel: 416-298-1311
U.S.A.
Yamaha Corporation of America
6600 Orangethorpe Ave., Buena Park, Calif. 90620,
U.S.A.
Tel: 714-522-9011
Die Einzelheiten zu Produkten sind bei Ihrer unten aufgeführten
Niederlassung und bei Yamaha Vertragshändlern in den jeweiligen
Bestimmungsländern erhältlich.
Para detalles sobre productos, contacte su tienda Yamaha más cercana
o el distribuidor autorizado que se lista debajo.
ASIA
POLAND
Yamaha Music Central Europe GmbH
Sp.z. o.o. Oddzial w Polsce
ul. 17 Stycznia 56, PL-02-146 Warszawa, Poland
Tel: 022-868-07-57
THE NETHERLANDS/
BELGIUM/LUXEMBOURG
Yamaha Music Central Europe GmbH,
Branch Benelux
Clarissenhof 5-b, 4133 AB Vianen, The Netherlands
Tel: 0347-358 040
FRANCE
CENTRAL & SOUTH AMERICA
MEXICO
Yamaha de México S.A. de C.V.
Calz. Javier Rojo Gómez #1149,
Col. Guadalupe del Moral
C.P. 09300, México, D.F., México
Tel: 55-5804-0600
BRAZIL
Yamaha Musical do Brasil Ltda.
Rua Joaquim Floriano, 913 - 4' andar, Itaim Bibi,
CEP 04534-013 Sao Paulo, SP. BRAZIL
Tel: 011-3704-1377
ARGENTINA
Yamaha Music Latin America, S.A.
Sucursal de Argentina
Olga Cossettini 1553, Piso 4 Norte
Madero Este-C1107CEK
Buenos Aires, Argentina
Tel: 011-4119-7000
PANAMA AND OTHER LATIN
AMERICAN COUNTRIES/
CARIBBEAN COUNTRIES
Yamaha Music Latin America, S.A.
Torre Banco General, Piso 7, Urbanización Marbella,
Calle 47 y Aquilino de la Guardia,
Ciudad de Panamá, Panamá
Tel: +507-269-5311
EUROPE
THE UNITED KINGDOM
Yamaha Music U.K. Ltd.
Sherbourne Drive, Tilbrook, Milton Keynes,
MK7 8BL, England
Tel: 01908-366700
GERMANY
Yamaha Music Central Europe GmbH
Siemensstraße 22-34, 25462 Rellingen, Germany
Tel: 04101-3030
SWITZERLAND/LIECHTENSTEIN
Yamaha Music Central Europe GmbH,
Branch Switzerland
Seefeldstrasse 94, 8008 Zürich, Switzerland
Tel: 01-383 3990
AUSTRIA
Yamaha Music Central Europe GmbH,
Branch Austria
Schleiergasse 20, A-1100 Wien, Austria
Tel: 01-60203900
CZECH REPUBLIC/SLOVAKIA/
HUNGARY/SLOVENIA
Yamaha Music Central Europe GmbH,
Branch Austria, CEE Department
Schleiergasse 20, A-1100 Wien, Austria
Tel: 01-602039025
Yamaha Musique France
BP 70-77312 Marne-la-Vallée Cedex 2, France
Tel: 01-64-61-4000
ITALY
Yamaha Musica Italia S.P.A.
Combo Division
Viale Italia 88, 20020 Lainate (Milano), Italy
Tel: 02-935-771
SPAIN/PORTUGAL
Yamaha Música Ibérica, S.A.
Ctra. de la Coruna km. 17, 200, 28230
Las Rozas (Madrid), Spain
Tel: 91-639-8888
THE PEOPLE’S REPUBLIC OF CHINA
Yamaha Music & Electronics (China) Co.,Ltd.
25/F., United Plaza, 1468 Nanjing Road (West),
Jingan, Shanghai, China
Tel: 021-6247-2211
INDONESIA
PT. Yamaha Music Indonesia (Distributor)
PT. Nusantik
Gedung Yamaha Music Center, Jalan Jend. Gatot
Subroto Kav. 4, Jakarta 12930, Indonesia
Tel: 21-520-2577
KOREA
Yamaha Music Korea Ltd.
8F, 9F, Dongsung Bldg. 158-9 Samsung-Dong,
Kangnam-Gu, Seoul, Korea
Tel: 080-004-0022
MALAYSIA
Yamaha Music Malaysia, Sdn., Bhd.
Lot 8, Jalan Perbandaran, 47301 Kelana Jaya,
Petaling Jaya, Selangor, Malaysia
Tel: 3-78030900
SINGAPORE
Yamaha Music Asia Pte., Ltd.
#03-11 A-Z Building
140 Paya Lebor Road, Singapore 409015
Tel: 747-4374
SWEDEN
Yamaha Scandinavia AB
J. A. Wettergrens Gata 1, Box 30053
S-400 43 Göteborg, Sweden
Tel: 031 89 34 00
TAIWAN
DENMARK
YS Copenhagen Liaison Office
Generatorvej 6A, DK-2730 Herlev, Denmark
Tel: 44 92 49 00
NORWAY
Norsk filial av Yamaha Scandinavia AB
Grini Næringspark 1, N-1345 Østerås, Norway
Tel: 67 16 77 70
Yamaha KHS Music Co., Ltd.
3F, #6, Sec.2, Nan Jing E. Rd. Taipei.
Taiwan 104, R.O.C.
Tel: 02-2511-8688
THAILAND
Siam Music Yamaha Co., Ltd.
4, 6, 15 and 16th floor, Siam Motors Building,
891/1 Rama 1 Road, Wangmai,
Pathumwan, Bangkok 10330, Thailand
Tel: 02-215-2626
OTHER ASIAN COUNTRIES
RUSSIA
Yamaha Music (Russia)
Office 4015, entrance 2, 21/5 Kuznetskii
Most street, Moscow, 107996, Russia
Tel: 495 626 0660
OTHER EUROPEAN COUNTRIES
Yamaha Music Central Europe GmbH
Siemensstraße 22-34, 25462 Rellingen, Germany
Tel: +49-4101-3030
AFRICA
Yamaha Corporation,
Asia-Pacific Music Marketing Group
Nakazawa-cho 10-1, Naka-ku, Hamamatsu,
Japan 430-8650
Tel: +81-53-460-2313
MIDDLE EAST
TURKEY/CYPRUS
Yamaha Corporation,
Asia-Pacific Music Marketing Group
Nakazawa-cho 10-1, Naka-ku, Hamamatsu,
Japan 430-8650
Tel: +81-53-460-2317
OCEANIA
AUSTRALIA
Yamaha Music Australia Pty. Ltd.
Level 1, 99 Queensbridge Street, Southbank,
Victoria 3006, Australia
Tel: 3-9693-5111
COUNTRIES AND TRUST
TERRITORIES IN PACIFIC OCEAN
Yamaha Corporation,
Asia-Pacific Music Marketing Group
Nakazawa-cho 10-1, Naka-ku, Hamamatsu,
Japan 430-8650
Tel: +81-53-460-2313
Yamaha Music Central Europe GmbH
Siemensstraße 22-34, 25462 Rellingen, Germany
Tel: 04101-3030
OTHER COUNTRIES
Yamaha Music Gulf FZE
LOB 16-513, P.O.Box 17328, Jubel Ali,
Dubai, United Arab Emirates
Tel: +971-4-881-5868
HEAD OFFICE Yamaha Corporation, Pro Audio & Digital Musical Instrument Division
Nakazawa-cho 10-1, Naka-ku, Hamamatsu, Japan 430-8650
Tel: +81-53-460-2441
PA21
U.R.G., Pro Audio & Digital Musical Instrument Division, Yamaha Corporation
© 2005 Yamaha Corporation
Yamaha Manual Library
http://www.yamaha.co.jp/manual/
WF82100 806IPAPx.x-0xA1
Printed in Japan