1
Operating and installation instructions
Ovens
H 5140 B, H 5240 B
To avoid the risk of accidents or
damage to the appliance it is
essential to read these instructions
before it is installed and used for the
first time.
en - AU, NZ
M.-Nr. 07 253 330
2
C o ntents
W
C
G
F
O
S
ar ning and S afety instr u c tio ns . . . . . . . . . . . . . . . . . . . . . . . . . . . . . . . . . . . . . 6
ar ing fo r th e env ir o nm ent . . . . . . . . . . . . . . . . . . . . . . . . . . . . . . . . . . . . . . . . . 11
u id e to th e ap p lianc e . . . . . . . . . . . . . . . . . . . . . . . . . . . . . . . . . . . . . . . . . . . . 12
eatu r es . . . . . . . . . . . . . . . . . . . . . . . . . . . . . . . . . . . . . . . . . . . . . . . . . . . . . . . . 13
ven controls. . . . . . . . . . . . . . . . . . . . . . . . . . . . . . . . . . . . . . . . . . . . . . . . . . . . . 13
afety features . . . . . . . . . . . . . . . . . . . . . . . . . . . . . . . . . . . . . . . . . . . . . . . . . . . . 13
S y stem lock. . . . . . . . . . . . . . . . . . . . . . . . . . . . . . . . . . . . . . . . . . . . . . . . . . . . 13
S afety sw itch-off . . . . . . . . . . . . . . . . . . . . . . . . . . . . . . . . . . . . . . . . . . . . . . . . 13
C ooling sy stem . . . . . . . . . . . . . . . . . . . . . . . . . . . . . . . . . . . . . . . . . . . . . . . . . 13
V ented oven door . . . . . . . . . . . . . . . . . . . . . . . . . . . . . . . . . . . . . . . . . . . . . . . 13
P erfectC lean treated surfaces . . . . . . . . . . . . . . . . . . . . . . . . . . . . . . . . . . . . . . . . 14
C ataly tic enamelled surface . . . . . . . . . . . . . . . . . . . . . . . . . . . . . . . . . . . . . . . . . 14
E nergy efficiency functions . . . . . . . . . . . . . . . . . . . . . . . . . . . . . . . . . . . . . . . . . . 14
Time of day display . . . . . . . . . . . . . . . . . . . . . . . . . . . . . . . . . . . . . . . . . . . . . . 14
E nergy efficiency rating according to E N 50304 . . . . . . . . . . . . . . . . . . . . . . . . . . 14
A ccessories . . . . . . . . . . . . . . . . . . . . . . . . . . . . . . . . . . . . . . . . . . . . . . . . . . . . . . 14
B aking tray , universal tray and rack . . . . . . . . . . . . . . . . . . . . . . . . . . . . . . . . . 15
A nti-splash insert . . . . . . . . . . . . . . . . . . . . . . . . . . . . . . . . . . . . . . . . . . . . . . . 15
C o ntr o ls . . . . . . . . . . . . . . . . . . . . . . . . . . . . . . . . . . . . . . . . . . . . . . . . . . . . . . . . 16
F unction selector . . . . . . . . . . . . . . . . . . . . . . . . . . . . . . . . . . . . . . . . . . . . . . . . . . 16
Temperature selector . . . . . . . . . . . . . . . . . . . . . . . . . . . . . . . . . . . . . . . . . . . . . . 17
S ensors . . . . . . . . . . . . . . . . . . . . . . . . . . . . . . . . . . . . . . . . . . . . . . . . . . . . . . . . . 17
S y mbols in the display . . . . . . . . . . . . . . . . . . . . . . . . . . . . . . . . . . . . . . . . . . . . . . 18
Triangle V in the display . . . . . . . . . . . . . . . . . . . . . . . . . . . . . . . . . . . . . . . . . 19
F u nc tio ns . . . . . . . . . . . . . . . . . . . . . . . . . . . . . . . . . . . . . . . . . . . . . . . . . . . . . . . 20
Befo r e u sing fo r th e fir st tim e. . . . . . . . . . . . . . . . . . . . . . . . . . . . . . . . . . . . . . . 22
To set the time of day for the first time. . . . . . . . . . . . . . . . . . . . . . . . . . . . . . . . . . 22
C hanging the time of day . . . . . . . . . . . . . . . . . . . . . . . . . . . . . . . . . . . . . . . . . 22
C leaning and heating up for the first time . . . . . . . . . . . . . . . . . . . . . . . . . . . . . . . 23
O p er atio n . . . . . . . . . . . . . . . . . . . . . . . . . . . . . . . . . . . . . . . . . . . . . . . . . . . . . . . 24
U sing the oven . . . . . . . . . . . . . . . . . . . . . . . . . . . . . . . . . . . . . . . . . . . . . . . . . . . . 24
C ooling sy stem . . . . . . . . . . . . . . . . . . . . . . . . . . . . . . . . . . . . . . . . . . . . . . . . . 24
R ecommended temperature . . . . . . . . . . . . . . . . . . . . . . . . . . . . . . . . . . . . . . . . . 24
C hanging the temperature . . . . . . . . . . . . . . . . . . . . . . . . . . . . . . . . . . . . . . . . 25
Temperature indicator . . . . . . . . . . . . . . . . . . . . . . . . . . . . . . . . . . . . . . . . . . . 25
P re-heating . . . . . . . . . . . . . . . . . . . . . . . . . . . . . . . . . . . . . . . . . . . . . . . . . . . . . . 25
S w itching on and off automatically . . . . . . . . . . . . . . . . . . . . . . . . . . . . . . . . . . . . 26
3
C o ntents
E ntering a cooking duration . . . . . . . . . . . . . . . . . . . . . . . . . . . . . . . . . . . . . . . 26
E ntering a cooking duration and delay ing the finish time . . . . . . . . . . . . . . . . 27
The end of a cooking programme . . . . . . . . . . . . . . . . . . . . . . . . . . . . . . . . . . 28
To check and change an entered time. . . . . . . . . . . . . . . . . . . . . . . . . . . . . . . 28
To delete an entered time. . . . . . . . . . . . . . . . . . . . . . . . . . . . . . . . . . . . . . . . . 28
M inu te m ind er (eg g tim er ) . . . . . . . . . . . . . . . . . . . . . . . . . . . . . . . . . . . . . . . . . . 29
% S etting s . . . . . . . . . . . . . . . . . . . . . . . . . . . . . . . . . . . . . . . . . . . . . . . . . . . . . . 30
To change the "status" of a setting . . . . . . . . . . . . . . . . . . . . . . . . . . . . . . . . . . . . 31
S y stem lo c k . . . . . . . . . . . . . . . . . . . . . . . . . . . . . . . . . . . . . . . . . . . . . . . . . . . . . 32
Bak ing tip s . . . . . . . . . . . . . . . . . . . . . . . . . . . . . . . . . . . . . . . . . . . . . . . . . . . . . . 33
B akew are . . . . . . . . . . . . . . . . . . . . . . . . . . . . . . . . . . . . . . . . . . . . . . . . . . . . . . . . 33
B aking parchment . . . . . . . . . . . . . . . . . . . . . . . . . . . . . . . . . . . . . . . . . . . . . . 33
U niversal tray . . . . . . . . . . . . . . . . . . . . . . . . . . . . . . . . . . . . . . . . . . . . . . . . . . 33
R etangular tins . . . . . . . . . . . . . . . . . . . . . . . . . . . . . . . . . . . . . . . . . . . . . . . . . 33
Notes about the charts . . . . . . . . . . . . . . . . . . . . . . . . . . . . . . . . . . . . . . . . . . . . . 34
Temperature, baking duration . . . . . . . . . . . . . . . . . . . . . . . . . . . . . . . . . . . . . 34
S helf level . . . . . . . . . . . . . . . . . . . . . . . . . . . . . . . . . . . . . . . . . . . . . . . . . . . . . 34
F roz en food . . . . . . . . . . . . . . . . . . . . . . . . . . . . . . . . . . . . . . . . . . . . . . . . . . . . . . 34
Bak ing c h ar t . . . . . . . . . . . . . . . . . . . . . . . . . . . . . . . . . . . . . . . . . . . . . . . . . . . . . 35
F an plus . . . . . . . . . . . . . . . . . . . . . . . . . . . . . . . . . . . . . . . . . . . . . . . . . . . . . . . . . 35
C onventional heat . . . . . . . . . . . . . . . . . . . . . . . . . . . . . . . . . . . . . . . . . . . . . . . . . 36
Intensive bake . . . . . . . . . . . . . . . . . . . . . . . . . . . . . . . . . . . . . . . . . . . . . . . . . . . . 37
R o asting tip s . . . . . . . . . . . . . . . . . . . . . . . . . . . . . . . . . . . . . . . . . . . . . . . . . . . . 38
U seful tips . . . . . . . . . . . . . . . . . . . . . . . . . . . . . . . . . . . . . . . . . . . . . . . . . . . . . . . 39
B row ning. . . . . . . . . . . . . . . . . . . . . . . . . . . . . . . . . . . . . . . . . . . . . . . . . . . . . . 39
S tanding time . . . . . . . . . . . . . . . . . . . . . . . . . . . . . . . . . . . . . . . . . . . . . . . . . . 39
R oasting poultry . . . . . . . . . . . . . . . . . . . . . . . . . . . . . . . . . . . . . . . . . . . . . . . . 39
F roz en meat . . . . . . . . . . . . . . . . . . . . . . . . . . . . . . . . . . . . . . . . . . . . . . . . . . . 39
R o asting c h ar t . . . . . . . . . . . . . . . . . . . . . . . . . . . . . . . . . . . . . . . . . . . . . . . . . . . 40
G r illing tip s . . . . . . . . . . . . . . . . . . . . . . . . . . . . . . . . . . . . . . . . . . . . . . . . . . . . . . 41
P reparing food for grilling . . . . . . . . . . . . . . . . . . . . . . . . . . . . . . . . . . . . . . . . . . . 43
G rilling . . . . . . . . . . . . . . . . . . . . . . . . . . . . . . . . . . . . . . . . . . . . . . . . . . . . . . . . . . 43
U seful tips . . . . . . . . . . . . . . . . . . . . . . . . . . . . . . . . . . . . . . . . . . . . . . . . . . . . . . . 43
G r illing c h ar t. . . . . . . . . . . . . . . . . . . . . . . . . . . . . . . . . . . . . . . . . . . . . . . . . . . . . 44
D efr o st . . . . . . . . . . . . . . . . . . . . . . . . . . . . . . . . . . . . . . . . . . . . . . . . . . . . . . . . . 45
C o o k ing r ead y m eals . . . . . . . . . . . . . . . . . . . . . . . . . . . . . . . . . . . . . . . . . . . . . . 46
4
C o ntents
C leaning and c ar e . . . . . . . . . . . . . . . . . . . . . . . . . . . . . . . . . . . . . . . . . . . . . . . . 47
A ppliance front . . . . . . . . . . . . . . . . . . . . . . . . . . . . . . . . . . . . . . . . . . . . . . . . . . . 47
A ccessories . . . . . . . . . . . . . . . . . . . . . . . . . . . . . . . . . . . . . . . . . . . . . . . . . . . . . . 48
B aking tray , universal tray , anti-splash insert . . . . . . . . . . . . . . . . . . . . . . . . . . 48
R ack, runners . . . . . . . . . . . . . . . . . . . . . . . . . . . . . . . . . . . . . . . . . . . . . . . . . . 48
O ven interior . . . . . . . . . . . . . . . . . . . . . . . . . . . . . . . . . . . . . . . . . . . . . . . . . . . . . 48
S eal and inside of the oven door . . . . . . . . . . . . . . . . . . . . . . . . . . . . . . . . . . . 48
P erfectC lean . . . . . . . . . . . . . . . . . . . . . . . . . . . . . . . . . . . . . . . . . . . . . . . . . . . . . 49
C ataly tic enamel surfaces . . . . . . . . . . . . . . . . . . . . . . . . . . . . . . . . . . . . . . . . . . . 51
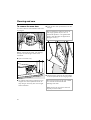
To remove the oven door . . . . . . . . . . . . . . . . . . . . . . . . . . . . . . . . . . . . . . . . . . . . 52
To dismantle the oven door . . . . . . . . . . . . . . . . . . . . . . . . . . . . . . . . . . . . . . . 53
To refit the door . . . . . . . . . . . . . . . . . . . . . . . . . . . . . . . . . . . . . . . . . . . . . . . . . . . 56
To remove the runners . . . . . . . . . . . . . . . . . . . . . . . . . . . . . . . . . . . . . . . . . . . . . . 57
To remove the cataly tic enamelled back panel . . . . . . . . . . . . . . . . . . . . . . . . . . . 57
To low er the top heat/grill element. . . . . . . . . . . . . . . . . . . . . . . . . . . . . . . . . . . . . 58
P r o b lem so lv ing g u id e . . . . . . . . . . . . . . . . . . . . . . . . . . . . . . . . . . . . . . . . . . . . 59
After sales ser v ic e . . . . . . . . . . . . . . . . . . . . . . . . . . . . . . . . . . . . . . . . . . . . . . . . 61
O p tio nal ac c esso r ies . . . . . . . . . . . . . . . . . . . . . . . . . . . . . . . . . . . . . . . . . . . . . . 62
H andle . . . . . . . . . . . . . . . . . . . . . . . . . . . . . . . . . . . . . . . . . . . . . . . . . . . . . . . 62
E lec tr ic al c o nnec tio n . . . . . . . . . . . . . . . . . . . . . . . . . . . . . . . . . . . . . . . . . . . . . . 64
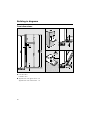
Bu ild ing -in d iag r am s . . . . . . . . . . . . . . . . . . . . . . . . . . . . . . . . . . . . . . . . . . . . . . 65
A ppliance dimensions and unit cut-out . . . . . . . . . . . . . . . . . . . . . . . . . . . . . . . . . 65
F ront dimensions . . . . . . . . . . . . . . . . . . . . . . . . . . . . . . . . . . . . . . . . . . . . . . . . . . 66
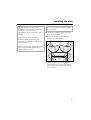
Installing th e o v en . . . . . . . . . . . . . . . . . . . . . . . . . . . . . . . . . . . . . . . . . . . . . . . . 67
5
W ar ning and S afety instr u c tio ns
This appliance conforms to current
safety req uirements. Inappropriate
use can, how ever, lead to personal
injury and damage to property .
To avoid the risk of accidents and
damage to the appliance, please
read these instructions carefully
before using it for the first time.
They contain important notes on
installation, safety , use and
maintenance.
K eep these instructions in a safe
place and ensure that new users are
familiar w ith the content. P ass them
on to any future ow ner.
C o r r ec t ap p lic atio n
~ The appliance is intended for
domestic use to cook food, and in
particular to bake, roast, grill, cook,
defrost and dry fruit. A ny other usage is
at the ow ner's risk and could be
dangerous. The manufacturer cannot
be held liable for damage resulting
from incorrect or improper use or
operation.
6
~ This oven is not intended for use by
persons (including children) w ith
reduced phy sical, sensory or mental
capabilities, or lack of ex perience and
know ledge, unless they are supervised
w hilst using it or have been given
instruction concerning its use by a
person responsible for their safety .
S afety w ith c h ild r en
~ This appliance is not a toy ! To
prevent the risk of injury or damage, do
not let children play w ith the appliance
or its controls.
~O
lder children may only use the
oven w hen its operation has been
clearly ex plained to them and they are
able to use it safely , recognising the
dangers of misuse.
~G
reat care should be taken to
ensure that children do not touch the
appliance w hen it is being used.
C hildren's skin is far more sensitive to
high temperatures than that of adults.
E x ternal parts of the oven such as the
door glass, control panel and the vent
become q uite hot.
W ar ning and S afety instr u c tio ns
T ec h nic al safety
~ Installation, maintenance and
repairs may only be carried out by a
suitably q ualified and competent
person in strict accordance w ith current
national and local safety regulations.
R epairs and other w ork by unq ualified
persons could be dangerous. The
manufacturer cannot be held liable for
unauthorised w ork.
~ B efore installation, check the
appliance for visible signs of damage.
D o not install and use a damaged
appliance. A damaged appliance could
be dangerous.
~ The electrical safety
of this
appliance can only be guaranteed
w hen continuity is complete betw een it
and an effective earthing sy stem. It is
most important that this basic safety
req uirement is present and tested
regularly , and w here there is any doubt
the household w iring sy stem should be
inspected by a q ualified electrician.
The manufacturer cannot be held liable
for the conseq uences of an inadeq uate
earthing sy stem (e.g. electric shock).
~ B efore connecting the appliance,
make sure that the connection data on
the data plate (voltage and connected
load) match the mains electricity
supply .
This data must correspond in order to
avoid the risk of damage to the
appliance. C onsult a competent person
if in doubt.
~D
o not connect the appliance to the
mains electricity supply by a
multi-socket unit or an ex tension lead.
These do not guarantee the req uired
safety of the appliance (e.g. danger of
overheating).
~ F or safety
reasons, this appliance
may only be used w hen it has been
built in.
~ Never open the housing of the
appliance.
Tampering w ith electrical connections
or components and mechanical parts is
highly dangerous to the user and can
cause operational faults.
~ W hile the appliance is under
guarantee, repairs should only be
undertaken by a service technician
authorised by the manufacturer.
O therw ise the guarantee w ill be
invalidated.
7
W ar ning and S afety instr u c tio ns
~ D uring installation, maintenance and
repair w ork, the appliance must be
disconnected from the mains electricity
supply . It is only completely isolated
from the electricity supply w hen:
C o r r ec t u se
– the mains fuse is disconnected,
~U
– the screw -out fuse is removed (in
countries w here this is applicable),
– it is sw itched off at the isolator.
E nsure that current is not supplied to
the appliance until after maintenance
or repair w ork has been carried out.
~ F aulty components must only be
replaced by genuine Miele original
spare parts. The manufacturer can only
guarantee the safety of the appliance
w hen Miele replacement parts are
used.
~ If the supply cord is damaged, it
must be replaced by a Miele approved
service technician to avoid a haz ard.
~ This appliance may
only be used in
mobile installations such as ships,
caravans, aircraft etc. if a risk
assessment of the installation has been
carried out by a suitably q ualified
engineer.
~ In areas w hich may be subject to
infestation by cockroaches or other
vermin, pay particular attention to
keeping the appliance and its
surroundings in a clean condition at all
times. A ny damage w hich may be
caused by cockroaches or other vermin
w ill not be covered by the guarantee.
8
C aution. D anger of burning.
H igh temperatures are produced by
the oven.
se oven gloves w hen placing food
in the oven, turning or removing it and
w hen adjusting oven shelves etc. in a
hot oven. B e very careful that y ou do
not burn y ourself on the top heating /
grill element.
~ Never leave the appliance
unattended w hen cooking w ith oil or
fats, as these are a fire haz ard if
allow ed to overheat.
~D
o not ex ceed the recommended
grilling times w hen using the "G rill Y",
"E conomy G rill Z" and "F an G rill \"
functions. E x cessively long grilling
times can lead to food dry ing out and
burning, or could even cause it to catch
fire.
~ D o not use the "G rill Y", "E conomy
G rill Z" or "F an G rill \" to finish
baking par-cooked rolls or bread or to
dry flow ers or herbs. F ire haz ard.
U se "F an P lus U" or "C onventional V"
instead.
W ar ning and S afety instr u c tio ns
~ If using alcohol in y our recipes, high
temperatures can cause the alcohol to
vaporise and even to ignite on the hot
heating elements.
A lcohol should be burnt off before the
dish is placed in the oven to avoid this
danger.
~ C over any food w hich is left in the
oven to be kept hot. A ny moisture in the
food could lead to corrosion damage in
the oven. This also prevents the food
from dry ing out.
~ If y ou w ish to complete a cooking
process using the residual heat in the
oven, leave the function selector at the
position set and turn the temperature
selector to the low est setting. D o not
sw itch the appliance off until the food
has been removed. Increased moisture
in the oven could cause condensation
to form w hich could lead to
– corrosion in the oven compartment.
– damage to the control panel, w orktop
and surrounding kitchen furniture.
~ D o not line the floor of the oven w ith
aluminium foil w hen using
"C onventional V"/"B ottom H eat X"/
"Intensive B ake O"/"R apid
H eat-up S".
This w ould cause a build-up of heat
w hich could cause damage to the floor
of the oven.
F or this reason do not place a dish, tin
or baking tray directly on the oven floor.
If using a tray made by a different
manufacturer, make sure that there is a
gap of at least 6 cm betw een the
bottom of the tray and the floor of the
oven.
~ Never add cold w
ater to food on a
hot universal tray or baking tray or
directly onto food in a hot oven. The
steam created could cause serious
burns or scalding and the sudden
change in temperature can damage the
enamel.
~
A lw ay s ensure that food is suitably
cooked or reheated.
S ome foods may contain
micro-organisms w hich are only
destroy ed by thorough cooking at
temperatures over 70 ° C for a minimum
of 10 minutes. Therefore w hen cooking
or reheating foods, e.g. poultry , it is
particularly important that food is fully
cooked through. If in doubt select a
longer cooking or reheating time.
It is important that the heat is allow ed to
spread evenly throughout the food
being cooked. This can be achieved by
stirring and/or turning the food during
cooking.
~ If using plastic containers for
cooking, they must be declared by the
manufacturer as being suitable for use
in an oven. O ther ty pes of plastic
containers melt at high temperatures,
and could damage the oven.
9
W ar ning and S afety instr u c tio ns
~ D o not heat up unopened tins or jars
of food in the oven. P ressure can build
up and they may ex plode, resulting in
injury or damage.
~ D o not push pots and pans around
on the oven floor, as this could damage
the surface.
~ D o not lean or sit on an open oven
door, or place heavy items on it. Make
sure that nothing gets trapped betw een
the door and the oven compartment.
This could damage the oven.
The oven door can support a max imum
load of 15 kg.
~ D o not use the appliance to heat up
the room. D ue to the high temperatures
radiated, objects near the appliance
could catch fire.
Ac c esso r ies
~ O nly use genuine Miele spare parts
and accessories w ith this appliance. If
spare parts or accessories from other
manufacturers are used, this w ill
invalidate the guarantee, and Miele
cannot accept liability .
10
The manufacturer cannot be held
liable for damage caused by
non-compliance w ith these W arning
and S afety instructions.
C ar ing fo r th e env ir o nm ent
D isp o sal o f th e p ac k ing
m ater ial
D isp o sal o f y o u r o ld ap p lianc e
o r m ac h ine
The transport and protective packing
has been selected from materials w hich
are environmentally friendly for disposal
and can normally be recy cled.
E lectrical and electronic appliances /
machines often contain materials
w hich, if handled or disposed of
incorrectly , could be potentially
haz ardous to human health and to the
environment. They are, how ever,
essential for the correct functioning of
y our appliance or machine. Therefore,
please do not dispose of y our old
machine or appliance w ith y our
household w aste.
E nsure that any plastic w rappings,
bags, etc. are disposed of safely and
kept out of the reach of babies and
y oung children. D anger of suffocation.
R ather than just throw ing these
materials aw ay , please ensure they are
offered for recy cling.
P lease dispose of it at y our local
community w aste collection / recy cling
centre and ensure that it presents no
danger to children w hile being stored
for disposal.
It should be unplugged or disconnected
from the mains electricity supply by a
competent person.
The plug must be rendered useless
and the cable cut off directly behind the
appliance or the machine to prevent
misuse.
11
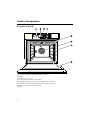
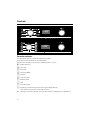
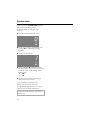
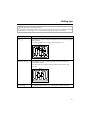
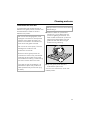
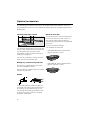
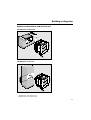
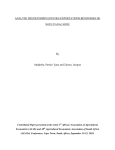
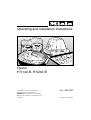
G u id e to th e ap p lianc e
H 5 1 4 0 B, H 5 2 4 0 B
a F unction selector, retractable w hen it is at "0"
b D isplay
c S ensors V, O K , W, N
d Temperature selector, retractable
e H eating element for top heat and grilling w ith roof liner
f C ataly tic enamelled back panel w ith air inlet for the fan
g S ide runners w ith five shelf levels
h D oor
12
F eatu r es
O v en c o ntr o ls
C o o ling sy stem
In addition to operating the various
cooking programmes to bake, roast
and grill the controls also offer the
follow ing:
A cooling fan w ill come on
automatically w hen a cooking
programme is started. The cooling fan
mix es hot air from the oven cavity w ith
cool room air before venting it out into
the kitchen through vents located
betw een the appliance door and the
control panel.
– a time of day display ,
– a minute minder,
– a timer to automatically sw itch
cooking programmes on and off,
– settings can be customised.
S afety featu r es
S y stem lo c k
The sy stem lock 0 prevents the oven
from being used unintentionally by
children, for ex ample. S ee "S y stem
lock".
S afety sw itc h -o ff
S afety sw itc h -o ff is triggered
automatically if the oven is operated for
an unusually long period of time.
The period of time w ill depend on the
particular oven function being used.
The oven w ill sw itch off automatically
and "F ault 55" w ill appear in the display .
The oven can be used again immediately after sw itching it off and back on.
The cooling fan w ill continue to run for a
w hile after the oven has been sw itched
off to prevent any humidity building up
in the oven, on the control panel or on
the oven housing unit.
W hen the temperature in the oven has
fallen sufficiently , the cooling fan w ill
sw itch off automatically .
V ented o v en d o o r
The oven door is an open sy stem and
the door panes have a heat-reflecting
coating. D uring operation, cool air is
passed through the oven door to keep
the outer pane cool.
If necessary , the oven door can be
dismantled for cleaning.
13
F eatu r es
P er fec tC lean tr eated su r fac es
The follow ing surfaces are all treated
w ith P erfectC lean enamelling:
– O ven interior,
– R unners,
– B aking tray ,
– U niversal tray ,
– A nti-splash insert and
– R ack
P erfectC lean enamelled surfaces have
very good anti-stick properties and are
much easier to keep clean than
conventional enamel, if cleaned
regularly .
S ee "C leaning and care" for more
information.
C ataly tic enam elled su r fac e
The back panel is coated w ith dark
grey cataly tic enamel. S oiling from oil
and fat is burnt off these surfaces w hen
very high temperatures are used in the
oven.
S ee "C leaning and care" for more
information.
14
E ner g y effic ienc y fu nc tio ns
T im e o f d ay d isp lay
The time of day display can be
sw itched off to save energy . The time of
day display remains dark w hen the
appliance is sw itched off. It continues
to run unseen in the background and is
visible w hen the appliance is operated.
E ner g y effic ienc y r ating
ac c o r d ing to E N 5 03 04
This appliance is rated energy
efficiency class A in accordance w ith
E N 50304.
Tests w ere carried out using "F an
P lus U".
Ac c esso r ies
The follow ing accessories are supplied
w ith this oven.
These and other accessories are also
available to order from the Miele S pare
P arts D epartment, y our C hartered
A gent or via the internet on
w w w .miele-shop.com (depending on
country ).
F eatu r es
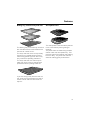
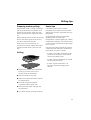
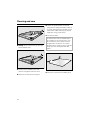
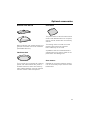
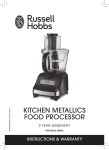
Bak ing tr ay , u niv er sal tr ay and r ac k
The baking tray , universal tray and rack
are inserted into the oven betw een the
tw o rails of a shelf runner.
The tray s and rack have non-tip safety
notches in the middle w hich prevent
them being pulled right out w hen they
only need to be partially pulled out.
The tray s and rack can then only be
taken out of the oven by raising them
upw ards and then pulling them out.
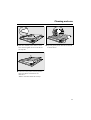
Anti-sp lash inser t
The anti-splash insert should be placed
in the universal tray w hen grilling or
roasting.
The juices from the food being cooked
collect under the anti-splash tray . This
prevents them from spitting and making
the oven dirty . The juices can then be
used for making gravy and sauces.
If y ou are using a tray w ith the rack on
top, insert the tray betw een the rails of
a shelf runner and the rack w ill sit on
top of it.
15
C o ntr o ls
F u nc tio n selec to r
The left-hand control is used to select the function.
It can be turned clockw ise or anti-clockw ise.
The function selector can only be retracted w hen it is at "0".
S R apid H eat-up
U F an P lus
\ F an G rill
O Intensive B ake
P D efrost
V C onventional
X B ottom H eat
Y G rill
Z E conomy G rill
T L ighting: F or sw itching on the oven light independently .
This can be useful w hen cleaning the oven.
%
16
S ettings: F rom this position y ou can also alter the settings of the appliance.
C o ntr o ls
T em p er atu r e selec to r
The right-hand control V 6 W is used to select the temperature.
It can be turned clockw ise or anti-clockw ise.
The temperature selector can be retracted in any position.
S enso r s
The sensors underneath the display react to touch.
A key pad tone sounds each time a sensor is touched. Y ou can sw itch off the
key pad tone (see "S ettings % - P 4").
U se
O K
– F or calling up the functions in the display . Triangle V w ill appear in the
display .
– F or confirming an entry .
W
– F or moving triangle V in the display to the right.
– F or increasing time entries.
V
– F or moving triangle V in the display to the left.
– F or decreasing time entries.
N
F or entering a minute minder time, e.g. for boiling eggs.
17
C o ntr o ls
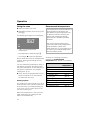
S y m b o ls in th e d isp lay
%
I2:00
h
m in
N m T S 0
V
The follow ing sy mbols w ill appear in the display depending on the position of the
function selector and/or w hether a sensor has been touched:
P o sitio n o f th e
fu nc tio n selec to r
0
F u nc tio n (ex c ep t
L ig h t)
S ym bol
u
Time of day
0
S y stem lock
Temperature indicator
%
Temperature
u
T and h
S etting s %
Any
F u nc tio n/m eaning
Time of day
D uration
S
F inish
P and a number
S etting
S and a number
S tatus of the setting
V lights up under The function w ill show in the display .
a sy mbol
V flashes under a The function is selected and can be
sy mbol
altered.
Any
18
N and min
Minute minder time
C o ntr o ls
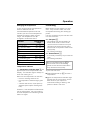
T r iang le V in th e d isp lay
I60
%
V
m T S
Y ou can only make entries w ith the V
or W sensors w hilst triangle V is
flashing.
If the triangle has stopped flashing,
y ou w ill need to select the function
again w ith the O K sensor.
W hen a sensor is touched, the
sy m b o ls o f th e fu nc tio n at w hich the
function selector is set w ill light up and
y ou can enter settings.
The follow ing w ill change each time the
V or W is touched
Touch the V or W sensor repeatedly
until triangle V is underneath the
sy mbol of the req uired function in the
display .
– the Minute minder time N at first in
increments of 5 seconds and then in
increments of a minute.
Then call up the function w ith the O K
sensor.
T r iang le V w ill flash for approx .
5 seconds.
– D uration T and F inish time S in
increments of a minute,
Touching the sensor for longer, speeds
up the change in the display .
19
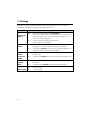
F u nc tio ns
Y our oven has a range of oven functions for preparing a w ide variety of recipes.
F u nc tio ns
N o tes
V C o nv entio nal – F or baking traditional recipes, e.g. fruit cake, casseroles.
– A lso ideal for soufflé s.
– If using an older recipe or cookbook, set the oven
temperature for C onventional, 10° C low er than that
recommended.
The cooking duration does not need to be changed.
X Bo tto m h eat – U se this setting tow ards the end of baking, to reheat or
brow n the base of a cake, q uiche or piz z a.
Y F u ll g r ill
– F or grilling larger q uantities of thin cuts (e.g. steaks).
– F or brow ning larger dishes.
Z E c o no m y
g r ill
– F or grilling small q uantities of flat cuts (e.g. steaks)
– F or brow ning smaller dishes.
20
F u nc tio ns
F u nc tio ns
N o tes
S R ap id
h eat-u p
– F or pre-heating the oven compartment.
The oven function req uired must then be selected.
U F an p lu s
– F or baking and roasting.
– Y ou can bake and roast on different levels at the same
time.
– L ow er temperatures can be used than w ith "C onventional
V" as the F an plus sy stem distributes the heated air
around the food.
\ F an g r ill
– F or grilling larger items, e.g. rolled meat, poultry .
– The hot air from the grill is distributed over the food by the
fan. This enables a low er temperature to be selected than
w hen using "F ull grill Y"/"E conomy grill Z".
O Intensiv eb ak e
– F or cooking dishes w hich req uire a moist topping and a
crisp base such as piz z a and q uiche lorraine.
– Intensive bake is not suitable for baking thin biscuits etc.
or for roasting as the juices w ill become too dark.
P D efr o st
– F or the gentle defrosting of froz en food.
21
Befo r e u sing fo r th e fir st tim e
B efore the oven can be used, y ou
w ill need to
– release the controls by pressing
them in, if they are pushed in
w hen the oven is delivered.
– set the time of day .
T o set th e tim e o f d ay fo r th e
fir st tim e
The time can only be entered w hen
the function selector is at "0".
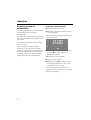
In the display :
– the clock sy mbol m w ill light up,
– and "I2:00" and triangle V
underneath the m sy mbol w ill start
flashing.
The time of day y ou have selected has
now been entered.
If there is a pow er cut, the appliance
w ill store the current time of day of
approx . 24 hours. If more than 24
hours have elapsed it w ill show "i2:00"
and w ill need to be re-set.
W hen pow er is restored the time of day
w ill flash in the display . If it is correct
press the O K sensor to confirm it.
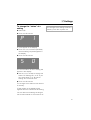
C h ang ing th e tim e o f d ay
^ Touch the O K sensor.
^ U se the V or W sensors to enter the
hour first of all.
^ Touch the O K sensor.
^ Now use the V or W sensors to enter
the minutes.
^ Touch the O K sensor.
The time of day has been changed.
I2:00
m
V
^ U se the V or W sensors to enter the
hour first of all.
^ Touch the O K sensor.
This confirms the hour and the minutes
w ill then start to flash.
^ Now use the V or W sensors to enter
the minutes.
^ Touch the O K sensor.
This confirms the minutes.
22
Befo r e u sing fo r th e fir st tim e
C leaning and h eating u p fo r
th e fir st tim e
B efore use, please remove
– any stickers from the floor of the
oven.
– any protective foil from the
oven front.
S ee "C leaning and care" for more
information.
B efore using the oven for the first time
– take all ac c esso r ies out of the oven
and w ash them.
– then h eat th e o v en u p o nc e w ith
no th ing in it. New ovens can give off
a slight smell on first use. D oing this
w ill dissipate the smells before y ou
use it to cook food.
^ B efore heating the oven up it is a
good idea to w ipe the interior out w ith
a damp cloth. This w ay any dust or
bits of packaging that may have
accumulated in the oven cavity
during storage and unpacking w ill be
removed.
The oven w ill start heating up as soon
as this entry has been accepted.
^ H eat the empty oven for at least an
hour.
P lease ensure the room is w ell
ventilated during this operation.
C lose doors to other rooms to
prevent the smell spreading
throughout the house.
The timer can also be used to set the
finish time. S ee "E ntering a cooking
duration".
^ L eave the appliance to cool dow n to
room temperature.
^ Then w ipe the oven interior out w ith a
solution of hot w ater and a mild
detergent and then dry it thoroughly
w ith a soft clean cloth.
L eave the oven door open until the
oven interior is completely dry .
^ P ress in the function selector and the
temperature selector to release them.
^ U se the function selector to select
"F an plus U".
The recommended temperature of
160 ° C w ill appear.
^ U se the temperature selector to set
the highest temperature (250 ° C ).
23
O p er atio n
U sing th e o v en
^ P lace the food in the oven.
^ S elect the function y ou w ant (e.g. F an
plus U).
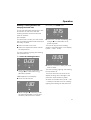
The follow ing w ill appear in the display :
I60
%
V
– "160" - the recommended
temperature,
R ec o m m end ed tem p er atu r e
The temperature recommendations in
these operating instructions are
provided as a general guide for use
in different countries and may not
alw ay s suit individual customer
preferences in A ustralia and New
Z ealand.
F or hints, tips and recipes w hich
have been specifically designed for
local conditions, please visit
w w w .miele.com.au, w w w .miele.co.nz
or contact y our nearest Miele S ales
and Information C entre.
– the temperature indicator light ,
– the triangle V under the % sy mbol.
A t the same time the oven compartment
heating, lighting and cooling fan w ill
sw itch on.
Y ou can follow the temperature rising in
the display . A buz z er w ill sound w hen
the oven temperature is reached (only if
this option is selected - see chapter
"S ettings % - P 2").
A s soon as a cooking function is
selected, a r ec o m m end ed
tem p er atu r e w ill appear in the display .
F u nc tio n
R ec o m m end ed
tem p er atu r e
U F an plus
160 ° C
O Intensive bake
170 ° C
V C onventional
180 ° C
^ A t the end of the programme turn the
function selector to "0" and remove
the food from the oven.
X B ottom heat
180 ° C
\ F an grill
200 ° C
Y F ull grill
240 ° C
C o o ling sy stem
Z E conomy grill
240 ° C
The cooling fan w ill continue to run for a
w hile after the oven has been sw itched
off to prevent any humidity building up
in the oven, on the control panel or on
the oven housing unit.
P D efrost
W hen the temperature in the oven has
fallen sufficiently the cooling fan w ill
sw itch off automatically .
24
S R apid heat-up
Time of day
160 ° C
O p er atio n
C h ang ing th e tem p er atu r e
P r e-h eating
If y our recipe req uires a temperature
w hich is different from the
recommended temperature for that
function y ou can use the temperature
selector to change it w ithin a given
range. The temperature can be
changed in increments of 5° C .
Most dishes can be placed in a cold
oven. They w ill then make use of the
heat produced during the heating-up
phase.
It is only necessary to pre-heat the oven
in a few instances:
F u nc tio n
T em p er atu r e
r ang e
U F an plus
30 – 250 ° C
O Intensive bake
50 – 250 ° C
V C onventional
30 – 280 ° C
X B ottom heat
100 – 280 ° C
\ F an grill
50 – 260 ° C
Y F ull grill
200 – 300 ° C
Z E conomy grill
200 – 300 ° C
P D efrost
S R apid heat-up
W ith F an p lu s U,
– pre-heating may be necessary for
foods w hich cook in less than 20
minutes and for foods such as puff
pastries and y east mix tures w here
instant heat is req uired to make them
rise q uickly .
– for roasting beef/fillet.
W ith C o nv entio nal V
– it is usually necessary to pre-heat the
oven.
– for roasting beef/fillet.
–
30 – 250 ° C
T em p er atu r e ind ic ato r
The tem p er atu r e ind ic ato r lig h t w ill
appear nex t to the temperature in the
display . The indicator light is alw ay s on
w hen the heating is on.
W hen the set temperature is reached,
– the oven heating sw itches off.
– the temperature indicator light goes
out.
– a buz z er w ill sound, if this option is
selected (see chapter "S ettings % P 2").
D o not use R apid heat-up S to
pre-heat the oven w hen baking
piz z as or biscuits and small cakes.
They w ill brow n too q uickly .
To pre-heat the oven:
^ S elect R apid heat-up S and set a
temperature.
^ W hen the temperature indicator light
goes out for the first time, set the
oven function y ou req uire for
continued cooking or baking, and
place the food in the oven.
H ow ever, if the temperature falls below
the set temperature, the oven heating
and the temperature indicator light w ill
sw itch on again.
25
O p er atio n
S w itc h ing o n and o ff
au to m atic ally
E nter ing a c o o k ing d u r atio n
Y ou can programme the oven to sw itch
off automatically or on and off
automatically .
^ S elect the req uired function and set
the temperature.
F or automatic sw itching off y ou need to
enter the duration or the duration and a
finish time.
^ P lace the food in the oven.
The oven heating, lighting and cooling
fan w ill sw itch on.
0:00
%
m T S
V
The max imum duration w hich can be
set is 12 hours.
W e recommend using automatic
sw itching on and off w hen roasting.
H ow ever, do not delay the start for too
long w hen baking as the cake mix ture
or dough w ill dry out, and the raising
agents w ill lose their effectiveness.
h
^ Touch the W sensor repeatedly until
triangle V is underneath the T
(D uration) sy mbol.
"0:00" appears in the display .
^ Touch the O K sensor.
^ W hilst triangle V is flashing, enter
the req uired duration in hours and
minutes w ith the W sensor.
If no other sy mbol is selected, the
cooking duration w ill be seen counting
dow n in the display .
26
O p er atio n
E nter ing a c o o k ing d u r atio n and
d elay ing th e finish tim e
To use the automatic sw itching on and
off function on the oven, both the
cooking duration and the finish time
must be entered.
F or ex ample:
The time now is 10:45; y ou w ant a dish
w ith a cooking duration of 90 minutes to
be ready at 13:30.
^ P lace the food in the oven.
^ S elect the req uired function and set
the temperature.
Now delay the F inish time:
I2:I5
%
m T S
V
^ Touch the W sensor repeatedly until
triangle V is underneath the S
(F inish) sy mbol.
The time of day plus the cooking
duration entered appear in the display
(10:45 + 1:30 = 12:15).
The oven heating, lighting and cooling
fan w ill sw itch on.
I3:30
F irst enter th e c o o k ing d u r atio n:
0:00
%
m T S
V
h
"0:00" appears in the display .
^ Touch the O K sensor.
I:30
m T S
V
^ U se the W sensor to delay the finish
time to 13:30.
^ Touch the W sensor repeatedly until
triangle V is underneath the T
(D uration) sy mbol.
%
h
The oven heating, lighting and cooling
fan w ill sw itch off.
The F inish time w ill now show in the
display as long as the triangle is not
moved to under another sy mbol.
A s soon as the start time (13:30 - 1:30
= 12:00) is reached, the oven heating,
lighting and cooling fan w ill sw itch on.
T
V
^ W hilst triangle V is flashing, enter
the req uired duration in hours and
minutes (1:30) w ith the W sensor.
27
O p er atio n
T h e end o f a c o o k ing p r o g r am m e
T o c h ec k and c h ang e an enter ed tim e
A t the end of the duration
It is possible to check or change times
entered for a cooking programme at
any time by calling up the relevant
sy mbol w ith the V or W sensors.
– the oven heating sw itches off
automatically .
– the cooling fan w ill continue to run for
a w hile.
– the S sy mbol (F inish) w ill start
flashing.
– a buz z er w ill sound, if this option is
selected (see chapter "S ettings % P 2").
^ Turn the function selector to "0".
The buz z er w ill stop and the sy mbols in
the display w ill go out.
^ R emove the food from the oven.
28
To change the time, touch the O K
sensor and w hilst triangle V is
flashing, change the entry w ith the V or
W sensor.
T o d elete an enter ed tim e
^ S et the duration to "0:00" or turn the
function selector to "0".
If there is a pow er cut, all data entered
w ill be deleted.
M inu te m ind er (eg g tim er )
The minute minder can be used to time
any activity in the kitchen, e.g. boiling
eggs.
A max imum minute minder time of 59
minutes and 55 seconds can be set.
Y ou can set the minute minder at the
same time as another timed
programme, e.g. as a reminder to stir a
dish or add seasoning etc.
T o set th e m inu te m ind er
^ Touch the N sensor.
0:00
A t the end of the time set for the minute
minder
– the N sy mbol w ill flash.
– a buz z er w ill sound, if this option is
selected (see chapter "S ettings % P 3").
– at the end of the minute minder time,
the display w ill show the time
counting upw ards.
^ Touch the O K sensor.
T o c anc el th e tim e set fo r th e
m inu te m ind er
m in
N
V
"0:00" appears in the display .
^ C all up the N function w ith the O K
sensor.
Triangle V must be flashing
underneath the sy mbol.
^ U se the V sensor to set the minute
minder time to "0:00".
^ W hilst triangle V is flashing, enter
the minute minder time w ith the W
sensor.
The minute minder time w ill be visible
counting dow n in the display , as long
as triangle V is underneath the N
sy mbol.
29
% S etting s
Y our oven is supplied w ith standard factory default settings. Y ou can select
alternative settings by changing the status (see chart).
S etting
S tatu s (* S tand ar d d efau lt setting )
P I
T im e o f d ay
d isp lay
S 0
The time of day display is sw itc h ed o ff.
W hen the function selector is turned to the "0" position, the
display remains dark. The time of day continues to run
unseen in the background.
S I*
The time of day display is sw itched on
and is visible in the display .
S 0
The buz z er d o es no t so u nd at the end of a cooking
programme or at the end of the heating-up phase.
S I*
The buz z er so u nd s at the end of a cooking programme
and at the end of the heating-up phase.
P 3
Bu z z er
fo r m inu te
m ind er
S 0
The buz z er d o es no t so u nd at the end of the minute
minder time.
S I*
The buz z er so u nd s at the end of the minute minder time.
P 4
K ey p ad
to nes
S 0
A key pad tone d o es no t so u nd w hen a sensor is
touched.
S I*
A key pad tone so u nd s w hen a sensor is touched.
P 2
Bu z z er
P 5
24 *
C lo c k fo r m at I2
30
24 hour clock
12 hour clock
% S etting s
T o c h ang e th e " statu s" o f a
setting
^ S elect "%".
The change to the setting remains in
memory even after a pow er cut.
^ Touch the O K sensor.
P
I
"P I" w ill appear in the display .
^ Touch the V or W sensor repeatedly
until the setting req uired appears in
the display .
^ Touch the O K sensor.
S
0
The current status "S" of the setting w ill
appear in the display .
^ U se the V or W sensor to change the
status. F or S ettings "P I" to "P 4" y ou
can select either "I" or "0" and for
S etting "P 5 " either 24 or I2.
^ Touch the O K sensor.
The change to the status is then stored
in memory .
"P" w ill appear in the display again
together w ith the number for the setting.
Y ou can alter more settings as long as
the function selector is not turned to "0".
31
S y stem lo c k
Y our oven has a sy stem lo c k 0 w hich
prevents it from being used
unintentionally , for ex ample, by
children.
^ Turn the function selector to "0".
0
0
V
^ Touch the W sensor repeatedly until
triangle V is underneath the 0
sy mbol.
^ Touch the O K sensor.
I
0
V
^ W hilst triangle V is flashing under
the 0 sy mbol, use the V or W sensors
to select the "I" or "0" setting for the
sy stem lock.
"0" = O ff
"I" = O n
^ C onfirm y our choice of setting by
touching the O K sensor.
If the "I" setting is selected, the
appliance cannot be operated.
The 0 sy mbol w ill remind y ou that the
sy stem lock has been activated.
The lock remains active even after a
pow er cut.
32
Bak ing tip s
Bak ing p ar c h m ent
R efer to the baking charts for
suggestions of temperatures, shelf
levels and cooking durations. These
take into account a range of different
baking tins, q uantities and cooking
traditions.
H andling and preparing food
correctly is essential for maintaining
good health.
O nly bake cakes, piz z a, chips etc
until they are golden. D o not
overcook them.
Bak ew ar e
P lease take into account the material of
y our bakew are in y our choice of oven
function:
B ecause of their P erfectC lean anti-stick
surface th e b ak ing tr ay and th e
u niv er sal tr ay do not need to be
greased or lined w ith baking parchment
for baking.
B aked goods are easily removed w hen
done.
Bak ing p ar c h m ent is o nly nec essar y
w h en b ak ing :
– A ny thing w ith a h ig h salt c o ntent
(e. g. pretz els, bread sticks),
because sodium can damage the
P erfectC lean surface.
– Meringues or biscuits w ith a h ig h
eg g -w h ite c o ntent, because they
are more likely to stick.
U niv er sal tr ay
A ny heat-resistant material can be
used.
W hen baking cakes w ith fr esh fr u it
to p p ing s and d eep sp o ng e c ak es
place the tin in the universal tray to
catch any spillages and keep the oven
cleaner.
C o nv entio nal V
R etang u lar tins
D ark metal, enamel or aluminium
baking tins w ith a matt finish, as w ell as
heat-resistant glass and ceramic
dishes can be used.
B right, shiny metal tins result in uneven
or poor brow ning and in some cases
cakes might not cook properly .
P lace cakes in retangular tins w ith the
longer side across the w idth of the oven
for optimum heat distribution and even
results.
F an P lu s U, Intensiv e Bak e O
33
Bak ing tip s
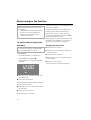
N o tes ab o u t th e c h ar ts
T em p er atu r e, b ak ing d u r atio n
To achieve even results w ithout
over-brow ning the food,
– alw ay s select the lo w est
tem p er atu r e given in the chart.
D o not set a temperature higher than
that recommended. Increasing the
temperature may reduce the cooking
time, but w ill lead to uneven
brow ning, and unsatisfactory
cooking results.
– C heck if the food is cooked at the
end of the sh o r test tim e q u o ted .
To check if a cake is ready , insert a
w ooden skew er into the centre.
It is ready if the skew er comes out
clean, w ithout dough or crumbs
sticking to it.
S h elf lev el
The shelf levels are counted from the
bottom of the oven upw ards (1 =
low est, 5 = highest).
N u m b er
o f tr ay s
S h elf lev el
1
2
2
1 and 3
3
1, 3 and 5 *
O
1
1 or 2
V
1
1 or 2
U
* W hen baking moist cakes, bread etc
do not use more than tw o baking tins
at the same time.
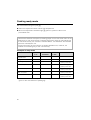
34
F r o z en fo o d
W hen baking froz en products such as
c ak es, p iz z a and b ag u ettes, use the
low est temperature q uoted on the
manufacturer's packaging. B ake on a
lay er of baking parchment placed on
the rack. C ooking large froz en items on
the baking tray or the universal tray can
cause the metal to distort. This
distortion w ould increase w ith
subseq uent use.
S mall items of froz en food such as
o v en c h ip s o r p o tato c r o q u ettes can
be cooked on the universal tray . P lace
them on baking parchment and select
the low est temperature q uoted on the
manufacturer's packaging. Turn several
times during cooking.
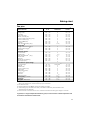
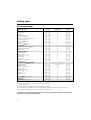
Bak ing c h ar t
F an p lu s
C ak es / b isc u its
C r eam ed m ix tu r e
S ponge cake
R ing cake
F oam cake (tray )
Marble, nut cake (tin)
F resh fruit cake w ith filling (tray )
F resh fruit cake (tray )
F resh fruit cake (tin)
F lan base 3)
S mall cakes/biscuits3) (tray )
S p o ng e m ix 3 )
S ponge cake (3 to 6 eggs) 3)
S ponge cake (2 eggs) 3)
S w iss roll2)
R u b b ed in m ix tu r e
Tart / flan base
S treusel cake
S mall cakes/biscuits3) (tray )
C heese cake
A pple pie
A pricot tart w ith topping
S w iss apple pie2)
Y east m ix tu r e / q u ar k d o u g h
To prove dough
G uglhupf
S treusel cake
F resh fruit cake (tray )
W hite bread
W holegrain bread 2)
P iz z a (tray ) 3)
O nion tart
A pple turnvovers
C h o u x p astr y 3) , E clairs
P u ff p astr y
M er ing u es, Macaroons
T em p er atu r e
in ° C
R ec o m m end ed
sh elf lev el
D u r atio n1 )
in m in.
150 – 170
150 – 170
150 – 170
150 – 170
150 – 170
150 – 170
150 – 170
150 – 170
150 – 170
2
2
2
2
2
2
2
2
1, 3 4)
60 – 70
65 – 80
25 – 40
60 – 80
45 – 50
35 – 55
55 – 65
25 – 30
20 – 25
160 – 180
160 – 180
160 – 180
2
2
2
25 – 35
20 – 25
20 – 25
150 – 170
150 – 170
150 – 170
150 – 170
150 – 170
150 – 170
190 – 210
2
2
1, 3 4)
2
2
2
2
20 – 25
45 – 55
15 – 25
70 – 90
50 – 70
55 – 75
25 – 35
30 – 50
150 – 170
150 – 170
160 – 180
160 – 180
170 – 190
170 – 190
170 – 190
150 – 170
160 – 180
170 – 190
120 – 140
O ven floor 5)
2
2
2
2
2
2
2
1, 3 4)
1, 3 4)
1, 3 4)
1, 3 4)
15 – 30
50 – 60
35 – 45
40 – 50
40 – 50
50 – 60
35 – 45
35 – 45
25 – 30
30 – 40
20 – 25
25 – 50
1) U nless otherw ise stated, the times given are for an oven w hich has not been pre-heated.
W ith a pre-heated oven, shorten times by up to 10 minutes.
2) P re-heat the oven.
3) S w itch R apid heat-up S off during the heating-up phase.
4) Take baking tray s out of the oven early if the food is sufficiently brow ned before the
specified time has elapsed.
5) P lace the rack on the floor of the oven, and stand the bow l containing the dough on the rack.
In g ener al, if a r ang e o f tem p er atu r es/tim es is g iv en, it is b est to selec t a lo w er tem p er atu r e and
to c h ec k th e fo o d after th e sh o r test tim e.
35
Bak ing c h ar t
C o nv entio nal h eat
C ak es / b isc u its
C r eam ed m ix tu r e
S ponge cake
R ing cake
F oam cake (tray ) 1)
Marble, nut cake (tin)
F resh fruit cake, w ith filling (tray )
F resh fruit cake (tray )
F resh fruit cake (tin)
F lan base 2) 3)
S mall cakes 2) 3) (tray )
S p o ng e m ix 2 ) 3 )
S ponge cake (3 to 6 eggs) 2) 3)
S ponge cake (2 eggs) 2) 3)
S w iss roll 2) 3)
R u b b ed in m ix tu r e
Tart / flan base
S treusel cake
S mall cakes2) 3) (tray )
C heesecake
A pple pie 2)
A pricot tart, w ith filling2)
S w iss apple pie 2)
Y east m ix tu r es / q u ar k d o u g h
To prove doughG uglhupf
S treusel cake
F resh fruit cake (tray )
W hite bread
W holegrain bread 2)
P iz z a (tray ) 2) 3)
O nion tart 2)
A pple turnvovers
C h o u x p astr y 2) 3) , E clairs
P u ff p astr y 2)
M er ing u es2) , Macaroons
1) U
W
2) P
3) S
4) P
5) S
T em p er atu r e
in ° C
R ec o m m end ed
sh elf lev el
D u r atio n1 )
in m in.
150 – 170
170 – 190
170 – 190
150 – 170
170 – 190
170 – 190
160 – 180
170 – 190
170 – 190
2
2
2
2
2
2
2
2
3
60 – 70
65 – 80
25 – 40
60 – 80
45 – 50
35 – 55
55 – 65
20 – 25
15 – 25
170 – 190
170 – 190
180 – 200
3
3
3
20 – 35
15 – 20
12 – 16
170 – 190
170 – 190
160 – 180
170 – 190
170 – 190
170 – 190
220 – 240
2
2
3
2
2
2
1
15 – 20
45 – 55
15 – 25
70 – 90
45 – 65
55 – 75
25 – 35
30 – 50
160 – 180
170 – 190
180 – 200
160 – 180
190 – 210
190 – 210
180 – 200
160 – 180
180 – 200
190 – 210
120 – 140
O ven floor 4)
1
2 5)
2 5)
1
2
1
2
2
3
2
2
15 – 30
50 – 60
35 – 45
40 – 50
50 – 60
50 – 60
30 – 40
25 – 35
25 – 30
35 – 45
15 – 25
25 – 50
nless otherw ise stated, the times given are for an oven w hich has not been pre-heated.
ith a pre-heated oven, shorten times by up to 10 minutes.
re-heat the oven.
w itch R apid heat-up S off during the heating-up phase.
lace the rack on the floor of the oven, and stand the bow l containing the dough on the rack.
helf level for y east dough. F or q uark dough, use shelf level 3.
In g ener al, if a r ang e o f tem p er atu r es/tim es is g iv en, it is b est to selec t a lo w er tem p er atu r e and
to c h ec k th e fo o d after th e sh o r test tim e.
36
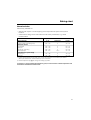
Bak ing c h ar t
Intensiv e b ak e
P articularly suitable for
– dishes that req uire a moist topping and crisp base like piz z a and q uiche
lorraine.
– cakes w ith a filling w here the base has not been pre-baked, e.g. some
cheesecakes.
C ak es / b isc u its
C r eam ed m ix tu r e
F resh fruit cake, w ith filling (tray )
R u b b ed in m ix tu r e
C heesecake
A pple pie
A pricot tart, w ith filling
S w iss apple pie
Y east m ix tu r es / q u ar k d o u g h
P iz z a (tray ) 2)
O nion tart
T em p er atu r e
in ° C
R ec o m m end ed
sh elf lev el
D u r atio n1 )
in m in.
150 – 170
2
30 – 35
150 – 170
150 – 170
150 – 170
190 – 210
2
2
2
1 or 2
65 – 75
50 – 60
50 – 60
25 – 30
170 – 190
170 – 190
2
2
40 – 50
25 – 35
1) U nless otherw ise stated, the times given are for an oven w hich has not been pre-heated.
W ith a pre-heated oven, shorten times by up to 10 minutes.
2) S w itch R apid heat-up S off during the heating-up phase.
In g ener al, if a r ang e o f tem p er atu r es/tim es is g iv en, it is b est to selec t a lo w er tem p er atu r e and
to c h ec k th e fo o d after th e sh o r test tim e.
37
R o asting tip s
R ec o m m end atio ns N o tes
F u nc tio n
F an P lus U
C o ntainer s
A ny heat-resistant
containers
Y ou can also use C onventional V.
The Miele G ourmet oven dish, roasting pans w ith a lid,
ovenproof china or glass, roasting bags, the universal tray ,
the rack on top of the universal tray , the anti-splash insert (if
y ou have one) in the universal tray .
W e recommend roasting in a covered pot, as
– this ensures that sufficient stock remains for making
gravy .
– and the oven stay s cleaner, too.
S h elf lev el
2nd shelf level from
the bottom
P r e-h eating
G enerally not
req uired
P lace the covered pot on the rack into a cold oven.
P re-heating is only req uired w hen roasting beef/fillet.
T em p er atu r e
P lease refer to the
roasting chart.
– D o not select a higher temperature than that suggested.
The meat w ill brow n on the outside, but w ill not be
properly cooked through.
– W ith F an P lus U, a temperature of 20° C less than for
C onventional V is sufficient.
– F or cuts w hich w eigh 3 kg or more, select a temperature
approx . 10 ° C low er than that given in the roasting chart.
R oasting w ill take longer at the low er temperature, but
w ill be more even.
– F or r o asting d ir ec tly o n th e r ac k , select a temperature
that is about 20° C low er than for roasting in a covered
pot.
R o asting tim es
P lease refer to the
roasting chart.
To calculate the roasting time: The traditional B ritish
method is to allow 15 to 20 minutes per lb/450 grammes,
according to ty pe of meat, plus approx . 20 minutes,
adjusting the length of time as roasting proceeds to obtain
the req uired result.
38
R o asting tip s
U sefu l tip s
Br o w ning
B row ning only occurs tow ards the end
of the roasting time. R emove the lid
about halfw ay through the roasting time
if a more intensive brow ning result is
desired.
S tand ing tim e
A t the end of the programme, take the
roast out of the oven, w rap in aluminium
foil and leave to stand for about
10 minutes. This helps retain juices
w hen the meat is carved.
R o asting p o u ltr y
F or a crisp finish, baste the poultry ten
minutes before the end of cooking time
w ith slightly salted w ater.
F r o z en m eat
D o not roast deep froz en meat. Meat
should be thoroughly defrosted before
roasting.
39
R o asting c h ar t
Food
R ec o m m end ed
sh elf
lev el
F an p lu s U
C o nv entio nal V1 )
T em p er atu r e
in ° C 2 )
T im e
in m in.3 )
T em p er atu r e
in ° C 2 )
T im e
in m in.3 )
Topside of beef, approx .
1 kg
2
170 – 190
100 – 120
190 – 210
100 – 120
B eef fillet or roast beef,
approx . 1 kg4)
2
190 – 210
45 – 55
200 – 220
45 – 55
V enison, approx . 1 kg
2
180 – 200
90 – 120
190 – 210
90 – 120
P ork joint, approx . 1 kg
2
170 – 190
100 – 120
200 – 220
100 – 120
P ork joint w ith crackling,
approx . 2 kg
2
150 – 170
160 – 180
180 – 200
120 – 150
G ammon joint, approx . 1 kg
2
170 – 190
60 – 70
200 – 220
60 – 70
Meat loaf, approx . 1 kg
2
160 – 180
70 – 80
190 – 210
70 – 80
V eal, approx . 1.5 kg
2
170 – 190
100 – 120
190 – 210
100 – 120
L eg of lamb, approx . 1.5 kg
2
170 – 190
90 – 120
200 – 220
90 – 120
R ack of lamb, approx .
1.5 kg4)
2
170 – 190
50 – 60
190 – 210
50 – 60
P oultry , 0.8 – 1 kg
2
170 – 190
60 – 70
190 – 210
60 – 70
P oultry , approx . 2 kg
2
170 – 190
90 – 110
190 – 210
90 – 110
P oultry , stuffed, approx .
2 kg
2
170 – 190
110 – 130
190 – 210
110 – 130
P oultry , approx . 4 kg
2
160 – 180
150 – 180
180 – 200
150 – 180
F ish, w hole, approx . 1.5 kg
2
160 – 180
35 – 55
190 – 210
35 – 55
1) W e recommend F an plus U for roasting, how ever, C onventional V can also be used.
2) Temperature in a covered pot.
If open roasting, set the temperatures 20° C low er.
3) U nless otherw ise stated, the times given are calculated on the basis of an oven
w hich has not been pre-heated.
4) P re-heat the oven.
In g ener al, if a r ang e o f tem p er atu r es and tim es is g iv en, it is b est to selec t a tem p er atu r e in th e
m id d le and to c h ec k th e fo o d after th e sh o r test tim e.
40
G r illing tip s
,G rill w ith the oven door closed.
If y ou grill w ith the door open, hot air w ill escape from the oven instead of being
cooled by the cooling fan. The controls w ill get hot. D anger of burning.
F u nc tio n
N o tes
G rill Y:
F or grilling thin cuts in large q uantities and for brow ning large
baked dishes.
The w hole grill element w ill get hot and glow red.
E conomy G rill Z: F or grilling thin cuts in small q uantities and for brow ning
small baked dishes.
The inner part of the grill heating element w ill get hot and
glow red.
F an G rill \:
F or grilling thicker items, e.g. rolled meat, poultry pieces.
41
G r illing tip s
R ec o m m end atio ns
N o tes
C o ntainer s
R ack on the universal
D o not use the baking tray .
tray
A nti-splash insert in the
universal tray (if y ou
have one)
S h elf lev el fr o m th e
b o tto m
P lease refer to the
grilling chart.
F or thin cuts use shelf level 4 or 5
F or thicker cuts use shelf level 3 or 4
P r e-h eating
is necessary
P re-heat the grill for approx . 5 minutes w ith the door
shut.
T em p er atu r e
P lease refer to the
grilling chart.
– F or thin cuts of meat
(e. g. chops or steak): 275 ° C
– F or grilling thicker items,
(e. g. rolled meat, poultry ) 240 ° C
– D o not select a higher temperature than that
suggested. The meat w ill brow n on the outside, but
w ill not be properly cooked through.
G r illing tim e
P lease refer to the
grilling chart.
– F lat pieces of fish and meat usually take 6 – 8
minutes per side. Thicker pieces take a little longer.
– W ith rolled meat, allow approx . 10 minutes per cm
diameter.
– Turn food half w ay through cooking.
42
G r illing tip s
P r ep ar ing fo o d fo r g r illing
U sefu l tip s
R inse briefly under running cold w ater,
pat dry and season w ith pepper and
herbs. D o not season meat w ith salt
before grilling as this draw s the juices
out.
It is best to grill food of a similar
thickness at the same time so that the
grilling time for each item does not vary
too greatly .
A dd a little oil to lean meat if necessary .
D o not use other ty pes of fat as they
can burn and cause smoke.
C lean fish in the normal w ay . To
enhance the flavour, add a little salt or
sq ueez e a little lemon juice over the
fish.
G r illing
To grill thicker pieces of food more
gradually after an initial high
temperature, continue grilling at a low er
temperature setting or use a low er shelf
runner to allow the food to cook through
to the centre.
O ne w ay of finding out how far through
a piece of meat has been cooked is to
press dow n on it w ith a spoon.
– If there is very little resistance to the
pressure of the spoon, it w ill still be
red on the inside ("rare").
– If there is some resistance the inside
w ill be pink ("medium").
– If there is great resistance, it is
throughly cooked through ("w ell
done").
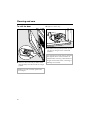
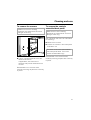
^ A ssemble the rack and anti-splash
insert (if y ou have one) on the
universal tray as illustrated.
^ P lace the food on the rack.
^ S elect the req uired function and set
the temperature.
^ P re-heat the grill for approx .
5 minutes w ith the door shut.
^ P lace the food under the grill and
shut the door.
^ Turn food half w ay through cooking.
43
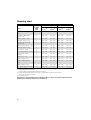
G r illing c h ar t
P re-heat the grill for approx . 5 minutes w ith the door shut.
F u ll g r ill Y /E c o no m y
g r ill Z
F o o d to b e g r illed
F an g r ill \
R ec o m m end ed
sh elf
lev el
T em p er atu r e
in ° C
T o tal
g r illing tim e
in m in.1 )
T em p er atu r e
in ° C
T o tal
g r illing tim e
in m in.1 )
S teak
4
275
10 – 16
220
20 – 25
K ebabs
4
240
25 – 30
220
16 – 20
C hicken kebabs
4
240
20 – 25
200
23 – 27
275
12 – 18
220
23 – 27
T h in c u ts
E scalope
4 or 52)
L iver
4 or 5
2)
275
8 – 12
220
12 – 15
B urgers
4 or 52)
275
14 – 20
220
18 – 22
S ausages
4 or 52)
275
10 – 15
220
9 – 13
F ish fillet
4 or 52)
275
12 – 16
220
13 – 18
Trout
4 or 52)
275
16 – 20
220
20 – 25
Toast
4 or 52)
275
2–4
220
3–6
C heese toast
4 or 52)
275
7–9
220
5–8
Tomatoes
4
275
6–8
220
8 – 10
P eaches
4
275
6–8
220
15 – 20
C hicken
(approx . 1 kg)
3
240
50 – 60
190
60 – 65
R olled meat,
C 7 cm, (approx .
1 kg)
2
240
75 – 85
200
100 – 110
P ork shank
(approx . 1 kg)
2
240
100 – 120
200
95 – 100
S irloin, approx .
1 kg
2
–
–
250
25 – 35
T h ic k er c u ts
1) Turn half w ay through the grilling time.
2) S elect the appropriate shelf level for the thickness of the food.
44
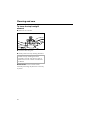
D efr o st
The D efrost P function uses the fan to
circulate air at room temperature.
P lease note:
– W here possible remove the
packaging and put the food to be
defrosted on the universal tray or into
a suitable dish.
– W hen defrosting poultry , put it on the
rack over the universal tray to catch
the defrosted liq uid so that the meat
is not ly ing in this liq uid.
,It is particularly
important to
observe food hy giene rules w hen
defrosting poultry . D o not use the
liq uid from the defrosted poultry .
P our it aw ay , and w ash the tray , the
sink and y our hands. D anger of
salmonella poisoning.
D efr o sting tim es
The time needed for defrosting
depends on the ty pe and w eight of the
food, and at w hat temperature it w as
deep froz en. The follow ing chart is for
guidance only . It is important to check
that food is thoroughly defrosted.
C hicken, 800 g. . . . . . . . . 90 – 120 min.
Meat, 500 g . . . . . . . . . . . . 60 – 90 min.
Meat, 1000 g . . . . . . . . . . 90 – 120 min.
S ausages, 500 g . . . . . . . . 30 – 50 min.
F ish, 1000 g . . . . . . . . . . . . 60 – 90 min.
S traw berries, 300 g . . . . . . 30 – 40 min.
S ponge cake, 500 g. . . . . . 20 – 30 min.
B read, 500 g . . . . . . . . . . . 30 – 40 min.
– F ish does not need to be fully
defrosted before cooking.
D efrost so that the surface is
sufficiently soft to take herbs and
seasoning.
,D o not refreez e food once it has
thaw ed.
45
C o o k ing r ead y m eals
W e recommend using F an plus U.
^ S elect the req uired function and set the temperature.
^ W hen the temperature indicator light goes out, place the dish in the
pre-heated oven.
C ook froz en desserts and piz z a on baking paper on the rack rather than on the
baking tray or the universal tray . C ooking large froz en items on the baking tray
or the universal tray can cause the metal to distort. This distortion w ill increase
w ith each subseq uent use.
F roz en food such as oven chips or croq uette potatoes can, how ever, be
cooked on the baking tray or the universal tray .
E x am p les o f r ead y m eals
Food
P otato, pasta or
vegetable bake
T em p er atu r e
in ° C *
250
S h elf lev el fr o m
th e b o tto m *
2
T im e
in m in.*
N o tes
20 – 25
P lace in a suitable dish
L asagne, cannelloni
190
2
35 – 40
R emove the lid
F illed baguette, panini
200
2
12 – 15
P lace on baking paper,
directly on the rack
P re-cooked piz z a
200
2
12 – 20
P lace on baking paper,
directly on the rack
P re-cooked mini piz z a
220
2
8 – 10
P lace on baking paper,
directly on the rack
P otato pancakes,
R ö sti, croq uettes
220
2
12 – 20
P lace on baking paper,
directly on the rack
P retz els
220
2
12 – 15
P lace on baking paper,
directly on the rack
* O bserve recommended temperatures, cooking times and position in the oven
given on the manufacturer's packaging.
46
C leaning and c ar e
Miele branded cleaning and
conditioning products are available
from the Miele S pare P arts D epartment.
,D o not use a steam cleaner to
clean the appliance. The steam
could reach electrical components
and cause a short circuit.
Ap p lianc e fr o nt
R emove any soiling immediately .
If not, it might become impossible to
remove and could cause the surface
to alter or discolour.
C lean the front using a damp microfibre
cloth or w ith a clean sponge and a
solution of hot w ater and w ashing-up
liq uid. W ipe dry using a soft cloth.
The ex ternal surfaces of this
appliance are all susceptible to
scratching. S cratches on glass
surfaces could even cause a
breakage in certain circumstances.
C ontact w ith unsuitable cleaning
agents can alter or discolour the
outer surfaces.
T o p r ev ent d am ag e to y o u r ap p lianc e
w h en c leaning , d o no t u se:
– C leaning agents containing soda,
ammonia, acids or chlorides
– C leaning agents containing
descaling agents
– A brasive cleaning agents, e.g.
pow der cleaners and cream cleaners
– S olvent-based cleaning agents
– S tainless steel cleaning agents
– D ishw asher cleaner
– O ven spray s
– G lass cleaning agents
– H ard, abrasive sponges and
brushes, e.g. pot scourers
– S harp metal scrapers.
47
C leaning and c ar e
Ac c esso r ies
Bak ing tr ay , u niv er sal tr ay ,
anti-sp lash inser t
The surface has been treated w ith
P er fec tC lean enam el.
P lease refer to the section on
"P erfectC lean" for information on
cleaning and care.
R ac k , r u nner s
The surface has been treated w ith
P er fec tC lean enam el.
Treat in the same w ay as other surfaces
coated w ith P erfectC lean. S ee
"P erfectC lean".
O v en inter io r
A llow the oven to cool dow n before
cleaning.
D anger of burning
The oven interior should be cleaned
after each use. If this is not done
subseq uent soiling from baking and
roasting w ill become w orse and
make cleaning harder. In ex treme
cases soiling w ill be impossible to
remove or even cause damage to
the surface material.
The surface of the oven interior has
been treated w ith P er fec tC lean
enam el.
W hen baking items w ith a high salt
content (e.g. continental pretz els) place
them on baking parchment in the
universal tray . S odium deposits can
48
cause lasting discolouration to
P erfectC lean surfaces.
P lease refer to the section on
"P erfectC lean" for information on
cleaning and care.
The removable b ac k p anel is coated
w ith a dark grey c ataly tic enam el.
S ee the cleaning instructions for
"C ataly tic enamelled surfaces".
To make cleaning easier
remove the oven door,
dismantle the door,
take out the runners,
remove the cataly tic enamelled back
panel.
– low er the top heating/grill element.
–
–
–
–
Instructions for doing so are given
further on in this section.
S eal and insid e o f th e o v en d o o r
G rease desposits on the seal betw een
the inside of the oven door and the
oven interior can cause it to become
brittle and cracked.
It is best to clean the seal and the
inside of the door after each w ith a
Miele E -cloth or a clean sponge and a
solution of hot w ater w ith a little
w ashing-up liq uid. W ipe dry using a
soft cloth.
C leaning and c ar e
P er fec tC lean
B efore using for the first time remove
any stickers from P erfectC lean
surfaces.
The enam elled su r fac es of the oven
interior, the baking tray , universal tray
and anti-splash insert have been
treated w ith a special ty pe of
enamelling called " P er fec tC lean" .
This surface has very good anti-stick
properties and is much easier to keep
clean than conventional oven enamel, if
cleaned regularly .
F ood can be taken off it more easily ,
and soiling from baking and roasting is
easier to remove.
The follow ing notes on cleaning and
care should ensure that the anti-stick
and easy clean properties of
P erfectC lean last for many y ears.
P erfectC lean surfaces can be treated
as y ou w ould treat glass.
F ood can be sliced or cut up on the
P erfectC lean surface in the same w ay
as on a baking tray w ith conventional
enamel.
A llow the oven and any accessories
to cool dow n before cleaning.
D anger of burning.
N o r m al so iling
C lean as soon as possible after each
use w ith a dishcloth, soft sponge or a
soft ny lon brush, and a solution of hot
w ater and a little w ashing-up liq uid. The
longer soiling is left, the harder it may
become to remove.
S tu b b o r n so iling
S tubborn soiling, e.g. from roasting,
may need to be soaked first w ith a
damp sponge to loosen it and if
necessary a non-abrasive stainless
steel spiral pad or a scraper suitable for
glass can be used to remove it.
A fter cleaning, rinse thoroughly w ith
clean w ater. The w ater must run off
the surface easily . A ny residual
cleaning agents w ill hinder this
effect.
U sing o v en sp r ay s o n v er y stu b b o r n
so iling
S ome oven cleaners contain strong
alkalines and / or abrasive materials.
B ecause P erfectC lean enamel is
designed to be easily cleaned, the use
of these cleaners is not recommended.
H ow ever, if y ou still cannot get the
surface clean, an oven cleaner can be
used, but for a couple of minutes only .
49
C leaning and c ar e
D o not attempt to use on a hot oven or
accessories. A llow the P erfectC lean
surfaces to cool dow n to room
temperature before apply ing an oven
spray .
R emove the cataly tic back panel,
side liners and roof liner before
using oven spray . The chemicals
used in oven spray s w ill damage
cataly tic enamel, rendering it
ineffective.
A pply a spray oven cleaner to the
soiled areas. L eave to take effect for a
c o u p le o f m inu tes o nly !
If necessary use a soft sponge, soft
ny lon brush or a scraper suitable for
glass surfaces to loosen the soiling.
R epeat the process if necessary .
A fter cleaning, rinse thoroughly w ith
clean w ater and then dry thoroughly .
F or optimum performance of
P erfectC lean enamel it is important to
clean the oven and accessories after
each use.
The surfaces w ill become harder to
clean and the anti-stick properties w ill
deteriorate if soiling is not removed
after each use and allow ed to build up.
In ex treme cases cleaning may
become impossible.
50
T h e fo llo w ing c au se lasting d am ag e
to th e su r fac e str u c tu r e and r ed u c e
th e anti-stic k effec t and m u st no t b e
u sed o n P er fec tC lean su r fac es:
– abrasive cleaning agents, e.g.
pow der cleaners and cream
cleaners,
– cleaning agents for ceramic hobs,
– w ire w ool or metal scourers,
– abrasive sponges, e.g. pot scourers
or sponges w hich have been
previously used w ith abrasive
cleaning agents,
– oven spray must not be used in a hot
oven or left on for too long,
– P erfectC lean enamelled items must
not be w ashed in a dishw asher.
N o te:
– S oiling such as spilt juices and cake
mix tures are best removed w hilst the
oven or tray is still w arm. E x ercise
caution, make sure the oven is not
too hot - danger of burning.
– S pilt fruit juices may cause lasting
discolouration to the surfaces and
roasting can cause matt areas to
appear. C lean these follow ing the
instructions given above and do not
use force to remove them. This
discolouration is permanent but w ill
not affect the efficiency of the
enamel.
C leaning and c ar e
C ataly tic enam el su r fac es
^ S elect F an P lus U.
The back panel is coated w ith dark
grey cataly tic enamel.
S oiling from oil and fat is burnt off these
surfaces w hen very high temperatures
are used in the oven. The higher the
temperature, the more effective the
process.
^ S et the highest temperature setting.
The cataly tic coating becomes
ineffective through using
– abrasive cleaning agents,
– hard brushes or abrasive
sponges,
– oven spray s.
R emove the cataly tic back panel
from the oven before cleaning the
P erfectC lean oven surfaces w ith
oven spray .
Note that deposits of sp ic es, sy r u p s
and sim ilar su b stanc es are not
removed from the cataly tic coating by
this process. These should be removed
by hand w hilst still fresh, using a mild
solution of hot w ater and w ashing-up
liq uid applied w ith a soft sponge or
brush. R emove the panels from the
oven to do this.
S oiling caused by o il and g r ease
sp lash es are removed from cataly tic
coated surfaces w hen the oven is
heated to a high temperature. To do
this:
R un the oven for approx . 1 hour. The
length of time w ill depend on the level
of soiling.
The timer can also be used to set the
finish time. S ee "E ntering a cooking
duration".
If the cataly tic coated panels are
very heavily soiled w ith oil and
grease, a film w ill develop on the
oven surface during the cleaning
process w hich can be w iped off w ith
w arm w ater and a little w ashing-up
liq uid once cool.
^ F inally , clean the P erfectC lean
surfaces and the inside of the door.
A ny remaining soiling w ill gradually
disappear w ith each subseq uent use of
the oven at high temperatures.
S hould the cataly tic coating on the
back panel become ineffective
through improper use or heavy
soiling, a replacement can be
obtained from y our Miele C hartered
A gent or the Miele S pare P arts
D epartment.
^ Take all accessories out of the oven.
^ W ipe large deposits of soiling from
the oven interior and the inside of the
door before starting the cleaning
process to avoid them baking onto
P erfectC lean surfaces and becoming
impossible to remove.
51
C leaning and c ar e
T o r em o v e th e o v en d o o r
The oven door is connected to the oven
by hinges.
^ Then lift the door upw ards as far as it
w ill go.
D o not attempt to take the door off
the hinge guides w hen it is in a
horiz ontal position. The guides w ill
close, and damage the appliance.
D anger of inury .
B efore removing the door, the locking
clamps on both hinges have to be
released.
^ O pen the door fully .
^ H old the door securely at both sides
and lift upw ards off the hinge guides.
^ To release the locking clamps on the
hinges turn them upw ards as far as
they w ill go until they are at an angle.
S ee illustration.
D o not lift the door off by the handle.
The handle could break and
damage the door.
Make sure that y ou lift the door off
eq ually on both sides.
52
C leaning and c ar e
T o d ism antle th e o v en d o o r
If condensate has w orked its w ay in
betw een the glass panes, the door can
be dismantled in order to clean in
betw een the panes.
D o not use scouring agents, hard
sponges or brushes or sharp metal
tools to clean glass as these can
scratch the surface. S cratches can
also cause the glass to break.
A lw ay s remove the oven door before
dismantling it.
^ P lace the door on a protective
surface (e.g. on a table cloth) to
prevent it getting scratched. The
door handle should line up w ith the
edge of the table. Make sure the
glass lies flat and does not get
broken during cleaning.
D o not use an oven spray . This w ill
damage the surface of the
aluminium surrounds.
E nsure that the glass panes are
inserted the correct w ay round after
cleaning as each side of the pane
has a different coating. Those facing
the oven interior reflect the heat.
To avoid the risk of breakage, it is
advisable to place the panes on a
table protected by a soft cloth (e.g.
a tow el).
^ F lip the glass pane retainers
outw ards to open them.
Y ou can now remove the inner and
middle panes.
53
C leaning and c ar e
^ C lean the glass panes and other
parts w ith a damp microfibre cloth or
a clean sponge and a solution of hot
w ater w ith a little w ashing-up liq uid.
W ipe dry using a soft cloth.
^ To refit the door:
^ G ently lift the inner pane up and out
of the plastic strip.
^ G ently lift the middle pane and
remove it together w ith the seal.
^ R emove the seal from the pane.
54
To make sure that the middle pane
is put back in the correct w ay , one
of the corners of the pane is more
angled than the others. The more
angled corner must be at the top left
w hen y ou are facing tow ards the
pane.
^ S ecure the seal to the middle pane.
C leaning and c ar e
^ R efit the middle pane and the seal.
The more angled corner must be at
the top left.
^ F lip the glass pane retainers inw ards
to close them.
^ P ush the inner pane into the plastic
strip and place it betw een the
retainers.
"Miele" must be visible at the top.
55
C leaning and c ar e
T o r efit th e d o o r
^ O pen the door fully .
^ F lip both locking clamps back up as
far as they w ill go into a horiz ontal
position.
^ H old the door securely at both sides
and carefully fit it back onto the hinge
guides.
Make sure that the door goes back
on straight.
56
It is essential that the locking clamps
are flipped dow n w hen the door is
refitted after cleaning. O therw ise the
hinges could w ork loose, resulting in
damage to the door.
C leaning and c ar e
T o r em o v e th e r u nner s
Make sure the oven heating
elements are sw itched off and cool.
D anger of burning.
T o r em o v e th e c ataly tic
enam elled b ac k p anel
Make sure the oven heating
elements are sw itched off and cool.
D anger of burning.
S ee "C leaning and care" for information
on cleaning.
^ R emove the runners.
^ L oosen the screw s in the back panel
and take it out.
The oven must not be used w ithout
the back panel fitted. This could
cause considerable injury .
^ P ull the runners forw ards out of the
holder and remove.
If applicable, also remove the
cataly tic side panels attached to the
runners.
R eassemble in the reverse order,
carefully ensuring all parts are correctly
in place.
R eassemble in the reverse order,
carefully ensuring all parts are correctly
in place.
57
C leaning and c ar e
T o lo w er th e to p h eat/g r ill
elem ent
^ R emove the runners.
^ U nscrew the w ing nut.
^ G ently low er the top heating element.
L ow er the top heating element
carefully . D o not use force to pull it
dow n as this can cause the element
to break.
R eassem b le in the reverse order,
carefully ensuring all parts are correctly
in place.
58
P r o b lem so lv ing g u id e
W ith the aid of the follow ing guide, minor problems can be easily corrected
w ithout contacting Miele.
If y ou then can't solve the remedy y ourself, please call the Miele C ustomer
C ontact C enter.
,O n no account open the appliance casing!
Installation, maintenance and repairs may only be carried out by a suitably
q ualified and competent person in strict accordance w ith current national and
local safety regulations.
R epairs and other w ork by unq ualified persons could be dangerous. The
manufacturer cannot be held liable for unauthorised w ork.
P r o b lem
P o ssib le c au se and r em ed y
The display is dark. – C heck w hether the time of day display is set so that it
does not show in the display (see "S ettings % - P i").
– C heck w hether the mains fuse has tripped. If it has,
contact a q ualified electrician or the Miele C ustomer
C ontact C entre.
The oven does not
heat up.
– C heck w hether the sy stem lock has been activated.
– C heck w hether the mains fuse has tripped. If it has,
contact a q ualified electrician or the Miele C ustomer
C ontact C entre.
"i2:00" or the time of A ll pre-set times have been lost due to pow er cut.
day is flashing in
R eset the times w ith the sensor buttons and press O K .
the display .
P re-set user programmes have to be reset.
A noise can be
heard after a
cooking process.
The cooling fan continues to run for a w hile after the oven
has been sw itched off to prevent any humidity building up
in the oven, on the control panel or on the oven housing
unit. W hen the temperature has fallen sufficiently , the fan
sw itches off automatically .
There are spots like W hen roasting on the rack, the circulating air sometimes
rust on the cataly tic picks up spices, w hich are then deposited on the oven
surfaces.
interior w alls. These residues are not removed by cataly tic
cleaning, and should be removed w hile fresh w ith a mild
solution of hot w ater and w ashing-up liq uid applied w ith a
soft brush.
59
P r o b lem so lv ing g u id e
P r o b lem
P o ssib le c au se and r em ed y
The oven lighting
doesn't w ork.
^ D isconnect the appliance from the electricity supply :
S w itch off and unplug at the socket, or disconnect the
fuse, or sw itch off at the isolator as appropriate.
^ U nscrew the lamp cover and the seal.
^ C hange the halogen lamp (O sram 66275 A M, 230 V ,
25 W , G 9).
^ S crew the lamp cover and the seal back on again.
^ R econnect the appliance to the mains electricity supply .
C akes and biscuits – C heck that the correct temperature has been set.
are not cooked
– C heck if y ou have amended the recipe. The addition of
properly after
more liq uids or more eggs makes a moister mix w hich
follow ing the times
w ould req uire a longer baking time.
given in the chart.
B row ning is uneven. There w ill alw ay s be a slight unevenness. If brow ning is
very uneven, check w hether the temperature w as set too
high, or w hether the correct shelf level w as used.
W ith C onventional heat V check the colour and material of
the baking tins being used. L ight coloured, shiny , or thin
w alled tins are less suitable.
A fault code w ill
Y ou can rectify the follow ing fault code y ourself:
appear in the
– F au lt 5 5 : S afety sw itch-off has been triggered.
display : F + number
The oven can be used again immediately by sw itching it
off and on again.
F or all other fault codes please contact the Miele C ustomer
C ontact C entre.
60
After sales ser v ic e
In the event of any faults w hich y ou
cannot remedy y ourself, or if the
appliance is under guarantee, please
contact
– y our Miele C hartered A gent or
or
P lease q uote the model and serial
number w hen contacting the Miele
C ustomer C ontact C entre.
These information are show n on the
data plate, visible below the oven
interior, w ith the door fully open.
– the Miele C ustomer C ontact C entre
Y ou find the telephone number of
the Miele C ustomer C ontact C entre
on the back cover of the manual.
61
O p tio nal ac c esso r ies
The follow ing accessories may come as standard w ith some models. They are
also available to order from y our Miele C hartered A gent or the Miele S pare P arts
D epartment.
F lex iC lip telesc o p ic r u nner s
G o u r m et o v en d ish
The gourmet oven dish can be placed
in the oven directly on the runners. It
has non-tip safety notches like the
universal tray to prevent it being pulled
out too far.
It has an anti-stick coating.
The F lex iC lip telescopic runners can be
used on any shelf level. E ach shelf level
can be draw n right out of the oven
individually to give a good overview of
cooking in progress.
It is available in tw o siz es:
– H U B 5000-M (internal dimensions
approx . 38 x 22 x 8 cm)
Y ou can fit a F lex iC lip runners to all the
shelf runners at the same time.
Bak ing tr ay , u niv er sal tr ay and r ac k
These items, supplied w ith y our oven,
are also available to order.
W hen ordering, please q uote the model
number of y our oven.
H and le
The handle makes it easier to take the
universal tray , baking tray and rack out
of the oven, or to put them into it. The
tw o prongs at the top go inside the tray
or above the rack, and the U -shaped
supports underneath.
62
– H U B 5000-X L (internal dimensions
approx . 38 x 35 x 8 cm)
O p tio nal ac c esso r ies
G o u r m et o v en d ish lid
P iz z a sto ne
The piz z a stone is ideal for items w hich
need a w ell baked base such as piz z a,
q uiche, bread, bread rolls and savoury
snacks.
W hen ordering a lid, please specify the
gourmet oven dish it is to be used w ith
(H U B 5000 M or X L ).
F lan/P iz z a d ish
The baking stone is made from heat
retaining fire brick and is glaz ed.
P lace it directly on the rack.
A paddle made of untreated w ood is
supplied w ith it for placing food on the
piz z a stone and taking it off.
O v en c leaner
This circular pan is suitable for cooking
piz z as, flat cakes made w ith y east or
w hisked mix tures, sw eet and savoury
tarts, baked desserts, and can also be
used for froz en cakes and piz z as.
S uitable for removing stubborn soiling.
It is not necessary to pre-heat the oven
beforehand.
63
E lec tr ic al c o nnec tio n
Im p o r tant
A ll electrical w ork should be
undertaken by a suitably q ualified
and competent person in strict
accordance w ith current national
and local safety regulations.
Installation, repairs and other w ork
by unq ualified persons could be
dangerous. The manufacturer
cannot be held liable for
unauthorised w ork.
E nsure pow er is not supplied to the
appliance until after installation or
repair w ork has been carried out.
The v o ltag e and c o nnec ted lo ad are
given on the data plate, visible below
the oven interior, w ith the door open.
E nsure that these match the household
mains supply . P lease q uote these data,
and the model and serial number w hen
contacting Miele.
C onnection of this appliance should be
made via a fused connection unit or a
suitable isolator, w hich complies w ith
national and local safety regulations,
and the on/off sw itch should be easily
accessible after the appliance has
been built in.
If the sw itch is not accessible after
installation (depending on country ) an
additional means of disconnection must
be provided for all poles.
F or ex tra safety it is advisable to install
a residual current device (R C D ). P lease
contact a q ualified electrician for
advice.
64
The appliance is supplied for
connection to a 230 V , 50 H z electricity
supply .
The w ires in the mains lead are
coloured in accordance w ith the
follow ing code:
G reen/y ellow = earth
B lue = neutral
B row n = live
W AR N IN G
T H IS AP P L IAN C E M U S T BE
E AR T H E D
W hen replacing the cable supplied
w ith another cable or changing the
connection, only cable ty pe
H 05 V V -F or H 05 R R -F w ith a
suitable cross-sectional area (C S A )
may be used (available from the
Miele C ustomer C ontact C entre).
Test marks . . . . . . . . . . E lectrical safety
. . . . . . . . . . . . . . . . . . . . . . C -Tick Mark
E lectrically suppressed
according to. . . . . . . . . . . A S /NZ S 1044
Bu ild ing -in d iag r am s
Ap p lianc e d im ensio ns and u nit c u t-o u t
Installatio n in a b ase u nit
Installatio n in a tall u nit
* A ppliances w ith glass front
* * A ppliances w ith metal front
65
Bu ild ing -in d iag r am s
F r o nt d im ensio ns
A H 5140: 53.2
H 5240: 47.5
B A ppliances w ith glass front: 2.2
A ppliances w ith metal front: 1.2
66
Installing th e o v en
,The appliance must not be
operated until it has been correctly
installed in its housing unit.
O therw ise it poses an electric shock
haz ard.
Important. D o not fit insulation
material inside the housing unit.
This w ould hinder the intake of air to
the appliance.
Turn off the mains electricity supply
to the isolator.
^ C onnect the mains cable from the
oven to the isolator.
^ P ush the appliance into the oven
housing unit and align it.
W hen installing the appliance do not
lift it up by the door handle as this
can damage the door.
^ O pen the oven door and using tw o
screw s secure it to the side w alls of
the housing unit through the holes in
the oven trim.
67
A lteration rights reserved / 22 / 1209
(H 5140 B , H 5240 B )
M.-Nr. 07 253 330 / 01