1
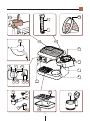
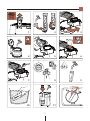
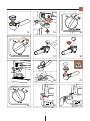
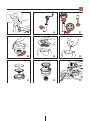
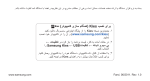
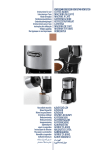
BCO 420/410 دفترچه راهنما برای مشاهدهی تصاویر اشاره شده در مت��ن ،لطف�� ًا به ابت��دای دفترچه راهنمای انگلیس��ی مراجعه نمایید. قهوهساز BCO 420/410 FA عالئم کاربردی دراین دفترچه عالئم زیر ،برای کاربر توصیههایی مهم به همراه دارد .این توصیهها باید پیروی شوند. • برای قطع کردن کامل برق دستگاه ،دوشاخه را از پریز (به صورتی که در باال گفته ش��د) جدا کنید. • در صورت بروز خرابی ،سعی نکنید دستگاه را تعمیر کنید .دستگاه را خاموش کنید و دوشاخه را از پری��ز جدا نمایید .س��پس ب��ا مرکز خدمات پسازفروش شرکت دلونگی تماس بگیرید. • در صورت صدمه دیدن دوش��اخه یا س��یم برق ،برای جلوگی��ری از خطر ،اجازه دهید فقط مرکز خدمات پسازفروش دلونگی آن را برایتان تعویض کند. احتی��اط! اج��زای بس��تهبندی (کیفه��ای پالس��تیکی ،پالس��تیکهای ضربهگیر) را دور از دسترس کودکان قرار دهید. احتیاط! اجازه ندهید افرادی با عدم توانایی روانی ،جسمی و حسی از جمله کودکان یا افرادی با نداشتن تجربه یا دانش ،از دستگاه استفاده کنند. مگرتوسط افرادی که مسئولیت ایمنی آنها را بر عهده دارند ،تحت نظارت و آموزش قرار گیرند. مراقب کودکان باش��ید و اجازه ندهید با دستگاه بازی کنند. خط��ر س��وختگی! ای��ن دس��تگاه در زمان کارکردن ،آب داغ و بخ��ار تولید میکند .مراقب قطرات و بخار آب داغ باشید. خطر! کوتاه��ی در این اعمال ،میتوان��د منجر به خطر برقگرفتگی و بروز صدمههای جانی گردد. احتیاط! کوتاهی در ای��ن اعمال ،میتواند باعث صدمه به دستگاه شود. خطر سوختگی! کوتاهی در این اعمال ،میتواند باعث ایجاد تاول یا سوختگی شود. لطفاً توجه کنید! این عالئم ،توصیهه��ا و اطالعات مهمی را برای کاربر به روشنی توضیح میدهد. توصیههای مهم ایمنی خطر! در هنگام اس��تفاده از دستگاهی که به جریان برق وصل اس��ت ،نباید خطر برقگرفتگی را نادیده گرفت .بنابراین از توصیههای ایمنی که در زیر ارایه میشوند ،پیروی کنید. • با دس��ت یا پاهای مرطوب دستگاه را لمس نکنید. • با دس��تهای مرطوب به دوش��اخهی برق دست نزنید. • در هنگام اس��تفاده ،مطمئن شوید پریز برق، همیش��ه در دسترس شما باشد تا در صورت نیاز بتوانید دوشاخه را به آسانی از پریز جدا نمایید. • برای ج��دا کردن دوش��اخه از پری��ز ،خود دوش��اخه را در دست بگیرید وهرگز سیم برق را نکش��ید .در غیر اینصورت باعث صدمه زدن به آن خواهید شد. از این دستگاه برای مقاصد زیر استفاده کنید: این دستگاه به منظور تهیهی قهوه و گرمنگهداشتن آن طراحی و ساخته ش��ده است .شایسته نیست از آن اس��تفادههای دیگری کنید .این دس��تگاه به علت اندازهی کوچک ،فقط برای استفاده در منزل ساخته شده است و هدف از ساخت آن به معنای عدم استفاده در مکانهای زیر است: • محیطهای آشپزخانهی کارمندان فروشگاهها، دفاتر و دیگر فضاهای کاری • خانههای ییالقی • مش��تریان هتلها ،مسافرخانهها و انواع دیگر 2 محیطهای مسکونی • انواع استراحتگاهها تماس با لبههای تیز یا سطوح گرم مانند صفحات الکتریکی نباشد. دستورالعمل استفاده قب��ل از بهکارب��ردن دس��تگاه ،این ن��کات را به دق��ت بخوانید .کوتاهی در توج��ه به این نکات، ممکن اس��ت باعث س��وختگی یا آس��یب دیدن دستگاه شود .در صورت غفلت از رعایت نکات دس��تورالعمل ،شرکت س��ازنده مسئول صدمات وارده نخواهد بود. طریقهی اتصال دستگاه احتیاط! مطمئن ش��وید که ولت��اژ پریز برق ب��ا اطالعات درجش��ده در قسمت زیرین دس��تگاه ،هماهنگی داشته باشد. دس��تگاه را به پریز ب��رق حداقل 10آمپری که از نظر فنی با دس��تگاه س��ازگار بوده و دارای سیم اتصال ب��ه زمین (ارت) مناس��ب اس��ت ،متصل نمایید .اگر دوش��اخه با پریز دستگاه هماهنگی ن��دارد ،از نمایندگ��ی خدم��ات پ��س از فروش دلونگی بخواهید تا آن را برایتان تعویض نماید. لطفاً توج��ه کنید! این دفترچ��ه را به دقت نگ��هداری کنی��د .اگر این دس��تگاه به اش��خاص دیگری واگذار ش��د.آنها نیز حتم��اً باید به این دفترچه دسترسی داشته باشند. بررسی دستگاه بعد از بازکردن بستهبندی دستگاه ،مطمئن شوید دس��تگاه کامل و س��الم بوده و تمام لوازم جانبی آن موجود باش��د .در صورت مشاهدهی هر گونه آسیب ،از دستگاه استفاده نکنید و با مرکز خدمات پسازفروش شرکت دلونگی تماس بگیرید. نصب دستگاه احتیاط! در زم��ان نص��ب دس��تگاه ،نکات ایمن��ی زیر را رعایت کنید: • از آنج��ا که این دس��تگاه گرم��ا را به محیط اط��راف پخش میکند ،بعد از قرار دادن دس��تگاه بر روی س��طح مورد نظر ،دق��ت کنید که حداقل فضای 3س��انتیمتری بی��ن س��طوح (دیوارهای کناری و قس��مت عقب) با دس��تگاه و فضای 25 سانتیمتری در باالی دستگاه موجود باشد. • نفوذ آب ،به دس��تگاه آس��یب وارد میکند. بنابراین دس��تگاه را نزدیک ش��یر آب یا س��ینک ظرفشویی قرار ندهید. ی��خ زدن آب موجود در دس��تگاه میتواند به آن آس��یب برساند .بنابراین دس��تگاه را در جایی که امکان کاهش دما تا نقط��هی انجماد وجود دارد، قرار ندهید. • سیم برق دستگاه را طوری قرار دهید که در 3 توصیف اجزاء دستگاه .Aپوشش مخزن آب برای قهوه اسپرسو . Bمخزن آب برای قهوه اسپرسو . Cصاف��ی تصفی��هی آب ب��رای مخ��زن آب قهوهاسپرسو . Dدستگیرهی خروجی برای صافی ضدکلر . Eنگهدارندهی صافی ضدکلر . Fصافی ضدکلر .Gنگهدارندهی صافی برای قهوهفرانسه . Hصافی دائمی .Iدستگیرهی بازکننده .Jمحفظهی پرکردن آب .Kصفحهی داغشونده برای قهوهفرانسه .Lظرف قهوهفرانسه .Mسینی فنجان برای قهوهاسپرسو .Nسینی جمعآوری چکه .Oصافی قهوهاسپرسو برای دو فنجان .Pصافی قهوهاسپرسو برای یک فنجان .Qنگهدارندهی صافی برای قهوهاسپرسو .Rقاشق پیمانه با گیره .Sکفساز شیر .Tچراغ آمادهبودن ( )OKبرای قهوه اسپرسو و بخاردهی .Uدکمهی تنظیم برای قهوهاسپرسو و بخاردهی ظرف قهوهفرانسه را به تعداد فنجانهای دلخواه از آب پ��ر کنی��د .دق��ت کنید ظرف را بیش��تر از اندازهی نشاندادهشده در شکل 4پر نکنید. • آب درون ظرف را در محفظهی پر کردن آب بریزید (شکل .)5 • صاف��ی دائمی ( در صورت موجود بودن) یا صافی کاغ��ذی را درون نگهدارندهی صافی قرار دهید (شکل .)6 • ب��ه ان��دازهی ی��ک پیمانهی پر (س��رتخت) ازقه��وهی پودر ،داخل صافی بریزید( .ش��کل )7 معموال ً برای هر فنجان ،یک پیمانه قهوه ( 7گرم) استفاده میشود ( 10پیمانه برای 10فنجان). • درپوش نگهدارندهی صافی را ببندید و ظرف را هم��راه با درپ��وش روی صفح��هی گرمکننده بگذارید. را فش��ار دهی��د .چراغ روی • کلید کلید ،نشاندهندهی روشنبودن قهوهساز است. • بعد از چند ثانیه ،قهوه از صافی خارج ش��ده و به داخل ظرف ریخته میشود. .Vدکمهی روشن /خاموش برای قهوهفرانسه .Wچراغ روشن /خاموش برای قهوهفرانسه .Xچراغ انتخابگر برای عملکرد بخار .Yچراغ روشن /خاموش برای قهوهاسپرسو .Zچراغ انتخابگر برای عملکرد اسپرسو .Z1دکمهی بخار برای کاپوچینو اطالعات فنی 220-240ولت | 50/60هرتز ولتاژ: 1750وات توان: 372×323×262میلیمتر اندازه: 15بار فشار پمپ اسپرسو: جنس ظرف جوشان اسپرسو :استیل ضدزنگ 1/2لیتر گنجایش مخزن اسپرسو: 1/4لیتر گنجایش مخزن قهوهفرانسه: 1/2متر طول سیم برق: وزن: :BCO 420 7/15کیلوگرم 6کیلوگرم :BCO 410 صافی ضدکلر ای��ن صافی طعم کل��ر را در آب کاهش میدهد. برای نصب صافی به روش زیر عمل کنید: • مخزن را با کش��یدن به سمت باال از شکاف آن جداکنید (شکل .)1 • صافی ضدکلر را از بالش��تک پالس��تیکی آن جدا نموده و زیر شیر آب بشویید (شکل .)2 • درب مخزن را باز کنید و صافی را داخل آن طبق شکل 2قراردهید. • درپوش مخزن را ببندید (شکل )2و با فشار به سمت پایین داخل شکاف و در جای خود قرار دهید. • صافی ضدکلر باید بعد از 80فنجان یا 6ماه پس از استفاده تعویض شود. بی��رون آمدن بخار در زمان بی��رون آمدن قهوه از صافی ،کام ً ال طبیعی اس��ت .برای داغ نگهداشتن قهوه ،زمانیکه صفحهی گرمکننده روش��ن است، ظ��رف قه��وهی صافش��ده را روی صفح��هی گرمکننده قرار دهید .در این حالت ،قهوهی درون ظرف در دمای مناسب خواهد ماند .برای روشن/ را فش��ار خاموش کردن دس��تگاه کلید دهید. روش تهیه قهوه اسپرسو قبل از اولین بار استفاده ،باید همهی لوازم جانبی دستگاه و لولههای داخلی دستگاه تمیز شوند .به همین روش بگذارید دستگاه کارکند تا 2بار آب مخزن دستگاه خالی شود .پس از آن میتوانید به روش معمول قهوه درست کنید. روش تهیه قهوهفرانسه • درپوش نگهدارن��دهی صافی را با چرخاندن به سمت راست باز کنید (شکل.)3 صافی تصفیهی آب (در بعضی از مدلها) 4 .3صبر کنید تا عالمت OKظاهر ش��ود (شکل .)15س��پس فورا ً دکمهی تنظیمگر را در وضعیت قرار دهید (ش��کل .)16صبرکنید تا آب از دس��تگاه خارج ش��ود و عالمت OKناپدیدشود. سپس با چرخاندن دکمهی تنظیمگر به حالت ری��زش آب را متوق��ف کنید (ش��کل )12و آب فنجان را خالی نمایید. (زمانیک��ه نگهدارندهی صافی به دس��تگاه متصل نباشد ،پاشیدن بخار به اطراف ،طبیعی است). بعضی از دس��تگاههای قهوهس��از مجهز به صافی تصفیهی آب هستند. برای نصب صافی طبق روش زیر انجام دهید. .1صافی را از بسته باز کنید. .2صفح��هی تاریخنما را بچرخانی��د تا مدت زمان قابلاس��تفاده برای دو ماه آین��ده را برایتان مشخص کند( .طبق شکل .)8 ّ لطفاً توجه کنید! اگر به طور معمول از دستگاه استفاده کنید ،صافی معادل دو ماه کار خواهد کرد .هرگاه دس��تگاه با صافی بدون استفاده باقی بماند ،میتوانید تا 3ماه روش تهیهی اسپرسو با قهوهی آسیابشده: .1ابت��دا آن گونه ک��ه در باال توضی��ح دادیم، از صافی روی دستگاه استفاده نمایید. .3صافی را با نیم لیتر آب روان بشویید (شکل دس��تگاه را از پیشگرم کنید .اگر مایلید 1فنجان قهوه داش��ته باش��ید ،از صاف��ی کوچکتر و اگر .)9 .4صافی را در ظ��رف آب فرو ببرید و لوله را مایلی��د 2فنج��ان قهوه داش��ته باش��ید ،از صافی به صورت ش��یبدار نگه دارید تا حبابهای هوا بزرگتر استفاده کنید. .2اگر میخواهید 1فنجان قهوه درس��ت کنید، از آن بگذرد (شکل.)10 .5مخزن آب را پر کنید و صافی را در شکاف به مقداری مشخص (حدود 7گرم) قهوهی پودر مخصوص خود جای داده (ش��کل )11و محکم درون صافی بریزید و اگ��ر مایلید 2فنجان قهوه داش��ته باشید ،مقداری بیش��تر قهوه درون صافی به سمت پایین فشار دهید. بریزی��د (حدود 12گ��رم) .ب��رای جلوگیری از ریخت��ن قهوه به بیرون ،همیش��ه مقداری کمتر از مرحلهی «ازپیشگرمکردن» دستگاه برای داش��تن قهوهاسپرس��و در دمای مناس��ب ،معمول قهوه درون صافی بریزید. احتی��اط! ب��رای آن که از کارکرد درس��ت پیش��نهاد میکنیم که قهوهساز را به روش زیر «از دس��تگاه قبل از پرکردن دوب��ارهی صافی مطمئن پیش گرم» کنید. ش��وید ،باید بعد از آخرین بار استفاده هیچ مقدار .1با چرخان��دن دکمهی تنظیمگر به حالت دستگاه را روشن کنید(.چراغ مربوطه مانند شکل پودر قهور در صافی باقی نمانده باشد. 12ظاهرمیش��ود) .س��پس صافی و نگهدارندهی .3قهوهی پودر را به طور یکدس��ت در صافی آن را طبق ش��کل 14به دس��تگاه وصل میکنیم بریزی��د و با انگش��تان ب��ه نرمی روی آن فش��ار ولی هنوز داخل دستگاه قهوهی پودر نمیریزیم .دهید (ش��کل .)18طریقهی فش��ار دادن قهوهی مطمئن شوید که دس��تگیرهی دستگاه در شکاف پودر ،عاملی مؤثر برای داش��تن قهوهاسپرس��ویی مخصوص خ��ود به درس��تی قرار گرفته باش��د باکیفیت اس��ت .اگر با انگشتانتان قهوهی پودر را (ش��کل .)13اگر مایلی��د 1فنجان قهوه داش��ته درون صافی محکم فشار دهید ،قهوه به آرامی از باش��ید ،از صافی کوچکتر و اگر مایلید 2فنجان دستگاه خارجشده و رنگ آن تیره خواهد بود .از قهوه داشته باشید ،از صافی بزرگتر استفاده کنید .طرف دیگر اگر به آرامی آن را فش��ار دهید ،قهوه .2یک فنج��ان در زیر نگهدارندهی صافی قرار به سرعت خارج شده و رنگ آن روشنتر خواهد دهید .میتوانید از همان فنجان برای قهوه استفاده بود. کنید .بنابراین میتوانید آن را «ازپیشگرم» کنید .4 .قه��وهی دور صاف��ی را پ��اک کنید .س��پس 5 نگهدارندهی صافی را دوب��اره درجای خود قرار دهید .برای جلوگیری از چکه ،دس��تگیره را مانند شکل 14محکم به سمت راست بچرخانید. .5فنجانه��ا را در زی��ر دهان��هی نگهدارندهی صاف��ی ق��رار دهید ( ش��کل .)19برای داش��تن اسپرسویی بهتر پیشنهاد میکنیم قبل از قرار دادن فنجانها در زیر دهانه ،آنها را با مقداری آب داغ بشویید. .6مطمئن ش��وید عالمت OKظاهرشده است (شکل ( .)15اگر عالمت OKظاهر نشد ،صبرکنید تا چراغ آن روشن شود ).و دکمهی انتخابگر را قراردهید (ش��کل .)16زمانی در وضعیت ک��ه مقدار قهوهی م��ورد نیاز تهیه ش��د ،دکمهی انتخابگر را در حالت قراردهید (شکل .)12 ( پیشنهاد میشود بیش از 45دقیقه قهوه را روی دستگاه قرار ندهید). .7برای خ��ارج ک��ردن نگهدارن��دهی صافی، دستگیرهی آن را از راست به چپ بچرخانید. لطفاً توجه کنید! از قهوهکیس��ههایی اس��تفاده کنی��د ک��ه دارای اس��تاندارد جهانی ESEباشند .قهوههایی که روی بستهبندی آن عالمت تج��اری زی��ر باش��ند ،دارای استاندارد ESEهستند. ESEاستانداردی بینالمللی است که تولیدکنندگان بزرگ قهوه باید معیارهای آن را رعایت کنند .این اس��تاندارد تهیهی قهوه را برای شما تمیز و آسان میکند. .2صاف��ی کوچک را درون نگهدارندهی صافی قرار دهید و مطمئن ش��وید که گیرهی نگهدارنده در شکاف مخصوص خود قرار گیرد (مانند شکل .)13 .3کیس��هی قه��وه را در فاصل��های دور ،روی صافی بگذارید (ش��کل .)21برای قرار دادن محل مناسب کیسه ،همیش��ه از دستورالعمل راهنما که روی بستهی قهوه وجود دارد ،پیروی کنید. .4نگهدارن��دهی صاف��ی را به دس��تگاه وصل کنید و مطمئن ش��وید که میتوانی��د آن را کام ً ال بچرخانید (شکل .)14 .5طبق نکات 6 ،5و 7قسمت قبل عمل کنید. خطر سوختگی! برای جلوگیری از پاشیدن قهوه ،زمانی که دستگاه در حال کارکردن است ،هرگز نگهدارندهی صافی را از آن جدا نکنید. .8ب��رای خارج نمودن قهوهی استفادهش��ده از دس��تگاه ،صافی را محکم نگه داری��د و به اهرم روی دستگیره فشار وارد کنید .سپس با چرخاندن و بیرون آوردن سریع نگهدارندهی صافی ،قهوهی استفادهش��ده را از دس��تگاه خارج نمایید (شکل .)20 .9ب��رای خام��وش ک��ردن دس��تگاه ،دکمهی انتخابگر را در وضعیت قراردهید. روش تهیهی کاپوچینو .1با استفاده از فنجانی بزرگ طبق قسمت قبل اسپرسو تهیه نمایید. .2دکم��هی تنظیمگ��ر را در وضعیت قرار دهید (شکل )22تا چراغ مربوطه روشن شود. .3در این لحظه برای درس��ت کردن هر فنجان کاپوچینو 100گرم ش��یر در ظرفی بریزید .ش��یر باید س��رد باشد و در یخچال نگهداری شود (داغ روش تهیهی اسپرسو با قهوهی کیسهای نباش��د) .در زمان انتخاب ظرف دقت کنید چون .1دس��تگاه را آن گون��ه ک��ه در قس��مت حجم شیر دو تا سه برابر خواهد شد. «ازپیشگرمکردن» توضیح داده شد ،آماده نمایید. مطمئن ش��وید که نگهدارندهی صافی به دستگاه لطفاً توجه کنید! متصل اس��ت .با این روش شما میتوانید قهوهی پیش��نهاد میش��ود از ش��یری کمچربی در دمای داغتری داشته باشید. 6 برای کاپوچینو تهیه کنید. • اگر میخواهید بیش از یک فنجان کاپوچینو درس��ت کنید ،بعد از تهیهی کف ش��یر صبر کنید تا بخارس��از دستگاه خنک شود چون در غیر این صورت قهوه به حالت سوخته بیرون خواهد آمد. ب��رای خنک کردن بخارس��از ،ظرفی زیر دهانهی بخارس��از قراردهی��د و دکمهی تنظیمگ��ر را در قراردهی��د (ش��کل .)16اجازه وضعی��ت دهید تا آب دس��تگاه خارج ش��ود و دکمهی OK روی صفحهی نشانگر ظاهر شود .سپس دکمهی تنظیمگ��ر را به وضعیت بچرخانید و آن گونه که در قس��مت قبل توضیح داده شد ،قهوه را تهیه نمایید. • پیشنهاد میشود بیش از 60ثانیه از بخارساز و بیش از 3بار متوالی از کفساز استفاده نکنید. یخچال استفاده نمایید. .4ظرف شیر را در زیر کفساز قراردهید. .5صبرکنید تا چراغ OKروش��ن شود .این چراغ نش��اندهندهی آن است که بخارس��از دستگاه به دمای ایدهآل برای تولید بخار رسیده است .کام ً ال طبیعی است که در هنگام تولید بخار ،کمی بخار و آب به سینی چکه بریزد. .6کفس��از را ب��ا کش��یدن به س��مت جلو و چرخاندن به س��مت چپ بیرون بیاورید (ش��کل .)23در این لحظه دقت کنید تا دس��تتان به سری داغ لوله تماس پیدا نکند .سپس ظرف شیر را زیر کفساز قراردهید. .7کفس��از را تا عمق چن��د میلیمتری درون ظرف شیر فرو برید (شکل .)24دکمهی بخار را حداقل نیمدور درجهت عکس حرکت عقربههای ساعت بچرخانید (شکل .)25در این لحظه بخار از کفس��از خارج خواهد ش��د و ظاهر شیر ،به ص��ورت خامهای درآم��ده و حج��م آن افزایش مییاب��د .ب��رای ایج��اد حبابه��ای خامهایتر، کفساز را در شیر فروبرده و به آرامی باال آورید. .8زمانیکه حجم ش��یر دو برابر شد ،کفساز را کام ً ال در شیر فرو برید تا شیر گرم شود .وقتی به دما ( 60درجهی س��انتیگراد) و حجم دلخواه دست یافتید ،دکمهی بخار را در جهت عقربههای س��اعت بچرخانید تا خروج بخار متوقف شود و دکمهی انتخابگر در حالت قرار بگیرد .برای خاموشکردن دس��تگاه ،دکمهی انتخابگر را در وضعیت قرار دهید. .9ش��یر ک��فدار را در فنجانهای��ی ک��ه از قبل اسپرس��و را در آن نگهداش��تهاید ،بریزی��د .حاال کاپوچینو آماده اس��ت .اگر مایلید ،میتوانید شکر به آن اضافه کنید و مقداری پودر ش��کالت روی کف شیر بریزید. احتیاط! به دالیل بهداشتی پیشنهاد میکنیم همیشه بعد از استفاده ،کفس��از را تمیز کنید .برای تمیز کردن طبق روش زیر عمل کنید: .1ب��ا چرخاندن دکمهی بخار مانند ش��کل 25 اجازه دهید مقدار کمی بخار از لوله خارج ش��ود ( نکات 5 ،2و 6قس��مت قب��ل را ببینید) .به این روش اگر احتماال ً کف ش��یر در لولهی کفس��از باقیمانده باش��د ،از آن خارج میش��ود .با فشار دادن دکمهی ON/OFFدستگاه را خاموش کنید. .2با یک دس��ت لول��هی کفس��از را محکم بگیری��د و با دس��ت دیگر با چرخان��دن لوله در جهت عقربههای س��اعت آن را باز کنید (ش��کل .)26 .3با کش��یدن به س��مت پایین َسری بخار را از لوله جدا کنید. .4لولهی کفس��از و َس��ری آن را کام ً ال با آب داغ بشویید. .5دو س��وراخی ک��ه ب��ا فلش در ش��کل 27 لطفاً توجه کنید! • اگر میخواهید بیش از یک فنجان کاپوچینو نش��انهگذاری شدهاند را بررس��ی کنید و مطمئن درس��ت کنید ،همهی اسپرس��وها را باهم از قبل شوید که مسدود نباشند. آماده کنی��د و بعدا ً همهی خامهه��ای مخلوط را َ .6س��ری بخار را با محکم فشار دادن به سمت 7 • صافی را از داخل نگهدارنده جدا کنید. • طبق ش��کل 28با چرخاندن درپوش صافی، آن را باز کنید. • با فش��ار دادن قسمت باالیی کفساز ،آن را از مخزن جدا کنید. • واشر را باز کنید. • تمام اجزاء و صافی فلزی را کام ً ال با آب داغ بش��ویید و با برس آنها را تمیز کنید (شکل.)29 سوراخهای صافی را بررسی کنید .اگر سوراخها مس��دود هس��تند ب��ا س��وزنی آنها را ب��از کنید (شکل.)30 • صاف��ی و واش��ر را دوب��اره روی صفحهی پالستیکی نصب کنید (شکل.)31 • گیرهی صفحه را طبق فلشی که در شکل 31 میبینید ،بر روی سوراخ واشر قرار دهید. • قطع��ات بستهش��ده را دوب��اره روی مخزن فلزی نصب کنید (شکل )32و مطمئن شوید که گیره روی س��وراخ قرار دارد (فلش تصویر 32را ببینید). • در پایان سری صافی را ببندید. در صورتی ک��ه روش تمیزکاری ب��ه ترتیب باال نباشد ،شامل ضمانتنامه نخواهد شد. باال در جای خود روی لوله قرار دهید. .7با چرخاندن لولهی کفساز به جهت عکس حرکت عقربهی ساعت در جای خود نصب کنید. روش تهیهی آب داغ .1ب��ا چرخاندن دکم��هی تنظیمگر به وضعیت دس��تگاه را روش��ن کنید (چ��راغ مربوطه نیز روشن میشود) (ش��کل .)12صبر کنید تا چراغ OKبر روی صفحه نمایان شود (شکل .)15 .2ظرفی را در زیر کفساز قرار دهید. .3زمانی که چ��راغ OKنمایان ش��د ،دکمهی تنظیمگر را در وضعیت قرار دهید (ش��کل .)16همزم��ان دکمهی بخ��ار را در جهت عکس حرکت عقربههای ساعت بچرخانید (شکل .)25 در ای��ن لحظه آب داغ از لولهی کفس��از خارج میشود. .4برای توقف جری��ان آب داغ ،دکمهی بخار را در جهت حرکت عقربههای ساعت بچرخانید و دکم��هی تنظیمگر را در وضعیت قرار دهید (شکل .)12 پیشنهاد میش��ود بیش از 60ثانیه از دستگاه آب داغ نگیرید. تمیزکاری: روش تمیزکاری سری بخارساز • برای تمیز کردن دس��تگاه ،هرگ��ز آن را در بعد از درس��ت کردن حدودا ً 300فنجان ،س��ری آب ف��رو نبرید .فراموش نکنید این دس��تگاه یک بخارساز باید طبق روش زیر تمیز شود. وسیلهی برقی است. • در ابتدا مطمئن شوید دستگاه داغ نبوده و دو • قبل از انجام هر گونه تمیزکاری قسمتهای شاخه به پریز متصل نباشد. خارجی ،دستگاه را خاموش کنید ،دوشاخه را از • ب��ا اس��تفاده از پیچگوش��تی ،پیچه��ای پری��ز برق جدا نمایید و بگذارید دس��تگاه خنک نگهدارندهی س��ری بخارساز را جدا کنید (شکل شود. .)33 • سری بخارساز را باز کنید. تمیزکاری و نگهداری صافیهای قهوه اسپرسو • سری بخارس��از را کام ً ال با آب داغ بشویید. بعد از درس��ت کردن حدودا ً 300فنجان و زمانی با برس��ی آن را تمیز کنید .س��وراخهای صافی را که قهوه به صورت چک��ه از نگهدارندهی صافی بررس��ی کنید .اگر س��وراخها مس��دود هستند با بی��رون میریزد یا قهوه به طور کامل از دس��تگاه سوزنی آنها را باز کنید (شکل.)30 خارج نمیشود ،صافی و نگهدارندهی آن را طبق • با شس��تن س��ری با برس از تمیز شدن آن روش زیر تمیز کنید: مطمئن شوید. 8 • س��ری بخارس��از را دوب��اره در جای خود نصب کنید. • دقت کنید تا سری روی واشر قرار بگیرد. در صورتیک��ه روش تمی��زکاری ب��ه ترتیب باال نباشد ،شامل ضمانتنامه نخواهد شد. دهی��د و اجازه دهید یکچهارم آب مخزن خارج ش��ود .س��پس در فواصل زمانی مختلف دکمهی تنظیمگ��ر را چرخانده و اج��ازه دهید تا مقداری مایع رسوبزدا از لولهی کفساز در داخل ظرف ریخته ش��ود .س��پس برای متوقف شدن عملیات رس��وبزدایی دکمهی تنظیمگ��ر را در وضعیت قراردهی��د و اجازه دهید تا باقیماندهی مایع رسوبزدا به مدت 5دقیقه در مخزن باقی بماند. .5مرحلهی باال (مرحل��هی )4را 3بار تکرار کنید تا مایع رس��وبزدا در مخ��زن کام ً ال خارج شود. .6برای مطمئن ش��دن از تخلی��هی کامل مایع مخ��زن ،آن را با آب به خوبی بش��ویید و با آب تمیز (بدون مایع رسوبزدا) پر کنید. .7دکم��هی تنظیمگ��ر را در وضعی��ت (ش��کل )16قرارداده و اجازه دهید تا آب مخزن کام ً ال تخلیه شود. .8مرحلهی 6و 7را دوباره تکرار کنید. در صورتی که مراحل رسوبزدایی به ترتیب باال انجام نش��ود ،تعمیرات ناشی از این قصور شامل ضمانتنامه نخواهد شد. نکات مهم تمیزکاری .1برای تمیز کردن دس��تگاه از مایعات و دیگر تمیزکنندههای س��اینده اس��تفاده نکنید .دستمالی مرطوب کافیست. .2به ط��ور منظم نگهدارندهی صافی ،صافیها، س��ینی چکه و مخزن آب دس��تگاه را تمیز کنید. برای باز کردن س��ینی چکه ،میلهی نگهدارنده را برداش��ته و آب آن را خالی ک��رده و با پارچهای، سینی را تمیز کنید .سپس دوباره سینی چکه را به دستگاه متصل کنید. خطر! از آنجایی که این دس��تگاه برقی است ،در هنگام تمیزکاری هرگز دستگاه را در آب فرو نبرید. رسوبزدایی قسمت قهوهاسپرسو پیشنهاد میشود بعد از درست کردن 200فنجان رسوبزدایی قسمت قهوه فرانسه: در طول زمان ممکن است رسوب آب در دستگاه ایجاد شود و در فرآیند کار دستگاه مشکل ایجاد کند .توصیه میش��ود بعد از تهیهی هر 40فنجان قهوه ،دس��تگاه را رس��وبزدایی کنید .از مایعات رس��وبزدایی که در نمایندگ��ی دلونگی موجود اس��ت ،اس��تفاده کنی��د .اگر ای��ن محصوالت در دسترس نیست ،میتوانید اقدامهای زیر را انجام دهید: .1چهار لیوان آب داخل ظرف بریزید. 2 .2قاش��ق پر (حدود 30گرم) اسیدسیتریک در آب حل کنید. .3ظرف را روی صفحهی گرمکننده قرار دهید. را فشاردهید و اجازه دهید .4دکمهی ت��ا مقداری مایع رس��وبزدا از دهانهی خروجی خارج شود .سپس دستگاه را خاموش کنید. قهوه ،این قسمت را رسوبزدایی کنید .همچنین برای رسوبزدایی میتوانید از مایع رسوبزدای دلونگی که در نمایندگی ما موجود است ،استفاده نمایید. برای رسوبزدایی طبق روش زیر عمل کنید: .1مخ��زن آب دس��تگاه را از مایع رس��وبزدا پر کنید .این مایع باید طبق دس��تورالعملی که در قسمت بستهبندی ذکر میشود ،با آب رقیق گردد. .2ب��ا چرخاندن دکم��هی تنظیمگر به وضعیت دستگاه را روش��ن کنید و صبر کنید تا چراغ OKبر روی صفحهی نمایشگر ظاهر شود. .3مطمئن ش��وید ک��ه نگهدارن��دهی صافی در دس��تگاه نصب نباش��د .س��پس ظرفی را در زیر دهانهی خروجی دستگاه قرار دهید. قرار .4دکم��هی تنظیمگر را در وضعیت 9 .5اجازه دهید مایع رسوبزدا به مدت 5دقیقه در دس��تگاه باقی بماند .س��پس مراحل 4و 5را دوباره تکرار کنید. .6دستگاه را روشن کنید و باقیماندهی مایع را طبق دستورالعمل باال کام ً ال از دستگاه تخلیه کنید. .7مخ��زن را پر از آب کنید و اجازه دهید تا آب آن از دستگاه خارج شود .این عمل را 3بار تکرار کنید تا دستگاه به خوبی شسته شود. بازیافت جداگانهی لوازم خانگی از بروز پیامدهای خطرن��اک محیطزیس��ت و س�لامت جلوگیری کرده و امکان بازیافت مواد باارزش و اس��تفادهی دوبارهی آنها را در چرخهی تولید فراهم ساخته، موج��ب صرفهجوی��ی در منابع انرژی میش��ود. ب��رای بازیافت این دس��تگاه ،عالم��ت ضربدر روی سطل آشغال ،نشاندهندهی آن است که این محصول باید از زبالههای خانگی جدا شود. اطالع��ات مرب��وط ب��ه روش صحیح بازیافت دس��تگاه مطاب��ق با مصوبهی اتحادی��هی اروپ��ا ب��ه ش��مارهی 2002/96/EC این دستگاه ،با مصوبات اتحادیهی اروپا کخ در زیر میآید همخوانی دارد: • مصوب��هی 2006/95/CEو اصالح��ات بعدی برای رعایت ولتاژ پایین • مصوب��هی EMC 2004/108/CEو اصالحات بعدی • مصوبات قانونی اتحادیهی اروپا به شمارهی 935/2004ب��رای س��ازگاری تم��اس اش��یاء و اجناس با مواد غذایی روش بازیافت دستگاه درپایان عمر مفید دستگاه نباید آن را همراه با دیگر زبالهه��ای خانگی دور انداخت .میت��وان آن را به مرکز جداس��ازی و بازیافت زباله در نزدیکی محل زندگیت��ان ببرید یا به یکی از مراکز مجاز خدمات پسازفروش دلونگی تحویل دهید. رفع عیب ایراد قهواسپرس��و از دستگاه بیرون نمی ریزد. قهوهاسپرس��و به ج��ای چکیدن از س��وراخها ،از لبههای نگهدارندهی صافی بیرون میریزد. علتهای احتمالی راهحل آب در داخل مخزن وجود ندارد. مخزن را پر کنید. محل��ی که قهوه از آن بیرون میآید یعن��ی س��وراخهای نگهدارن��دهی صافی مسدود هستند. س��وراخهای لول��هی نگهدارندهی صافی را تمیز کنید. لولهی بخارس��از اسپرس��و مسدود است. ب��ه قس��مت تمی��زکاری لول�� هی بخارساز رجوع کنید. نگهدارندهی صافی به طور صحیح در دستگاه قرار نگرفته است. نگهدارندهی صافی را در جای خود قرارداده و محکم به س��مت پایین فشار دهید. واش��ر روی بخارس��از حال��ت ارتجاع��ی خ��ود را از دس��ت داده است. واش��ر جدید را از مرک��ز خدمات پسازف��روش دلونگ��ی تهی��ه و تعویض نمایید. س��وراخهای نگهدارن��دهی صافی مسدود است. سوراخها را تمیز کنید. 10 ایراد قهوه اسپرسو سرد است. صدای غیرعادی از پمپ قهوه رقیق و کمرنگ است قهوه غلیظ و پررنگ است. علتهای احتمالی راهحل زمانی که دکمهی روشن /خاموش را فش��ار میدهی��د ،چ��راغ OKبر روی صفح��ه نمایش ظاهر نش��ده است. صبر کنید تا چراغ OKظاهرشود. عملک��رد «از پی��ش گ��رم ش��دن» صورت نگرفته است. عملکرد «از پیش گرم شدن» را که در قس��مت مربوط ذکر شد ،انجام دهید. فنجانها از پیش گرم نشدهاند. با مقداری آب داغ آنها را گرم کنید ی��ا فنجانها را به م��دت 20دقیقه روی قفسهی گرمکردن فنجانها که در قسمت باالی دستگاه قرار دارد، بگذارید. مخزن آب خالی است. مخزن آب را پر کنید. مخ��زن آب ب��ه درس��تی در جای خود ق��رار ندارد ی��ا دریچهی پایه باز نیست. مخ��زن را به آرامی فش��ار دهید تا دریچهی آن باز شود. قهوهی پودر به نرمی کوبیده ش��ده است. کمی فش��ار روی قهوه ی آس��یاب وارد کنید. مقدار قهوهی پودر کم است. مقدار قهوهی پودر را افزایش دهید. قهوهی پودر درشت است. برای قهوه اسپرس��و فقط از قهوهی کام ً ال پودرشده استفاده کنید. نوع قهوهی پودر مناسب نسیت. از نوع دیگری استفاده کنید قهوهی پودر به سختی کوبیده شده است. ذرات قه��وهی پ��ودر را از هم باز کنید. مقدار زیادی قهوهی پودر اس��تفاده شده است. مقدار قهوهی پودر را کاهش دهید. سری بخار اسپرسو مسدود است. عملک��رد «تمی��زکاری» را ک��ه در بخش مربوط به «تمیزکاری س��ری بخار اسپرسو» ذکر شد ،انجام دهید. سوراخ صافی مسدود است. عملک��رد «تمی��زکاری» را ک��ه در بخش مربوط به «تمیزکاری صافی» ذکر شد ،انجام دهید. 11 FA علتهای احتمالی راهحل ایراد پودرقهوه بس��یار ریز ی��ا مرطوب است. برای قهوه اسپرسو فقط از «قهوهی مناسب پودرش��ده» استفاده کنید و مطمئن شوید مرطوب نیستند. نوع قهوهی پودر مناسب نسیت. از نوع دیگری استفاده کنید. شیر به اندازهی کافی سرد نیست. همیش��ه از ش��یری ک��ه در دم��ای یخچال نگهداری میش��ود ،استفاده کنید. کفساز کثیف است. سوراخهای ریز کفساز را به دقت و طبق شکل 27تمیز کنید. قهوهفرانسه یا اسپرسو طعم اسیدی دارد. بع��د از مرحل��هی رس��وبزدایی، دستگاه به خوبی شسته نشده است. طب��ق روش��ی ک��ه در قس��مت رسوبزدایی ذکر ش��د ،دستگاه را به خوبی شستوشو نموده و تمیز کنید. مدت زمان زیادی طول میکشد تا قهوهفرانسه از صافی عبور نماید. دستگاه نیاز به رسوبزدایی دارد. عملک��رد «رس��وبزدایی» ک��ه در بخش مرب��وط به «رس��وبزدایی قهوهفرانسه» ذکر شد ،انجام دهید. قهوه غلیظ و پررنگ است. در هنگام تهیهی کاپوچینو شیر کف نمیکند. 12 H* C* E B F Z1 D A G I X Y Z J K T O U V W S M P Q R N 2 L 1 2 3 * 10 MAX 4 5 6 7 8 9 10 11 12 3 2 1 14 15 16 17 18 19 20 21 22 23 24 13 4 25 26 27 28 29 30 31 32 33 5 Safety Warnings Symbols used in the present instructions Important warnings carry these symbols. It is vitally important to observe these warnings. or with insufficient expertise or knowledge, unless they are carefully supervised and instructed by a responsible person. Children should be supervised and not allowed to play with the appliance. Danger! Failure to observe this warning can be the cause of lesions from electric shock which may endanger life. Danger of scalding! This appliance produces hot water, and when in use can form steam vapour. Take care not to come into contact with jets of hot water or steam. Caution! Failure to observe this warning can be the cause of lesions or of damage to the appliance. Use in conformity with purpose This appliance is designed for the preparation of coffee and for heating beverages. The appliance is intended solely for domestic use. It is not meant to be used in: • rooms used as kitchens by the staff of shops, offices and other work-places • farmhouse holiday accommodation • hotels, motels and other places offering hospitality • room lets Any use other than that intended shall be considered improper and therefore dangerous. The manufacturer is not responsible for injuries resulting from improper use of the appliance. Danger of scalding! Failure to observe this warning can be the cause of scalds or burns. Take note: This symbol highlights advice or information important for the user. Important safety warnings Danger! As the appliance uses electric current, the possibility of electric shocks cannot be excluded. Therefore, please pay attention to the following safety warnings: • Do not touch the appliance with wet hands or feet. • Do not touch the plug with wet hands. • Ensure that the electric socket used is always freely accessible, so that the plug can be easily disconnected when necessary. • If you wish to remove the plug from the socket, hold the plug itself. Never pull the electric cable, as this may damage it. • To disconnect the appliance completely, remove the plug from the electric socket. • If the appliance breaks down, do not attempt to repair it. Switch off the appliance, remove the plug from the socket and contact Technical Assistance. • If the plug or supply cable are damaged, then, in order to avoid any possible risks, have them replaced solely by De’Longhi Technical Assistance. Instructions for use Read these instructions carefully before using the appliance. Failure to respect these instructions can be the source of lesions and of damage to the appliance. The manufacturer is not responsible for any damage resulting from a failure to respect these instructions for use. Take note: Keep these instructions carefully. If this appliance is ever passed on to other persons, ensure that they are also given these instructions for use. Checking the item After removing the packaging, check that the appliance is intact and complete with all its accessories. Do not use the appliance if it is obviously damaged. Contact your Authorized Technical Assistance. Caution: Keep all packaging material (plastic bags, expanded polystyrene) out of the reach of children. Installation of the appliance Caution! When installing the appliance, the following safety instructions must be observed: • The appliance emits heat into the surrounding environment. After positioning the appliance on the Caution: The appliance should not be used by people (including children) with limited psychological/physical/sensory capacity, 6 Preparation of filter coffee • • • Antichlor filter The filter eliminates the taste of chlorine in the water. To install the filter, proceed as follows: • Release the container from its slot by pulling it upwards (fig. 1). • Remove the antichlor filter from the plastic sachet and rinse it under a running tap (fig. 2). • Open the container and carefully put the filter in place as shown in fig. 2. • Close the container (fig. 2), and reposition it in its slot, pushing it firmly downwards. • The antichlor filter should be replaced after 80 cycles, and at least after every 6 months of operation. spare filters are available by contacting Customer Experience. work-surface, check that there is a free space of at least 3 cm between the surfaces of the appliance, both to the sides and the rear, and a space of at least 25 cm above the coffee machine. Any penetration of water into the machine can cause damage. Do not position the appliance near taps or washbasins. The appliance may be damaged if the water inside it is allowed to freeze. Do not install the appliance in a room where the temperature is liable to drop below freezing. Position the power cable in such a way that it is not liable to be damaged by sharp edges or by contact with hot surfaces (for example, electric plates). Preparation of filter coffee • Open the filter-holder door, rotating it towards the right (fig. 3). • Fill the jug to the level indicator relative to number of cups of coffee you wish to prepare, taking care not to exceed the MAX level (fig.4). • Pour the water into the water-fill compartment (fig. 5). • Position the permanent filter (if applicable), or the paper filter, in the filter-holder (fig. 6). • Put the ground coffee in the filter using the measuring cup supplied, and level it off evenly (fig. 7). As a general rule, use a level measure of coffee (approx 7 grams) for every cup of coffee required (for example, 10 measures to obtain 10 cups). • Close the filter-holder door and place the jug, with cover in place, onto the hot plate. • Press the switch. The light on the switch itself indicates that the filter coffee-maker is in operation. • The coffee will begin to come out after a few seconds. It is perfectly normal for the appliance to emit steam while the coffee is percolating. To keep the coffee hot after the percolation process has finished, place the jug on the hot plate and leave the machine turned on (with the filter coffee light on): the coffee in the jug will be kept at the right temperature. • To turn off the machine press the switch. Connection of the appliance Caution! Ensure that the voltage of the electrical supply corresponds to that given on the data plate attached to the bottom of the appliance. Only connect the appliance to a properly installed electrical socket which has a minimum yield of 10A and is fitted with an efficient earth. If there is incompatibility between the plug and the socket, the plug should be exchanged for a suitable type, and only by a professional person. Technical Data Voltage: Capacity: Dimensions (l x h x p): Espresso pump pressure: Espresso boiler: Espresso tank capacity: Filter coffee tank capacity: Length of power cable: Weight: 220-240V˜50/60Hz 1750W 372 x 323 x 262 (or 370) mm 15 bar Stainless steel 1.2 L 1.4 L 1.2 m BCO420 = 7.15 kg BCO410 = 6 kg Preparation of espresso coffee Take note: Before using for the first time, all the accessories should be washed and all the internal pipes of the appliance should be well rinsed. Proceed as if making coffee, repeating until two tanks of water have been emptied out. The coffee can then be 7 Preparation of espresso coffee prepared in the normal way. 2. If you only want to make one cup of coffee, fill the filter with a level measure of ground coffee, about 7gr (fig. 17). If, on the other hand, you wish to make two coffees, fill the filter with two scant measures of ground coffee (about 6+6 gr.). Fill the filter with small quantities at a time to avoid spillage of the ground coffee. Water filter (only in certain models) Certain models come with a water-filter in-pack. All models can have this water filter fitted. To install, proceed as follows: 1. Remove the filter from the packaging. 2. Rotate the calendar disc (see fig. 8) to reveal the next two months of use. Caution: To guarantee correct functioning, before refilling the filter with ground coffee, ensure that it is free of any coffee powder residue from the previous infusion. 3. Distribute the ground coffee evenly and press it down lightly with the tamper (fig. 18). The way in which the ground coffee is pressed down is a very important factor in obtaining a good espresso. If you press too firmly, the coffee will come out slowly and have a thick, darkcoloured consistency. On the other hand, if you press too lightly, the coffee will come out too fast and will have a thin, light-coloured consistency. 4. Remove any excess coffee from the edge of the filterholder, and attach the latter to the machine. Rotate the hand-grip firmly to the right (fig. 14) to avoid any water leakage. 5. Position the cup or cups under the nozzles of the filterholder (fig. 19). It is advisable to warm the cups before making the coffee, by rinsing them with a little hot water. 6. Check that the OK light (fig. 15) is on (if it is off, wait until it comes on), and turn the selector dial to position (fig. 16). Once you have obtained the quantity of coffee you want, stop the process by rotating the selector dial (fig. 12). (It is advisable not to dispense to position coffee for more than 45 seconds) 7. To detach the filter-holder, rotate the hand-grip from right to left. Take note: The filter will last the equivalent of two months if the appliance is used normally. If, on the other hand, the machine is left unused with the filter installed, it will last for the equivalent of 3 weeks, maximum. 3. Rinse the filter with at least 0.5 L of running water (fig. 9). 4. Immerse the filter completely in a basin of water, tipping it to allow any air bubbles to escape (fig. 10). 5. Fill the water-tank, insert the filter in its proper slot (fig. 11) and push it firmly down. Pre-heating the coffee machine To obtain an espresso coffee at the right temperature, you are advised to pre-heat the machine in the following way: 1. Switch on the machine by turning the selector dial into the position (the relative light will come on) (fig. 12). Insert an espresso coffee filter into the filter holder, ensuring that the pin is correctly inserted into its proper slot as indicated in fig. 13. Use the smaller filter if you want to make one cup of coffee, or the larger filter if you wish to make two. Attach the filter-holder, complete with filter, to the machine (fig. 14), without filling it with ground coffee. 2. Position a cup under the filter-holder. Use the same cup in which you intend to make the coffee, so that it will prewarm. 3. Wait for the OK light to come on (fig. 15) and then immediately turn the selector dial to position (fig. 16) Let the water come out until the OK light goes off, then stop it by turning the selector dial to position (fig. 12) and empty the cup. (It is normal for a small, harmless puff of steam to escape while the filter-holder is being detached). Danger of scalding! To avoid splashing, never detach the filter-holder while the machine is dispensing. 8. To dispose of used coffee, hold the filter fast while pressing it with the appropriate lever incorporated into the hand-grip. Then turn out the grounds by turning the filter-holder over and rapping it sharply (fig. 20). 9 . To switch off the coffee machine, turn the selector dial to position . Preparation of espresso with ground coffee 1. First, pre-heat the machine and the filter-holder as described in the previous paragraph. Use the smaller filter if you want to make one cup of coffee, or the larger filter if you wish to make two. 8 Preparation of espresso using pods 1. Carry out the preheating process as described in the paragraph “PREHEATING THE COFFEE MACHINE”, ensuring Preparation of Cappuccino that the filter-holder is left attached to the machine. By doing this you will obtain hotter coffee. steam will emit from the milk-frother, giving the milk a creamy appearance and increasing its volume. To obtain creamier foam, immerse the milk-frother in the milk and move the container slowly upwards. 8. When the volume of the milk has doubled, immerse the milk-frother fully and continue to heat the milk. When the required temperature is reached (ideally 60°), together with the right density of cream, cut off the steam supply by turning the steam dial in a clockwise direction until it stops, and rotating the selector to position . To turn off the machine, turn the selector dial to position . 9. Pour the frothed milk into the cups containing the previously prepared espresso coffee. The cappuccino is now ready. Add sugar to taste and, if desired, sprinkle a little chocolate powder on the froth. Take note: Use pods which conform to the ESE standard. This will be printed on the packet with the following trademark. The ESE standard is a system accepted by the major pod manufacturers. It allows you to prepare an espresso coffee in a clean and simple way. 2. Insert the small filter into the filter-holder, ensuring that the pin is correctly inserted into the proper slot, as indicated in fig. 13. 3. Insert the pod, centring it as far as possible over the filter (fig. 21). Always follow the instructions on the packet of pods for correct positioning of the pod the filter. 4. Attach the filter-holder to the machine, making sure you rotate it fully (fig. 14). 5. Proceed as in points 5, 6 and 7 of the previous paragraph. • To make cappuccino 1. Prepare espresso coffee as describe in the preceding paragraphs, using sufficiently large cups. 2. Turn the selector dial to position (fig. 22): the relative light will come on. 3. Meanwhile, fill a receptacle with about 100 grams of milk for every cappuccino that you want to prepare. The milk should be cold, from the fridge (not hot!). When choosing a receptacle, take note of the fact that the volume of the milk will increase 2 or 3 times. • • Take note: You are advised to use semi-skimmed milk, at fridge temperature. 4. Position the receptacle with the milk under the milkfrother. 5. Wait until the OK light comes on. This indicates that the boiler has reached the ideal temperature for steam production. It is quite normal that in reaching the ideal temperature there should be some small emissions of water and steam into the drip-tray (N). 6. Extract the milk-frother by pulling it forward and rotating it to the left (fig. 23). Be careful not to touch the hot boiler pipe while performing this operation. Then position the receptacle containing the milk under the milk-frother itself. 7. Immerse the milk-frother into the milk to the depth of a few millimetres (fig. 24). Rotate the steam-dial at least half a turn in an anti-clockwise direction (fig. 25). The Take note: If you want to prepare more than one cappuccino, make all the espresso coffees together in advance and only then prepare the frothed milk for all the cappuccinos. If you want to prepare some more coffee after frothing up the milk, wait until the boiler cools down, because otherwise the coffee will come out burnt. To cool down the boiler, put a container under the boiler nozzle; turn the selector dial to (fig. 16); let the water escape until the “OK” light goes out; turn the selector dial back to and prepare the coffee as described in the preceding paragraphs. You are advised not to let the steam come out for more than 60 seconds, and not to froth up the milk more than 3 times consecutively. Caution: For reasons of hygiene you are recommended to always clean the milk-frother after use. Proceed in the following manner: 1. Allow a little steam to escape for a few seconds (see points 2, 5, and 6 of the preceding paragraph) by turning the steam dial (fig. 25). In this way, the milk-frother will flush out milk that may have remained inside it. Turn off the appliance by pressing the on/off button. 2. Grip the tube of the milk-frother firmly with one hand (Attention: this may be HOT!), and with the other, release the milk-frother itself by turning it in a clockwise direction and unscrewing it downwards (fig. 26). 3. Remove the steam nozzle from the supply tube by pulling it downwards. 4. Wash the milk-frother and the steam nozzle thoroughly in warm water. 9 Production of hot water - Cleaning 5. Check that the two holes indicated by arrows in fig. 27 are not blocked. If necessary, clean them out with a pin. 6. Replace the steam nozzle, pushing it upwards quite forcefully into the steam tube. 7. Re-mount the milk-frother by screwing it upwards in an anti-clockwise direction. • Reinstall this assembly in the steel filter container (fig. 32), making sure that the pin is inserted into the hole of the support itself (see the arrow in fig. 32). • Finally, screw up the top. The guarantee will not be valid if the cleaning procedure described above is not carried out regularly. Production of hot water 1. Switch on the machine by turning the selector dial to position (the relative light will come on) (fig. 12). Wait until the OK light shows (fig. 15). 2. Position a receptacle under the milk-frother. 3. When the OK light comes on, position the selector dial at (fig. 16), simultaneously turning the steam dial in an anti-clockwise direction (fig. 25): hot water will come out of the milk-frother. 4. To stop the flow of hot water, turn the steam dial in a clockwise direction and turn the selector dial to (fig. 12). A maximum output of 60 seconds is advisable. Cleaning of the boiler nozzle After about every 300 coffees, the boiler nozzle should be cleaned in the following manner: • Ensure that the coffee machine is not hot, and that the plug is disconnected; • Using a screwdriver, undo the screws holding the nozzle of the espresso boiler (fig. 33); • Remove the boiler nozzle; • Clean the boiler with a wet cloth (fig. 33) • Wash the nozzle thoroughly in hot water, scrubbing it with a brush. Check that the small holes are not blocked and, if necessary, clean them out with a pin (fig. 30). • Rinse the nozzle under the tap, continuing to scrub it. • Re-mount the boiler nozzle, taking care to position it correctly on the washer. The guarantee will not be valid if the cleaning procedure described above is not carried out regularly. Cleaning • • Danger! During the cleaning operation, never immerse the machine in water. It is an electrical appliance. Before carrying out any cleaning of the external parts of the appliance, switch off the machine, remove the plug from the power socket and let the machine cool down. Other cleaning operations 1. Do not use solvents or abrasive detergents to clean the machine. A soft, wet cloth is sufficient. 2. Clean the filter-holder cup regularly, as well as the filters, the drip-tray, and the water-tank. To empty the drip-tray, remove the cup-stand grill, eliminate any water, and clean the tray with a cloth: then re-assemble the drip-tray. Cleaning and maintenance of the espresso coffee filters After every 300 coffees, or when the coffee comes out of the filter-holder in drops or fails to come out completely, clean the filter-holder and the filters in the following manner: • Remove the filter from the filter-holder. • Undo the top of the filter (fig. 28), unscrewing it in the direction indicated on the top itself. • Remove the frothing device from the container by pushing it off the top part. • Take out the washer. • Rinse all the components and clean the metal filter thoroughly with hot water, scrubbing it with a brush (fig. 29). Check that the small holes in the filter are not blocked and, if necessary, clean them out with a pin (see fig. 30). • Replace the filter and the washer on the plastic disc, as shown in fig. 31. Take care to insert the pin of the plastic disc into the hole of the washer indicated by the arrow in fig. 31. Danger! During the cleaning operation never immerse the machine in water. It is an electrical appliance. De-scaling of the espresso coffee section It is advisable to de-scale the machine after about every 200 cups of coffee. The use of De’ Longhi de-scaler is recommended, available from shops. Follow the procedure below: 1. Fill the tank with the de-scaling solution, made by diluting the de-scaler with water according to the instructions on the packaging. 2. Switch on the machine by turning the selector knob to position and wait for the OK light to come on. 3. Ensure that the filter-holder is not engaged and position a receptacle under the nozzle of the machine. 10 Descaling - Disposal Disposal 4. Turn the selector dial to and allow about 1/4 of the solution in the tank to flow out. Turn the steam dial from time to time and let some of the solution escape through the tube of the milk-frother. Then stop, turning the selector dial to and leave the solution to act for about 5 minutes. 5. Repeat point 4 another 3 times, until the tank has been emptied completely. 6. To eliminate the remains of the solution and the scale, rinse out the tank thoroughly, and then refill it with clean water (without de-scaler). 7. Turn the selector dial to (fig. 16) and let the water flow out until the tank is completely empty. 8. Repeat operations 6 and 7 once more. Repairs to the machine due to problems with scale will not be covered by the guarantee if the de-scaling procedure described above is not carried out regularly. Information regarding the correct disposal of the product, as decreed by European Directive 2002/96/ EC. When the product reaches the end of its useful life, it must not be disposed of together with household refuse. It can be taken to an appropriate recycling centre provided by the local authorities, or to one of the authorized dealers who provide such a service. Separate disposal of electrical goods helps avoid negative consequences for health and for the environment, which can result from improper disposal. In addition, it allows the materials of which the item is composed to be retrieved, thus achieving an important saving of energy and resources. In order to emphasize the obligation to dispose of electrical items separately, the product carries the symbol of a rubbish skip with a cross through it. The appliance conforms to the following EC directives: • Descaling of the filter coffee section With time, the limescale content of the water can cause obstructions which may effect the correct functioning of the appliance. It is advisable to carry out de-scaling of the machine after about every 40 uses. For this de-scaling procedure, use an appropriate de-scaler for filter coffee machines, available in the shops. If such a product is not obtainable, the operation can be carried out in the following way: 1. Pour 4 cupfuls of water into the jug; 2. Dissolve 2 spoonfuls (about 30 grams) of citric acid in the water (available at a chemist’s or grocer’s); 3. Put the jug on the hot plate; 4. Press the , switch, percolate the equivalent of a cupful and then switch off the appliance; 5. Leave the solution to act for 15 minutes. Repeat operations 4 and 5 another time. 6. Switch on the machine and continue production until the tank is completely empty. 7. Rinse out by running the appliance just using water at least three times (3 full tanks of water). • • 11 Low Voltage Directive 2006/95/CE and successive amendments; Directive EMC 2004/108/CE and successive amendments; Materials and objects intended to come into contact with food products conform to the prescriptions of European Regulation 1935/2004. Troubleshooting Problem The espresso coffee no longer comes out The espresso coffee drips from the edge of the filter-holder instead of through the holes The espresso coffee is cold High noise level from the pump The consistency of the coffee is thin and pale (it emerges rapidly from the spout) The consistency of the coffee is thick and dark (it emerges slowly from the spout) Possible causes Solution Lack of water in the tank Re-fill the water-tank The holes in the filter-holder where the coffee emerges have become blocked Clean out the holes of the filter-holder nozzles The nozzle of the espresso boiler is clogged up Carry out a cleaning procedure as described in the paragraph “Cleaning the boiler nozzle” The filter-holder has not been inserted properly Connect the filter-holder correctly and turn it forcibly downwards The washer on the espresso boiler has lost its elasticity Obtain a replacement for the espresso boiler washer by calling customer Experience The holes in the filter-holder nozzles are blocked Clean the holes of the nozzles The OK light for espresso is not on when one presses the coffee supply switch Wait for the OK light to come on The pre-warming operation has not been done Carry out the pre-warming procedure as indicated in the paragraph The cups have not been pre-warmed Pre-warm the cups with some hot water, or leave them for at least 20 minutes on the cup-warming shelf on the cover The water-tank is empty Fill the tank Initial setup / machine not used for some time, noise Open the steam valve while pumping water through the boiler to release air blockages The tank is not inserted properly and the valve on its base is not open Press the tank lightly so as to open up the valve on its base The ground coffee is insufficiently tamped Tamp down the ground coffee a bit harder (fig. 18) The quantity of ground coffee is insufficient Increase the quantity of ground coffee The coffee is too coarsely ground Only use ground coffee for espresso coffee machines The ground coffee is not the correct type Change the type of ground coffee The ground coffee has been tamped too firmly Tamp the coffee less firmly (fig. 18) Too much ground coffee has been used Reduce the quantity of ground coffee The nozzle of the espresso boiler is clogged up Carry out a cleaning operation as described in the chapter “Cleaning the espresso boiler nozzle” The filter is blocked Carry out a cleaning operation as outlined in the paragraph “Cleaning the filter” The ground coffee is too fine or is damp Only use ground coffee for espresso coffee machines and ensure it is not damp The ground coffee is not the correct type Change the type of ground coffee powder The milk does not froth when making a cappuccino The milk is not cold enough Always use milk at fridge temperature The milk-frother is dirty Clean the small holes in the milk-frother very carefully, particularly those indicated in fig. 27 The filter or espresso coffee has an acidic flavour Insufficient rinsing after the de-scaling operation Rinse the appliance as described in the chapter “De-scaling of the filter section” or “De-scaling of the espresso section” 12 Electrical connection Electrical connection (UK only) Carry out the de-scaling procedure as described in The time taken to percolate the filter cof- The coffee-maker filter needs de-scaling Before using this appliance ensure that the voltage indicated on the product corresponds with the main in “De-scaling your home,ofifthe youfilter arecoffee in anysection” doubt thevoltage paragraph fee is getting longer about your supply contact your local electricity company. The flexible mains lead is supplied connected to a B.S. 1363 fused plug having a fuse of 13 amp capacity. Should this plug not fit the socket outlets in your home, it should be cut off and replaced with a suitable plug, following the procedure outlined below. Note: Such a plug cannot be used for any other appliance and should therefore be properly disposed of and not left where children might find it and plug it into a supply socket - with the obvious consequent danger. N.B. We recommend the use of good quality plugs and wall sockets that can be switched off when the machine is not in use. important: the wires in the mains lead fitted to this appliance are coloured in accordance with the following code: Green and Yellow to Earth green and yellow blue brown 13 amp Fuse earth neutral live Blue to neutral Brown to live Cord Clamp As the colours of the wires in the mains lead of this appliance may not correspond with the coloured markings identifying the terminals in your plug, proceed as follows: - The wire which is coloured green and yellow must be connected to the terminal in the plug which is marked with the letter E or by the earth symbol or coloured green or green and yellow. - The wire which is coloured blue must be connected to the terminal which is marked with the letter N or coloured black. - The wire which is coloured brown must be connected to the terminal which is marked with the letter L or coloured red. When wiring the plug, ensure that all strands of wire are securely retained in each terminal. Do not forget to tighten the mains lead clamp on the plug. If your electricity supply point has only two pin socket outlets, or if you are in doubt, consult a qualified electrician. Should the mains lead ever require replacement, it is essential that this operation be carried out by a qualified electrician and should only be replaced with a flexible cord of the same size. After replacement of a fuse in the plug, the fuse cover must be refitted. If the fuse cover is lost, the plug must not be used until a replacement cover is obtained. The colour of the correct replacement fuse cover is that of the coloured insert in the base of the fuse recess or elsewhere on the plug. Always state this colour when ordering a replacement fuse cover. Only 13amp replacement fuses which are asta approved to B.S. 1362 should be fitted. This appliance conforms to the Norms EN 55014 regarding the suppression of radio interference. Warning - this appliance must be earthed 13