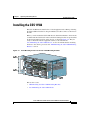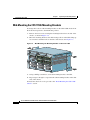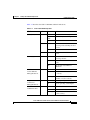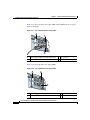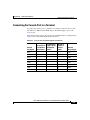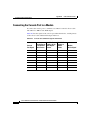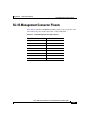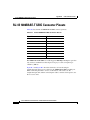
1
Cisco 11500 Series
Content Services Switch
Hardware Installation Guide
Software Version 7.40 and 7.50
March 2005
Corporate Headquarters
Cisco Systems, Inc.
170 West Tasman Drive
San Jose, CA 95134-1706
USA
http://www.cisco.com
Tel: 408 526-4000
800 553-NETS (6387)
Fax: 408 526-4100
Customer Order Number: DOC-7816421=
Text Part Number: 78-16421-01
THE SPECIFICATIONS AND INFORMATION REGARDING THE PRODUCTS IN THIS MANUAL ARE SUBJECT TO CHANGE WITHOUT
NOTICE. ALL STATEMENTS, INFORMATION, AND RECOMMENDATIONS IN THIS MANUAL ARE BELIEVED TO BE ACCURATE BUT
ARE PRESENTED WITHOUT WARRANTY OF ANY KIND, EXPRESS OR IMPLIED. USERS MUST TAKE FULL RESPONSIBILITY FOR
THEIR APPLICATION OF ANY PRODUCTS.
THE SOFTWARE LICENSE AND LIMITED WARRANTY FOR THE ACCOMPANYING PRODUCT ARE SET FORTH IN THE
INFORMATION PACKET THAT SHIPPED WITH THE PRODUCT AND ARE INCORPORATED HEREIN BY THIS REFERENCE. IF YOU
ARE UNABLE TO LOCATE THE SOFTWARE LICENSE OR LIMITED WARRANTY, CONTACT YOUR CISCO REPRESENTATIVE FOR A
COPY.
The following information is for FCC compliance of Class A devices: This equipment has been tested and found to comply with the limits for a Class
A digital device, pursuant to part 15 of the FCC rules. These limits are designed to provide reasonable protection against harmful interference when
the equipment is operated in a commercial environment. This equipment generates, uses, and can radiate radio-frequency energy and, if not installed
and used in accordance with the instruction manual, may cause harmful interference to radio communications. Operation of this equipment in a
residential area is likely to cause harmful interference, in which case users will be required to correct the interference at their own expense.
The following information is for FCC compliance of Class B devices: The equipment described in this manual generates and may radiate
radio-frequency energy. If it is not installed in accordance with Cisco’s installation instructions, it may cause interference with radio and television
reception. This equipment has been tested and found to comply with the limits for a Class B digital device in accordance with the specifications in
part 15 of the FCC rules. These specifications are designed to provide reasonable protection against such interference in a residential installation.
However, there is no guarantee that interference will not occur in a particular installation.
Modifying the equipment without Cisco’s written authorization may result in the equipment no longer complying with FCC requirements for Class
A or Class B digital devices. In that event, your right to use the equipment may be limited by FCC regulations, and you may be required to correct
any interference to radio or television communications at your own expense.
You can determine whether your equipment is causing interference by turning it off. If the interference stops, it was probably caused by the Cisco
equipment or one of its peripheral devices. If the equipment causes interference to radio or television reception, try to correct the interference by
using one or more of the following measures:
• Turn the television or radio antenna until the interference stops.
• Move the equipment to one side or the other of the television or radio.
• Move the equipment farther away from the television or radio.
• Plug the equipment into an outlet that is on a different circuit from the television or radio. (That is, make certain the equipment and the television
or radio are on circuits controlled by different circuit breakers or fuses.)
Modifications to this product not authorized by Cisco Systems, Inc. could void the FCC approval and negate your authority to operate the product.
The Cisco implementation of TCP header compression is an adaptation of a program developed by the University of California, Berkeley (UCB) as
part of UCB’s public domain version of the UNIX operating system. All rights reserved. Copyright © 1981, Regents of the University of California.
NOTWITHSTANDING ANY OTHER WARRANTY HEREIN, ALL DOCUMENT FILES AND SOFTWARE OF THESE SUPPLIERS ARE
PROVIDED “AS IS” WITH ALL FAULTS. CISCO AND THE ABOVE-NAMED SUPPLIERS DISCLAIM ALL WARRANTIES, EXPRESSED
OR IMPLIED, INCLUDING, WITHOUT LIMITATION, THOSE OF MERCHANTABILITY, FITNESS FOR A PARTICULAR PURPOSE AND
NONINFRINGEMENT OR ARISING FROM A COURSE OF DEALING, USAGE, OR TRADE PRACTICE.
IN NO EVENT SHALL CISCO OR ITS SUPPLIERS BE LIABLE FOR ANY INDIRECT, SPECIAL, CONSEQUENTIAL, OR INCIDENTAL
DAMAGES, INCLUDING, WITHOUT LIMITATION, LOST PROFITS OR LOSS OR DAMAGE TO DATA ARISING OUT OF THE USE OR
INABILITY TO USE THIS MANUAL, EVEN IF CISCO OR ITS SUPPLIERS HAVE BEEN ADVISED OF THE POSSIBILITY OF SUCH
DAMAGES.
CCSP, CCVP, the Cisco Square Bridge logo, Follow Me Browsing, and StackWise are trademarks of Cisco Systems, Inc.; Changing the Way We Work,
Live, Play, and Learn, and iQuick Study are service marks of Cisco Systems, Inc.; and Access Registrar, Aironet, ASIST, BPX, Catalyst, CCDA, CCDP,
CCIE, CCIP, CCNA, CCNP, Cisco, the Cisco Certified Internetwork Expert logo, Cisco IOS, Cisco Press, Cisco Systems, Cisco Systems Capital, the
Cisco Systems logo, Cisco Unity, Empowering the Internet Generation, Enterprise/Solver, EtherChannel, EtherFast, EtherSwitch, Fast Step, FormShare,
GigaDrive, GigaStack, HomeLink, Internet Quotient, IOS, IP/TV, iQ Expertise, the iQ logo, iQ Net Readiness Scorecard, LightStream, Linksys,
MeetingPlace, MGX, the Networkers logo, Networking Academy, Network Registrar, Packet, PIX, Post-Routing, Pre-Routing, ProConnect, RateMUX,
ScriptShare, SlideCast, SMARTnet, StrataView Plus, TeleRouter, The Fastest Way to Increase Your Internet Quotient, and TransPath are registered
trademarks of Cisco Systems, Inc. and/or its affiliates in the United States and certain other countries.
All other trademarks mentioned in this document or Website are the property of their respective owners. The use of the word partner does not imply a
partnership relationship between Cisco and any other company. (0502R)
Cisco 11500 Series Content Services Switch Hardware Installation Guide
Copyright © 2005 Cisco Systems, Inc. All rights reserved.
CONTENTS
Preface xv
Audience xvi
How to Use This Guide xvi
Related Documentation xviii
Symbols and Conventions xxii
Obtaining Documentation xxiii
Cisco.com xxiii
Documentation DVD xxiii
Ordering Documentation xxiv
Documentation Feedback xxiv
Cisco Product Security Overview xxiv
Reporting Security Problems in Cisco Products xxv
Obtaining Technical Assistance xxvi
Cisco Technical Support Website xxvi
Submitting a Service Request xxvii
Definitions of Service Request Severity xxvii
Obtaining Additional Publications and Information xxviii
CHAPTER
1
Unpacking and Installing the CSS 1-1
Site Requirements 1-2
Safety Guidelines 1-2
Chassis-Lifting Guidelines for the CSS 11503 and CSS 11506 1-3
Cisco 11500 Series Content Services Switch Hardware Installation Guide
78-16421-01
v
Contents
Electrical Safety 1-4
Specifications for Cisco 11500 Series Power Supplies 1-6
Power Guidelines for DC Systems (CSS 11503 and CSS 11506) 1-7
Required Tools and Equipment 1-7
Shipment Contents 1-8
Unpacking the CSS 1-9
Unpacking the CSS 11501 1-9
Unpacking the CSS 11503 or CSS 11506 1-9
If the Product is Damaged 1-10
Preinstallation Requirements 1-11
Installing the CSS 11501 1-12
Installing a CSS 11501 as a Freestanding Unit 1-12
Installing a CSS 11501 as a Rackmounted Unit 1-13
Installing the CSS 11503 1-14
Installing a CSS 11503 as a Freestanding Unit 1-14
Installing a CSS 11503 as a Rackmounted Unit 1-15
Installing the CSS 11506 1-17
Mid-Mounting the CSS 11506 Mounting Brackets 1-18
Rack-Mounting the CSS 11506 Chassis 1-19
Installing a CSS Module 1-19
Installation Precautions and Restrictions 1-20
Installation Precautions 1-20
Module Slot Restrictions 1-21
Unpacking a CSS Module 1-24
Installing a Module 1-24
Installing a Passive SCM in a CSS 11506 1-26
Cisco 11500 Series Content Services Switch Hardware Installation Guide
vi
78-16421-01
Contents
CHAPTER
2
Cabling and Troubleshooting the CSS 2-1
Cabling the CSS 11501 2-2
CSS 11501 Connectors and LEDs 2-4
Cabling the CSS 11503 and CSS 11506 Modules 2-6
CSS 11503 and CSS 11506 Module Overview 2-7
Switch Control Module Connectors and LEDs 2-11
Fast Ethernet Module Connectors and LEDs 2-15
Gigabit Ethernet Module Connectors and LEDs 2-17
Session Accelerator Module LEDs 2-20
Secure Socket Layer (SSL) Module LEDs 2-21
Connecting the Console 2-23
Connecting the Chassis to Ground 2-23
Tools and Supplies 2-24
Attaching the Grounding Cable 2-25
Connecting the Power Cord 2-27
Connecting a CSS 11501 Power Cord 2-27
Connecting a CSS 11503 Power Cord 2-28
Connecting a CSS 11503 AC Power Cord 2-28
Connecting a CSS 11503 DC Power Cord 2-30
Connecting a CSS 11506 Power Cord 2-32
Connecting a CSS 11506 AC Power Cord 2-33
Connecting a CSS 11506 DC Power Cord 2-34
Checking the DC Power Connection (CSS 11503 and CSS 11506) 2-37
Powering Up the CSS 2-37
Powering Down the CSS 2-38
Troubleshooting the CSS Hardware Components 2-38
Troubleshooting the CSS 11501 2-39
Troubleshooting the CSS Modules 2-40
Troubleshooting the Console Interface 2-44
Cisco 11500 Series Content Services Switch Hardware Installation Guide
78-16421-01
vii
Contents
Troubleshooting the CSS Power Supply 2-45
Troubleshooting the CSS 11501 Power Supply 2-45
Troubleshooting the CSS 11503 Power Supply 2-46
Troubleshooting the CSS 11506 Power Supply 2-46
Troubleshooting the CSS Fans 2-50
Troubleshooting the CSS 11501 Chassis Fans 2-50
Troubleshooting the CSS 11503 Chassis Fans 2-51
Troubleshooting the CSS 11506 Fan Module 2-52
APPENDIX
A
Specifications A-1
Electrical Specifications A-2
Environmental Specifications A-3
Physical Specifications A-4
CSS 11501 Bandwidth and Memory Specifications A-5
CSS 11503 and CSS 11506 Module Specifications A-5
Disk Specifications A-6
Supported Standards A-6
Transport A-6
Network A-7
Routing A-7
Gateway A-7
Application A-7
Network Utilities A-8
Network Management A-8
Cisco 11500 Series Content Services Switch Hardware Installation Guide
viii
78-16421-01
Contents
APPENDIX
B
Cable Connector Pinouts B-1
RJ-45 Fast Ethernet Connector Pinouts B-2
RJ-45 RS-232 Console Port Pinouts B-3
Connecting the Console Port to a PC B-4
Connecting the Console Port to a Terminal B-5
Connecting the Console Port to a Modem B-6
RJ-45 Management Connector Pinouts B-7
RJ-45 1000BASE-T GBIC Connector Pinouts B-8
APPENDIX
C
Connecting a Modem to the CSS C-1
Configuring a Modem C-1
Cabling a Modem to the CSS C-2
APPENDIX
D
Regulatory Compliance and Safety Information for the Cisco 11500 Series
Content Services Switch D-1
Agency Approvals D-2
FCC Class A Compliance Notice (United States) D-3
FCC Compliance Information Statement (United States) D-4
ICES-003 Class A Compliance Notice (Canada) D-5
Europe (EU) D-5
Declaration of Conformity with Regard to the Directives 73/23/EEC and
89/336/EEC as amended by Directive 93/68/EEC D-6
CISPR 22 Class A Warning D-7
VCCI Class A Warning D-8
Class A Warning for Taiwan and Other Traditional Chinese Markets D-10
Class A EMC Warning D-10
Safety Requirements D-11
Laser Safety D-12
Cisco 11500 Series Content Services Switch Hardware Installation Guide
78-16421-01
ix
Contents
Translated Safety Warnings D-13
Warning Definition D-13
Battery Handling D-22
Invisible Laser Radiation D-24
Jewelry Removal Warning D-25
Installation Instructions D-27
Invisible Laser Radiation Warning D-28
Equipment Installation D-29
Two Person Lifting Requirement D-32
Chassis Lifting Warning D-33
Chassis Installation Warning D-39
Work During Lightning Activity D-41
Disconnect Device D-42
Cisco 11500 Power Source D-45
DC Power Supply Warning D-47
More Than One Power Supply D-49
Ground Conductor D-52
Installing or Replacing the Unit D-54
Use Copper Conductors Only D-56
Short-circuit Protection D-58
Blank Faceplates and Cover Panels D-61
Power Module D-66
Ground Conductor D-68
INDEX
Cisco 11500 Series Content Services Switch Hardware Installation Guide
x
78-16421-01
F I G U R E S
Figure 1-1
Front-Mounting the Mounting Brackets on the CSS 11501
1-13
Figure 1-2
Front-Mounting the Mounting Brackets on the CSS 11503
1-15
Figure 1-3
Mid-Mounting the Mounting Brackets on the CSS 11503
Figure 1-4
Front-Mounting Position of the CSS 11506 Mounting Brackets
Figure 1-5
Mid-Mounting the Mounting Brackets on the CSS 11506
Figure 1-6
Fully-Configured CSS 11503
1-22
Figure 1-7
Fully-Configured CSS 11506
1-23
Figure 1-8
Installing a Module into a CSS Chassis
Figure 1-9
Installing a PCMCIA Cover on an SCM
Figure 2-1
CSS 11501 Connectors and LEDs
Figure 2-2
CSS 11503 Content Services Switch
2-9
Figure 2-3
CSS 11506 Content Services Switch
2-10
Figure 2-4
Switch Control Module Connectors and LEDs
Figure 2-5
8-Port Fast Ethernet Module Connectors and LEDs
Figure 2-6
16-Port Fast Ethernet Module Connectors and LEDs
Figure 2-7
Gigabit Ethernet Module Connectors and LEDs
Figure 2-8
Session Accelerator Module LEDs
Figure 2-9
SSL Module LEDs
Figure 2-10
Attaching Grounding Wire to Grounding Lug
Figure 2-11
Connecting a CSS 11501 AC Power Cord
2-27
Figure 2-12
Connecting a CSS 11503 AC Power Cord
2-29
Figure 2-13
Location of the CSS 11503 DC Power Supply Connectors
Figure 2-14
Connecting a CSS 11506 AC Power Cord
1-16
1-17
1-18
1-25
1-27
2-4
2-13
2-15
2-16
2-18
2-20
2-22
2-26
2-31
2-33
Cisco 11500 Series Content Services Switch Hardware Installation Guide
78-16421-01
xi
Figures
Figure 2-15
Location of CSS 11506 DC Power Supply Connectors
Figure 2-16
Location of the CSS 11506 Power Supplies
Figure 2-17
CSS 11506 AC Power Supply LEDs
2-48
Figure 2-18
CSS 11506 DC Power Supply LEDs
2-48
Figure B-1
Four Twisted-Pair Straight-Through Cable Schematic for the CSS 1000BASE-T GBIC
Module Port B-9
Figure B-2
Four Twisted-Pair Crossover Cable Schematic for the CSS 1000BASE-T GBIC Module
Port B-9
Figure C-1
Switch Control Module Console Connector
2-35
2-47
C-2
Cisco 11500 Series Content Services Switch Hardware Installation Guide
xii
78-16421-01
T A B L E S
Table 1-1
AC Electrical Specifications
1-6
Table 1-2
DC Electrical Specifications
1-6
Table 1-3
CSS 11503 Chassis Slot Restriction
1-21
Table 1-4
CSS 11506 Chassis Slot Restriction
1-21
Table 2-1
CSS 11501 LED Descriptions
Table 2-2
Switch Control Module LED Descriptions
Table 2-3
Fast Ethernet Module LED Descriptions
Table 2-4
Gigabit Ethernet Module LED Descriptions
Table 2-5
Session Accelerator Module LED Descriptions
Table 2-6
SSL Module LED Descriptions
Table 2-7
CSS Console Port Default Settings
Table 2-8
Tools and Supplies
Table 2-9
CSS 11503 to DC Power Source Cabling
2-32
Table 2-10
CSS 11506 to DC Power Source Cabling
2-36
Table 2-11
Troubleshooting the CSS 11501
Table 2-12
Troubleshooting the CSS Modules
Table 2-13
Troubleshooting the Console Interface
Table 2-14
LEDs of the CSS 11506 Power Supply
Table A-1
AC Electrical Specifications
A-2
Table A-2
DC Electrical Specifications
A-2
Table A-3
Environmental Specifications
Table A-4
Physical Specifications
Table A-5
CSS 11501 Specifications
2-5
2-14
2-17
2-19
2-21
2-22
2-23
2-24
2-39
2-41
2-44
2-49
A-3
A-4
A-5
Cisco 11500 Series Content Services Switch Hardware Installation Guide
78-16421-01
xiii
Tables
Table A-6
CSS 11503 and CSS 11506 Module Specifications
Table A-7
Disk Specifications
Table B-1
RJ-45 Fast Ethernet Connector Pinouts
Table B-2
RJ-45 RS-232 Serial Connector Pinouts for the Console Port
Table B-3
Console Port to PC Signals and Pinouts
Table B-4
Console Port to Terminal Signals and Pinouts
Table B-5
Console Port to Modem Signals and Pinouts
Table B-6
RJ-45 Management Connector Pinouts
Table B-7
RJ-45 1000BASE-T GBIC Connector Pinouts
Table C-1
CSS Console Port Default Settings
C-3
Table D-1
Regulatory Approval Requirements
D-2
A-5
A-6
B-2
B-3
B-4
B-5
B-6
B-7
B-8
Cisco 11500 Series Content Services Switch Hardware Installation Guide
xiv
78-16421-01
Preface
This guide is intended to help you install your Cisco 11500 Series Content
Services Switches (CSS), models CSS 11501, CSS 11503, and CSS 11506. It
provides you with instructions for installing, cabling, and powering the CSS.
Information in this guide applies to all CSSs except where noted.
This preface describes the following topics:
•
Audience
•
How to Use This Guide
•
Related Documentation
•
Symbols and Conventions
•
Obtaining Documentation
•
Documentation Feedback
•
Cisco Product Security Overview
•
Obtaining Technical Assistance
•
Obtaining Additional Publications and Information
Cisco 11500 Series Content Services Switch Hardware Installation Guide
78-16421-01
xv
Preface
Audience
Audience
Warning
Only trained and qualified personnel are allowed to install or replace this
equipment.
This guide is intended for the following trained and qualified service personnel
who are responsible for installing and operating the CSS:
•
System installer
•
Hardware technician
•
System operator
How to Use This Guide
This section describes the chapters and contents in this guide.
Chapter/Appendix
Description
Chapter 1,
Unpacking and
Installing the CSS
Provides instructions for unpacking and installing the
CSS.
Chapter 2,
Cabling and
Troubleshooting the
CSS
Describes the CSS 11501 integrated platform and the
CSS 11503 and 11506 modular platforms, including
LEDs and connectors. This chapter also provides
instructions for connecting the console, powering the
CSS, and troubleshooting the CSS console, modules, and
power supply.
Appendix A,
Specifications
Provides specifications for the CSS and its components.
Cisco 11500 Series Content Services Switch Hardware Installation Guide
xvi
78-16421-01
Preface
How to Use This Guide
Chapter/Appendix
Description
Appendix B,
Cable Connector
Pinouts
Provides pinouts for each connector on the CSS.
Appendix C,
Connecting a
Modem to the CSS
Provides information for connecting a modem to the
CSS.
Appendix D,
Regulatory
Compliance and
Safety Information
for the Cisco 11500
Series Content
Services Switch
Provides information on regulatory compliance and
safety pertaining to the CSS.
Cisco 11500 Series Content Services Switch Hardware Installation Guide
78-16421-01
xvii
Preface
Related Documentation
Related Documentation
In addition to this document, the CSS documentation set includes the following:
Document Title
Description
Release Note for the Cisco Provides information on operating considerations,
caveats, and CLI commands for the Cisco 11500
11500 Series Content
series CSS.
Services Switch
Cisco Content Services
Switch Getting Started
Guide
This guide describes how to perform initial
administration and configuration tasks on the CSS,
including:
•
Booting the CSS for the first time and a routine
basis, and logging in to the CSS
•
Configuring the username and password,
Ethernet management port, static IP routes,
and the date and time
•
Configuring DNS server for hostname
resolution
•
Configuring sticky cookies with a sticky
overview and advanced load-balancing method
using cookies
•
Finding information in the CSS documentation
with a task list
•
Troubleshooting the boot process
Cisco 11500 Series Content Services Switch Hardware Installation Guide
xviii
78-16421-01
Preface
Related Documentation
Document Title
Description
Cisco Content Services
Switch Administration
Guide
This guide describes how to perform administrative
tasks on the CSS, including upgrading your CSS
software and configuring the following:
Cisco Content Services
Switch Routing and
Bridging Configuration
Guide
•
Logging, including displaying log messages
and interpreting sys.log messages
•
User profile and CSS parameters
•
SNMP
•
RMON
•
XML documents to configure the CSS
•
CSS scripting language
•
Offline Diagnostic Monitor (Offline DM)
menu
This guide describes how to perform routing and
bridging configuration tasks on the CSS, including:
•
Management ports, interfaces, and circuits
•
Spanning-tree bridging
•
Address Resolution Protocol (ARP)
•
Routing Information Protocol (RIP)
•
Internet Protocol (IP)
•
Open Shortest Path First (OSPF) protocol
•
Cisco Discovery Protocol (CDP)
•
Dynamic Host Configuration Protocol (DHCP)
relay agent
Cisco 11500 Series Content Services Switch Hardware Installation Guide
78-16421-01
xix
Preface
Related Documentation
Document Title
Description
Cisco Content Services
Switch Content
Load-Balancing
Configuration Guide
This guide describes how to perform CSS content
load-balancing configuration tasks, including:
Cisco Content Services
Switch Global Server
Load-Balancing
Configuration Guide
Cisco Content Services
Switch Redundancy
Configuration Guide
•
Flow and port mapping
•
Services
•
Service, global, and script keepalives
•
Source groups
•
Loads for services
•
Server/Application State Protocol (SASP)
•
Dynamic Feedback Protocol (DFP)
•
Owners
•
Content rules
•
Sticky parameters
•
HTTP header load balancing
•
Content caching
•
Content replication
This guide describes how to perform CSS global
load-balancing configuration tasks, including:
•
Domain Name System (DNS)
•
DNS Sticky
•
Content Routing Agent
•
Client-Side Accelerator
•
Network proximity
This guide describes how to perform CSS
redundancy configuration tasks, including:
•
VIP and virtual interface redundancy
•
Adaptive session redundancy
•
Box-to-box redundancy
Cisco 11500 Series Content Services Switch Hardware Installation Guide
xx
78-16421-01
Preface
Related Documentation
Document Title
Description
Cisco Content Services
Switch Security
Configuration Guide
This guide describes how to perform CSS security
configuration tasks, including:
Cisco Content Services
Switch SSL Configuration
Guide
Cisco Content Services
Switch Command
Reference
•
Controlling access to the CSS
•
Secure Shell Daemon protocol
•
Radius
•
TACACS+
•
Firewall load balancing
This guide describes how to perform CSS SSL
configuration tasks, including:
•
SSL certificate and keys
•
SSL termination
•
Back-end SSL
•
SSL initiation
This reference provides an alphabetical list of all
CLI commands including syntax, options, and
related commands.
This guide explains how to use the Device
Cisco Content Services
Management user interface, an HTML-based
Switch Device
Management User’s Guide Web-based application that you use to configure
and manage your CSS.
Cisco 11500 Series Content Services Switch Hardware Installation Guide
78-16421-01
xxi
Preface
Symbols and Conventions
Symbols and Conventions
This guide uses the following symbols and conventions to emphasize certain
information.
Caution
A caution means that a specific action you take could cause a loss of data or
adversely impact use of the equipment.
Note
A note provides important related information, reminders, and recommendations.
Warning
A warning describes a specific action that could cause either physical harm to
you or damage to the equipment.
Bold text indicates a command in a paragraph.
Courier text
indicates text that appears in a command line, including the CLI
prompt.
Courier bold text
indicates commands and text you enter in a command line.
Italics text indicates the first occurrence of a new term, book title, and emphasized
text.
1.
A numbered list indicates that the order of the list items is important.
a. An alphabetical list indicates that the order of the secondary list items is
important.
•
A bulleted list indicates that the order of the list topics is unimportant.
– An indented list indicates that the order of the list subtopics is
unimportant.
Before you install, configure, or perform maintenance on the CSS, review the
documentation for the procedure you are about to perform, paying special
attention to the safety warnings. If you need translations of the safety warnings,
refer to the Appendix D, Regulatory Compliance and Safety Information for the
Cisco 11500 Series Content Services Switch.
Cisco 11500 Series Content Services Switch Hardware Installation Guide
xxii
78-16421-01
Preface
Obtaining Documentation
Obtaining Documentation
Cisco documentation and additional literature are available on Cisco.com. Cisco
also provides several ways to obtain technical assistance and other technical
resources. These sections explain how to obtain technical information from Cisco
Systems.
Cisco.com
You can access the most current Cisco documentation at this URL:
http://www.cisco.com/univercd/home/home.htm
You can access the Cisco website at this URL:
http://www.cisco.com
You can access international Cisco websites at this URL:
http://www.cisco.com/public/countries_languages.shtml
Documentation DVD
Cisco documentation and additional literature are available in a Documentation
DVD package, which may have shipped with your product. The Documentation
DVD is updated regularly and may be more current than printed documentation.
The Documentation DVD package is available as a single unit.
Registered Cisco.com users (Cisco direct customers) can order a Cisco
Documentation DVD (product number DOC-DOCDVD=) from the Ordering tool
or Cisco Marketplace.
Cisco Ordering tool:
http://www.cisco.com/en/US/partner/ordering/
Cisco Marketplace:
http://www.cisco.com/go/marketplace/
Cisco 11500 Series Content Services Switch Hardware Installation Guide
78-16421-01
xxiii
Preface
Documentation Feedback
Ordering Documentation
You can find instructions for ordering documentation at this URL:
http://www.cisco.com/univercd/cc/td/doc/es_inpck/pdi.htm
You can order Cisco documentation in these ways:
•
Registered Cisco.com users (Cisco direct customers) can order Cisco product
documentation from the Ordering tool:
http://www.cisco.com/en/US/partner/ordering/
•
Nonregistered Cisco.com users can order documentation through a local
account representative by calling Cisco Systems Corporate Headquarters
(California, USA) at 408 526-7208 or, elsewhere in North America, by
calling 1 800 553-NETS (6387).
Documentation Feedback
You can send comments about technical documentation to [email protected].
You can submit comments by using the response card (if present) behind the front
cover of your document or by writing to the following address:
Cisco Systems
Attn: Customer Document Ordering
170 West Tasman Drive
San Jose, CA 95134-9883
We appreciate your comments.
Cisco Product Security Overview
Cisco provides a free online Security Vulnerability Policy portal at this URL:
http://www.cisco.com/en/US/products/products_security_vulnerability_policy.ht
ml
From this site, you can perform these tasks:
•
Report security vulnerabilities in Cisco products.
Cisco 11500 Series Content Services Switch Hardware Installation Guide
xxiv
78-16421-01
Preface
Cisco Product Security Overview
•
Obtain assistance with security incidents that involve Cisco products.
•
Register to receive security information from Cisco.
A current list of security advisories and notices for Cisco products is available at
this URL:
http://www.cisco.com/go/psirt
If you prefer to see advisories and notices as they are updated in real time, you
can access a Product Security Incident Response Team Really Simple Syndication
(PSIRT RSS) feed from this URL:
http://www.cisco.com/en/US/products/products_psirt_rss_feed.html
Reporting Security Problems in Cisco Products
Cisco is committed to delivering secure products. We test our products internally
before we release them, and we strive to correct all vulnerabilities quickly. If you
think that you might have identified a vulnerability in a Cisco product, contact
PSIRT:
Tip
•
Emergencies — [email protected]
•
Nonemergencies — [email protected]
We encourage you to use Pretty Good Privacy (PGP) or a compatible product to
encrypt any sensitive information that you send to Cisco. PSIRT can work from
encrypted information that is compatible with PGP versions 2.x through 8.x.
Never use a revoked or an expired encryption key. The correct public key to use
in your correspondence with PSIRT is the one that has the most recent creation
date in this public key server list:
http://pgp.mit.edu:11371/pks/lookup?search=psirt%40cisco.com&op=index&ex
act=on
In an emergency, you can also reach PSIRT by telephone:
•
1 877 228-7302
•
1 408 525-6532
Cisco 11500 Series Content Services Switch Hardware Installation Guide
78-16421-01
xxv
Preface
Obtaining Technical Assistance
Obtaining Technical Assistance
For all customers, partners, resellers, and distributors who hold valid Cisco
service contracts, Cisco Technical Support provides 24-hour-a-day,
award-winning technical assistance. The Cisco Technical Support Website on
Cisco.com features extensive online support resources. In addition, Cisco
Technical Assistance Center (TAC) engineers provide telephone support. If you
do not hold a valid Cisco service contract, contact your reseller.
Cisco Technical Support Website
The Cisco Technical Support Website provides online documents and tools for
troubleshooting and resolving technical issues with Cisco products and
technologies. The website is available 24 hours a day, 365 days a year, at this
URL:
http://www.cisco.com/techsupport
Access to all tools on the Cisco Technical Support Website requires a Cisco.com
user ID and password. If you have a valid service contract but do not have a user
ID or password, you can register at this URL:
http://tools.cisco.com/RPF/register/register.do
Note
Use the Cisco Product Identification (CPI) tool to locate your product serial
number before submitting a web or phone request for service. You can access the
CPI tool from the Cisco Technical Support Website by clicking the Tools &
Resources link under Documentation & Tools. Choose Cisco Product
Identification Tool from the Alphabetical Index drop-down list, or click the
Cisco Product Identification Tool link under Alerts & RMAs. The CPI tool
offers three search options: by product ID or model name; by tree view; or for
certain products, by copying and pasting show command output. Search results
show an illustration of your product with the serial number label location
highlighted. Locate the serial number label on your product and record the
information before placing a service call.
Cisco 11500 Series Content Services Switch Hardware Installation Guide
xxvi
78-16421-01
Preface
Obtaining Technical Assistance
Submitting a Service Request
Using the online TAC Service Request Tool is the fastest way to open S3 and S4
service requests. (S3 and S4 service requests are those in which your network is
minimally impaired or for which you require product information.) After you
describe your situation, the TAC Service Request Tool provides recommended
solutions. If your issue is not resolved using the recommended resources, your
service request is assigned to a Cisco TAC engineer. The TAC Service Request
Tool is located at this URL:
http://www.cisco.com/techsupport/servicerequest
For S1 or S2 service requests or if you do not have Internet access, contact the
Cisco TAC by telephone. (S1 or S2 service requests are those in which your
production network is down or severely degraded.) Cisco TAC engineers are
assigned immediately to S1 and S2 service requests to help keep your business
operations running smoothly.
To open a service request by telephone, use one of the following numbers:
Asia-Pacific: +61 2 8446 7411 (Australia: 1 800 805 227)
EMEA: +32 2 704 55 55
USA: 1 800 553-2447
For a complete list of Cisco TAC contacts, go to this URL:
http://www.cisco.com/techsupport/contacts
Definitions of Service Request Severity
To ensure that all service requests are reported in a standard format, Cisco has
established severity definitions.
Severity 1 (S1)—Your network is “down,” or there is a critical impact to your
business operations. You and Cisco will commit all necessary resources around
the clock to resolve the situation.
Severity 2 (S2)—Operation of an existing network is severely degraded, or
significant aspects of your business operation are negatively affected by
inadequate performance of Cisco products. You and Cisco will commit full-time
resources during normal business hours to resolve the situation.
Cisco 11500 Series Content Services Switch Hardware Installation Guide
78-16421-01
xxvii
Preface
Obtaining Additional Publications and Information
Severity 3 (S3)—Operational performance of your network is impaired, but most
business operations remain functional. You and Cisco will commit resources
during normal business hours to restore service to satisfactory levels.
Severity 4 (S4)—You require information or assistance with Cisco product
capabilities, installation, or configuration. There is little or no effect on your
business operations.
Obtaining Additional Publications and Information
Information about Cisco products, technologies, and network solutions is
available from various online and printed sources.
•
Cisco Marketplace provides a variety of Cisco books, reference guides, and
logo merchandise. Visit Cisco Marketplace, the company store, at this URL:
http://www.cisco.com/go/marketplace/
•
Cisco Press publishes a wide range of general networking, training and
certification titles. Both new and experienced users will benefit from these
publications. For current Cisco Press titles and other information, go to Cisco
Press at this URL:
http://www.ciscopress.com
•
Packet magazine is the Cisco Systems technical user magazine for
maximizing Internet and networking investments. Each quarter, Packet
delivers coverage of the latest industry trends, technology breakthroughs, and
Cisco products and solutions, as well as network deployment and
troubleshooting tips, configuration examples, customer case studies,
certification and training information, and links to scores of in-depth online
resources. You can access Packet magazine at this URL:
http://www.cisco.com/packet
•
iQ Magazine is the quarterly publication from Cisco Systems designed to
help growing companies learn how they can use technology to increase
revenue, streamline their business, and expand services. The publication
identifies the challenges facing these companies and the technologies to help
solve them, using real-world case studies and business strategies to help
readers make sound technology investment decisions. You can access iQ
Magazine at this URL:
http://www.cisco.com/go/iqmagazine
Cisco 11500 Series Content Services Switch Hardware Installation Guide
xxviii
78-16421-01
Preface
Obtaining Additional Publications and Information
•
Internet Protocol Journal is a quarterly journal published by Cisco Systems
for engineering professionals involved in designing, developing, and
operating public and private internets and intranets. You can access the
Internet Protocol Journal at this URL:
http://www.cisco.com/ipj
•
World-class networking training is available from Cisco. You can view
current offerings at this URL:
http://www.cisco.com/en/US/learning/index.html
Cisco 11500 Series Content Services Switch Hardware Installation Guide
78-16421-01
xxix
Preface
Obtaining Additional Publications and Information
Cisco 11500 Series Content Services Switch Hardware Installation Guide
xxx
78-16421-01
C H A P T E R
1
Unpacking and Installing the CSS
This chapter describes how to unpack and install the CSS as a free-standing or
rack-mounted unit.
Warning
This is a class A product. In a domestic environment this product may cause
radio interference, in which case the user may be required to take adequate
measures.
This chapter contains the following sections:
•
Site Requirements
•
Safety Guidelines
•
Required Tools and Equipment
•
Shipment Contents
•
Unpacking the CSS
•
If the Product is Damaged
•
Preinstallation Requirements
•
Installing the CSS 11501
•
Installing the CSS 11503
•
Installing the CSS 11506
•
Installing a CSS Module
Cisco 11500 Series Content Services Switch Hardware Installation Guide
78-16421-01
1-1
Chapter 1
Unpacking and Installing the CSS
Site Requirements
Note
For information on installing a replacement component in the CSS (such as a
replacement PCMCIA disk or a power supply), refer to the reference sheet
included with the component.
Site Requirements
Before you select an installation site for the CSS, read the electrical,
environmental, and physical requirements as described in Appendix A,
Specifications.
Safety Guidelines
When you install the CSS, observe all of the caution and warning statements in
the installation procedures. For warning translations, refer to Appendix D,
Regulatory Compliance and Safety Information for the Cisco 11500 Series
Content Services Switch.
Read the following guidelines to help ensure your safety and protect the
equipment. These guidelines may not cover all potentially hazardous situations
you may encounter during system installation, so be alert.
•
The installation of your CSS must comply with national and local electrical
codes. In the United States, this means the National Fire Protection
Association (NFPA) 70, United States National Electrical Code. In Canada,
Canadian Electrical Code, part I, CC22.1. In other countries, International
Electrotechnical Commission (IEC) 364, part 1 through part 7.
•
Keep tools and chassis components away from walk areas.
•
Do not wear loose clothing, jewelry (including rings and chains), or other
items that could get caught in the chassis.
•
The AC-powered CSS ships with a three-wire AC electrical grounding-type
plug, which only fits into a grounding-type power outlet. This is a safety
feature. Ensure the equipment grounding is in compliance with local and
national electrical codes.
Cisco 11500 Series Content Services Switch Hardware Installation Guide
1-2
78-16421-01
Chapter 1
Unpacking and Installing the CSS
Safety Guidelines
Warning
•
The DC-powered CSS 11503 and CSS 11506 are not shipped with the wiring
required to connect to the DC source. You must provide input, return, and
earth (grounding) wiring at the site (refer to Chapter 2, Cabling and
Troubleshooting the CSS), and install and protect the wiring in accordance
with local and national wiring regulations.
•
The CSS operates safely when it is used in accordance with its marked
electrical ratings and product usage instructions.
Only trained and qualified personnel should be allowed to install or replace this
equipment.
Chassis-Lifting Guidelines for the CSS 11503 and CSS 11506
The fully-configured CSS 11503 weighs approximately 34 pounds. The
fully-configured CSS 11506 weighs approximately 58 pounds. The chassis is not
intended to be moved frequently. Before you install the CSS, ensure that your site
is properly prepared; by doing so, you can avoid moving the chassis later to
accommodate power sources and network connections.
When lifting either the CSS 11503 or CSS 11506 chassis, follow these guidelines:
•
Two or more people are required to lift the CSS 11506 chassis (as described
in the procedure at the end of this section). Never attempt to lift the chassis
by yourself. Because of the size and weight of the chassis, use at least two
people to safely lift and move it; by doing so, you can avoid causing injury or
damaging the equipment.
•
When lifting a chassis, ensure that your footing is solid, and balance the
weight of the chassis between your feet.
•
Lift the chassis slowly; never move suddenly or twist your body as you lift.
•
Keep your back straight and lift the chassis with your legs, not your back. If
you must bend down to lift the chassis, bend at the knees, not at the waist, to
reduce the strain on your back muscles.
•
If you remove the fan assembly and power modules to lighten the chassis, be
sure to provide anti-static mats or bags to protect the removed components.
Be careful when you remove the power modules—they are heavy.
Cisco 11500 Series Content Services Switch Hardware Installation Guide
78-16421-01
1-3
Chapter 1
Unpacking and Installing the CSS
Safety Guidelines
Warning
•
Cisco Systems recommends that you leave line cards installed in the chassis.
Removing line cards greatly increases the chances of damage to the chassis
or components, and introduces the possibility that you will unintentionally
change the configuration.
•
Always disconnect all external cables before lifting or moving the chassis.
Two people are required to lift the CSS 11506 chassis. To prevent injury, keep
your back straight and lift with your legs, not your back.
To safely lift the CSS 11506 chassis, perform the following steps:
1.
Stand on one side of the chassis and tell your helper to stand on the other side.
2.
Place one hand under the front or side of the chassis, and tell your helper to
do the same.
3.
With the other hand, grasp the top-rear of the chassis and carefully lift the
chassis.
Electrical Safety
Follow these basic guidelines when you are working with any electrical
equipment:
•
Before you begin any procedures requiring access to the chassis interior,
locate the emergency power-off switch for the room in which you are
working.
•
Disconnect all power and external cables before installing or removing a
chassis.
•
Do not work alone when potentially hazardous conditions exist.
•
Never assume that power has been disconnected from a circuit; always check.
Cisco 11500 Series Content Services Switch Hardware Installation Guide
1-4
78-16421-01
Chapter 1
Unpacking and Installing the CSS
Safety Guidelines
•
Do not perform any action that creates a potential hazard to people or makes
the equipment unsafe. Never install equipment that appears damaged.
•
Carefully examine your work area for possible hazards such as moist floors,
ungrounded power extension cables, and missing safety grounds.
Use the following guidelines when you work with any equipment that is
connected to telephone wiring or other network cabling, even if that equipment is
disconnected from its power source.
•
Never install telephone wiring during a lightning storm.
•
Never install a telephone jack in a wet location unless the jack is specifically
designed for wet locations.
•
Never touch uninsulated telephone wires or terminals unless the telephone
line has been disconnected at the network interface.
•
Use caution when installing or modifying telephone lines.
Warning
Do not work on the system or connect or disconnect cables during periods of
lightning activity.
Warning
Before you work on equipment that is connected to power lines, remove jewelry
(including rings, necklaces, and watches). Metal objects will heat up when
connected to power and ground and the heat can cause serious burns or weld
the metal object to the terminals.
Warning
Read the installation instructions before you connect the system to its power
source.
Cisco 11500 Series Content Services Switch Hardware Installation Guide
78-16421-01
1-5
Chapter 1
Unpacking and Installing the CSS
Safety Guidelines
Specifications for Cisco 11500 Series Power Supplies
Table 1-1 describes the CSS 11501, CSS 11503, and CSS 11506 AC electrical
specifications.
Table 1-1
AC Electrical Specifications
AC Specification
CSS 11501
CSS 11503
CSS 11506
Input Voltage AC
100 to 240 VAC
50 to 60 Hz
100 to 240 VAC
50 to 60 Hz
100 to 240 VAC
50 to 60 Hz
Current AC (max@
100 VAC)
1.6 Amps
5 Amps
9 Amps
Power Consumption
(maximum)
150VA
430VA
860VA
Heat Dissipation
512 BTU/hr
1468 BTU/hr
2936 BTU/hr
Table 1-2 describes the CSS 11503 and CSS 11506 DC electrical specifications.
Table 1-2
DC Electrical Specifications
DC Specification
CSS 11503
CSS 11506
Voltage DC
-48.0 to -60.0 VDC
-48.0 to -60.0 VDC
Current DC (maximum)
9 Amps
18 Amps
Power Consumption
(maximum)
430VA
860VA
Heat Dissipation
1468 BTU/hr
2936 BTU/hr
Cisco 11500 Series Content Services Switch Hardware Installation Guide
1-6
78-16421-01
Chapter 1
Unpacking and Installing the CSS
Required Tools and Equipment
Power Guidelines for DC Systems (CSS 11503 and CSS 11506)
The DC-input power supply allows the CSS 11503 and CSS 11506 to operate at
–48 VDC nominal in North America and at –48 VDC or –60 VDC in Europe.
See Table 1-2 for system power specifications, including input voltage and
operating frequency ranges.
Warning
Incorporate a readily accessible 2-poled disconnect device into the fixed
wiring.
Follow your local and national electrical codes for DC wiring.
Required Tools and Equipment
To install the CSS hardware, you need the following tools and equipment:
•
A #1 Phillips-head screwdriver
•
An anti-static wrist strap, provided in the CSS accessory kit
•
A hand lift (recommended) for lifting the CSS chassis into the equipment
rack
Once you complete the installation, you need a console terminal (or equivalent)
that runs at 9600 baud to enter console commands (refer to Chapter 2, Cabling and
Troubleshooting the CSS).
Cisco 11500 Series Content Services Switch Hardware Installation Guide
78-16421-01
1-7
Chapter 1
Unpacking and Installing the CSS
Shipment Contents
Shipment Contents
The CSS shipment contains the following items, except where noted:
•
Content Services Switch
•
Anti-static wrist strap
•
Four rubber feet (CSS 11501 and CSS 11503 only)
•
Mounting brackets and hardware (installed on the CSS 11506)
•
RJ-45 to female 25-pin sub-d connector
•
RJ-45 to female 9-pin sub-d connector
•
RJ-45 console cable
•
Cisco 11500 Series Content Services Switch Hardware Installation Guide
•
Standard software license key. If you ordered the Enhanced feature set or the
Secure Management option (which include the Secure Shell Host option and
SSL strong encryption for the Device Management software), additional
Claim Certificates will be included in the accessory kit.
Note
If you cannot locate the Standard software license key or a license key
Claim Certificate in the accessory kit, call the Cisco Licensing
department in the Technical Assistance Center at (800) 553-2447 or
email them at [email protected].
Cisco 11500 Series Content Services Switch Hardware Installation Guide
1-8
78-16421-01
Chapter 1
Unpacking and Installing the CSS
Unpacking the CSS
Unpacking the CSS
The CSS is shipped in a protective shipping carton. The CSS 11501 is shipped as
a self-contained chassis; no components can be added or removed.The CSS 11503
and CSS 11506 contains the power supply, fan unit, Switch Module (SM), Switch
Control Module (SCM), and all ordered I/O modules (IOMs) preinstalled.
This section describes:
•
Unpacking the CSS 11501
•
Unpacking the CSS 11503 or CSS 11506
•
If the Product is Damaged
Unpacking the CSS 11501
To unpack the CSS 11501:
1.
Remove the CSS 11501 accessories from the shipping carton. Save the
packing materials in case you need to repack the CSS later.
2.
Check the configuration of the CSS 11501 and the accessories against the
items listed on the packing slip. Report any discrepancies as described in “If
the Product is Damaged” section.
3.
To install the CSS 11501, go to the “Preinstallation Requirements” section.
Unpacking the CSS 11503 or CSS 11506
Due to the size and weight of a CSS 11503 or CSS 11506, move it to the
installation site before unpacking it from the shipping carton.
To unpack the CSS 11503 or CSS 11506:
1.
Remove the CSS accessories from the shipping carton. Save the packing
materials in case you need to repack the CSS later.
2.
Check the configuration of the CSS and the accessories against the items
listed on the packing slip. Report any discrepancies as described in “If the
Product is Damaged” section.
Cisco 11500 Series Content Services Switch Hardware Installation Guide
78-16421-01
1-9
Chapter 1
Unpacking and Installing the CSS
Unpacking the CSS
3.
Warning
Carefully remove the CSS from the carton.
Two people are required to lift the CSS 11506 chassis. Grasp the chassis
underneath the lower edge and lift with both hands. To prevent injury, keep your
back straight and lift with your legs, not your back. To prevent damage to the
chassis and components, never attempt to lift the chassis with the handles on
the power supplies, fan module, or on the interface processors, or by the plastic
panels on the front of the chassis. These handles were not designed to support
the weight of the chassis.
4.
To install the CSS 11503 or CSS 11506, go to the “Preinstallation
Requirements” section.
If the Product is Damaged
If any portion of the unit or component is damaged in transit, forward an
immediate request to the delivering carrier to perform an inspection of the product
and to prepare a damage report. Save the container and all packing materials until
the contents are verified.
Concurrently, report the nature and extent of the damage to Customer Service.
Report the problem or deficiency to Customer Service along with the model
number and serial number. Upon receipt of this information, you will be provided
with service instructions, or a Return Material Authorization (RMA) number and
shipping information. To obtain assistance, refer to “Preface”, the “Obtaining
Documentation” section.
Cisco 11500 Series Content Services Switch Hardware Installation Guide
1-10
78-16421-01
Chapter 1
Unpacking and Installing the CSS
Preinstallation Requirements
Preinstallation Requirements
Prior to installing the CSS, observe the following installation requirements:
•
The ambient operating temperature is 32° to 104°F (0 to 40°C).
If you install the CSS in a closed or multi-unit rack, the ambient operating
temperature of the rack environment may be greater than the room ambient
temperature. Ensure that the temperature does not exceed the CSS maximum
ambient operating temperature.
Caution
•
The minimum clearance requirement is 2 inches (10 cm) of air flow space on
both sides of the chassis.
•
Ensure that the CSS is reliably grounded to earth. Cisco Systems recommends
that you do not use power strips or extension cords to connect the CSS to the
power source.
To prevent the chassis from overheating, never install a CSS in an enclosed rack
or in a room that is not properly ventilated or air conditioned.
See the following sections for the steps to install a CSS:
•
Installing the CSS 11501
•
Installing the CSS 11503
•
Installing the CSS 11506
Cisco 11500 Series Content Services Switch Hardware Installation Guide
78-16421-01
1-11
Chapter 1
Unpacking and Installing the CSS
Installing the CSS 11501
Installing the CSS 11501
The CSS 11501 can be a freestanding unit or installed in a 19-inch equipment
rack, as described in the following sections.
Warning
Note
Do not remove the CSS 11501 cover. There are electrical shock hazards present
in the unit if the cover is removed. The fans and power supply in a CSS 11501 are
not user-serviceable or installable components.
Removing the CSS 11501 cover voids its warranty.
This section covers:
•
Installing a CSS 11501 as a Freestanding Unit
•
Installing a CSS 11501 as a Rackmounted Unit
Installing a CSS 11501 as a Freestanding Unit
To install a freestanding CSS 11501:
Note
1.
Position the CSS 11501 on the selected flat surface.
2.
Attach the rubber feet, provided in the accessory kit, to each bottom corner
of the CSS.
All cables connect to the front of the chassis with the exception of the power cord.
Cisco 11500 Series Content Services Switch Hardware Installation Guide
1-12
78-16421-01
Chapter 1
Unpacking and Installing the CSS
Installing the CSS 11501
Installing a CSS 11501 as a Rackmounted Unit
Before you begin, you need the mounting brackets and the eight Phillips screws
shipped in the accessory kit accompanying the CSS 11501, and a #2 Phillips
screwdriver.
To install the mounting brackets on the CSS 11501 chassis:
1.
Position the CSS with its front panel facing you. On the left and right sides
of its chassis, note the screw holes for installing the mounting brackets.
2.
Position a mounting bracket on one side of the chassis. Align it with the
appropriate screw holes for front-mounting.
Figure 1-1 illustrates front-mounting the mounting brackets.
Figure 1-1
Front-Mounting the Mounting Brackets on the CSS 11501
STATUS
LINK/ACT
DUPLEX
LINK DPLX
CONSOLE
LINK DPLX
LINK DPLX
LINK DPLX
LINK DPLX
LINK DPLX
LINK DPLX
PCMCIA
2
3
10/100
CISCO 115
00
LINK DPLX
CONTE
GE
4
5
6
7
10/100
LINK
NT SE
RVIC
SERIES
ES SW
ITC
H
8
78675
1
3.
Secure the mounting bracket to the CSS with four screws provided.
4.
Repeat steps 2 and 3 to install a mounting bracket on the other side of the
CSS.
You are ready to install the CSS in the rack.To install the CSS 11501 into an
equipment rack:
1.
Raise the CSS to the installation height and align the screw holes on the
mounting bracket with the holes on the equipment rack.
2.
Secure each mounting bracket to each side of the rack.
Cisco 11500 Series Content Services Switch Hardware Installation Guide
78-16421-01
1-13
Chapter 1
Unpacking and Installing the CSS
Installing the CSS 11503
Installing the CSS 11503
The CSS 11503 can be a freestanding unit or installed in a 19-inch equipment
rack, as described in the following sections.
Warning
Note
Do not remove the CSS 11503 cover. There are electrical shock hazards present
in the unit if the cover is removed. The fans and power supply in a CSS 11503 are
not user-serviceable or installable components.
Removing the CSS 11503 cover voids its warranty.
This section covers:
•
Installing a CSS 11503 as a Freestanding Unit
•
Installing a CSS 11503 as a Rackmounted Unit
Installing a CSS 11503 as a Freestanding Unit
To install a freestanding CSS 11503:
Note
1.
Position the CSS 11503 on the selected flat surface.
2.
Attach the rubber feet, provided in the accessory kit, to each bottom corner
of the CSS.
All cables connect to the front of the unit with the exception of the power cord.
Cisco 11500 Series Content Services Switch Hardware Installation Guide
1-14
78-16421-01
Chapter 1
Unpacking and Installing the CSS
Installing the CSS 11503
Installing a CSS 11503 as a Rackmounted Unit
Before you rack-mount the CSS 11503:
•
Determine if you want to front-mount or mid-mount the mounting brackets
on the CSS chassis. Refer to the location of the mounting bars in the
equipment cabinet to determine the mount position of the mounting brackets.
•
Install the mounting brackets on the CSS, as described below.
Before you begin, you need the mounting brackets and the eight Phillips screws
shipped in the accessory kit accompanying the CSS 11503, and a #1 Phillips
screwdriver.
To install the mounting brackets on the CSS chassis:
1.
Position the CSS with its front panel facing you. On the left and right sides
of its chassis, note the screw holes for installing the mounting brackets.
2.
Position a mounting bracket on one side of the chassis. Align it with the
appropriate screw holes for front- or mid-mounting.
Figure 1-2 illustrates front-mounting the mounting brackets. Figure 1-3
illustrates mid-mounting of the brackets.
Front-Mounting the Mounting Brackets on the CSS 11503
59538
Figure 1-2
MANAGEMENT
10BASE-T
DUPLEX
LINK
CISCO 115
2
3
4
CONTE
5
6
7
8
9 10
11 12
13 14
15
1
CONSOLE
LINK
LINK
DPLX
DPLX
2
3
4
5
6
7
8
NT
00 SERIES
SERVIC
ES
SWITC
H
9 10
11 12
13 14
15
LINK
LINK
DPLX
DPLX
16 Fast Ethernet
1
LINK
GE 2
SLOT 0
System Control
3
SLOT 1
CSS5-10M-16FE
2
CSS5-SCM-2GE
GE 1
1
PCMCIA
CSS5-10M-16FE
LINK/ACT
16 Fast Ethernet
STATUS
Cisco 11500 Series Content Services Switch Hardware Installation Guide
78-16421-01
1-15
Chapter 1
Unpacking and Installing the CSS
Installing the CSS 11503
Mid-Mounting the Mounting Brackets on the CSS 11503
59539
Figure 1-3
MANAGEMENT
10BASE-T
DUPLEX
LINK
2
3
CISCO 115
00
4
CONTE
5
6
7
8
9 10
11 12
13 14
15
SLOT 0
1
CONSOLE
LINK
LINK
DPLX
DPLX
2
3
4
5
6
7
8
NT
SERVIC
ES
SERIES
SWITC
H
9 10
11 12
13 14
15
LINK
LINK
DPLX
DPLX
16 Fast Ethernet
GE 2
SLOT 1
System Control
3
1
LINK
PCMCIA
CSS5-10M-16FE
2
CSS5-SCM-2GE
GE 1
1
CSS5-10M-16FE
LINK/ACT
16 Fast Ethernet
STATUS
3.
Secure the mounting bracket to the CSS with four screws provided.
4.
Repeat steps 2 and 3 to install a mounting bracket on the other side of the
CSS.
You are ready to install the CSS in the rack. Before you install the CSS 11503 into
an equipment rack, note the following:
Warning
•
Always install heavier equipment in the lower half of a rack to maintain a low
center of gravity. This practice helps prevent the rack from falling over.
•
Install rack stabilizers (if available) before you mount the chassis.
At least three people are required to mount the chassis in the equipment rack:
two people are needed to hold the chassis in place while a third person
tightens the mounting screws.
To install the CSS 11503 into an equipment rack:
1.
Raise the CSS to the installation height and align the screw holes on the
mounting bracket with the holes on the equipment rack.
2.
Secure each mounting bracket to each side of the rack.
Cisco 11500 Series Content Services Switch Hardware Installation Guide
1-16
78-16421-01
Chapter 1
Unpacking and Installing the CSS
Installing the CSS 11506
Installing the CSS 11506
The CSS 11506 must be installed in a 19-inch equipment rack. When positioning
the CSS 11506 for installation, keep in mind that all cables connect to the front of
the unit.
Before you rack-mount the CSS 11506 chassis, determine whether to front-mount
or mid-mount the CSS chassis in the rack. The mounting brackets are preinstalled
in the front-mounted position on the chassis, as shown in Figure 1-4. They are
ready for installation in the equipment cabinet, as described in the
“Rack-Mounting the CSS 11506 Chassis” section. To mid-mount the mounting
brackets to the chassis, proceed to the “Mid-Mounting the CSS 11506 Mounting
Brackets” section.
Figure 1-4
Front-Mounting Position of the CSS 11506 Mounting Brackets
CSS506-SM
CSS506-SM
MANAGEMENT
10BASE-T
CISCO 115
DUPLEX
1
LINK
GE 2
LINK
CONTE
2
3
4
5
6
7
8
PCMCIA
SLOT 1
LINK
GE 1
1
LINK
CSS5-10M-2GE
GE 2
LINK
2
3
4
5
6
7
8
DPLX
DPLX
6
PS1
PS2
PS3
7
6
7
8
00 SERIES
SERVIC
ES
SWITC
H
DPLX
9 10
11 12
13 14
15
3
4
5
8
DPLX
DPLX
9 10
11 12
13 14
15
LINK
LINK
DPLX
DPLX
AC DC
OK OK
AC DC
OK OK
59540
5
6
CSS5-10M-16FE
DPLX
AC DC
OK OK
DISCONNECT
POWER SOURCALL
BEFORE SERVICES
ING
4
5
LINK
16 Fast Ethernet
LINK
3
4
LINK
2
CSS5-10M-16FE
Gigabit Ethernet
LINK
8
2
3
9 10
11 12
13 14
15
1
CAUTION
7
1
2
CSS5-10M-16FE
LINK
STATUS
16 Fast Ethernet
CONSOLE
System Control
1
SLOT 0
NT
9 10
11 12
13 14
15
CSS5-10M-16FE
CSS5-SCM-2GE
GE 1
16 Fast Ethernet
LINK/ACT
16 Fast Ethernet
STATUS
~
100-240V
5A 50-60
Hz
~
100-240V
5A 50-60
Hz
~
100-240V
5A 50-60
Hz
This section covers:
•
Mid-Mounting the CSS 11506 Mounting Brackets
•
Rack-Mounting the CSS 11506 Chassis
Cisco 11500 Series Content Services Switch Hardware Installation Guide
78-16421-01
1-17
Chapter 1
Unpacking and Installing the CSS
Installing the CSS 11506
Mid-Mounting the CSS 11506 Mounting Brackets
To change the location of the mounting brackets on the CSS 11506 chassis from
the front-mount position to the mid-mount position:
1.
Remove the four screws securing the mounting bracket from one side of the
chassis, as shown in Figure 1-4.
2.
Move the mounting bracket to the mid-mount position on the CSS, lining up
its screw holes with the holes on the side of the chassis. See Figure 1-5.
Figure 1-5
Mid-Mounting the Mounting Brackets on the CSS 11506
59541
CSS506-SM
CSS506-SM
MANAGEMENT
10BASE-T
CISCO 115
DUPLEX
1
LINK
GE 2
LINK
CONTE
2
3
4
5
6
7
8
PCMCIA
LINK
GE 1
1
LINK
CSS5-10M-2GE
GE 2
LINK
2
3
4
5
6
7
8
DPLX
DPLX
4
5
6
PS1
PS2
PS3
6
7
6
7
8
00 SERIES
SERVIC
ES
SWITC
H
DPLX
DPLX
9 10
11 12
13 14
15
3
4
5
8
DPLX
DPLX
9 10
11 12
13 14
15
CSS5-10M-16FE
16 Fast Ethernet
LINK
5
LINK
AC DC
OK OK
3
4
LINK
2
CSS5-10M-16FE
Gigabit Ethernet
LINK
CAUTION
8
2
3
9 10
11 12
13 14
15
1
LINK
DISCONNECT
POWER SOURCALL
BEFORE SERVICES
ING
7
1
2
CSS5-10M-16FE
LINK
STATUS
16 Fast Ethernet
CONSOLE
System Control
1
SLOT 0
NT
9 10
11 12
13 14
15
SLOT 1
CSS5-10M-16FE
CSS5-SCM-2GE
GE 1
16 Fast Ethernet
LINK/ACT
LINK
16 Fast Ethernet
STATUS
DPLX
DPLX
AC DC
OK OK
AC DC
OK OK
~
100-240V
5A 50-60
Hz
~
100-240V
5A 50-60
Hz
~
100-240V
5A 50-60
Hz
3.
Using a Phillips screwdriver, secure the mounting bracket to the CSS.
4.
Repeat steps 1 through 3 to reposition the other mounting bracket on the other
side of the chassis.
To install the chassis in a rack, proceed to the “Rack-Mounting the CSS 11506
Chassis” section.
Cisco 11500 Series Content Services Switch Hardware Installation Guide
1-18
78-16421-01
Chapter 1
Unpacking and Installing the CSS
Installing a CSS Module
Rack-Mounting the CSS 11506 Chassis
You are ready to install the CSS in the rack. Before you install the CSS 11506 into
an equipment rack, note the following:
Warning
•
Always install heavier equipment in the lower half of a rack to maintain a low
center of gravity. This practice helps prevent the rack from falling over.
•
Install rack stabilizers (if available) before you mount the chassis.
At least three people are required to mount the chassis in the equipment rack:
two people are needed to hold the chassis in place while a third person
tightens the mounting screws.
To install the CSS 11506 chassis into an equipment rack:
1.
Raise the CSS to the installation height and align the screw holes on the
mounting bracket with the holes on the equipment rack.
2.
Secure each mounting bracket to each side of the rack.
Installing a CSS Module
The modules that you ordered with either the CSS 11503 or CSS 11506 chassis
are preinstalled. If you need to reseat a module, or remove and replace it, refer to
the following sections:
•
Installation Precautions and Restrictions
•
Unpacking a CSS Module
•
Installing a Module
•
Installing a Module
This information applies to the CSS modules only.
If you received an additional module at a later time, it comes with a reference
sheet providing information on the module and how to install it.
Cisco 11500 Series Content Services Switch Hardware Installation Guide
78-16421-01
1-19
Chapter 1
Unpacking and Installing the CSS
Installing a CSS Module
Installation Precautions and Restrictions
This section includes background material related to installing a module into the
CSS chassis. Cisco Systems recommends that you read the topics in this section
before installing a module.
Installation Precautions
Read and observe the following precautionary information prior to servicing the
CSS.
Caution
You must power down the CSS 11503 or 11506 chassis to install or remove a
module.
Warning
Do not remove or install modules without using appropriate anti-static guard
measures. The CSS includes an anti-static wrist strap in the accessory kit.
Attach the copper tape end of the strap to an unpainted metal surface on the
chassis. You can leave the strap connected to the chassis when you are done.
Warning
If you do not power down the CSS, an electrical energy hazard is present within
the chassis. Prior to installing or removing components, remove all metallic
objects from hands and wrists to prevent bridging of live contact points.
Cisco 11500 Series Content Services Switch Hardware Installation Guide
1-20
78-16421-01
Chapter 1
Unpacking and Installing the CSS
Installing a CSS Module
Module Slot Restrictions
Prior to installing a module in a CSS, see Table 1-3 and Table 1-4 for information
on chassis slot restrictions in the CSS 11503 and CSS 11506. I/O modules include
the Fast Ethernet Module (FEM), Gigabit Ethernet Module (GEM), Session
Accelerator Module (SAM), and Secure Socket Layer (SSL) module.
Table 1-3
CSS 11503 Chassis Slot Restriction
Slot Number
Slot Usage
1
Initial active Switch Control Module (SCM)
2
I/O module
3
I/O module
Table 1-4
CSS 11506 Chassis Slot Restriction
Slot Number
Slot Usage
1
Initial active Switch Control Module (SCM)
2
Initial passive SCM or I/O module
3
I/O module
4
I/O module
5
I/O module
6
I/O module
Cisco 11500 Series Content Services Switch Hardware Installation Guide
78-16421-01
1-21
Chapter 1
Unpacking and Installing the CSS
Installing a CSS Module
Figure 1-6 illustrates a fully-configured CSS 11503 and its slot locations.
Figure 1-6
Fully-Configured CSS 11503
MANAGEMENT
10BASE-T
DUPLEX
LINK
CISCO 115
2
3
4
CONTE
5
6
7
8
9 10
11 12
13 14
15
1
CONSOLE
LINK
LINK
DPLX
DPLX
3
4
5
6
7
8
NT
00 SERIES
SERVIC
ES
SWITC
H
9 10
11 12
13 14
15
CSS5-10M-16FE
SLOT 0
2
59549
GE 2
SLOT 1
System Control
3
1
LINK
PCMCIA
CSS5-10M-16FE
2
CSS5-SCM-2GE
GE 1
1
LINK
LINK
DPLX
DPLX
16 Fast Ethernet
LINK/ACT
16 Fast Ethernet
STATUS
1
2
1
Slot location 1
2
Slot location 2
3
3
Slot location 3
Cisco 11500 Series Content Services Switch Hardware Installation Guide
1-22
78-16421-01
Chapter 1
Unpacking and Installing the CSS
Installing a CSS Module
Figure 1-7 illustrates a fully-configured CSS 11506 and its slot locations.
Figure 1-7
Fully-Configured CSS 11506
1
2
3
CSS506-SM
CSS506-SM
MANAGEMENT
10BASE-T
CISCO 115
DUPLEX
1
LINK
GE 2
LINK
CONTE
2
3
4
5
6
7
8
PCMCIA
LINK
GE 1
1
LINK
CSS5-10M-2GE
GE 2
LINK
2
3
4
5
6
7
8
DPLX
DPLX
6
PS1
PS2
PS3
6
7
6
7
8
ES
SWITC
H
DPLX
DPLX
9 10
11 12
13 14
15
3
4
5
DPLX
DPLX
8
9 10
11 12
13 14
15
LINK
LINK
DPLX
DPLX
AC DC
OK OK
AC DC
OK OK
59550
3
5
00 SERIES
SERVIC
CSS5-10M-16FE
16 Fast Ethernet
LINK
5
LINK
AC DC
OK OK
8
2
4
LINK
2
CSS5-10M-16FE
Gigabit Ethernet
CAUTION
DISCONNECT
POWER SOURCALL
BEFORE SERVICES
ING
4
3
9 10
11 12
13 14
15
1
LINK
7
1
2
CSS5-10M-16FE
LINK
STATUS
16 Fast Ethernet
CONSOLE
System Control
1
SLOT 0
NT
9 10
11 12
13 14
15
SLOT 1
CSS5-10M-16FE
CSS5-SCM-2GE
GE 1
16 Fast Ethernet
LINK/ACT
16 Fast Ethernet
STATUS
~
100-240V
5A 50-60
Hz
~
100-240V
5A 50-60
Hz
~
100-240V
5A 50-60
Hz
4
5
6
1
Slot location 1
4
Slot location 4
2
Slot location 2
5
Slot location 5
3
Slot location 3
6
Slot location 6
Cisco 11500 Series Content Services Switch Hardware Installation Guide
78-16421-01
1-23
Chapter 1
Unpacking and Installing the CSS
Installing a CSS Module
Unpacking a CSS Module
To unpack a CSS module:
1.
Verify that the module is the model you ordered by checking the model
number listed on the side of the shipping carton.
2.
Remove the module from the shipping carton, leaving it in its anti-static bag.
3.
Put on the anti-static strap provided with your CSS. For example, wear the
anti-static wrist strap (included in the accessory kit) and stick the copper-tape
end of the strap to an unpainted metal surface on the chassis. Make sure that
the wrist strap makes good contact with your skin.
4.
Remove the module from the anti-static shielding bag and inspect it for
damage.
Always hold the module by the faceplate, being careful not to touch the
components. If the module appears to be damaged, return it to the anti-static
bag, repack it in the shipping carton, and contact your local supplier.
5.
To install a module into the CSS chassis, see the “Installing a Module”
section.
Installing a Module
Caution
You must power down the CSS before installing or removing a Switch Module in
a CSS 11506.
Cisco 11500 Series Content Services Switch Hardware Installation Guide
1-24
78-16421-01
Chapter 1
Unpacking and Installing the CSS
Installing a CSS Module
To install a module:
1.
Properly ground yourself prior to handling the module. For example, wear the
anti-static wrist strap (included in the accessory kit) and stick the copper-tape
end of the strap to an unpainted metal surface on the chassis. Make sure that
the wrist strap makes good contact with your skin.
2.
If the CSS is powered up, power it down.
3.
Locate an open slot in the chassis for the module. See Table 1-3 to identify
possible slots for the module. If necessary, use a #1 Phillips screwdriver to
remove a blank panel from the chassis to expose a slot for the module.
4.
Insert the module into the board guides at the left and right of the slot. Make
sure that the ejectors are fully extended outward. Slide the module into the
chassis by pressing firmly at the left and right of the faceplate as shown in
Figure 1-8.
Figure 1-8
Installing a Module into a CSS Chassis
CISCO 11
1
CONTE
NT
500 SERIES
SERVIC
ES
9 10
11 12
13 14
15
4
5
6
7
8
2
CSS5-10M-16FE
DPLX
LINK
LINK
9 10
11 12
13 14
15
DPLX
DPLX
59542
3
DPLX
H
16 Fast Ethernet
2
16 Fast Ethernet
1
SWITC
1
Spring-loaded screw (one on
each side)
2
5.
Close both ejectors simultaneously to seat the module connector into the
backplane.
6.
Using a Phillips screwdriver, tighten the spring-loaded screws on the front of
the module faceplate.
7.
Reboot the chassis to activate the module.
Ejector (one on each side), extend
outward during insertion
Cisco 11500 Series Content Services Switch Hardware Installation Guide
78-16421-01
1-25
Chapter 1
Unpacking and Installing the CSS
Installing a CSS Module
Installing a Passive SCM in a CSS 11506
You can install a passive SCM in a CSS 11506 chassis. A passive module is a
stand-by module in case of an active module failure. As implemented in
WebNS 5.10 and greater, if the active SCM fails:
Note
1.
The CSS reboots and connections are terminated.
2.
The CSS restores all configurations using the startup-config file.
3.
The passive SCM becomes active automatically.
Passive modules do not load share processing functions with the active module.
To install a passive SCM:
1.
Properly ground yourself prior to handling the module.
2.
As defined in Table 1-3, SCMs are restricted to slots 1 or 2.
3.
If the CSS is powered up, power it down.
4.
If necessary, remove a blank panel from the chassis to expose the slot.
5.
Insert the module into the board guides at the left and right of the slot and
slide it into the chassis by pressing firmly at the left and right of the faceplate.
6.
Extend both ejectors simultaneously to seat the module connector into the
backplane.
7.
Using a Phillips screwdriver, tighten the spring-loaded screws on the front of
the module faceplate.
Cisco 11500 Series Content Services Switch Hardware Installation Guide
1-26
78-16421-01
Chapter 1
Unpacking and Installing the CSS
Installing a CSS Module
8.
Optionally, you can install the PCMCIA cover to the front of the disk slots
and secure it with its two spring-loaded screws, as shown in Figure 1-9. The
cover protects the disks in the SCM.
Figure 1-9
Installing a PCMCIA Cover on an SCM
MANAGEM
ENT
10BASE-T
DUPLEX
CSS5-SCM-2GE
GE 1
GE 2
PCMCIA
LINK
SLOT 1
SLOT 0
9.
LINK
CONSOLE
59602
LINK/ACT
System Control
STATUS
Reboot the CSS to initialize the passive SCM.
10. To copy the boot configuration from the active SCM to the passive SCM, use
the passive sync command in boot configuration mode. For more
information, refer to the Cisco Content Services Switch Administration
Guide.
Cisco 11500 Series Content Services Switch Hardware Installation Guide
78-16421-01
1-27
Chapter 1
Unpacking and Installing the CSS
Installing a CSS Module
Cisco 11500 Series Content Services Switch Hardware Installation Guide
1-28
78-16421-01
C H A P T E R
2
Cabling and Troubleshooting the CSS
This chapter describes the CSS 11501 integrated platform and the CSS 11503 and
CSS 11506 modular platforms, including LEDs and connectors. This chapter also
provides instructions for connecting the console, powering the CSS, and
troubleshooting the CSS console, modules, and power supply. The information in
this chapter applies to the CSS 11501, CSS 11503, and CSS 11506, except where
noted.
This chapter contains the following sections:
•
Cabling the CSS 11501
•
Cabling the CSS 11503 and CSS 11506 Modules
•
Connecting the Console
•
Connecting the Chassis to Ground
•
Connecting the Power Cord
•
Powering Up the CSS
•
Powering Down the CSS
•
Troubleshooting the CSS Hardware Components
Cisco 11500 Series Content Services Switch Hardware Installation Guide
78-16421-01
2-1
Chapter 2
Cabling and Troubleshooting the CSS
Cabling the CSS 11501
Cabling the CSS 11501
A CSS 11501 is a fully integrated platform, delivering transport and application
(layers 4-7) services for Internet and Intranet data centers. The CSS 11501 is a
single-rack-unit, with 6-Gbps aggregate throughput. The integrated components
in the CSS 11501 contribute to the overall processing and memory needs for flow
set up and flow forwarding.
The fully integrated CSS 11501 is responsible for the following functions:
•
System powerup and boot control
•
Centralized routing table management
•
System-wide connection management
•
An interface to an external Network Management Station
•
Disk management
•
An external RS-232 interface
The CSS 11501 configuration supports:
•
288 MB RAM memory (256 MB of usable memory)
•
Two PCMCIA slots for a hard or flash disk drive for the system software, and
logging and off-line system files. A cover is preinstalled over the slots.
•
RJ-45 RS-232 Console port
•
RJ-45 10-Mbps half-duplex Ethernet management connector
•
RJ-45 RS-232 Diag connector (reserved for field service diagnostic use only).
•
Eight auto-sensing 10/100-Mbps Ethernet (10BASE-T/100BASE-TX) interfaces
•
Optional integrated Secure Sockets Layer (SSL) termination
Cisco 11500 Series Content Services Switch Hardware Installation Guide
2-2
78-16421-01
Chapter 2
Cabling and Troubleshooting the CSS
Cabling the CSS 11501
•
1000-Mbps Ethernet small form-factor pluggable gigabit interface converters
(SFP GBICs); 1000BASE-SX or LX with LC-type connectors, or
1000BASE-T with RJ-45 connectors.
The CSS can use the following SFP GBIC with LC-type connectors:
– Long-wavelength SFP GBICs (CSS5-GBIC-LX). The longwave length
transceiver (1000BASE-LX) can reach 1,804.4 ft. (550 m) for all
multimode media types. For single-mode fiber, the distance is 16,404 ft.
(5,000 m).
– Short-wavelength SFP GBICs (CSS5-GBIC-SX). The transceiver
distance can reach from 721.8 ft. ( 220 m) to 1,640.4 ft. (500 m),
depending on the quality of the fiber.
The 1000BASE-T SFP GBIC on a CSS supports 1000 Mbps full-duplex
operation only and uses standard four twisted-pair, Category 5e cable at
lengths up to 328.08 ft.(100 m).
Warning
Because invisible radiation may be emitted from the aperture of the port when
no fiber cable is connected, avoid exposure to radiation and do not stare into
open apertures.
The CSS 11501 front panel LEDs indicate chassis and configuration status:
•
Two status module LEDs indicating power and device readiness
•
Link/Act and Duplex LEDs for the Ethernet Management port
•
Link/Act and Duplex LEDs for each Ethernet port
•
Link/Act LED for the SFP GBIC
Cisco 11500 Series Content Services Switch Hardware Installation Guide
78-16421-01
2-3
Chapter 2
Cabling and Troubleshooting the CSS
Cabling the CSS 11501
CSS 11501 Connectors and LEDs
The CSS 11501 has all connectors and LEDs on the chassis front panel. Figure 2-1
illustrates the connectors and LEDs on the CSS 11501.For information on the
connector pinouts, refer to Appendix B, Cable Connector Pinouts.
Figure 2-1
CSS 11501 Connectors and LEDs
6
2
4
1
3
5b
7
8
STATUS
DUPLEX
LINK DPLX
LINK DPLX
LINK DPLX
LINK DPLX
LINK DPLX
LINK DPLX
LINK DPLX
PCMCIA
1
10
11
5a
2
3
10/100
CISCO 1150
0
LINK DPLX
CONTE
GE
4
5
6
7
10/100
LINK
NT
S E RV I C
ES
78930
LINK/ACT
CONSOLE
SERIES
SWITC
H
8
9
1
Bicolor status LED
(green and red)
6
RJ-45 Ethernet
10BASE-T/100BASE-TX
connectors 1 through 81
2
Amber status LED
7
SFP GBIC (optional)
3
RJ-45 RS-232 Console connector
8
Link LED for SFP GBIC
4
10-Mbps half-duplex Ethernet
management connector
9
RJ-45 RS-232 Diag connector for
field service diagnostic use only.
(A connector cover is provided.
Removing the cover voids the
warranty.)
5a PCMCIA slot 0 containing a flash 10 PCMCIA slot cover
or hard disk
5b PCMCIA slot 1 (shown empty) for 11 Recessed button (reserved for field
optional installation of a second
service use only)
flash or hard disk
1. The Ethernet Link/Act LED and Duplex LED are located at the top of each RJ-45 Ethernet
connector and are not visible in this illustration.
Cisco 11500 Series Content Services Switch Hardware Installation Guide
2-4
78-16421-01
Chapter 2
Cabling and Troubleshooting the CSS
Cabling the CSS 11501
Table 2-1 describes the CSS 11501 LEDs and their indications.
Table 2-1
CSS 11501 LED Descriptions
LED Name
Color
State
Indicates
Status (left)
Green
Solid
The CSS 11501 is ready.
Variable
blink
Disk activity is occurring.
Slow blink The CSS 11501 failed.
Red
Solid
The CSS 11501 failed the
power-up self test during the boot
process.
Slow blink The CSS 11501 failed.
Status (right)
No color Off
The CSS 11501 failed and has no
power.
Amber
The CSS 11501 is running
power-up self test.
Fast blink
Slow blink The CSS 11501 is offline and
active.
Link/Act
for the Ethernet
Management Port
Green
Duplex
for Ethernet
Management Port
Green
Link/Act
for Ethernet Port
Green
Off
See the left status LED for
indication.
Off
There is no link.
On
The link is established but there is
no activity.
Blinking
The link is established with
transmit or receive activity.
Off
Port is operating at half duplex.
On
Port is operating at full duplex.
Off
No link established.
On
Link established but no activity.
Blinking
Link established with transmit or
receive activity.
Cisco 11500 Series Content Services Switch Hardware Installation Guide
78-16421-01
2-5
Chapter 2
Cabling and Troubleshooting the CSS
Cabling the CSS 11503 and CSS 11506 Modules
Table 2-1
CSS 11501 LED Descriptions (continued)
LED Name
Color
State
Indicates
Duplex
for Ethernet Port
Green
Off
Port is operating at half duplex.
On
Port is operating at full duplex.
Link /Act
for the Gigabit
Ethernet Port
Green
Off
There is no link.
On
The link exists and
synchronization is achieved.
Blinking
The link is established with
transmit or receive activity.
Cabling the CSS 11503 and CSS 11506 Modules
The CSS 11503 and CSS 11506 modules have connectors and LEDs on their front
panels. The following sections describe:
•
CSS 11503 and CSS 11506 Module Overview
•
Switch Control Module Connectors and LEDs
•
Fast Ethernet Module Connectors and LEDs
•
Gigabit Ethernet Module Connectors and LEDs
•
Session Accelerator Module LEDs
•
Secure Socket Layer (SSL) Module LEDs
For information on the connector pinouts, refer to Appendix B, Cable Connector
Pinouts.
If you encounter problems with the modules in the CSS 11503 and CSS 11506,
see the “Troubleshooting the CSS Modules” section later in this chapter.
Cisco 11500 Series Content Services Switch Hardware Installation Guide
2-6
78-16421-01
Chapter 2
Cabling and Troubleshooting the CSS
Cabling the CSS 11503 and CSS 11506 Modules
CSS 11503 and CSS 11506 Module Overview
The CSS 11503 and CSS 11506 are compact modular platforms, delivering
transport and application (layers 4-7) services for Internet and Intranet data
centers. A CSS is a fully-distributed architecture with all modules in the system
contributing to the overall processing and memory needs for flow set up.
Performance increases incrementally as you add modules, and the modules
balance the overall traffic load.
•
The Cisco 11506 is a five-rack unit, supporting six-slots, with 40-Gbps
aggregate throughput. The CSS 11506 requires at least one Switch Control
Module (SCM) and may be configured with a second SCM in standby mode
for redundancy. With the required SCM in one slot, the CSS 11506 has five
additional slots supporting any combination of I/O modules.
•
The Cisco 11503 is a two-rack-unit, supporting three-slots, with 20-Gbps
aggregate throughput. The CSS 11503 requires an SCM and accommodates
any two of the other modules.
Though all modules except for the SSL module participate in flow setup, they
differ primarily in control functions, performance, and I/O. Each CSS 11500
module consists of one high-speed MIPS RISC processor for flow-setup, one
network processor for flow forwarding, one policy co-processor for search
operations and a maximum of 288 MB of RDRAM (up to 256 MB of usable
memory).
The CSS 11506 not only supports redundancy in SCMs but also supports
redundant power supplies and redundant Switch Modules (20 Gbps each). A CSS
11506 can contain a maximum of three power supplies, but it requires two
functioning power supplies to guarantee service.
The CSS modules are as follows:
•
288 MB (256 MB of usable memory) Switch Control Module (SCM) with:
– Two 1000-Mbps Ethernet small form-factor pluggable gigabit interface
converters (SFP GBICs); 1000BASE-SX or LX with LC-type
connectors, or 1000BASE-T with RJ-45 connectors.
– Two PCMCIA slots for a hard or flash disk drive for the system software,
and logging and off-line system files.
– RJ-45 RS-232 console port.
– 1 RJ-45 10-Mbps half-duplex Ethernet management connector.
Cisco 11500 Series Content Services Switch Hardware Installation Guide
78-16421-01
2-7
Chapter 2
Cabling and Troubleshooting the CSS
Cabling the CSS 11503 and CSS 11506 Modules
•
Switch Module (SM). An SM provides connectivity among the SCM and
IOMs.
– The CSS 11503 has a single integrated SM. A single SM has an aggregate
throughput of 20 Gbps.
– The CSS 11506 has two removable SMs that share the switching
functions. Two SMs provide 40 Gbps aggregate throughput. As
implemented in WebNS 5.10 and greater, if one SM fails, the CSS
reboots and continues to operate through the other SM.
•
Two slots in the CSS 11503 and five slots in the CSS 11506 are configurable
with:
– Fast Ethernet Modules that provide either 8 or 16 auto-sensing
10/100-Mbps Ethernet (10BASE-T/100BASE-TX) RJ-45 ports.
– Gigabit Ethernet Modules that provide up to two 1000-Mbps Ethernet
SFP GBICs; 1000BASE-SX or LX with LC-type connectors, or
1000BASE-T with RJ-45 connectors.
– A Session Accelerator Module (SAM) that provides a cost-effective way
to add flow performance when additional connectivity is not required.
Using the same flow setup and forwarding processors as the I/O modules,
it provides the flexibility to optimize the CSS for port density and
performance.
– A Secure Socket Layer (SSL) module that functions as an SSL server by
adding security services between the Web browsers (the client) and
HTTP servers and backend SSL servers. The SSL module is responsible
for all user authentication, public/private key generation, certificate
management, and packet encryption and decryption functions between
the client and the server. Each SSL module terminates SSL connections
received from a client. The CSS 11503 supports a maximum of two SSL
modules and the CSS 11506 supports a maximum of four SSL modules. For
information on SSL commands and functions, refer to the Cisco Content
Services Switch SSL Configuration Guide.
– An additional SCM to serve as a passive redundant module.
Cisco 11500 Series Content Services Switch Hardware Installation Guide
2-8
78-16421-01
Chapter 2
Cabling and Troubleshooting the CSS
Cabling the CSS 11503 and CSS 11506 Modules
Figure 2-2 illustrates a fully-configured CSS 11503 and its components.
Figure 2-2
CSS 11503 Content Services Switch
DUPLEX
1
LINK
GE 2
LINK
2
3
CISCO 115
00
4
CONTE
5
6
7
8
9 10
11 12
13 14
15
SLOT 1
1
LINK
LINK
DPLX
DPLX
2
3
4
5
6
7
8
NT
SERVIC
ES
SERIES
SWITC
H
9 10
11 12
13 14
15
CSS5-10M-16FE
CONSOLE
16 Fast Ethernet
SLOT 0
System Control
3
CSS5-10M-16FE
2
CSS5-SCM-2GE
GE 1
1
LINK
LINK
DPLX
DPLX
16 Fast Ethernet
LINK/ACT
PCMCIA
59549
MANAGEMENT
10BASE-T
STATUS
1
2
3
1
Slot 1 for the SCM only
2
Slot 2 for an I/O module
3
Slot 3 for an I/O module
Cisco 11500 Series Content Services Switch Hardware Installation Guide
78-16421-01
2-9
Chapter 2
Cabling and Troubleshooting the CSS
Cabling the CSS 11503 and CSS 11506 Modules
Figure 2-3 illustrates a fully-configured CSS 11506 and its components.
Figure 2-3
CSS 11506 Content Services Switch
2
4
3
5
CSS506-SM
CSS506-SM
MANAGEMENT
10BASE-T
CISCO 115
DUPLEX
LINK
CONTE
3
4
5
6
7
8
1
LINK
STATUS
LINK
GE 1
1
LINK
CSS5-10M-2GE
GE 2
LINK
2
3
4
5
6
7
8
DPLX
DPLX
4
5
6
PS1
PS2
PS3
6
7
6
7
8
00 SERIES
SERVIC
ES
SWITC
H
DPLX
DPLX
9 10
11 12
13 14
15
3
4
5
8
DPLX
DPLX
9 10
11 12
13 14
15
CSS5-10M-16FE
16 Fast Ethernet
LINK
5
LINK
AC DC
OK OK
3
4
LINK
2
CSS5-10M-16FE
Gigabit Ethernet
LINK
CAUTION
8
2
3
9 10
11 12
13 14
15
1
LINK
DISCONNECT
POWER SOURCALL
BEFORE SERVICES
ING
7
1
2
CSS5-10M-16FE
CONSOLE
16 Fast Ethernet
SLOT 0
NT
9 10
11 12
13 14
15
SLOT 1
LINK
DPLX
DPLX
AC DC
OK OK
AC DC
OK OK
59527
GE 2
2
PCMCIA
System Control
1
1
LINK
CSS5-10M-16FE
CSS5-SCM-2GE
GE 1
16 Fast Ethernet
LINK/ACT
16 Fast Ethernet
STATUS
~
100-240V
5A 50-60
Hz
~
100-240V
5A 50-60
Hz
~
100-240V
5A 50-60
Hz
6
1
Fan module
4
Slot 2 for an SCM or I/O module
2
Slot 1 for the SCM
5
Slot 61
3
Switch Modules in slots 7 and 8
6
Power supplies 1, 2, and 3
1. Slots 3 through 6 are for I/O modules, including SAMs and SSL modules.
Cisco 11500 Series Content Services Switch Hardware Installation Guide
2-10
78-16421-01
Chapter 2
Cabling and Troubleshooting the CSS
Cabling the CSS 11503 and CSS 11506 Modules
Switch Control Module Connectors and LEDs
The Switch Control Module (SCM), model CSS5-SCM-2GE, provides master
control and is responsible for the following functions:
•
System powerup and boot control
•
Centralized routing table management
•
System-wide connection management
•
An interface to an external Network Management Station
•
Disk management
•
An external RS-232 interface
A CSS supports a maximum of two SCMs, one active and one passive.
The Switch Control Module contains the following connectors and slots:
•
1 RJ-45 10-Mbps half-duplex Ethernet management connector.
•
1 RJ-45 RS-232 Console connector.
•
1 RJ-45 RS-232 Diag connector (reserved for field service diagnostic use
only).
Cisco 11500 Series Content Services Switch Hardware Installation Guide
78-16421-01
2-11
Chapter 2
Cabling and Troubleshooting the CSS
Cabling the CSS 11503 and CSS 11506 Modules
•
2 SFP GBICs; 1000BASE-SX or LX with LC-type connectors, or
1000BASE-T with RJ-45 connectors.
The SCM can use the following GBICs with LC-type connectors:
– Long-wavelength SFP GBICs (CSS5-GBIC-LX). The longwave length
transceiver (1000BASE-LX) can reach 1,804.4 ft. (550 m) for all
multimode media types. For single-mode fiber, the distance is 16,404 ft.
(5,000 m).
– Short-wavelength SFP GBICs (CSS5-GBIC-SX). The transceiver
distance can reach from 721.8 ft. ( 220 m) to 1,640.4 ft. (500 m),
depending on the quality of the fiber.
Warning
Because invisible radiation may be emitted from the aperture of the port when
no fiber cable is connected, avoid exposure to radiation and do not stare into
open apertures.
The 1000BASE-T SFP GBIC on a CSS supports 1000 Mbps full-duplex
operation only and uses standard four twisted-pair, Category 5e cable at
lengths up to 328.08 ft. (100 m).
•
Note
Two PCMCIA slots for a hard disk or flash disk. A cover is preinstalled over
the slots.
The SCM can have a maximum of two disk drives.
The SCM front panel LEDs indicate module and configuration status:
•
Two status module LEDs indicating power and module readiness
•
Link/Act and Duplex LEDs for the Ethernet management port
•
Link LEDs for each SFP GBIC
Cisco 11500 Series Content Services Switch Hardware Installation Guide
2-12
78-16421-01
Chapter 2
Cabling and Troubleshooting the CSS
Cabling the CSS 11503 and CSS 11506 Modules
Figure 2-4 illustrates the SCM front panel connectors, PCMCIA slots, and LEDs.
Figure 2-4
Switch Control Module Connectors and LEDs
4
3
6
5
7
11b
MANAGEM
ENT
10BASE-T
GE 1
CSS5-SCM-2GE
1
DUPLEX
LINK
GE 2
PCMCIA
8
SLOT 1
SLOT 0
10
9
LINK
12
CONSOLE
78993
2
LINK/ACT
System Control
STATUS
11a
1
10-Mbps half-duplex Ethernet
management connector
8
RJ-45 RS-232 Console connector
2
Bicolor status LED (green and
red)
9
RJ-45 RS-232 Diag connector for
field service diagnostic use only.
(A connector cover is provided.
Removing the cover voids the
warranty.)
3
Amber status LED
10
PCMCIA slot cover
4
Link/Act LED
11a
PCMCIA slot 0 containing a flash
or hard disk
5
Duplex LED
11b
PCMCIA slot 1 (shown empty) for
optional installation of a second
flash or hard disk
6
SFP GBIC (one of two)
12
7
Link LED for the associated
SFP GBIC on the left
Recessed button (reserved for field
service use only)
Cisco 11500 Series Content Services Switch Hardware Installation Guide
78-16421-01
2-13
Chapter 2
Cabling and Troubleshooting the CSS
Cabling the CSS 11503 and CSS 11506 Modules
Table 2-2 describes the SCM LEDs and their indications.
Table 2-2
Switch Control Module LED Descriptions
LED Name
Color
State
Indicates
Status (left)
Green
Solid
The module is ready.
Variable
blink
Disk activity is occurring.
Slow blink Another CSS module failed.
Red
Solid
The module failed the power-up
self test during the boot process.
Slow blink The module failed.
Status (right)
No color Off
The module failed and has no
power.
Amber
The module is running power-up
self test.
Fast blink
Slow blink The module is offline and active.
Link/Act
for the Ethernet
Management Port
Link
for each Gigabit
Ethernet Port
Green
Green
Solid
The module is online and not
active (passive SCM).
Off
See the left status LED for
indication.
Off
There is no link.
On
The link is established but there is
no activity.
Blinking
The link is established with
transmit or receive activity.
Off
There is no link.
On
The link exists and
synchronization is achieved.
Blinking
The link is established with
transmit or receive activity.
Cisco 11500 Series Content Services Switch Hardware Installation Guide
2-14
78-16421-01
Chapter 2
Cabling and Troubleshooting the CSS
Cabling the CSS 11503 and CSS 11506 Modules
Fast Ethernet Module Connectors and LEDs
The FEM is available in two models:
•
Model CSS5-IOM-8FE contains 8 auto-sensing RJ-45 Fast Ethernet
10/100-Mbps 10BASE-T/100BASE-TX connectors.
•
Model CSS5-IOM-16FE contains 16 auto-sensing RJ-45 Fast Ethernet
10/100-Mbps 10BASE-T/100BASE-TX connectors.
Each connector has Link and Duplex LEDs. The LEDs indicate the module and
network status. Figure 2-5 illustrates the LEDs and connectors on the 8-port FEM.
Figure 2-5
8-Port Fast Ethernet Module Connectors and LEDs
2
3
4
LINK
LINK
5
6
7
5
8
DPLX
8 Fast Ethernet
1
2
CSS5-10M-8FE
1
4
DPLX
3
2
59534
3
6
1
RJ-45 Ethernet
10BASE-T/100BASE-TX
connector 1 (connector 2 is
shown directly above it)
4
RJ-45 Ethernet
10BASE-T/100BASE-TX connector
8 (connector 7 is shown directly
below it)
2
Link LED (on each connector)
5
Spring-loaded screw (one of two)
3
Duplex LED (on each
connector)
6
Ejector (one of two)
Cisco 11500 Series Content Services Switch Hardware Installation Guide
78-16421-01
2-15
Chapter 2
Cabling and Troubleshooting the CSS
Cabling the CSS 11503 and CSS 11506 Modules
Figure 2-6 illustrates the LEDs and connectors on the 16-port FEM.
Figure 2-6
16-Port Fast Ethernet Module Connectors and LEDs
2
3
3
4
5
6
7
8
9 10
11 12
13 14
15
5
LINK
DPLX
DPLX
3
2
59533
LINK
16 Fast Ethernet
1
2
CSS5-10M-16FE
1
4
6
4
1
RJ-45 Ethernet
10BASE-T/100BASE-TX
connector 1 (connector 2 is
shown directly above it)
2
Link LED (on each connector) 5
3
Duplex LED (on each
connector)
6
RJ-45 Ethernet
10BASE-T/100BASE-TX connector
16 (connector 15 is shown directly
below it)
Spring-loaded screw (one of two)
Ejector (one of two)
Cisco 11500 Series Content Services Switch Hardware Installation Guide
2-16
78-16421-01
Chapter 2
Cabling and Troubleshooting the CSS
Cabling the CSS 11503 and CSS 11506 Modules
Table 2-3 describes the FEM LEDs and their indications.
Table 2-3
LED Name
Color
State
Indicates
Link
Green
Off
No link established
On
Link established but no activity
Blinking
Link established with transmit or receive
activity
Off
Port is operating at half duplex
On
Port is operating at full duplex
Duplex
Note
Fast Ethernet Module LED Descriptions
Green
If all of the FEM Link and Duplex LEDs blink synchronously, the module has
failed.
Gigabit Ethernet Module Connectors and LEDs
The Gigabit Ethernet Module (GEM), model CSS5-IOM-2GE, contains two
1000-Mbps SFP GBICs; 1000BASE-SX or LX with LC-type connectors, or
1000BASE-T with RJ-45 connectors.
The GEM can use the following GBICs with LC-type connectors:
Warning
•
Long-wavelength SFP GBICs (CSS5-GBIC-LX). The longwave length
transceiver (1000BASE-LX) can reach 1,804.4 ft. (550 m) for all multimode
media types. For single-mode fiber, the distance is 16,404 ft. (5,000 m).
•
Short-wavelength SFP GBICs (CSS5-GBIC-SX). The transceiver distance
can reach from 721.8 ft. ( 220 m) to 1,640.4 ft. (500 m), depending on the
quality of the fiber.
Because invisible radiation may be emitted from the aperture of the port when
no fiber cable is connected, avoid exposure to radiation and do not stare into
open apertures.
Cisco 11500 Series Content Services Switch Hardware Installation Guide
78-16421-01
2-17
Chapter 2
Cabling and Troubleshooting the CSS
Cabling the CSS 11503 and CSS 11506 Modules
The 1000BASE-T SFP GBIC on a CSS supports 1000 Mbps full-duplex operation
only and uses standard four twisted-pair, Category 5e cable at lengths up to
328.08 ft. (100 m).
The GEM front panel LEDs indicate the network status for each of the connectors
(Link LEDs). Figure 2-7 illustrates the LEDs and connectors on a GEM.
Figure 2-7
Gigabit Ethernet Module Connectors and LEDs
3
2
4
4
5
STATUS
LINK
GE 2
LINK
2 Gigabit Ethernet
CSS5-10M-2GE
GE 1
59535
1
6
1
Bicolor status LED (green and
red)
4
Link LED (next to its
corresponding SFP GBIC)
2
Amber status LED
5
Spring-loaded screw (one of two)
3
SFP GBIC (one of two)
6
Ejector (one of two)
Cisco 11500 Series Content Services Switch Hardware Installation Guide
2-18
78-16421-01
Chapter 2
Cabling and Troubleshooting the CSS
Cabling the CSS 11503 and CSS 11506 Modules
Table 2-4 describes the GEM LEDs.
Table 2-4
Gigabit Ethernet Module LED Descriptions
LED Name
Color
State
Indicates
Status (left)
Green
Solid
The module is ready.
Red
Solid
The module failed the power-up self
test during the boot process.
Slow blink
The module failed.
Status (right)
Link
No color Off
The module failed and has no power.
Amber
Fast blink
The module is running power-up self
test.
Slow blink
The module is offline and active.
Solid
The module is online and not active.
Off
See the left status LED for indication.
Off
There is no link.
On
The link exists and synchronization is
achieved.
Blinking
The link is established with transmit
or receive activity.
Green
Cisco 11500 Series Content Services Switch Hardware Installation Guide
78-16421-01
2-19
Chapter 2
Cabling and Troubleshooting the CSS
Cabling the CSS 11503 and CSS 11506 Modules
Session Accelerator Module LEDs
The Session Accelerator Module (SAM), model CSS5-SAM, is used with the
SCM to provide additional processing support for session setup. The SAM front
panel LEDs indicate its operational status. The SAM has no connectors.
Figure 2-8 illustrates the SAM front panel LEDs.
Figure 2-8
Session Accelerator Module LEDs
2
3
Session Accelerator
CSS5-SAM
59537
STATUS
1
4
1
Bicolor status LED (green and red) 3
2
Amber status LED
4
Spring-loaded screw (one of two)
Ejector (one of two)
Cisco 11500 Series Content Services Switch Hardware Installation Guide
2-20
78-16421-01
Chapter 2
Cabling and Troubleshooting the CSS
Cabling the CSS 11503 and CSS 11506 Modules
Table 2-5 describes the LEDs.
Table 2-5
Session Accelerator Module LED Descriptions
LED Name
Color
State
Indicates
Status
(left)
Green
Solid
The module is ready.
Red
Solid
The module failed the power-up self test
during the boot process.
Slow blink
The module failed.
No color
Off
The module failed and has no power.
Amber
Fast blink
The module is running power-up self test.
Slow blink
The module is offline and active.
Solid
The module is online and not active.
Off
See the left status LED for indication.
Status
(right)
Secure Socket Layer (SSL) Module LEDs
The Secure Socket Layer (SSL) module, model CSS5-SSL-K9, operates as an
SSL server by adding security services between Web browsers (the client) and
HTTP servers. The SSL module is responsible for all user authentication,
public/private key generation, certificate management, and packet encryption and
decryption functions between the client and the server. Each SSL module
terminates SSL connections received from a client.
The front panel LEDs on the module indicate its operational status. The SSL
module has no connectors.
The CSS 11503 supports a maximum of two SSL modules and the CSS 11506
supports a maximum of four SSL modules.
Cisco 11500 Series Content Services Switch Hardware Installation Guide
78-16421-01
2-21
Chapter 2
Cabling and Troubleshooting the CSS
Cabling the CSS 11503 and CSS 11506 Modules
Figure 2-9 illustrates the SSL module front panel LEDs.
Figure 2-9
SSL Module LEDs
2
3
Session Accelerator
CSS5-SAM
59537
STATUS
1
4
1
Bicolor status LED (green and red) 3
2
Amber status LED
4
Spring-loaded screw (one of two)
Ejector (one of two)
Table 2-6 describes the LEDs.
Table 2-6
SSL Module LED Descriptions
LED Name
Color
State
Indicates
Status
(left)
Green
Solid
The module is ready.
Red
Solid
The module failed the power-up self test
during the boot process.
Slow blink
The module failed.
No color
Off
The module failed and has no power.
Amber
Fast blink
The module is running power-up self test.
Slow blink
The module is offline and active.
Solid
The module is online and not active.
Off
See the left status LED for indication.
Status
(right)
Cisco 11500 Series Content Services Switch Hardware Installation Guide
2-22
78-16421-01
Chapter 2
Cabling and Troubleshooting the CSS
Connecting the Console
Connecting the Console
To connect a console to the CSS, attach the console cable (provided in the
accessory kit) to the Console port on the CSS. Your terminal settings must match
the CSS default settings specified in Table 2-7.
Table 2-7
CSS Console Port Default Settings
Parameters
Default Settings
Baud
9600
Data Bits
8
Parity
None
Stop Bits
1
Terminal Type
VT100/ANSI
Flow Control
None
If a communications problem occurs between the CSS and a console, see the
“Troubleshooting the Console Interface” section later in this chapter.
Connecting the Chassis to Ground
Connecting the CSS 11503 or CSS 11506 chassis to earth ground is required for
all DC-powered installations, and any AC-powered installation where compliance
with Telcordia (formerly Bellcore) grounding requirements is necessary. Have the
recommended tools and supplies available before you begin this procedure (see
Table 2-8).
Warning
Never defeat the ground conductor or operate the equipment in the absence of
a suitably installed ground conductor. Contact the appropriate electrical
inspection authority or an electrician if you are uncertain that suitable
grounding is available.
Cisco 11500 Series Content Services Switch Hardware Installation Guide
78-16421-01
2-23
Chapter 2
Cabling and Troubleshooting the CSS
Connecting the Chassis to Ground
Tools and Supplies
The accessory kit shipped with the CSS contains the following items used in this
procedure:
•
One 2-hole grounding lug (Panduit no. LCD6-10A-L)
•
Two M5 screws for the grounding lug
Table 2-8 lists the other tools, equipment, and supplies that you need to connect
system ground to the chassis. These are items that you must supply.
Table 2-8
Tools and Supplies
Quantity
Description
Comments
1
Number 2 Phillips screwdriver
—
1
Wire stripping tool
Choose a tool that does not nick
the wire.
Varies
Grounding wire
6 AWG, 0.204 in. (5.18 mm)
recommended. The wire should
have applicable agency
approvals such as Telcordia.
Varies
Screws to attach ground wire to
grounding point at site
Part requirements depend on
location.
1 or 2
2-hole grounding lug. Lug must Recommended types:
fit 6 AWG stranded copper or
• Panduit no. LCD6-10A-L
37/24 flex cables. Each lug must
(1 supplied in accessory
have two holes, centered
kit)
0.625 in. (1.587 cm) apart, and
• Panduit no. LCC6-10A-L
must accept M5 screws.
(long barrel)
One lug is supplied by Cisco
Systems in the accessory kit. The • Thomas & Betts no.
256-30695-1183(*4*)
supplied lug is for the router end
of the ground wire. You may
• Burndy no. YA6CL2TC10
wish to use a lug other than the
one supplied. If you need a lug
for the facility end of the ground
wire, you must supply it.
Cisco 11500 Series Content Services Switch Hardware Installation Guide
2-24
78-16421-01
Chapter 2
Cabling and Troubleshooting the CSS
Connecting the Chassis to Ground
Table 2-8
Tools and Supplies (continued)
Quantity
Description
Comments
1
Crimping tool
Must fit diameter of grounding
lugs. Cisco Systems
recommends that you use a
crimping tool recommended by
the lug manufacturer.
2
M5 screws with captive, locking Included in accessory kit
washers
shipped with the CSS.
Attaching the Grounding Cable
The following procedure describes how to attach:
Warning
•
The grounding lug to the grounding cable
•
The grounding cable to the chassis
When you install or replace the unit, the ground connection must always be
made first and disconnected last.
1.
Power off the chassis by setting the power switch (or switches) to the O (off)
position.
2.
Strip the covering from the end of the grounding wire (Figure 2-10). The
amount of covering to be stripped varies depending on the type of lug you
plan to attach to the wire.
Lug
Strip Length
Panduit no. LCD6-10A-L (supplied in accessory kit)
13/16 inch (2 cm)
Panduit no. LCC6-10A-L (long barrel)
1 1/16 inch (2.7 cm)
Thomas & Betts no. 256-30695-1183(*4*)
3/4 inch (1.9 cm)
Burndy no. YA6CL2TC10
7/8 inch (2.2 cm)
Cisco 11500 Series Content Services Switch Hardware Installation Guide
78-16421-01
2-25
Chapter 2
Cabling and Troubleshooting the CSS
Connecting the Chassis to Ground
3.
Insert the stripped end of the grounding wire into the open end of a lug
(Figure 2-10) and crimp the grounding lug securely to the wire. Use the lug
manufacturer’s recommended crimping tool and crimping procedure to
ensure a proper crimp.
53632
Figure 2-10 Attaching Grounding Wire to Grounding Lug
Stripped wire
4.
Grounding lug
Attach the grounding lug firmly to the threaded holes on the chassis using two
M5 screws.
•
On the CSS 11503 chassis, the holes are located on the left side (looking
from the rear) near the bottom rear corner.
•
On the CSS 11506 chassis, the holes are located on the right rear panel.
The three threaded holes are unevenly spaced to accommodate different lugs.
5.
Strip the covering from the other end of the grounding wire. See the table in
step 2 for strip lengths for different lugs.
6.
Insert the stripped end of the grounding wire into the open end of a grounding
lug and crimp the grounding lug securely to the wire.
7.
Attach the grounding lug to an appropriate grounding point at your site.
8.
Proceed to the “Connecting the Power Cord” section.
Cisco 11500 Series Content Services Switch Hardware Installation Guide
2-26
78-16421-01
Chapter 2
Cabling and Troubleshooting the CSS
Connecting the Power Cord
Connecting the Power Cord
The CSS 11500 series models are powered by either an AC or DC power supply.
Before you install the AC or DC power cord, ensure that you have read
Appendix A, Specifications, for information on the electrical specifications. The
following sections describe:
•
Connecting a CSS 11501 Power Cord
•
Connecting a CSS 11503 Power Cord
•
Connecting a CSS 11506 Power Cord
•
Checking the DC Power Connection (CSS 11503 and CSS 11506)
Connecting a CSS 11501 Power Cord
To connect an AC power cord to a CSS 11501:
1.
At the rear of the chassis, ensure that the CSS power switch is in the O (off)
position.
2.
Plug the AC power cord connector into the CSS power connector, as shown
in Figure 2-11.
Figure 2-11 Connecting a CSS 11501 AC Power Cord
78677
1
2
1
AC power connector
2
Power switch
Cisco 11500 Series Content Services Switch Hardware Installation Guide
78-16421-01
2-27
Chapter 2
Cabling and Troubleshooting the CSS
Connecting the Power Cord
Note
3.
Plug the power cord into a dedicated 3-wire grounding receptacle.
4.
See the “Powering Up the CSS” section to power on the CSS.
The CSS 11501 power supply is autosensing for voltage and frequency, and it
requires no additional modifications.
Connecting a CSS 11503 Power Cord
The following sections provide information on:
•
Connecting a CSS 11503 AC Power Cord
•
Connecting a CSS 11503 DC Power Cord
Connecting a CSS 11503 AC Power Cord
To connect an AC power cord to a CSS 11503:
1.
At the rear of the chassis, ensure that the CSS power switch is in the O (off)
position.
2.
Plug the AC power cord connector into the CSS power connector, as shown
in Figure 2-12.
Cisco 11500 Series Content Services Switch Hardware Installation Guide
2-28
78-16421-01
Chapter 2
Cabling and Troubleshooting the CSS
Connecting the Power Cord
Figure 2-12 Connecting a CSS 11503 AC Power Cord
1
~
59543
100-240V
50-60 Hz
5A
430 W
2
Note
1
Power switch
2
3.
Plug the power cord into a dedicated 3-wire grounding receptacle.
4.
See the “Powering Up the CSS” section to power on the CSS.
AC power connector
The CSS 11503 power supply is autosensing for voltage and frequency, and it
requires no additional modifications.
Cisco 11500 Series Content Services Switch Hardware Installation Guide
78-16421-01
2-29
Chapter 2
Cabling and Troubleshooting the CSS
Connecting the Power Cord
Connecting a CSS 11503 DC Power Cord
Before you install a DC power cord, refer to Appendix A, Specifications, for the
DC power supply.
Warning
The DC power supply cord requires at least a 14 AWG wire (maximum 10 AWG
wire). The CSS 11503 draws a maximum of 10 amps.
Warning
Use copper conductors only.
Warning
Before working on equipment that is connected to power lines, remove jewelry
(including rings, necklaces, and watches). Metal objects will heat up when
connected to power and ground and can cause serious burns or weld the metal
object to the terminals.
Warning
Before performing the DC installation procedure, ensure that power is removed
from the DC circuit. To ensure that all power is off, locate the circuit breaker
that services the DC circuit and switch it off.
Warning
When you are installing or replacing the unit, the ground connection must
always be made first and disconnected last.
Warning
Only a DC power source that is isolated from AC mains with reinforced
insulation, and that complies with the other safety extra-low voltage (SELV)
requirements in UL1950, CSA 950 3rd Edition, EN 60950, and IEC950, can be
connected to a Cisco 11503 system. This requirement ensures that in a
catastrophic power source fault condition, hazardous voltages are not present
on power terminals and connectors.
Cisco 11500 Series Content Services Switch Hardware Installation Guide
2-30
78-16421-01
Chapter 2
Cabling and Troubleshooting the CSS
Connecting the Power Cord
To connect the CSS 11503 DC power supply to a power source:
1.
At the rear of the chassis, ensure that the CSS power switch is in the O (off)
position.
2.
Locate the DC terminal block on the rear of the chassis as shown in
Figure 2-13.
Figure 2-13 Location of the CSS 11503 DC Power Supply Connectors
59544
-48/-60V
9.0A,430V
A
1
Warning
2
1
Terminal block (–, +, and
3.
Using a flat-head screwdriver, loosen the captive screws on the three DC
connectors (labeled from left to right, –, +, and
, respectively).
)
2
Power switch
Before installing a wire, ensure that the polarity of the DC connections is
correct. Reversed polarity causes damage to the DC power supply and can
create a dangerous shock hazard.
Do not consolidate the end of a conductor by soft soldering prior to installation.
4.
Install the wires into the appropriate connector. Make sure that the
non-insulated part of each wire is 9 mm (0.35 inches) in length.
Cisco 11500 Series Content Services Switch Hardware Installation Guide
78-16421-01
2-31
Chapter 2
Cabling and Troubleshooting the CSS
Connecting the Power Cord
Warning
When installing the wires, always connect the ground wire first. When
disconnecting the wires, always disconnect the ground wire last.
5.
Tighten the captive screws to 5 to 7 inch-pounds (0.6 to 0.8 Nm) of torque to
secure the wires in the connectors. Ensure that the wires are held firmly in
place.
6.
Install the wires to the DC power source.
For the proper power cable wiring between the CSS 11503 and DC power
source, see Table 2-9.
Table 2-9
CSS 11503 to DC Power Source Cabling
CSS 11503
DC Power Source
(Ground)
Warning
(Ground)
+
+
–
–
The proper wiring sequence is ground to ground, positive to positive, and
negative to negative. The ground wire should always be connected first and
disconnected last.
7.
Switch on the circuit breaker that services the DC circuit.
8.
To check the DC power connection, see the “Checking the DC Power
Connection (CSS 11503 and CSS 11506)”section.
Connecting a CSS 11506 Power Cord
The following sections provide information for connecting an AC or DC power
cords to a CSS 11506.
•
Connecting a CSS 11506 AC Power Cord
•
Connecting a CSS 11506 DC Power Cord
Cisco 11500 Series Content Services Switch Hardware Installation Guide
2-32
78-16421-01
Chapter 2
Cabling and Troubleshooting the CSS
Connecting the Power Cord
Connecting a CSS 11506 AC Power Cord
To connect the AC power cord to each power supply in the CSS 11506:
1.
At the front of the supply, ensure that the CSS power switch is in the O (off)
position.
2.
Plug the AC power cord connector into the power connector, as shown in
Figure 2-14.
Figure 2-14 Connecting a CSS 11506 AC Power Cord
1
GE 1
1
LINK
CSS5-10M-2GE
GE 2
LINK
2
3
4
CSS5-10M-16FE
Gigabit Ethernet
2
CAUTION
AC DC
OK OK
DISCONNE
CT ALL
POWER SOU
BEFORE SERRCES
VICING
7
1
8
2
3
4
5
6
PS1
PS2
PS3
AC DC
OK OK
~
59545
100-240V
5A 50-60
Hz
3
Note
1
Power supply LEDs
3
2
Power switch
3.
Plug the power cord into a dedicated 3-wire grounding receptacle.
4.
Repeat steps 1 through 3 for each power supply.
5.
See the “Powering Up the CSS” section to power on the CSS.
AC power connector
The CSS 11506 power supplies are autosensing for voltage and frequency, and
they require no additional modifications.
Cisco 11500 Series Content Services Switch Hardware Installation Guide
78-16421-01
2-33
Chapter 2
Cabling and Troubleshooting the CSS
Connecting the Power Cord
Connecting a CSS 11506 DC Power Cord
Before you install a DC power cord, refer to Appendix A, Specifications, for the
DC power supply.
Warning
The DC power supply cord requires at least a 14 AWG wire (maximum 10 AWG
wire). The CSS 11503 draws a maximum of 18 amps.
Warning
Use copper conductors only.
Warning
Before working on equipment that is connected to power lines, remove jewelry
(including rings, necklaces, and watches). Metal objects will heat up when
connected to power and ground and can cause serious burns or weld the metal
object to the terminals.
Warning
Before performing the DC installation procedure, ensure that power is removed
from the DC circuit. To ensure that all power is off, locate the circuit breaker
that services the DC circuit and switch it off.
Warning
When you are installing or replacing the unit, the ground connection must
always be made first and disconnected last.
Warning
Only a DC power source that is isolated from AC mains with reinforced
insulation, and that complies with the other safety extra-low voltage (SELV)
requirements in UL1950, CSA 950 3rd Edition, EN 60950, and IEC950, can be
connected to a Cisco 11506 system. This requirement ensures that in a
catastrophic power source fault condition, hazardous voltages are not present
on power terminals and connectors.
Cisco 11500 Series Content Services Switch Hardware Installation Guide
2-34
78-16421-01
Chapter 2
Cabling and Troubleshooting the CSS
Connecting the Power Cord
Warning
This unit might have more than one power supply connection; all connections
must be removed completely for you to completely remove power from the unit.
To connect each CSS 11506 DC power supply to a power source:
1.
On the power supply, ensure that the CSS power switch is in the O (off)
position.
2.
Locate the power supply DC terminal block, as shown in Figure 2-15.
Figure 2-15 Location of CSS 11506 DC Power Supply Connectors
GE 1
2
LINK
1
LINK
Gigabit Ethernet
CSS5-10M-2GE
GE 2
2
3
CSS5-10M-16FE
1
CAUTION
AC
I/P DC
OK OK
DISCONNE
CT ALL
POWER SOU
BEFORE SERRCES
VICING
7
1
8
2
3
4
5
6
PS1
PS2
PS3
AC DC
OK OK
3
~
59546
100-240V
5A
5060
-48/-60VHz
10/8A
Warning
1
Power supply LEDs
2
Power switch
3.
Using a flat-head screwdriver, loosen the captive screws on the three DC
connectors (labeled from left to right, –, +, and
, respectively).
Terminal block (–, +, and
)
59199
3
Before installing a wire, ensure that the polarity of the DC connections is
correct. Reversed polarity can cause damage to the DC power supply and can
create a dangerous shock hazard.
Do not consolidate the end of a conductor by soft soldering prior to installation.
Cisco 11500 Series Content Services Switch Hardware Installation Guide
78-16421-01
2-35
Chapter 2
Cabling and Troubleshooting the CSS
Connecting the Power Cord
4.
Warning
Install the wires into the appropriate connector. Make sure that the
non-insulated part of each wire is 9 mm (0.35 inches) in length.
When installing the wires, always connect the ground wire first. When
disconnecting the wires, always disconnect the ground wire last.
5.
Tighten the captive screws to 5 to 7 inch-pounds (0.6 to 0.8 Nm) of torque to
secure the wires in the connectors. Ensure that the wires are held firmly in
place.
6.
Repeat steps 1 through 5 for each power supply.
7.
Install the three sets of wires to the DC power source.
For the proper power cable wiring between the CSS 11506 and DC power
source, see Table 2-10.
Table 2-10 CSS 11506 to DC Power Source Cabling
CSS 11506
DC Power Source
(Ground)
Warning
(Ground)
+
+
–
–
The proper wiring sequence is ground to ground, positive to positive, and
negative to negative. The ground wire should always be connected first and
disconnected last.
8.
Switch on each circuit breaker that services each DC circuit.
9.
To check the DC power connection, see the “Checking the DC Power
Connection (CSS 11503 and CSS 11506)” section.
Cisco 11500 Series Content Services Switch Hardware Installation Guide
2-36
78-16421-01
Chapter 2
Cabling and Troubleshooting the CSS
Powering Up the CSS
Checking the DC Power Connection (CSS 11503 and CSS 11506)
Follow these steps to verify that you have correctly connected DC power to the
CSS 11503 or CSS 11506 chassis:
Warning
1.
Turn on power to the DC circuit or circuits.
2.
Use a voltmeter to check the voltage at the terminal block on the power
supply. Connect the voltmeter’s positive contact to the positive (+) terminal
on the CSS power supply terminal block. Connect the voltmeter’s negative
contact to the negative (–) terminal on the CSS power supply terminal block.
If the power is wired correctly, the voltmeter registers approximately
+48VDC to +56VDC (or battery float voltage).
Do not allow the test probes of the voltmeter to touch each other while they are
touching the power terminals. This is an ENERGY HAZARD to you, to the
voltmeter, and to the wires connecting the CSS to its power source.
3.
To power on the CSS, see the “Powering Up the CSS” section.
Powering Up the CSS
To power up a CSS:
•
On an AC CSS, toggle the power switch to the 1 (on) position.
– See Figure 2-11 for the location of the CSS 11501 AC power switch.
– See Figure 2-12 for the location of the CSS 11503 AC power switch.
– See Figure 2-14 for the location of the CSS 11506 AC power switch for
each power supply. Power on all of the supplies in the CSS. The AC OK
and DC OK LEDs light up on each power supply. If either LED remains
unlit, see the “Troubleshooting the CSS Power Supply” section later in
this chapter.
Cisco 11500 Series Content Services Switch Hardware Installation Guide
78-16421-01
2-37
Chapter 2
Cabling and Troubleshooting the CSS
Powering Down the CSS
•
For a DC CSS, switch on the applicable circuit breakers for the power source.
Then on the CSS, toggle the power switch to the 1 (on) position.
– See Figure 2-13 for the location of the CSS 11503 DC power switch.
– See Figure 2-15 for the location of the CSS 11506 DC power switch for
each power supply. Power on all of the supplies in the CSS. The I/P OK
and DC OK LEDs light up on each power supply. If either LED remains
unlit, see the “Troubleshooting the CSS Power Supply” section later in
this chapter.
The CSS starts the boot process. For information concerning the boot process on
the Cisco 11500 series CSS, refer to the Cisco Content Services Switch Getting
Started Guide.
Powering Down the CSS
To shut down the CSS gracefully and avoid introducing lost or fragmented files,
always use the shutdown command prior to removing power from the CSS.
For example:
(config-boot)# shutdown
Once the CSS shuts down all processes, you can remove power from the CSS.
Troubleshooting the CSS Hardware Components
This section provides general troubleshooting information for the CSS
components. It includes the following sections:
•
Troubleshooting the CSS 11501
•
Troubleshooting the CSS Modules
•
Troubleshooting the Console Interface
•
Troubleshooting the CSS Power Supply
•
Troubleshooting the CSS Fans
Information in this section applies to the CSS 11501, CSS 11503, and CSS 11506,
except where noted.
Cisco 11500 Series Content Services Switch Hardware Installation Guide
2-38
78-16421-01
Chapter 2
Cabling and Troubleshooting the CSS
Troubleshooting the CSS Hardware Components
Troubleshooting the CSS 11501
CSS 11501 status is indicated by the Status LED on the front panel. For
information about the CSS 11501 LEDs, see the “Cabling the CSS 11501”section
earlier in this chapter.
Table 2-11 provides suggestions for correcting problems that may occur with the
CSS 11501.
Table 2-11 Troubleshooting the CSS 11501
Symptom
Recommended Action
At boot up, the following
message appears:
When there is a failure on a CSS 11501
component, the CSS 11501 attempts the boot
process three times. If the boot is unsuccessful,
the CSS generates a log message and saves it in
the boot.log file. Obtain technical assistance.
Refer to “Preface”. For information on log
files, refer to the Cisco Content Services Switch
Administration Guide.
CHMGR: Slot slot/subslot
had diagnostic failures NOT STARTING UP
Cisco 11500 Series Content Services Switch Hardware Installation Guide
78-16421-01
2-39
Chapter 2
Cabling and Troubleshooting the CSS
Troubleshooting the CSS Hardware Components
Table 2-11 Troubleshooting the CSS 11501 (continued)
Symptom
Recommended Action
During normal CSS operation, Check the six fans in the chassis. The
the following message appears: CSS 11501 is running at a temperature that is
too high, as indicated by the x variable. When a
Temperature has reached x
fan failure occurs, obtain technical assistance.
celsius for slot number
You cannot access log or
archive files on the CSS disk but
traffic is still passed in and out
of the CSS.
Replace the disk containing the files. Remove
the disk and install the replacement in the
CSS 11501. Refer to the reference sheet that
comes with the replacement disk.
After you install the disk in the CSS, you must
wait 10 seconds before you can reseat or
remove it.
If the replacement disk does not have the same
software version that the CSS is running, the
CSS 11501 will not initialize the disk. You
must reboot the CSS and configure a primary
boot record. You can select the CSS software
currently on the disk or instruct the CSS where
to locate the CSS software ADI file to install on
the disk. If you archived an offline version of
your CSS running-config file, copy it back onto
the CSS.
Troubleshooting the CSS Modules
CSS 11503 and CSS 11506 module status is indicated by the Status LED on the
module front panel. For information about the module LEDs, see the “Cabling the
CSS 11503 and CSS 11506 Modules” section earlier in this chapter.
Table 2-12 provides suggestions for correcting problems that may occur with the
modules in the CSS 11503 and CSS 11506.
Caution
Always power down the CSS prior to removing or installing a module.
Cisco 11500 Series Content Services Switch Hardware Installation Guide
2-40
78-16421-01
Chapter 2
Cabling and Troubleshooting the CSS
Troubleshooting the CSS Hardware Components
Note
As implemented in WebNS 5.10 and greater, when a CSS module fails during
normal operations, the CSS reboots.
Table 2-12 Troubleshooting the CSS Modules
Symptom
Recommended Action
At boot up, the following
message appears:
CHMGR: Slot slot/subslot
had diagnostic failures NOT STARTING UP
During normal CSS operation,
the following message appears
and then, the CSS reboots:
ONDM: LifeTick for
Sub-Module in slot/sub-slot
- slot/subslot failed,
resetting..
During normal CSS operation,
the following message appears
and then, the CSS reboots:
ONDM: Port C Path Failure
%s, turning off Focus-C
Port.
1.
Power down the CSS.
2.
Reseat the module in its slot.
3.
Power up the CSS to boot the module.
If reseating the module does not correct the
failure, replace the module. Refer to the
reference sheet that comes with the
replacement module.
If the module is not functioning, the left Status
LED will be Red and blinking slowly. If it is an
FEM, all of its Link and Duplex LEDs will
blink synchronously. When the CSS reboots,
the Status LED is off. Use the show chassis
command to verify the state of the module.
1.
Replace the module. Refer to the reference
sheet that comes with the replacement
module.
2.
Power up the CSS to boot the module.
The Switch Module in slot 1 failed.
1.
Power down the CSS.
2.
Remove and replace the module. Refer to
the reference sheet that comes with the
replacement module.
3.
Reboot the CSS to boot the module.
Cisco 11500 Series Content Services Switch Hardware Installation Guide
78-16421-01
2-41
Chapter 2
Cabling and Troubleshooting the CSS
Troubleshooting the CSS Hardware Components
Table 2-12 Troubleshooting the CSS Modules (continued)
Symptom
Recommended Action
During normal CSS operation,
the following message appears
and then, the CSS reboots:
The Switch Module in slot 2 failed.
ONDM: Port D Path Failure
%s, turning off Focus-D
Port.
During normal CSS operation,
the following message appears
and then, the CSS reboots:
ONDM: Both Port C and Port
D Focus Connect paths have
failed.
1.
Power down the CSS.
2.
Remove and replace the module. Refer to
the reference sheet that comes with the
replacement module.
3.
Reboot the CSS to boot the module.
The Switch Modules in slot 1 and 2 failed.
1.
Power down the CSS.
2.
Remove and replace the modules. Refer to
the reference sheet that comes with the
modules.
3.
Reboot the CSS to boot the modules.
During normal CSS operation, Check the fans in the chassis. The module in
the following message appears: the designated slot number is running a
temperature that is too high, indicated by the x
Temperature has reached x
variable.
celsius for slot number
•
For a CSS 11503, replace the chassis.
•
For a CSS 11506, replace the fan module.
Refer to the reference sheet that comes
with the replacement module.
Cisco 11500 Series Content Services Switch Hardware Installation Guide
2-42
78-16421-01
Chapter 2
Cabling and Troubleshooting the CSS
Troubleshooting the CSS Hardware Components
Table 2-12 Troubleshooting the CSS Modules (continued)
Symptom
Recommended Action
You cannot access log or
archive files on the CSS disk but
traffic is still passed in and out
of the CSS.
Replace the disk containing the files. Remove
the disk and install the replacement in the
SCM. Refer to the reference sheet that comes
with the replacement disk.
After you install the disk in the SCM, you must
wait 10 seconds before you can reseat or
remove it.
If the replacement disk does not have the same
software version that the CSS is running, the
SCM will not initialize the disk. You must
reboot the CSS and configure a primary boot
record. You can select the CSS software
currently on the disk or instruct the CSS where
to locate the CSS software ADI file to install on
the disk. If you archived an offline version of
your CSS running-config file, copy it back onto
the CSS.
Cisco 11500 Series Content Services Switch Hardware Installation Guide
78-16421-01
2-43
Chapter 2
Cabling and Troubleshooting the CSS
Troubleshooting the CSS Hardware Components
Troubleshooting the Console Interface
Table 2-13 lists common communications problems that may exist between the
CSS and a console. Ensure the console settings are configured to:
•
Baud Rate - 9600
•
Data Bits - 8
•
Parity - none
•
Stop Bits -1
•
Flow Control - none
For information on console cable pinouts, refer to Appendix B, Cable Connector
Pinouts.
Table 2-13 Troubleshooting the Console Interface
Possible Problem
Recommended Action
Nothing appears on the screen.
Ensure that the RS-232 cable is
securely connected to the console port.
Characters appear on the screen, but
are garbled.
Verify that the CSS and the console
settings match with respect to baud
rate, data bits, stop bits, and parity.
Abbreviated input is used, but pressing Ensure that you enter a sufficient
the tab key does not enter the command number of characters for the CSS to
you want.
distinguish between different
commands and options.
Random characters are lost.
Set the flow command on the console
to XON/XOFF.
Cisco 11500 Series Content Services Switch Hardware Installation Guide
2-44
78-16421-01
Chapter 2
Cabling and Troubleshooting the CSS
Troubleshooting the CSS Hardware Components
Troubleshooting the CSS Power Supply
The following sections discuss:
•
Troubleshooting the CSS 11501 Power Supply
•
Troubleshooting the CSS 11503 Power Supply
•
Troubleshooting the CSS 11506 Power Supply
Troubleshooting the CSS 11501 Power Supply
The CSS 11501 has one power supply as part of its chassis. When you power on
the CSS, the indications of a successful power up are that it boots properly and
become operational, and displays the following log message:
CHMGR: All power supplies are present (1).
Note
This message is displayed only if the logging level is set to the Info-6 or Debug-7
level.
If you power on the CSS and it does not boot as indicated by the Status LEDs,
either:
•
There is no power to the power supply. Ensure that the CSS 11501 has power.
Check the power switch, power cord, and power source.
•
The power supply failed, obtain technical assistance.
Cisco 11500 Series Content Services Switch Hardware Installation Guide
78-16421-01
2-45
Chapter 2
Cabling and Troubleshooting the CSS
Troubleshooting the CSS Hardware Components
Troubleshooting the CSS 11503 Power Supply
The CSS 11503 has one power supply as part of its chassis. When you power on
the CSS, the indications of a successful power up are that its modules boot and
become operational, and the following log message appears:
CHMGR: All power supplies are present (1).
Note
This message is displayed only if the logging level is set to the Info-6 or Debug-7
level.
If you power on the CSS and its modules do not boot as indicated by their Status
LEDs, either:
•
There is no power to the power supply. Ensure that the CSS has power. Check
the power switch, power cord, and power source.
•
The power supply failed. You must replace the CSS chassis.
Troubleshooting the CSS 11506 Power Supply
If the CSS 11506 power supplies power on successfully and the CSS completes
the boot process, the following message appears:
CHMGR: All power supplies are present (3).
Note
This message is displayed only if the logging level is set to the Info-6 or Debug-7
level.
A CSS 11506 can contain a maximum of three power supplies, but it requires two
functioning power supplies to guarantee service.
Cisco 11500 Series Content Services Switch Hardware Installation Guide
2-46
78-16421-01
Chapter 2
Cabling and Troubleshooting the CSS
Troubleshooting the CSS Hardware Components
Figure 2-16 shows the location of the power supplies.
Figure 2-16 Location of the CSS 11506 Power Supplies
CSS506-SM
CSS506-SM
MANAGEMENT
10BASE-T
CISCO 115
DUPLEX
1
LINK
GE 2
LINK
CONTE
2
3
4
5
6
7
8
PCMCIA
LINK
GE 1
1
LINK
CSS5-10M-2GE
GE 2
LINK
2
3
4
5
6
7
8
DPLX
DPLX
5
6
PS2
PS3
7
6
7
8
00 SERIES
SERVIC
ES
SWITC
H
DPLX
DPLX
9 10
11 12
13 14
15
3
4
5
DPLX
DPLX
8
9 10
11 12
13 14
15
LINK
LINK
DPLX
DPLX
AC DC
OK OK
AC DC
OK OK
59603
4
PS1
6
CSS5-10M-16FE
16 Fast Ethernet
LINK
5
LINK
AC DC
OK OK
3
4
LINK
2
CSS5-10M-16FE
Gigabit Ethernet
LINK
CAUTION
8
2
3
9 10
11 12
13 14
15
1
DISCONNECT
POWER SOURCALL
BEFORE SERVICES
ING
7
1
2
CSS5-10M-16FE
LINK
STATUS
16 Fast Ethernet
CONSOLE
System Control
1
SLOT 0
NT
9 10
11 12
13 14
15
SLOT 1
CSS5-10M-16FE
CSS5-SCM-2GE
GE 1
16 Fast Ethernet
LINK/ACT
16 Fast Ethernet
STATUS
~
100-240V
5A 50-60
Hz
~
100-240V
5A 50-60
Hz
~
100-240V
5A 50-60
Hz
1
2
1
Power supply 1
2
Power supply 2
3
3
Power supply 3
If the CSS 11506 contains less than three power supplies, a power supply is
powered off, or a power supply module failed, the CSS displays the following
messages:
CHMGR: Missing backup power supply.
CHMGR: Cannot locate power supply: PSnumber.
The PSnumber variable indicates which power supply cannot be found or has
failed.
When this message occurs, view the LEDs on the power supply.
Cisco 11500 Series Content Services Switch Hardware Installation Guide
78-16421-01
2-47
Chapter 2
Cabling and Troubleshooting the CSS
Troubleshooting the CSS Hardware Components
Figure 2-17 shows the AC power supply LEDs. These LEDs indicate the power
status of the supply.
Figure 2-17 CSS 11506 AC Power Supply LEDs
1
GE 1
1
LINK
CSS5-10M-2GE
GE 2
LINK
2
3
4
CSS5-10M-16FE
Gigabit Ethernet
2
CAUTION
AC DC
OK OK
DISCONNECT
POWER SOU ALL
BEFORE SERRCES
VICING
7
1
8
2
3
4
5
6
PS1
PS2
PS3
AC DC
OK OK
~
59545
100-240V
5A 50-60
Hz
3
1
Power Supply LEDs: AC OK and DC OK
2
Power switch
3
AC connector
Figure 2-18 shows the DC power supply LEDs.
Figure 2-18 CSS 11506 DC Power Supply LEDs
GE 1
2
LINK
1
LINK
Gigabit Ethernet
CSS5-10M-2GE
GE 2
2
3
CSS5-10M-16FE
1
CAUTION
AC
I/P DC
OK OK
DISCONNECT
POWER SOU ALL
BEFORE SERRCES
VICING
7
1
8
2
3
4
5
6
PS1
PS2
PS3
AC DC
OK OK
3
~
59546
100-240V
5A
-4850/-660
0VHz
10/8A
1
Power Supply LEDs: I/P OK and DC OK
2
Power switch
3
Terminal block
Cisco 11500 Series Content Services Switch Hardware Installation Guide
2-48
78-16421-01
Chapter 2
Cabling and Troubleshooting the CSS
Troubleshooting the CSS Hardware Components
Table 2-14 describes these LEDs and provide suggestions for correcting
problems.
Table 2-14 LEDs of the CSS 11506 Power Supply
LED State
AC OK or
I/P OK (DC power supply)
DC OK
On
Possible Problem
Recommended Action
On
There is no problem
with the power source
and the power supply.
Not applicable.
Off
Off
There is no power to the Ensure the supply has power.
power supply.
Check the power switch, power
cord, and power source.
On
Off
The power supply failed. Remove and replace the power
supply. Refer to the reference
sheet that comes with the
replacement supply.
After you install the power supply,
the CSS automatically brings the
power supply into service.
Cisco 11500 Series Content Services Switch Hardware Installation Guide
78-16421-01
2-49
Chapter 2
Cabling and Troubleshooting the CSS
Troubleshooting the CSS Hardware Components
Troubleshooting the CSS Fans
The following sections discuss:
•
Troubleshooting the CSS 11501 Chassis Fans
•
Troubleshooting the CSS 11503 Chassis Fans
•
Troubleshooting the CSS 11506 Fan Module
Troubleshooting the CSS 11501 Chassis Fans
The CSS 11501 has six fans. When the CSS starts up and the fans are operational,
the following message appears:
CHMGR: All fans are present (6).
Note
This message is displayed only if the logging level is set to the Info-6 or Debug-7
level.
If a fan fails when the CSS 11501 starts up, or fails during its normal operation,
the following message appears:
CHMGR: Missing fans. Expected 6. Found number.
The number variable indicates the total number of functioning fans. If the
CSS 11501 starts to overheat, the following message appears:
Temperature has reached x celsius for slot number
The x variable indicates the temperature of the CSS 11501.
When a fan failure occurs, obtain technical assistance.
Cisco 11500 Series Content Services Switch Hardware Installation Guide
2-50
78-16421-01
Chapter 2
Cabling and Troubleshooting the CSS
Troubleshooting the CSS Hardware Components
Troubleshooting the CSS 11503 Chassis Fans
The CSS 11503 has four fans, three for cooling the modules and one for the power
supply. When the CSS starts up and fans are operational, the following message
appears:
CHMGR: All fans are present (4).
Note
This message is displayed only if the logging level is set to the Info-6 or Debug-7
level.
If a fan fails when the CSS starts up, or fails during its normal operation, the
following message appears:
CHMGR: Missing fans. Expected 4. Found number.
The number variable indicates the total number of functioning fans. If the
modules start to overheat in the chassis, the following message appears:
Temperature has reached x celsius for slot number
The x variable indicates the temperature of the module. The module in the
designated slot number is running a temperature that is too high.
If the power supply fan fails, the following message appears:
CHMGR: Power Supply Fan Failure.
When a fan failure occurs, you must replace the CSS chassis.
Cisco 11500 Series Content Services Switch Hardware Installation Guide
78-16421-01
2-51
Chapter 2
Cabling and Troubleshooting the CSS
Troubleshooting the CSS Hardware Components
Troubleshooting the CSS 11506 Fan Module
The CSS 11506 has three fans in a single fan module. When the CSS starts up and
fans are operational, the following message appears:
CHMGR: All fans are present (3).
Note
This message is displayed only if the logging level is set to the Info-6 or Debug-7
level.
If a fan fails when the CSS starts up, or fails during its normal operation, the
following message appears:
CHMGR: Missing fans. Expected 3. Found number.
The number variable indicates the total number of functioning fans.
If the modules start to overheat in the chassis, the following message appears:
Temperature has reached x celsius for slot number
The x variable indicates the temperature of the module. The module in the
designated slot number is running a temperature that is too high.
When a fan failure occurs, you must replace the fan module to prevent the CSS
modules from overheating.
Cisco 11500 Series Content Services Switch Hardware Installation Guide
2-52
78-16421-01
A P P E N D I X
A
Specifications
This appendix contains the following sections that list specifications for the
CSS 11501, CSS 11503, and CSS 11506:
•
Electrical Specifications
•
Environmental Specifications
•
Physical Specifications
•
CSS 11501 Bandwidth and Memory Specifications
•
CSS 11503 and CSS 11506 Module Specifications
•
Disk Specifications
•
Supported Standards
Cisco 11500 Series Content Services Switch Hardware Installation Guide
78-16421-01
A-1
Appendix A
Specifications
Electrical Specifications
Electrical Specifications
Table A-1 describes the CSS 11501, CSS 11503, and CSS 11506 AC electrical
specifications. The CSS 11501, CSS 11503, and CSS 11506 AC power supplies
autosense for voltage and frequency.
Table A-1
AC Electrical Specifications
AC Specification
CSS 11501
CSS 11503
CSS 11506
Input Voltage AC
100 to 240 VAC
50 to 60 Hz
100 to 240 VAC
50 to 60 Hz
100 to 240 VAC
50 to 60 Hz
Current AC (max@
100 VAC)
1.6 Amps
5 Amps
9 Amps
Power Consumption
(maximum)
150VA
430VA
860VA
Heat Dissipation
512 BTU/hr
1468 BTU/hr
2936 BTU/hr
Table A-2 describes the CSS 11503 and CSS 11506 DC electrical specifications.
Table A-2
DC Electrical Specifications
DC Specification
CSS 11503
CSS 11506
Voltage DC
-48.0 to -60.0 VDC
-48.0 to -60.0 VDC
Current DC (maximum)
9 Amps
18 Amps
Power Consumption
(maximum)
430 VA
860 VA
Heat Dissipation
1468 BTU/hr
2936 BTU/hr
Cisco 11500 Series Content Services Switch Hardware Installation Guide
A-2
78-16421-01
Appendix A
Specifications
Environmental Specifications
Environmental Specifications
Table A-3 describes the CSS 11501, CSS 11503, and CSS 11506 environmental
specifications.
Table A-3
Environmental Specifications
Specification Operating
Non-operating
Temperature
32° to 104°F (0° to 40°C)
-4° to 149°F (-20° to 64°C)
Humidity
10 to 90% (non-condensing) Up to 95% (non-condensing)
Altitude
0 to 10,000 ft. (0 to 3,000 m) 0 to 15,000 ft. (0 to 4750 m)
Shock
21 inch/sec2 (0.53 m/sec2),
half sine
Vibration
0.35 Grms from 3 to 500 Hz 1.0 Grms from 3 to 500 Hz
Acoustic
Noise
70 dBa, maximum
20 G, 52 inch/sec2 (1.32 m/sec2),
trapezoidal pulse
Not applicable
Note
G is the unit of acceleration due to gravity, where 1 G equals 32.17 ft/sec2
(9.81 m/sec2).
Note
Grms is the root mean square value of acceleration.
Cisco 11500 Series Content Services Switch Hardware Installation Guide
78-16421-01
A-3
Appendix A
Specifications
Physical Specifications
Physical Specifications
Table A-4 describes the CSS 11501, CSS 11503, and CSS 11506 physical
specifications.
Table A-4
Physical Specifications
Specification
CSS 11501
CSS 11503
CSS 11506
Chassis Dimensions
(H x W x D)
1.72” x 17.29” x 18.1”
3.5” x 17.25” x 18.5”
8.25” x 17.25” x 14”
42.85 lbs. (19.44 kg)
67.65 lbs. (30.69 kg)
(base system containing
one SCM and two I/O
modules plus accessory
box)
(base system containing
two power supplies,
one SCM, five I/O
modules, and mounting
brackets plus accessory
box)
33.3 lbs.
57.7 lbs.
Chassis Shipping Weight 21.5 lbs. (9.77 kg)
Chassis Weight Fully
Configured
18.0 lbs.
(base system containing (base system containing
two power supplies,
one SCM and two I/O
one SCM, and five I/O
modules)
modules)
Cisco 11500 Series Content Services Switch Hardware Installation Guide
A-4
78-16421-01
Appendix A
Specifications
CSS 11501 Bandwidth and Memory Specifications
CSS 11501 Bandwidth and Memory Specifications
Table A-5 describes the CSS 11501 switch bandwidth and memory specifications.
Table A-5
CSS 11501 Specifications
Specification
Description
Switch Bandwidth
6 Gbps
Two full-duplex 1.6 Gbps pathways into a
full-meshed switch fabric
SCM Memory (RDRAM)
288 MB
(256 MB of usable memory)
SSL Integrated Module Memory
512 MB SDRAM
CSS 11503 and CSS 11506 Module Specifications
Table A-6 describes the CSS 11503 and CSS 11506 module specifications.
Table A-6
CSS 11503 and CSS 11506 Module Specifications
Specification
CSS 11503
CSS 11506
Slot Configuration
2 slots for I/O modules
with one SCM
5 slots for I/O modules with one SCM
Switch Bandwidth
20 Gbps
Each slot has two full-duplex 1.6 Gbps
pathways into a full-meshed switch
fabric
40 Gbps
Each slot has two full-duplex 1.6 Gbps
pathways into a full-meshed switch
fabric
SCM Memory
(RDRAM)
288 MB
(256 MB of usable memory)
288 MB
(256 MB of usable memory)
IOM Memory
(RDRAM)
144 MB default or 288 MB optional
(128 MB or 256 MB of usable
memory, respectively)
144 MB default or 288 MB optional
(128 MB or 256 MB of usable
memory, respectively)
SSL Module Memory 512 MB SDRAM
4 slots for I/O modules with two
SCMs (1 active, 1 passive)
512 MB SDRAM
Cisco 11500 Series Content Services Switch Hardware Installation Guide
78-16421-01
A-5
Appendix A
Specifications
Disk Specifications
Disk Specifications
Table A-7 defines the specifications for each disk in the CSS 11501 chassis or in
a CSS 11503 or CSS 11506 SCM.
Table A-7
Disk Specifications
Specification
Hard Disk
Flash Disk
Capacity (minimum)
Refer to data sheet.
Refer to data sheet.
Interface
PCMCIA ATA
PCMCIA ATA
Supported Standards
The CSS supports the following standards:
•
Transport
•
Network
•
Routing
•
Gateway
•
Application
•
Network Utilities
•
Network Management
Transport
The CSS supports the following transport standards:
•
TCP
•
UDP
Cisco 11500 Series Content Services Switch Hardware Installation Guide
A-6
78-16421-01
Appendix A
Specifications
Supported Standards
Network
The CSS supports the following network standards:
•
Internet Protocol (IP)
•
ICMP
•
Address Resolution Protocol (ARP)
•
Inverse ARP
Routing
The CSS supports the following routing standards:
•
RIP I
•
RIP II
•
OSPF Version 2
Gateway
The CSS supports Network Address Translation (NAT), per RFC 1631 gateway
standards
Application
The CSS supports the following application standards:
•
HTTP 1.0, HTTP 1.1
•
TELNET
•
FTP, TFTP
•
RTP
Cisco 11500 Series Content Services Switch Hardware Installation Guide
78-16421-01
A-7
Appendix A
Specifications
Supported Standards
Network Utilities
The CSS supports the following network utility standards:
•
DNS Client
•
RADIUS Client
•
TACACS+ Client
•
HTTP Client
•
FTP Daemon
•
SNTP
Network Management
The CSS supports the following network management standards:
•
SNMP v1
•
SNMP v2c
Cisco 11500 Series Content Services Switch Hardware Installation Guide
A-8
78-16421-01
A P P E N D I X
B
Cable Connector Pinouts
This appendix contains the following sections that list pinouts for the connectors
used with the CSS 11501, CSS 11503, and CSS 11506:
•
RJ-45 Fast Ethernet Connector Pinouts
•
RJ-45 RS-232 Console Port Pinouts
•
RJ-45 Management Connector Pinouts
•
RJ-45 1000BASE-T GBIC Connector Pinouts
Cisco 11500 Series Content Services Switch Hardware Installation Guide
78-16421-01
B-1
Appendix B
Cable Connector Pinouts
RJ-45 Fast Ethernet Connector Pinouts
RJ-45 Fast Ethernet Connector Pinouts
Table B-1 lists the pinouts for the RJ-45 Fast Ethernet connectors on the
CSS 11501 front panel and the 8- and 16-port Fast Ethernet Modules in the
CSS 11503 or CSS 11506 chassis. The 10/100 Mb ports support autocrossover,
allowing a connection to be made to any device using an Ethernet-type cable.
Table B-1
RJ-45 Fast Ethernet Connector Pinouts
Signal Name
RJ-45 Fast Ethernet Pin
Numbers
RX +
1
RX -
2
TX +
3
Unconnected
4
Unconnected
5
TX -
6
Unconnected
7
Unconnected
8
Cisco 11500 Series Content Services Switch Hardware Installation Guide
B-2
78-16421-01
Appendix B
Cable Connector Pinouts
RJ-45 RS-232 Console Port Pinouts
RJ-45 RS-232 Console Port Pinouts
Table B-2 lists the RJ-45 RS-232 Serial connector pinouts for the Console port on
the CSS 11501 front panel and the CSS 11503 or CSS 11506 Switch Control
Module (SCM).
Table B-2
RJ-45 RS-232 Serial Connector Pinouts for the Console Port
Signal Name
Pin Number
RTS
1
DTR
2
TXD
3
GND
4
GND
5
RXD
6
DSR
7
CTS
8
The following sections provide the pinouts for:
•
Connecting the Console Port to a PC
•
Connecting the Console Port to a Terminal
•
Connecting the Console Port to a Modem
Cisco 11500 Series Content Services Switch Hardware Installation Guide
78-16421-01
B-3
Appendix B
Cable Connector Pinouts
RJ-45 RS-232 Console Port Pinouts
Connecting the Console Port to a PC
To connect the console port to a PC running terminal emulation software, use an
RJ-45 to RJ-45 rollover cable and an RJ-45 to DB-9 female DTE adapter labeled
Terminal. The DTE adapter is part of the accessory kit.
Table B-3 lists the signals of the console port and PC console device, and the
pinouts of the rollover cable and the DTE adapter interfaces.
Table B-3
Console Port to PC Signals and Pinouts
Console
Port Signal
RJ-45 Rollover
Console Port to Cable to RJ-45
RJ-45 Rollover DTE Adapter
Pinouts
Cable Pinouts
DB-9 DTE
Adapter to PC
Console
PC Console
Device Pinouts Device Signal
RTS
1
8
8
CTS
DTR
2
7
6
DSR
TXD
3
6
2
RXD
GND
4
5
5
GND
GND
5
4
5
GND
RXD
6
3
3
TXD
DSR
7
3
4
DTR
CTS
8
1
7
RTS
Cisco 11500 Series Content Services Switch Hardware Installation Guide
B-4
78-16421-01
Appendix B
Cable Connector Pinouts
RJ-45 RS-232 Console Port Pinouts
Connecting the Console Port to a Terminal
To connect the console port to a terminal, use an RJ-45 to RJ-45 rollover cable
and an RJ-45 to DB-25 female DTE adapter. The DTE adapter is part of the
accessory kit.
Table B-4 lists the signals of the console port and terminal device, and the pinouts
of the rollover cable and the DTE adapter interfaces.
Table B-4
Console Port to Terminal Signals and Pinouts
Console
Port Signal
RJ-45 Rollover
Console Port to Cable to RJ-45
RJ-45 Rollover DTE Adapter
Pinouts
Cable Pinouts
DB-25 DTE
Adapter to
Terminal
Pinouts
Terminal
Device Signal
RTS
1
8
5
CTS
DTR
2
7
6
DSR
TXD
3
6
3
RXD
GND
4
5
7
GND
GND
5
4
7
GND
RXD
6
3
2
TXD
DSR
7
3
20
DTR
CTS
8
1
4
RTS
Cisco 11500 Series Content Services Switch Hardware Installation Guide
78-16421-01
B-5
Appendix B
Cable Connector Pinouts
RJ-45 RS-232 Console Port Pinouts
Connecting the Console Port to a Modem
To connect the console port to a terminal, use an RJ-45 to RJ-45 rollover cable
and an RJ-45 to DB-25 male DCE adapter.
Table B-5 lists the signals of the console port and modem device, and the pinouts
of the rollover cable and the DCE adapter interfaces.
Table B-5
Console Port to Modem Signals and Pinouts
Console
Port Signal
RJ-45 Rollover
Console Port to Cable to RJ-45
RJ-45 Rollover DCE Adapter
Pinouts
Cable Pinouts
DB-25 DCE
Adapter to
Modem
Pinouts
Modem
Device Signal
RTS
1
8
4
RTS
DTR
2
7
20
DTR
TXD
3
6
3
TXD
GND
4
5
7
GND
GND
5
4
7
GND
RXD
6
3
2
RXD
DSR
7
3
8
DCD
CTS
8
1
5
CTS
Cisco 11500 Series Content Services Switch Hardware Installation Guide
B-6
78-16421-01
Appendix B
Cable Connector Pinouts
RJ-45 Management Connector Pinouts
RJ-45 Management Connector Pinouts
Table B-6 lists the RJ-45 10-MB Ethernet Management connector pinouts on the
CSS 11501 front panel and the CSS 11503 or CSS 11506 SCM.
Table B-6
RJ-45 Management Connector Pinouts
Signal Name
Pin Number
TX +
1
TX -
2
RX +
3
Unconnected
4
Unconnected
5
RX -
6
Unconnected
7
Unconnected
8
Cisco 11500 Series Content Services Switch Hardware Installation Guide
78-16421-01
B-7
Appendix B
Cable Connector Pinouts
RJ-45 1000BASE-T GBIC Connector Pinouts
RJ-45 1000BASE-T GBIC Connector Pinouts
Table B-7 lists the RJ-45 1000BASE-T GBIC connector pinouts.
Table B-7
RJ-45 1000BASE-T GBIC Connector Pinouts
Signal Name
Pin Number
TP0 +
1
TP0 -
2
TP1+
3
TP2+
4
TP2-
5
TP1-
6
TP3+
7
TP3-
8
The 1000BASE-T SFP GBIC on a CSS supports 1000 Mbps full-duplex operation
only and uses standard four twisted-pair, Category 5e cable at lengths up to
328.08 ft. (100 m).
Figure B-1 and Figure B-2 show the schematics of four twisted-pair
straight-through and crossover cables for the 1000BASE-T GBIC module port.
When connecting the CSS to servers, workstations, and routers, use the
straight-through cable. When connecting the CSS to switches and repeaters, use
the crossover cable.
Cisco 11500 Series Content Services Switch Hardware Installation Guide
B-8
78-16421-01
Appendix B
Cable Connector Pinouts
RJ-45 1000BASE-T GBIC Connector Pinouts
CSS
Server or Router
1 TPO+
1 TP1+
2 TPO-
2 TP1-
3 TP1+
3 TPO+
6 TP1-
6 TPO-
4 TP2+
4 TP3+
5 TP2-
5 TP3-
7 TP3+
7 TP2+
8 TP3-
8 TP2-
Figure B-2
119598
Four Twisted-Pair Straight-Through Cable Schematic for the CSS
1000BASE-T GBIC Module Port
Four Twisted-Pair Crossover Cable Schematic for the CSS
1000BASE-T GBIC Module Port
CSS
Switch
1 TPO+
1 TP0+
2 TPO-
2 TP0-
3 TP1+
3 TP1+
6 TP1-
6 TP1-
4 TP2+
4 TP2+
5 TP2-
5 TP2-
7 TP3+
7 TP3+
8 TP3-
8 TP3-
119599
Figure B-1
Cisco 11500 Series Content Services Switch Hardware Installation Guide
78-16421-01
B-9
Appendix B
Cable Connector Pinouts
RJ-45 1000BASE-T GBIC Connector Pinouts
Cisco 11500 Series Content Services Switch Hardware Installation Guide
B-10
78-16421-01
A P P E N D I X
C
Connecting a Modem to the CSS
This appendix explains how to configure a dial-up modem and connect it to the
console port on the CSS. Connecting a modem to the CSS allows you to remotely
perform the same CSS console operations as you would locally. The CSS supports
the following modems:
•
3Com (US Robotics) Courier Model 3453 Modem
•
3Com OfficeConnect Model 3294 Modem
•
3Com (US Robotics) Sportster Model 5686 Modem
•
MultiTech Model MT5634ZBA Modem
This appendix includes the following sections:
•
Configuring a Modem
•
Cabling a Modem to the CSS
Configuring a Modem
You must configure the modem before you can connect it to the CSS. You can
connect the modem to a terminal or a PC using a terminal emulation program,
such as Hyperterm. If you connect the modem to the COM port on a PC, you need
the following cable and connectors (see Appendix B, Cable Connector Pinouts):
•
RJ-45-to-RJ-45 rolled cable
•
RJ-45-to-DB-25 modem adapter
•
DB-9-to-RJ-45 terminal adapter
Cisco 11500 Series Content Services Switch Hardware Installation Guide
78-16421-01
C-1
Appendix C
Connecting a Modem to the CSS
Cabling a Modem to the CSS
Then, you configure the modem by entering commands from the Attention (AT)
command set and, if applicable, setting the configuration switches on the modem.
Although the process to configure the modem may vary from one modem to
another, configure your modem so that its resulting behavior is as follows:
•
Answers a call on the first ring
•
Disables both hardware and software flow control mechanisms
•
Ignores modem control signals DTR and RTS
•
Suppresses echoing of command mode input
•
Disables recognition of AT commands
Cabling a Modem to the CSS
After you configure the modem, unplug the flat rolled RJ-45-to-RJ-45 cable from
the terminal adapter on the PC and connect the cable to the SCM console port of
the CSS. On a CSS 11503 or CSS 11506, the console port is on the SCM (see
Figure C-1). If you have two SCMs installed in the CSS, make sure that you
connect the cable to the active SCM.
Figure C-1
Switch Control Module Console Connector
MANAGEM
ENT
10BASE-T
DUPLEX
CSS5-SCM-2GE
GE 1
LINK
GE 2
PCMCIA
LINK
87315
LINK/ACT
SLOT 1
SLOT 0
CONSOL
E
System Control
STATUS
1
1
Console connector
Cisco 11500 Series Content Services Switch Hardware Installation Guide
C-2
78-16421-01
Appendix C
Connecting a Modem to the CSS
Cabling a Modem to the CSS
Make sure that the settings on the remote console match the CSS default settings
specified in Table C-1.
Table C-1
Note
CSS Console Port Default Settings
Parameters
Default Settings
Baud
9600
Data Bits
8
Parity
None
Stop Bits
1
Terminal Type
VT100/ANSI
Flow Control
None
When you remotely log in to the CSS through a modem, make sure that you log
out before disconnecting from the session. Use the idle timeout minutes
command to set the maximum amount of time that the console session can be idle
on the CSS before the CSS logs it out. By default, the timeout is disabled.
Cisco 11500 Series Content Services Switch Hardware Installation Guide
78-16421-01
C-3
Appendix C
Connecting a Modem to the CSS
Cabling a Modem to the CSS
Cisco 11500 Series Content Services Switch Hardware Installation Guide
C-4
78-16421-01
A P P E N D I X
D
Regulatory Compliance and Safety
Information for the Cisco 11500 Series
Content Services Switch
This appendix provides international agency compliance information applicable
to the Cisco Content Services Switches (CSS) 11501, 11503, and 11506.
This appendix also provides translations of safety warnings. Use the information
in this appendix in conjunction with the information contained in the CSS
documentation set, listed in the “Related Documentation” section of the Preface.
This appendix includes the following sections:
•
Agency Approvals
•
Safety Requirements
•
Translated Safety Warnings
Cisco 11500 Series Content Services Switch Hardware Installation Guide
78-16421-01
D-1
Appendix D
Agency Approvals
Regulatory Compliance and Safety Information for the Cisco 11500 Series Content Services Switch
Agency Approvals
Table D-1 lists the regulatory approval requirements for the Cisco 11500 Series
CSSs.
Table D-1
Regulatory Approval Requirements
Regulatory
Requirement Category
Electromagnetic
Compatibility
(Emissions)
Approval Agency and Requirement
AS/NZS 3548:1995, Class A or CISPR 22:2002
CISPR 22 Class A, 1997
EN55022 or CISPR 22 Class A, Korean Criteria for in
country testing
FCC, 47CFR15 Sub Part B, Class A
EN55022 Class A, 1998
VCCI V-3/2001.4, Class A
CNS13438 (Taiwan)
ICES-003:1998, Class A
EN61000-3-2:2000, Harmonic Current Emissions
EN61000-3-3:1995, Power Line Flicker
Electromagnetic
Compatibility
(Immunity)
EN55024:1998 [Reference]
The equipment complies with the requirements of the
following specifications as defined in the reference:
EN61000-4-2, ESD
EN61000-4-3, Radiated Immunity
EN61000-4-4, Electrical Fast Transients
EN61000-4-5, Surges
EN61000-4-6, Conducted Immunity
EN61000-4-11, Dips, Sags, and Voltage
Interruptions
EN50082-1:1992, Generic Immunity Requirements Light Industrial
Cisco 11500 Series Content Services Switch Hardware Installation Guide
D-2
78-16421-01
Appendix D
Regulatory Compliance and Safety Information for the Cisco 11500 Series Content Services Switch
Agency Approvals
FCC Class A Compliance Notice (United States)
This equipment has been tested and found to comply with the limits for a Class A
digital device, pursuant to Part 15 of the FCC Rules. These limits are designed to
provide reasonable protection against harmful interference when the equipment is
operated in a commercial environment. This equipment generates, uses, and can
radiate radio frequency energy and, if not installed and used in accordance with
the instruction manual, may cause harmful interference to radio communications.
Operation of this equipment in a residential area is likely to cause harmful
interference in which case the user will be required to correct the interference at
his own expense.
You can determine whether your equipment is causing interference by turning it
off. If the interference stops, it was probably caused by the Cisco equipment or
one of its peripheral devices. If the equipment causes interference to radio or
television reception, try to correct the interference by using one or more of the
following measures:
•
Turn the television or radio antenna until the interference stops.
•
Move the equipment to one side or the other of the television or radio.
•
Move the equipment farther away from the television or radio.
•
Plug the equipment into an outlet that is on a different circuit from the
television or radio. (That is, make certain the equipment and the television or
radio are on circuits controlled by different circuit breakers or fuses.)
Modifying the equipment without Cisco's authorization may result in the
equipment no longer complying with FCC requirements for Class A or Class B
digital devices. In that event, your right to use the equipment may be limited by
FCC regulations, and you may be required to correct any interference to radio or
television communications at your own expense.
Cisco 11500 Series Content Services Switch Hardware Installation Guide
78-16421-01
D-3
Appendix D
Agency Approvals
Regulatory Compliance and Safety Information for the Cisco 11500 Series Content Services Switch
FCC Compliance Information Statement (United States)
Cisco 11500 Series Content Services Switches (CSS 11503 and CSS 11506)
This equipment has been tested and found to comply with the limits for a Class A
digital device, pursuant to Part 15 of the FCC Rules. These limits are designed to
provide reasonable protection against harmful interference in a residential
installation. This equipment generates, uses and can radiate radio frequency
energy and, if not installed and used in accordance with the instructions, may
cause harmful interference to radio communications. However, there is no
guarantee that interference will not occur in a particular installation. If this
equipment does cause harmful interference to radio or television reception, which
can be determined by turning the equipment off and on, the user is encouraged to
try to correct the interference by one or more of the following measures:
•
Reorient or relocate the receiving antenna.
•
Increase the separation between the equipment and receiver.
•
Connect the equipment into an outlet on a circuit different from that to which
the receiver is connected.
•
Consult the dealer or an experienced radio/TV technician for help.
Note: equipment must be installed and operated using the relevant manuals and
must only be installed with the correct cables and connectors. Cisco Systems Inc.
is not responsible for any radio or television interference caused by unauthorized
changes or modifications to this equipment. Unauthorized changes or
modifications could void the user’s authority to operate the equipment.
This device complies with Part 15 of the FCC rules. Operation I subject to the
following two conditions: (1) this device may not cause harmful interference, and
(2) this device must accept any interference received, including interference that
may cause undesired operation.
Responsible party: Corporate Compliance Manager, Cisco Systems Inc.
Cisco Systems Inc.
170 West Tasman Drive
San Jose, CA 95134
USA
+408 526-7208
Cisco 11500 Series Content Services Switch Hardware Installation Guide
D-4
78-16421-01
Appendix D
Regulatory Compliance and Safety Information for the Cisco 11500 Series Content Services Switch
Agency Approvals
ICES-003 Class A Compliance Notice (Canada)
English Statement of Compliance
This class A digital apparatus complies with Canadian ICES-003.
French Statement of Compliance
Cet appareil numerique de la classe A est conforme a la norme NMB-003 du
Canada
Europe (EU)
This Apparatus complies with EN55022 Class A and EN55024/ EN50082-1
standard requirements in Europe.
Cisco 11500 Series Content Services Switch Hardware Installation Guide
78-16421-01
D-5
Appendix D
Agency Approvals
Regulatory Compliance and Safety Information for the Cisco 11500 Series Content Services Switch
Declaration of Conformity with Regard to the Directives
73/23/EEC and 89/336/EEC as amended by Directive 93/68/EEC
English:
Dansk:
This equipment is in compliance with the essential requirements and other
provisions of Directives 73/23/EEC and 89/336/EEC as amended by Directive
93/68/EEC.
Dette udstyr er i overensstemmelse med de ufravigelige hensyn og andre
bestemmelser i direktiv 73/23/EEC og 89/336/EEC som ændred i direktiv
93/68/EEC.
Deutsch:
Dieses Gerät entspricht den wesentlichen Anforderungen und weiteren
Bestimmungen der Richtlinien 73/23/EWG und 89/336/EWG mit der Ergänzung
durch Richtlinie 93/68/EWG.
Español:
Este equipo cumple con los requisitos esenciales y otras disposiciones de las
Directrices 73/23/EEC y 89/336/EEC de acuerdo a las modificaciones de la
Directriz 93/68/EEC.
Français:
Cet appareil remplit les principales conditions requises et autres dispositions
des Directives 73/23/EEC et 89/336/EEC, modifiées par la Directive 93/68/EEC.
Íslenska:
Þessir búnaður samrýmist lögboðnum kröfum og öðrum ákvæðum tilskipana
73/23/EBE og 89/336/EBE, með breytingum skv. tilskipun 93/68/EBE.
Italiano:
Questa apparecchiatura è conforme ai requisiti essenziali e altre disposizioni
delle Direttive 73/23/EEC e 89/336/EEC modificate con la Direttiva 93/68/EEC.
Nederlands:
Deze apparatuur voldoet aan de belangrijkste eisen en andere voorzieningen
van richtlijnen 73/23/EEC en 89/336/EEC zoals gewijzigd door richtlijn
93/68/EEC.
Norsk:
Dette utstyret samsvarer med de vesentligste kravene og andre regler i
direktivene 73/23/EEC og 89/336/EEC samt i tilleggsdirektiv 93/68/EEC.
Cisco 11500 Series Content Services Switch Hardware Installation Guide
D-6
78-16421-01
Appendix D
Regulatory Compliance and Safety Information for the Cisco 11500 Series Content Services Switch
Agency Approvals
Português:
Este equipamento satisfaz os requisitos essenciais e outras provisões das
Directivas 73/23/EEC e 89/336/EEC, conforme amendados pela Directiva
93/68/EEC.
Cisco 11500 Series CSS
Suomalainen:
Svenska:
Tämä laite on direktiivien 73/23/ETY ja 89/336/ETY (kuten muutettu
direktiivissä 93/68/ETY) keskeisten vaatimusten ja määräysten mukainen.
Denna utrustning uppfyller de väsentliga kraven och andra villkor i direktiven
73/23/EEC och 89/336/EEC enligt ändringarna i direktiv 93/68/EEC.
CISPR 22 Class A Warning
Warning
This is a class A product. In a domestic environment this product may cause
radio interference in which case the user may be required to take adequate
measures.
Cisco 11500 Series Content Services Switch Hardware Installation Guide
78-16421-01
D-7
Appendix D
Agency Approvals
Regulatory Compliance and Safety Information for the Cisco 11500 Series Content Services Switch
VCCI Class A Warning
Warning
This is a Class A product based on the standard of the Voluntary Control
Council for Interference by Information Technology Equipment (VCCI). If this
equipment is used in a domestic environment, radio disturbance may arise.
When such trouble occurs, the user may be required to take corrective
actions.
Waarschuwing
Dit is een product van klasse A gebaseerd op de VCCI-norm (Voluntary Control
Council for Interference by Information Technology Equipment). Indien deze
apparatuur in een huishoudelijke omgeving wordt gebruikt, kan radiostoring
optreden. Wanneer dit probleem zich voordoet, kan het nodig zijn dat het door
de gebruiker wordt verholpen.
Varoitus
Tämä on "Voluntary Control Council for Interference by Information Technology
Equipment" (VCCI) -standardin mukaisesti luokan A laite. Jos tätä laitetta
käytetään kotiympäristössä, se voi aiheuttaa radiohäiriöitä. Ongelmien
esiintyessä käyttäjän on ehkä ryhdyttävä toimenpiteisiin tilanteen
korjaamiseksi.
Attention
Cet équipement est un produit de la Classe A basé sur les normes du VCCI
(Voluntary Control Council for Interference by Information Technology
Equipment). L'utilisation de cet équipement dans un environnement
domestique risque d'entraîner des brouillages radio-électriques. En présence
de tels brouillages, l'utilisateur sera peut-être amené à prendre des mesures
correctives.
Warnung
Dies ist laut Standard des Voluntary Control Council for Interference by
Information Technology Equipment (VCCI) ein Produkt der Klasse A. Wenn
dieses Gerät in einem häuslichen Umfeld gebaucht wird, können
Radiostörungen auftreten. Sollte das der Fall sein, muß der Benutzer
gegebenenfalls Gegenmaßnahmen ergreifen.
Cisco 11500 Series Content Services Switch Hardware Installation Guide
D-8
78-16421-01
Appendix D
Regulatory Compliance and Safety Information for the Cisco 11500 Series Content Services Switch
Agency Approvals
Avvertenza
Il presente è un prodotto di Classe A ai sensi della norma del Voluntary Control
Council for Interference by Information Technology Equipment (VCCI). Se
questa apparecchiatura viene usata in ambito domestico, è possibile che ne
derivino radiointerferenze. In questo caso, è possibile che all’utente venga
richiesto di prendere le opportune misure correttive.
Advarsel
Dette er et klasse A produkt basert på standard for Voluntary Control Council
for Interference by Information Technology Equipment (VCCI). Hvis dette
utstyret bruket i et hjemmemiljø, kan radioforstyrrelser eventuelt oppstå. Når
denne type problemer finner sted, kan det bli nødvendig at brukeren må
benytte seg av korrigerende handlinger.
Aviso
Este é um produto de Classe A baseado na norma do Voluntary Control Council
for Interference by Information Technology Equipment (Conselho de Controlo
Voluntário para a Interferência por Equipamento de Tecnologia de Informação)
(VCCI). Poderão ocorrer interferências de rádio, caso este equipamento seja
utilizado num ambiente doméstico. Quando ocorrer tal problema, o utilizador
poderá ter de tomar medidas correctivas.
Advertencia
Este es un producto de Clase A basado en el estándar del Voluntary Control
Council for Interference by Information Technology Equipment (VCCI ). Si este
equipo se usa en un entorno doméstico, puede provocar radiointerferencias.
Si ocurren tales problemas, el usuario debe tomar medidas correctivas.
Varning!
Detta är en klass A produkt enligt standarden som fastställts av Voluntary
Control Council for Interference by Information Technology Equipment (VCCI).
Om utrustningen används i hemmiljö kan den orsaka radiostörning. Om sådana
problem uppstår kan användaren behöva vidta åtgärder som rättar till
problemet.
Cisco 11500 Series Content Services Switch Hardware Installation Guide
78-16421-01
D-9
Appendix D
Agency Approvals
Regulatory Compliance and Safety Information for the Cisco 11500 Series Content Services Switch
Class A Warning for Taiwan and Other Traditional Chinese
Markets
Warning
This is a Class A Information Product, when used in residential environment, it
may cause radio frequency interference, under such circumstances, the user
may be requested to take appropriate countermeasures.
Class A EMC Warning
Warning
This is a Class A Device and is registered for EMC requirements for industrial
use. The seller or buyer should be aware of this. If this type was sold or
purchased by mistake, it should be replaced with a residential-use type.
Cisco 11500 Series Content Services Switch Hardware Installation Guide
D-10
78-16421-01
Appendix D
Regulatory Compliance and Safety Information for the Cisco 11500 Series Content Services Switch
Safety Requirements
Safety Requirements
This section identifies safety requirements with which Cisco Content Services
Switches comply.
US
UL 60950 Third Edition - Safety of Information Technology Equipment.
Canada
CAN/CSA 22.2 No. 60950-00 Third Edition - Safety of Information Technology
Equipment.
Europe
EN 60950 - Safety of Information Technology Equipment; incorporating
Amendments 1, 2, 3, 4, and 11 with all National Deviations.
IEC 60950 Second Edition - Safety of Information Technology Equipment;
incorporating Amendments 1, 2, 3, and 4.
Cisco 11500 Series Content Services Switch Hardware Installation Guide
78-16421-01
D-11
Appendix D
Safety Requirements
Regulatory Compliance and Safety Information for the Cisco 11500 Series Content Services Switch
Mexico
NOM-019-SCFI-1998, Safety of Data Processing Equipment.
Australia
ACA TS001 1997 Test Report and Statement of Compliance AS/NZS3260
incorporating Amendment 1, 2, 3, and 4.
Laser Safety
This section identifies laser safety requirements with which Cisco Content
Services Switches comply.
US
21CFR 1040, Subchapter J
Europe
EN60825-1
EN60825-2
International
IEC60825-1
IEC60825-2
Cisco 11500 Series Content Services Switch Hardware Installation Guide
D-12
78-16421-01
Appendix D
Regulatory Compliance and Safety Information for the Cisco 11500 Series Content Services Switch
Translated Safety Warnings
Translated Safety Warnings
This section repeats, in multiple languages, the warnings contained in this
publication. In addition, this section contains translated warnings that can be used
with other switch- or router-specific documents, such as those describing the
individual field-replaceable units (FRUs) applicable to a particular switch or
router.
Warning Definition
Warning
IMPORTANT SAFETY INSTRUCTIONS
This warning symbol means danger. You are in a situation that could cause
bodily injury. Before you work on any equipment, be aware of the hazards
involved with electrical circuitry and be familiar with standard practices for
preventing accidents. Use the statement number provided at the end of each
warning to locate its translation in the translated safety warnings that
accompanied this device. Statement 1071
SAVE THESE INSTRUCTIONS
Waarschuwing
BELANGRIJKE VEILIGHEIDSINSTRUCTIES
Dit waarschuwingssymbool betekent gevaar. U verkeert in een situatie die
lichamelijk letsel kan veroorzaken. Voordat u aan enige apparatuur gaat
werken, dient u zich bewust te zijn van de bij elektrische schakelingen
betrokken risico's en dient u op de hoogte te zijn van de standaard praktijken
om ongelukken te voorkomen. Gebruik het nummer van de verklaring
onderaan de waarschuwing als u een vertaling van de waarschuwing die bij
het apparaat wordt geleverd, wilt raadplegen.
BEWAAR DEZE INSTRUCTIES
Cisco 11500 Series Content Services Switch Hardware Installation Guide
78-16421-01
D-13
Appendix D Regulatory Compliance and Safety Information for the Cisco 11500 Series Content Services Switch
Translated Safety Warnings
Varoitus
TÄRKEITÄ TURVALLISUUSOHJEITA
Tämä varoitusmerkki merkitsee vaaraa. Tilanne voi aiheuttaa ruumiillisia
vammoja. Ennen kuin käsittelet laitteistoa, huomioi sähköpiirien
käsittelemiseen liittyvät riskit ja tutustu onnettomuuksien yleisiin
ehkäisytapoihin. Turvallisuusvaroitusten käännökset löytyvät laitteen
mukana toimitettujen käännettyjen turvallisuusvaroitusten joukosta
varoitusten lopussa näkyvien lausuntonumeroiden avulla.
SÄILYTÄ NÄMÄ OHJEET
Attention
IMPORTANTES INFORMATIONS DE SÉCURITÉ
Ce symbole d'avertissement indique un danger. Vous vous trouvez dans une
situation pouvant entraîner des blessures ou des dommages corporels. Avant
de travailler sur un équipement, soyez conscient des dangers liés aux circuits
électriques et familiarisez-vous avec les procédures couramment utilisées
pour éviter les accidents. Pour prendre connaissance des traductions des
avertissements figurant dans les consignes de sécurité traduites qui
accompagnent cet appareil, référez-vous au numéro de l'instruction situé à la
fin de chaque avertissement.
CONSERVEZ CES INFORMATIONS
Warnung
WICHTIGE SICHERHEITSHINWEISE
Dieses Warnsymbol bedeutet Gefahr. Sie befinden sich in einer Situation, die
zu Verletzungen führen kann. Machen Sie sich vor der Arbeit mit Geräten mit
den Gefahren elektrischer Schaltungen und den üblichen Verfahren zur
Vorbeugung vor Unfällen vertraut. Suchen Sie mit der am Ende jeder Warnung
angegebenen Anweisungsnummer nach der jeweiligen Übersetzung in den
übersetzten Sicherheitshinweisen, die zusammen mit diesem Gerät
ausgeliefert wurden.
BEWAHREN SIE DIESE HINWEISE GUT AUF.
Cisco 11500 Series Content Services Switch Hardware Installation Guide
D-14
78-16421-01
Appendix D
Regulatory Compliance and Safety Information for the Cisco 11500 Series Content Services Switch
Translated Safety Warnings
Avvertenza
IMPORTANTI ISTRUZIONI SULLA SICUREZZA
Questo simbolo di avvertenza indica un pericolo. La situazione potrebbe
causare infortuni alle persone. Prima di intervenire su qualsiasi
apparecchiatura, occorre essere al corrente dei pericoli relativi ai circuiti
elettrici e conoscere le procedure standard per la prevenzione di incidenti.
Utilizzare il numero di istruzione presente alla fine di ciascuna avvertenza per
individuare le traduzioni delle avvertenze riportate in questo documento.
CONSERVARE QUESTE ISTRUZIONI
Advarsel
VIKTIGE SIKKERHETSINSTRUKSJONER
Dette advarselssymbolet betyr fare. Du er i en situasjon som kan føre til skade
på person. Før du begynner å arbeide med noe av utstyret, må du være
oppmerksom på farene forbundet med elektriske kretser, og kjenne til
standardprosedyrer for å forhindre ulykker. Bruk nummeret i slutten av hver
advarsel for å finne oversettelsen i de oversatte sikkerhetsadvarslene som
fulgte med denne enheten.
TA VARE PÅ DISSE INSTRUKSJONENE
Aviso
INSTRUÇÕES IMPORTANTES DE SEGURANÇA
Este símbolo de aviso significa perigo. Você está em uma situação que poderá
ser causadora de lesões corporais. Antes de iniciar a utilização de qualquer
equipamento, tenha conhecimento dos perigos envolvidos no manuseio de
circuitos elétricos e familiarize-se com as práticas habituais de prevenção de
acidentes. Utilize o número da instrução fornecido ao final de cada aviso para
localizar sua tradução nos avisos de segurança traduzidos que acompanham
este dispositivo.
GUARDE ESTAS INSTRUÇÕES
Cisco 11500 Series Content Services Switch Hardware Installation Guide
78-16421-01
D-15
Appendix D Regulatory Compliance and Safety Information for the Cisco 11500 Series Content Services Switch
Translated Safety Warnings
¡Advertencia!
INSTRUCCIONES IMPORTANTES DE SEGURIDAD
Este símbolo de aviso indica peligro. Existe riesgo para su integridad física.
Antes de manipular cualquier equipo, considere los riesgos de la corriente
eléctrica y familiarícese con los procedimientos estándar de prevención de
accidentes. Al final de cada advertencia encontrará el número que le ayudará
a encontrar el texto traducido en el apartado de traducciones que acompaña
a este dispositivo.
GUARDE ESTAS INSTRUCCIONES
Varning!
VIKTIGA SÄKERHETSANVISNINGAR
Denna varningssignal signalerar fara. Du befinner dig i en situation som kan
leda till personskada. Innan du utför arbete på någon utrustning måste du vara
medveten om farorna med elkretsar och känna till vanliga förfaranden för att
förebygga olyckor. Använd det nummer som finns i slutet av varje varning för
att hitta dess översättning i de översatta säkerhetsvarningar som medföljer
denna anordning.
SPARA DESSA ANVISNINGAR
Cisco 11500 Series Content Services Switch Hardware Installation Guide
D-16
78-16421-01
Appendix D
Regulatory Compliance and Safety Information for the Cisco 11500 Series Content Services Switch
Translated Safety Warnings
Cisco 11500 Series Content Services Switch Hardware Installation Guide
78-16421-01
D-17
Appendix D Regulatory Compliance and Safety Information for the Cisco 11500 Series Content Services Switch
Translated Safety Warnings
Aviso
INSTRUÇÕES IMPORTANTES DE SEGURANÇA
Este símbolo de aviso significa perigo. Você se encontra em uma situação em
que há risco de lesões corporais. Antes de trabalhar com qualquer
equipamento, esteja ciente dos riscos que envolvem os circuitos elétricos e
familiarize-se com as práticas padrão de prevenção de acidentes. Use o
número da declaração fornecido ao final de cada aviso para localizar sua
tradução nos avisos de segurança traduzidos que acompanham o dispositivo.
GUARDE ESTAS INSTRUÇÕES
Advarsel
VIGTIGE SIKKERHEDSANVISNINGER
Dette advarselssymbol betyder fare. Du befinder dig i en situation med risiko
for legemesbeskadigelse. Før du begynder arbejde på udstyr, skal du være
opmærksom på de involverede risici, der er ved elektriske kredsløb, og du
skal sætte dig ind i standardprocedurer til undgåelse af ulykker. Brug
erklæringsnummeret efter hver advarsel for at finde oversættelsen i de
oversatte advarsler, der fulgte med denne enhed.
GEM DISSE ANVISNINGER
Cisco 11500 Series Content Services Switch Hardware Installation Guide
D-18
78-16421-01
Appendix D
Regulatory Compliance and Safety Information for the Cisco 11500 Series Content Services Switch
Translated Safety Warnings
Cisco 11500 Series Content Services Switch Hardware Installation Guide
78-16421-01
D-19
Appendix D Regulatory Compliance and Safety Information for the Cisco 11500 Series Content Services Switch
Translated Safety Warnings
Cisco 11500 Series Content Services Switch Hardware Installation Guide
D-20
78-16421-01
Appendix D
Regulatory Compliance and Safety Information for the Cisco 11500 Series Content Services Switch
Translated Safety Warnings
Cisco 11500 Series Content Services Switch Hardware Installation Guide
78-16421-01
D-21
Appendix D Regulatory Compliance and Safety Information for the Cisco 11500 Series Content Services Switch
Translated Safety Warnings
Battery Handling
Warning
There is the danger of explosion if the battery is replaced incorrectly. Replace
the battery only with the same or equivalent type recommended by the
manufacturer. Dispose of used batteries according to the manufacturer’s
instructions. Statement 1015
Waarschuwing
Er is ontploffingsgevaar als de batterij verkeerd vervangen wordt. Vervang de
batterij slechts met hetzelfde of een equivalent type dat door de fabrikant
aanbevolen is. Gebruikte batterijen dienen overeenkomstig
fabrieksvoorschriften weggeworpen te worden.
Varoitus
Räjähdyksen vaara, jos akku on vaihdettu väärään akkuun. Käytä
vaihtamiseen ainoastaan saman- tai vastaavantyyppistä akkua, joka on
valmistajan suosittelema. Hävitä käytetyt akut valmistajan ohjeiden mukaan.
Attention
Danger d'explosion si la pile n'est pas remplacée correctement. Ne la
remplacer que par une pile de type semblable ou équivalent, recommandée
par le fabricant. Jeter les piles usagées conformément aux instructions du
fabricant.
Warnung
Bei Einsetzen einer falschen Batterie besteht Explosionsgefahr. Ersetzen Sie
die Batterie nur durch den gleichen oder vom Hersteller empfohlenen
Batterietyp. Entsorgen Sie die benutzten Batterien nach den Anweisungen des
Herstellers.
Avvertenza
Pericolo di esplosione se la batteria non è installata correttamente. Sostituire
solo con una di tipo uguale o equivalente, consigliata dal produttore.
Eliminare le batterie usate secondo le istruzioni del produttore.
Advarsel
Det kan være fare for eksplosjon hvis batteriet skiftes på feil måte. Skift kun
med samme eller tilsvarende type som er anbefalt av produsenten. Kasser
brukte batterier i henhold til produsentens instruksjoner.
Cisco 11500 Series Content Services Switch Hardware Installation Guide
D-22
78-16421-01
Appendix D
Regulatory Compliance and Safety Information for the Cisco 11500 Series Content Services Switch
Translated Safety Warnings
Aviso
¡Advertencia!
Varning!
Existe perigo de explosão se a bateria for substituída incorrectamente.
Substitua a bateria por uma bateria igual ou de um tipo equivalente
recomendado pelo fabricante. Destrua as baterias usadas conforme as
instruções do fabricante.
Existe peligro de explosión si la batería se reemplaza de manera incorrecta.
Reemplazar la batería exclusivamente con el mismo tipo o el equivalente
recomendado por el fabricante. Desechar las baterías gastadas según las
instrucciones del fabricante.
Explosionsfara vid felaktigt batteribyte. Ersätt endast batteriet med samma
batterityp som rekommenderas av tillverkaren eller motsvarande. Följ
tillverkarens anvisningar vid kassering av använda batterier.
Cisco 11500 Series Content Services Switch Hardware Installation Guide
78-16421-01
D-23
Appendix D Regulatory Compliance and Safety Information for the Cisco 11500 Series Content Services Switch
Translated Safety Warnings
Invisible Laser Radiation
Warning
Waarschuwing
Varoitus
Invisible laser radiation present. Statement 1016
Onzichtbare laserstraling aanwezig.
Näkymättömiä lasersäteitä.
Attention
Rayonnement laser actif mais invisible.
Warnung
Unsichtbare Laserstrahlung.
Avvertenza
Advarsel
Aviso
¡Advertencia!
Varning!
Radiazione laser invisibile.
Usynlig laserstråling.
Radiação laser invisível presente.
Existe radiación láser invisible.
Nu pågående osynlig laserstrålning.
Cisco 11500 Series Content Services Switch Hardware Installation Guide
D-24
78-16421-01
Appendix D
Regulatory Compliance and Safety Information for the Cisco 11500 Series Content Services Switch
Translated Safety Warnings
Jewelry Removal Warning
Warning
Waarschuwing
Before working on equipment that is connected to power lines, remove
jewelry (including rings, necklaces, and watches). Metal objects will heat up
when connected to power and ground and can cause serious burns or weld the
metal object to the terminals. Statement 43
Alvorens aan apparatuur te werken die met elektrische leidingen is
verbonden, sieraden (inclusief ringen, kettingen en horloges) verwijderen.
Metalen voorwerpen worden warm wanneer ze met stroom en aarde zijn
verbonden, en kunnen ernstige brandwonden veroorzaken of het metalen
voorwerp aan de aansluitklemmen lassen.
Varoitus
Ennen kuin työskentelet voimavirtajohtoihin kytkettyjen laitteiden parissa,
ota pois kaikki korut (sormukset, kaulakorut ja kellot mukaan lukien).
Metalliesineet kuumenevat, kun ne ovat yhteydessä sähkövirran ja maan
kanssa, ja ne voivat aiheuttaa vakavia palovammoja tai hitsata metalliesineet
kiinni liitäntänapoihin.
Attention
Avant d’accéder à cet équipement connecté aux lignes électriques, ôter tout
bijou (anneaux, colliers et montres compris). Lorsqu’ils sont branchés à
l’alimentation et reliés à la terre, les objets métalliques chauffent, ce qui peut
provoquer des blessures graves ou souder l’objet métallique aux bornes.
Warnung
Vor der Arbeit an Geräten, die an das Netz angeschlossen sind, jeglichen
Schmuck (einschließlich Ringe, Ketten und Uhren) abnehmen.
Metallgegenstände erhitzen sich, wenn sie an das Netz und die Erde
angeschlossen werden, und können schwere Verbrennungen verursachen
oder an die Anschlußklemmen angeschweißt werden.
Avvertenza
Prima di intervenire su apparecchiature collegate alle linee di alimentazione,
togliersi qualsiasi monile (inclusi anelli, collane, braccialetti ed orologi). Gli
oggetti metallici si riscaldano quando sono collegati tra punti di
alimentazione e massa: possono causare ustioni gravi oppure il metallo può
saldarsi ai terminali.
Cisco 11500 Series Content Services Switch Hardware Installation Guide
78-16421-01
D-25
Appendix D Regulatory Compliance and Safety Information for the Cisco 11500 Series Content Services Switch
Translated Safety Warnings
Advarsel
Fjern alle smykker (inkludert ringer, halskjeder og klokker) før du skal arbeide
på utstyr som er koblet til kraftledninger. Metallgjenstander som er koblet til
kraftledninger og jord blir svært varme og kan forårsake alvorlige
brannskader eller smelte fast til polene.
Aviso
Antes de trabalhar em equipamento que esteja ligado a linhas de corrente,
retire todas as jóias que estiver a usar (incluindo anéis, fios e relógios). Os
objectos metálicos aquecerão em contacto com a corrente e em contacto com
a ligação à terra, podendo causar queimaduras graves ou ficarem soldados
aos terminais.
¡Advertencia!
Antes de operar sobre equipos conectados a líneas de alimentación, quitarse
las joyas (incluidos anillos, collares y relojes). Los objetos de metal se
calientan cuando se conectan a la alimentación y a tierra, lo que puede
ocasionar quemaduras graves o que los objetos metálicos queden soldados a
los bornes.
Varning!
Tag av alla smycken (inklusive ringar, halsband och armbandsur) innan du
arbetar på utrustning som är kopplad till kraftledningar. Metallobjekt hettas
upp när de kopplas ihop med ström och jord och kan förorsaka allvarliga
brännskador; metallobjekt kan också sammansvetsas med kontakterna.
Cisco 11500 Series Content Services Switch Hardware Installation Guide
D-26
78-16421-01
Appendix D
Regulatory Compliance and Safety Information for the Cisco 11500 Series Content Services Switch
Translated Safety Warnings
Installation Instructions
Warning
Read the installation instructions before connecting the system to the power
source. Statement 1004
Waarschuwing
Raadpleeg de installatie-instructies voordat u het systeem op de voedingsbron
aansluit.
Varoitus
Lue asennusohjeet ennen järjestelmän yhdistämistä virtalähteeseen.
Attention
Avant de brancher le système sur la source d'alimentation, consulter les
directives d'installation.
Warnung
Vor dem Anschließen des Systems an die Stromquelle die
Installationsanweisungen lesen.
Avvertenza
Advarsel
Consultare le istruzioni di installazione prima di collegare il sistema
all'alimentatore.
Les installasjonsinstruksjonene før systemet kobles til strømkilden.
Aviso
Leia as instruções de instalação antes de ligar o sistema à fonte de energia.
¡Advertencia!
Lea las instrucciones de instalación antes de conectar el sistema a la red de
alimentación.
Cisco 11500 Series Content Services Switch Hardware Installation Guide
78-16421-01
D-27
Appendix D Regulatory Compliance and Safety Information for the Cisco 11500 Series Content Services Switch
Translated Safety Warnings
Varning!
Läs installationsanvisningarna innan du kopplar systemet till
strömförsörjningsenheten.
Invisible Laser Radiation Warning
Warning
Because invisible laser radiation may be emitted from the aperture of the port
when no cable is connected, avoid exposure to laser radiation and do not
stare into open apertures. Statement 70
Waarschuwing
Omdat er onzichtbare laserstraling uit de opening van de poort geëmitteerd
kan worden wanneer er geen kabel aangesloten is, dient men om blootstelling
aan laserstraling te vermijden niet in de open openingen te kijken.
Varoitus
Kun porttiin ei ole kytketty kaapelia, portin aukosta voi vuotaa näkymätöntä
lasersäteilyä. Älä katso avoimiin aukkoihin, jotta et altistu säteilylle.
Attention
Etant donné qu’un rayonnement laser invisible peut être émis par l’ouverture
du port quand aucun câble n’est connecté, ne pas regarder dans les
ouvertures béantes afin d’éviter tout risque d’exposition au rayonnement
laser.
Cisco 11500 Series Content Services Switch Hardware Installation Guide
D-28
78-16421-01
Appendix D
Regulatory Compliance and Safety Information for the Cisco 11500 Series Content Services Switch
Translated Safety Warnings
Warnung
Avvertenza
Aus der Öffnung des Ports kann unsichtbare Laserstrahlung austreten, wenn
kein Kabel angeschlossen ist. Kontakt mit Laserstrahlung vermeiden und nicht
in offene Öffnungen blicken.
Poiché quando nessun cavo è collegato alla porta, da quest’ultima potrebbe
essere emessa radiazione laser invisibile, evitare l’esposizione a tale
radiazione e non fissare con gli occhi porte a cui non siano collegati cavi.
Advarsel
Usynlige laserstråler kan sendes ut fra åpningen på utgangen når ingen kabel
er tilkoblet. Unngå utsettelse for laserstråling og se ikke inn i åpninger som
ikke er tildekket.
Aviso
Evite uma exposição à radiação laser e não olhe através de aberturas
expostas, porque poderá ocorrer emissão de radiação laser invisível a partir
da abertura da porta, quando não estiver qualquer cabo conectado.
¡Advertencia!
Cuando no esté conectado ningún cable, pueden emitirse radiaciones láser
invisibles por el orificio del puerto. Evitar la exposición a radiaciones láser y
no mirar fijamente los orificios abiertos.
Varning!
Osynliga laserstrålar kan sändas ut från öppningen i porten när ingen kabel är
ansluten. Undvik exponering för laserstrålning och titta inte in i ej täckta
öppningar.
Equipment Installation
Warning
Only trained and qualified personnel should be allowed to install, replace, or
service this equipment. Statement 1030
Waarschuwing
Deze apparatuur mag alleen worden geïnstalleerd, vervangen of hersteld door
bevoegd geschoold personeel.
Varoitus
Tämän laitteen saa asentaa, vaihtaa tai huoltaa ainoastaan koulutettu ja
laitteen tunteva henkilökunta.
Cisco 11500 Series Content Services Switch Hardware Installation Guide
78-16421-01
D-29
Appendix D Regulatory Compliance and Safety Information for the Cisco 11500 Series Content Services Switch
Translated Safety Warnings
Attention
Il est vivement recommandé de confier l'installation, le remplacement et la
maintenance de ces équipements à des personnels qualifiés et expérimentés.
Warnung
Das Installieren, Ersetzen oder Bedienen dieser Ausrüstung sollte nur
geschultem, qualifiziertem Personal gestattet werden.
Avvertenza
Questo apparato può essere installato, sostituito o mantenuto unicamente da
un personale competente.
Advarsel
Bare opplært og kvalifisert personell skal foreta installasjoner, utskiftninger
eller service på dette utstyret.
Aviso
¡Advertencia!
Varning!
Apenas pessoal treinado e qualificado deve ser autorizado a instalar,
substituir ou fazer a revisão deste equipamento.
Solamente el personal calificado debe instalar, reemplazar o utilizar este
equipo.
Endast utbildad och kvalificerad personal bör få tillåtelse att installera, byta
ut eller reparera denna utrustning.
Cisco 11500 Series Content Services Switch Hardware Installation Guide
D-30
78-16421-01
Appendix D
Regulatory Compliance and Safety Information for the Cisco 11500 Series Content Services Switch
Translated Safety Warnings
Aviso
Advarsel
Somente uma equipe treinada e qualificada tem permissão para instalar,
substituir ou dar manutenção a este equipamento.
Kun uddannede personer må installere, udskifte komponenter i eller servicere
dette udstyr.
Cisco 11500 Series Content Services Switch Hardware Installation Guide
78-16421-01
D-31
Appendix D Regulatory Compliance and Safety Information for the Cisco 11500 Series Content Services Switch
Translated Safety Warnings
Two Person Lifting Requirement
Warning
Two people are required to lift the chassis. To prevent injury, keep your back
straight and lift with your legs, not your back. Statement 164
Waarschuwing
Er zijn twee personen nodig om het chassis op te tillen. Om letsel te
voorkomen dient u uw rug recht te houden en met uw benen te tillen in plaats
van met uw rug.
Varoitus
Asennuspohjan nostamiseen tarvitaan kaksi henkilöä. Nosta jalkojen (ei
selän) avulla pitäen selkäsi suorana, jotta välttäisit loukkaantumista.
Attention
Le châssis doit être soulevé par au minimum deux personnes. Pour éviter tout
risque d'accident, maintenez le dos droit et poussez sur vos jambes. Ne
soulevez pas l'unité avec votre dos.
Warnung
Um das Chassis anzuheben, sind zwei Leute erforderlich. Um
Verletzungsgefahr auszuschalten, halten Sie den Rücken gerade und heben
Sie mit den Beinen, nicht dem Rücken.
Avvertenza
Per sollevare il chassis occorre l’intervento di due persone. Onde evitare il
rischio di lesioni personali, tenere sempre ben dritta la schiena e piegare solo
le gambe durante il sollevamento in modo da scaricare il peso sulle gambe e
non sulla schiena.
Advarsel
Det er nødvendig at to personer løfter kabinettet. Hold ryggen rett og løft med
beina - ikke ryggen - for å unngå personskade.
Aviso
São necessárias duas pessoas para levantar o chassis. Para evitar lesões,
mantenha as costas direitas e levante o peso com ambas as pernas, sem forçar
as costas.
Cisco 11500 Series Content Services Switch Hardware Installation Guide
D-32
78-16421-01
Appendix D
Regulatory Compliance and Safety Information for the Cisco 11500 Series Content Services Switch
Translated Safety Warnings
¡Advertencia!
Varning!
Se requieren dos personas para elevar el chasis. Para evitar lesiones,
mantenga su espalda en posición recta y levante con sus piernas, no con su
espalda.
Det krävs två personer för att lyfta chassit. För att undvika skador ska du hålla
ryggen rak och lyfta med benen, inte ryggen.
Chassis Lifting Warning
Warning
Two people are required to lift the chassis. Grasp the chassis underneath the
lower edge and lift with both hands. To prevent injury, keep your back straight
and lift with your legs, not your back. To prevent damage to the chassis and
components, never attempt to lift the chassis with the handles on the power
supplies or on the interface processors, or by the plastic panels on the front of
the chassis. These handles were not designed to support the weight of the
chassis. Statement 5
Waarschuwing
Er zijn twee mensen nodig om het frame op te tillen. Het frame dient onder de
onderste rand vastgegrepen en met beide handen omhooggetild te worden. Om
te voorkomen dat u letsel oploopt, dient u uw rug recht te houden en met
behulp van uw benen, niet uw rug, te tillen. Om schade aan het frame en de
onderdelen te voorkomen, mag u nooit proberen om het frame op te tillen aan
de handvatten op de voedingen of op de interface-processors of aan de
kunststof panelen aan de voorkant van het frame. Deze handvatten zijn niet
ontworpen om het gewicht van het frame te dragen.
Varoitus
Asennuspohjan nostamiseen tarvitaan kaksi henkilöä. Ota ote asennuspohjan
alareunasta ja nosta molemmin käsin. Pitäen selkäsi suorana nosta jalkojen
(ei selän) avulla, jotta välttäisit loukkaantumista. Älä yritä nostaa
asennuspohjaa virtalähteen tai liitäntäprosessorin kahvoista tai
asennuspohjan etuosan muovipaneeleista, jotta estät asennuspohjan ja
rakenneosien vaurioitumisen. Näitä kahvoja ei ole suunniteltu kestämään
asennuspohjan painoa.
Cisco 11500 Series Content Services Switch Hardware Installation Guide
78-16421-01
D-33
Appendix D Regulatory Compliance and Safety Information for the Cisco 11500 Series Content Services Switch
Translated Safety Warnings
Attention
Il faut deux personnes pour soulever le châssis. Le saisir par son rebord
inférieur et soulever des deux mains. Pour éviter tout trauma de la région
lombaire, garder le dos droit et soulever la charge en redressant les jambes.
Pour éviter d'endommager le châssis et ses composants, ne jamais tenter de
le soulever par les poignées des blocs d'alimentation ou des processeurs
d'interface, ni par les panneaux en plastique à l'avant du châssis. Ces
poignées ne sont pas prévues pour supporter le poids du châssis.
Warnung
Zum Anheben des Chassis werden zwei Personen benötigt. Fassen Sie das
Chassis unterhalb der unteren Kante an und heben es mit beiden Händen an.
Um Verletzungen zu vermeiden, ist der Rücken aufrecht zu halten und das
Gewicht mit den Beinen, nicht mit dem Rücken, anzuheben. Um Schäden an
Chassis und Bauteilen zu vermeiden, heben Sie das Chassis nie an den
Kunststoffabdeckungen vorne am Chassis oder mit den Griffen am Netzgerät
oder an den Schnittstellenprozessoren an. Diese Griffe sind nicht so
konstruiert, daß sie das Gewicht des Chassis tragen könnten.
Avvertenza
Il telaio va sollevato da due persone. Afferrare il telaio al di sotto del bordo
inferiore e sollevare con entrambe le mani. Per evitare infortuni, mantenere la
schiena diritta e sollevare il peso con le gambe, non con la schiena. Per
evitare danni al telaio ed ai componenti, non provare mai a sollevare il telaio
tramite le maniglie sugli alimentatori o sui processori di interfaccia oppure
tramite i pannelli in plastica sulla parte anteriore del telaio. Queste maniglie
non sono state progettate per sostenere il peso del telaio.
¡Advertencia!
Se necesitan dos personas para levantar el chasis. Sujete el chasis con las
dos manos por debajo del borde inferior y levántelo. Para evitar lesiones,
mantenga la espalda recta y levántelo con la fuerza de las piernas y no de la
espalda. Para evitar daños al chasis y a sus componentes, no intente nunca
levantar el chasis por las asas de las fuentes de alimentación o de los
procesadores de interfase, ni por los paneles de plástico situados en el frontal
del chasis. Las asas no han sido diseñadas para soportar el peso del chasis.
Advarsel
Det er nødvendig med to personer for å løfte kabinettet. Ta tak i kabinettet
under den nedre kanten, og løft med begge hender. Unngå personskade ved å
holde ryggen rett og løfte med bena, ikke ryggen. Unngå skade på kabinettet
og komponentene ved å aldri prøve å løfte kabinettet etter håndtakene på
strømforsyningsenhetene, grensesnittprosessorene eller i plastpanelene
foran på kabinettet. Disse håndtakene er ikke beregnet på å tåle vekten av
kabinettet.
Cisco 11500 Series Content Services Switch Hardware Installation Guide
D-34
78-16421-01
Appendix D
Regulatory Compliance and Safety Information for the Cisco 11500 Series Content Services Switch
Translated Safety Warnings
Aviso
São necessárias duas pessoas para levantar o chassis. Agarre o chassis
imediatamente abaixo da margem inferior, e levante-o com ambas as mãos.
Para evitar lesões, mantenha as suas costas direitas e levante o peso com
ambas as pernas, sem forçar as costas. Para prevenir danos no chassis e nos
seus componentes, nunca tente levantá-lo pelas asas das unidades
abastecedoras de energia, nem pelos processadores de interface, ou pelos
painéis plásticos localizados na frente do chassis. Estas asas não foram
criadas para suportar o peso do chassis.
Varning!
Det krävs två personer för att lyfta chassit. Fatta tag i chassit under den nedre
kanten och lyft med båda händerna. För att undvika skador skall du hålla
ryggen rak och lyfta med benen, inte ryggen. Chassit och delarna kan skadas
om du försöker lyfta chassit i handtagen på strömförsörjningsenheterna eller
gränssnittsprocessorerna, eller i plastpanelerna på chassits framsida.
Handtagen är inte konstruerade för att hålla chassits tyngd.
Cisco 11500 Series Content Services Switch Hardware Installation Guide
78-16421-01
D-35
Appendix D Regulatory Compliance and Safety Information for the Cisco 11500 Series Content Services Switch
Translated Safety Warnings
Aviso
São necessárias duas pessoas para suspender o chassi. Segure o chassi por
baixo das extremidades da parte inferior e suspenda-o com as duas mãos.
Para evitar lesões, mantenha-se ereto e suspenda-o flexionando as pernas
sem forçar as costas. Para evitar danos no chassi e em seus componentes,
nunca tente suspendê-los pelas alças nas fontes de alimentação ou nos
processadores da interface ou pelos painéis plásticos frontais.
Essas alças não foram projetadas para suportar o peso do chassi.
Advarsel
Der kræves to personer til at løfte chassiset. Tag fat i chassiset under den
nederste kant og løft med begge hænder. For at forhindre skader, skal du holde
din ryg ret og løfte med benene, ikke ryggen. For at forhindre beskadigelse af
chassiset og komponenter, må du aldrig forsøge at løfte chassiset i
håndtagene på strømforsyningen eller på interfaceprocessoren, eller i
plastikpanelerne på forsiden af chassiset.
Disse håndtag er ikke beregnede til at bære vægten af chassiset.
Cisco 11500 Series Content Services Switch Hardware Installation Guide
D-36
78-16421-01
Appendix D
Regulatory Compliance and Safety Information for the Cisco 11500 Series Content Services Switch
Translated Safety Warnings
Cisco 11500 Series Content Services Switch Hardware Installation Guide
78-16421-01
D-37
Appendix D Regulatory Compliance and Safety Information for the Cisco 11500 Series Content Services Switch
Translated Safety Warnings
Cisco 11500 Series Content Services Switch Hardware Installation Guide
D-38
78-16421-01
Appendix D
Regulatory Compliance and Safety Information for the Cisco 11500 Series Content Services Switch
Translated Safety Warnings
Chassis Installation Warning
Warning
At least three people are required to mount the chassis in the equipment rack:
two people are needed to hold the chassis in place while a third person
tightens the mounting screws. Statement 234
Waarschuwing
Het chassis moet door ten minste drie personen in het apparatuurrek worden
bevestigd. Twee personen houden het chassis in de juiste positie terwijl de
derde de bevestiginsschroeven aandraait.
Varoitus
Tarvitaan ainakin kolme henkilöä asentamaan asennuspohja
laitteistotelineeseen: kaksi pitää asennuspohjaa paikoillaan ja kolmas
kiristää asennusruuvit.
Attention
l faut trois personnes pour monter le châssis dans la baie d'équipement : deux
pour maintenir le châssis en place et une autre pour serrer les vis
d'assemblage.
Warnung
Zum Einbauen des Chassis in das Gerätegestell werden mindestens drei
Personen benötigt: Zwei Personen sollten das Chassis festhalten, während
eine dritte Person die Befestigungsschrauben festzieht.
Avvertenza
Advarsel
Aviso
Si richiedono almeno 3 persone per montare il telaio sul rack
dell'equipaggiamento: due persone per reggere il telaio nella giusta posizione
mentre la terza persona serra le viti di montaggio.
Det trengs minst tre personer for å montere kabinettet i utstyrshyllen. To
personer må holde kabinettet på plass mens en tredje person fester
monteringsskruene.
São necessárias pelo menos três pessoas para montar o chassi no suporte do
equipamento: duas pessoas para segurar o chassi no lugar e uma terceira
pessoa para apertar os parafusos de montagem.
Cisco 11500 Series Content Services Switch Hardware Installation Guide
78-16421-01
D-39
Appendix D Regulatory Compliance and Safety Information for the Cisco 11500 Series Content Services Switch
Translated Safety Warnings
¡Advertencia!
Varning!
Se necesitan al menos tres personas para montar el chasis sobre el soporte
del equipo: dos personas para mantener el chasis en su lugar y una tercera
persona para ajustar los tornillos de montaje.
Det krävs minst tre personer vid monteringen av chassit i avsett
instrumentrack: två personer som håller chassit på plats medan en tredje
person drar åt monteringsskruvarna.
Cisco 11500 Series Content Services Switch Hardware Installation Guide
D-40
78-16421-01
Appendix D
Regulatory Compliance and Safety Information for the Cisco 11500 Series Content Services Switch
Translated Safety Warnings
Work During Lightning Activity
Warning
Do not work on the system or connect or disconnect cables during periods of
lightning activity. Statement 1001
Waarschuwing
Tijdens onweer dat gepaard gaat met bliksem, dient u niet aan het systeem te
werken of kabels aan te sluiten of te ontkoppelen.
Varoitus
Älä työskentele järjestelmän parissa äläkä yhdistä tai irrota kaapeleita
ukkosilmalla.
Attention
Ne pas travailler sur le système ni brancher ou débrancher les câbles pendant
un orage.
Warnung
Arbeiten Sie nicht am System und schließen Sie keine Kabel an bzw. trennen
Sie keine ab, wenn es gewittert.
Avvertenza
Non lavorare sul sistema o collegare oppure scollegare i cavi durante un
temporale con fulmini.
Advarsel
Utfør aldri arbeid på systemet, eller koble kabler til eller fra systemet når det
tordner eller lyner.
Aviso
Não trabalhe no sistema ou ligue e desligue cabos durante períodos de mau
tempo (trovoada).
¡Advertencia!
No operar el sistema ni conectar o desconectar cables durante el transcurso
de descargas eléctricas en la atmósfera.
Varning!
Vid åska skall du aldrig utföra arbete på systemet eller ansluta eller koppla
loss kablar.
Cisco 11500 Series Content Services Switch Hardware Installation Guide
78-16421-01
D-41
Appendix D Regulatory Compliance and Safety Information for the Cisco 11500 Series Content Services Switch
Translated Safety Warnings
Disconnect Device
Warning
Waarschuwing
Varoitus
A readily accessible two-poled disconnect device must be incorporated in the
fixed wiring. Statement 1022
Er moet een gemakkelijk toegankelijke, tweepolige stroomverbreker
opgenomen zijn in de vaste bedrading.
Kiinteään johdotukseen on liitettävä kaksinapainen kytkinlaite, johon on
helppo päästä käsiksi.
Attention
Un disjoncteur bipolaire facile d’accès doit être intégré dans le câblage fixe.
Warnung
Die feste Verdrahtung muß eine leicht zugängliche, zweipolige
Trennvorrichtung enthalten.
Avvertenza
Advarsel
Nei cablaggi fissi va incorporato un sezionatore a due poli facilmente
accessibile.
En lett tilgjengelig, topolet frakoblingsenhet må være innebygd i det faste
ledningsnettet.
Cisco 11500 Series Content Services Switch Hardware Installation Guide
D-42
78-16421-01
Appendix D
Regulatory Compliance and Safety Information for the Cisco 11500 Series Content Services Switch
Translated Safety Warnings
Aviso
Deverá incorporar-se um dispositivo de desconexão de dois pólos de acesso
fácil, na instalação eléctrica fixa.
Advertencia
El cableado fijo debe incorporar un dispositivo de desconexión de dos polos
y de acceso fácil.
Varning!
Aviso
Advarsel
En lättillgänglig tvåpolig frånkopplingsenhet måste ingå i den fasta
kopplingen.
Um dispositivo de desconexão de dois pólos de fácil acesso deve ser
incorporado à fiação fixa.
En to-polet afmonteringsenhed med nem adgang skal integreres i det faste
ledningsnet.
Cisco 11500 Series Content Services Switch Hardware Installation Guide
78-16421-01
D-43
Appendix D Regulatory Compliance and Safety Information for the Cisco 11500 Series Content Services Switch
Translated Safety Warnings
Cisco 11500 Series Content Services Switch Hardware Installation Guide
D-44
78-16421-01
Appendix D
Regulatory Compliance and Safety Information for the Cisco 11500 Series Content Services Switch
Translated Safety Warnings
Cisco 11500 Power Source
Warning
Waarschuwing
Only a DC power source that is isolated from AC mains with reinforced
insulation, and that complies with the other safety extra-low voltage (SELV)
requirements in UL950, CSA 950, EN 60950, and IEC950, can be connected to a
Cisco 11500 system. This requirement assures that in a catastrophic power
source fault condition, hazardous voltages are not present on power terminals
and connectors. Statement 143
Alleen een gelijkstroombron die geïsoleerd is van het wisselstroomnet met
gewapende isolatie en die voldoet aan de andere veiligheidsvereisten voor
extra-laag voltage (SELV) in UL950, CSA 950, EN 60950 en IEC950 mag op een
Cisco 11500 systeem worden aangesloten. Dit vereiste verzekert dat bij een
catastrofale foutconditie van de stroombron er geen gevaarlijke voltages
aanwezig zijn op de stroomaansluitingspunten en connectors.
Varoitus
Cisco 11500 -järjestelmään saa yhdistää vain tasavirtalähteen, joka on
eristetty vaihtovirtalähteistä vahvistetulla eristeellä ja joka noudattaa muita
suojattujen erittäin alhaisen jännitteen (SELV) piirien vaatimuksia (UL950,
CSA 950, EN 60950 ja IEC950). Tämä vaatimus varmistaa, että katastrofaalisen
virtalähteen virhetilanteen sattuessa ei virtapäätteissä ja liitännöissä ole
vaarallisia jännitteitä.
Attention
Pour éviter toute présence de tension dangereuse dans les terminaux
d’alimentation et dans les connecteurs en cas de panne d’alimentation grave,
le système Cisco 11500 doit être raccordé uniquement à une alimentation CC
séparée du secteur CA par une isolation renforcée, conforme aux autres
recommandations SELV (Safety Extra-Low Voltage) des normes UL950, CSA
950, EN 60950 et IEC950.
Warnung
Ein Cisco 11500-System darf nur an eine Gleichstrom-Stromquelle
angeschlossen werden, die durch eine verstärkte Isolierung von
Wechselstrom-Hauptleitungen isoliert ist und die mit den anderen
Sicherheitsanforderungen bezüglich Extra-Niederspannung (SELV) in UL950,
CSA 950, EN 60950 und IEC950 übereinstimmt.
Cisco 11500 Series Content Services Switch Hardware Installation Guide
78-16421-01
D-45
Appendix D Regulatory Compliance and Safety Information for the Cisco 11500 Series Content Services Switch
Translated Safety Warnings
Avvertenza
Solo un alimentatore elettrico DC isolato dal AC principale con materiale
isolante rinforzato e aderente a altre esigenze di extra-low voltage (SELV) del
UL950, CSA950, EN 60950 e IEC950, può essere collegato a un sistema Cisco
11500. Queste esigenze assicurano che in caso l'alimentatore elettrico
dovesse affrontare condizioni catastrofiche, non ci siano rischi di voltaggi
pericolosi sui terminali e connettori elettrici.
Advarsel
Bare likestrømskilder som er isolert fra vekselstrømledninger med ekstra
isolasjon, og som oppfyller andre sikkerhetskrav for lavspenning (SELV) i
UL950, CSA 950, EN 60950 og IEC950 kan kobles til et Cisco 11500-system. Disse
kravene sikrer at hvis det skulle oppstå en katastrofal feil i en strømkilde, er
det ikke farlig spenning tilstede på strømterminaler og kontakter.
Aviso
Apenas uma fonte de alimentação de energia do circuito de corrente contínua
que esteja isolada da CA através de um isolamento reforçado, e que esteja em
conformidade com os outros requisitos de circuito de tensão extrema inferior
de segurança (SELV) em UL950, CSA 950, EN 60950 e IEC950, pode ser
conectada ao sistema Cisco 11500. Este requisito assegura que numa situação
de avaria catastrófica de potência, não se encontrem presentes voltagens
perigosas nos terminais e conectores de potência.
¡Advertencia!
Sólo una fuente de alimentación de CC con aislamiento reforzado de las
fuentes principales de corriente alterna y que cumpla con los demás
requisitos de voltajes de seguridad extrabajos (SELV) estipulados en las
normas UL950, CSA 950, EN 60950 e IEC950 puede conectarse a un sistema de
la serie Cisco 11500. Estos requisitos garantizan que en una condición de falla
catastrófica de la fuente de poder, no existan niveles de voltaje peligrosos en
los terminales y conectores de alimentación.
Varning!
Endast en likströmskälla som är isolerad från nätväxelström med förstärkt
isolering och som uppfyller de andra kraven för SELV-kretsar (skyddskretsar
för mycket låg spänning) i UL950, CSA 950, EN 60950 och IEC950, kan anslutas
till ett Cisco 11500-system. Detta krav garanterar att farlig spänning inte kan
förekomma på strömterminaler och kontakter under ett katastrofalt
strömkällefel.
Cisco 11500 Series Content Services Switch Hardware Installation Guide
D-46
78-16421-01
Appendix D
Regulatory Compliance and Safety Information for the Cisco 11500 Series Content Services Switch
Translated Safety Warnings
DC Power Supply Warning
Warning
The illustration shows the DC power supply terminal block. Wire the DC
power supply using the appropriate lugs at the wiring end, or with no lugs, as
illustrated. The proper wiring sequence is ground to ground, positive to
positive, and negative to negative. Note that the ground wire should always be
connected first and disconnected last. Statement 197
Waarschuwing
De figuur toont de aansluitstrip van de gelijkstroomvoeding. Breng de
bedrading aan voor de gelijkstroomvoeding met behulp van de juiste
aansluitpunten aan het draadeinde zoals aangegeven. De juiste
bedradingsvolgorde is aarde naar aarde, positief naar positief en negatief
naar negatief. Let op dat de aarddraad altijd het eerst verbonden en het laatst
losgemaakt wordt.
Varoitus
Kuva esittää tasavirran pääterasiaa. Kytke tasavirtalähde sen
kiinnitysalustaan joko korvakkeilla tai ilman niitä kuvan esittämällä tavalla.
Oikea kytkentäjärjestys on seuraava: maajohto maajohtoon, positiivinen
positiiviseen ja negatiivinen negatiiviseen. Muista, että maajohto yhdistetään
aina ensin ja irrotetaan viimeisenä.
Attention
La figure illustre le bloc de connexion de l'alimentation en courant continu.
Câblez l'alimentation en courant continu en fixant les cosses appropriées aux
extrémités câblées ou sans utiliser de cosses, conformément au schéma. La
séquence de câblage à suivre est terre-terre, positif-positif, et négatif-négatif.
Notez que le fil de masse doit toujours être connecté en premier et déconnecté
en dernier.
Warnung
Die Abbildung zeigt den Terminalblock des Gleichstrom-Netzgeräts.
Verdrahten Sie das Gleichstrom-Netzgerät unter Verwendung von geeigneten
Kabelschuhen am Verdrahtungsende oder ohne Kabelschuhe (siehe
Abbildung). Die richtige Verdrahtungsfolge ist Erde an Erde, positiv an positiv
und negativ an negativ. Beachten Sie bitte, daß der Erdungsdraht immer als
erster verbunden und als letzter abgetrennt werden sollte.
Cisco 11500 Series Content Services Switch Hardware Installation Guide
78-16421-01
D-47
Appendix D Regulatory Compliance and Safety Information for the Cisco 11500 Series Content Services Switch
Translated Safety Warnings
Avvertenza
L’illustrazione mostra la morsettiera dell alimentatore CC. Cablare
l’alimentatore CC usando i connettori adatti all’estremità del cablaggio,
oppure senza capicorda, come illustrato. La corretta sequenza di cablaggio è
da massa a massa, da positivo a positivo e da negativo a negativo. Tenere
presente che il filo di massa deve sempre venire collegato per primo e
scollegato per ultimo.
Advarsel
Figuren viser likestrømforsyningsenhetens tilkoplingsterminal.
Likestrømforsyningsenheten tilkoples ved hjelp av passende kabelsko som
festes i enden av ledningene, slik som vist i figuren. Riktig tilkoplingssekvens
er jord til jord, positiv til positv, og negativ til negativ. Husk at
jordingsledningen alltid bør tilkoples først og frakoples sist.
Aviso
A figura mostra o bloco do terminal de fornecimento de corrente contínua.
Ligue o fornecimento de corrente contínua utilizando os bornes apropriados
na extremidade do cabo, ou sem bornes, conforme ilustrado. A sequência
correcta de instalação é terra-a-terra, positivo-positivo, e negativo-negativo.
Note que o fio de terra deverá ser sempre o primeiro a ser ligado, e o último a
ser desligado.
¡Advertencia!
La figura muestra la caja de bornes de la fuente de alimentación. Cablee la
fuente de alimentación de corriente continua, utilizando las lengüetas de
conexión apropiadas en el extremo del cable, tal como se muestra, o sin
lengüetas. Las conexiones deben realizarse en el siguiente orden: tierra con
tierra, positivo con positivo y negativo con negativo. Tenga en cuenta que el
conductor de tierra siempre tiene que conectarse el primero y desconectarse
el último.
Varning!
Illustrationen visar anslutningsplinten för likströmförsörjningsenheten.
Koppla ledningarna till strömförsörjningsenheten med lämpliga kabelskor,
eller utan kabelskor, i ledningsändarna som bilden visar. Korrekt
kopplingssekvens är jord till jord, positiv till positiv och negativ till negativ.
Observera att jordledningen alltid skall anslutas först och kopplas bort sist.
Cisco 11500 Series Content Services Switch Hardware Installation Guide
D-48
78-16421-01
Appendix D
Regulatory Compliance and Safety Information for the Cisco 11500 Series Content Services Switch
Translated Safety Warnings
More Than One Power Supply
Warning
Waarschuwing
This unit might have more than one power supply connection. All connections
must be removed to de-energize the unit. Statement 1028
Deze eenheid kan meer dan één stroomtoevoeraansluiting bevatten. Alle
aansluitingen dienen ontkoppeld te worden om de eenheid te ontkrachten.
Cisco 11500 Series Content Services Switch Hardware Installation Guide
78-16421-01
D-49
Appendix D Regulatory Compliance and Safety Information for the Cisco 11500 Series Content Services Switch
Translated Safety Warnings
Varoitus
Tässä laitteessa voi olla useampia kuin yksi virtakytkentä. Kaikki liitännät on
irrotettava, jotta jännite poistetaan laitteesta.
Attention
Cette unité peut avoir plus d'une connexion d'alimentation. Pour supprimer
toute tension et tout courant électrique de l'unité, toutes les connexions
d'alimentation doivent être débranchées.
Warnung
Dieses Gerät kann mehr als eine Stromzufuhr haben. Um sicherzustellen, dass
der Einheit kein Strom zugeführt wird, müssen alle Verbindungen entfernt
werden.
Avvertenza
Questa unità può avere più di una connessione all'alimentazione elettrica.
Tutte le connessioni devono essere staccate per togliere la corrente
dall'unità.
Advarsel
Denne enheten kan ha mer enn én strømtilførselskobling. Alle koblinger må
fjernes fra enheten for å utkoble all strøm.
Aviso
Esta unidade poderá ter mais de uma conexão de fonte de energia. Todas as
conexões devem ser removidas para desligar a unidade.
¡Advertencia!
Puede que esta unidad tenga más de una conexión para fuentes de
alimentación. Para cortar por completo el suministro de energía, deben
desconectarse todas las conexiones.
Varning!
Denna enhet har eventuellt mer än en strömförsörjningsanslutning. Alla
anslutningar måste tas bort för att göra enheten strömlös.
Cisco 11500 Series Content Services Switch Hardware Installation Guide
D-50
78-16421-01
Appendix D
Regulatory Compliance and Safety Information for the Cisco 11500 Series Content Services Switch
Translated Safety Warnings
Aviso
Advarsel
Esta unidade pode ter mais de uma conexão de fonte de alimentação. Todas as
conexões devem ser removidas para interromper a alimentação da unidade.
Denne enhed har muligvis mere end en strømforsyningstilslutning. Alle
tilslutninger skal fjernes for at aflade strømmen fra enheden.
Cisco 11500 Series Content Services Switch Hardware Installation Guide
78-16421-01
D-51
Appendix D Regulatory Compliance and Safety Information for the Cisco 11500 Series Content Services Switch
Translated Safety Warnings
Ground Conductor
Warning
This equipment must be grounded. Never defeat the ground conductor or
operate the equipment in the absence of a suitably installed ground conductor.
Contact the appropriate electrical inspection authority or an electrician if you
are uncertain that suitable grounding is available. Statement 1024
Waarschuwing
Deze apparatuur dient geaard te zijn. De aardingsleiding mag nooit buiten
werking worden gesteld en de apparatuur mag nooit bediend worden zonder
dat er een op de juiste wijze geïnstalleerde aardingsleiding aanwezig is.
Neem contact op met de bevoegde instantie voor elektrische inspecties of met
een elektricien als u er niet zeker van bent dat er voor passende aarding
gezorgd is.
Varoitus
Laitteiden on oltava maadoitettuja. Älä koskaan ohita maajohdinta tai käytä
laitteita ilman oikein asennettua maajohdinta. Ota yhteys
sähkötarkastusviranomaiseen tai sähköasentajaan, jos olet epävarma
maadoituksen sopivuudesta.
Attention
Cet équipement doit être mis à la masse. Ne jamais rendre inopérant le
conducteur de masse ni utiliser l'équipement sans un conducteur de masse
adéquatement installé. En cas de doute sur la mise à la masse appropriée
disponible, s'adresser à l'organisme responsable de la sécurité électrique ou
à un électricien.
Cisco 11500 Series Content Services Switch Hardware Installation Guide
D-52
78-16421-01
Appendix D
Regulatory Compliance and Safety Information for the Cisco 11500 Series Content Services Switch
Translated Safety Warnings
Warnung
Dieses Gerät muss geerdet sein. Auf keinen Fall den Erdungsleiter unwirksam
machen oder das Gerät ohne einen sachgerecht installierten Erdungsleiter
verwenden. Wenn Sie sich nicht sicher sind, ob eine sachgerechte Erdung
vorhanden ist, wenden Sie sich an die zuständige Inspektionsbehörde oder
einen Elektriker.
Avvertenza
Questa apparecchiatura deve essere dotata di messa a terra. Non escludere
mai il conduttore di protezione né usare l'apparecchiatura in assenza di un
conduttore di protezione installato in modo corretto. Se non si è certi della
disponibilità di un adeguato collegamento di messa a terra, richiedere un
controllo elettrico presso le autorità competenti o rivolgersi a un elettricista.
Advarsel
Aviso
Dette utstyret må jordes. Omgå aldri jordingslederen og bruk aldri utstyret
uten riktig montert jordingsleder. Ta kontakt med fagfolk innen elektrisk
inspeksjon eller med en elektriker hvis du er usikker på om det finnes
velegnet jordning.
Este equipamento deve ser aterrado. Nunca anule o fio terra nem opere o
equipamento sem um aterramento adequadamente instalado. Em caso de
dúvida com relação ao sistema de aterramento disponível, entre em contato
com os serviços locais de inspeção elétrica ou um eletricista qualificado.
¡Advertencia!
Este equipo debe estar conectado a tierra. No inhabilite el conductor de tierra
ni haga funcionar el equipo si no hay un conductor de tierra instalado
correctamente. Póngase en contacto con la autoridad correspondiente de
inspección eléctrica o con un electricista si no está seguro de que haya una
conexión a tierra adecuada.
Varning!
Denna utrustning måste jordas. Koppla aldrig från jordledningen och använd
aldrig utrustningen utan en på lämpligt sätt installerad jordledning. Om det
föreligger osäkerhet huruvida lämplig jordning finns skall elektrisk
besiktningsauktoritet eller elektriker kontaktas.
Cisco 11500 Series Content Services Switch Hardware Installation Guide
78-16421-01
D-53
Appendix D Regulatory Compliance and Safety Information for the Cisco 11500 Series Content Services Switch
Translated Safety Warnings
Installing or Replacing the Unit
Warning
When installing or replacing the unit, the ground connection must always be
made first and disconnected last. Statement 1046
Waarschuwing
Bij installatie of vervanging van het toestel moet de aardverbinding altijd het
eerste worden gemaakt en het laatste worden losgemaakt.
Varoitus
Laitetta asennettaessa tai korvattaessa on maahan yhdistäminen aina tehtävä
ensiksi ja maadoituksen irti kytkeminen viimeiseksi.
Attention
Lors de l’installation ou du remplacement de l’appareil, la mise à la terre doit
toujours être connectée en premier et déconnectée en dernier.
Warnung
Der Erdanschluß muß bei der Installation oder beim Austauschen der Einheit
immer zuerst hergestellt und zuletzt abgetrennt werden.
Cisco 11500 Series Content Services Switch Hardware Installation Guide
D-54
78-16421-01
Appendix D
Regulatory Compliance and Safety Information for the Cisco 11500 Series Content Services Switch
Translated Safety Warnings
Avvertenza
In fase di installazione o sostituzione dell'unità, eseguire sempre per primo il
collegamento a massa e disconnetterlo per ultimo.
Advarsel
Når enheten installeres eller byttes, må jordledningen alltid tilkobles først og
frakobles sist.
Aviso
¡Advertencia!
Varning!
Aviso
Advarsel
Ao instalar ou substituir a unidade, a ligação à terra deverá ser sempre a
primeira a ser ligada, e a última a ser desligada.
Al instalar o sustituir el equipo, conecte siempre la toma de tierra al principio
y desconéctela al final.
Vid installation eller utbyte av enheten måste jordledningen alltid anslutas
först och kopplas bort sist.
Ao instalar ou substituir a unidade, a conexão terra sempre deve ser
executada primeiro e desconectada em seguida.
Ved installation og genmontering af enheden, skal jordforbindelsen altid
installeres først og afinstalleres sidst.
Cisco 11500 Series Content Services Switch Hardware Installation Guide
78-16421-01
D-55
Appendix D Regulatory Compliance and Safety Information for the Cisco 11500 Series Content Services Switch
Translated Safety Warnings
Use Copper Conductors Only
Warning
Waarschuwing
Varoitus
Use copper conductors only. Statement 1025
Gebruik alleen koperen geleiders.
Käytä vain kuparijohtimia.
Cisco 11500 Series Content Services Switch Hardware Installation Guide
D-56
78-16421-01
Appendix D
Regulatory Compliance and Safety Information for the Cisco 11500 Series Content Services Switch
Translated Safety Warnings
Attention
Utilisez uniquement des conducteurs en cuivre.
Warnung
Verwenden Sie ausschließlich Kupferleiter.
Avvertenza
Advarsel
Aviso
¡Advertencia!
Varning!
Usate unicamente dei conduttori di rame.
Bruk bare kobberledninger.
Utilize apenas fios condutores de cobre.
Emplee sólo conductores de cobre.
Använd endast ledare av koppar.
Cisco 11500 Series Content Services Switch Hardware Installation Guide
78-16421-01
D-57
Appendix D Regulatory Compliance and Safety Information for the Cisco 11500 Series Content Services Switch
Translated Safety Warnings
Short-circuit Protection
Warning
This product requires short-circuit (overcurrent) protection, to be provided as
part of the building installation. Install only in accordance with national and
local wiring regulations. Statement 1045
Waarschuwing
Voor dit product moet kortsluitbeveiliging (overstroombeveiliging) deel
uitmaken van de installatie in het gebouw. De installatie moet voldoen aan de
nationale en lokale bedradingvoorschriften.
Varoitus
Tämä tuote vaatii suojauksen oikosulkuja (ylivirtaa) vastaan osana asennusta
rakennukseen. Asenna ainoastaan kansallisten ja paikallisten
johdotussäännösten mukaisesti.
Attention
La protection de ce produit contre les courts-circuits (surtensions) doit être
assurée par la configuration électrique du bâtiment. Vérifiez que l'installation
a lieu uniquement en conformité avec les normes de câblage en vigueur au
niveau national et local.
Warnung
Für dieses Produkt ist eine Kurzschlußsicherung (Überstromsicherung)
erforderlich, die als Teil der Gebäudeinstallation zur Verfügung gestellt wird.
Die Installation sollte nur in Übereinstimmung mit den nationalen und
regionalen Vorschriften zur Verkabelung erfolgen.
Avvertenza
Advarsel
Aviso
Questo prodotto richiede una protezione contro i cortocircuiti, da fornirsi
come parte integrante delle dotazioni presenti nell’edificio. Effettuare
l’installazione rispettando le Norme CEI pertinenti.
Dette produktet krever beskyttelse mot kortslutninger (overspenninger) som
en del av installasjonen. Bare installer utstyret i henhold til nasjonale og
lokale krav til ledningsnett.
Este produto requer proteção contra curto-circuitos (sobreintensidade de
corrente), que deve estar instalada nos edifícios. Instale apenas de acordo
com as normas de instalação elétrica nacionais e locais.
Cisco 11500 Series Content Services Switch Hardware Installation Guide
D-58
78-16421-01
Appendix D
Regulatory Compliance and Safety Information for the Cisco 11500 Series Content Services Switch
Translated Safety Warnings
Advertencia
Este producto necesita estar conectado a la protección frente a cortacircuitos
(sobretensiones) que exista en el edificio. Instálelo únicamente en
conformidad con las regulaciones sobre cableado, tanto locales como
nacionales, a las que se tenga que atener.
Varning!
Denna produkt kräver att kortslutningsskydd (överström) tillhandahålles som
en del av byggnadsinstallationen. Installera bara i enlighet med nationella
och lokala kabeldragningsbestämmelser.
Aviso
Advarsel
Este produto requer uma proteção contra curto-circuito (sobrecorrente) que
deve fazer parte da instalação do edifício. Faça a instalação somente de
acordo com as regulamentações de cabeamento nacionais e locais.
Dette produkt kræver beskyttelse mod kortslutning (overstrøm). Dette skal
være en del elinstallationen i bygningen. Installation skal ske i
overensstemmelse med nationale og lokale ledningsregler.
Cisco 11500 Series Content Services Switch Hardware Installation Guide
78-16421-01
D-59
Appendix D Regulatory Compliance and Safety Information for the Cisco 11500 Series Content Services Switch
Translated Safety Warnings
Cisco 11500 Series Content Services Switch Hardware Installation Guide
D-60
78-16421-01
Appendix D
Regulatory Compliance and Safety Information for the Cisco 11500 Series Content Services Switch
Translated Safety Warnings
Blank Faceplates and Cover Panels
Warning
Blank faceplates and cover panels serve three important functions: they
prevent exposure to hazardous voltages and currents inside the chassis; they
contain electromagnetic interference (EMI) that might disrupt other
equipment; and they direct the flow of cooling air through the chassis. Do not
operate the system unless all cards, faceplates, front covers, and rear covers
are in place. Statement 1029
Waarschuwing
Lege vlakplaten en afdekpanelen vervullen drie belangrijke functies:
ze voorkomen blootstelling aan gevaarlijke voltages en stroom binnenin het
frame, ze bevatten elektromagnetische storing (EMI) hetgeen andere
apparaten kan verstoren en ze leiden de stroom van koellucht door het frame.
Het systeem niet bedienen tenzij alle kaarten, vlakplaten en afdekkingen aan
de voor- en achterkant zich op hun plaats bevinden.
Varoitus
Tyhjillä tasolaikoilla ja suojapaneeleilla on kolme tärkeää käyttötarkoitusta:
Ne suojaavat asennuspohjan sisäisille vaarallisille jännitteille ja
sähkövirralle altistumiselta; ne pitävät sisällään elektromagneettisen häiriön
(EMI), joka voi häiritä muita laitteita; ja ne suuntaavat tuuletusilman
asennuspohjan läpi. Järjestelmää ei saa käyttää, elleivät kaikki tasolaikat,
etukannet ja takakannet ole kunnolla paikoillaan.
Cisco 11500 Series Content Services Switch Hardware Installation Guide
78-16421-01
D-61
Appendix D Regulatory Compliance and Safety Information for the Cisco 11500 Series Content Services Switch
Translated Safety Warnings
Attention
Ne jamais faire fonctionner le système sans que l’intégralité des cartes, des
plaques métalliques et des panneaux avant et arrière ne soient fixés à leur
emplacement. Ceux-ci remplissent trois fonctions essentielles : ils évitent
tout risque de contact avec des tensions et des courants dangereux à
l’intérieur du châssis, ils évitent toute diffusion d’interférences
électromagnétiques qui pourraient perturber le fonctionnement des autres
équipements, et ils canalisent le flux d’air de refroidissement dans le châssis.
Warnung
Blanke Faceplates und Abdeckungen haben drei wichtigen Funktionen: (1) Sie
schützen vor gefährlichen Spannungen und Strom innerhalb des Chassis; (2)
sie halten elektromagnetische Interferenzen (EMI) zurück, die andere Geräte
stören könnten; (3) sie lenken den kühlenden Luftstrom durch das Chassis. Das
System darf nur betrieben werden, wenn alle Karten, Faceplates, Voder- und
Rückabdeckungen an Ort und Stelle sind.
Avvertenza
Le piattaforme bianche e i panelli di protezione hanno tre funzioni importanti:
Evitano l'esposizione a voltaggi e correnti elettriche pericolose nello chassis,
trattengono le interferenze elettromagnetiche (EMI) che potrebbero
scombussolare altri apparati e dirigono il flusso di aria per il raffreddamento
attraverso lo chassis. Non mettete in funzione il sistema se le schede, le
piattaforme, i panelli frontali e posteriori non sono in posizione.
Advarsel
Aviso
Blanke ytterplater og deksler sørger for tre viktige funksjoner: de forhindrer
utsettelse for farlig spenning og strøm inni kabinettet; de inneholder
elektromagnetisk forstyrrelse (EMI) som kan avbryte annet utstyr, og de
dirigerer luftavkjølingsstrømmen gjennom kabinettet. Betjen ikke systemet
med mindre alle kort, ytterplater, frontdeksler og bakdeksler sitter på plass.
As faces furadas e os painéis de protecção desempenham três importantes
funções: previnem contra uma exposição perigosa a voltagens e correntes
existentes no interior do chassis; previnem contra interferência
electromagnética (EMI) que poderá danificar outro equipamento; e canalizam
o fluxo do ar de refrigeração através do chassis. Não deverá operar o sistema
sem que todas as placas, faces, protecções anteriores e posteriores estejam
nos seus lugares.
Cisco 11500 Series Content Services Switch Hardware Installation Guide
D-62
78-16421-01
Appendix D
Regulatory Compliance and Safety Information for the Cisco 11500 Series Content Services Switch
Translated Safety Warnings
¡Advertencia!
Las placas frontales y los paneles de relleno cumplen tres funciones
importantes: evitan la exposición a niveles peligrosos de voltaje y corriente
dentro del chasis; reducen la interferencia electromagnética (EMI) que podría
perturbar la operación de otros equipos y dirigen el flujo de aire de
enfriamiento a través del chasis. No haga funcionar el sistema a menos que
todas las tarjetas, placas frontales, cubiertas frontales y cubiertas traseras
estén en su lugar.
Varning!
Tomma framplattor och skyddspaneler har tre viktiga funktioner: de förhindrar
att personer utsätts för farlig spänning och ström som finns inuti chassit; de
innehåller elektromagnetisk interferens (EMI) som kan störa annan
utrustning; och de styr riktningen på kylluftsflödet genom chassit. Använd inte
systemet om inte alla kort, framplattor, fram- och bakskydd är på plats.
Cisco 11500 Series Content Services Switch Hardware Installation Guide
78-16421-01
D-63
Appendix D Regulatory Compliance and Safety Information for the Cisco 11500 Series Content Services Switch
Translated Safety Warnings
Aviso
Advarsel
Plaquetas vazias e painéis de proteção têm três funções importantes:
impedem a exposição a tensões e correntes elétricas perigosas dentro do
chassi; apresentam interferência eletromagnética (EMI) que pode danificar
outros equipamentos: direcionam o fluxo do ar refrigerado pelo chassi. Não
opere o sistema a menos que todas as placas, plaquetas, tampas frontais e
tampas traseiras estejam em seu devido lugar.
Blanke frontplader og sidepaneler tjener tre vigtige formål: de forhinder
udsættelse for farlig spænding og strøm inde i chassiset, de isolerer
elektromagnetisk interferens (EMI), der kan forstyre andet udstyr, og de leder
en strøm af kølig luft gennem chassiset. Betjen ikke systemet medmindre alle
kort, frontplader, sidepaneler og bagpaneler er på plads.
Cisco 11500 Series Content Services Switch Hardware Installation Guide
D-64
78-16421-01
Appendix D
Regulatory Compliance and Safety Information for the Cisco 11500 Series Content Services Switch
Translated Safety Warnings
Cisco 11500 Series Content Services Switch Hardware Installation Guide
78-16421-01
D-65
Appendix D Regulatory Compliance and Safety Information for the Cisco 11500 Series Content Services Switch
Translated Safety Warnings
Power Module
Warning
Waarschuwing
Varoitus
Never install an AC power module and a DC power module in the same
chassis. Statement 1050
Een voedingsmodule met wisselstroom mag nooit samen met een
gelijkstroomvoedingsmodule in het chassis geïnstalleerd worden.
Älä koskaan asenna vaihtosähkötehomoduulia ja tasasähkötehomoduulia
samaan asennuspohjaan.
Attention
N’installez jamais un module d’alimentation AC et un module d’alimentation
DC dans le même châssis.
Warnung
Ein Wechelstromsmodul und ein Gleichstrommodul dürfen niemals in
demselben Chassis installiert werden.
Avvertenza
Advarsel
Non installare un modulo di alimentazione in corrente alternata e un modulo
di alimentazione in corrente continua nello stesso chassis.
En vekselstrømmodul og en likestrømmodul må aldri installeres i samme
chassis.
Cisco 11500 Series Content Services Switch Hardware Installation Guide
D-66
78-16421-01
Appendix D
Regulatory Compliance and Safety Information for the Cisco 11500 Series Content Services Switch
Translated Safety Warnings
Aviso
Nunca instale um modulo de corrente CA (corrente alternada) e um modulo CC
(corrente contínua) no mesmo chassis.
¡Advertencia!
Nunca instale un módulo de potencia de corriente alterna (CA) en un módulo
de potencia de corriente continua (CC) en el mismo chasis.
Varning!
Installera aldrig en växelströms- och en likströmskraftenhet i samma chassi.
Cisco 11500 Series Content Services Switch Hardware Installation Guide
78-16421-01
D-67
Appendix D Regulatory Compliance and Safety Information for the Cisco 11500 Series Content Services Switch
Translated Safety Warnings
Ground Conductor
Warning
This equipment must be grounded. Never defeat the ground conductor or
operate the equipment in the absence of a suitably installed ground conductor.
Contact the appropriate electrical inspection authority or an electrician if you
are uncertain that suitable grounding is available. Statement 1024
Waarschuwing
Deze apparatuur dient geaard te zijn. De aardingsleiding mag nooit buiten
werking worden gesteld en de apparatuur mag nooit bediend worden zonder
dat er een op de juiste wijze geïnstalleerde aardingsleiding aanwezig is.
Neem contact op met de bevoegde instantie voor elektrische inspecties of met
een elektricien als u er niet zeker van bent dat er voor passende aarding
gezorgd is.
Varoitus
Laitteiden on oltava maadoitettuja. Älä koskaan ohita maajohdinta tai käytä
laitteita ilman oikein asennettua maajohdinta. Ota yhteys
sähkötarkastusviranomaiseen tai sähköasentajaan, jos olet epävarma
maadoituksen sopivuudesta.
Attention
Cet équipement doit être mis à la masse. Ne jamais rendre inopérant le
conducteur de masse ni utiliser l'équipement sans un conducteur de masse
adéquatement installé. En cas de doute sur la mise à la masse appropriée
disponible, s'adresser à l'organisme responsable de la sécurité électrique ou
à un électricien.
Warnung
Dieses Gerät muss geerdet sein. Auf keinen Fall den Erdungsleiter unwirksam
machen oder das Gerät ohne einen sachgerecht installierten Erdungsleiter
verwenden. Wenn Sie sich nicht sicher sind, ob eine sachgerechte Erdung
vorhanden ist, wenden Sie sich an die zuständige Inspektionsbehörde oder
einen Elektriker.
Avvertenza
Questa apparecchiatura deve essere dotata di messa a terra. Non escludere
mai il conduttore di protezione né usare l'apparecchiatura in assenza di un
conduttore di protezione installato in modo corretto. Se non si è certi della
disponibilità di un adeguato collegamento di messa a terra, richiedere un
controllo elettrico presso le autorità competenti o rivolgersi a un elettricista.
Cisco 11500 Series Content Services Switch Hardware Installation Guide
D-68
78-16421-01
Appendix D
Regulatory Compliance and Safety Information for the Cisco 11500 Series Content Services Switch
Translated Safety Warnings
Advarsel
Aviso
Dette utstyret må jordes. Omgå aldri jordingslederen og bruk aldri utstyret
uten riktig montert jordingsleder. Ta kontakt med fagfolk innen elektrisk
inspeksjon eller med en elektriker hvis du er usikker på om det finnes
velegnet jordning.
Este equipamento deve ser aterrado. Nunca anule o fio terra nem opere o
equipamento sem um aterramento adequadamente instalado. Em caso de
dúvida com relação ao sistema de aterramento disponível, entre em contato
com os serviços locais de inspeção elétrica ou um eletricista qualificado.
¡Advertencia!
Este equipo debe estar conectado a tierra. No inhabilite el conductor de tierra
ni haga funcionar el equipo si no hay un conductor de tierra instalado
correctamente. Póngase en contacto con la autoridad correspondiente de
inspección eléctrica o con un electricista si no está seguro de que haya una
conexión a tierra adecuada.
Varning!
Denna utrustning måste jordas. Koppla aldrig från jordledningen och använd
aldrig utrustningen utan en på lämpligt sätt installerad jordledning. Om det
föreligger osäkerhet huruvida lämplig jordning finns skall elektrisk
besiktningsauktoritet eller elektriker kontaktas.
Cisco 11500 Series Content Services Switch Hardware Installation Guide
78-16421-01
D-69
Appendix D Regulatory Compliance and Safety Information for the Cisco 11500 Series Content Services Switch
Translated Safety Warnings
Cisco 11500 Series Content Services Switch Hardware Installation Guide
D-70
78-16421-01
INDEX
CSS 11506 2-6
Numerics
Fast Ethernet Module 2-15
1000BASE-T GBIC
Gigabit Ethernet Module 2-17
connector pinouts B-8
Switch Control Module 2-11
chassis
connecting to ground 2-23
A
ground connection warning 2-25
accessory kit 1-8
grounding lugs 2-24
AC electrical specifications 1-6, A-2
preventing overheating 1-11
AC power cord
connecting CSS 11501 2-27
configuring
Ethernet Management port B-7
connecting CSS 11503 2-28
connecting a modem C-1
connecting CSS 11506 2-33
connectors
AC power supply
CSS 11501 2-2
LEDs 2-48
Fast Ethernet Module 2-15
troubleshooting 2-45, 2-46
Gigabit Ethernet Module 2-18
anti-static wrist strap 1-7
application protocol A-7
audience xvi
Switch Control Module 2-11
console port
connector pinouts B-3
troubleshooting 2-44
C
cabling
CSS 11501
installing 1-12
mounting bracket installation 1-13
CSS 11501 2-4
overview 2-2
CSS 11503 2-6
unpacking 1-9
Cisco 11500 Series Content Services Switch Hardware Installation Guide
78-16421-01
IN-1
Index
CSS 11503
documentation
installing 1-14
chapter contents xvi
mounting bracket installation 1-15
related xviii
overview 2-9
set xviii
unpacking 1-9
symbols and conventions xxii
CSS 11506
installing 1-17
mounting bracket installation 1-18
E
overview 2-10
electrical codes (US) 1-2
unpacking 1-9
electrical specifications A-2
electro-static discharge caution 1-24
environmental specifications A-3
D
Ethernet connector, pinouts B-2
damage to product 1-10
Ethernet Management port
connector pinouts B-7
DC electrical specifications 1-6, A-2
DC power, checking 2-37
DC power cord
connecting CSS 11503 2-30
connecting CSS 11506 2-34
DC power supply
connector location for CSS 11503 2-31
connector location for CSS 11506 2-35
F
fan module
location 2-10
troubleshooting 2-52
Fast Ethernet Module (FEM)
LEDs 2-48
16-port LEDs and connectors 2-16
troubleshooting 2-45, 2-46
8-port LEDs and connectors 2-15
disk
LED definitions 2-17
failure 2-40, 2-43
pinouts B-2
specifications A-6
Cisco 11500 Series Content Services Switch Hardware Installation Guide
IN-2
78-16421-01
Index
front-mounting
lifting chassis (CSS 11503 and CSS
11506) 1-3
CSS 11501 brackets 1-13
module 1-24
CSS 11503 brackets 1-15
qualified personnel (warning) 1-3
CSS 11506 brackets 1-17
international agency compliance
information D-1
G
L
gateway protocol A-7
Gigabit Ethernet Module
LEDs
cabling 2-17
CSS 11501 2-3, 2-5
LED definitions 2-19
Fast Ethernet Module 2-17
LEDs and connectors 2-18
Gigabit Ethernet Module 2-19
grounding
power supply 2-47
connecting chassis ground 2-23
CSS 1-11
SCM 2-5, 2-14
Secure Socket Layer (SSL) Module 2-21
lugs 2-24
Session Accelerator Module 2-20
wire 2-24
license key
locating 1-8
lugs, grounding 2-24
I
installation
M
precautions 1-20
preinstallation requirements 1-11
requirements 1-11
CSS 11503 brackets 1-15
installing
CSS 11506 brackets 1-18
chassis ground connection 2-23
CSS 11501 1-12
CSS 11503 1-14
CSS 11506 1-17
mid-mounting
modem, connecting to a CSS C-1
module
installation precautions 1-20
installing 1-19, 1-24
Cisco 11500 Series Content Services Switch Hardware Installation Guide
78-16421-01
IN-3
Index
slot restrictions 1-21
R
specifications A-5
troubleshooting 2-40
rack-mounting
unpacking 1-24
CSS 11501 1-13
mounting brackets
CSS 11503 1-15
CSS 11501 1-13
CSS 11506 1-19
CSS 11503 1-15
regulatory compliance D-1
CSS 11506 1-18
requirements
installation tools and equipment 1-7
site planning 1-2
N
RJ-45
1000BASE-T GBIC connector pinouts B-8
network
protocol A-7
fast Ethernet connector pinouts B-2
utilities protocols A-8
management connector pinouts B-7
RS-232 console port pinouts B-3
routing protocol A-7
P
physical specifications A-4
S
pinouts
RJ-45 1000BASE-T GBIC connector B-8
safety guidelines
RJ-45 fast Ethernet connector B-2
electricity 1-4
RJ-45 management connector B-7
lifting the chassis (CSS 11503 and CSS
11506) 1-3
RJ-45 RS-232 console port B-3
power cords, connecting 2-27
power supply
LEDs 2-47
troubleshooting 2-45, 2-46
preinstallation requirements 1-11
lightning warning 1-5
removing jewelry 1-5
US electrical codes 1-2
safety warning 1-12, 1-14, D-1
screws, for grounding 2-24, 2-25
protocols, supported A-6 to A-8
Cisco 11500 Series Content Services Switch Hardware Installation Guide
IN-4
78-16421-01
Index
Secure Socket Layer (SSL) Module
CSS 11501 (integrated) 2-2
transport protocol A-6
troubleshooting
LED definitions 2-21
console port 2-44
overview 2-21
CSS 11501 2-39
Session Accelerator Module (SAM)
CSS 11503 fans 2-50, 2-51
LED definitions 2-20
CSS 11506 fan module 2-52
overview 2-20
modules 2-40
shipment contents 1-8
power supply 2-45, 2-46
site requirements 1-2
slot restrictions 1-21
U
software
license key location 1-8
unpacking
specifications
CSS 11501 1-9
CSS 11501 switch bandwidth and
memory A-5
electrical A-2
CSS 11503 1-9
CSS 11506 1-9
modules 1-24
environmental A-3
module A-5
W
modules A-5
physical A-4
warning, safety 1-12, 1-14
Switch Control Module (SCM)
wire stripping tool 2-24
connectors and LEDs 2-13
wiring
LED definitions 2-5, 2-14
chassis ground 2-24
passive switchover 1-26
safety (warning) 1-7
T
tools and equipment required 1-2
tools and supplies, connecting chassis to
ground 2-24
Cisco 11500 Series Content Services Switch Hardware Installation Guide
78-16421-01
IN-5
Index
Cisco 11500 Series Content Services Switch Hardware Installation Guide
IN-6
78-16421-01