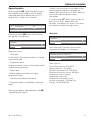
1
Operating instructions
Dryers
PT 7251
PT 7331
PT 7401
PT 7501
PT 7801
To avoid the risk of accidents
or damage to the machine it is
essential to read these instructions
before installing, commissioning and
using it for the first time.
G
M.-Nr. 06 533 441
2
M.-Nr. 06 533 441
Contents
Warning and Safety instructions . . . . . . . . . . . . . . . . . . . . . . . . . . . . . . . . . . . . . . . . . . . . . . . 4
Caring for the environment . . . . . . . . . . . . . . . . . . . . . . . . . . . . . . . . . . . . . . . . . . . . . . . . . . . . 7
Description of the machine . . . . . . . . . . . . . . . . . . . . . . . . . . . . . . . . . . . . . . . . . . . . . . . . . . . . 8
Control elements . . . . . . . . . . . . . . . . . . . . . . . . . . . . . . . . . . . . . . . . . . . . . . . . . . . . . . . . . . . . . 9
Drying . . . . . . . . . . . . . . . . . . . . . . . . . . . . . . . . . . . . . . . . . . . . . . . . . . . . . . . . . . . . . . . . . . . . 11
Sort the laundry . . . . . . . . . . . . . . . . . . . . . . . . . . . . . . . . . . . . . . . . . . . . . . . . . . . . . . . . . . . . . 11
Before using for the first time . . . . . . . . . . . . . . . . . . . . . . . . . . . . . . . . . . . . . . . . . . . . . . . . . . . 12
Switch the machine on and load the drum . . . . . . . . . . . . . . . . . . . . . . . . . . . . . . . . . . . . . . . . 12
Select a programme. . . . . . . . . . . . . . . . . . . . . . . . . . . . . . . . . . . . . . . . . . . . . . . . . . . . . . . . . . 13
Card operation . . . . . . . . . . . . . . . . . . . . . . . . . . . . . . . . . . . . . . . . . . . . . . . . . . . . . . . . . . . . . 16
Card access operation. . . . . . . . . . . . . . . . . . . . . . . . . . . . . . . . . . . . . . . . . . . . . . . . . . . . . . . . 16
Drying using coin mechanism
C 4060 / C 4065 / C 4070 . . . . . . . . . . . . . . . . . . . . . . . . . 16
Additional options . . . . . . . . . . . . . . . . . . . . . . . . . . . . . . . . . . . . . . . . . . . . . . . . . . . . . . . . . . 17
Start date and time. . . . . . . . . . . . . . . . . . . . . . . . . . . . . . . . . . . . . . . . . . . . . . . . . . . . . . . . . . . 17
Programme stop. . . . . . . . . . . . . . . . . . . . . . . . . . . . . . . . . . . . . . . . . . . . . . . . . . . . . . . . . . . . . 18
Programme cancellation . . . . . . . . . . . . . . . . . . . . . . . . . . . . . . . . . . . . . . . . . . . . . . . . . . . . . . 18
Changing the programme order . . . . . . . . . . . . . . . . . . . . . . . . . . . . . . . . . . . . . . . . . . . . . . . . 18
Programme information . . . . . . . . . . . . . . . . . . . . . . . . . . . . . . . . . . . . . . . . . . . . . . . . . . . . . . . 19
Peak load cut-out (optional) . . . . . . . . . . . . . . . . . . . . . . . . . . . . . . . . . . . . . . . . . . . . . . . . . . . . 19
Standard programme overview . . . . . . . . . . . . . . . . . . . . . . . . . . . . . . . . . . . . . . . . . . . . . . . . 20
Optional modules . . . . . . . . . . . . . . . . . . . . . . . . . . . . . . . . . . . . . . . . . . . . . . . . . . . . . . . . . . . 21
Operating data . . . . . . . . . . . . . . . . . . . . . . . . . . . . . . . . . . . . . . . . . . . . . . . . . . . . . . . . . . . . . . 21
Problem solving guide . . . . . . . . . . . . . . . . . . . . . . . . . . . . . . . . . . . . . . . . . . . . . . . . . . . . . . . 24
Error messages . . . . . . . . . . . . . . . . . . . . . . . . . . . . . . . . . . . . . . . . . . . . . . . . . . . . . . . . . . . . . 24
After sales service . . . . . . . . . . . . . . . . . . . . . . . . . . . . . . . . . . . . . . . . . . . . . . . . . . . . . . . . . . . 26
Cleaning and care . . . . . . . . . . . . . . . . . . . . . . . . . . . . . . . . . . . . . . . . . . . . . . . . . . . . . . . . . . 27
Fluff / lint filter . . . . . . . . . . . . . . . . . . . . . . . . . . . . . . . . . . . . . . . . . . . . . . . . . . . . . . . . . . . . . . . 27
Dryer. . . . . . . . . . . . . . . . . . . . . . . . . . . . . . . . . . . . . . . . . . . . . . . . . . . . . . . . . . . . . . . . . . . . . . 27
Notes for the installer. . . . . . . . . . . . . . . . . . . . . . . . . . . . . . . . . . . . . . . . . . . . . . . . . . . . . . . . 29
Explanation of symbols on the data plate . . . . . . . . . . . . . . . . . . . . . . . . . . . . . . . . . . . . . . . 31
Abbreviated operating instructions PT 7251/7331/7401/7501/7801 . . . . . . . . . . . . . . . . . . . 33
This machine must only be installed and commissioned
by a Miele authorised technician. In the U.K. gas heated
machines must be installed by a Corgi registered fitter
only.
M.-Nr. 06 533 441
3
Warning and Safety instructions
To avoid the risk of accidents and
damage to the machine read the
operating instructions carefully before
using it for the first time. They contain
important information about the
installation, safety, use and maintenance
of the machine.
Keep these operating instructions in a
safe place and ensure that new users are
familiar with the content. Pass them on to
any future owner of the machine.
With sensitive fabrics there may be a
danger of them self igniting if dried for
too long. They should be removed as soon
as the programme has finished or if there is
a power cut.
Keep a fire extinguisher near the machine at
all times.
Do not unload laundry from the drum
after the cooling down phase has been
completed.
Hot laundry can self-ignite and cause a fire
when folded or put away.
Technical and electrical safety
Correct usage
This dryer must only be used for drying
articles which were washed in water and
which have a care label stating that the
article is suitable for machine drying.
To prevent the risk of fire the following
textiles must not be dried in this
machine:
– fabrics which contain a large proportion of
rubber, foam rubber or rubber-like
materials.
– items which have been treated with
inflammable cleaning agents.
– items which have been splashed with hair
lacquer, hair spray, nail varnish remover or
similar substances.
– items which have been soiled with oils or
residues containing grease (kitchen oils,
cosmetics etc.).
– items soiled with wax or other chemicals
(e.g. mops and floor cloths).
– items with padding which has been
damaged, e.g. pillows and jackets.
– items soiled with grease or oil which have
not been properly cleaned beforehand.
Use heavy-duty detergents where
necessary to clean very dirty garments,
e.g. workwear. If necessary consult the
detergent manufacturer for advice.
4
The electrical safety of this machine can
only be guaranteed if connected to a
correctly installed earthing system on site. It
is most important that this basic safety
requirement is present and tested regularly,
and where there is any doubt, the on-site
electrical wiring should be inspected by a
qualified electrician. The manufacturer
cannot be held liable for the consequences
of an inadequate earthing system (e.g.
electric shock).
The machine is only completely isolated
from the electricity supply either when it
is switched off at the isolator switch or the
mains fuse has been withdrawn.
Repairs to electrical and gas heated
machines may only be carried out by a
suitably qualified and competent person in
accordance with local and national safety
regulations. Repairs to gas heated machines
in the UK must only be carried out by a
"Corgi" registered technician. Repairs and
other work by unqualified persons could be
dangerous. The manufacturer cannot be
held liable for unauthorised work.
Faulty components must only be
replaced by genuine Miele original spare
parts. Only when these parts are fitted can
the safety standards of the machine be
guaranteed.
M.-Nr. 06 533 441
Warning and Safety instructions
This machine must not be operated in
the same room as dry cleaning
machines which use solvents containing
chlorofluorocarbons (CFCs). Escaping
vapours break down during combustion into
hydrochloric acid which can have a
detrimental
effect on both the laundry and the machine.
These machines should be installed in
separate rooms and there must be no
exchange of air between them.
Any removable outer panels must be
back in place, and all moving or
electrical parts shielded before the machine
is switched on.
The dryer must have a constant supply
of fresh air. Vapours containing chlorine,
fluorine or other solvents must not be able to
reach the dryer.
Never use the machine without the fluff
filter. Fire risk!
A damaged filter must be replaced before
the machine is used again.
Otherwise fluff and lint will cause a blockage
in the airways and the correct functioning of
the machine cannot be assured.
The ventilation inlets to the dryer are
located at the back of the machine.
These must not be blocked or hindered in
any way. Do not cover the machine lid with
cloths or similar items.
Benzine, petrol, paraffin, or any easily
flammable liquid must not be stored or
used near the machine. Fire and explosion
risk!
To ensure the correct performance of the
machine and to prevent the risk of faults
and fire risk it is important to check the
machine and carry out maintenance on a
regular basis.
Use
To prevent the risk of injury or scalding,
components carrying steam must not be
touched.
Always make sure that the drum is
stationary before reaching into the
machine to remove laundry.
Cleaning and disinfecting agents often
contain chlorine based substances. Do
not let such agents come into contact with
the stainless steel surfaces, as the chlorine
can have a corrosive effect and cause rust.
Use chlorine-free agents for washing and
disinfecting and also for cleaning stainless
steel surfaces to protect them from
corrosion. If in doubt, confirm with the
manufacturer that their product is suitable. If
any agent containing chlorine comes into
contact with the stainless steel surfaces,
wipe it away immediately with clean water.
Then dry with a soft cloth.
Do not use a high pressure cleaner or
hose to clean the machine.
This machine must only be used when it
is connected to a suitable ducting
system. The installation site must be
adequately ventilated.
This machine is not a toy! To avoid the
risk of injury never allow children to play
on or near the machine, or to operate it
themselves.
Do not use a machine with damaged
controls or cables. These must be
repaired before it is used again.
Do not damage, remove or bypass the
safety features, fixtures and control
elements of this machine.
M.-Nr. 06 533 441
5
Warning and Safety instructions
Gas heated dryers
Using accessories
The gas mains connection and the gas
connection to the machine should be
switched off for all cleaning and
maintenance work and in the event of a fault.
Accessory parts may only be fitted when
expressly approved by Miele. If other
parts are used, guarantee, performance and
product liability claims may be invalidated.
Safety precautions to take if you smell
gas
– Turn off the gas emergency control valve
immediately. (Usually located near the gas
meter).
– Eliminate all sources of ignition in a safe
manner. Do not smoke, light cigarette
lighters or matches.
– Do not operate electrical lights or
switches, either "On" or "Off".
– Open all doors and windows to ventilate
the area.
Disposal of your old machine
Before disposing of an old machine, first
make the door lock unusable. This way
you will prevent children from accidentally
locking themselves in and endangering their
lives.
Keep these instructions in a safe and
accessible place.
– If the smell of gas persists, evacuate the
building.
You must now:
– In the U.K. call TRANSCO (0 800 111 999)
– Arrange for an appointment of a Corgi
registered gas installer to visit the site
(Talking pages 0 800 600 900)
In other countries please follow relevant
country specific procedures.
Warning: After installation, maintenance,
conversion, repairs and before using for the
first time it is essential that a test for possible
leakages is carried out. All components
which carry gas must be checked, including
the gas valve and burner jets.
In the U.K. this must be carried out by a
Corgi registered technician.
Particular attention must be paid to the test
nipple on the gas valve.
Testing must be carried out with the burner
switched on and switched off.
6
M.-Nr. 06 533 441
Caring for the environment
Disposal of the packing material
The transport and protective packing has
been selected from materials which are
environmentally friendly for disposal and can
normally be recycled. Packaging e.g. cling
film, polystyrene and plastic wrappings must
be kept out of the reach of babies and
young children. Danger of suffocation.
Rather than just throwing these materials
away, please ensure that they are recycled.
Disposal of your old machine
Electrical and electronic machines often
contain materials which, if handled or
disposed of incorrectly, could be potentially
hazardous to human health and to the
environment. They are, however, essential
for the correct functioning of your machine.
Please do not therefore dispose of it with
your household waste.
Please dispose of it at your local community
waste collection/recycling centre, and
ensure that it presents no danger to children
while being stored for disposal.
It should be unplugged or disconnected
from the mains electricity supply by a
competent person. The plug must be
rendered useless, and the cable cut off
directly behind it to prevent misuse. See the
"Warning and Safety" section of this booklet
for further details.
M.-Nr. 06 533 441
7
Description of the machine
b
f
a
c
d
g
h
e
a Emergency stop switch
Press the red button to switch the machine
off.
b Control panel
c Drum door
f Electrical connection
g Air intake
h Exhaust connection
Pull the door handle to open the drum door.
d Access to fluff / lint filter
e 4 adjustable screw feet
8
M.-Nr. 06 533 441
Description of the machine
Control elements
d PC / Optical interface
a Display
This interface is used for transferring data to
the control unit from a PC and vice versa.
1
Cottons dry plus
0%
2
Cottons dry
0%
3
Cottons damp
20%
FC
e Rotary selector
A
After switching on, the "Welcome" display
will appear for a short time followed by the
programme list. The most recently used
programme is highlighted.
b Function buttons
The six buttons underneath the display are
the function buttons. These buttons have
specific functions depending on the status
of the machine.
The function is described in the display
above the relevant button.
c h Start button
The lightring will flash when a selected
programme can be started. Pressing the
Start button will start the programme. After a
programme has started, pressing this button
will show the display as it was before the
start of the programme.
Turning the selector brings up options and
menus in the display.
Pressing the selector confirms your
selection.
f Chip card reader (optional)
If the machine has been programmed for
card operation, you can only use those
programmes stored on the card to dry
laundry.
Insert the card in the direction of the arrow
(on the card).
g I Mains on switch
Switches the machine on.
h 0 Mains off switch
Switches the machine off.
i Emergency stop switch
Only for use in an emergency.
Press the red button to switch the machine
off. After the problem has been resolved,
turn the red dial clockwise to release it.
Then press the Start h button to continue
the interrupted programme.
M.-Nr. 06 533 441
9
Description of the machine
Function buttons
Chip card operation
f Stop/End
The function button on the right-hand side is
used to stop a programme after it has
started. Pressing it again finishes the
programme.
The chip card is supplied without any
programmes.
See the programming instruction booklet for
information on transferring data from the
control unit to the chip card and vice versa.
[ Block plus
The relevant programme block (e.g. Pre-dry)
is added to the programme.
FC Settings
Press this button to switch to another
language temporarily.
m Start time
Pressing this button before the start of a
programme displays the message that a
start time can be selected.
K Information
Press this button to call up programme
information in the display.
ü Change order
The order of the programme in progress can
be changed or programme blocks can be
repeated.
The chip card can store a maximum of 30
programmes, each with 6 blocks.
The back of the chip card can be labelled.
A Back
Takes you back to the previous display.
e/- Indicates that there is more
information on next or previous line.
S Save
See the programming instruction booklet.
$ Programme locked
Once a locked programme has been
started, the End button can only be used to
stop and cancel it during the first minute.
%
\
Programme unlocked
Operating data
D Data transfer
10
M.-Nr. 06 533 441
Drying
Sort the laundry
Not all textiles are suitable for machine
drying. Please read the instructions given
on the garment care label.
Significance of symbols:
q = Dry at normal temperature
r = Dry at low temperature
s = Do not tumble dry
Sort the laundry according to fibre type and
weave to ensure even drying.
,There is a danger of fire with the
following and on no account should
they be dried in this machine:
-articles containing foam rubber, rubber or
rubber-like materials,
-articles which have been treated with
inflammable cleaning agents,
-articles which have been splashed with
hair lacquer, hair spray, nail varnish
remover etc.,
-articles soiled with oils, grease and other
residues e.g. cosmetics,
-articles contaminated with residues such
as wax or chemicals, e.g. mops and floor
cloths,
-articles with damaged padding,
-articles soiled with oils or grease which
have not been sufficiently washed
beforehand. Use heavy-duty detergents
where necessary to clean very dirty
garments, e.g. workwear. If necessary
consult the detergent manufacturer for
advice.
Important:
Textiles with large metal accessories such as
buckles, hooks and zip tags should be
placed in a laundry bag or a pillow case
before drying. This is to protect the drum
from scratches and dents during drying.
Garments with closed metal zips can cause
the sensor electrodes in the drum ribs to be
bridged. This can cause the drying process
to go on for too long, or to not finish at all.
Open the zip before drying.
Loopknit and woven textiles have a
tendency to shrink depending on their
quality. This is made worse by over-drying.
Do not use the "Cottons dry plus"
programme for these textiles.
Starched laundry can be machine dried.
Select the most appropriate programme for
ironing by hand or machine.
Sort the laundry according to the level of
dryness required. It is not necessary to sort
according to size.
Duvet covers and pillow cases should be
closed to prevent smaller items rolling up
inside them.
For greater economy dry a full load.
Underloading is uneconomical. Overloading
will impair the drying result and the laundry
finish.
Rinsing the laundry using hot water in the
final rinse will reduce the residual moisture
level further and the residual heat in the
laundry will help the programme duration to
be shortened, thus saving energy.
The following textiles should not be
machine dried:
Woollens and wool blends as these tend to
matt and shrink.
Pure linen tends to roughen if tumble dried.
Please follow instructions given on the care
label.
M.-Nr. 06 533 441
11
Drying
^ Open the drum door.
The machine must be commissioned by a
Miele service technician or a dealer
authorised by the manufacturer before it is
used for the first time. For gas heated
machines in the U.K. this must be carried
out by a Corgi registered technician.
Before using for the first time
Before loading the dryer with laundry you
should wipe the internal drum surface with a
soft, dry cloth.
^ Load the drum.
The pre-sorted laundry should be loaded
loosely in the drum.
Make sure any dispensing aids such as
detergent balls have been removed from
the laundry.
Max. load (dry weight of laundry)
Switch the machine on and load the
drum
^ Open all stopcocks for gas and steam as
applicable.
7251
^ Switch on the on-site mains switch.
250
^ Press the I "On" button in.
10 kg
The Welcome screen will appear.
5 kg
PROFESSIONAL
2 kg
PT 7xx1
Welcome
4 kg
PT
7331
7401
7501
Drum volume in litres
330
400
500
1, 2, 3, 4, 5 Cottons
13 kg
16 kg
20 kg
6, 7, 8 Minimum iron
7801
800
32 kg
6.5 kg
8 kg
10 kg
16 kg
9 Delicates / Synthetics
2.6 kg 3.2 kg
4 kg
6.4 kg
10 Woollens
5.2 kg 6.4 kg
8 kg 12.8 kg
This is followed by the programme list (with
the most recently used programme
highlighted).
1
Cottons dry plus
To prevent the risk of damaging laundry
make sure it cannot be trapped when the
door is closed.
0%
2
Cottons dry
0%
3
Cottons damp
20%
FC
A
^ Close the drum door
Select a programme using the rotary
selector.
12
M.-Nr. 06 533 441
Drying
Select a programme
This machine is equipped with an electronic
sensor system that continually monitors the
moisture level of the laundry.
As soon as the required dryness is reached
the laundry is cooled down. At the end of
this cooling down phase the drying
programme is automatically finished.
1
Cottons dry plus
0%
2
Cottons dry
0%
3
Cottons damp
20%
FC
^ Turn the rotary dial to select a programme
(e.g. Programme 2 Cottons).
Select the additional option [
"Blockplus" if required
Standard programmes:
– For drying cotton and
linen textiles
(this is not available on standard
programmes)
1 Cottons dry plus 0 %
^ Confirm the selection of the programme by
pressing the rotary selector.
2 Cottons dry 0 %
3 Cottons damp
20 %
4 Cottons damp
25%
5 Cottons damp
40 %
The following (example) will appear in the
display:
22
0%
– For drying synthetic and mixed fibre
textiles
6 Minimum iron dry
0%
7 Minimum iron damp 10 %
8 Minimum iron damp 20 %
5 min.
Drying
70°C
[
e
A
m
^ If wished you can now select the Predrying programme block, by pressing the
[ "Blockplus" function button.
24 %
15 min.
0%
[
– For drying small loads of laundry or for
finishing drying individual items.
12 Timed drying warm
10.0 / 10.0 kg
Cooling down
22
– For airing textiles
11 Timed drying cold
Cottons dry
When the [ "Blockplus" function button is
pressed, the following will appear in the
display:
9 Delicates 20 %
10 Woollens
A
20 min.
Cottons dry
10.0 / 10.0 kg
Pre-drying
Drying
m
e
A
The [ field is highlighted.
Press the function button again to deselect
the function.
If you do not wish to make any further
alterations to the programme:
^ Press the h "Start" button.
The programme will start.
M.-Nr. 06 533 441
13
Drying
If you wish to make alterations before the
start of the programme, e.g. to the load
size, temperature or residual moisture:
2
0%
2
0%
Cottons dry
10.0 / 10.0 kg
Drying
70°C
e
A
Cooling down
m
The max. load will be shown at the far right
of the display.
Load weight
You can enter the weight of the load
manually before the start of the programme.
2
0%
Cottons dry
10,0
Drying
70°C
m
^ Turn the rotary dial to highlight the load.
Press the dial to confirm your selection.
Turn the dial to alter the weight and
confirm your selection by pressing it.
Temperature in 1 °C increments from cold,
30 to max. 80 °C .
^ Turn the rotary dial to select the
"Temperature" field (70 °C for drying) and
press it to confirm your selection.
2
0%
Cottons dry
Drying
70°C
m
A
^ Turn the rotary dial to alter the residual
moisture level and then press it to confirm
your selection.
^ Press the Start button h and the
programme selected will commence
Once a programme has started the
programme sequence will appear in the
display.
2
0%
Cottons dry
Drying
>40 %
Cooling down
Ready at 12:35
m
K
f
10.0 kg
e
A
Cooling down
10.0 kg
Cooling down
^ Confirm the selection of the programme by
pressing the rotary selector.
The following (example) will appear in the
display:
Cottons dry
In the 2nd line of the display, drying in this
example, the actual residual moisture level
(>40%) will also be shown. The 3rd line
displays the following programme block.
The time that the programme will finish
(12:35) is shown on the right hand side of
the display.
The programme end display has a
self-learning function and will not show an
accurate reading until the programme has
been run several times.
10.0 kg
Drying
70°C
Cooling down
m
e
A
^ Turn the rotary dial to alter the temperature
value and then press it to confirm your
selection.
Residual moisture in
1 % increments from -4 to 40 % .
^ Turn the rotary dial to select the "Residual
moisture" field (0 %) and press it to confirm
your selection.
14
M.-Nr. 06 533 441
Drying
At the end of a programme
2
If no more laundry is to be processed:
^ Close the drum door
Cottons dry
Programme finished
Anti-crease
Ready at 12:35
m
FC
K
f
^ Press the 0 "Off" button to switch the
machine off.
^ Switch off the on-site mains switch.
The programme end time is displayed,
the buzzer sounds and the anti-crease
phase commences. The drum will rotate at
intervals to keep the laundry from creasing.
^ Close all stopcocks for gas and steam as
applicable.
This is useful if laundry is not going to be
unloaded as soon as the programme
finishes.
Adding or removing items
^ Open the drum door.
^ Unload the drum.
Make sure nothing is left behind in the
drum. If items are left in the dryer, they
could be damaged by overdrying when
the dryer is next used.
,Do not unload laundry from the drum
until after the cooling down phase has
been completed.
Hot laundry can self-ignite and cause a
fire when folded or put away.
The drum door can be opened during a
drying programme to remove or add items if
necessary.
,Always make sure that the drum is
stationary before reaching into the
machine to remove laundry. Reaching into
a moving drum is extremely dangerous!
2
Cottons dry
Programme stop
Door open. Please close the door.
FC
f
To continue the drying programme:
^ Close the drum door
^ Check the fluff / lint filter and clean if
necessary.
2
The fan will switch itself on automatically if
the temperature in the drum is too high.
Cottons dry
^ Press the h "Start" button and the
programme selected will continue.
Programme finished
Check lint filter
A
A reminder will appear in the display when
the filter need to be cleaned. The filter
should be cleaned as soon as the
programme finishes.
M.-Nr. 06 533 441
15
Card operation
Cards on which a programme has been
saved can only be used on the machine
type for which they have been written.
Unwritten cards can be used universally.
If the card is inserted the wrong way round
the following message will appear in the
display:
§
^ Press the "On" I button to switch the
machine on.
Card fault
Card incorrectly inserted in card reader.
Continue: Press start
The Welcome screen will appear.
ü
f
^ Insert the card the right way round in the
card reader.
If the card is not the right one for the
machine it is being used in, the following
message will appear in the display:
Card operation
Programmes on the card are only suitable
for machine type PT 7501 .
A
^ Insert the correct card for the machine in
the card reader.
Card access operation
^ Insert the card in the reader.
The programmes listed on the card will
appear in the display.
Card operation
17
Protective clothing
45 °C
18
Minimum iron
60 °C
FC
A
^ Use the rotary selector to highlight the
programme you want to use. Press the
rotary dial to select the programme you
have highlighted.
^ Press the h Start button. The programme
will start.
After pressing the h "Start" button you can
remove the card from the reader. The
programme is deleted from the machine's
memory once it has finished.
,Never insert any other card or object
into the card reader!
16
Programmes requiring special procedures
are written onto a card which is then used to
run the programme.
"Card access" has be activated via the
supervisor level in the machine.
The machine will then only run programmes
by using a card (on which one programme
has been saved). Programmes in the
machine's control unit cannot then be
accessed.
Drying using coin mechanism
C 4060 / C 4065 / C 4070
If the machine is not operated in the
following order you will lose your money or
tokens!
A Load the drum and close the door.
B Press the I "On" button.
C Select a programme
D Insert coins or tokens.
E Press the h "Start" button.
M.-Nr. 06 533 441
Additional options
Language selection
Start date and time
The language shown in the display can be
changed briefly before starting a
programme if you wish. To do so use the
button underneath the flag symbol.
If you want a programme to start at a later
time use the m button for "Start date and
time".
To set a date and time
1
Cottons dry plus
0%
2
Cottons dry
0%
3
Cottons damp
20%
FC
A
If you press the FC button the following will
appear in the display:
Settings
Back <-
Main menu
Language
2
0%
Cottons dry
10.0 kg
Drying
70°C
e
Cooling down
m
Supervisor level
FC
After selecting your programme, the
following (example) will appear in the
display:
A
^ Press the m "Start date and time" button.
A
The following (example) will appear in the
display:
^ Press the rotary dial to confirm your
selection of the "Language" menu.
2
Cottons dry
10.0 kg
Settings
Back <-
Start time:
Language
Deutsch
After selection press the start button.
: 10
Start date: 2.4.2003
m
English
FC
16
A
A
^ Turn the rotary dial to highlight the
language you want and then press the dial
to confirm your selection.
The FC function button can be pressed to
change to a different language temporarily.
By highlighting the language the display will
immediately change to show the language
selected. If the programme is not started, or
no other buttons or controls are activated in
the next 5 minutes the language will revert
back to the default setting.
The language will revert back to the default
setting 5 minutes after the end of a
programme with the door open.
The current time and date will then appear.
The input field for hours will be highlighted.
^ Press the rotary dial to change the hour.
Turn the rotary dial to alter the hour and
then press it to confirm your selection.
^ Then turn the rotary dial to select the
"Minutes" field and press it to confirm your
selection.
Turn the dial to alter the minutes and then
press it to confirm your selection.
^ Then turn the rotary dial to select the "Start
date" field and press it to confirm your
selection.
Turn the dial to alter the date and then
press it to confirm your selection.
^ Do the same for the month and the year.
M.-Nr. 06 533 441
17
Additional options
After setting the required start date and time:
Changing the programme order
^ Press the Start button h and the
programme selected will commence at the
time specified.
The order of the programme in progress can
be changed or programme blocks can be
repeated.
The display will now contain the following
information:
^ Press the f button and the programme
will stop.
2
0%
Cottons dry
10.0 kg
Cottons dry
Programme stop
Drying
16:15 -2.4.2003
2
Start 6:00-3.4.2003
m
A
ü
f
^ After pressing the ü button the current
area or block will appear in the display.
The current time and date as well as the
start time will be displayed.
^ If the door is opened again you will have to
press the Start button h again.
See also "Programme structure" in the
Progamming Manual.
To cancel the start time and date function
Reorganise -> 2 Cottons dry
Press the m "Start date and time" button
again or press A"Back", and any changes
will be rejected.
Programme stop
S
e
A
S
A
Area 1: Drying
Area 1: Drying
Block 1: Pre-drying
Programme stop
-
To halt the programme press the f button.
The programme remains stationary.
2
Cottons dry
Programme stop
ü
f
To continue the programme press the h
"Start" button.
Programme cancellation
To cancel a programme press the f
"Stop/End" button twice in succession.
18
^ Turn the rotary dial to select the area, and
then press it to confirm your selection.
Select Area: 1 Drying, or 2 Cooling down
and confirm your selection.
^ Turn the rotary dial to select the block and
then press it to confirm your selection.
Select Block: Drying 1-10, or Cooling down
1-10 and confirm your selection.
^ Press the S "Save" button and then press
h "Start" to reorganise the programme
order or press the A "Back" button to go
back to programme stop and not change
the programme order.
M.-Nr. 06 533 441
Additional options
Programme information
Peak load cut-out (optional)
Pressing the K "Information" button will call
up further information about the programme
e.g.:
If the peak-load cut out function is activated
the heating will switch itself off and any
programme running will be stopped. The
following message will appear in the display:
2
Cottons dry
1
Start date and time: 10.7.2003
Start time: 9:47
m
K
e
f
Cottons dry plus
Prog. stopped. Peak load cut-out.
Programme will continue.
ü
f
Time after start: 0h 23 min
Time left: 0h 11min
Progr.-End: 10: 21 h
e
Area: 1 Drying
Block: 1 Pre-drying
Exhaust temperature Actual: 59 °C
e
Once the peak load has finished, the
programme will continue automatically as
before.
If the door is opened during the peak load
cut-out the programme will have to be
started again.
Exhaust temperature Required: 74 °C
Air intake temperature: Actual: 125 °C
Air intake temperature: Required: 150 °C
e
Peak load: No
Anti-crease: 3 s./87s./60 min
Exhaust / Recirculation: Recirculation
2
e
Cottons dry
Block end signal Yes
A
^ Press the A "Back" button to return to the
programme sequence display.
M.-Nr. 06 533 441
19
Standard programme overview
Programme
1 Cottons dry plus 0 %
(Normal+)
2 Cottons dry 0 %
(Normal)
3 Cottons damp 20 %
(Machine iron)
4 Cottons damp 25%
(Machine iron)
5 Cottons damp 40 %
(Machine iron)
6 Minimum iron dry 0 %
(Normal)
7 Minimum iron damp 10 %
(Machine iron)
8 Minimum iron damp 20 %
(Machine iron)
9 Delicates 20 %
Fabric
Multi-layered cotton and
linen textiles which do not get dry in
the Cottons dry programme.
Single and multi-layered cotton and
linen textiles.
Cotton and linen textiles which are
to be machine ironed.
Synthetic and mixed fibre textiles
which are to be machine ironed.
Synthetic textiles
For fluffing up woollen garments.
This programme does not dry
woollens.
11 Timed drying cool air 15 min.
Items which need airing only.
For drying small loads of laundry or
for finishing drying individual items.
20
PT 7251
PT 7331
PT 7401
PT 7501
PT 7801
10 kg
13 kg
16 kg
20 kg
32 kg
Cotton and linen textiles which are
to be machine ironed.
10 Woollens 5 min.
12 Timed drying warm air 20 min.
Max. load
PT 7251 5.0 kg
PT 7331 6.5 kg
PT 7401 8.0 kg
PT 7501 10 kg
PT 7801 16 kg
PT 7251
PT 7331
PT 7401
PT 7501
PT 7801
PT 7251
PT 7331
PT 7401
PT 7501
PT 7801
PT 7251
PT 7331
PT 7401
PT 7501
PT 7801
2.0 kg
2.6 kg
3.2 kg
4.0 kg
6.4 kg
4.0 kg
5.2 kg
6.4 kg
8.0 kg
12.8 kg
10 kg
13 kg
16 kg
20 kg
32 kg
M.-Nr. 06 533 441
Optional modules
Operating data
By pressing the \ "Operating data" button,
the module can be used to read or delete
operating data either before the start of a
programme, or after it has finished.
1
Cottons dry plus
2
Cottons dry
0%
Cottons damp
20%
\
If you press the A "Back" button or do not
press the h "Start" button within 30
seconds, the display will revert to the way it
was before starting the programme.
0%
3
FC
If there is no more memory available in the
operating data module a message will
appear after pressing the h "Start" button to
say that the operating data will be
overwritten.
A
After pressing the \ button the following
will appear in the display:
Total data
Operating data module
Total data
Operating data module
Programme data
Total data
Programme data
\
e
A
\
e
A
After selecting Total data, the following
(example) will appear in the display:
Selection choice:
Operating data module ~ Total data
– Total data
In this option all programme data is collated
and summarised.
Total time power on: 200,987 h
Operating hours: 123456 h
\
– Programme data
Other options:
Programme data contains all the data called
up during a programme.
Total time power on: 200,987 h
Operating hours: 123,456 h
Duration heating active: 123,456 h
Duration drive motor active: 93,456 h
Programme starts: 23,456
Programme stops: 567
Programme cancellations: 67
Amount of laundry: 1,234,567 kg
Energy: 12,345,678 kWh
– Delete data
- Module (delete total data including
programme data)
- Total data (only delete total data)
- Programme data (only delete programme
data)
e
A
Pressing the button again deselects the \
"Operating data" option.
M.-Nr. 06 533 441
21
Optional modules
Programme data
Programme fault: None (only the last 3 faults are
Operating data module
saved.)
Programme data
e
A
Delete data
\
After selecting Programme data the
following (example) will appear in the
display:
Area 1: Drying
Block1: Pre-drying
Process type: Residual moisture
Value: 15 %
Actual residual moisture: 15 %
Duration: 6 min
Max. exhaust temperature: 72 °C
Max. air intake temperature: 122 °C
Operating data module~ Programme data
1
Cottons dry plus
0%
2
Cottons dry
0%
\
e
A
Select the programme you want from the list
and press the rotary dial to call up a list of all
programme starts including date and start
time for that programme (Cottons dry plus in
the example).
Programme data ~ 1 Cottons dry plus
Date: 21.05.2004 Start time: 11:30
Date: 21.05.2004 Start time: 12:30
\
e
A
Select the required programme start from
the list for programme 1 Cottons dry plus
and confirm your choice by pressing the
rotary dial.
Area1: Drying
Block2: Drying
Process type: Residual moisture
Value: 0 %
Actual residual moisture: 0 %
Duration: 6 min
Max. exhaust temperature: 78 °C
Max. air intake temperature: 138 °C
Area2: Cooling down
Block: Cooling down
Process type: Cooling down
Value: 50 %
Actual temperature: 50 °C
Duration: 3 min
Max. exhaust temperature: 52 °C
Max. air intake temperature: 95 °C
Residual moisture: -3 %
Programme data ~ 1 Cottons dry plus
Date: 21.05.2004 Start time: 11:30
Name: Smith
\
e
A
Other options:
Town: Abingdon
Serial number: 12345678
Machine type: PT 7331
Load size: 13 kg
+ Button: Activated
Programme start: 11:30
Programme finished: 12:05
Total operating time: 0 h 35 min
Electrical energy: 12.5 kWh
Gas energy: 0 kWh
Steam energy: 0 kWh
Programme change: 2 (after making your selection
and pressing the rotary dial only the last 3 stops and starts
will be displayed.)
22
M.-Nr. 06 533 441
Optional modules
Delete data
Operating data module
Programme data
e
A
Delete data
[
After selecting Delete data the following
message will appear in the display:
Operating data module~ Delete data
Module: 21.02.2004
e
A
Total data: 12.07.2004
[
The module menu option can be used to
delete the total data and programme data
from the operating data memory.
The total data option can only be used to
delete the total data from the operating data.
The programme data option can only be
used to delete programme data from the
operating data.
After making your selection and pressing the
rotary dial you will be prompted to enter your
password.
Password: _ _ _ _
ABCDEFGHIJKLMNOPQRSTUVWXYZ
0123456789
K
S
A
After keying in your password or inserting
your supervisor level key card in the reader
the following security prompt will appear in
the display:
Delete operating data?
S
A
After pressing the S button the data will be
deleted!
M.-Nr. 06 533 441
23
Problem solving guide
Error messages
A message will flash in the display if there is
a problem either before starting a
programme or once it has started:
,Repairs to electrical, gas or steam
operated machines may only be carried
out by a suitably qualified person in
accordance with national and local safety
regulations. For gas heated machines in
the U.K. this must be a "Corgi" registered
technician. Repairs and other work by
unqualified persons could be dangerous.
The manufacturer cannot be held liable
for unauthorised work.
If any of the following messages still appear
after five re-starts of the machine the
following general fault message will appear:
§
System fault
Call the Service Department
if restart does not work.
f
Whenever the machine is switched on or the
programme list is called up the controls
carry out an analysis of the system. All
modules and sensors, data from the
operating system, drying programmes and
languages are tested.
If a fault is detected in a programme or a
language the following symbol will appear in
the display §. The programme or language
affected cannot be selected.
1
Cottons dry plus
2
Cottons dry
3
Cottons damp
0%
The display remains dark.
There is no power to the machine.
^ Check the mains switch and the on-site
fuses.
0%
20%
§
f
§
Fan fault
Programme stopped. Press the start button.
Motor overheating.
Settings
Back <-
Language
Deutsch
f
^ Allow the motor to cool down.
English§
FC
A
§
If a fault is found in a language that has
already been selected the following
message will appear:
§
Machine fault
f
Data fault
Function restricted
Language defect
f
24
M.-Nr. 06 533 441
Problem solving guide
m
Drive motor fault
§
Motor overheating.
Press the start button to continue.
Gas system fault
Call the Service Department
if restart does not work.
f
f
If this message appears after a programme
has been started:
^ Allow the motor to cool down.
y
^ Open the gas tap and then press the "h
Start" button.
Power cut
Programme stop
Press the start button.
f
^ Press the h "Start" button.
^ The programme can be continued by
pressing the h "Start" button.
§
^ If the programme still will not start please
call the Service Department.
Heating system fault
Programme stopped. Press the start button.
Programme will run without heating
f
§
Card fault
Card incorrectly inserted in card reader.
Continue: Press start
f
^ To continue the programme without
heating press the h "Start" button.
Call the Service Department.
§
If this message appears during a
programme the pressure in the gas supply
has dropped because of other gas heated
appliances operating at the same time.
^ Insert the card the right way round in the
card reader.
Heating system fault
Call the Service Department
if restart does not work.
f
^ Call the Service Department.
§
Pressure monitor fault
Call the Service Department
if restart does not work
f
^ If the programme still will not start please
call the Service Department.
M.-Nr. 06 533 441
25
Problem solving guide
After sales service
In the event of any faults please contact your
Dealer or the nearest Service Department.
When contacting the Service Department,
please quote the Model (Typ), Serial number
(Fabr.Nr) and Material number (M.Nr) of your
machine. These are shown on the data
plate.
This is visible above the door aperture or
at the back of the machine.
Please let the Service Department know any
error message that has appeared in the
display.
Should you require spare parts ensure that
you only use original Miele Spare Parts
(and remember to let the Spare Parts
Department know the model number, serial
number and material number of your
machine).
26
M.-Nr. 06 533 441
Cleaning and care
Fluff /lint filter
Dryer
A lint filter collects any fluff and lint from the
laundry.
Before cleaning the dryer switch off at the
on-site mains switch.
With gas heated dryers the gas connection
must also be switched off, both at the mains
and at the machine.
It should be cleaned at least once a day and
whenever a reminder to clean it appears in
the display.
If there is a large build-up of fluff and lint the
filter will need frequent cleaning.
The filter must not be removed. When
cleaning it do so with care and make sure it
does not get damaged.
^ Open the lint compartment flap
,Do not use a high pressure cleaner or
hose to clean the machine.
^ The housing, control panel and any plastic
components should be cleaned using a
suitable mild cleaning agent, applied with
a soft damp cloth. Rub dry with a soft cloth
after cleaning.
^ If starched laundry has been dried the
drum should be wiped over with a damp
cloth afterwards.
Do not clean the machine with abrasive
cleaning agents.
After cleaning check the seals for any
damage and make sure the door and lint
com-partment flap shut correctly.
The ventilation inlet to the dryer located at
the back of the machine. It must not be
blocked or hindered in any way. Do not
cover the machine lid with cloths or similar
items.
^ Wipe the fluff and lint off the filter by hand.
Never use pointed or sharp edged objects
to do this.
The area surrounding the machine, in
particular the air inlets must be kept free of
dust and fluff at all times. If taken into the
dryer they can cause faults to the machine.
,Never use the macine without the lint /
fluff filter. Fire risk!
A damaged filter must be replaced before
the machine is used again.
Otherwise fluff and lint will cause a
blockage in the airways and the correct
functioning of the machine cannot be
assured.
M.-Nr. 06 533 441
27
Cleaning and care
The following should be checked and
cleaned once a year by a Miele service
technician:
– The burners and burner compartment on
gas heated dryers, the heaters and heater
shaft on electric heated dryers.
– the entire interior of the dryer
– the fins on the exhaust fan
,To ensure the correct performance of
the machine and to prevent the risk of
faults and fire risk it is important to check
the machine and carry out maintenance
on a regular basis.
28
M.-Nr. 06 533 441
Notes for the installer
This machine must only be installed and
commissioned by a Miele authorised
technician. In the U.K. gas heated
machines must be installed by a Corgi
registered fitter only.
Please observe the installation instructions
and the installation diagram supplied with
the machine. They are important for the
correct setting up and connection of the
machine.
,The machine must not be transported
without its transport pallet in position.
Do not install the machine in a room where
there is a risk of frost occurring.
This dryer is fitted with an exhaust fan which
can be heard during operation.
If this noise disturbs you it is possible to fit a
silencer into the dryer's exhaust duct. These
are available from retail outlets.
Coin mechanism
This dryer can be fitted with a coin
mechanism.*
To do so a suitable adapter* is required. The
machine also has to be reprogrammed by a
Miele trained service technician.
All parts marked * are available from your
Miele Dealer or the Miele Spare Parts
Department.
To ensure suitable access is maintained for
future maintenance and service work please
ensure that the minimum distances between
the machine and the wall specified on the
installation diagram are strictly observed.
Levelling the machine
This machine does not require a plinth. It
must, however, be aligned horizontally to
compensate for any unevenness in the floor.
Otherwise the correct functioning of the
machine may be impaired.
The screw feet (A) can be adjusted to align
the machine.
After aligning the machine correctly you
need to use a screwdriver to secure discs
(B) to the floor plate.
M.-Nr. 06 533 441
29
Notes for the installer
Electrical connection
Steam connection
The electrical components of this machine
comply with IEC 335-1 and IEC 335-2-11.
Steam connection must only be carried out
by an authorised installer. See installation
diagram and installation instructions
supplied with the machine.
The electrical connection may only be
carried out by a suitably qualified technician
in accordance with current local and
national safety regulations (BS 7671 in the
UK).
Gas connection
This work must be carried out by an
authorised person in accordance with local
and national safety regulations. This must be
a Corgi registered technician in the UK.
See installation diagram and installation
instructions supplied with the machine.
,The earth lead (N) and phase
conductor (L) must be connected
correctly.
The gas group to which the machine has
been set at the factory is given on the Gas
Data label on the rear of the machine.
Please observe the wiring diagram supplied
with the machine (located behind the plug
connector cover), as well as the installation
diagram. These diagrams are important for
the correct electrical functioning of the
machine.
Please ensure that the voltage and
frequency of the machine as quoted on the
data plate comply with the on-site supply.
The machines are supplied ex-works as
follows:
PT 7251 13.5 kW
PT 7331 18 kW
PT 7401 22.5 kW
PT 7501 27 kW
PT 7801 36 kW .
Air inlet and exhaust connection
This machine must only be used when it is
connected to a suitable ducting system.
The installation site must be adequately
ventilated.
See installation diagram and installation
instructions supplied with the machine.
30
If the machine is converted for a different
gas group, or to liquid gas, a conversion kit
is required. This is available from the Spare
Parts Department. When ordering please
quote the model and serial number of the
machine, as well as the gas type, group and
connection pressure in the country of
installation.
Please follow the installation instructions
carefully. To ensure safety any conversion
work must only be carried out by an
authorised technician, e.g. Corgi registered
in the UK.
,Do not attempt to repair or work on
gas heated machines yourself! Any repair
work may only be carried out by an
authorised technician. In the event of a
fault please contact the Miele Service
Department.
,After setting up and connecting the
machine ensure that all outer casing parts
are correctly fitted back into position.
M.-Nr. 06 533 441
Explanation of symbols on the data plate
1 Machine type
2 Serial number / year of manufacture
3 Voltage/Frequency
4 Mains fuse rating
5 Drive motor
6 Plate diameter/No. of plates *
7 Drum data
8 Drum diameter/drum depth *
9 Spin speed *
10 Drum volume/Laundry dry weight
11 Kinetic energy *
12 Run-up time *
13 Braking time *
14 Heating
15 Electric heating
16 Fuse rating (on-site)
17 Indirect steam heating *
18 Direct steam heating *
19 Gas heating
20 Commissioning date
21 Water regulations registration no. *
22 Field for test certification / CE - 0063 (Gas)
* does not apply to this machine
M.-Nr. 06 533 441
Noise emission
Registered on the A scale
PT 7251
PT 7331
PT 7401
PT 7501
68 dB
67 dB
72 dB
72 dB
Measured in Germany in accordance with
DIN (IEC) 45 635. Machine noise
regulations, 3. GSGV § 1 1.a
31
32
M.-Nr. 06 533 441
Abbreviated operating instructions PT 7251/7331/7401/7501/7801
1. Sort the laundry
Not all textiles are suitable for machine drying. Please read the instructions given on the
garment care label.
q = Dry at normal temperature
r = Dry at low temperature
s = Do not tumble dry
^ Sort the laundry according to fibre type and weave
2. Switch the machine on and load the drum
^ Press the "On" button I in
^ Open the drum door and load the laundry
3. Select a programme using the rotary selector
Standard programmes: 1
2
3
4
5
6
7
8
9
10
11
12
Cottons dry plus 0 %
Cottons dry 0 %
Cottons damp 20 %
Cottons damp 25 %
Cottons damp 40 %
Minimum iron dry 0 %
Minimum iron damp 10 %
Minimum iron damp 20 %
Delicates 20%
Woollens 5 min.
Timed drying cold 15 min.
Timed drying warm 20 min.
4. Press the start button h and the programme selected will commence
5. A buzzer will sound at the end of the programme
^ Open the drum door and unload the laundry
2
Cottons dry
Programme finished
Anti-crease
Ready at 12:35
m
FC
K
f
6. If no more laundry is to be processed:
^ Close the drum door
^ Then switch the dryer off using the 0 "Off" switch
M.-Nr. 06 533 441
33
34
M.-Nr. 06 533 441
M.-Nr. 06 533 441
35
Alteration rights reserved 48.05
M.-Nr. 06 533 441 /02