1
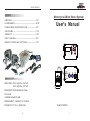
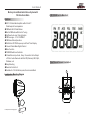
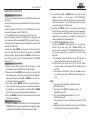
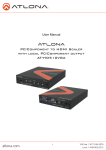
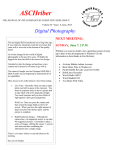
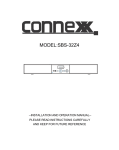
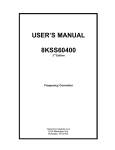
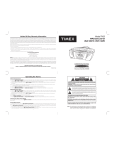
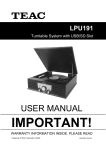
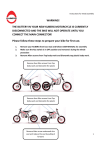
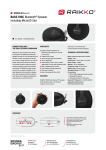
Motorcycle Mount Amplified 50 Watt x 2 Stereo Sound System
W/Dual Handlebar Mount Speakers/FM Radio/Remote Control
User's Manual
CONTENTS
Motorcycle & Boat Stereo System
AMPLIFIER -----------------------------------------------------1PC
LOUDSPEAKER -----------------------------------------------2PCS
POWER CABLE( WITH NOISE FILTER)-------------------1PC
User's Manual
AUDIO CABLE -------------------------------------------------1PC
SCREW KIT -----------------------------------------------------1PC
USER’S MANUAL--------------------------------------------1PC
REMOTE CONTROL UNIT (OPTIONAL)-------------------1PC
SPECIFICATION
RMS POWER: 25W×2@4 Ohm 10%THD
50W×2@2 Ohm 10%THD
FREQUENCY RESPONSE:20Hz-20KHz
S/N:>50dB
CHANNEL BALANCE:<2dB
FM FREQUENCY RANGE:87.5-108.0MHz
FM SENSITIVITY:10μV @S/N 30dB
8
Model: PLMCA10
1
User's Manual
Motorcycle and Boat A udio Stereo S ystem with
FM Auto Scan Radio
LCD SCREEN on the Main Unit
Features
● 50W×2 Detachable Amplifier with a Pair of 3′
Weatherproof Loudspeakers
● FM Radio/AUX/Clock Modes
● Built in FM Radio with Electric Tuning
● Up/Down Auto-scan Tuning System
● FM Coverage : 87.5-108.0MHZ
● FM Stereo/Mono Operation
● Dot Matrix LCD FM Frequency and Clock Time Display
● Volume/Treble/Bass Digital Control
● Mute Function
● POWER Switch and Indicator
● 3.5mm Stereo Input Jack, Easy Connection to the Output
of Other Audio Devices Like Mini-CD(Discman), MD, Mp3,
Walkman, etc
● Easy Mounting
● Remote Control Unit
● Suitable for 12 Volts Motorcycles, Scooters and Boat
Front View of Remote Control Unit
5
Loudspeaker Mounting Diagram
3
4
1
2
Loudspeaker mounting diagram
2
7
User's Manual
AUX Mode
A)Press the button MODE when in the FM radio Mode less
than 1s.Clock time and the AUX words will display on the
LCD.
B)Adjust the volume/treble/bass as step 3) ,
VOL/TREBLE/BASS adjustments of the FM Radio Mode
and Tuning on page 5.
C)The system will return to the AUX Mode automatically if no
buttons are pushed for 8s.
NOTE
MP3/MD/walkman/mini-CD can be used as one of AUX
sources when connecting the AUX source signal to the AUX
jack of the system on the front panel.
FM Radio Mode and AUX Mode Transfer
Press the MODE one time ( less than 1s) will change to the
AUX Mode from the FM radio mode or to the FM radio Mode
from the AUX Mode.
Mute Function
Press the MUTE button will mute sounds from the outputs of
the system at any state and disable it by pressing MUTE
button again .
Remote Control
This remote control unit can take place the 4 same buttons
and the POWER LED on the main unit. The functions of the
remote unit are below referring to the diagram on page 7.
① ---buttonV+: with the same function of the V+ on the main
unit.
②---buttonV-:with the same function of the V- on the main unit.
③---button MODE: with the same function of the MODE on the
main unit.
④---button MUTE: with the same function of the MUTE on the
main unit.
⑤---POWER LED: with the same function of the POWER LED
6
CONNECTION DIAGRAM
CD、WALKMAN
MD、MP3
Audio cable
Amplifier-Front
Loudspeaker(R)
FM antenna
Amplifier-Rear
Power cable
Remote Control Unit
Loudspeaker(L)
3
User's Manual
Operation instruction
First Time to Use the System
Connect the loudspeakers to the L-SP, R-SP RCA jacks on the
rear panel.
Connect an external source to the AUX jack on the front panel(
if there is).
Connect a Remote Control Unit to the REMOTE jack on the
rear panel(if needed, just for PLMCA10).
Fix the FM antenna to a proper place of good receiving.
Connect the power cable to a 12VDC power supply and plug
the connector into the jack marked DC IN on the rear channel:
The system will be operated in the Clock Mode and display the
default time: PM 12:00.
Pressing the button MODE for more than 2s, the system will
leave the Clock Mode to FM radio mode with the POWER
indicator lighting. Simply pressing the MODE in the same way
can change it back to the Clock Mode while the POWER
indicator is off.
Clock Mode and Time Setting
1) Before setting, Please ensure that the system is on the
Clock Mode and the POWER LED indicator is OFF.
2) Pressing the button MODE once (less than 1s) will be in the
hour setting state. Choose the parameter to be modified by
pressing either the buttons UP or DOWN and set the hour
on the active blinking parameters.
3) Pressing the button MODE once more (also less than 1s),
enter to the minute setting mode. Choose the parameter to
be modified by pressing either the buttons UP or DOWN
and set the minute on the active blinking parameters.
4) Press the MODE to finish the clock time setting after setup
of the hour and minute.
FM Radio Mode and Tuning
1) Pressing the MODE for more than 2s in the Clock Mode, the
POWER LED indicator will illuminate and the system is ready
for FM radio with its default FM stereo mode of 87.5MHz.
4
2) Press either the UP or DOWN button to locate a radio
station manually
in the range of 87.5~108.0MHz.
Pressing it for more than 2s will keep auto- scan tuning till
catching one station. The set frequency will hold up until
powering down the 12V DC supply.
3) Pressing the SET/ST button for more than 2s will change
the FM stereo mode to FM mono mode. Use the same way
to change back to the FM stereo mode with ST words
displayed on the screen. This is helpful for improving the
receiving effects during a weak signal.
4) VOLUME/TREBLE/BASS adjustments
Pressing the SET/ST button(less than 1s) one time will
transfer the mode from VOL--TREBLE--BASS--VOL
circularly and the words of VOL/TRE/BASS will blink on
the screen respectively to indicate the state being
adjusted.
A) Press either the button V+ or V- to set the Volume to a
desired value when VOL words blinking on LCD.
B) Press either the button V+ or V- to set the Treble
sounds to a desired value when TRE words blinking on
the LCD
C) Press either the button V+ or V- to set the Bass sounds
to a desired value when BASS words blinking on the
LCD.
NOTE
1. The range of the VOLUME adjustment is 0~30.
Default setting is 08.
2. The range of the TREBLE adjustment is -14~+14.
Default setting is 00.
3. The range of the BASS adjustment is -14~+14
Default setting is 00.
The setting will hold up till powering down the 12V DC
supply.
4. Setup mode will be disabled and return to the FM Mode
automatically if no buttons are pushed for 8s.
5