1
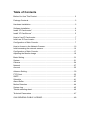
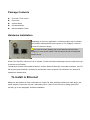
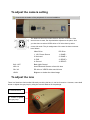
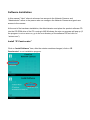
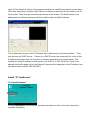
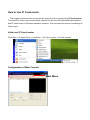
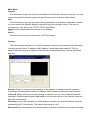
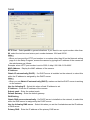
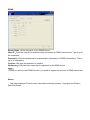
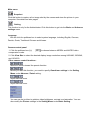
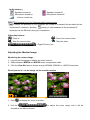
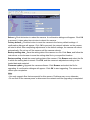
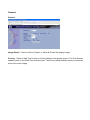
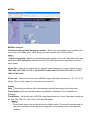
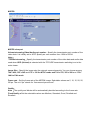
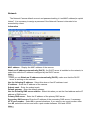
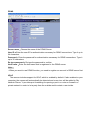
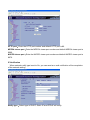
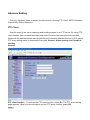
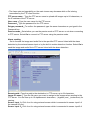
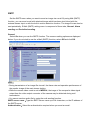
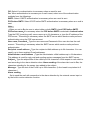
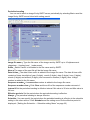
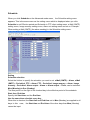
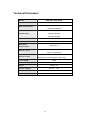
LevelOne FCS-1081 / FCS-1081A PoE IP Camera User Manual Ver:1.1.0-0710 Copyright (c) 2007 Digital Data Communications Co., Ltd. All Rights Reserved. Before You Use This Product The use of surveillance devices may be prohibited by law in your country. The Network Camera is not only a high-performance web-ready camera but also can be part of a flexible surveillance system. It is the user’s responsibility to ensure that the operation of such devices is legal before installing this unit for its intended use. It is important to first verify that all contents received are complete according to the list in the "Package Contents" chapter. Take notice of the warnings in “Quick installation guide” before the Network Camera is installed, then carefully read and follow the instructions in the “Installation” chapter to avoid damages due to faulty assembly and installation. This also ensures the product is used properly as intended. The Network Camera is a network device and its use should be straightforward for those who have basic network knowledge. The “Troubleshooting” chapter in the Appendix provides remedies to the most common errors in set up and configuration. You should consult this chapter first if you run into a system error. The Network Camera is designed for various applications including video sharing, general security/surveillance, etc. The “How to Use” chapter suggests ways to best utilize the Network Camera and ensure proper operations. For paragraphs preceded by the reader should use caution to understand completely the warnings. Ignoring the warnings may result in serious hazards or injuries. ATTENTION 1. All operation please refer to the instruction. 2. Please don’t place the product on unstable desk or bracket. 3. Please avoid any liquid permeate inside of the machine in case damage the product. 4. Before wiring, please follow all electronic safety standards, and using the recommendable power supply adapter. 5. Do not let the camera aim at sun or other lighting objects no matter the camera is operating or not, otherwise it might damage the CCD camera permanently. 6. When the product is out of order, please do not try to fix it by yourself, please refer to the trouble shooting section of this instruction to figure out the problems in advance. If the problem is not found, please contact us or our authorized dealers directly. 7. All the features and functions are subject to change without notice. Please visit www.level1.com for the latest ones. Table of Contents Before You Use This Product .......................................................................... 2 Package Contents............................................................................................2 Hardware Installation .......................................................................................2 Software Installation.........................................................................................4 Install “IP CamLocator” ................................................................................... 4 Install “IP CamSecure” .................................................................................... 5 How to Use IP CamLocator..............................................................................7 Initial use IP Cam Locator ............................................................................... 7 Configuration of Main Console........................................................................ 7 How to Access to the Network Camera..........................................................16 Initial accessing the network camera .............................................................16 Configuration of Main Console.......................................................................17 Adjusting the Monitor Image ..........................................................................19 Basic Setting ..................................................................................................21 System...........................................................................................................21 Camera ..........................................................................................................24 Network..........................................................................................................27 Account ..........................................................................................................32 Advance Setting.............................................................................................33 FTP Client ......................................................................................................33 SMTP.............................................................................................................37 Schedule ........................................................................................................41 Alarm Buffer ...................................................................................................42 Motion Detection ............................................................................................44 System Log ....................................................................................................45 Trouble shooting sheet...................................................................................46 Technical Parameters ....................................................................................47 GNU GENERAL PUBLIC LICENSE...............................................................48 Package Contents FCS-1081 / FCS-1081A Fixed Lens Camera Stand CD Manual/Utility Quick Installation Guide Hardware Installation Depending on the user’s application, an Ethernet cable may be needed. The Ethernet cable should meet the specs of UTP Category 5 and not exceed 100 meters in length. Connect the power adapter jack to the Network Camera before plugging in to the power socket. This will reduce the risk of accidental electric shock. Since FCS-1081/FCS-1081A is a PoE IP camera, it could work without attaching to power outlet as long as it connects to PoE switch. The Network Camera will first detect Ethernet. Until the Network Camera is connected to Network, the LED will become green and flash. Operating in the Network mode, the green LED will flash every second as heartbeat to indicate alive. To install in Ethernet Make sure the Ethernet is firmly connected to a switch hub. After attaching the Ethernet cable plug in the power adapter if users want to have a redundant power. If the LED turns out to be steady green after self-test, go to next paragraph “Software Installation”. To adjust the camera setting Consult with the dealer of the peripherals for correct installation. The Network Camera provides the auto iris lens connector. If the auto iris lens is used, the dip should be adjusted to AI option. And you also have to select VIDEO drive or DC drive lens by select correct iris mode. The pin assignment of the auto iris lens connector is as follows. Video Drive DC Drive 1. 12V, Power Source 1. DAMP - 2. Not used 2. DAMP + 3. IRIS 3. DRIVE + 4. Ground 4. DRIVE - BLC / OFF Back Light Control AES / AI Auto Electronic Shutter or Auto-Iris lens DD / VD DC drive or VIDEO drive auto-iris lens LEVEL Brighten or darken the video image To adjust the lens There is a fixed lens free bundled. Whereby revolving the lens, it can be focused on. However, users shall loosen or tighten the gray loop by using the wrench attached in the package. 1.Unscrew it first 2. Loosen or tighten the gray loop. Software Installation In this manual, "User" refers to whoever has access to the Network Camera, and "Administrator" refers to the person who can configure the Network Camera and grant user access to the camera. At the end of the hardware installation, the Administrator must place the product software CD into the CD-ROM drive of the PC running in MS Windows. An auto-run program will pop up (If the program is not on auto-run, go to the root directory of the software CD and click on “autorun.exe”). Install “IP CamLocator” Click on “Install Software” item, after the window contains changed, click on “IP CamLocator” to run installation program. Upon IP CamLocator’s start up, this program searches for LevelOne’s products on the same LAN. After searching, LevelOne Video Servers or Network cameras will be located by the IP CamLocator. There may be several entries shown in the window. The Administrator may differentiate the Network cameras with the model number and MAC address. The IP addresses shown in the "IP Address" field reflect those on the local network. They may be from the DHCP server. If there is no DHCP server, the camera will try to find a free IP address (this takes from 15 second to 3 minutes, depending on the LAN status). The method of finding IP address is seeking from 192.168.0.2, to 192.168.0.254. If any of the address inside this range is free, the Network Camera will be assigned to this IP address, and its subnet mask would be 255.255.255.0. Install “IP CamSecure” Click”Install Software” Click”IP CamSecure” and follow the onscreen instruction or refer to the user’s manual to complete installation. Custom Setup Type: You may install the system to the directory of your preference and choose which feature(s) you want to install to the PC. Hint: You may, for instance, install only Playback and/or LiveView on the PC at home or other remote site from which you do not install the camera but are going to watch them remotely. How to Use IP CamLocator This chapter introduces how to monitor the image from the camera using IP CamLocator. The LevelOne video server and Network camera can be used with Microsoft web browsers and IP CamLocator in Windows operation systems. This document focuses on introducing IP CamLocator. Initial use IP Cam Locator Click Start -> Program Files -> LevelOne -> IP Cam Locator -> IP Cam Locator. Configuration of Main Console Main Menu Main Menu Camera Click this button to get into common information of all Network cameras in network. You can connect the specific Network cameras to get life video and to optimize video setting. User Click this button to get into user basic setting information of all Network cameras in network. You can connect the specific Network cameras to get and set basic values. This section includes Info, User, Date Time, TCP/IP, PPPoE and DDNS. Note: Only the administrator has access to the Settings. About Click this button to get into information of IP CamLocator. Camera The Camera page provides you LevelOne network cameras in the network with information, including product name, IP address, MAC address, model name and model ID. Click on specific network cameras to optimize Video Setup including brightness, contrast, saturation and hue. Search:Click it to search network cameras in the network, it displays network cameras information including product name, IP address, MAC address, model name and model ID. Link to IE:After searching network cameras in network, you can click to specific Network cameras in search area and press Link to IE to set the video server of the network camera in Microsoft web browses. Username:Enter the username for authentication necessary for specific Network cameras connecting with IP CamLocator. The default user name is “root”. Password:Enter the password for authentication necessary for Network cameras connecting with IP CamLocator. The default password is the MAC address (in capital letters). Connect:After clicking to specific Network cameras in search area and type it with username and password to connect to the network camera in IP CamLocator. You can use the tool bar to optimize video Brightness, Contrast, Saturation and Hue. User The User page provides you all Network cameras configurations in the network with product or downloaded configuration file information, including Info, User, Date Time, TCP/IP, PPPoE and DDNS. Load configuration File:Select From PC File or From Device, the former one can load information of downloaded configuration file and the latter one can load Network Camera configurations in the network. From PC File:Click it and press Load to select configuration location from PC. Note: • Configuration file format is *.conf. From Device:Click it and press Load to select the specific device in the network. Type it with Username and Password to load configuration from device. Note: • If you have connected to the specific device before, you don’t type it with Username and Password again. After loading, you can get configuration from PC files or devices. IP CamLocator displays the sub folders including Info, User, Date Time, TCP/IP, PPPoE and DDNS. Info The Info page provides you with product factory information, including Product Name, Serial Number, Firmware Version and hardware version. User The Network Camera default account and password setting is “root/MAC address (in capital letters)”. IP CamLocator provides to assign a password if the Network Camera is intended to be accessed by others. Use this menu to set the user names and passwords of Administrator and up to 9 different users (User 1 to User 9), and the access right of each user. Username:Set a user name between 5 and 16 characters. Password:Set a password between 5 and 16 characters. Confirm:Re-type the password to confirm. Mode:Set s user to Admin, Operator or Viewer mode. Date Time Current date & time:This displays the current date and time of the camera. PC clock:This displays the date and time of the monitoring PC clock. Adjust:Select one of four time adjusting modes. Keep current setting:Select this mode to keep the current date and time of the camera. Synchronize with PC:Select this mode to make the date and time of the camera the same as the monitoring PC. Manual setting:Select this mode to manually adjust the date & time of the camera. Synchronize with NTP:Specify the NTP server name and the refresh Interval to synchronize the date and time of the camera with those of the time server, known as the NTP (Network Time Protocol) server. Note: • The NTP server (Network Time Protocol) is the time server which is an Internet standard protocol (built on top of TCP/IP) that assures accurate synchronization to the millisecond of computer clock times in a network of computers. NTP server name:Type the host name or IP address of the NTP server, up to 64 characters. Time zone:Select the time zone and time difference from Greenwich Mean Time in the area where the camera is installed from the pulldown box. TCP/IP HTTP Port:Select port 80 in general situations. If you want to use a port number other than 80, select the text box and enter a port number between 1024 and 65535. Note: • When you have set the HTTP port number to a number other than 80 on the Network setting page or in the Setup Program, access the camera by typing the IP address of the camera on the web browser as follows: Example: when HTTP port number is set to 2000 Æ http://192.168.0.100:2000/ MAC Address:Display the MAC address of the camera. IP Address Obtain IP automatically (DHCP):If a DHCP server is installed on the network, to select this while the IP address is assigned by the DHCP server. Note: • When you set Obtain IP automatically (DHCP), make sure that the DHCP server is working on the network. Use the following IP:Select this when a fixed IP address is set. IP Address:Enter the IP address of the camera. Subnet mask:Enter the subnet mask. Default Gateway:Enter the default gateway. DNS Setting Obtain DNS server automatically:If a DHCP server is installed on the network, to select this while the DNS server is assigned by the DHCP server. Use the following DNS server:Select this when you set the fixed address as the IP address of DNS server. Primary DNS:Enter the IP address of the primary DNS server. Secondary DNS:Enter the IP address of the secondary DNS server, if necessary. PPPoE Use this when you connect the camera through PPPoE (Point -to- Point Protocol over Ethernet). PPPoE connection is the protocol that is widely used in xDSL (digital affiliate line such as ADSL, VDSL or SDSL) as the authentication and connection system. IP Address:The IP address obtained at the PPPoE connecting with network. User ID:Enter the user ID for authentication necessary for PPPoE connections. Type it up to 64 characters. Password:Enter the password for authentication necessary for PPPoE connections. Type it up to 32 characters. Confirm:Re-type the password to confirm. Obtain DNS server automatically:Select this to obtain the address of DNS server automatically. Use the following DNS server:Select this when you set the fixed address as the IP address of DNS server. Primary DNS:Enter the IP address of the primary DNS server. Secondary DNS:Enter the IP address of the secondary DNS server. DDNS Server Name:Enter the name of the DDNS Server User ID:Enter the user ID for authentication necessary for DDNS connections. Type it up to 64 characters. Password:Enter the password for authentication necessary for DDNS connections. Type it up to 32 characters. Confirm:Re-type the password to confirm. Hostname:Enter the host name that is registered to the DDNS server. Note: • When you want to use DDNS function, you need to register an account in DDNS server first. About This page displays IP CamLocator information including Version, Copyright and Product Date information How to Access to the Network Camera This chapter introduces how to monitor the image from the camera using Microsoft web browser. The LevelOne video server and Network camera can be used with Microsoft web browsers and IP CamLocator in Windows operation systems. This section focuses on introducing camera web server. The recommended browser for Windows is Internet Explorer 6.0 or above. The functions of the camera should be set by the Administrator. Initial accessing the network camera Start your web browser, and enter the IP address or host name of the network camera of LevelOne in the Location / Address field of your browser. Use the default account “root” and default password which is the MAC address (in capital letters).After successful login, there would a screen appear for ActiveX. Click “Install” and proceed. Then the monitor image will be displayed in your browser. Note: The default user name and password are set at the factory for the administrator. You can change them in the Account Menu under Setting on later pages. Configuration of Main Console Camera control panel Main menu Monitor image Section Main menu Snapshot Click this button to capture a live image shot by the camera and store the picture in your computer. See details on later pages. Setting This function is only for the Administrator. Click this button to get into the Basic and Advance settings menu. Language You can click the pulldown box to select system language, including English, German, Danish, Greek, Traditional Chinese and Korean. Camera control panel 1. Click the pulldown box compression mode. to choose between MPEG4 and MJPEG video 2. Click View Size to select the desired display image resolution among 640X480, 320X240, and 160X120. Other camera control functions: Move the camera toward the preset direction. Before you start this function, you need to specify Guard tour settings in the Setting Menu under Advance / Patrol setting. Adjust camera focus. Adjust camera zoom. You can use the tool bar to optimize video brightness, contrast, and saturation. You can also modify the Picture settings in the Setting Menu under Basic Setting. Audio buttons: :Speakers turned on. :Microphone turned on. :Volume control bar. :Speakers turned off. :Microphone turned off. Note:This function is only for Cameras which support audio. • It means the speakers of your computer are turned on to transmit the sounds from the connected IP camera(s). Similarly, means you can broadcast to the connected IP camera(s) via the Ethernet using your microphone. Video play buttons: :Zoom in. :Pause the current video. :Stop the current video. :Play the video. :Digital Zoom in /out. Adjusting the Monitor Image Monitoring the camera image 1. Log into the homepage to display the main console. 2. Select between MPEG4 and MJPEG video compression mode. 3. Click the View Size box to choose among 640X480, 320X240 or 160X120 resolution. Directly zoom in / out the image via the monitor window 1. Click to display the zoom in window. 2. Pull the showed on the above window. to adjust the zoom range, and it will be 3. You can use the right click of your mouse to move the to any where on the window. Capturing the monitor image You can capture a still image shot by the camera and save it in your computer. 1. Press , and a snapshot window will appear. 2. Click the right button of your mouse and save the picture in your computer. 3. Select JPEG or Bit map under Save as type. 4. Specify File name, choose Save in location, and click Save. 5. Click “Close” to return to the Main console. Setting the camera Press for setting the camera. Only the administrator has access to the Settings. This section, including Basic and Advance settings, explains each option and how to use it. For camera control, please see “How to use”. How to use Basic setting Basic setting options includes System, Camera , Network, and Account. How to use Advance setting Advance setting options includes FTP Client , SMTP, Schedule, Alarm buffer, Motion Detection. Motion Detection When you click Motion Detection on main panel menu, the Motion Detection setting menu appears. There are three Motion Detection functions as sensors to set for different detecting zones. Each one has Threshold and Sensitivity inputs which you can adjust to specific zone sequentially. Motion Detection function can support to FTP and SMTP for capturing and sending images or starting alarm output. Language You can click the pulldown box to select system language, including English, German, Danish, Greek, Traditional Chinese and Korean. Basic Setting Click the “Basic” folder to display the sub folders, including System, Camera, Network, and Account. System Information The Information page provides you with product factory information, including product name, serial number, firmware version, Web version and hardware version. Day & Time Current date/time:This displays the current date and time of the camera. PC clock:This displays the date and time of the monitoring PC clock. Date & time format:Click the pulldown box to select among different time display formats, including yyyy-mm-dd hh:mm:ss (year-month-day hour:minute:second), mm-dd-yyyy hh:mm:ss (month-day-year hour:minute:second), and dd-mm-yyyy hh:mm:ss (day-month-year hour:minute:second). Adjust:Select one of four time adjusting modes. Keep current setting:Select this mode to keep the current date and time of the camera. Synchronize with PC:Select this mode to make the date and time of the camera the same as the monitoring PC. Manual setting:Select this mode to manually adjust the date & time of the camera. Synchronize with NTP:Specify the NTP server name and the Refresh Interval to synchronize the date and time of the camera with those of the time server, known as the NTP (Network Time Protocol) server. Note: • The NTP server (Network Time Protocol) is the time server which is an Internet standard protocol (built on top of TCP/IP) that assures accurate synchronization to the millisecond of computer clock times in a network of computers. NTP server name:Type the host name or IP address of the NTP server, up to 64 characters. Time zone:Select the time zone and time difference from Greenwich Mean Time in the area where the camera is installed from the pulldown box. Initialize Reboot:Click this button to reboot the camera. A confirmation dialogue will appear. Click OK to proceed. It takes about two minutes to reboot the camera. Factory default:Click this button to reset the camera to the factory default settings. A confirmation dialogue will appear. Click OK to proceed, the network indicator on the camera will start to blink. After completing adjustments to the default settings, the camera will reboot automatically. Do not turn off the camera until the camera reboots. Backup setting data:Save the setting data of the camera to a file. Click Save, and follow the instructions on the browser to save the setting data file to your specified location. Restore setting:Load the saved setting data of the camera. Click Browse and select the file in which the setting data is stored. Click OK, and the camera is adjusted according to the loaded data and restarted. Firmware update:Upgrade the camera software. Click Browse and select the file for upgrading. A confirmation dialogue will appear. Click OK to start upgrading. The camera will reboot upon completion. Note: • Use only upgrade files that are special for this camera. Problems may occur otherwise. • Do not turn off the camera power or disconnect the network until the upgrading is completed. Camera General Image Rotate:Select to Mirror, Rotate, or Mirror & Rotate the display image. Overlay:Select to add Text Overlay or Privacy Mask on the display screen. The Text Overlay enables users to see Date/Time on the screen. The Privacy Mask enables users to conceal an area of the video image. MPEG4 MPEG4 view port Unicast streaming Video/Audio port number : Specify the transmission port number of the video data. It is initially set to 8090. Specify an even number from 1024 to 65534. Note: • Unicast streaming:Specify the transmission port number of the video data and audio data used when UDP (Unicast) is selected with the TCP/UDP transmission switching icon in the main viewer. Image Size:Specify the image size the network camera transmits. You can choose among 704 × 480, 352 × 240 and 176 × 120 for NTSC mode and 704 × 576, 352 × 288 and 176 × 144 for PAL mode. Frame rate:Set the frame rate of the MPEG4 image. Selectable values are 5, 10, 15, 20, 25, 30 fps. The unit “fps” stands for “frames sent per second”. Quality Auto:The quality and bitrate will be automatically decided according to the frame rate. Fixed Quality:Set the selectable values are Medium, Standard, Good, Detailed and Excellent. Fixed Bitrate:Set the bit rate of MPEG4 image transmission for a line. Selectable values are 64, 128, 256, 384, 512, 768, 1024, 1536 and 2048 kbps. Note: • The selected frame rate and bit rate are a tentative value. The actual frame rate and bit rate may be different according to the image size, the shooting scene or the network condition. MJPEG MJPEG view port Unicast streaming Video/Audio port number : Specify the transmission port number of the video data. It is initially set to 8070. Specify an even number from 1024 to 65534. Note: • Unicast streaming:Specify the transmission port number of the video data and audio data used when UDP (Unicast) is selected with the TCP/UDP transmission switching icon in the main viewer. Image Size:Specify the image size the network camera transmits. You can choose among 704 × 480, 352 × 240 and 176 × 120 for NTSC mode and 704 × 576, 352 × 288 and 176 × 144 for PAL mode. Frame rate:Set the frame rate of the MPEG4 image. Selectable values are 5, 10, 15, 20, 25, 30 fps. The unit “fps” stands for “frames sent per second”. Quality Auto:The quality and bitrate will be automatically decided according to the frame rate. Fixed Quality:Set the selectable values are Medium, Standard, Good, Detailed and Excellent. Network The Network Camera default account and password setting is “root/MAC address(in capital letters)”. It is necessary to assign a password if the Network Camera is intended to be accessed by others. Information MAC address:Display the MAC address of the camera. Obtain an IP address automatically (DHCP):If a DHCP server is installed on the network, to select this while the IP address is assigned by the DHCP server. Note: • When you set Obtain an IP address automatically (DHCP), make sure that the DHCP server is working on the network. Use the following IP address:Select this when a fixed IP address is set. IP address:Enter the IP address of the camera. Subnet mask:Enter the subnet mask. Default gateway:Enter the default gateway. Use the following DNS server address:Select this when you set the fixed address as the IP address of DNS server. Primary DNS server:Enter the IP address of the primary DNS server. Secondary DNS server:Enter the IP address of the secondary DNS server, if necessary. HTTP port number:Select 80 in general situations. If you want to use a port number other than 80, select the text box and enter a port number between 1024 and 65535. Note: • When you have set the HTTP port number to a number other than 80 on the Network setting page or in the Setup Program, access the camera by typing the IP address of the camera on the web browser as follows: Example: when HTTP port number is set to 2000 Æ http://192.168.0.100:2000/ PPPoE Use this when you connect the camera through PPPoE (Point -to- Point Protocol over Ethernet). PPPoE connection is the protocol that is widely used in xDSL (digital affiliate line such as ADSL, VDSL or SDSL) as the authentication and connection system. IP address:The IP address obtained at the PPPoE connecting with network. User ID:Enter the user ID for authentication necessary for PPPoE connections. Type it up to 64 characters. Password:Enter the password for authentication necessary for PPPoE connections. Type it up to 32 characters. Re-type password:Re-type the password to confirm. Obtain DNS server address automatically:Select this to obtain the address of DNS server automatically. Use the following DNS server address:Select this when you set the fixed address as the IP address of DNS server. Primary DNS server:Enter the IP address of the primary DNS server. Secondary DNS server:Enter the IP address of the secondary DNS server. DDNS Server name:Choose the name of the DDNS Server User ID:Enter the user ID for authentication necessary for DDNS connections. Type it up to 64 characters. Password:Enter the password for authentication necessary for DDNS connections. Type it up to 32 characters. Re-type password:Re-type the password to confirm. Host name:Enter the host name that is registered to the DDNS server. Note: • When you want to use DDNS function, you need to register an account in DDNS server first. UPnP The camera includes support for UPnP, which is enabled by default. If also enabled on your computer, the camera will automatically be detected and a new icon will be added to “My Network Places.” It provides port forwarding for opening a port in a router or firewall in a private network in order to let a party from the outside world contact a user inside. HTTP port:Enter the HTTP port number and default HTTP port is 80. MPEG4 viewer port:Enter the MPEG4 viewer port number and default MPEG4 viewer port is 8090. MJPEG viewer port:Enter the MJPEG viewer port number and default MJPEG viewer port is 8070. IP Notification When network notify type is set to On, you can send an e-mail notification of the completion of the network setting. Notify type:Select type of DHCP, Static IP and PPPoE will notify. SMTP server name:Type the SMTP server name up to 64 characters, or the IP address of the SMTP server. Authentication:Select the authentication required when you send an email. Off: Select if no authentication is necessary when an email is sent. On: When authentication is necessary an e-mail is sent, select one of the authentication methods from the followings. SMTP: Select if SMTP authentication is necessary when an e-mail is sent. POP before SMTP: Select if POP before SMTP authentication is necessary when an e-mail is sent. Note: • When you set to On, be sure to select either or both SMTP or/and POP before SMTP. POP server name:It is necessary when the POP before SMTP is selected in Authentication. Type the POP (receiving mail) server name up to 64 characters, or type the IP address of the POP server. This setting is necessary when the SMTP server which sends e-mails performs authentication using the POP user account. User name, Password:Type the user name and Password of the user who has the mail account. This setting is necessary when the SMTP server which sends e-mails performs authentication. Recipient e-mail address:Type the recipient e-Mail address up to 64 characters. You can specify up to three recipient E-mail addresses. Administrator e-mail address:Type the Administrator e-Mail address up to 64 characters. This address is used for reply mail and sending system messages from the SMTP server. Subject:Type the subject/title of the e-Mail up to 64 characters. With respect to mail which is sent according to the IP notification. Message Type the text of the E-mail up to 384 characters. Default value provide network information including IP, Port, MAC, Model and Serial.. Account Setting The Network Camera default account and password setting is “root/MAC address(in capital letters)”. It is necessary to assign a password if the Network Camera is intended to be accessed by others. Use this menu to set the user names and passwords of Administrator and up to 9 different users (User 1 to User 9), and the access right of each user. Setting User name:Set a user name between 5 and 16 characters. Password:Set a password between 5 and 16 characters. Re-type password:Re-type the password to confirm. Viewer Mode:Set a user to Admin, Operator or Viewer mode. Viewer authentication:Allows any viewer direct access to Live View. Advance Setting Click the “Advance” folder to display the sub folders, including FTP Client, SMTP, Schedule, Alarm buffer, Motion Detection. FTP Client Use this menu to set up for capturing and sending images to an FTP server. By using FTP client function, you can send the image and audio file which has been shot and recorded linked with the external sensor input or with the built-in motion detection function to FTP server. FTP client setting menu is composed of two tabs, General ,Alarm sending and Periodical sending. General FTP client function:To activate the FTP client function, select On. The FTP client setting page appears. When you do not wish to use the FTP client function, select Off. Note: • The frame rate and operability on the main viewer may decrease while a file is being transmitted by the FTP client function. FTP server name:Type the FTP server name to upload still images up to 64 characters, or the IP address of the FTP server. User name:Type the user name for the FTP server. Password:Type the password for the FTP server. Retype password:To confirm the password, type the same characters as you typed in the Password box. Passive mode:Set whether you use the passive mode of FTP server or not when connecting to FTP server. Select On to connect to FTP server using the passive mode. Alarm sending Set to forward the image and audio file to the specified FTP server linked with the alarm detection by the external sensor input or by the built-in motion detection function. Select On to send the image and audio file to FTP server linked with the alarm detection. Remote path:Type the path to the destination in FTP server up to 64 characters. Image file name:Type the file name you want to assign to the images when sending to the FTP server. You can use up to 10 alphanumeric characters, - (hyphen) and _ (underscore) for naming. Sensor input 1:Click it on for using external sensor which is connected to sensor input1 of the camera I/O port. Sensor input 2:Click it on for using external sensor which is connected to sensor input2 of the camera I/O port. Sensor input 3:Click it on for using external sensor which is connected to sensor input3 of the camera I/O port. Sensor input 4:Click it on for using external sensor which is connected to sensor input4 of the camera I/O port. Motion Detection:Click it on for using Motion Detection function as a sensor. You can set the motion detection function page. Note: • Motion Detection works only when the Video mode is set to MPEG-4 and the Cropping is set to Off. Alarm buffer:Select Use alarm buffer when you forward the image/ audio of before and after the alarm detection (pre-alarm, post-alarm). If you do not select it, only the image of the moment of the alarm detection is forwarded. Click Alarm buffer to display the Alarm buffer setting menu. For details, see “Setting the Alarm Buffer — Alarm buffer setting Menu on page. Periodical sending You can set to send an image file to FTP server periodically by selecting On to send the image file to FTP server linked with setting period. Remote path:Type the remote path up to 64 characters. Image file name:Type the file name of the image sent to FTP server up to 10 alphanumeric characters, - (hyphen) and _ (under score). Suffix:Select a suffix to be added to the file name sent to FTP server. None:The name of the sent file will be the Image file name. Date & time:The date & time suffix is added to the Image file name. The date & time suffix consists of lower two-digits of year (2 digits), month (2 digits), date (2 digits), hour (2 digits), minute (2 digits) and second (2 digits), and consecutive number (2 digits), thus 14-digit number is added to the file name. Sequence number:A consecutive number is added to the Image file name. Sequence number clear:Click Clear and the suffix of the sequence number returns to 1. Interval:Set the periodical sending is effective interval. Min value is 1 min and Max value is 24 hour. Effective period:Set the period when the periodical sending is effective. Always:The periodical sending is always effective. Schedule:You can specify the period when the periodical sending is effective in the schedule setting in the other section. Click Schedule and the setting menu for the effective period is displayed. (“Setting the Schedule — Schedule setting Menu” on page 39) SMTP Set the SMTP menu when you want to send an image via e-mail. By using Mail (SMTP) function, you can send a mail with attached image which has been shot linked with the external sensor input or with the built-in motion detection function. The image file can also be sent periodically. E-Mail (SMTP) setting menu is composed of three tabs, General ,Alarm sending and Periodical sending. General Select On when you use the SMTP function. The common setting options are displayed below. If you do not wish to use the e-Mail (SMTP) function, select Off and click OK. Note: • During transmission of an image file via mail, the frame rate and operation performance of the monitor image of the main viewer decline. • While the camera video mode is set to MPEG-4, the image of the composite video signal output from the video output connector of the camera may be distorted during mail transmission. • You cannot send an audio file by using the mail sending function. SMTP server name:Type the SMTP server name up to 64 characters, or the IP address of the SMTP server. Authentication:Select the authentication required when you send an email. Off: Select if no authentication is necessary when an email is sent. On: When authentication is necessary an e-mail is sent, select one of the authentication methods from the followings. SMTP: Select if SMTP authentication is necessary when an e-mail is sent. POP before SMTP: Select if POP before SMTP authentication is necessary when an e-mail is sent. Note: • When you set to On, be sure to select either or both SMTP or/and POP before SMTP. POP server name:It is necessary when the POP before SMTP is selected in Authentication. Type the POP (receiving mail) server name up to 64 characters, or type the IP address of the POP server. This setting is necessary when the SMTP server which sends e-mails performs authentication using the POP user account. User name, Password:Type the user name and Password of the user who has the mail account. This setting is necessary when the SMTP server which sends e-mails performs authentication. Recipient e-mail address:Type the recipient e-Mail address up to 64 characters. You can specify up to three recipient E-mail addresses. Administrator e-mail address:Type the Administrator e-Mail address up to 64 characters. This address is used for reply mail and sending system messages from the SMTP server. Subject:Type the subject/title of the e-Mail up to 64 characters. With respect to mail which is sent according to the alarm detection when Alarm sending of the alarm tab is set to On, the characters standing for the sensor type added to the subject. Message:Type the text of the E-mail up to 384 characters. (A line break is equivalent to 2 characters.) Alarm sending Set to send the mail with connection to the alarm detection by the external sensor input or by the built-in motion detection function. Alarm sending:Select On to set to send mail with connection to the alarm detection. File attachment:Set whether an image file is attached to the mail sent or not. When On is selected, the image file made by the settings below is attached. When Off is selected, only the message is sent. Image file name:Type the file name you want to assign to the image to attach a mail. You can use up to 10 alphanumeric, - (hyphen) and _ (underscore) for naming. Sensor input 1:Click it on for using external sensor which is connected to sensor input1 of the camera I/O port. Sensor input 2:Click it on for using external sensor which is connected to sensor input2 of the camera I/O port. Sensor input 3:Click it on for using external sensor which is connected to sensor input3 of the camera I/O port. Sensor input 4:Click it on for using external sensor which is connected to sensor input4 of the camera I/O port. Motion Detection:Click it on for using Motion Detection function as a sensor. You can set the motion detection function page. Note: • Motion Detection works only when the Video mode is set to MPEG-4 and the Cropping is set to Off. Periodical sending You can set to send an image file by SMTP server periodically by selecting On to send the image file by SMTP server linked with setting peroid Image file name:Type the file name of the image sent by SMTP up to 10 alphanumeric characters, - (hyphen) and _ (under score). Suffix:Select a suffix to be added to the file name sent by SMTP. None:The name of the sent file will be the Image file name. Date & time:The date & time suffix is added to the Image file name. The date & time suffix consists of lower two-digits of year (2 digits), month (2 digits), date (2 digits), hour (2 digits), minute (2 digits) and second (2 digits), and consecutive number (2 digits), thus 14-digit number is added to the file name. Sequence number:A consecutive number is added to the Image file name. Sequence number clear:Click Clear and the suffix of the sequence number returns to 1. Interval:Set the periodical sending is effective interval. Min value is 30 min and Max value is 24 hour. Effective period:Set the period when the periodical sending is effective. Always:The periodical sending is always effective. Schedule:You can specify the period when the periodical sending is effective in the schedule setting in the other section. Click Schedule and the setting menu for the effective period is displayed. (“Setting the Schedule — Schedule setting Menu” on page 32) Schedule When you click Schedule on the Advanced mode menu, the Schedule setting menu appears. This is the same menu as the setting menu which is displayed when you click Schedule to set Effective period and Schedule in FTP client setting menu, e-Mail (SMTP) setting menu, Image memory setting menu, Alarm out setting menu and so on. Example: When setting e-Mail (SMTP) (the alarm sending) in the Schedule setting menu. Setting Schedule selection Select the list box to specify the schedule you want to set. e-Mail (SMTP) – Alarm, e-Mail (SMTP) – Periodical, FTP – Alarm, FTP – Periodical, Image memory – Alarm, Image memory – Periodical, Alarm output – Alarm or Alarm output – Timer, can be selected. Mon (Monday) to Sun (Sunday) The time period on the right of the checked day is the effective period of the schedule. Start time, End time Specify the Start time and the End time. Use the same time schedule every day When this is checked, the Start time and End time set to Mon (Monday) are applied to all days. In this case, the Start time and End time of the other days than Mon (Monday) cannot be input. Alarm Buffer You can set the Pre-alarm image and audio (the image and audio before the alarm detection) and the Post - alarm image and audio. These can be set when Alarm sending FTP client setting menu or Image memory setting menu is set to On, and besides when Use alarm buffer is selected. Setting Alarm buffer:To activate the Alarm buffer function, select On. The basic setting options are displayed below. When you do not use the Alarm output function, select Off. Recording capacity Pre-alarm period:Display the maximum recording capacity of image/audio before the alarm detection. Post-alarm period:Display the maximum recording capacity of image/audio after the alarm detection. Recording time Set the recording time for the Pre-alarm image/audio and Post alarm image/audio. Pre alarm period:Type it with recording time of the image/audio before the alarm detection. 42 Post alarm period:Type it with recording time of the image/audio after the alarm detection. Note: • The value of Recording capacity differs depending on Image size, Bitrate (for MPEG4) and Image quality (for MJPEG-4 and MJPEG) in the camera setting menu. 43 Motion Detection When you click Motion Detection on the Advance mode menu, the Motion Detection setting menu appears. There are three Motion Detection functions as sensors to set for different detecting zones. Each one has Threshold and Sensitivity inputs which you can adjust to specific zone sequentially. Motion Detection function can support to FTP, SMTP and Alarm output for capturing and sending images or starting alarm output. Click it On when you use the Motion Detection function and detecting zone appears for adjusting and moving. The common setting options are displayed below. If you do not wish to use the Motion Detection function, click it Off and press OK. Motion Detection 1:Click it on for using Motion Detection 1 function as a sensor. You can adjust and move the detecting zone by using mouse. Motion Detection 2:Click it on for using Motion Detection 2 function as a sensor. You can adjust and move the detecting zone by using mouse. Motion Detection 3:Click it on for using Motion Detection 3 function as a sensor. You can adjust and move the detecting zone by using mouse. Threshold:You can use the tool bar to set up-limit value. When detecting zone signals are over setting value, it would carry on assigned work. Sensitivity:You can use the tool bar to set down-limit value. When detecting zone signals are over setting value, it would carry on assigned work. 44 Carry out the following steps: 1. Click On to Motion Detection 1 choose one of eight orders. 2. A detecting zone 1 appears and use mouse to adjust and move the zone boundaries and position. 3. Use tool bar to set Threshold and Sensitivity value. 4. Follow the steps to set the other Motion Detection. 5. Click the OK to save the setting. Note: • Be careful! Motion Detection function don’t work with Patrol function at same time. System Log The System Log records all changes with time that the system has made. 45 Trouble shooting sheet After powering up or inserting LAN cable connected to a PoE switch, the Network Camera performs a self-diagnostic to detect any hardware defects. Reset and Restore At the rear side of the camera there is a button hidden in the pinhole as shown in the picture. It is used to reset the system or restore the factory default settings. Sometimes resetting the system sets the system back to normal state. If the system problems remain after reset, restore the factory settings and install again. Reset Button Restoring the factory defaults will erase any previous settings. Reset or restore the system after power on. Troubles Probable Reasons Power cable is not in well No action while power on. connection. No image. Reconnected. Start up with factory The Networking indicator isn’t flashing. Solutions Firmware is hang up. default setting by pressing the reset button over 5 seconds then releasing it. Having image but can’t control. Restart the Network Firmware is hang up. The indicator isn’t flashing. releasing the reset button. Poor video cable Unstable images connection Power W is not enough Vague images camera by pressing and The focus is out of focus. Incorrect camera setting 46 Reinsert Change Adjust the lens or focus manually. Check the dip switch. Technical Parameters M od e l FCS-1081 / FCS-1081A MJEG/MPEG4 Co mpr ess io n Mo de 704x480 pixels(NTSC) Max . R esolu t io n 704x576 pixels(PAL) 160x120: 30/25fps 320x240: 30/25fps F ra m e R at e 704x480: 30/25fps 1/3" ColourCCD Sensor 4.0mm/F1.2 L en s Minimu m 0.05Lux/F1.2 Illumination 1/60~1/100,000(NTSC) Shutter (sec) A u d io C ode c 1/50~1/110,000(PAL) G.711 PCM 64 kbit/s, ADPCM 32 kbit/s, MP3, MPEG4-AAC full duplex(FCS-1081A only) F l as h R OM 8MB SDRAM 32MB Digital: 10x Z oo m Pow er Suppl y DC 12V,± 5% T e mpe ra t ur es 0°C ~ + 50°C ≤ 95% non-condensing Humidit y 47 GNU GENERAL PUBLIC LICENSE Version 2, June 1991 Copyright (C) 1989, 1991 Free Software Foundation, Inc. 59 Temple Place, Suite 330, Boston, MA 02111-1307 USA Everyone is permitted to copy and distribute verbatim copies of this license document, but changing it is not allowed. Preamble The licenses for most software are designed to take away your freedom to share and change it. By contrast, the GNU General Public License is intended to guarantee your freedom to share and change free software--to make sure the software is free for all its users. This General Public License applies to most of the Free Software Foundation's software and to any other program whose authors commit to using it. (Some other Free Software Foundation software is covered by the GNU Library General Public License instead.) You can apply it to your programs, too. When we speak of free software, we are referring to freedom, not price. Our General Public Licenses are designed to make sure that you have the freedom to distribute copies of free software (and charge for this service if you wish), that you receive source code or can get it if you want it, that you can change the soft-ware or use pieces of it in new free programs; and that you know you can do these things. To protect your rights, we need to make restrictions that forbid anyone to deny you these rights or to ask you to surrender the rights. These restrictions translate to certain responsibilities for you if you distribute copies of the software, or if you modify it. For example, if you distribute copies of such a program, whether gratis or for a fee, you must give the recipients all the rights that you have. You must make sure that they, too, receive or can get the source code. And you must show them these terms so they know their rights. We protect your rights with two steps: (1) copyright the software, and (2) offer you this license which gives you legal permission to copy, distribute and/or modify the software. Also, for each author's protection and ours, we want to make certain that everyone understands that there is no warranty for this free software. If the software is modified by someone else and passed on, we want its recipients to know that what they have is not the original, so that any problems introduced by others will not reflect on the original authors' reputations. 48 Finally, any free program is threatened constantly by software patents. We wish to avoid the danger that redistributors of a free program will individually obtain patent licenses, in effect making the program proprietary. To prevent this, we have made it clear that any patent must be licensed for everyone's free use or not licensed at all. The precise terms and conditions for copying, distribution and modification follow. GNU GENERAL PUBLIC LICENSE Terms And Conditions For Copying, Distribution And Modification 0. This License applies to any program or other work which contains a notice placed by the copyright holder saying it may be distributed under the terms of this General Public License. The "Program", below, refers to any such program or work, and a "work based on the Program" means either the Program or any derivative work under copyright law: that is to say, a work containing the Program or a portion of it, either verbatim or with modifications and/or translated into another language. (Hereinafter, translation is included without limitation in the term "modification".) Each licensee is addressed as "you". Activities other than copying, distribution and modification are not covered by this License; they are outside its scope. The act of running the Program is not restricted, and the output from the Program is covered only if its contents constitute a work based on the Program (independent of having been made by running the Program). Whether that is true depends on what the Program does. 1. You may copy and distribute verbatim copies of the Program's source code as you receive it, in any medium, provided that you conspicuously and appropriately publish on each copy an appropriate copyright notice and disclaimer of warranty; keep intact all the notices that refer to this License and to the absence of any warranty; and give any other recipients of the Program a copy of this License along with the Program. You may charge a fee for the physical act of transferring a copy, and you may at your option offer warranty protection in exchange for a fee. 2. You may modify your copy or copies of the Program or any portion of it, thus forming a work based on the Program, and copy and distribute such modifications or work under the terms of Section 1 above, provided that you also meet all of these conditions: a) You must cause the modified files to carry prominent notices stating that you changed the files and the date of any change. b) You must cause any work that you distribute or publish, that in whole or in part contains or is derived from the Program or any part thereof, to be licensed as a whole at no charge to all third parties under the terms of this License. 49 c) If the modified program normally reads commands interactively when run, you must cause it, when started running for such interactive use in the most ordinary way, to print or display an announcement including an appropriate copyright notice and a notice that there is no warranty (or else, saying that you provide a warranty) and that users may redistribute the program under these conditions, and telling the user how to view a copy of this License. (Exception: if the Program itself is interactive but does not normally print such an announcement, your work based on the Program is not required to print an announcement.) These requirements apply to the modified work as a whole. If identifiable sections of that work are not derived from the Program, and can be reasonably considered independent and separate works in themselves, then this License, and its terms, do not apply to those sections when you distribute them as separate works. But when you distribute the same sections as part of a whole which is a work based on the Program, the distribution of the whole must be on the terms of this License, whose permissions for other licensees extend to the entire whole, and thus to each and every part regardless of who wrote it. Thus, it is not the intent of this section to claim rights or contest your rights to work written entirely by you; rather, the intent is to exercise the right to control the distribution of derivative or collective works based on the Program. In addition, mere aggregation of another work not based on the Program with the Program (or with a work based on the Program) on a volume of a storage or distribution medium does not bring the other work under the scope of this License. 3. You may copy and distribute the Program (or a work based on it, under Section 2) in object code or executable form under the terms of Sections 1 and 2 above provided that you also do one of the following: a) Accompany it with the complete corresponding machine-readable source code, which must be distributed under the terms of Sections 1 and 2 above on a medium customarily used for software interchange; or, b) Accompany it with a written offer, valid for at least three years, to give any third party, for a charge no more than your cost of physically performing source distribution, a complete machine-readable copy of the corresponding source code, to be distributed under the terms of Sections 1 and 2 above on a medium customarily used for software interchange; or, c) Accompany it with the information you received as to the offer to distribute corresponding source code. (This alternative is allowed only for noncommercial distribution and only if you received the program in object code or executable form with such an offer, in accord with Subsection b above.) The source code for a work means the preferred form of the work for making modifications to it. For an executable work, complete source code means all the source code for all modules it contains, plus any associated interface definition files, plus the scripts used to control 50 compilation and installation of the executable. However, as a special exception, the source code distributed need not include anything that is normally distributed (in either source or binary form) with the major components (compiler, kernel, and so on) of the operating system on which the executable runs, unless that component itself accompanies the executable. If distribution of executable or object code is made by offering access to copy from a designated place, then offering equivalent access to copy the source code from the same place counts as distribution of the source code, even though third parties are not compelled to copy the source along with the object code. 4. You may not copy, modify, sublicense, or distribute the Program except as expressly provided under this License. Any attempt otherwise to copy, modify, sublicense or distribute the Program is void, and will automatically terminate your rights under this License. However, parties who have received copies, or rights, from you under this License will not have their licenses terminated so long as such parties remain in full compliance. 5. You are not required to accept this License, since you have not signed it. However, nothing else grants you permission to modify or distribute the Program or its derivative works. These actions are prohibited by law if you do not accept this License. Therefore, by modifying or distributing the Program (or any work based on the Program), you indicate your acceptance of this License to do so, and all its terms and condi-tions for copying, distributing or modifying the Program or works based on it. 6. Each time you redistribute the Program (or any work based on the Program), the recipient automatically receives a license from the original licensor to copy, distribute or modify the Program subject to these terms and conditions. You may not impose any further restrictions on the recipients' exercise of the rights granted herein. You are not responsible for enforcing compliance by third parties to this License. 7. If, as a consequence of a court judgment or allegation of patent infringement or for any other reason (not limited to patent issues), conditions are imposed on you (whether by court order, agreement or otherwise) that contradict the conditions of this License, they do not excuse you from the conditions of this License. If you cannot distribute so as to satisfy simultaneously your obligations under this License and any other pertinent obligations, then as a consequence you may not distribute the Program at all. For example, if a patent license would not permit royalty-free redistribution of the Program by all those who receive copies directly or indirectly through you, then the only way you could satisfy both it and this License would be to refrain entirely from distribution of the Program. If any portion of this section is held invalid or unenforceable under any particular circumstance, the balance of the section is intended to apply and the section as a whole is intended to apply in other circumstances. 51 It is not the purpose of this section to induce you to infringe any patents or other property right claims or to contest validity of any such claims; this section has the sole purpose of protecting the integrity of the free software distribution system, which is implemented by public license practices. Many people have made generous contributions to the wide range of software distributed through that system in reliance on consis-tent application of that system; it is up to the author/donor to decide if he or she is willing to distribute software through any other system and a licensee cannot impose that choice. This section is intended to make thoroughly clear what is believed to be a consequence of the rest of this License. 8. If the distribution and/or use of the Program is restricted in certain countries either by patents or by copyrighted interfaces, the original copyright holder who places the Program under this License may add an explicit geographical distribution limitation excluding those countries, so that distribution is permitted only in or among countries not thus excluded. In such case, this License incorporates the limitation as if written in the body of this License. 9. The Free Software Foundation may publish revised and/or new versions of the General Public License from time to time. Such new versions will be similar in spirit to the present version, but may differ in detail to address new problems or concerns. Each version is given a distinguishing version number. If the Program specifies a version number of this License which applies to it and "any later version", you have the option of following the terms and condi-tions either of that version or of any later version published by the Free Software Foundation. If the Program does not specify a version number of this License, you may choose any version ever published by the Free Software Foundation. 10. If you wish to incorporate parts of the Program into other free programs whose distribution conditions are different, write to the author to ask for permission. For software which is copyrighted by the Free Software Foundation, write to the Free Software Foundation; we sometimes make exceptions for this. Our decision will be guided by the two goals of preserving the free status of all derivatives of our free software and of promoting the sharing and reuse of software generally. 52 NO WARRANTY 11. BECAUSE THE PROGRAM IS LICENSED FREE OF CHARGE, THERE IS NO WARRANTY FOR THE PROGRAM, TO THE EXTENT PERMITTED BY APPLICABLE LAW. EXCEPT WHEN OTHERWISE STATED IN WRITING THE COPYRIGHT HOLDERS AND/OR OTHER PARTIES PROVIDE THE PROGRAM "AS IS" WITHOUT WARRANTY OF ANY KIND, EITHER EXPRESSED OR IMPLIED, INCLUDING, BUT NOT LIMITED TO, THE IMPLIED WARRANTIES OF MERCHANTABILITY AND FITNESS FOR A PARTICULAR PURPOSE. THE ENTIRE RISK AS TO THE QUALITY AND PERFORMANCE OF THE PROGRAM IS WITH YOU. SHOULD THE PROGRAM PROVE DEFECTIVE, YOU ASSUME THE COST OF ALL NECESSARY SERVICING, REPAIR OR CORRECTION. 12. IN NO EVENT UNLESS REQUIRED BY APPLICABLE LAW OR AGREED TO IN WRITING WILL ANY COPYRIGHT HOLDER, OR ANY OTHER PARTY WHO MAY MODIFY AND/OR REDISTRIBUTE THE PROGRAM AS PERMITTED ABOVE, BE LIABLE TO YOU FOR DAMAGES, INCLUDING ANY GENERAL, SPECIAL, INCIDENTAL OR CONSEQUENTIAL DAMAGES ARISING OUT OF THE USE OR INABILITY TO USE THE PROGRAM (INCLUDING BUT NOT LIMITED TO LOSS OF DATA OR DATA BEING RENDERED INACCURATE OR LOSSES SUSTAINED BY YOU OR THIRD PARTIES OR A FAILURE OF THE PROGRAM TO OPERATE WITH ANY OTHER PROGRAMS), EVEN IF SUCH HOLDER OR OTHER PARTY HAS BEEN ADVISED OF THE POSSIBILITY OF SUCH DAMAGES. All the source code of LevelOne GPL products are uploaded to http://www.level1.com All the users can download freely. 53