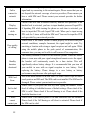
1
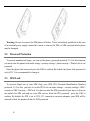
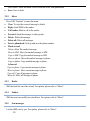
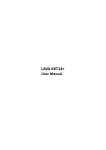
KKT Flash A User’s Guide 1 Content 1 2 3 Overview ......................................................................................................................................... 4 1.1 Introduction ....................................................................................................................... 4 1.2 Phone overview ................................................................................................................. 4 1.3 Safety Notice...................................................................................................................... 5 1.4 Maintainenance ................................................................................................................. 5 Getting Started................................................................................................................................ 5 2.1 SIM ................................................................................................................................... 5 2.2 Password Protection .......................................................................................................... 6 2.3 SIM Lock ........................................................................................................................... 6 Phone Menus ................................................................................................................................... 7 3.1 Call logs ............................................................................................................................ 7 3.2 Contacts ............................................................................................................................ 8 3.3 Music ................................................................................................................................ 8 3.4 Camera ............................................................................................................................. 9 3.5 Messages ........................................................................................................................... 9 3.6 MultiMedia ...................................................................................................................... 11 3.7 File Manager ................................................................................................................... 13 3.8 Fun & Games .................................................................................................................. 13 2 3.9 Organizer ........................................................................................................................ 13 3.10 Tools ............................................................................................................................... 14 3.11 Settings............................................................................................................................ 14 3.12 Internet............................................................................................................................ 19 4 SAR (Specific Absorption Rate) Information ............................................................................... 19 5 E-waste Disposal Mechanism ........................................................................................................ 20 5.1 Do’s and Don’ts for disposal e-waste ............................................................................... 20 5.2 Consequences of improper handling & disposal of E-Waste .............................................. 21 6 Troubleshooting ............................................................................................................................ 21 7 Lava warranty certificate.............................................................................................................. 23 3 1 Overview 1.1 Introduction Thank you for choosing KKT Flash mobile phone. You can read the manual for comprehensive understanding of using mobile phones and enjoy its functionality and simple method of operation. KKT Flash supports Dual SIM system. This phone provides you variety of features to facilitate your work and leisure activities. In addition to providing call facility, also provides you phone book, personalized ring tones, alarm, camera, image viewer, video recorder, video player, audio player, FM, Memory Card , calculator, calendar, GPRS etc. Lava mobiles reserves the right to alter the contents of this manual without any prior notice 1.2 Phone overview 4 1 Receiver 2 Display 3 Navigation Key 4 Left Soft Key 5 Dial/Answer Key 6 Keypad 7 OK Key 8 Right Soft Key 9 End/Power Key 10 Speaker 11 Camera 1.3 Safety Notice If your phone is lost or stolen, immediately inform your telecomm service provider to de activate the SIM. This will prevent you from umnnecessary postpaid bills & prepaid balance. To make you more secure use of mobile phones, please take precautionary measures, such as: - Set up mobile phone SIM card PIN password, PIN password to prevent your SIM from unauthorized usage. 1.4 Maintainenance Keep your mobile phone away from water & high humid areas. Use a soft, dry cloth to clean the phone, battery and charger. Regular clean your mobile to avoid dirt accumulate on open areas of phone or else may lead to poor keypad detection, power-down or poor audio & camera qualityregular cleaning. 2 Getting Started 2.1 SIM Before start using your phone you must insert a valid SIM (Subscriber Identity Module) card. 5 Warning: Be sure to remove the SIM phone off before. There is absolutely prohibited in the case of an external power supply connected to insert or remove the SIM, or SIM card and mobile phone may be damaged. 2.2 Password Protection To prevent unauthorised usage, you can set the phone, password protected. To Use this function, you must enter the phone lock under setings >security setings > phone security > Phone Lock to set password Enter the phone lock password, press the LSK to confirm. By default, the phone lock password is set to 4321. It is recommended to change it. 2.3 SIM Lock To prevent illegal use of your SIM Keep your SIM, PIN (Personal Identification Number) protected. To Use this, you have to set the PIN Lock on under setings > security settings> SIM 1 security or SIM 2 security > PIN lock. You have to enter the PIN password at boot time, so that you can unlock the SIM card and use your SIM service. Enter the PIN password,press the LSK to confirm. By default, the PIN is set to 1234. If 3 consecutive incorrect attempts, your SIM will be network locked, the phone will ask for PUK password. 6 3 Phone Menus 3.1 Call logs 3.1.1 Missed calls Display the missed calls list. Select contact & press the Options key: View: View the details. Call: Call the record number. Send text message: Send text message to record number. Save to phone book: Add the phone number to contacts Add to Blacklist: Save the number to phonebook black list. Delete: Delete the number. 3.1.2 Dialled calls Display the list of contacts of phone numbers to who call has been initiated. Please refer to missed calls for details. 3.1.3 Received calls Display the list from who call has been received. Please refer to missed calls for details. 3.1.4 All calls Display the all calls list (Missed, Dailled & Receieved). Please refer to missed calls for details. 3.1.5 Delete call logs Press the LSK to select "OK" to enter sub-menu to delete call records from respective category of call logs. 3.1.6 Call timers Display the SIM 1 & SIM 2 Last, dialled, received & total call duration. 7 3.2 Contacts You can use the phonebook to store recordes, can store the following: name and phone number.In the phonebook list, select a record, to make a call when you press the dial keys.Select a record in the phonebook, you can do the following: View: View the contact details or edit record. Send text message: Send text message to this number. Call: Make a call to the number. Edit: Can edit and save record. Delete: Delete the record. Copy: Copy the current record to Phone/SIM. Add to Blacklist: Add the number to phonebook black list. Mark several: Mark some or all contacts to send message or delete. Group: classify the contacts into the business, family, friends, others and Vip Contact settings: Preferred storage: Can be in the SIM1, SIM2, Phone and All to switch which will store to SIM1 once full, will store to SIM2 once full, will store to phone. Speed dial: can be A key dial-up. FDN contacts: To prevent illegal use when the phone give the third-partly software using, just can used the phone number you have been set. Memory status: View the usage and free Phonebook capacity. Copy contacts: To copy contacts to & fro between SIMs & phone memory. Move contacts: To cut paste contacts to & from the SIMs to phone memory Delete all contacts: To delete all contacts in SIMs or phone memory. Backup contacts: Backup phonebook list. Restore contacts: Restore backed up the phonebook. 3.3 Music In the Audio player interface, you can press left and right keys to switch the music; Use Up & Down navigation key to adjust the play volume. Press the LSK to enter "list" menu and choose to play any songs in the list. Press LSK to see options for songs listed. Play: To play the selected song 8 Refersh list: Update the list when it have change Settings : List auto gen: Turning it on, you can perform Refresh Playlist operation. Repeat: You can set particular or all songs to repear mode. Shuffle: Random order of play list. Background play: Turnning this on enables you to listen songs in other menu’s too (background). Song play will pause while calling & will resume after call completion Lyrics display: Turnning this on enables you to listen songs with the lyrics 3.4 Camera The phone includes 1.3 MP camera stores photos and videos in memory card. The LSK and RSK keys on camera screen can be used to adjust camera brightness. State in the preview, press the LSK to enter "Options": Switch to video recorder: Switch to the video recorder. Photos: Photo album shows the current list of files. Camera settings: Including Anti-flicker, Scene mode, White balance and Delay timer, setting operation contents of the regulation. Use LSK > "OK" to save the current settings. Image settings: Include the Image size and image quality regulation. Restore default: Set all parameters to default settings. 3.5 Messages It facilitates to send SMS, view receive SMS, save SMS etc. You can also create back of SMS & restore from Memory card 3.5.1 Write message Send to : After editing the information, select the operation, enter the number manually, or add records from the phonebook, you can do send, Edit recipient, Remove recipient, Remove all recipients, Save oprations.Sent SMS to one or more persons, and storage to Drafts. Input method: ABC, Abc, abc or hindi etc Insert templates: Offer many kinds of templates to choose. Advanced: Insert number: Insert number into SMS from phonebook. 9 Insert name: Insert the name of the record into SMS from phonebook. Save: Save to drafs. 3.5.2 Inbox Press LSK "Options" to enter the menu: View: To view the received message’s details. Reply: Send SMS to the sender. Call sender: Make a call to the sender. Forward: Send the message to other people. Delete: Delete the message. Delete all: Delete all messages. Save to phonebook: Pick up and save the phone number Mark several: Delete: deletr The marked message Move to SIM: Move the marked message to SIM Copy to SIM: Copy the marked message to SIM Move to phone: Move the marked message to phone. Copy to phone: Copy marked message to phone. Advanced Copy to phone: Copy current message to phone. Move to phone: Move current message to phone. Copy all: Copy all message to phone. Move all: Move all Message to phone. 3.5.3 Drafts SMS not sent but saved are stored. For options, please refer to "Inbox". 3.5.4 Outbox SMS not sent successfully are stored here. For options refer to "Inbox". 3.5.5 Sent messages List the SMS sent by you. For options, please refer to "Inbox". 10 3.5.6 SMS signature Status: To add the signature Content: Input the signature 3.5.7 SMS templates Use the templates for sending message. This menu can edit and remove the template 3.5.8 SMS settings SIM1\SIM2: This menu can set SMS address、delivery report、reply path and voicemail server function。 Memory status: View the SIM and Phone Occupied & free memory. Message blacklist: Status: Turn on the message blacklist function. Meassge blacklist: Input the blacklist phone number Text message counter: Count the number of the SIM1/SIM2 sent and received message Save sent message: If you turn off this feature, sent SMS will be unsaved. Preferred storage: Can set preferred storage as SIM or phone. Note: This function needs the network operator support. 3.5.9 SMS Backup Create a backup of SMS into Memory card. 3.5.10 SMS Restore To restore SMS from Memory card. 3.6 3.6.1 MultiMedia Image viewer To view the images captured from mobile camera. Press the LSK to enter to "Options" to choose the pictures to do the View, Send, Use as, Rename, Delete, change Storage and check Image 11 information operations. Use navigation key to switch over pictures. 3.6.2 Video recorder Switch to camera: Switch to the camera. Video list: Display the video you recorded and saved in the memory card. Camcorder settings: Recorder settings includingAnti-flicker setting. Video settings: Include video quality. Restore default: Restore the settings of video recoder 3.6.3 Video player Choose video player sub-menu, you can easily view the saved video player in the video list, press the LSK to enter "Options" to select the video files to do the play, send(send the video via Bluetooth or multimedia message if you want) ,rename, delete etc operations. 3.6.4 Sound recorder The options consist of: New record: Start a new record. You can pause, start & stop recording. On stop you can choose to save the video. List: Display the sound you recorded and saved in the memory card. Settings: You can set the file format and audio quality of the record. 3.6.5 FM radio FM interface, press the OK key to turn on / off FM play, press the up/down navigation key to automatic search,press left/right navigation key to adjust the FM playing volume. Press the left soft key "Options" can show FM options menu, the content were: Channel list: Shows FM channel list. Manual input: To manually enter the channel frequency, 87.5 ~ 108.0. Auto search: Auto search FM channels in the channel list. Settings: To Turn on/off the background and loudspeaker play.Also can set FM record audio quality. Record: Record your favorite FM audio. 12 File list: To view get recorded FM audio. 3.7 File Manager Menu display Memory card. Select “Memory Card”, press the LSK to enter "Options" follows: Open: Displys the directories and files. Format: Format the memory card, this action will remove all current flash memory data. Details: More information you can view, such as Name, Total size, free size. You can paly the music or video files, view Photo, copy/move/delete files, remame files and so on.You can send the file through Bluetooth. 3.8 Fun & Games This menu displays Lava zone and games (Tweety Bird a paid game & snake a free game) 3.9 Organizer 3.9.1 Calendar Enter calendar sub-menu, the screen will show a calendar month, and other background box with the current date marked. Press the up, down, left, and right navigation keys to change the date, calendar information on the screen will be updated accordingly. Press the left soft key "Options" option to display the calendar menu, and content as follows: 3.9.2 Alarm Five alarm scan be set. Select and edit an alarm clock: Can edit the setting of alarm on / off, Time, Snooze, Repeat, Alarm tone and Alert type. You can choose to set to repeat: Once, Everyday & Customize of days. 3.9.3 World clock Display the major cities’ time and time zone in the world 13 3.10 Tools 3.10.1 Bluetooth Power: Activate Bluetooth on or off the Bluetooth function. Visibility: If set on, other devices can search this Bluetooth device; if set as Off, other devices can not search this Bluetooth device. My device: Can search for nearby Bluetooth devices. Search audio device: Free devices to search for near-free Bluetooth enabled devices, such as Bluetooth headsets. My name: The Bluetooth device name can be modified. Advanced : Audio path: Set the sound path can be set to stay in the sound and go hands-free cell phone devices. If set to go hands-free device, connected to the phone, the sound will be automatically transferred to the handsfree device. The file received will be automatically stored on memory card. 3.10.2 Torch: To turn on/off the torch. 3.10.3 Calculator Press the LSK to "Clear" RSK (Back) to exit the calculator. Note: This calculator has limited accuracy and rounding errors will be generated, especially while doing operation on out of range numbers which are beyond capacity of phone to calculate. When the calculation is out of range, the display area will use the letter "E" to represent. 3.10.4 SIM tool kit Enter SIM tool kit menu, display Operators’s information. 3.11 Settings 14 3.11.1 Call settings Sim1 & Sim1 settings will be activated only after inserting the sim’s. 3.11.1.1 Call waiting (SIM1 & SIM2) Open this feature, during the call if the new call comes, the network will notify you. Activate : Launch the function. Deactivate : Close the function. Query status: Query the function’s status. 3.11.1.2 Call divert (SIM1 & SIM2) It allows you to divert incoming call to other phone number you specify or store in voice mail. The features include: Divert all voice calls,Divert if unreachable, Divert if no answer, Divert if busy, divert all data calls. 3.11.1.3 Advanced settings Blacklist: This feature allows you to block the numbers from which you do not want to receive the call. Auto redial: When turned on your phone on failed attempt can automatically redial upto 10 times. This feature can save you the trouble of repeated calls. Call limit:It can hang up a certain length of time to set up the call, according to the menu function mode in order to select the following tips: Status : Close the function. Time: Enter any numbers between 1-9999(sec), which arrived at the selected time (seconds) of talk time when hung up. Reject by SMS: You have option to reject a call by sms. Call Connect notice: Phone will vibrate when call is connected Answer mode: Any key and Anto answer when headset mode two choices for selecting.When you select any key, press any key outside power key and RSK can answer the call. Auto call recording: Turns on the automatic recording during a call. 15 3.11.2 Connectivity You can set Modem account as well as WAP account & use sim card services. 3.11.3 Display Wallpaper: To set the Wallpaper already stored in phone or choose from memory card. Show date and time: Whether to show date and time on home screen or not 3.11.4 Dual SIM settings Select to Dual open, only one or close SIM cards’ function. The SIM cards’ function will active when you dual open and only one open the SIM card. Flight mode will disable the SIM cards or any wireless connection 3.11.5 3.11.6 Network settings SIM1 and SIM2: Press the left soft key to select automatic or manual mode. In Automatic, mobile phone SIM card information is automatically selected according to service provider. In manual you have to select the network services, mobile phone search to get the current list of service providers for users to select the service provider. GPRS transfer preference: The phone supports 2 types of GPRS transfer. One is Data prefer that is the call will hang up when you are using the net date, the other is Call prefer that is the net will broken when you are in caling. Phone settings Into the phone settings sub-menu, you can change the following settings: 3.11.6.1 Time and Date You can set the phone time and date. The menu consists: Set home city: Set the mobile phone home city. Set time/date: Time and date can be set to standard format. Phone allows you to set year from 2000 to 2030 between the dates. If daylight saving is set to open, then the phone time to add in the original time of one hour or one hour later. 16 Set format: Set time and data’s form. Update with time zone: On /off update with time zone. Auto update time: On /off auto update time. 3.11.6.2 Languages Phone supports both English & Hindi language. Set the current language type, then menu and interface refresh for the corresponding language. 3.11.6.3 Preferred input method The phone supports 5 types of input methods (ABC, abc & Hindi etc) for SMS & at other relevant menus. By default it is set to Abc. 3.11.6.4 Shortcuts It facilitates to generate the list of items which will pop-up on pressing right navigation on home page. Press LSK (options) it displays add, edit, delete, delete all and change order. 3.11.6.5 Dedicated keys Set up Navigation keys for particul menu item. By default, Up: Camera, Down: Calendar, Left: write message & Right: Shortcuts. 3.11.6.6 LCD backlight To set the LCD brightness level and turn off time (Backlight off time). 3.11.7 Profiles Profiles include General, Silent, Meeting, Outdoor and Headset. Based on the different scenarios you can select the corresponding profile. You can activate, customize & reset. Activate: Enable the selected profile. Customize: It lets you alter the profile settings as per your needs. Alert type: Can choose to Ring only, Vib. Only, Vib.and ring, Vib. Ring type: You can choose repeat and beep once. 17 SIM 1 and SIM 2 Ringtone: You can choose ringtones 1-3, or from the memory card. Ringtone volume: To set the volume level from 1 to 7. Message1 and Message2: You can choose ringtones 1-5 or from memory card Message volume: To set the volume level from 1 to 7. Keypad: You can set keypad as silent, click and tone Keypad volume: To set the volume level from 1 to 7. System alert: To turn on/off system alert. Reset: Reset profiles to defaults settings. 3.11.8 Restore factory settings In this menu, enter the password, once determined, the phone automatically reboot the phone after the relevant parameters can be set to return to the case of mobile phone factory. The default password is 4321. 3.11.9 Security settings Into the "Security Settings" menu, you can set the phone's security options, mobile phone or SIM card to avoid unauthorized use. 3.11.9.1 SIM security PIN lock : PIN password to lock your SIM card to prevent unauthorized use. If the current SIM card lock is off select On to lock. The next boot requires that you enter the correct PIN password to enter; If the current SIM card lock is On, select Off to keep the PIN non password protected. Change PIN: If the current PIN password lock has been activated, you can re-set on the PIN password Change PIN2: PIN2 old to enter the correct password, you can set on the PIN2 password. 3.11.9.2 Phone security Phone lock: Phone lock password can prevent your mobile phone being used by the others. Select on to enable the phone lock. Enter the correct password to enable phone lock; on next boot it requires the password to unlock the phone. Change password: Enter the current password and then enter a new password to change. New 18 password will be set only after it is confirmed. Phone default password is 4321. 3.11.9.3 MobileTracker Status: Input phone password into,the mobile tracking set to on or off. Settings: Input phone number and remarks. 3.11.9.4 Privacy Protection Settings: Input phone password to set privacy for Call logs, Messages, Contacts & File Manager. Deafult Password is 4321. Change password: Change the privacy protection password. 3.11.9.5 Screen auto lock Set the screen auto lock time. 3.12 Internet 3.12.1 Internet service In the internet service interface, it has includes the following items: Homepage: Log on homepage, you will find it is a WAP website that you setted.user can set it by themselves. Bookmarks: Thas default bookmarks, yahoo. You can go to relevant website conveniencly. Users can add bookmarks by themselves. Search or input URL: You can edit any website you want, but it is effective. Settings it includes following items to users to set: data account, browser options and preferences settings. Note: GPRS service requires network support, must be after the opening and in a GPRS network coverage area, you can use GPRS services. 4 SAR (Specific Absorption Rate) Information 19 The highest SAR value for this mobile phone is <1.6 W/Kg, in accordance with the requirements of the ICNIRP, which recommended that the limit for exposure to radio waves is 1.6 watts/kilogram(W/kg) averaged over 1 gram of tissue. For more information, please visit our website (www.lavamobiles.com) to query. Safety precautions: Use wireless hands-free system ( Headphone, headset) with a low power Bluetooth emitter Make sure the cell phone has a low SAR Keep your calls short or send a text message (SMS) instead. This advice applies especially to children, adolescents and pregnant women Use cell phone when the signal quality is good People having active medical implants should preferably keep the cell phone at least 15cm away from the implant 5 E-waste Disposal Mechanism 'E-waste' means waste electrical and electronic equipment (WEEE). In other words E-waste is a popular, informal name for electronic products nearing the end of their "useful life". For more details about e-waste please refer e-waste rules, 2011 www.moef.nic.in Do’s and Don’ts for disposal e-waste 5.1 5.1.1 5.1.2 Do’s: Ensure that an Authorized Person repairs your Lava products Call Our Local Authorized Collection Centers to Dispose Lava products Always drop your used electronic products, batteries or any accessories thereof after the end of their life at nearest Authorized Collection Point or Collection Center. Separate the packaging material according to responsible waste disposal options and sorting for recycling. Always remove the battery from the product, when you do not intend to use the product anymore it in future. Don’ts: Do not Dismantle your Lava Product on your own 20 5.2 6 Do not give your e-waste to Kabbadi Wala / Scrap Dealer/ Rag Pickers. Do not dispose-off the e-waste in landfills Never dump E-waste in garbage bins. Do not dispose of your product at municipal waste bins or rooms. Do not throw used batteries into household waste. Consequences of improper handling & disposal of E-Waste Improper disposal of waste prevents natural resources from being re-used. Some waste contains hazardous chemicals and if not disposed of properly may release toxins into the soil and water, and also releases greenhouse gases into the environment If e-waste is not properly disposed of, it can threat to the health and well-being of humans and animals and it also has adverse effect on the environment. Placing of batteries or devices on or in heating devices, such as microwave, ovens, stoves, or radiators and improper disposal of batteries may lead to explosion. If the battery terminals are in contact with metal objects, it may cause a fire. For more details on how to dispose of your Lava products at the end of life, Please refer the list of our Services Centers on Pan India basis on our website www.lavamobiles.com or please view this link for the details of Service Centers http://www.lavamobiles.com/support-services. Troubleshooting Service Center number No.: 1860-200-7500 Kindly note please send area code of place through SMS to this No. and in return you will get address of service center nearest to you by SMS Frequently Asked Questions (FAQ’s and Troubleshooting) FAQ Cause and Solution Press the power key for over 1 second. Check if the battery is properly Fail to connected. Please remove and install it again and retry; Check if battery is switch on appropriately charged. 21 Fail to connect to network Display information while turning on Poor quality of calling Standby duration shortened SIM Card Error Fail to dial out Callers cannot contact you 22 In case of Weak signal, please try and move to a location with strong signal and try connecting to the network again; Please ensure that you are not beyond the network coverage of service providers; Please ensure you have a valid SIM card. Please contact your network provider for further information. Check if the SIM card is installed correctly Handset lock password: If the handset lock is activated, you have to input handset password. Input PIN: if Inputting PIN while turning the phone on each time is activated, you have to input the PIN code. Input PUK code: When you’ve input wrong PIN code for 3 times will lock the SIM card. You need to input the PUK code provided by your network provider. Please check if the sound volume is tuned properly In an area with poor network conditions, example: basement, the signal might be weak. Try searching a location with stronger signal reception and call again. While using the mobile phone in the peak period of communication, like commute time, you may not be able to call because of line congestion. The standby duration is relative to the network systems. While the mobile phone is in an area with poor signal strength and cannot receive the signal, the handset will continuously search for a base station. This will significantly reduce battery charge. It is recommended that you turn off your mobile in area with no signal reception to save battery. Need replacing the battery: Please change to a new battery as battery performance may decrease after prolonged usage. Dirt on the metal surface of an SIM card: Use clean cloth to wipe the metal touch point on an SIM card. The SIM card is not installed. The SIM card is damaged. Please contact your network service provider. Please check if you press the dial key after typing the number. Please check if calling is forbidden because of default settings. Please check if the SIM is valid. Please check if the call barring is set. Please check if the fixed dial function is set. Please check if the mobile phone is on and connected with the network. Please check if the Call barring or call divert is activated. Please check if the SIM card is valid. Fail to charge 7 May be due to poor contact. Please check if the plug is connected well. Please confirm if the environment temperature is within the range of 0ºC ~40ºC while charging. If the battery or charger is damaged in that case you need to replace it. Lava warranty certificate Limited warranty: LAVA international Ltd. (LAVA) provides limited warranty for your mobile phone and original accessories delivered with your mobile phone (hereinafter referred to as “product”) The warranty period for the transceiver is one (1) year and for battery, charger and headset is six (6) months from the date of purchase. LAVA Warranty Subject to the conditions of this Limited Warranty, LAVA warrants a product to be free from defects in design, material and workmanship at the time of its original purchase by you, and for a subsequent period of one (1) year for transceiver and six (6) months for battery & charger. You shall have no coverage or benefits under this warranty in the event that any of the following conditions are applicable: The product has been subjected to abnormal use or conditions, improper storage, exposure to 1, excessive moisture or dampness, exposure to excessive temperature, unauthorized modification, unauthorized repair (including but not limited to use of unauthorized spare parts in repairs),abuse, accidents, Acts of God, spills of food or liquids, improper installation You have not notified Lava about defect during the applicable warranty period. The product serial no. code or the accessories date code has been removed, defaced or altered. The product has been used with or connected to an accessory (i) Not supplied by Lava or its affiliates, (ii) Not fit for use with the product or (iii) Used otherwise than in manner intended. The seals of the product’s battery enclosure have been broken or shown evidence of tempering or the product’s battery has been used in equipment other than that for which it has been specified usable by LAVA. All plastic surfaces and all other externally exposed part that is scratched or damaged due to normal use. To get maximum of your new product, we recommend you to: Read the guidelines for safe and efficient use as mentioned in the manual. Read the terms and conditions of your Lava warranty in the manual. Keep your original receipt; you will need it for warranty services if asked to produce. 23 Present this Lava Warranty Certificate along with original proof of purchase whenever you require any warranty services. In case Lava product needs service, please visit the nearest Lava service centers given in the service guide. Please visit our Website www.lavamobiles.com for updated list of Authorized Service Centers near to your location. Important note: for your warranty to be valid, all information on the warranty certificate has to be completed including the stamp from the authorized distributor/retailer. All warranty information, product features and specifications are subject to change without notice. IMEI No. ..………………………………………….. Dealers Stamp …………………………………………… Date of purchase .………………………………………….. Model No. …………………………………………… 24