1
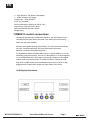
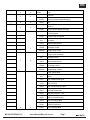
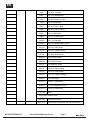
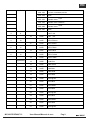
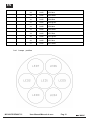
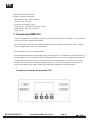
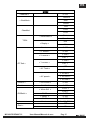
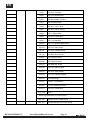
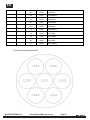
MOVILED BEAM 712
Rev. 14.09.01
User Manual / Instrucciones de Usuario
EN
1. Dispacking
Thank you for choosing our moving head. For your own safety,
please
Read this manual before installing the device. This manual covers the
important
I nformation on installation and applications. Please install and operate the
fixture with following instructions. Meanwhile, please keep this manual well for
Future needs.
This moving wash is made of a new type of high temperature strength of
engineering plastics and cast aluminum casting with nice outlook.The fixture is
designed and manufactured strictly following ISO standards. complying with
international standard DMX512 protocol. It’s available independently
controlled and linkable with each other for operation. And it is applicable for
large-scale live performances, theater, studio, nightclubs and discos.
Adopts high brightness and stability powerful LED lamps . Please
carefully dispack it when you receive the fixture and check whether it is
damage d during the transportation. and please check whether the following
items are included inside the box:
Moving Head ------one
User Manual ------one
Signal Cable ------one
2.Safety Instruction
● Please read carefully the instruction, which includes important information about the
installation, usage and maintenance.
● Please keep this User Guide for future consultation. If you sell the unit to another user, be sure
that they also receive this instruction booklet.
● Unpack and check carefully there is no transportation damage before using the unit .
● Before operating, ensure that the voltage and frequency of power supply match the power
MOVILED BEAM 712
User Manual/Manual de uso
Pag 1
EN
requirements of the unit.
● It’s important to ground the yellow/green conductor toearth in order to avoid electric shock.
● The unit is for indoor use only. Use only in a dry Iocation.
● The unit must be installed in a iocation with adequate ventilation, at least 50cm from adiacent
surfaces. Be sure that no ventilation slots are blocked.
● Disconnect main power before replacement or servicing.
● Make sure there is no flammable materials close to the unit while operating as it is firehazard.
● Use safety cable when fixes this unit. Don’t handle the unig by taking its head only, but always
by taking its base.
● Maximum ambient temperature is ta:4 0ºC.Don’t operateif the temperature is higher than this.
● Unit surface temperature may reach up to 85 ºC . Don’t touch the housing bare - hand
during its operation.Turn off the power and allow about 15 minutes for the unit
to cool down before replacing or serving.
● In the event of serious operating problem, stop using the unig immediately. never
try to repair the unit by yourself. Repairs carred out by unskilled people can lead
to damage or malfunction .please contact the nearest authorized technical
assista nce center. always use the same type spare parts.
● Do not touch any wire during operation as high voltage might becausing electric
shock.
3.Warning
● To prevent or reduce the risk of electrical shock or fire ,do not expose the unit
to rain or moisture.
● Do not open the unit within five minutes after switching off.
● The housing, the lenses, or the ultraviolet filter must be replaced if they are
visibly damaged.
Caution:
There are no user serviceable parts inside the unit. Do not open the housing or
attempt any repairs yourself. In the unlikely event your unit may require service,
please contact your nearest dealer.
Installation
The unit should be mounted via its screw holes on the bracket. Always ensure that
the unit is firmly fixed to avoid vibration and slipping while operating. And make
sure that the structure to which you are attaching the unit is secure and is able
to support a weight of 10 times of the unit ’s weight. Also always use a safety
cable that can hold 12 times of the weight of the unit when installing the fixture.
The equipment must be fixed by professionals. And it must be fixed at a place where
is out of the touch of people and has no one pass by or under it.
4.Operation Instructions
The moving head is an LED wash lignt for onsite decoration purpose.
Don ’ t turn on the fixture if it’ s been theough severe temperature difference
MOVILED BEAM 712
User Manual/Manual de uso
Pag 2
EN
like after transportation because it might damage the light due to the
environment changes. So make sure to operate the fixture until it is in
normal temperature.
This light should be keep away from strong shaking during any
transportation or movement.
Don ’ t pull up the light by only the head, or it might cause damages to the
mechanical parts.
Don ’ t expose the fixture in overheat, moisture or environment with too
much du st when installing it. And don’ t lay any power cables on the floor.
Or it might cause electronic shock to the people.
Make sure the installation place is in good safety condition before installing
the fixture.
Make sure to put the safety chain and check whether the screws are
screwed properly when installing the fixture.
Make sure the lens are in good condition. It’ s recommended to replace the
units if there are any damages or severe scratch.
Make sure the fixture is operated by qualified personnel who knows the
fixture before using.
Keep the original packages if any second shipment is needed.
Don ’ t try to change the fixtures without any instruction by the
manufacture r or the appointed repairing agencies.
It is not in warranty range if there are any malfunctions fron not following
the user manual to operate or any illegal operation, like shock short
circuit ,electronic shock, lamp broke, etc.
5.Installation via clamp
Screw one clamp each via a M8 screw and nut onto the holders.
Insert the quick -lock fasteners of the first holder into the respective holes
on the bottom of the device. Tighten the quick-lock fasteners fully
clockwise. install the second holder.
Pull the safety -rope through the holes on the bottom of the base and over
the trussing system or a safe fixation spot. insert the end in the carabine
and tighten the safety scres.
6.Technical specification
●
●
●
●
●
Extremely small, fast and powerful led moving beam.
DMX channels:6/12/37
Tilt: 270° ,speed adjustable
Smooth electronic dimming:0 - 100﹪
Electronic strobe with pulse and random effects
MOVILED BEAM 712
User Manual/Manual de uso
Pag 3
EN
● High efficiency, low power consumption
● Super compact, low weight
Voltage:100 ~240V,50/60HZ
Fuse: 5A_(5*20MM)
Power consumption:150W (24V 2A,9V 12A)
Light source: 12W LED*7(R G B W)
Dimension:304mm*267mm*167mm
Weight:6.2kg
7.DMX512 control connections
Connect the provided XLR cable to the female 3 -pin XLR output of your
controller and the other side to the male 3 -pin XLR input of the moving
head. You can chain multiple
Moving head together through serial linking. The cable needed should be
two core, screened cable with XLR input and output connectors.
DMX512 connection with DMX terminator
For installations where the DMX cable has to run along distance or is in an
electrically noisy environment, such as in a discotheque, it is recommended
to use a DMX terminator .This helps in preventing corruption of the digital
control signal by electrical noise. The DMX terminator is simply an XLR
plug whith a 120R resistor connected between pins 2 and 3,which is then
plugged into the output XLR socket of the last fixture in the chain.
LCD Display Operations
MOVILED BEAM 712
User Manual/Manual de uso
Pag 4
EN
MENU
< Address >
0- 512
Dmx512
Auto
< WorkMod >
Sound
6CH
13CH
ChanMod
37CH
< Dimm MOD >
Fast
Smooth
TOOL
60S
< Display >
< ON >
< X revise >
0- 255
< Y revise >
0- 255
< YES >
< X reverse >
< No >
< YES >
< Y reverse >
< PT Sett >
< No >
< OFF >
< XY Trade >
< No >
< XY fast >
< XY speed >
< XY norm >
< XY slow >
< Control >
< CH1- CH40 >
0- 255
< DmxLive >
< CH1- CH40 >
0- 255
< White SW >
< RGBwhit >
<Info>
< WhitR >
< WhitG >
< ON >
0- 255
0- 255
< WhitB >
0- 255
< Version >
< Rest >
MOVILED BEAM 712
< OFF >
Xm168_7*12d
OFF
ON
User Manual/Manual de uso
Pag 5
EN
DMX CONTROLLER
6 Channel
13 Channel 37 Channel
DMX value
Function
Motor position shutter effect
1
1
2
2
0 - 19
Shutter closed
20-49
Shutter open
50-64
Strobe 1(fast
-slow)
65-69
Shutter open
70-84
Strole 2:opening pulse(fast - slow)
85-89
Shutter open
90-104
Strobe 3:closing pulse(fast - slow)
105-109
Shutter open
110-124
Strobe 4: random strobe (fast slow)
125-129
Shutter open
130-144
Strobe 5:random opening pulse (fast- slow)
145-149
Shutter open
150-164
Strobe 6:random closing pulse (fast slow)
165-169
Shutter open
170-184
Strobe 7:burst pulse (fast slow)
185-189
Shutter open
190-204
Strobe 8:random burst ppulse (fast slow)
205-209
Shutter open
210-224
Strobe 9:sine wave (fast slow)
225-229
No function
230-244
Strobe 10:burst (fast - slow)
245-255
Shutter open
0-244
245-255
MOVILED BEAM 712
Dimmer
0-100/% intensity
User Manual/Manual de uso
Pag 6
EN
1
2
3
3
4
4
5
5
6
6
0-255
Pan
Pan fine
0-255
Pan fine(Least Signeficant Byte)
0-255
Tilt
Tilt fine
0-255
Tilt fine (Least Signficant Byte)
Pan/Tilt Speed
0-255
0-9
7
0-100% Pan/Tilt Speed
No effect
10-14
Reset entire fixture1
15-249
All lamps control
248-255
simple lamp control
Fixture control settings
0-9
7
8
All lamp control
10-14
Reset entire fixturel
15-248
Al l lamps control
249-255
simple Lamp conrtrol
Color wheel effect
0-9
8
MOVILED BEAM 712
9
Open.
10-14
LEE 790Moroccan pink
15-19
LEE 157Pink
20-24
LEE 332Special rose pink
25-29
LEE328 Follies pink
30-34
LEE 345 Fuchsia
35-39
LEE 194 Surprise pink
40-44
LEE 181Congo Blue
45-49
LEE071 Tolyo blue
50-54
LEE 120Deep Blue
User Manual/Manual de uso
pink
Pag 7
EN
55-59
LEE 079 Just Blue
60-64
LEE 132 Medium Blue
65-69
LEE 200 Double CT Blue
70-74
LEE 161Slate Blue
75-79
LEE 201 Full CT blue
80-84
LEE 202 Half CT BLUE
85-89
LEE 117 Steel Blue
90-94
LEE 353 Lighter Blue
95-99
LEE 118 Light blue
100-104
LEE 116 Medium Blue Green
105-109
LEE 124 Dark Green
110-114
LEE 139 Primary Green
115-119
LEE 089 Moss Green
120-124
LEE 122Fern Green
125-129
LEE 738JAS Green
130-134
LEE 088Lime Green
135-139
LEE 100 Spring yellow
140-144
LEE 104 Deep Amber
145-149
LEE 179 Chrome Orange
150-154
LEE 105orange
155-159
LEE021 Gold Amber
160-169
Lee 778 Millennium Gold
170-174
LEE 164 Flame Red
175 - 179
Open
Color wheel rotation effect
MOVILED BEAM 712
180 – 201
Clockwise,fast slow
202 - 207
Stop (this will stop wherever the color is at the time)
User Manual/Manual de uso
Pag 8
EN
3
Open
235 - 239
Random color Fast
240 - 244
Random color Medium
245 - 249
Random color Slow
250 - 255
Open
0-255
Led1
0-255
LED1-7Green
0-255
LED1 Green
0-255
LED1-7 Blue
0-255
LED1 Blue
0-255
LED1-7 white
13
0-255
LED1 white
14
0-255
Led2 Red
15
0-255
Led2 Green
16
0-255
Led2 Blue
17
0-255
Led2 white.
18
0-255
LED3 Red
19
0-255
LED3 green
20
0-255
LED3 blue
21
0-255
LED3 white
22
0-255
LED4 Red
23
0-255
LED4 green
24
0-255
LED4 blue
25
0-255
LED4 white
26
0-255
LED5 Red
27
0-255
LED5 green
10
11
12
6
230 - 234
Led1-7 red
11
5
Counter– clockwise,slow fst
9
10
4
208 - 229
12
13(reserve)
MOVILED BEAM 712
red
User Manual/Manual de uso
Pag 9
EN
Led
Lamps
MOVILED BEAM 712
28
0-255
LED5 blue
29
0-255
LED5 white
30
0-255
LED6 Red
31
0-255
LED6 green
32
0-255
LED6 blue
33
0-255
LED6 white
34
0-255
LED7 Red
35
0-255
LED7 green
36
0-255
LED7 blue
37
0-255
LED7 white
position
User Manual/Manual de uso
Pag 10
ES
1. Desembalando
Gracias por elegir nuestra cabeza móvil. Por su seguridad, por favor, lea este manual
antes de instalar el dispositivo. Este manual incluye información importante sobre su
instalación y aplicaciones.
Por favor, instale el dispositivo y manéjelo de acuerdo a las instrucciones contenidas
en este manual.
Por favor, conserve estas instrucciones para futuras referencias.
Esta cabeza móvil tipo wash está fabricada con un nuevo tipo de plástico resistente
a las altas temperaturas y con piezas moldeadas en aluminio con un excelente
aspecto. El dispositivo está diseñado y fabricado siguiendo los mas estrictos
estándares ISO y cumpliendo con el protocolo internacional DMX512. Puede ser
controlado de manera independiente y conectado a otros dispositivos similares para
su manejo. Puede ser utilizado en instalaciones en directo de grandes dimensiones,
teatros, estudios pubs o discotecas.
El dispositivo adopta lámparas LED de alto brillo y efectividad. Por favor, desembale
la unidad cuidadosamente y cuando lo reciba, compruebe que no se ha dañado
durante el transporte y compruebe además si incluye los siguientes elementos.
Cabeza móvil ---------- una
Manual de uso --------- uno
Cable de señal ---------- uno
2.Instrucciones de seguridad
● Por favor, lea cuidadosamente estas instrucciones, las cuales incluyen información importante sobre
la instalación, uso y mantenimiento.
● Por favor, conserve esta manual para futuras referencias. Si vende la unidad a otro usuario,
asegúrese de incluirle estas instrucciones.
● Al desembalar la unidad, compruebe cuidadosamente que no hay daños en la unidad debido al
transporte antes de usar el dispositivo.
● Antes de poner en marcha la unidad, asegúrese que el voltaje y la frecuencia de la alimentación
son las correctas.
MOVILED BEAM 712
User Manual/Manual de uso
Pag 11
ES
● Es importante conectar a masa el cable amarillo/verde de toma de tierra para evitar descargas eléctricas.
● La unidad está diseñada sólo para su uso en interior. Utilice la unidad en un lugar seco.
● La unidad de be ser instalada en un lugar con la ventilación adecuada y al menos a 50 cm de cualquier
superficie adyacente. Asegúrese que las tomas de ventilación no están bloqueadas.
● Desconecte la unidad de la alimentación antes de realizar cualquier mantenimiento.
● Asegúrese que no hay materiales inflamables cerca de la unidad, pueden constituir un riesgo de
incendio.
● Use un cable de seguridad para fijar la unidad. No manipule la unidad cogiendo la cabeza del
dispositivo, hágalo siempre cogiendo la base.
● La máxima temperatura ambiente es, ta: 40ºC. No haga funcionar la unidad a una temperatura mayor.
● La superficie de la unidad puede alcanzar los 85ºC. No toque el chasis con las manos durante su
funcionamiento. Apague la unidad y dejela unos 15 minutos para que se enfríe antes de cualquier
operación de mantenimiento.
● En el caso de problemas serios de funcionamiento, deje de usar la unidad inmediatamente. Nunca
trate de repararla por usted mismo. Las reparaciones llevadas a cabo por personal no cualificado
pueden ocasionar más daños o mal funcionamiento. Por favor, contacte con un servicio técnico
autorizado para su asistencia. Use siempre repuestos originales.
● No toque ningún cable durante su uso para evitar descargas eléctricas.
3.Aviso
● Para prevenir o reducir el riesgo de descarga eléctrica, no exponga la unidad a la lluvia o la humedad.
● No abra la unidad hasta pasados 15 minutos de su apagado.
● El chasis, las lentes o los filtros deben ser sustituidos si se aprecia un daño en su visibilidad.
Precaución:
No hay elementos de uso para el usuario en el interior de la unidad. No abra la carcasa o trate de
repararlo por su cuenta. En el caso que la unidad necesite ser revisada, contacte con su distribuidor
más cercano.
La unidad debe ser montada mediante los agujeros de tornillo de las asas. Asegúrese que la unidad
está firmemente fijada para evitar vibraciones o caídas durante su uso. Asegúrese que la estructura
donde está fijada la unidad es segura y capaz de soportar 10 veces el peso del dispositivo. También
utilice siempre un cable de seguridad capaz de soportar hasta 12 veces el peso de la unidad. El
equipamiento debe ser fijado por profesionales y fijado en un lugar lejos del alcance o del paso de
la gente bajo él.
4.Instrucciones de Uso
Esta cabeza móvil es un foco tipo wash con LEDs diseñado para funciones de interior.
No encienda la unidad si hay una diferencia severa de temperatura entre la unidad y el lugar de
instalación. Esto puede ocurrir después de su transporte. La mejor solución es encender la unidad
MOVILED BEAM 712
User Manual/Manual de uso
Pag 12
ES
cuando alcance una temperatura ambiente normal.
Evite que la unidad sufra fuertes sacudidas durante su transporte.
No coja la unidad desde la cabeza, podrían dañarse las partes mecánicas.
No exponga la unidad a altas temperaturas, humedad o ambientes con mucho polvo. No deje los
cables por el suelo, podrían provocar descargas eléctricas a la gente.
Asegúrese que el lugar de instalación es realmente seguro antes de instalar el dispositivo.
Asegúrese de colocar un cable de seguridad para fijar la unidad y evitar su caída.
Asegúrese de las buenas condiciones de las lentes. Es recomendable su sustitución si aparecen
rayadas o dañadas.
Asegúrese que la unidad es manejada por un persona experta.
Conserve el embalaje original por si se necesita transportarlo.
No realice cambios en la unidad sin consultar con el fabricante o servicio de reparación autorizado.
La garantía se anulará si la unidad se ha dañado por no seguir las instrucciones contenidas en este
manual hacerlo funcionar de manera errónea, provocando cortocircuitos, roturas de lámparas,
descargas eléctricas, etc.
5.Instalación mediante una garra o abrazadera
Atornille una garra mediante el tornillo de M8 y tuerca situado en la base.
Fije la abrazadera utilizando los dos tornillos de la base, apretándoles firmemente
Pase un cable de seguridad entre los agujeros de la base y el sistema de truss.
6.Especificaciones Técnicas
●
●
●
●
●
Cabeza móvil LED de reducido tamaño, rápida y potente
Canales DMX: 6/12/37
Tilt: 270º, velocidad ajustable
Suave dimmerización electrónica: 0-100%
Strobo electrónico con pulsos y efectos random
MOVILED BEAM 712
User Manual/Manual de uso
Pag 13
ES
● Alta eficacia y bajo consumo
● Super compacto, ligero peso
Alimentación: 100 - 240V, 50/60 Hz
Fusible: 5A (5 x 20 mm)
Consumo de potencia: 150W
Fuente de luz: 7 LEDs (R G B W) de 12W c.u
Dimensiones: 304 x 367 x 167 mm
Peso: 6.2 kg
7. Conexiones DMX 512
Conecte el cable XLR suministrado a la toma XLR 3 pin hembra de su controlador y el otro conector
a la toma XLR 3 pin macho de la unidad.
La unidad puede conectarse de manera encadenada a otros dispositivos DMX. El cable necesario
debe ser apantallado y tener dos conductores.
Conexión DMX 512 con terminador DMX
Para instalaciones donde el cable DMX tenga mucha longitud o en ambientes con ruido eléctrico, es
recomendable usar un terminador DMX. Este terminador ayuda a prevenir el deterior de la señal de
control digital por el ruido eléctrico. El terminador XLR es simplemente un conector XLR con una
resistencia de 120 ohmios conectada entre los pines 2 y 3. Este conector debe conectarse en la
toma XLR de salida de la última unidad de la cadena de dispositivos DMX conectados.
Controles y funciones de la pantalla LCD
MOVILED BEAM 712
User Manual/Manual de uso
Pag 14
ES
MENU
< Address >
0- 512
Dmx512
Auto
< WorkMod >
Sound
6CH
13CH
ChanMod
37CH
< Dimm MOD >
Fast
Smooth
TOOL
60S
< Display >
< ON >
< X revise >
0- 255
< Y revise >
0- 255
< YES >
< X reverse >
< No >
< YES >
< Y reverse >
< PT Sett >
< No >
< OFF >
< XY Trade >
< No >
< XY fast >
< XY speed >
< XY norm >
< XY slow >
< Control >
< CH1-CH40 >
0-255
< DmxLive >
< CH1-CH40 >
0-255
< White SW >
< RGBwhit >
<Info>
< WhitR >
< WhitG >
< ON >
0- 255
0- 255
< WhitB >
0- 255
< Version >
< Rest >
MOVILED BEAM 712
< OFF >
Xm168_7*12d
OFF
ON
User Manual/Manual de uso
Pag 15
ES
CONTROLADOR DMX
6 Canales
13 Canales 37 Canales
valor DMX
Función
Efecto Shutter, posición de motor
1
1
2
2
0 - 19
Shutter cerrado
20-49
Shutter abierto
50-64
Strobe 1(rápido-lento)
65-69
Shutter abierto
70-84
Strobe 2:pulso abierto (rápido-lento)
-
85-89
Shutter abierto
90-104
Strobe 3:pulso cerrado (rápido-lento)
105-109
Shutter abierto
110-124
Strobe 4: strobo random (rápido-lento)
125-129
Shutter abierto
130-144
Strobe 5:pulso abierto (rápido-lento)
145-149
Shutter abierto
150-164
Strobe 6:pulso cerrado (rápido-lento)
165-169
Shutter abierto
170-184
Strobe 7:pulso potente (rápido-lento)
185-189
Shutter abierto
190-204
Strobe 8:pulso potente random (rápido-lento)
205-209
Shutter abierto
210-224
Strobe 9:onda sinusoidal (rápido-lento)
225-229
Sin función
230-244
Strobe 10:potente (rápido-lento)
245-255
Shutter abierto
0-244
245-255
MOVILED BEAM 712
Dimmer
0-100/% intensidad
User Manual/Manual de uso
Pag 16
ES
1
2
3
3
4
4
5
5
6
6
0-255
Pan
Pan fine
0-255
Pan fine(Byte menos significativo)
0-255
Tilt
Tilt fine
0-255
Tilt fine (Byte menos significativo)
Velocidad Pan/Tilt
0-255
0-9
7
Velocidad Pan/Tilt 0-100%
Sin efecto
10-14
Reset completo fixture1
15-249
Control de todas las lámparas
248-255
Control de una única lámpara
Configuración del control de la unidad
0-9
7
8
10-14
15-248
249-255
Control de todas las lámparas
Reset completo de la unidad
Control de todas las lámparas
Control de una única lámpara
Rueda de efectos de color
0-9
8
MOVILED BEAM 712
9
Abierto
10-14
LEE 790Moroccan pink
15-19
LEE 157Pink
20-24
LEE 332Special rose pink
25-29
LEE328 Follies pink
30-34
LEE 345 Fuchsia
35-39
LEE 194 Surprise pink
40-44
LEE 181Congo Blue
45-49
LEE071 Tolyo blue
50-54
LEE 120Deep Blue
User Manual/Manual de uso
pink
Pag 17
ES
55-59
LEE 079 Just Blue
60-64
LEE 132 Medium Blue
65-69
LEE 200 Double CT Blue
70-74
LEE 161Slate Blue
75-79
LEE 201 Full CT blue
80-84
LEE 202 Half CT BLUE
85-89
LEE 117 Steel Blue
90-94
LEE 353 Lighter Blue
95-99
LEE 118 Light blue
100-104
LEE 116 Medium Blue Green
105-109
LEE 124 Dark Green
110-114
LEE 139 Primary Green
115-119
LEE 089 Moss Green
120-124
LEE 122Fern Green
125-129
LEE 738JAS Green
130-134
LEE 088Lime Green
135-139
LEE 100 Spring yellow
140-144
LEE 104 Deep Amber
145-149
LEE 179 Chrome Orange
150-154
LEE 105orange
155-159
LEE021 Gold Amber
160-169
Lee 778 Millennium Gold
170-174
LEE 164 Flame Red
175 - 179
Open
Efecto de rotación de la rueda de color
MOVILED BEAM 712
180 – 201
Sentido horario, rápido-lernto
202 - 207
Stop (Se detendrá con el color actual)
User Manual/Manual de uso
Pag 18
ES
3
10
11
12
6
230 - 234
Abierto
235 - 239
Color Random Rápido
240 - 244
Color Random Medio
245 - 249
Color Random Lento
250 - 255
Abierto
Led1-7 rojo
11
5
Sentido antihorario, lento-rápido
9
10
4
208 - 229
12
13(reservado)
MOVILED BEAM 712
0-255
Led1
rojo
0-255
LED1-7 Verde
0-255
LED1 Verde
0-255
LED1-7 Azul
0-255
LED1 Azul
0-255
LED1-7 Blanco
13
0-255
LED1 Blanco
14
0-255
Led2 Rojo
15
0-255
Led2 Verde
16
0-255
Led2 Azul
17
0-255
Led2 Blanco
18
0-255
LED3 Rojo
19
0-255
LED3 Verde
20
0-255
LED3 Azul
21
0-255
LED3 Blanco
22
0-255
LED4 Rojo
23
0-255
LED4 Verde
24
0-255
LED4 Azul
25
0-255
LED4 Blanco
26
0-255
LED5 Rojo
27
0-255
LED5 Verde
User Manual/Manual de uso
Pag 19
ES
28
0-255
LED5 Azul
29
0-255
LED5 Blanco
30
0-255
LED6 Rojo
31
0-255
LED6 Verde
32
0-255
LED6 Azul
33
0-255
LED6 Blanco
34
0-255
LED7 Rojo
35
0-255
LED7 Verde
36
0-255
LED7 Azul
37
0-255
LED7 Blanco
Posición de las lámparas LED
MOVILED BEAM 712
User Manual/Manual de uso
Pag 20
EQUIPSON, S.A.
Avda. El Saler, 14 - Pol. Ind. L´Alteró,46460 - Silla (Valencia) Spain
Tel. +34 96 121 63 01 Fax + 34 96 120 02 42
www.equipson.es [email protected]