1
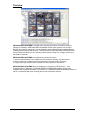
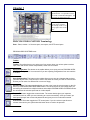
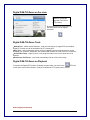
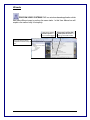
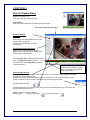
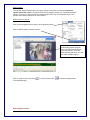
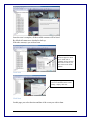
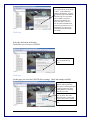
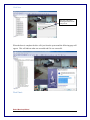
Dx
User Manual
85 Lancing Dr. Unit M
Hamilton, Ontario
L8W 2Z9
905-575-7223
Ver. 1.7.534854
i
TABLE OF CONTENT
Overview ............................................................................................... 2
Chapter 1 ............................................................................................................ 2
PROCOM VIDEO SYSTEMS Terminology ..................................... 3
Chapter 2 ............................................................................................................ 5
Structure Pane ...................................................................................... 5
Layouts .................................................................................................. 6
Layout Sequences ................................................................................ 7
Digital PAN-Tilt-Zoom on live view ................................................... 8
Digital PAN-Tilt-Zoom on Playback.................................................... 8
Wizards ................................................................................................. 9
Chapter 3 ........................................................................................................... 10
How to Playback Video- ..................................................................... 10
Playback Window Structure- .............................................................. 10
To Navigate through the Video -......................................................... 10
Fast forward, rewind .......................................................................... 10
Smart Search- ...................................................................................... 11
Define motion of interest – ................................................................. 11
Chapter 4 ........................................................................................................... 12
Backup Servers Archive Data ............................................................. 12
Export Snapshots ................................................................................ 16
Notes ................................................................................................... 17
For Your Records................................................................................ 18
ii
Overview
PROCOM VIDEO SYSTEMS is a digital video recording and remote surveillance software
package for Windows. PROCOM VIDEO SYSTEMS accepts video streams from all major
Network (IP) cameras and servers, Frame Grabbers and any Direct Show compatible devices
including Webcams and USB cameras. This along with the PROCOM VIDEO SYSTEMS clientserver architecture allows you to build fully scalable solution sizing from a single camera up to
thousands of cameras.
PROCOM VIDEO SYSTEMS was designed to primarily be used to:
1. View live video streams from multiple sources locally and remotely, over the Internet.
2. Record video from multiple sources and play them back later locally or remotely
3. Export previously recorded video to preserve it and to present it as evidence.
PROCOM VIDEO SYSTEMS offers a principally new concept for DVR solutions – “One
Software/Choice of Hardware”. PROCOM VIDEO SYSTEMS DVR software can be either
integrated with supported hardware or acquired from a PROCOM VIDEO SYSTEMS reseller as a
part of a complete digital video recording and remote surveillance solution.
2
Chapter 1
The icons perform functions which are
explained below. It is possible to move
these icons or make them disappear. Use
your mouse to arrange the icons.
Each of the panes on the
screen can be closed by
left clicking on the “x” in
the top right corner of the
pane.
PROCOM VIDEO SYSTEMS Terminology
Pane - Panel, window. i.e. Structure pane, event pane, and PTZ control pane.
PROCOM VIDEO SYSTEMS Icons-
Toolbar
Toolbar- The toolbar that you see at the top of your screen gives you various options such as
open, save and various screen manipulations, at the click of a button.
Open Configuration- This button on the toolbar allows you to open previous PROCOM VIDEO
SYSTEMS configurations. It is most useful if you are exporting configurations from one machine
to another.
Save Configuration- This button on the toolbar allows you to save any changes that you have
just made to your DVR, it will continue to save to the same file unless you click on File and Save
As then you can save to a different file or even to a floppy.
Structure Pane- This button toggles whether you see or don’t see the structure pane on the left
side of your PROCOM VIDEO SYSTEMS window. The structure pane is most useful when you
are looking at cameras from multiple locations and multiple PROCOM VIDEO SYSTEMS servers.
We will discuss the structure pane later on in this chapter.
Events - This button toggles the events window. The events window gives you important
notifications such as, when you are connecting to a server successfully. It lets you know if you
have input improper user names and passwords and gives you error codes when needed.
PTZ Control- This button toggles the PTZ control pane. If you do not have a pan-tilt-zoom
camera connected to your system then this button does no need to be pressed.
3
Video amplification- This button toggles the video amplification pane. When this button is
pressed a pane will come up from which you will be able to adjust the brightness, contrast,
saturation, sharpness, and hue for any camera.
Audio- This button toggles Audio pane control. Audio pane enables you to listen to Audio
from different cameras
Full Screen- This button toggles full screen mode. In full screen, none of the panes will be seen
and the cameras will be expanded to their maximum size to fill the full screen of your monitor.
Open Archive – This button opens archive viewer window. You will be able to view archived data
of your connected DVR
Manage Maps – This button toggles map module window for managing and viewing cameras on
Google or previously added maps.
Save Current Frame as – This button allows you to save currently rendered video frame into file.
Frame from selected screen will be saved only.
Wizards- The wizard’s icon on the toolbar gives you a shortcut to various server, camera
options and configurations. You can also access these features through the right click menus in
the software.
Views- These buttons on the toolbar allow you to manipulate your views and camera layouts to
your own preference.
Screen Footer- The screen footer button on the toolbar allows you to display various information
underneath each camera window. It can display frame rate, time, picture quality, recording,
motion detection, and image size. The screen footer is the text below each camera
Stream Selection- The stream selection button allows you to pick which camera you would like
to view in the selected camera window. This can also be done through the right click menus and
by dragging the desired camera from the structure pane to the desired display window, or right
click on any camera window and select stream.
Show Motion- The show motion toolbar button toggles whether or not you want the motion
outlined on the selected camera screen. Note: Motion detection must be setup before this feature
can be activated.
Maximize- When pressed the maximize button puts the selected camera into a single view, if
pressed again it will return to the previous view. This can also be accomplished by double clicking
on the camera of choice.
4
Chapter 2
Structure Pane
The structure pane is the control centre of your DVR. It lists
the server(s), cameras, archive cameras and Layouts set
up on the DVR. Right click on the word layouts to create
customized layout which will be discuss later in this
manual.
Bring a camera to full Screen
In the live view you can double click on any camera in your layout to bring it to
full screen. To return the image to its original layout position, double click on the
full screen image.
From the structure pane you can left click on a camera title and drag it over to the
layout and drop it into a box. This will place the camera in that location on the
screen.
5
Layouts
Create custom Layouts by grouping
cameras for more efficient monitoring,
and better management. For example
group together all out-door cameras or
all POS cameras.
Individual Layouts can be activated by double-clicking on them with the mouse.
Users now can perform playback and other function by right-clicking on the camera of their
interest.
6
Layout Sequences
When Layouts are created, they can be used for sequencing.
To create sequences right mouse click on Layout Sequences.
Set time interval
between layouts
Manage priority or remove
layouts of your choice.
7
Choose given
Layouts for adding
them in a sequence.
Digital PAN-Tilt-Zoom on live view
Right-Click on any
camera to activate the
Digital Pan-Tilt & Zoom
(PTZ) function.
By activating the PTZ control pane live
streaming video can be digitally
enhanced.
Digital PAN-Tilt-Zoom Tools
Default Tool – default mouse behaviour, it will click and drag as no digital PTZ was enabled.
Digital PTZ control can still be accessible via PTZ control pane.
Drag Tool – when selected the mouse can drag a digitally zoomed image around the screen
changing your viewpoint. Additionally, the mouse wheel will work the zoom in/zoom out functions.
Zoom In/Out Tools – digital zoom in or out using left button on the mouse when this tool is
selected.
Zoom Out to Full Frame – zoom level automatically reverts to full screen image.
Digital PAN-Tilt-Zoom on Playback
To activate the Digital PTZ function on already recorded video, just click on the
PTZ icon
control pane in the archive window. It can be controlled via PTZ control pane or mouse.
End of digital pan-tilt-zoom
8
Wizards
PROCOM VIDEO SYSTEMS DVR is a windows based application which
has many different ways to perform the same tasks. In this User Manual we will
explain one method only for simplicity.
Select this option to
review recorded images
Wizards: for easy navigation and
step by-step setup to perform
configurations and other setup
tasks.
9
Use this option to record
images to removable media.
CHAPTER 3
How to Playback VideoTo playback recorded video
Select the “wizards” icon.
From the menu select “Open Archive”
You can also:
Right click on any camera view and choose open archive.
Your archive pane will now open
Playback Window
StructureNow that you are in the playback screen, the
structure pane on the left
lists all of the cameras that you have
recordings for.
To Navigate through the Video Double click on the camera you wish to
playback (This camera will now appear with
footage on the video screen)
The solid green line on the bottom represents
time. The light green lines represent
recorded video. The orange lines represent
motion information.
There are basic VCR controls on
the bottom of the playback screen,
which you can use to play, pause,
forward, and rewind.
Fast forward & Rewind
You have a jog dial on the bottom of the screen, which you can drag in either direction to browse
through your video in high speeds.
Another way to fast forward is to use the arrow controls on top of the screen in which you can
select increments of time in which you would like to move through the video.
Playback Motion OnlyLocated at the top of your Archive Pane, there are two buttons that allow you to seek video with
actual motion saving you time.
With the camera you wish to review.
Choose either:
“seek previous motion”
or “seek next motion”
10
Smart SearchYou can also search through video not only by motion in the screen, but also by motion in a
specific part of the screen. Through Procom Video’s playback screen, you can define a specific
object in your view, or define a path, and seek through motion only in that specific region. This
process is commonly referred to as “smart search”.
Define motion of interest –
Click on the navigation menu at the top of the playback screen
Click on “Define region of motion interest”.
While having the left button
continuously pressed, drag the
mouse over the area you would
like to see motion in (This will
create a grid in that area). You can
also select multiple regions.
Click on “seek to previous motion”
in the defined grid(s).
or “seek to next motion”
End of Playback Video
11
to search through motion
Chapter 4
Back Up Server’s Archive Data
The most common method to perform this task is to use the “wizards”
icon.
Select “wizards”
Icon
Then select “Backup
server’s archive
data.”
The following introductory page will appear.
By checking the box
“skip introduction page
next time” this page will
no longer appear.
Click Next
The system will then scan all the hard drives for video footage. This process could take
several minutes.
12
Once the scan is complete, all the available cameras will be listed.
By default all cameras are checked to back up.
Select the camera(s) you wish to burn.
Right click in this area. A
menu will appear to allow
you to “Mark All” or
“Unmark All” the cameras.
This will save time if you
don’t want to burn all the
cameras.
Click Next
This page will appear on the
screen it is defaulted to the correct
setting. Simply, click next.
Click Next
On this page you select the time and date of the event you wish to burn.
13
This box shows the estimated
size of the back-up you are about
to make. A CD-R will hold
700mb of information. A DVDR will hold 4.7gb of information.
If the back-up size exceeds the
space available you will be
asked to insert another disc.
Please note that if you try to
burn too much information the
system may present an error. If
this happens you will need to
break up the burn into smaller
time frames.
Click Next
Select the destination of the burn.
The default is to record to a CD/DVD.
Again, this shows you
the estimated back up
size.
Click Next
On this page you select the CD/DVD Drive settings. Check the settings carefully.
If the system is running Windows
7 this box will read like this.
If the system is running Windows
XP this box must read “Nero
Burning ROM” Use the drop
down arrow to select.
This box must refer to a “Drive
letter” as shown. If it reads
“Image Recorder” use the drop
arrow to select a drive location.
Ensure this box reads “eject disc
drive”
14
Click Next
This page will appear
showing the status of the
burn process.
When the burn is complete the disc will eject from the system and the following page will
appear. This will indicate what was recorded and if it was successful.
Click Finish
End of Back-up Wizard
15
Export Snapshots.
Another way to export video is to save one frame at a time, like a snapshot.
First pause the video on the picture that you would like to copy,
Click on edit
Choose “save current frame as…”
Select the location in which you would like to save the snapshot.
It is recommended you purchase a USB flash drive to save snapshots to. This will allow you to
easily transfer the image to a different computer or email.
In this location select
the location to save
the snapshot.
Insert the name you
wish to call the file.
Save File
End of Export Snapshots
16
Enter Notes Here_____________________________________________________________________________
_____________________________________________________________________________
_____________________________________________________________________________
_____________________________________________________________________________
_____________________________________________________________________________
_____________________________________________________________________________
_____________________________________________________________________________
_____________________________________________________________________________
_____________________________________________________________________________
_____________________________________________________________________________
_____________________________________________________________________________
_____________________________________________________________________________
_____________________________________________________________________________
_____________________________________________________________________________
_____________________________________________________________________________
_____________________________________________________________________________
_____________________________________________________________________________
_____________________________________________________________________________
_____________________________________________________________________________
_____________________________________________________________________________
_____________________________________________________________________________
_____________________________________________________________________________
_____________________________________________________________________________
_____________________________________________________________________________
_____________________________________________________________________________
_____________________________________________________________________________
_____________________________________________________________________________
_____________________________________________________________________________
_____________________________________________________________________________
_____________________________________________________________________________
_____________________________________________________________________________
_____________________________________________________________________________
_____________________________________________________________________________
_____________________________________________________________________________
_____________________________________________________________________________
_____________________________________________________________________________
_____________________________________________________________________________
_____________________________________________________________________________
17
For Your Records
Dealer Name: PROCOM VIDEO SYSTEMS
Dealer Address: 85 Lancing Dr.
Hamilton, Ontario
L8W 2L6
905-575-7223
Date Of Purchase:
Purchase Location: Hamilton, Ontario
Software Activation Key:
Dates Software Last Upgraded:
_______________
_______________
_______________
_______________
_______________
_______________
_______________
_______________
_______________
_______________
_______________
_______________
_______________
_______________
_______________
_______________
_______________
_______________
_______________
_______________
_______________
_______________
_______________
_______________
_______________
_______________
_______________
_______________
_______________
_______________
_______________
_______________
www.procomvideosystems.com
18