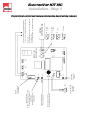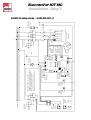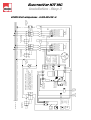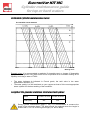
1
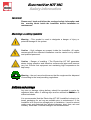
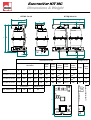
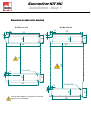
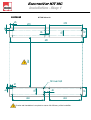
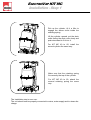
TECHNICAL HANDBOOK
ELECTRODE STEAM HUMIDIFIER
Humidificateur vapeur à électrodes
ELECTROVAP KIT MC
Contents
Safety information
4-5
Product accreditation
6
RoHS declaration
7
Delivery contents
8
Dimensions & Weight
9
KIT MC component parts
10
Installation
Step 1 - Installation
11-15
Step 2 - Water connection
16-17
Step 3 - Electrical installation
18 to 27
Maintenance
Cylinder maintenance guideline
28
Cleaning the steam cylinder
29
Cleaning the valves
Spare parts list
30-31
32 to 34
ELECTROVAP KIT MC
Safety information
IMPORTANT
Please read, heed and follow the enclosed safety information and
the warning labels inside the humidifier before installation or
maintenance.
Warnings & safety symbols
Warning : This symbol is used to designate a danger of injury or
potential damage to the system.
Caution : High voltages are present inside the humidifier. All works
concerned with the electrical installation must be carried out by skilled
and qualified personnel.
Caution : Danger of scalding ! The ElectroVap KIT MC generates
steam during operation and therefore surfaces and pipe-work become
very hot. Ensure that equipment not sustaining high temperatures be
kept away.
Warning : the end user should ensure that the equipment be disposed
of according to the local prevailing regulations.
Delivery and storage
Any loss or damage during delivery should be reported to carrier by
registered letter within 3 working days and be advised to devatec or to
authorized dealer.
It is recommended that the ElectroVap KIT MC humidifier be kept in its
transit packaging for as long as possible prior to maintenance. If the
humidifier is to be put into storage prior to installation, it must be stored
under cover and protected from physical damage, dust, frost, rain and
humidity. More than 6 months storage is not recommended.
ELECTROVAP KIT MC
Safety information
GENERAL
This manual contains all details necessary for the planning and installation of the
ElectroVap KIT MC humidifier. In addition commissioning and maintenance details are
included.
The manual is intended for use by engineers and properly trained technical personnel.
Maintenance, servicing or repair work must only be carried out by suitable skilled and
qualified personnel, the customer must be responsible for ensuring their suitability.
Any risks or hazards, especially when working from ladders or towers should be identified
by a skilled and Health and Safety representative and effective control measure put in
place.
No liability will attach to the Distributor if any damage, injury or accident is attributable to
inattentive, inappropriate, negligent or incorrect operation of the machinery whether or not
caused deliberately. Always isolate all electrical and water supplies before commencing
any maintenance.
Every effort has been made to ensure details contained in this manual are correct,
however, in view of the wide range of conditions experienced in air handling systems, the
information provided should only be used as a guide. Please contact your Agent if any
doubt.
Correct use
ElectroVap MC2 humidifiers are ONLY intended for use with air handling systems or direct
air humidification. ANY OTHER APPLICATION IS NOT CONSIDERED USE FOR THE
INTENDED PURPOSE. THE MANUFACTURER CANNOT BE MADE LIABLE FOR ANY
DAMAGE RESULTING FROM INCORRECT USE.
Water
ElectroVap KIT MC humidifiers are designed to be used with mains, demineralized R/O or
softened water. On no account attempt to introduce any other fluid or chemical into the
system. Water supply should not exceed 6.0 bar and installation should comply with local
regulations.
Electricity
All work concerned with electrical installation MUST only be performed by skilled and
qualified technical personnel (eg electrician or technicians with appropriate training). The
customer MUST be responsible for ensuring their suitability.
It is the duty of the installer to ensure that suitable sized cables and MCB protection is
provided. Please observe the local regulations concerning the provision of electrical
installations.
Warranty
A two year warranty term—cost and labor—is applicable to the parts of the ElectroVap KIT
MC to the exception of the consumable parts (valves, cylinders or parts of cylinders)
provided our recommendations of use & maintenance have been adhered to. Failure to
specify and fit original parts and accessories will invalidate our warranty.
NOTE
The manufacturer’s policy is one of continuous research and development. He therefore
reserves the right to amend without notice the specifications given in this document.
ELECTROVAP KIT MC
Product accreditation
APPLIED DIRECTIVES
Electromagnetic Compatibility Directive :
Low Voltage Directive :
Machinery Directive :
89/336/EEC, 2004/108/EC
73/23/EEC, 2006/95/EC
98/37/EC Amending Directive 89/392/EEC
Standard(s) to which Conformity is declared :
EN 61000-6-3 : Electromagnetic compatibility generic requirements (residential, commercial and light industries)
EN 55022 class B conducted and radiated emission limits)
EN 61000-6-2 : Electromagnetic compatibility (EMC) – Generic standards –Immunity for industrial environments;
EN 61000-4-3 : Radiated, radio frequency, electromagnetic field immunity test.
EN 61000-4-6 : Immunity to conducted disturbances induced by radio frequency fields
EN 61000-4-4 : Electrical fast transient/burnt immunity test
EN 61000-4-5 : Surge immunity test
EN 61000-4-2 : Electrostatic discharge immunity test
EN 60204-1 : Safety of machinery – Electrical Equipment of machines – Part 1 : General requirements
EN 292 Parts 1 & 2 : Safety of machinery basic principle mechanical design.
Manufacturer’s Name and Address
DEVATEC SAS
Rue Saint Eloi
76550 Ambrumesnil - FRANCE
Authorised Representative
Type of equipment
STEAM HUMIDIFIER
Model Name (s) & Series:
ELECTROVAP MC / KIT MC
Year of Manufacture
2001
We the undersigned, hereby declare that the equipment
specified above conforms to the above Directive(s) and Standard(s).
Mr FRAMBOT Jean-François
Managing Director
Date : 02.07.2007
ELECTROVAP KIT MC
RoHS declaration
devatec sas
Rue Feu St Eloi
76550 Ambrumesnil
France
Confirms that the ElectroVap KIT MC steam humidifier is manufactured in compliance with
the European regulations 2002/95/EU (RoHS).
This guideline regulates after July 1st 2006 the use of mercury, cadmium, lead
(soldering
processes), chrome VI as well as PBB and PBDE. ELMC steam humidifiers manufactured
previously to this date may contain above materials.
Name : MINFRAY Jean-Marie
Position : R&D Engineer
Date : 05.06.2008
Signature:
ELECTROVAP KIT MC
Delivery contents
Any loss or damage during delivery should be reported to carrier by registered
letter within 3 working days and be advised to devatec or to authorized dealer.
It is recommended that the ElectroVap KIT MC humidifier be kept in its transit
packaging for as long as possible prior to maintenance. If the humidifier is to
be put into storage prior to installation, it must be stored under cover and
protected from physical damage, dust, frost, rain and humidity. More than 6
months storage is not recommended.
What is in the box :
1.
One steam humidifier in on/off or proportional control , one disposable or cleanable
cylinder (for KIT MC 5 to 30), 2 cylindres (for KIT MC 40 to 60), and one technical
brochure.
2.
One special command board (ref: 500101/05).
3.
Hose clamps :
KIT MC 5 to 30 : 2 clamps for the steam hose
KIT MC 40 to 60: 4 clamps for the steam hoses
KIT MC 5 to 30
KIT MC 5 to 30
KIT MC 40 to 60
KIT MC 40 to 60
Board 500101/05
OPTIONS
4. Water hose kit (part nb 100050902) including 1m. long Ø 25mm drain, one
clamp and one hose with 3/4” thread (with washers) for tap water connection.
5. Electrical kit (part nb 10005903) including one on/off rock switch and 1 m. long
valve electrical cables.
ELECTROVAP KIT MC
Dimensions & Weight
KIT MC 40 to 60
KIT MC 5 to 30
A
1
A
1
G1
577,3
1
E
G
1
H
1
D1
B
F1
C1
I1
1F
J1
I1
Dimensions in mm
Water Steam
inlet
outlet
Humidifier
Steam
outlet
spacing
Drain
outlet
H
I
Drain
outlet
spacing Empty Opera
-ting
J
A
B
C
D
E
F
G
KIT MC 5 to 15-2
305
453
270
191
480
30
146
178,5
7
9
KIT MC 20 to 30
305
605
270
191
632
30
146
178,5
9
12
KIT MC 40 to 60
710
605
270
191
632
30
146
18
23
Ref: 500101/05
110
195
141,5
345
Weight in Kg
35
Board réf: 500101/05-1TI
Electronics
305
0,6
B
1
Model
Weight in Kg
A1
C
1
ELECTROVAP KIT MC
KIT MC component parts
Example : KIT MC 5 to 30
5
8
6
4
3
7
2
9
1
10
1
Bracket (lower)
2
Drain valve
3
Steam cylinder
4
Cylinder holding spring
5
Bracket (upper)
6
Filling cup
7
Inlet valve
8
Main electronic board (Ref: 500101/05-1TI)
9
High water level electrode wire
10 Power electrode wire (x3)
ELECTROVAP KIT MC
Installation - Step 1
How to install the humidifier on wall
The humidifier should be operated within 5°C and 40°C in a room with less than 80% of
humidity.
When in operation, the rear panel becomes hot (60°C) so do not hang the humidifier on a
heat sensitive surface.
The devatec humidifiers have been developped to be hanged on wall. Before installation,
make sure that the surface material is strong enough to hold the humidifier.
The best performances of the humidifier are achieved when the steam discharge is made
at short distance from the humidifier.
On wall :
103
188
Dimensions for wall mounting
3
3
Réf: 500101/05-1TI
3
4 trous O4,5
3
ELECTROVAP KIT MC
Installation - Step 1
Dimensions for wall bracket mounting
KIT MC 5 to 15-2
25
KIT MC 20 to 30
25
270
305
82
50
82
50
20
20
270
442
290
305
81
8 trous O6,5
263
8 trous O6,5
Precise wall installation is required to ensure full
efficiency of the humidifier.
55
10
21
263
81
55
10
21
ELECTROVAP KIT MC
Installation - Step 1
continued
270
270
50
35
82
20
25
KIT MC 40 to 60
442
610
16 trous O6,5
263
46
81
55
10
21
263
Precise wall installation is required to ensure full efficiency of the humidifier.
ELECTROVAP KIT MC
Installation - Step 1
Method :
Any loss or damage during delivery should be reported to carrier by registered letter within 3
working days and be advised to devatec or to authorized dealer.
Unpack the humidifier from its carton box, take the steam cylinder off the bracket and lay it gently on ground and attach the humidifier bracket on the the wall as per the following :procedure :
Pick up the supplied drilling template and lay it
flat against the wall where the humidifier
should be installed paying care of the
measures.
The small KIT MC 5 to 30 requires 8 drilling
marks while the large KIT MC 40 to 60
requires 16 drilling marks. For the large kit,
mark the first eight drilling marks, trace the
template corners and then report the drilling
template to the right side aligning the corners.
Mark the eight drilling marks anew.
Drill holes at the drilling marks, insert pegs
appropriate to the support.
Take the upper bracket and fix it with a screw
(as per in 1 on the attached drawing). Level
the bracket with a bubble level and screw up
the other three screws.
1
Take care : KIT MC 40 to 60 requires that two
upper brackets be wall installed and secured
by 8 screws.
Take the lower bracket, install it on wall with
screws 2 & 3 as per attached drawing. Control
vertical alignment and distance H (s.a. page
) and screw up the 4 screws.
1
H
Take care : KIT MC 40 to 60 requires that two
lower brackets be wall installed and secured
by 8 screws.
2
3
ELECTROVAP KIT MC
Installation - Step 1
Pick up the cylinder, tilt it a little to
engage the steam outlet inside the
retaining spring.
Lift the cylinder upward, put the drain
outlet facing the drain valve body and
push downward to fit it into it.
For KIT MC 40 to 60, install the
second cylinder the same way.
Make sure that the retaining spring
fits correctly the top of the cylinder.
For KIT MC 40 to 60, attach the
second retaining spring the same
way.
The Installation step is now over.
The unit should now be properly connected to mains, water supply and to steam discharge.
ELECTROVAP KIT MC
Installation - Step 2
WATER CONNECTION
Recommendations :
The operating principle of the electrode steam humidifier is the electrolyse
where an electrical current runs through stainless steel electrode plates
immersed in water made conductive by the mineral salts it contains.
The water level must be
between « a » and « b » for
the maximum capacity of
the cylinder.
b a
The ElectroVap humidifier can produce steam from 3 water qualities having
the following characteristics :
Town water or raw water : the water TH should be between 0 and 40°
French grade for a conductivity between 1000µ and 350µS/cm (Micro
Siemens per centimetre).
Softened water: water treated by sodium/calcium permutation on resins.
The titration value TH should be kept as constant as possible and between
0° and 2°.
It is essential that the salt maintenance of softeners be programmed for the
water volume consummed in order to prevent
an excessive salt
concentration to humidifer once the regeneration cycle is finished (please
refer to the softener’s user manual). Duplex softeners are best suited to your
humidifier in this regard. In doubt, please consult devatec.
Demineralised water: this is a water treatment by reverse osmosis or
running through resins.
The ElectroVap humidifier can work with demineralised waters having a
minimum water quality of 30µS/cm. A tea spoon of bicarbonate of soda
must be added on start-up to initiate steam production.
No chemical agent whatsoever (chlorine, disinfectant, ozone… ) must
be added to the water. Some water qualities may generate foam that
can disturb the correct functionning of the humidifier. If this occurs to
your humidifier, please refer to devatec for further assistance.
Recommendations on water tapping :
A fresh mains cold water service should be used to supply the unit. The
water pressure should not exceed 6 bar and should not be inferior to 1 bar
with a temperature less than 40°C.
The water supply connection is on the bottom of the unit. All the KIT MC
are supplied with a 500 mm long water inlet hose with a 3/4” female
connection to the cold water supply. A check valve should be located on
the mains and cold water service connection to the unit.
The KIT MC humidifier uses water to produce steam so leakage may
happen causing potential damage. If an installation in false ceiling or
above prime rooms such as museum, exhibition or laboratory rooms
is considered, ensure that the floor below the humidifier is
constructed from waterproof materials (with draining facilities) to
withstand any water spilling during servicing or if a problem occurs.
ELECTROVAP KIT MC
Installation - Step 2
Steam ouput
The connection to the steam outlet should be made with a Ø 25 or 40 mm steam
hose as per the model of humidifier. To prevent steam leakage, it must be tightened
with the supplied clamp.
A Ø 25 mm heat resisting drain hose must be connected to the drain outlet. To
prevent any water leakage, the drain hose must be tightened with a collar clamp.
For an easy installation, a water hose kit (part nb 10005902) is available (s.a. page
8) .
ELECTROVAP KIT MC
Installation - Step 3
RECOMMANDATIONS :
All works concerned with the electrical installation must be carried out by
skilled and qualified personnel (eg electrician with appropriate training).
The customer is responsible for ensuring their suitability. Please observe
local regulations concerning the provision of electrical installations.
Check all electrical terminal screws at commissioning, after 50 hours
operation and at every service thereafter.
Take care : the KIT MC electronic components are very sensitive to
electrostatic shocks. Appropriate steps must be taken before any
operation.
ELECTROVAP KIT MC
Installation - Step 3
KIT MC steam humidifier in 3 X 380V - 50/60 Hz
Production
(KG/St)
In
Imaxi
Pmaxi
Steam
Torroidal
(A)
(A)
( KW )
diameter
transformer
5
5
5,7
6,4
4,2
Small
25
Loop
8
8
9,1
10
6,6
Small
25
Straight through
10
10
11,4
12,4
8,2
Small
25
Straight through
15-2
15
17,1
18,4
12,1
Small
25
Straight through
20
20
22,8
24,5
16,1
40 large
40
Straight through
30
30
34,3
36,5
24
40 large
40
Split
40
40
45,7
48,5
31,9
2 x 40 large
40
Straight through
50
50
57,1
60,5
39,8
2 x 40 large
40
Split
60
60
68,5
72,6
47,8
2 x 40 large
40
Split
Steam
Torroidal
diameter
transformer
KIT MC
Cylinder size
KIT MC steam humidifier in 3 X 400V - 50/60 Hz
Production
(KG/St)
In
Imaxi
Pmaxi
(A)
(A)
( KW )
5
5
5,5
6,2
4,24
Small
25
Loop
8
8
8,8
9,7
6,63
Small
25
Straight through
10
10
11
12
8,21
Small
25
Straight through
15-2
15
16,5
17,8
12,18
Small
25
Straight through
20
20
22
23,5
16,07
40 large
40
Straight through
30
30
33
35,1
24,01
40 large
40
Split
40
40
44
46,7
31,94
2 x 40 large
40
Straight through
50
50
55
58,3
39,88
2 x 40 large
40
Split
60
60
66
69,8
47,74
2 x 40 large
40
Split
KIT MC
Cylinder size
ALL WORKS CONCERNED WITH ELECTRICAL INSTALLATION MUST BE CARRIED OUT BY A SKILLED AND QUALIFIED PERSONNEL
ELECTROVAP KIT MC
Installation - Step 3
KIT MC steam humidifier in3 X 415V - 50/60 Hz
Production
(KG/St)
In
Imaxi
Pmaxi
(A)
(A)
( KW )
Steam
Torroidal
diameter
transformer
5
5
5,3
6
4,26
Small
25
Loop
8
8
8,5
9,3
6,60
Small
25
Straight through
10
10
10,6
11,6
8,23
Small
25
Straight through
15-2
15
15,9
17,1
12,14
Small
25
Straight through
20
20
21,2
22,7
16,11
40 large
40
Straight through
30
30
31,8
33,9
24,06
40 large
40
Split
40
40
42,4
45
31,93
2 x 40 large
40
Straight through
50
50
53
56,2
39,88
2 x 40 large
40
Split
60
60
63,6
67,3
47,76
2 x 40 large
40
Split
KIT MC
Cylinder size
ALL WORKS CONCERNED WITH ELECTRICAL INSTALLATION MUST BE CARRIED OUT BY A SKILLED AND QUALIFIED PERSONNEL
ELECTROVAP KIT MC
Installation - Step 3
Functions of the main circuit board (500101/05)
Connection to the water
drain valve
Connection to remote
information
Connection to the water
inlet valve
Transofrmer of
intensit
High water level red led
indicating that the maintenance of the steam
cylinder is required
+
Steam production
yellow led
Manual drain
button
Connection for
the proportional
control signal
Conn ection for
the high water
level detection
sensor
TR
Connection for the
on/off switch
230Vac power supply
Connection to power
contactor K
Manual drain push button
/ Bouton vidange manuelle
Steam production lamp /
Voyant de production
INT
Option: SWITCH
/ Interrupteur
(ON/OFF )
Red led / led rouge.
High level, Niveau haut: L1 is "ON"
Default / Defaut: 5 Blinks / 5
clignotements
Maintenance / 2 Blinks / 2
clignotements
Option
Display board /
carte afficheur
5
Power lamp /
Voyant sous
tension
L3
X18
L2
L1
X14
X10
B1
4
3 2
X9
X12
on
F1:
2A
12
11
9 10
12 34
S1
X1
X2
X5
19
20
DEVATEC
Réf:500101-05
6 7 8
1 0
X8
on
on
on
on
12 34
12 34
12 34
12 34
0-10V
2-10V
S1
S1
4-20mA
1-5V
S1 0-20V
4-20V
S1
OPTION
OPTION
CONTROL
SIGNAL
REGULATION
+
RED LED
L1: 2 blinks : Maintenance: / 2 clignotements:
Entretien a faire :
L1: 5 blinks: Default: / 5 clignotements: Défaut
:
Free contact Remote defaut and mainetance /
Contact sec renvoi de défaut et de maintenance
ELECTROVAP KIT MC
Installation - Step 3
Proportional control and remote information board wiring scheme
%
H2O
%
H2O
Q2
(2A)
Circuit breaker /
disjoncteur: 2A
2
L1
L2
L3
N
PE
N
HIGHT
SAFETY
/
HYGROSTAT
VENTILATION
SAFETY
CONTROL
1
3 x 400Vac + N
VE
INLET
VALVE /
vanne de
remplissage
I>
L
OUTLET
VALVE /
vanne de
vidange
VS
Option:
SWITCH /
Interrupteur
(ON/OFF )
INT
Manual drain push
button / Bouton
vidange manuelle
Free contact Remote
default / Contact
renvoi de défaut
5
X18
B1
X14
X10
MATERIAL SUPPLY / Matériel fourni :
- Cylinder, drain and inlet valve fitted on a L'braket
/ Cylindre, vanne de vidange et de remplissage.
- Power cable and plug. / Câbles et fiche de
raccordement aux électrodes du cylindre
- Circuit board / Carte électronique : ref: 500101
4
2
3 2
X9
3
X12
6
8
F1:
2A
12
11
9 10
12 34
S1
X1
X2
X5
19
20
DEVATEC
Réf:500101-05
on
0
6 7 8
1 0
X8
1
V
Power lamp /
Voyant sous
tension
11
CYLINDER/
Cylindre /
Above view /
vue de dessus
Ep3
Si Proportionnel
signal voir:
raccordement signal
proportionnel.
OPTION
If Proportional
control see:
proportional
connection wiring /
230V
Ep2
Enh
Q1
Ep1
Enh
White /
Blanc
Ep2
Black
/ noir
I>
CYLINDER/ Cylindre
Ep1
Brown /
marron
I>
Main circuit breaker /
disjoncteur principal
K1
Ep3
Black
/ noir
I>
K1
A1
A2
Ground terminal
/ borne de mise à
la terre
ELECTROVAP KIT MC
Installation - Step 3
KIT MC2 5 wiring scheme - 3x380-400-415V + N
%
H2O
%
H2O
Q2
(2A)
1
2
L1
L2
L3
N
PE
N
HIGHT
SAFETY
/
HYGROSTAT
VENTILATION
SAFETY
CONTROL
Circuit breaker /
disjoncteur: 2A
3 x 400Vac + N
VE
OUTLET
VALVE /
vanne de
vidange
VS
Option:
SWITCH /
Interrupteur
(ON/OFF )
INT
Manual drain push
button / Bouton
vidange manuelle
Free contact Remote
default / Contact
renvoi de défaut
5
X18
B1
X14
X10
MATERIAL SUPPLY / Matériel fourni :
- Cylinder, drain and inlet valve fitted on a L'braket
/ Cylindre, vanne de vidange et de remplissage.
- Power cable and plug. / Câbles et fiche de
raccordement aux électrodes du cylindre
- Circuit board / Carte électronique : ref: 500101
INLET
VALVE /
vanne de
remplissage
I>
L
4
2
3 2
X9
3
X12
6
8
F1:
2A
12
11
9 10
1 2 34
S1
X1
X2
X5
19
20
DEVATEC
Réf:500101-05
on
0
6 7 8
1 0
X8
1
V
Power lamp /
Voyant sous
tension
11
CYLINDER/
Cylindre /
Above view /
vue de dessus
Ep3
Si Proportionnel
signal voir:
raccordement signal
proportionnel.
OPTION
If Proportional
control see:
proportional
connection wiring /
230V
Ep2
Enh
Q1
Ep1
Enh
White /
Blanc
Ep2
Black
/ noir
I>
CYLINDER/ Cylindre
Ep1
Brown /
marron
I>
Main circuit breaker /
disjoncteur principal
K1
Ep3
Black
/ noir
I>
K1
A1
A2
Ground terminal
/ borne de mise à
la terre
ELECTROVAP KIT MC
Installation - Step 3
KIT MC2 8 to 20 wiring scheme - 3x380-400-415V + N
%
H2O
%
H2O
Q2
(2A)
1
2
L1
L2
L3
N
PE
N
HIGHT
SAFETY
/
HYGROSTAT
VENTILATION
SAFETY
CONTROL
Circuit breaker /
disjoncteur: 2A
3 x 400Vac + N
VE
INLET
VALVE /
vanne de
remplissage
I>
L
OUTLET
VALVE /
vanne de
vidange
VS
Option:
SWITCH /
Interrupteur
(ON/OFF )
INT
Manual drain push
button / Bouton
vidange manuelle
Free contact Remote
default / Contact
renvoi de défaut
5
X18
B1
X14
X10
MATERIAL SUPPLY / Matériel fourni :
- Cylinder, drain and inlet valve fitted on a L'braket
/ Cylindre, vanne de vidange et de remplissage.
- Power cable and plug. / Câbles et fiche de
raccordement aux électrodes du cylindre
- Circuit board / Carte électronique : ref: 500101
4
2
1 0
X8
1
X12
6
8
F1:
2A
12
11
9 10
12 34
S1
X1
X2
X5
19
20
DEVATEC
Réf:500101-05
on
0
6 7 8
Code xxx
3 2
X9
3
V
Power lamp /
Voyant sous
tension
11
CYLINDER/
Cylindre /
Above view /
vue de dessus
Ep3
Si Proportionnel
signal voir:
raccordement signal
proportionnel.
OPTION
If Proportional
control see:
proportional
connection wiring /
230V
Ep2
Enh
Q1
Ep1
Enh
White /
Blanc
Ep2
CYLINDER/ Cylindre
Ep1
Black
/ noir
I>
Brown /
marron
I>
Main circuit breaker /
disjoncteur principal
K1
Ep3
Black
/ noir
I>
K1
A1
A2
Ground terminal
/ borne de mise à
la terre
ELECTROVAP KIT MC
Installation - Step 3
KIT MC2 30 wiring scheme - 3x380-400-415V + N
%
H2O
%
H2O
Q3
(2A)
2
L1
L2
L3
N
PE
HIGHT
SAFETY
/
HYGROSTAT
VENTILATION
SAFETY
CONTROL
1
Circuit breaker /
disjoncteur: 2A
3 x 400Vac + N
N
INLET
VALVE /
vanne de
remplissage
VE
I>
L
OUTLET
VALVE /
vanne de
vidange
VS
Option:
SWITCH /
Interrupteur
(ON/OFF )
INT
Manual drain push
button / Bouton
vidange manuelle
Free contact Remote
default / Contact sec
renvoi de défaut
5
X18
B1
X14
X10
4
2
3 2
X9
3
X12
6
8
F1:
2A
12
11
9 10
12 34
S1
X1
X2
X5
11
230V
CYLINDER/
Cylindre /
Above view /
vue de dessus
Ep3
Ep2
Enh
Si Proportionnel
signal voir:
raccordement signal
proportionnel.
OPTION
If Proportional
control see:
proportional
connection wiring /
Power lamp /
Voyant sous
tension
V
19
20
DEVATEC
Réf:500101-05
on
0
6 7 8
1 0
X8
1
MATERIAL SUPPLY / Matériel fourni :
- Cylinder, drain and inlet valve fitted on a L'braket
/ Cylindre, vanne de vidange et de remplissage.
- Power cable and plug. / Câbles et fiche de
raccordement aux électrodes du cylindre
- Circuit board / Carte électronique : ref: 500101
Q1
Ep1
Enh
White /
Blanc
Ep2
Ep3
K1
A1
A2
Q2
Enh
White /
Blanc
Ep2
Ep3
Black
/ noir
CYLINDER/ Cylindre
Ep1
Brown /
marron
I> I> I>
Main circuit breaker /
disjoncteur principal
Black
/ noir
CYLINDER/ Cylindre
Ep1
Brown /
marron
I> I> I>
Main circuit breaker /
disjoncteur principal
K2
A1
A2
Ground terminal
/ borne de mise à
la terre
ELECTROVAP KIT MC
Installation - Step 3
KIT MC2 40 wiring scheme - 3x380-400-415V + N
%
H2O
%
H2O
Q3
(2A)
2
L1
L2
L3
N
PE
HIGHT
SAFETY
/
HYGROSTAT
VENTILATION
SAFETY
CONTROL
1
Circuit breaker /
disjoncteur: 2A
3 x 400Vac + N
N
INLET
VALVE /
vanne de
remplissage
VE
I>
L
OUTLET
VALVE /
vanne de
vidange
VS
Option:
SWITCH /
Interrupteur
(ON/OFF )
INT
Manual drain push
button / Bouton
vidange manuelle
Free contact Remote
default / Contact sec
renvoi de défaut
5
X18
B1
X14
X10
4
2
3 2
X9
3
X12
6
8
F1:
2A
12
11
9 10
1 2 34
S1
X1
X2
X5
11
230V
CYLINDER/
Cylindre /
Above view /
vue de dessus
Ep3
Ep2
Enh
Si Proportionnel
signal voir:
raccordement signal
proportionnel.
OPTION
If Proportional
control see:
proportional
connection wiring /
Power lamp /
Voyant sous
tension
V
19
20
DEVATEC
Réf:500101-05
on
0
6 7 8
1 0
X8
1
MATERIAL SUPPLY / Matériel fourni :
- Cylinder, drain and inlet valve fitted on a L'braket
/ Cylindre, vanne de vidange et de remplissage.
- Power cable and plug. / Câbles et fiche de
raccordement aux électrodes du cylindre
- Circuit board / Carte électronique : ref: 500101
Q1
Ep1
Enh
White /
Blanc
Ep2
Ep3
K1
A1
A2
Q2
Enh
White /
Blanc
Ep2
Ep3
Black
/ noir
CYLINDER/ Cylindre
Ep1
Brown /
marron
I> I> I>
Main circuit breaker /
disjoncteur principal
Black
/ noir
CYLINDER/ Cylindre
Ep1
Brown /
marron
I> I> I>
Main circuit breaker /
disjoncteur principal
K2
A1
A2
Ground terminal
/ borne de mise à
la terre
ELECTROVAP KIT MC
Installation - Step 3
KIT MC2 50-60 wiring scheme - 3x380-400-415V + N
ELECTROVAP KIT MC
Cylinder maintenance guide
for tap or hard waters
Estimated cylinder maintenance curve
X= Humidifier steam demand
300 H
800 H
1000 H
2000 H
4000 H
Working hours
Example given: it is recommended to maintain (if cleanable type) or change (if disposable
type) the steam cylinder every 800 to 900 hours of operation for a humidifier running at full
capacity and using a water of TH20.
•
•
The water tightness is indicated in French grade, the said value is the water
hydrotimetric content (TH).
The water quality is to be mentioned on your request so that to fit the most appropriate
steam cylinder for the best working of the humidifier.
Length of the genuine stainless steel electrode plates
Model
Lenth (mm)
KIT MC 5 to 15-2 KIT MC 20 to 60
160
250
During cylinder maintenance (page n° 29), it is recommended to measure the
length of the electrode plates. The latter should be replaced when the lenght is
shorter than 1/3 or 1/2 of the original lenght (s.a. above table).
ELECTROVAP KIT MC
Maintenance - Cleaning of steam cylinder
The KIT MC humidifiers are currently fitted with disposable cylinder(s).The
latter can however be easily substitued for cleanable type at customer’s
choice.
1.
REPLACING THE STEAM CYLINDER
Drain the steam cylinder(s) fully using the manual drain key.
When the cylinder(s) is/are drained fully (a « DRAINING CYCLE
OVER » will appear on the display). Isolate the power both at the
general switchboard and at the humidifier (rocker power switch).
2.
The steam cylinder(s) may be very hot. Allow it/them to cool down
before removing.
3.
Remove the front panel from the humidifer to access the cylinder
compartment. Remove power and high water level electrode cables from
top of the cylinder(s) (picture 1).
Disconnect the steam hose(s) from the top of the cylinder(s) (pict. 2).
Lift the cylinder upwards until it is clear off the drain valve. Ensure that the
gasket remains in the drain valve (picture 3).
Release the top of the cylinder from the retaining clip and pull out the
cylinder (picture 4).
The disposable cylinder(s) will be merely replaced by new ones either
disposable or cleanable.
Retighten gently the steam hose on the cylinder outlet when the
cylinder has cooled down only to prevent deformation.
.
4.
CLEANING THE CLEANABLE STEAM CYLINDER
This method is intended for use with the cleanable cylinder only.
• Mark the edge of the cylinder halves so that they can be matched
up when reassembled (picture 5).
Remove the maintaining nuts and bolts, split the cylinder halves
and remove the gasket and the strainer that must be cleaned(pict
6).
• Scrap mineral deposits off the electrode plates and the shells (a
weak descaling solution can also be used) (pictures 7, 8 & 9).
• Rince the electrodes, the cylinder shells and the divider. It is
important that the strainer at the cylinder bottom be also cleaned.
Take care : never chock the shell rims to get rid of the deposits
5.
6.
7.
Relocate the strainer into the cylinder bottom. Replace the cylinder
gasket, and fit it inside the groove of the lower shell and attach the upper
shell with the electrodes .
When re-assembling, take care to align both shells. Refit the bolts and
nuts. Retigthen them gently (when the cylinder is still cold). Rinse the
drain valve ‘o’ ring and grease it or replace it if needed.
8.
Important
At this stage, the drain valve must be maintained.
NB : Refit the cylinder to the humidifier once the drain valve is
maintained.
9.
ELECTROVAP KIT MC
Maintenance - Valves
ENTRETIEN DE LA VANNE DE VIDANGE
The drain valve should be maintained whenever the
steam cylinder is maintained or changed.
Once the steam cylinder has been pulled out (please
refer to the « cleaning of the steam cylinder » page ),
disconnect the drain valve supply wires.
Unscrew the solenoid retaining nut and remove the
washer. Put them on the cylinder compartment tray.
Remove the coil from the valve stem.
Unscrew and remove the valve stem and the filling hose
from the valve body.
Important : Apply some soap on the O-ring and the
cylinder draining outlet
Remove the « O » ring and the drain valve collar.
Remove any pieces of calcius, rinse the steam and the
body with fresh water.
Assemble in reverse order.
It is now time to locate the new or cleaned steam cylinder in its compartment in
proceeding this way : set the maintaining clip on the steam cylinder outlet, engage the
drain outlet into the drain valve and push the cylinder downward. Reconnect the power
cables. Make sure that the power cable with the brown identification mark be connected
to the cylinder connection identified with a brown spot. If the brown spot is missing, the
cylinder electrode connection can be identified as the one closest to the high water level
probe. Locate the steam hose and fasten the clamp.
Ensure that all the clamps are properly tightened whenever the humidifier
is maintained.
ELECTROVAP KIT MC
Maintenance - Valves
INLET VALVE MAINTENANCE
The inlet valve should be maintained every 6
months as a minimum and after 50 hours operation.
1
Isolate the water supply and remove the water supply
hose from the valve.
Disconnect the electrical wires from the coil.
Untighten the collar clamp and remove the water feed
hose.
Unscrew the black nut 1 and lay it on the cylinder
compartment tray.
Take the valve out and remove the basket filter from the
base of the valve with a pair of long nose pliers. Pull the
coil out with a flat screw driver.
Wash the basket filter under clean water to remove any
dirt and debris.
Replace whole valve if cleaning is not practical or
replace coil if necessary.
Assemble in reverse order taking care to replace collar
clamp if necessary.
Ensure that everything is correctly assembled and switch the
humidifier on.
Ensure that all the clamps are properly tightened whenever
the humidifier is maintained.
ELECTROVAP KIT MC
Maintenance - Spare parts list
Rep
Code
Description
930058
930059
930060
Filling cup with hoses for KIT MC 5 to 15-2
Filling cup with hoses for KIT MC 20 to 30
Filling cup with hoses for KIT MC 40 to 60
2
930080
Cylinder retaining clip for KIT MC cylinder
3
930136
Overflow hose Ø18/22mm (per meter)
4
930136
Water feed hose Ø18/22mm (per meter)
5
930135
Water feed hose Ø12/16mm (per meter)
6
930189
Bag of 10 drain valve 0-rings
7
930153
930307
930220
930161
230V complete drain valve
Plastic drain valve body
Drain valve stem with 230V solenoid
230V solenoid
930150
930151
930160
Inlet valve KIT MC 5 to 15-2
Inlet valve KIT MC 20 to 60
230V inlet valve solenoid
9
930081
930082
930083
930301
930302
Hose clamp Ø12x22mm
Hose clamp Ø16x27mm
Hose clamp Ø20x32mm
Hose clamp Ø25x40mm
Hose clamp Ø40x60mm
10
930085
Power cable kit n° 1 (3 single cables with
sockets and boots)
Power cable kit n°2 (2 single cables + 1 split
cable with sockets and boots)
1
8
930086
11
930088
930089
High water level electrode cable for KIT MC 5 to
15-2
High water level electrode cable for KIT MC 20
to 60
1
2
3
5
6
4
7
9
8
10
11
ELECTROVAP KIT MC
Maintenance - Spare parts list
Rep
Code
Description
13
930190
Brass nut Ø 8mm
14
930301
Bag of 3 fibre washers
15+
18
930211
High water level electrode + nut Ø 4mm
930203
17
930223
Bag of bolts & nuts KIT MC 5 to 15-2
(cleanable cylinder )
Bag of bolts & nuts KIT MC 20 to 60
(cleanable cylinder)
930165
930158
Cylinder maintenance kit MC 5 to 15-2
Cylinder maintenace kit MC 20 to 90
20
930162
930166
Cylinder gasket KIT MC 5 to 15-2
Cylinder gasket KIT MC 20 to 60
21
930169
Electrode plate divider KIT MC 20 to 60
22
930168
930159
Cylinder strainer KIT MC 5 to 15-2
Cylinder strainer KIT MC 20 to 60
23
14
15
Cylinder upper half—Please consult factory
16
19
13
16
17
18
19
Cylinder lower half—please consult factory
20
21
22
23
ELECTROVAP KIT MC
Maintenance - Spare parts list
Rep
Code
Description
24
930010 Disposable cylinder KIT MC 5 to 15-2
930020 EA disposable KIT MC 5 to15-2
24
930028 Cleanable cylinder KIT MC 5 to 15-2
930037 EA cleanable cylinder KIT MC 5 to 15-2
24
Rep
Code
Description
25
930014 Disposable cylinder KIT MC 20 to 60
930023 EA disposable cyklinder KIT MC 20to 60
25
930032 Cleanable cylinder KIT MC 20 to 60
930040 EA cleanable cylinder KIT MC 20 to 60
25
Rue Feu St Eloi
76550 Ambrumesnil - France
LR 94104-2
Export division: tel. +33 (0)2 35 83 06 44 ou +33 (0)2 35 83 03 86
fax. +33 (0)2 35 85 36 72
Email: [email protected] - www.devatec.com
devatec reserves the right to change specifications or design of the equipments described in this borchure
without prior notice.
Kit MC Rev 4 - 29.06.11 edition