1
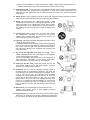
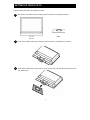
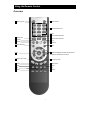
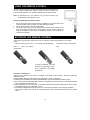
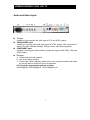
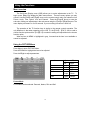
19” Widescreen LCD Television TLA-01901C Questions? Need some help? This manual should help you understand your new product. If you have questions, call our toll-free number found on the insert with this icon: Or visit www.polaroid.com. Table of Contents Important Safety Instructions------------------------------------------------------------2 FCC Warning-----------------------------------------------------------------------------------5 Package Contents----------------------------------------------------------------------------5 Setting Up Your LCD TV--------------------------------------------------------------------6 Using the Remote Control-----------------------------------------------------------------7 Understanding Your LCD TV--------------------------------------------------------------8 Product Features-----------------------------------------------------------------------------11 Product Notes---------------------------------------------------------------------------------12 Other TV Functions--------------------------------------------------------------------------12 Using the Functions-------------------------------------------------------------------------13 Troubleshooting------------------------------------------------------------------------------21 Specifications---------------------------------------------------------------------------------22 1 IMPORTANT SAFETY INSTRUCTIONS Electrical energy can perform many useful functions, but it can also cause personal injuries and property damage if improperly handled. This product has been engineered and manufactured with the highest priority on safety. But IMPROPER USE CAN RESULT IN POTENTIAL ELECTRICAL SHOCK OR FIRE HAZARD. In order to prevent potential danger, please observe the following instructions when installing, operating and cleaning the product. To ensure your safety and prolong the service life of your LCD TV product, please read the following precautions carefully before using the product. 1. Read these instructions---All operating instructions must be read and understood before the product is operated. 2. Keep these instructions---These safety and operating instructions must be kept in a safe place for future reference. 3. Heed all warnings--- All warnings on the product and in the instructions must be observed closely. 4. Follow all instructions---All operating instructions must be followed. 5. Attachments---Only use attachments/accessories specified by the manufacturer. Do not use attachments not recommended by the manufacturer. Use of improper attachments can result in accidents. 6. Power source---This product is intended to be supplied by a listed power supply indicated on the marking label. If you are not sure of the type of power supply to your home, consult your product dealer or local power company. For added protection for this product during a lightning storm, or when it is left unattended and unused for long periods of time, unplug it from the wall outlet and disconnect the cable system. 7. Power cord protection ---Protect the power cord from being walked on or pinched particularly at plugs, convenience receptacles, and the point where they exit from the apparatus. 8. Overloading---Do not overload wall outlets, extension cords, or convenience receptacles on other equipment as this can result in a risk of fire or electric shock. 9. Entering of objects and liquids---Never insert an object into the product through vents or openings. High voltage flows in the product, and inserting an object can cause electric shock and/or short internal parts. For the same reason, do not spill water or liquid on the product. 10. Servicing---Refer all servicing to qualified service personnel. Servicing is required when the apparatus has been damaged in any way, such as power-supply cord or plug is damaged, liquid has been spilled or objects have fallen into the apparatus, the apparatus has been exposed to rain or moisture, does not operate normally, or has been dropped. 11. Damage requiring service---If any of the following conditions occurs, unplug the power cord from the AC outlet, and request a qualified service person to perform repairs. a. When the power cord or plug is damaged. b. When a liquid is spilled on the product or when objects have fallen into the product. c. When the product has been exposed to rain or water. d. When the product does not operate properly as described in the operating instructions. Do not touch the controls other than those described in the operating instructions. Improper adjustment of controls not described in the instructions can cause damage, which often requires extensive adjustment work by a qualified technician. e. If the product has been dropped or the cabinet has been damaged in any way. 2 f. When the product displays an abnormal condition or exhibits a distinct change in performance. Any noticeable abnormality in the product indicates that the product needs servicing. 12. Replacement parts---In case the product needs replacement parts, make sure that the service person uses replacement parts specified by the manufacturer, or those with the same characteristics and performance as the original parts. Use of unauthorized parts can result in fire, electric shock and/or other danger. 13. Safety checks---Upon completion of service or repair work, request the service technician to perform safety checks to ensure that the product is in proper operating condition. I 14. Stand---Use only with the cart, stand, tripod, bracket, or table specified by the manufacturer, or sold with the apparatus. Do not place the product on an unstable trolley, stand, tripod or table. Placing the product on an unstable base can cause the product to fall, resulting in serious personal injuries as well as damage to the product. 15. Careful move---When a cart is used, use caution when moving the cart/apparatus combination to avoid injury from tip-over. Sudden stops, excessive force and uneven floor surfaces can cause the product to fall from the trolley. 16. Lightning---Unplug this apparatus during lightning storms or when unused for long periods of time. For added protection for this television equipment during a lightning storm, or when it is left unattended and unused for long periods of time, unplug it from the wall outlet and disconnect the antenna. This will prevent damage to the equipment due to lightning and power-line surges. 17. Do not use this apparatus near water---for example, near a bathtub, washbowl, kitchen sink, or laundry tub, in a wet basement, or near a swimming pool, and the like. Do not use immediately after moving from a low temperature to high temperature environment, as this causes condensation, which may result in fire, electric shock, or other hazards. 18. Clean only with dry cloth---Unplug this product from the wall outlet before cleaning. Do not use liquid cleaners or aerosol cleaners. Use a damp cloth for cleaning. 19. Ventilation---Do not block any ventilation openings. Install in accordance with the manufacturer instructions. The vents and other openings in the cabinet are designed for ventilation. Do not cover or block these vents and openings since insufficient ventilation can cause overheating and/or shorten the life of the product. Do not place the product on a bed, sofa, rug or other similar surface, since they can block ventilation openings. This product is not designed for built-in installation; do not place the product in an enclosed place such as a bookcase or rack, unless proper ventilation is provided or the manufacturer’s instructions are followed. 20. Heat sources---Do not install near any heat sources such as radiators, heat registers, stoves, or other apparatus (including amplifiers) that produce heat. 21. Panel protection---The LCD panel used in this product is made of glass. Therefore, it can break when the product is dropped or impacted upon by other objects. Be careful not to be injured by broken glass pieces in 3 case the LCD panel breaks. 22. Pixel defect---The LCD panel is a very high technology product, giving you finely detailed pictures. Occasionally, a few non-active pixels may appear on the screen as a fixed point of blue, green or red. Please note that this does not affect the performance of your product. 23. Mains plug---Mains plug / Appliance coupler is used as disconnect device and it should remain readily operable. 24. Grounding plug---Don’t defeat the safety purpose of grounding-type plug. A grounding-type plug has two blades and a third grounding prong. The third prong is provided for your safety. If the provided plug does not fit into your outlet, consult an electrician for replacement of the obsolete outlet. WARNING To reduce the risk of fire or electric shock, do not expose this product to rain or moisture. The apparatus shall not be exposed to dripping or splashing and that no objects filled with liquids, such as vases, shall be placed on the apparatus. Caution: To reduce the risk of electric shock, do not remove cover (or back). No CAUTION user serviceable parts inside. Refer RISK OF ELECTRIC SHOCK. servicing to qualified service personnel. DO NOT OPEN. This symbol indicates "dangerous voltage" inside the product that presents a risk of electric shock or personal injury. This symbol indicates important instructions accompanying the product. Caution: To prevent electric shock, match wide blade of plug to wide slot, fully insert. Refer to the identification/rating label located on the back panel of your product for its proper operating voltage 4 FCC Warning Class B Computing Device Information to User This equipment has been tested and found to comply with the limits for a Class B Digital Device pursuant to part 15 of FCC Rules. These limits are designed to provide reasonable protection against harmful interference in a residential installation. This equipment generates, uses, and can radiate radio frequency energy and, if not installed and used in accordance with the instructions, may cause harmful interference to radio communications. However, there is no guarantee that interference will not occur in a particular installation. If this equipment does cause harmful interference to radio or TV reception, which can be determined by turning the equipment off and on, the user is encouraged to try to correct the interference by one or more of the following measures: 1) Reorient or relocate the receiving antenna. 2) Increase the separation between the equipment and unit. 3) Connect the equipment into an outlet on a circuit different from that to which the unit is connected. 4) Consult the dealer or an experienced radio/TV technician for help and for additional suggestions. The user may find the following booklet prepared by the Federal Communications Commission helpful: “How to Identify and Resolve Radio - TV Interference Problems". This booklet is available from the US Government Printing Office, Washington, D.C. 20402, and Stock No. 004-000-00345-4. FCC Warning The user is cautioned that changes or modifications not expressly approved by the manufacturer could void the user's authority to operate the equipment. NOTE: In order for an installation of the product to maintain compliance with the limits for a Class B Device, shielded cables must be used. Manufacture under license from Dolby Laboratories. "Dolby" and the double-D symbol are trademarks of Dolby Laboratories. PACKAGE CONTENTS LCD TV User manual Quick start guide Remote control Remote control guide AC power cord Audio cord Video cord Component cable AAA batteries Warranty Card 1 1 1 1 1 1 5 1 1 1 2 1 SETTING UP YOUR LCD TV Follow the instructions below to install the TV stand: 1 Open the box, and make sure all necessary parts are in the box: The package contains: Stand LCD TV 2 Cover a level, stable surface with a soft cloth. Place the LCD TV unit facedown on the cloth. 3 Fit the stand onto the bottom of the LCD TV unit as shown. Then push until stand clicks into the LCD TV's stand socket. 6 Using the Remote Control Overview 1 Power On/Off 19 signal sources 2 Channel Number, Dot 9 Last 16 Picture Mode Selection 15 Display ratio 17 Sound Mode Selection 8 Favorite 21 List 12 Guide 10 Antenna 14 Menu Selection 22 Exit 5 Up/Down/Left/Right: To select an adjustment 6 OK or adjust the selected item in menus 3 Channel Up/ Down 4 Volume Up/ Down 7 Display 20 Sleep Timer 13 Mute 23 MTS 11 CC 24 PC 25 LOCK 18 HDMI 7 Remote Button Descriptions 1【 】POWER ON/OFF Press to turn on or off the TV. 2 0-9, Dot Press 【0-9】to select the channel; the channel will change after 2 seconds; Press【Enter】 to change channels immediately. In DTV mode, press【0-9】and dot key to select channel. For example: to get channel 9.1, press 9, then the dot key, and then 1. 3 CH+/Press to change the channel. 4 VOL+/Press to adjust the volume. 5 Up/Down/ Left/Right Press to adjust the menu operation. 6 OK Press to select or confirm sub menu of the OSD. 7 DISPLAY Press to show info of current program (in dual window mode, characters in red display the sub-picture information). 8 Favorite Press to list and select the favorite channel. In analog NTSC mode, edit the favorite channel in channel label menu, then select the favorite menu. In DTV mode, the list key can list the all channels and favorite channels. Select the channel you want. 9 LAST Press to switch between the last viewed and current channel. 10 ANT Press to select the air or cable. 11 CC Press to switch the CC (closed captioning) mode: On, CC on mute (when you mute the audio), Off. 12 GUIDE Press to view the Electronic Programming Guide (EPG) information in a digital program. 8 13 MUTE Press to mute sound or cancel mute (Mute will turn on when there is no signal). 14 MENU Press to go to the On Screen Display (OSD) menus or exit the menu operation. 15 ZOOM Press to adjust aspect ratio among Full-Screen, Zoom and Normal. 16 PICTURE The list key can select your desired picture settings: Personal, Nature, Rich, and Soft. 17 SOUND Press to select your desired sound settings: Personal, Standard, Music, and Movie. 18 HDMI Press to select HDMI as your input. 19 INPUT Press to select from the different signal sources available. 20 SLEEP Press to select the length of time that you want to keep the TV turned on. Once the time has elapsed, the TV will shut off. 21 LIST Press to display all the channel numbers and labels. 22 EXIT Press to exit the menu operation. 23 MTS In NTSC mode, press to select MTS (Multi-Channel Sound) or BTSC (Broadcast Television System Committee). In DTV mode, press to select Audio Language. 24 PC Press to select PC as your input. 25 LOCK Press to enter into LOCK menu. 9 2jk424hukjiokmImportant Safety Instructions USING THE REMOTE CONTROL ● Use the remote control by pointing it towards the remote sensor window of the set. Objects between the remote control and sensor window may prevent proper operation. See “Cautions regarding use of remote control”. Note: the illustration is for your reference only, the remote sensor may locate differently with different model. Cautions regarding use of remote control • • • Do not expose the remote control to shock. In addition, do not expose the remote control to liquids, and do not place in an area with high humidity. Do not use the remote control in direct sunlight. The remote control may not work properly if the remote sensor window of the main unit is under direct sunlight or strong lighting. In such a case, change the angle of the lighting or LCD TV set, or operate the remote control closer to the remote sensor window. BATTERIES FOR REMOTE CONTROL If the remote control fails to operate the LCD TV functions, replace the batteries in the remote control. 3. Slide the cover up until it clicks 1. Slide the remote control cover 2. Insert two AAA-size batteries. down to open the shut. battery compartment. ● Insert the batteries with their terminals corresponding to the (+) and (-) indications in the battery compartment. Precaution on battery use Improper use of batteries can result in a leakage of chemicals and/or explosion. Be sure to follow the instructions below. ● Place batteries with their terminals corresponding to the (+) and (–) indications. ● Different types of batteries have different characteristics. Do not mix batteries of different types. ● Do not mix old and new batteries. Mixing old and new batteries can shorten the life of new batteries and/or cause old batteries to leak chemicals. ● Remove batteries as soon as they are non-operable. Chemicals that leak from batteries can cause a rash. If chemical leakage is found, wipe with a cloth. ● The batteries supplied with the product may have a shorter life expectancy due to storage conditions. If the remote control is not used for an extended period of time, remove the batteries from the remote control. 10 UNDERSTANDING YOUR LCD TV Audio and Video Inputs TV input Capable of receiving audio and video signal in ATSC and NTSC systems. VIDEO/SVIDEO input Capable of receiving audio and video signal in NTSC system; Very convenient to watch VCR (video cassette recorder), Pickup Camera, other Disc’s programs. COMPONENT input Capable of receiving the high definition component signal in 480i, 480p, 720p and 1080i formats. PC input a. Connect with the host computer. b. Use as the display terminal. c. Connect the 3.5mm (diameter) audio cord to your computer’s audio main board so you can listen to music from your host computer. In PC mode the supported formats are as follow: 640×480@60Hz, 800×600@60Hz, 1024×768@60Hz, etc. 11 Product Features: BUILT-IN HD Tuner: Receive the ATSC Signal, without additional ATSC receiver. HDMI: Capable of receiving the high definition digital signal in 480p, 720p, 1080i, etc; HDTV Monitor: Enables you to receive the 1080i, 720p, 480p and 480i digital TV formats. By using the component IN jacks, you can connect a set-top box or DVD to enjoy the improved audio/video quality offered by these programs. EPG Display: Show information of the electronic program guide. Dolby AC-3 decoder V-Chip Function V-Chip technology allows parents to block unsuitable programming for younger viewers. CCD Function Allow you to select from the closed caption mode (for programs that are broadcast with closed caption). MTS Sound System Enjoy stereo, bilingual and mono programs. Timer function Automatically shuts off at certain preset time, and enters into the standby mode. Auto Off if no signal input In TV mode, the LCD TV will automatically power off within 15 minutes and enters into Standby Mode if there is no signal input. Multi-Language On-Screen Display menu Graphical user interface makes the menu operation more user-friendly. Product Notes: 1. The outdoor antenna should be properly installed according to its installation guide. 2. The antenna cable should not be tied to the power cord. 3. Please keep the packaging for future use when moving to a new location. 4. Connect the audio and video cables to the corresponding audio and video ports on the TV and the external device. 5. If you want going back to the TV mode in AV mode, please press the digit button to view the corresponding channel. 6. When connecting PC or HDMI cable, make sure to connect to the proper connector. Do not force the cable into the wrong input because this may cause damage to the cable or input. When using a PC (VGA) cable, use the screws from the cable to securely attach to the connector. Slowly tighten in a clockwise direction. Do not over-tighten. 7. Some remote control button functions may not be available. 12 Other TV Functions Auto off without signal The TV will automatically switch off and enter into Standby mode after 15 minutes if there is no signal (in case there is no program signal transmitted from the TV station or no commands from the remote control). Caution: The TV will be shut off automatically when the power goes out. Unplug the power cord from the AC outlet. The last TV mode will appear when power resumes. Unplug the power cord from the AC outlet when the power is shuts off. Sleep Press 【SLEEP】to enable the Sleep Timer function. The TV will set the period of time to shut off the TV and shut into the Standby mode. ※ When activating the Sleep Timer Off function, press【SLEEP】to view the set sleep, press again to reset the sleep timer off . The screen will display a prompt when entering into the SLEEP mode one minute before shutting down. 13 Using the Functions Menu overview The On-Screen Display menu (OSD) allows you to make adjustments to the TV. To begin, press【Menu】to display the Main menu screen. There are many options you may choose. Use the【Left】and【Right】arrow on the remote control make your selection from Picture, Audio, Time, Option, Lock and Channel. Press the【Down】arrow to enter the sub-menu. Make your adjustments in the sub-menus using the 【Left】or【Right】arrows. The menu display will remain on for 30 seconds. If you so nothing in that time it shuts off. The operation of the TV function keys is similar to the remote controls operation. The only difference is that when operating on the LCD TV, the【CH+】/【CH-】 will be used to choose function option and the 【V+】 【V-】 / to make the setting and adjustment to the chosen function option. When an item in MENU is highlighted in gray, it means that the item is not available or cannot be adjusted. Using the PICTURE Menu Press Menu to enter PICTURE Menu. Press UP/DOWN to highlight the item to be adjusted. Press Left/Right to adjust parameters. Item Contrast Brightness Sharpness Tint Color Picture Mode Four modes can be selected: Personal, Nature, Rich and Soft. 14 Adjustment Effect Left Right Lower Higher Darker Brighter Lower Higher More More Purple Green Lighter Deeper Using the AUDIO Menu Select the AUDIO menu and adjust the selected field. Analog TV signal Digital TV signal Sound Mode Select the desired sound mode from the following: Personal, Standard, Music and Movie. Bass Adjust the bass. Treble Adjust the treble. Balance Adjust the balance between the left and right speakers. MTS Select the desired mode of MTS. (Only for analog TV signal) Audio Language Select the desired audio language. (Only for digital TV signal) Audio Channel Select the desired mode of audio input. (Function not available on all TVs) Using the TIME Menu Select the TIME menu and make adjustments to the sub-menus. 15 Sleep Timer Set up the TV to enter Standby mode for your desired length of time (the length from the current set time to be in Standby mode). This can be set using the remote control with the 【SLEEP】button. Time Zone Choose from six time zones. Daylight Saving Time Use the【Left】/【Right】buttons to turn the daylight saving time on or off. Clock Display the time information. The digital signal will provide this information and be displayed when you press the【Display】button on the remote control. Using the OPTION Menu Press【MENU】and【Left】/【Right】to enter the OPTION Menu. Menu Language There are three languages available on the on-screen display (OSD). Transparency Use the【Left】/【Right】buttons to alter the transparency of the OSD. Color Temp There are three colors temperature options for the screen: normal, warm and cool. Selecting warm makes the TV display in a reddish tint. Selecting cool makes the TV display in a bluish tint. Zoom Mode 16 Select the desired screen size (aspect ratio) mode: Full-Screen, Zoom and Normal. In PC or HDMI modes, only Full-Screen and Normal modes are available. Blue Back Press【Left】/【Right】buttons to turn the blue background function on or off when there is no input signal. When the background is “Off”, the screen is black; when it is “On”, it is blue. PC Set Up Setup for PC mode. Closed Caption You can switch between CC display modes; Off, On when muted, or On. To select the preferences and press【Right】/【Down】to enter the edit mode: Restore Default All settings can be reset to the default settings. NOTE: When you “Restore Defaults”, you will lose all scanned channels for both air and cable TV input settings. You will need to perform a channel scan again. 17 Using the LOCK Menu You may prevent children from watching programs not suitable for them, such as sexual or violent programs. Press MENU and【Right】/【Down】to enter the LOCK Menu. A four digit password is required. The factory default password is “0000”. The old password is invalid when password is modified. If you forget your password, see “Lost password” on Troubleshooting. The next menu will display after you enter correct password. Change Password In LOCK mode, press【Right】to see the password submenu. Press the number button to enter the password. The default password is “0000”. Press the number button on the remote control to set the new password. When completed, a prompt of successful change appears, the TV will go back to previous menu. ※ After a password update has been confirmed, please remember it. When selecting the LOCK menu, each function can not be activated until the correct password is entered. If it is forgotten, the master password of “0760” is still valid. System Lock (ON/OFF) When System Lock is set to OFF, no channels are blocked from viewing. 18 Unrated Lock (ON/OFF) When Unrated Lock is set to ON, selected channels are blocked from viewing. US Press【Right】to enter the edit mode. TV Ratings TV-Y: All children TV-Y7: Directed to older children TG-G: General Audience TV-PG: Parental Guidance Suggested TV-14: Parents Strongly Cautioned TV-MA: Mature Audience only Fv: Fantasy Violence D: Suggestive Dialogue L: Strong Language S: Sexual situation V: Violence MPAA N/A: None G: All children and General Audience(General Audience) PG: Parental Guidance Suggested PG-13: Parental Guidance for children under 13 R: Restricted viewing, Parental guidance is suggested for children under 17 NC-17 and X: No one 17 and under allowed Canada Press【Right】to enter the edit mode. 19 Reset RRT Clear all rating settings. Using the CHANNEL Menu Press【MENU】, then use【Left】/【Right】buttons to select the CHANNEL menu in TV mode. Analog TV signal Digital TV signal Antenna Switch the TV input mode between cable and air. Auto Scan Select the Auto Scan and press【Right】to search the NTSC and ATSC TV channels automatically. During the search, the channels are stored. When antenna set to AIR, select Start to Scan, when the search is finished, the TV will automatically return to the first channel found. When antenna is set to CABLE, there are four cable selections for the OSD. Select one mode and Start to Scan. Channel Show/Hide 1. Press the 【Menu】 button. Using the 【Left】or 【Right】arrows select CHANNEL. Press the 【Down】arrow to highlight CHANNEL SHOW/HIDE and press the【Right】arrow. 20 2. Use the【Up】, 【Down】or【Left】arrows to scroll to the channel you wish to hide. When you come to the channel you wish to hide, press the 【OK】button to remove the check mark. This channel will no longer be available for viewing. If you want to see this channel again you enter the channel number by using the numeric keypad or follow above steps to SHOW the channel. Favorite List all your favorite channels. Press【Enter】to select or cancel it. Channel No. Select the desired item to adjust, press【Left】/【Right】 to adjust the channel. Channel Label 1. Select the Channel Label to edit channels individually. 2. Select the desired channel number then press【Right】to enter the edit mode. 3. Select the input character with 【Up】/【Down】buttons. Select the desired character then press the【Left】/【Right】buttons to edit the next character. Continue until all editing has been completed. 4. Press【MENU】to exit. DTV Signal Indicates the digital signal quality. (Only for digital TV signal) 21 TROUBLESHOOTING Before calling customer service or a qualified technician, please check the following items to see if the symptoms below can be identified and fixed. Symptoms Possible Reasons No picture, no sound, & no indicator light on 1. The power cord is not plugged in 2. The power is off No picture, no sound, but the blue light indicator is on 1. Contrast, sharpness, color and volume are all at the minimum value or TV is in mute mode 2. PC has no signal in PC mode 3. The signal cord is not correctly connected Correction 1. Plug the power cord in 2. Turn the power on 1. Alter the value of contrast, sharpness, color and volume 2. Press any button or input PC signal 3. Connect the signal cord correctly 4. Reset factory default settings 1. 1. Poor picture & sound Picture is spotted or with snowy Blue background in AV mode Picture is unclear, or moves or have black stripes on horizontal position in PC mode Contrast, sharpness, and color are set improperly 2. Color system is set improperly 3. Sound system is set improperly Signal source is low-grade or the signal cord is in a lower quality 1. No Video signal or the signal cord is improperly/ not connected 2. Video signal cord and S-video cord are plugged in at the same time Picture is not well adjusted PC Picture is not in the middle of the screen No sound No Audio signal or the signal cord is improperly/not connected The remote control does not work Batteries are improperly installed or exhausted Colors of PC Picture on display are abnormal The user made the wrong Color Temp adjustment Forgot the parent password The master password is 0760 22 Adjust the value of Contrast, sharpness, and color 2. Set the Color system to the country broadcasting standard 3. Set the Sound system to the country broadcasting standard Use the qualified signal cord 1. 2. Connect the signal cord properly unplug one cord Adjust automatically by selecting Auto Adjust or adjust Clock, Phase, H Position, V Position manually after entering into the PC Setting menu to solve this problem 1. Connect the audio signal cord properly 2. Set the sound system properly 1. Make sure the positive and the negative polarities are correct. 2. Check if there is a loose contact between the batteries and the springs 3. Replace the batteries Readjust the Color Temperature Specifications TFT-LCD Resolution 1440 x 900 TFT-LCD Screen Size 19 inches Power AC100~240V 50/60Hz Power Consumption < 60W Dimension 15.94 × 18.11 × 6.30 inches (HxWxD) Weight About 11 lbs. DESIGN AND SPECIFICATIONS ARE SUBJECT TO CHANGE WITHOUT NOTICE "Polaroid" and “Polaroid and Pixel” are trademarks of Polaroid Corporation. For service, support and warranty information, visit www.polaroid.com. 23 Questions? Need some help? This manual should help you understand your new product. If you have questions, call our toll-free number found on the insert with this icon: Or visit www.polaroid.com. 20071120 24 20070724