1
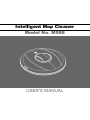
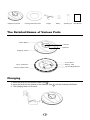
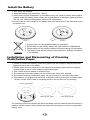
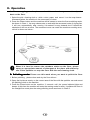
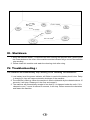
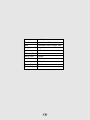
Intelligent Mop Cleaner
Model No. M988
USER'S MANUAL
Please follow the rules carefully in order to prevent any harm to you and your
property. The following signs mean:
Warning
Breaking the rules may lead to serious physical injury.
Notice
Breaking the rules may lead to slight harm or product
destruction.
Warning
Except the maintenance technical
expert, nobody is allowed to
disassemble, maintain or chang
this product.
Only the adapter provided by us
can be used, otherwise, it may
lead to product destruction, electric shock or fires.
Don’t touch the wire when your
hands are wet, otherwise, it may
lead to electric shock.
Don’t bend the wire strongly or put
the heavy things on it, otherwise,
it may destructlon to the wlre or
electlc shock or fires.
Notice
To check if the adapter is connected correctly with the socket,
otherwise, it may cause fires.
The DC jack should be fixed firmly,
otherwise, it may lead to short
circuit, smoke or fires.
Children are not allowed to use the
product.
Don’t sit or stand on the machine.
Don’t use the machine in public.
Don’t use the machine on the desk
or chair.
The machine is not for outdoor use.
Intelligent mop cleaner
Cleaning Cloth/Cotton Paper
Charger
Battery
Sprinkling Can User’s Manual
The Detailed Names of Various Parts
Power Button
Handle
Indicator
Charging Socket
Front Wheel
Nylon Fasteners
Moping support Plate
Battery case
Left and Right Wheels
Charging
1. Insert the plug into the power socket (see
).
2. Insert the plug into the socket of the machine (see
3. The charging time is 6~8 hours.
) and the indicator will flicker.
Install the Battery
1. Shut down the machine
2. Open the battery door (see Chart 1 and 2).
3. Insert three original AA batteries in accordance with the positive polarity and negative
polarity inside the battery holder. Where the original battery is damaged, please purchase
the AA 1.2V 1000mA rechargeable batteries for replacement.
4. At last insert the two clamps on the battery door into the recess of the robot and mount
the battery doo
Chart 1
1.
2.
3.
4.
Chart 2
Charging the non-rechargeable battery is prohibited.
Please take out the battery without fail if the machine is abandoned.
Please power off the machine without fail before taking out the battery.
The battery must be recovered for safe treatment. Improper discarding
is not allowed.
Installation and Dismounting of Cleaning
Cloth/Cotton Paper
1. Please put down the cleaning cloth/cotton paper with the mopping support plate after
alignment (as shown in the chart).
2. Please press the nylon fastener on the cleaning cloth/cotton paper with the mopping
support plate so as to fix the cleaning cloth/cotton paper.
3. Tear it down with two hands on dismounting it.
4. The cleaning cloth/cotton paper can be reused many times after washed.
5. The washed cleaning cloth/cotton paper can be mounted for use after being dried.
6. This machine is equipped with two kinds of cleaning cloth and one kind of cotton paper.
The two thicker one is used for mopping the floor and the thin one for polishing
Polish cloth(yellow)
cleaning cloth (pink)
cotton paper(white)
The indicator of the mop cleaner will flicker and beep once two seconds after the battery is
installed, which means it has finished self-inspection and begins to enter the operationwaiting state.
II. Operation
A. Floor-mopping mode: please select this mode when you want to wipe the
dust on the floor.
1. Select the pink cleaning cloth or white cotton paper and mount it on the mop cleaner.
Afterwards place the machine in the area ready to clean.
2. Press the Power button and the machine will be started to enter the floor-scrubbing mode.
As shown in Chart 1, the mop cleaner star to work with the movement route of zigzag line,
it will turn automatically after running 2-4 meters if no any obstacle; but if it meets the
obstacles it will turn at once. The movement route can reach the maximum working area,
which is shown as below :
h
ng wit
Meeti s ta c le s
b
o
e
th
0. 4- 0. 6 m
et er s
0.
40.
6
m
et
er
s
When it is hard to remove the stubborn stains on the floor, please
spray an appropriate amount of detergent at the place with stains by
use of the sprinkler or mop the floor with the wet cleaning cloth.
B. Polishing mode: Please use this mode when you want to polish the floor.
1. Before polishing , please clean and dry the floor without .
2. Spray the liquid wax evenly on the correct area of the floor with the sprinkler can and mount
the polishing cloth on the machine.
3. Press the Power button on the machine 3 seconds until the power indicator lights and
beeps. At this time the machine will enter the waxing mode for work. It polishes the floor in
the straight-line mode plus the rotary-polishing mode as shown in Chart 2.
with
Meeting c le s
ta
th e o b s
0. 4- 0. 6 m
et er s
0. 4- 0. 6 m
et er s
0.3
4
-0.
me
ter
s
er s
0. 4- 0. 6 m et
III. Shutdown
1. When the machine doesn¡¯t continue work after finishing the specified work, please press
the Power button on the cover of the machine and the indicator will go out and the machine
stop working.
2. Please clean this machine and wash the cleaning cloth after using.
IV. Troubleshooting :
The machine will automatically stop working in the following circumstances:
1. Low battery level: the power indicator will flicker to remind the battery level is low. Delay
in charging in time will cause automatic shutdown of the machine.
2. The machine is lifted up: When the machine is lifted or laid aside by the obstacle above 15
seconds, it will stop. Please put it the floor and restart it.
3. The machine will automatically recede to free itself if it is clamped under the sofa. If it is
clamped or can¡¯t move for above15 seconds, it will stop. Please remove the obstacles
and restart the machine.
Model
M-988
Color
Red/White/Black
Size
Diameter: 29cm; Height: 6cm
Weight
1kg
Speed
17cm/Sec.
Charging Time
6-8h
Using Time
60min
Noise Level
58dB
Input
5V=400mA
Rated Power
5W
Place of Origin
China


![取扱説明書 〝 連結用 LEDエコスリム [昼光色] 保管用](http://vs1.manualzilla.com/store/data/006636441_2-69cb1c61bbc35eb1f070891927a291d3-150x150.png)