1
GamSat
Adobe Photoshop* Mac Plug-In
User's Manual
Release 1.02
November, 2007
David Dunthorn
www.c-f-systems.com
Fast Track
First, install the correct GamSat.plugin file in the Photoshop filters folder (for more detail
see Installation). GamSat is intended for use with unaltered images and is generally
much less effective on an image that has already been "corrected" in Photoshop.
We recommend using our ColorPos or ColorNeg plug-ins to get a good starting image
that has color integrity before using GamSat. Images from those sources will already be
in 16-Bit/Channel RGB color format, which GamSat requires. If you start with an 8Bit/Channel image, it will have to be converted (Image Mode 16-Bits/Channel)
before GamSat can be used (more about the best way to do that below). Then start the
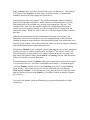
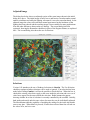
C F Systems Filter GamSat (for more detail see Using GamSat). You should see
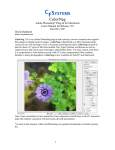
something similar to the large dialog box shown above.
At this point you can try the controls. The scrollbar individually adjusts saturation,
gamma, hue, highlight, and shadow. Which control the scrollbar adjusts is set by the
radio buttons above the scrollbar or by clicking in the appropriate value box. The
checkbox above each value box controls whether the corresponding adjustment is
actually used, so its primary function is to allow seeing the preview image with and
without the change. When you check a value on, it will also change scrollbar control to
that value.
Although these adjustments all represent departures from true color integrity, the
adjustments will be made while preserving color integrity insofar as that is possible,
resulting in enhanced images that have a more natural look than if the adjustments were
done by typical methods. For an idea of what this means, see how the image has changed
with the adjustments shown in the dialog box below.
The action of GamSat is slow compared with our other plug-ins, but we have managed to
speed up version 1.02 to that it typically takes less than 1/5th the time of version 1.00.
You still may have to wait a little to see a change reflected in the preview image, and
large image files still take longer than ColorPos or ColorNeg to do the final conversion
when you click OK to return to Photoshop.
The demonstration version of GamSat, which can be converted to a paid version, expires
in 30 days after first use. (See below and ReadMe.txt for details.) To obtain the paid
version of GamSat, purchase a key for the ColorNeg group for PC or the ColorNeg
group for Mac. The key that you receive will also work with two other plug-ins,
ColorNeg and ColorPos. If you already have a key purchased for use with any of those
plug-ins, that key will work with GamSat. PC and Mac versions do require a separate
key, however.
*As used in this manual, Adobe and Photoshop are registered trademarks of Adobe
Systems, Inc.
Introduction
C F Systems GamSat is a Photoshop filter plug-in that is intended to operate on positive
images output from our ColorNeg and ColorPos plug-ins. It is used to make
adjustments to the saturation, gamma, hue, highlight, and/or shadow of a color image to
enhance its appearance without unnecessarily damaging its color integrity. The
importance of color integrity and how it is easily lost while doing commonly
recommended Photoshop adjustments is explained in
http://www.c-f-systems.com/ColorIntegrity.html
and in mathematical terms in Color Integrity CFS-243 available at
http://www.c-f-systems.com/PhotoMathDocs.html.
These adjustments are typically done incorrectly in Photoshop.
Version 1.02 of GamSat is available for both PC and Mac.
Legal Notice
This software is provided "as is" without any warranty or condition, whether expressed,
implied or statutory. In no event will C F Systems be liable for any lost profits or other
consequential, incidental or special damages (however arising, including negligence) in
connection with the GamSat software even if C F Systems has been advised of the
possibility of such damages. In no event will C F Systems' liability in connection with
the GamSat software regardless of the form of action, exceed the purchase price of the
software, if any. C F Systems retains all right, title, and interest in and to the GamSat
software. This software and manual are Copyright © 2004-2007 by C F Systems. All
rights reserved. You may make copies of this software for personal use or for use within
your own single business location, not to exceed three (3) copies total. You are
prohibited from making copies for distribution in any other form.
Installation
We have not provided an installation program, but have taken the same approach as
Adobe has in distributing "RAW" conversion plug-in revisions. You have downloaded a
zip archive file. Put the zip file on your desktop and double-click to expand it as a folder
with the same name. This folder will contain this PDF manual, addendum manual (if
any), a ReadMe.txt file, GamSatKey.txt, and the plug-ins, GamSat.plugin XXX.zip. All that
really has to happen is the correct GamSat.plugin file needs to be placed in the Photoshop
filters folder. Locate the proper plug-in file archive for your Mac/Photoshop
combination:
Photoshop 7, CS, or CS2: GamSat.plugin CW.zip
Photoshop CS2 or CS3 PowerPC: GamSat.plugin XC PPC.zip
Photoshop CS3 (and higher), PowerPC or Intel: GamSat.plugin XC UNI.zip
Note that with some Mac/Photoshop combinations you have a choice.
Put the proper GamSat plugin archive (zip) file in the Photoshop filters folder, which
typically can be found by bringing up Applications in Finder, double-clicking Adobe
Photoshop x (where "Photoshop x" specifies the version of Photoshop), then doubleclicking Plug-Ins and finally double-clicking Filters. Once the GamSat.plugin archive (zip)
file has been placed in the Filters folder, double-click it to extract the GamSat.plugin. At
this point you may remove the archive file (zip). Photoshop will automatically configure
for GamSat the next time it is started. If your installation is not the default, you probably
already know how to find the corresponding filters folder on your system. This
completes installation. The Registration section describes the possible use of the
GamSatKey.txt file.
Using GamSat
GamSat is intended to operate on positive images output from our ColorNeg and
ColorPos plug-ins. The output from those plug-ins is already in the correct form. When
not using those plug-ins, the requirement is that the working file must be in 16Bits/Channel RGB mode (scanners which scan at 12-Bits/Channel and produce a 16Bits/Channel file are fine). Most scanners deliver positive scans as "gamma-corrected"
images by default. GamSat is intended to operate on gamma-corrected images. This
correction gamma ("Gamma C") is nearly always 2.20. If this is not the case, you will be
aware of it and you should set Gamma C in GamSat appropriately. Most users should
studiously avoid changing Gamma C.
If the image cannot be obtained in 16-Bits/Channel mode, it is permissible to convert an
8-Bit/Channel image to 16-Bits/Channel using Image Mode 16-Bits/Channel. If you
must convert an 8-bit image, there are several rules which will lead to better results if
they are followed. If you plan to use Image Image Size to increase the number of
pixels in the image, do so after converting to 16 Bits/Channel and before using GamSat.
Also, if you plan to use sharpening filter treatments and you do not plan to increase the
pixel count, do some or all of the sharpening after converting to 16 Bits/Channel and
before using GamSat.
With the window with the working image active, use the Photoshop Filter menu:
Filter→C F Systems→GamSat. The C F Systems entry should be near the bottom of the
Filter menu. A window will appear that looks like the one shown above in Fast Track,
where the first try at your positive image will replace the holly image in the above. At
this point you can try the controls. The scrollbar will adjust saturation, gamma, hue,
highlight, and shadow individually. The radio buttons above the scrollbar show which
property the scrollbar controls. This can be changed either using the radio buttons or by
clicking in the appropriate value box.
Values can also be directly entered into the appropriate box. Saturation can vary from 0
to 400, with 100 being normal; unchanged. Gamma can vary from 0.1 to 9.9 with 1.0
being normal (unchanged). Hue can vary from -89.9 to 89.9 with 0.0 being normal.
Highlight can vary from 50 to 150 with 100 being normal. Shadow can vary from -25 to
25 with 0 being normal. The checkboxes above each of the value boxes indicates
whether the value is to be used in forming the image, and affect both the preview and
final images. The primary intent of these checkboxes is to allow easy comparison of a
proposed change with the original image.
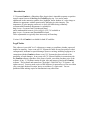
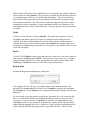
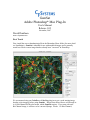
Adjusted Image
The dialog box below shows an adjusted version of the same image shown in the initial
dialog box, above. The initial image of holly leaves and berries was taken under normal
outdoor conditions and while the lighting was natural, it was also somewhat harsh. In the
adjusted image the colors still retain their natural appearance but the harshness of the
lighting has been reduced and the resulting image is more suitable for many applications.
Note the other differences between the two dialogs. The second dialog has been
registered, showing the Remember checkbox in place of the Register button, as explained
later. The second dialog also shows the use of selections:
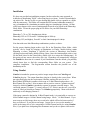
Selections
Version 1.02 introduces the use of feathered selections in GamSat. The Use Selection
checkbox regulates whether selections will be used or ignored. If no selection has been
made before calling GamSat, it will not be possible to check this box. When the box is
checked the existing value boxes apply to the areas inside the selection and a new set of
value boxes appear for the areas outside the selection. Radio buttons also appear,
showing whether In or Out of selection is currently controlled by the scrollbar. Initially,
both inside and outside take the same values, but now they can be individually adjusted.
The Match button adds the capability of matching the settings for the inside and outside
areas at any time. When Match is pressed, if In has been selected then Out will take on
the values of In, and vice versa.
In the example shown above the red holly berries were selected using a lightly feathered
selection prior to calling GamSat. The green leaves (outside the selection) have been set
to a reduced gamma (0.661) to even out the light and shadow. The berries (inside the
selection) have been given both an increased gamma and increased saturation to make
them stand out a bit more. The effect of this is make the image more decorative while
retaining the feeling of naturalness. Please understand that this is an illustration. Any
such adjustments are a matter of individual taste - they may appeal to one person but not
to another.
Undo
Version 1.02 also introduces Undo to GamSat. The undo feature operates in a fairly
straightforward manner, and up to 50 steps are retained for undo (Back) and redo
(Ahead). Note that scrollbar settings are saved for Undo only the scrollbar button is
released. Revert takes you back to the setting when GamSat was initially called, but if
no settings are changed after pressing Revert, it is possible to use Ahead or Back to return
to the active sequence.
Speed
Version 1.02 of GamSat is much faster than previous version, but is still slower than our
other plug-ins, ColorNeg and ColorPos. You may have to wait a bit to see a scrollbar
change reflected in the preview image, and the final conversion will take longer than
ColorNeg or ColorPos do when you click OK to return to Photoshop.
Registration
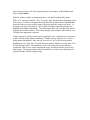
Pressing the Register button brings up a dialog box:
After typing in the key code (or see paragraph below for an alternate method) and
pressing OK, you must also OK or Cancel out of GamSat to complete the registration.
The next time you call up GamSat, your registration information will appear on the main
dialog box.
We were unable to get copy-paste to work for the registration key code on the Mac,but
there is a workaround for those who find hand-entering the long key too tedious and
error-prone. If you are already a ColorNeg user and have your ColorNegPath.txt and
ColorNegKey.txt files set up as required for registering , simply OK the registration box
without entering anything for the key. Otherwise we have provided a GamSatKey.txt file
which should be placed in the proper folder as explained just below. Then text edit
GamSatKey.txt so that it contains the key as a single line (you can copy and paste text to
do this) and save the file. Then, when GamSat puts up its dialog box asking for the
registration key, simply press the OK button. It is not necessary to leave the
GamSatKey.txt file in place after this has been done, and we recommend that you do not.
Remember that you will need to Cancel or OK out of GamSat and your registration will
show the next time you use GamSat.
Registration File Location
Photoshop Mac apparently wants to find files in a specific place and that place varies,
being different for Photoshop 7, CS, CS2, and CS3 which were used in developing the
software.
Photoshop 7 and Photoshop CS
The location for the registration file (GamSatKey.txt) for Photoshop 7 and Photoshop CS
is very odd and very nearly the same. To get there, double-click Applications in Finder,
then double-click Adobe Photoshop x, where x is either 7 or CS. Now locate the Adobe
Photoshop x icon you might normally double-click to start Photoshop, but do not doubleclick. This icon may or may not have .App after the Adobe Photoshop x. Although it does
not appear so, this icon is really a folder. Single click with the right mouse button (or
control-click on a single button mouse) to bring up a menu of options. Click on the
option Show Package Contents. This will open a new Finder window with a folder
Contents (and possibly other items). Double-click Contents. That will disclose several
other folders. For Photoshop 7 The folder you want is MacOS, while for Photoshop CS,
the folder you want is MacOsClassic. Put GamSatKey.txt in this folder and then text edit it
so that it contains your registration key alone as the first line.
Photoshop CS2 and Photoshop CS3
These versions of Photoshop pick the root folder instead of the hidden folders described
for Photoshop 7 and CS. The root folder is the one with a path that is a single slash, "/"
often shown in Finder as Macintosh HD. Put the file GamSatKey.txt in the root folder, and
then text edit it so that it contains your registration key alone as the first line.
The Remember Checkbox
Ordinarily it makes sense to start GamSat fresh each time, using default values (i. e.
unchanged) for each of the parameters. However, it is sometimes necessary to apply the
same or nearly the same changes to each of a series of similar images. The Remember
checkbox provides for this. Check Remember before you OK out of GamSat and the
next time GamSat comes up it will have retained the settings from the previous image as
a starting point. When you uncheck Remember before OKing out of GamSat, next time
up it will use the default values.