1
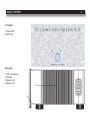
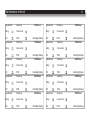
SA-1 Classic Series
User and Quality Inspection Manual
UK
Warning:
To avoid risk of fire or electric shock, do not expose this
appliance to rain or moisture. Verify line voltage before use.
Do not remove cover. No user serviceable parts inside. Refer servicing to qualified service
personnel.The warranty is void if the product is tampered with by non-authorised
personnel.Use only authorised Abrahamsen service center.
Warranty certificate
2
Expand your warranty from two(2) to five(5) years.
Register your amplifier with Abrahamsen and expand your warranty from two(2) to five(5) years. Use the included
registration form or registrate online at www.abrahamsenaudio.com. For fastest processing, we recommend using
the online registration. When we receive your registration, we will send you a personal warranty card.
Owner_sa1_v1.0 Copyright © ECS Holding AS, 2005
Use this information to registrate your amplifier.
Quality inspection
3
Thank you for chosing this Abrahamsen product. We know you will enjoy years of listening pleasure and true High End musical
performance from your audio system.
We strongly believes that uncompromising quality is not an option--it’s an obligation.
Abrahamsen maintains an extensive set of internal controls to ensure that products are designed, manufactured and
supported to the highest standards. A dedicated staff of incoming, intermediate and finished product quality inspectors
and auditors ensures that Abrahamsen’s products are manufactured to exact specifications.
The signatures shown below certify that this product was tested, it met or exceeded our strict standards.
Electric performance:___________
Listening:___________
Final inspection:___________
Per Abrahamsen
Designer
Introduction
4
This user and quality inspection manual contains important
information on the placement, installation, and operation
of your Abrahamsen product. Please read this information
carefully. A thorough understanding of these details will help
ensure satisfactory operation and long life for your product.
With today’s quality parts and the improvement of the original
design, this amplifier will again set a new industry standard,
just as the original did. To extend the quality of this product
as much as possible, several features has been built into the
concept.
The story behind the sound
In 1972 Dr. Otala and Mr. Lohstro finished their work in analysing transistor amplifiers to determine what actully created
the ”transistor sound” in general transistorised designs. The
results of their innovative design work were incorporated in
the legendary 25 watt amplifier.
All transistors are matched to further reduce the distortion.
This product was the first commercial transistor amplifier
to use this new design approach, and the amplifier was
immediately recognised as dramatically more musical
sounding than any other transistor amplifier. The same
design philosophy, has been constantly updated by
additional research and development. This philosophy
form the basis of the new Abrahamsen design.
A “clamp” is holding these capacitors, forcing them together to
remove any internal movement of the electrolytic so that the
well known “micro phonic” effect is avoided.
After the 25 watt amplifier had established a new standard
for transistor amplifiers, research was undertaken to find
ways to make the amplifier even better, and to extend its
highly musical sound quality to more powerful amplifier
design.
Only high current, high temperature low impedance capacitors
are used. This current reservoir is made up from different sizes
of capacitors in parallel, to create a supply as linear as possible
for all frequencies.
All AC and DC voltages are connected with 2x6mm copper
rails to avoid any cables in the current path.
A new type of speaker terminals has been developed under
the name “d’vise”. It is made from 16mm copper bolt and 2mm
copper bracket to ensure that there are no impedance loss or
“diode” junction between your speaker cable and the output
transistors.
Fully protected with an intelligent protection circuit with no
influence on the sound.
Before connection
5
Unpacking the SA-1
Immediately upon receipt of the SA-1, inspect the carton
for possible damage during shipment. The carton and packaging have been designed to provide the safest possible
protection for the transport of your amplifier. Unpack the unit
carefully. Save all packaging materials for future shipment.
How to avoid damages
Do not under any circumstances connect or disconnect equipment when power is turned on. The design of the RCA plug
generates a huge transient when inserted. Connecting or disconnecting equipment with the power on can result in severe
damage to both speaker and amplifier.
The contents of the carton
1 pcs Abrahamsen SA-1
1 pcs AC mains cord
1 pcs Owners manual
1 pcs Spare fuse
(located in the fuse drawer, main inlet. See page 7)
How to avoid noise problems
The SA-1 contains delicate circuits that are sensitive to magnetic strayfields. The unit should not be placed near mains
transformers, TV sets etc. Care should be taken regarding
placement of the interconnect cables. Do not run interconnect
cables in parallel with main cords or speaker cables. Keep
interconnect and speaker cables as short as possible.
If any of the items mentioned above are not included in the
carton, please contact your authorized Abrahamsen dealer,
distributor, or Abrahamsen factory for assistance.
Setup procedure
Before connecting the SA-1 to the mains, check that the
mains voltage indicated on the rear panel corresponds to
the line voltage in the territory you intend to use the unit.
How to avoid antenna problems
In some set-ups hum may occur when you connect the radio,
VCR or TV to your system. The problem is caused by DC
voltage coming from your antenna. Please contact your cable
network operator.
The amplifier will be warm
Due to the high class A operating point used in the Abrahamsen
design, it is normal that the amplifier feels warm. Proper ventilation will be needed, and the amplifier should not be covered
in. A good rule is to allow 2-3 inches of air sidewise, and 1-2
inches above the amplifier.
Layout overview
Front panel
1.Power switch
2.LED circle
Side panel
1.LED circle adjuster
2.Heat sink
3.Speaker out +
4.Speaker out -
6
Layout overview
Rear panel
1.Right balanced link
2.Right balanced input
3.Right unbalanced input
4.LED(light emitting diode)
5.Balanced/unbalanced switch
6.AC main inlet
7.Left balanced link
8.Left balanced input
9.Left unbalanced input
10.LED(light emitting diode)
11.Balanced/unbalanced switch
Main inlet
1.Fuse drawer
2.Spare fuse
3.Main fuse
Xlr pin configuration
1.Gnd
2.+
3.-
7
Installation and connection
How to connect your amplifier
Please read this page carefully.
Do not under any circumstances connect or disconnect
equipment when power is turned on.
Unbalanced operation
Upon arrival, the amplifier is set for singel-ended use. The
amplifier is ready to be connected in a normal way whith a
singel-ended preamplifier.
Balanced operation
The balanced mode can only be used if the signal source has
a balanced output. Use an XLR interconnect.
Unbalanced/Balanced
Set the ”Unbalanced/Balanced” switch to the desiered
operation.(Balanced push in - unbalanced out) Use a small
screwdriver and push the switch located on the rear of the
amplifier. One for each channel.
LED on = Balanced
LED off = Unbalanced
Important:Always turn the amplifier off when changing from
unbalanced to balanced mode.
8
Link
This output can be used to link more amplifiers together.Do not
short these outputs to ground or together.
Mono operation
Connect one channel of the preamplifier to the left input of
the SA-1. Connect an XLR phase adapter from left link to right
input.*
Connect the positive speaker terminal to the amplifiers positive left output. Connect the negative speaker terminal to
the amplifiers positive right output.
*XLR pin configuration:
Female GND pin1,+pin2 and -on pin3.
Male GND pin1,-pin2 and +on pin3.(reverse)
How to power up your system
You should always power up your system the following way:
Signal sources (CD player, tuner etc.) first. Then turn on the
preamplifier. Allow 30 seconds of preheating before you turn
on the power amplifier. After switching on the power amplifier,
there will be a 5 seconds delay before the speakers are connected. This will prevent large turn on/off transients to reach
the speakers. When turning your system off, you should start
by switching off your power amplifier, then the preamplifier, and
finally the signal source devices.
Wait approximately one minute before turnig the amplifier
back on.
Functions and maintenance
LED circle
The led circle has tre functions:
9
1.Normal operation, the led circle will light up.
2.Shorted output terminals, the led circle will blink.
3.If maintenance is recommended, the led circle will blink five
times at start up.
Servicing
Refer all servicing to qualified personnel. To reduce the risk
of electric shock, do not perform any servicing other than that
contained in the user manual unless you are qualified to do so.
Servicing is required when the amplifier has been damaged
in any way, such as the amplifier has been exposed to rain or
moisture, does not operate normally or has been dropped.
Short-circuited
The SA-1 has a short circuit monitoring system, if the short
circuit monitoring system has been trigged, you have to turn
the amplifier off and find the cause. Wait approximately one
minute before turnig the amplifier back on.
Do not remove any cover
There are areas with high voltages inside. To reduce the risk
of electric shock, do not remove any cover if the AC mains
cord is connected. The cover should be removed by qualified
personnel only. No user serviceable parts inside.
Maintenance interval
To ensure that your amplifier is performing to its maximum
efficiency, and to protect your investment, it is essential that
your amplifier is serviced in accordance with the correct
maintenance interval.
Fuse
To prevent a fire, make sure to use fuses with specified
standard(current, voltage, type). Do not use a different fuse
or short circuit the fuse holder. Before replacing the fuse, turn
OFF the amplifier and disconnect the power cord.
Every 5000 hour we recommend you to have maintenance on
your amplifier. This operation involves, among other things,
cleaning of connectors, adjustments of DC voltage and idling
current.
Cleaning
When the amplifier needs a cleaning, you can blow off dust
from the amplifier with a blower or clean with a rag etc. Don’t
use solvents such as benzol, alcohol or other fluids with very
strong volatility and flammability for cleaning the apperatus
body.
Technical specification
The following technical data were measured on randomized test
objects and are typical data.
All measurements are made with main voltage
120/240 V 50Hz / 60Hz.
Clipping point of the amplifier is set to a level where total
harmonic distortion (THD) is 0.2%.
Output impedance (20-20kHz) ..............................<0.01ohm
Input impedance stereo balanced .........................330kohm
Input impedance mono balanced ..........................165kohm
Input sensitivity for rated output ............................1.6V
Max. peak current ..................................................>200A
THD (1kHz half power, 8ohm) ...............................<0.02%
THD (1kHz –1dB, 8ohm) ......................................<0.02%
Noise (both inputs shortened) ...............................<130uV
Frequency response ..............................................DC-1MHz
Slew rate ...............................................................100Vus
Channel separation (1kHz-20kHz) ........................>90dB
10
Dimensions
Width
483mm
Depth 380mm
Height 110mm
Weight 20kg
(19”)
(15”)
(4.3”)
(33lbs)
The manufacturer reserves the right to alter these specifications
without further notice
If service is needed
If Service is needed
Your dealer will have all relevant information regarding the
service station in your area, and will ensure that your unit is
serviced with minimum delay. It is our general policy to have
your unit returned to you within five working days. This is an
average time, and can vary locally, depending on the workload
at that particular service station. If, for some reason, there are
no service facilities available in your country, please ship the
unit to the following address:
ECS Holding AS,
Solheimveien 36,
Box 108, N-1471 Lørenskog,
Norway
Switchboard:
Service:
Fax:
+47 67978190
+47 67978198
+47 67978191
E-mail:
[email protected]
Service department: [email protected]
Web:
www.abrahamsenaudio.com
11
The end-user is responsible for all shipping charges, insurance,
re-importation and duty charges. When shipping a product to
the factory for service, always include the following:
1. A sales slip or other proof of purchase if repair is claimed
under warranty.
2. A proforma invoice with value of goods, stating that the
amplifier is returned to Norway for repair.
3. An accompanying letter describing faults, symptoms, or problems with the unit.
4.Always ship the unit in its original carton and packaging
material to prevent damage in transit.
Abrahamsent will not cover damages incurred in transit. If
you require further information concerning the operation
of the unit, or if you have any questions related to service,
please do not hesitate to contact your dealer or national
distributor.
Maintenance interval
Adjustment:
Cleaning:
Idling
Connectors
DC
Adjustment:
PCB
Cleaning:
Idling
Connectors
DC
Adjustment:
PCB
Cleaning:
Idling
Connectors
DC
Adjustment:
PCB
Cleaning:
Idling
Connectors
DC
Adjustment:
PCB
Cleaning:
Idling
Connectors
DC
PCB
12
5000Hour
Date/Sign/Stamp
10000Hour
Date/Sign/Stamp
15000Hour
Date/Sign/Stamp
20000Hour
Date/Sign/Stamp
25000Hour
Date/Sign/Stamp
Adjustment:
Cleaning:
Idling
Connectors
DC
Adjustment:
PCB
Cleaning:
Idling
Connectors
DC
Adjustment:
PCB
Cleaning:
Idling
Connectors
DC
Adjustment:
PCB
Cleaning:
Idling
Connectors
DC
Adjustment:
PCB
Cleaning:
Idling
Connectors
DC
PCB
30000Hour
Date/Sign/Stamp
35000Hour
Date/Sign/Stamp
40000Hour
Date/Sign/Stamp
45000Hour
Date/Sign/Stamp
50000Hour
Date/Sign/Stamp
Warranty terms and conditions
1 Abrahamsen warrants that this product will be free from
any defects in matrials and/or workmanship for a period of
to(2) years from the purchase date, five(5) if you have completed the warranty registration.
2 The extended warranty service is only available to the
orginal consumer, who purchased this product directly from
the retail dealer, and it can not be transferred.
3 During the warranty service, Abrahamsen may repair or
replace this product at its own option at no charge to you for
parts or for labor in accordance with this limited warranty.
4 This warranty does not apply to the damages to this product that occurred as the following conditions:
4.1 Instead of operating in accordance with the user’s manual thoroughly, any abuse or misuse of this product.
4.2 Normal tear and wear.
4.3 The product has been altered or modified in any way.
4.4 Damage which may have been caused either directly or
indirectly by another product / force / etc.
13
4.5 Abnormal service or repairing by anyone other than the
qualified personnel or technician.
And in such cases, all the expenses will be charged to the
buyer.
5 In no event shall Abrahamsen be liable for any incidental
or consequential damages. Some countrys do not allow the
exclusion or limitation of incidental or consequential damages, so the above exclusion or limitation may not apply to
you.
6 This warranty gives you the specific rights, and these rights
are compatible with this country laws, you may also have
other statutory rights that may vary from country to country.