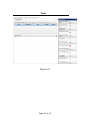
1
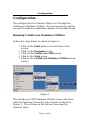
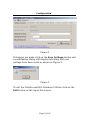
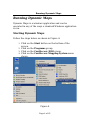
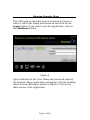
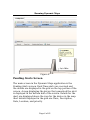
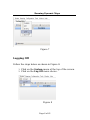
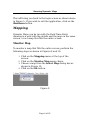
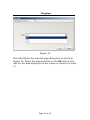
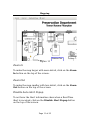
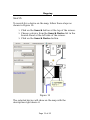
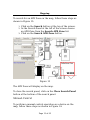
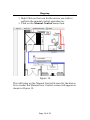
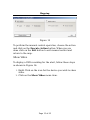
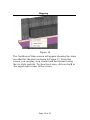
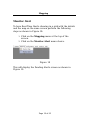
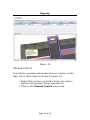
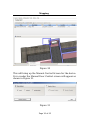
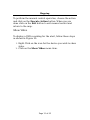
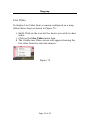
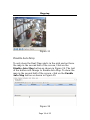
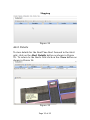
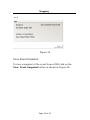
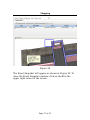
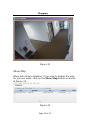
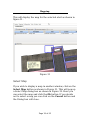
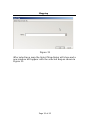
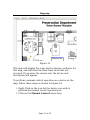
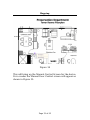
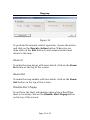
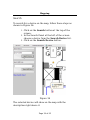
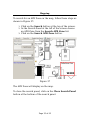
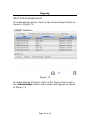
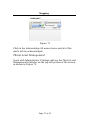
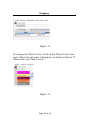
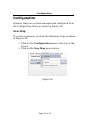
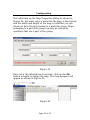
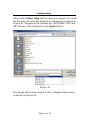
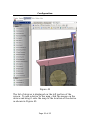
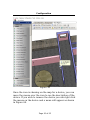
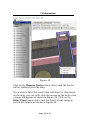
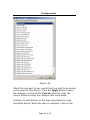
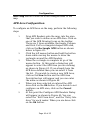
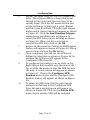
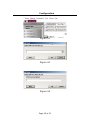
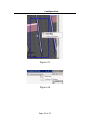
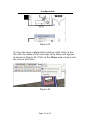
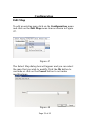
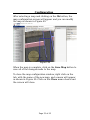
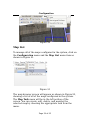
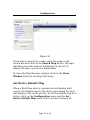
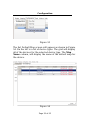
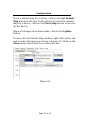
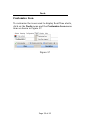
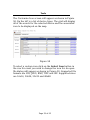
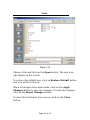
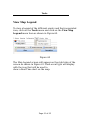
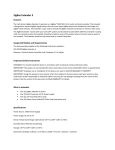
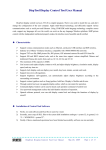
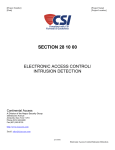
CA3000 USER MANUAL
DATE: 05/25/2007
SOFTWARE VERSION AND BUILD: VERSION 1.0 AND HIGHER
DOCUMENT PERTAINS TO: PROGRAMMING
Page 1 of 62
Configuration
Configuration
The configuration for Dynamic Maps is set through the
CardAccess Database Utilities. In most cases there will be
no need to make any additional changes for Dynamic Maps.
Running CardAccess Database Utilities
Follow the steps below as shown in Figure 1:
1. Click on the Start button on the bottom of the
2.
3.
4.
5.
screen.
Click on
Click on
Click on
Click on
choice.
the
the
the
the
Programs group.
CardAccess 3000 group.
Tools group.
CardAccess Database Utilities menu
Figure 1
The CardAccess 3000 Database Utilities screen will show
with the Database Connection tab selected as shown in
Figure 2. The settings on this tab are those used by
Dynamic Maps
Page 2 of 62
Configuration
Figure 2
If changes are made click on the Save Settings button and
a confirmation dialog will display indicating that your
settings have been saved as shown in Figure 3.
Figure 3
To exit the CardAccess3000 Database Utilities click on the
Exit button on the top of the screen.
Page 3 of 62
Running Dynamic Maps
Running Dynamic Maps
Dynamic Maps is a windows application and can be
executed in any of the ways a standard Windows application
is run.
Starting Dynamic Maps
Follow the steps below as shown in Figure 4:
1. Click on the Start button on the bottom of the
screen.
2. Click on the Programs group.
3. Click on the CardAccess 3000 group.
4. Click on the CardAccess Mapping System menu
choice.
Figure 4
Page 4 of 62
Running Dynamic Maps
This will bring up the login screen as shown in Figure 5.
Enter a valid User Name and Password and click on the
Login button. If you wish to exit the application, click on
the Shutdown button.
Figure 5
Upon validation of the User Name and password entered,
the Dynamic Maps application will appear with the Pending
Alerts screen showing as shown in Figure 6. This is the
main screen of the application.
Page 5 of 62
Running Dynamic Maps
Figure 6
Pending Alerts Screen
The main screen in the Dynamic Maps application is the
Pending Alerts screen. Real-Time alerts are received and
the details are displayed in the grid on the top portion of the
screen. A map displaying the device that generated the alert
is displayed in the bottom half of the screen. Details for the
alert are displayed above the icon for the device in the map.
Alert details displayed in the grid are Class, Description,
Date, Location, and priority.
Page 6 of 62
Running Dynamic Maps
Disabling Alerts
If it is necessary to disable the receiving of alerts, click on
the Disable Alerts button. The caption of the button will
change to Enable Alerts as shown in Figure 6A. To start
receiving alerts click on the Enable Alerts button.
Figure 6A
Closing the Pending Alerts Screen
If you do not wish to display the Pending Alerts screen you
can follow these steps to close it as shown in Figure 7.
1. Right click on the Pending Alerts tab
2. Click on the Close menu choice.
Page 7 of 62
Running Dynamic Maps
Figure 7
Logging Off
Follow the steps below as shown in Figure 8:
1. Click on the System menu at the top of the screen.
2. Click on the Log Off menu choice.
Figure 8
Page 8 of 62
Running Dynamic Maps
This will bring you back to the login screen as shown above
in Figure 5. If you wish to exit the application, click on the
Shutdown button.
Mapping
Dynamic Maps can be run with the Real-Time Alerts
showing in a grid with the details and the map on the same
screen, or as a map that fills the entire screen.
Monitor Map
To monitor a map that fills the entire screen, perform the
following steps as shown in Figures 9 and 10:
1. Click on the Mapping menu at the top of the
screen.
2. Click on the Monitor Map menu choice.
3. Choose a map from the Select Map dialog box as
shown in Figure 10.
4. Click on the Ok button.
Figure 9
Page 9 of 62
Mapping
Figure 10
This will display the selected map dialog box as shown in
Figure 10. Select the map and click on the Ok button. You
will see the map displayed on the screen as shown in Figure
11.
Page 10 of 62
Mapping
Figure 11
Zoom In
To make the map larger with more detail, click on the Zoom
In button on the top of the screen.
Zoom Out
To make the map smaller with less detail, click on the Zoom
Out button on the top of the screen.
Disable Auto Alert Popup
To not have the Alert information show when a Real-Time
Alert is received, click on the Disable Alert Popup button
on the top of the screen.
Page 11 of 62
Mapping
Search
To search for a device on the map, follow these steps as
shown in Figure 12:
1. Click on the Search button at the top of the screen.
2. Choose a device from the Search Device list in the
Search Panel at the left side of the screen.
3. Click on the Search Device button.
Figure 12
The selected device will show on the map with the
description right above it.
Page 12 of 62
Mapping
To search for an APB Zone on the map, follow these steps as
shown in Figure 13:
1. Click on the Search button at the top of the screen.
2. In the Search Panel at the left of the screen choose
an APB Zone from the Search APB Zone list.
3. Click on the Search APB Zone button.
Figure 13
The APB Zone will display on the map.
To close the search panel, click on the Close Search Panel
button at the bottom of the search panel.
Manual Control
To perform a manual control operation on a device on the
map, follow these steps as shown in Figure 14:
Page 13 of 62
Mapping
1. Right Click on the icon for the device you wish to
perform the manual control operation on.
2. Click on the Manual Control menu item.
Figure 14
This will bring up the Manual Control Screen for the device.
For a reader the Manual Door Control screen will appear as
shown in Figure 15.
Page 14 of 62
Mapping
Figure 15
To perform the manual control operation, choose the action
and click on the Execute Action button. When you are
done click on the Exit button to exit manual control and
return to the map.
Show Video
To display a DVR recording for the alert, follow these steps
as shown in Figure 16:
1. Right Click on the icon for the device you wish to show
video.
2. Click on the Show Video menu item.
Page 15 of 62
Mapping
Figure 16
The CardAccess Video screen will appear showing the video
recorded for the alert as shown in Figure 17. From this
screen, you can play, stop, rewind and fast forward using
the vcr style controls. To close the screen, click on the X in
.the upper right corner of the screen
Page 16 of 62
Mapping
Figure 17
Live Video
To display Live Video from a camera configured on a map,
follow these steps as shown in Figure 74:
1. Right Click on the icon for the device you wish to show
video.
2. Click on the Live Video menu item.
3. The CardAccess Video screen will appear showing the
live video from the selected camera.
Figure 74
Page 17 of 62
Mapping
Monitor Alert
To have Real-Time Alerts showing in a grid with the details
and the map on the same screen perform the following
steps as shown in Figure 18:
1. Click on the Mapping menu at the top of the
screen.
2. Click on the Monitor Alert menu choice.
Figure 18
This will display the Pending Alerts screen as shown in
Figure 19.
Page 18 of 62
Mapping
Figure 19
Manual Control
To perform a manual control operation on a device on the
map, follow these steps as shown in Figure 20:
1. Right Click on the icon for the device you wish to
perform the manual control operation on.
2. Click on the Manual Control menu item.
Page 19 of 62
Mapping
Figure 20
This will bring up the Manual Control Screen for the device.
For a reader the Manual Door Control screen will appear as
shown in Figure 21.
Figure 21
Page 20 of 62
Mapping
To perform the manual control operation, choose the action
and click on the Execute Action button. When you are
done click on the Exit button to exit manual control and
return to the map.
Show Video
To display a DVR recording for the alert, follow these steps
as shown in Figure 22:
1. Right Click on the icon for the device you wish to show
video.
2. Click on the Show Video menu item.
Page 21 of 62
Mapping
Figure 22
The CardAccess Video screen will appear showing the video
recorded for the alert as shown in Figure 23. From this
screen, you can play, stop, rewind and fast forward using
the vcr style controls. To close the screen, click on the X in
.the upper right corner of the screen
Page 22 of 62
Mapping
Live Video
To display Live Video from a camera configured on a map,
follow these steps as shown in Figure 75:
4. Right Click on the icon for the device you wish to show
video.
5. Click on the Live Video menu item.
6. The CardAccess Video screen will appear showing the
live video from the selected camera.
Figure 75
Page 23 of 62
Mapping
Figure 23
Disable Auto Map
To only show the Real-Time alerts in the grid and not have
the map in the second half of the screen, click on the
Disable Auto Map button as shown in Figure 24. The text
of the button will change to Enable Auto Map. To show the
map in the second half of the screen, click on the Enable
Auto Map button as shown in Figure 25.
Figure 24
Page 24 of 62
Mapping
Figure 25
Alert Details
To view details for the Real-Time Alert focused in the Alert
grid, click on the Alert Details button as shown in Figure
25. To return to the Alerts Grid click on the Close button as
shown in Figure 26.
Figure 25
Page 25 of 62
Mapping
Figure 26
View Event Snapshot
To view a snapshot of the event from a DVR click on the
View Event Snapshot button as shown in Figure 28.
Page 26 of 62
Mapping
Figure 28
The Event Snapshot will appear as shown in Figure 29. To
close the Event Snapshot window, click on the X in the
upper right corner of the screen.
Page 27 of 62
Mapping
Figure 29
Show Map
When Auto Map is disabled, if you wish to display the map
for just one event, click on the Show Map button as shown
in Figure 30.
Figure 30
Page 28 of 62
Mapping
This will display the map for the selected alert as shown in
figure 31.
Figure 31
Select Map
If you wish to display a map in another window, click on the
Select Map button as shown in Figure 31. This will pop up
a Select Map dialog box as shown in Figure 32. Here you
can select the map and click the Ok button. If you decide
not to select a map you can click on the Cancel button and
the Dialog box will close.
Page 29 of 62
Mapping
Figure 32
After selecting a map the Select Map dialog will close and a
new window will appear with the selected map as shown in
Figure 33.
Page 30 of 62
Mapping
Figure 33
This map will display the icons for the devices configure for
this map, and will show the Real-Time alerts that are
received. If you move the mouse over the device and
description will appear.
To perform a manual control operation on a device on the
map, follow these steps as shown in Figure 34:
1. Right Click on the icon for the device you wish to
perform the manual control operation on.
2. Click on the Manual Control menu item.
Page 31 of 62
Mapping
Figure 34
This will bring up the Manual Control Screen for the device.
For a reader the Manual Door Control screen will appear as
shown in Figure 35.
Page 32 of 62
Mapping
Figure 35
To perform the manual control operation, choose the action
and click on the Execute Action button. When you are
done click on the Exit button to exit manual control and
return to the map.
Zoom In
To make the map larger with more detail, click on the Zoom
In button on the top of the screen.
Zoom Out
To make the map smaller with less detail, click on the Zoom
Out button on the top of the screen.
Disable Alert Popup
To not have the Alert information show when a Real-Time
Alert is received, click on the Disable Alert Popup button
on the top of the screen.
Page 33 of 62
Mapping
Search
To search for a device on the map, follow these steps as
shown in Figure 36:
1. Click on the Search button at the top of the
screen.
2. In the Search Panel at the left of the screen
choose a device from the Search Device list.
3. Click on the Search Device button.
Figure 36
The selected device will show on the map with the
description right above it.
Page 34 of 62
Mapping
To search for an APB Zone on the map, follow these steps as
shown in Figure 37:
1. Click on the Search button at the top of the screen.
2. In the Search Panel at the left of the screen choose
an APB Zone from the Search APB Zone list.
3. Click on the Search APB Zone button.
Figure 37
The APB Zone will display on the map.
To close the search panel, click on the Close Search Panel
button at the bottom of the search panel.
Page 35 of 62
Mapping
Alert Acknowledgement
To Acknowledge alerts, click on the Acknowledge button as
shown in Figure 70.
Figure 70
To Acknowledge All alerts click on the Down Arrow next to
the Acknowledge button and a menu will appear as shown
in Figure 71.
Page 36 of 62
Mapping
Figure 71
Click in the Acknowledge All menu choice and all of the
alerts will be acknowledged.
Threat Level Management
Users with Administrator Privilege will see the Threat Level
Management Indicator on the top left portion of the screen
as shown in Figure 72.
Page 37 of 62
Mapping
Figure 72
To change the Threat Level, click on the Threat Level Icon
and a Threat Level menu will appear as shown in Figure 73.
Choose the new Threat Level.
Figure 73
Page 38 of 62
Configuration
Configuration
Dynamic Maps are created managed and configured from
the Configuration Menu as shown in Figure 38.
New Map
To create a new map, perform the following steps as shown
in Figures 38:
1. Click on the Configuration menu at the top of the
screen.
2. Click on the New Map menu choice.
Figure 38
Page 39 of 62
Configuration
This will bring up the Map Properties dialog as shown in
Figure 39. You must enter a name for the map, a description
and the width and height of the map. In addition you can
choose to have the map belong to a partition group. Maps
belonging to a partition group can only be viewed by
operators that are a part of the group.
Figure 39
Once all of the information is entered, click on the Ok
button to begin to design the map. The map designer will
appear as shown in Figure 40.
Figure 40
Page 40 of 62
Configuration
Click on the Select Map button choose an image to be used
for the map. An open file dialog box will appear as shown in
Figure 41. Supported file formats are JPEG, BMP, TIFF and
GIF. Choose a file and click on the Open button.
Figure 41
The image will now be shown in the configure map screen
as shown in Figure 42.
Page 41 of 62
Configuration
Figure 42
The list of devices is displayed on the left portion of the
screen. To add a device to the map, click the mouse on the
device and drag it onto the map to the location of the device
as shown in Figure 43.
Page 42 of 62
Configuration
Figure 43
Once the icon is showing on the map for a device, you can
move the mouse over the icon to see the description of the
device. If you wish to remove the device you can right click
the mouse on the device and a menu will appear as shown
in Figure 44.
Page 43 of 62
Configuration
Figure 44
Click on the Remove Device menu choice and the device
will be removed from the map.
If you wish to filter the events that will show for this device
on the map, you can right click the mouse on the device and
a menu will appear as shown in Figure 44. Click on the
Filter Event menu choice and the Select Event category
screen will appear as shown in Figure 45.
Page 44 of 62
Configuration
Figure 45
Check the box next to any events that you wish to be shown
on the map for this device. Click the Apply button to save
the changes or click on the Cancel button to close the
screen without saving the changes that were made.
Continue to add devices to the map repeating the steps
described above. When the map is complete, click on the
Page 45 of 62
Configuration
Save Map button to save all of the changes made to the
map.
APB Area Configuration
To configure an APB Area on the map, perform the following
steps:
1.
2.
3.
4.
5.
Drag APB Readers onto the map, into the area
that you wish to define as an APB Area. Click on
one of the APB Drawing Icons on the toolbar.
There are 3 types available, Rectangle, Polygon
and Oval. For a rectangular shaped APB area,
click on the Rectangle APB button as shown
below in figure 62.
Click the left mouse button and hold the button
down while moving the mouse to draw the
rectangle around the APB Readers.
When the rectangle is complete let go of the
mouse button. At this point a dialog box will
appear to select the APB Area you are defining
as shown in Figure 63. If you already have the
APB Area defined then you can select it from
the list. If you wish to create a new APB Area,
click on the New button and the APB Area
Description box will appear and you can enter
the name as shown in Figure 64.
When you have selected or entered the APB
Area click on the Ok button. If you decide to not
configure an APB area, click on the Cancel
button.
At this point the Configure APB Readers Dialog
will appear as shown in Figure 65. You can
select the “Exit From Area”, and the “Entry Into
Area” for each reader. When you are done click
on the Ok button.
Page 46 of 62
Configuration
6.
7.
8.
9.
10.
Repeat the same steps for the Oval shaped APB
Area. The Polygon APB is a shape that is not
limited to four sides and does not have to be
equally sized. Click the left mouse button and
let the button go to draw just a point. Repeat
until the Area is defined. Click the right mouse
button and a context menu will appear as shown
in Figure 69. Click the End Drawing Polygon
menu choice and dialog box will appear to
select the APB Area you are defining as shown
in Figure 63. When you have selected or
entered the APB Area click on the Ok
button. At this point the Configure APB Readers
Dialog will appear as shown in Figure 65. When
you are done click on the Ok button.
Once completed, you will see the APB area
defined by blue lines as shown in Figure 66. In
addition the APB area will appear in the
Configured APB Zone list.
To configure the readers you can click on the
Right Mouse Button while over the item in the
list or while the mouse is over the APB Area on
the map. A context menu will appear as shown
in Figure 67. Choose the Configure APB
Readers menu choice and the Configure APB
Readers Dialog will appear as shown in Figure
65.
To delete an APB Area click the right mouse
button over the item in the Configured APB
Zone list and a context menu will appear as
shown in Figure 68. Click on the Delete APB
menu choice and the APB will be removed.
Page 47 of 62
Configuration
Figure 62
Figure 63
Figure 64
Page 48 of 62
Configuration
Figure 65
Figure 66
Page 49 of 62
Configuration
Figure 67
Figure 68
Page 50 of 62
Configuration
Figure 69
To close the map configuration window, right click on the
tab with the name of the new map and a menu will appear
as shown in Figure 46. Click on the Close menu choice and
the screen will close.
Figure 46
Page 51 of 62
Configuration
Edit Map
To edit an existing map click on the Configuration menu
and click on the Edit Map menu item as shown in Figure
47.
Figure 47
The Select Map dialog box will appear and you can select
the map that you wish to modify. Click the Ok button to
continue or click on the Cancel button to not make
modifications.
Figure 48
Page 52 of 62
Configuration
After selecting a map and clicking on the Ok button, the
map configuration screen will appear and you can modify
the map as shown in Figure 49.
Figure 49
When the map is complete, click on the Save Map button to
save all of the changes made to the map.
To close the map configuration window, right click on the
tab, with the name of the new map, and a menu will appear
as shown in Figure 50. Click on the Close menu choice and
the screen will close.
Page 53 of 62
Configuration
Figure 50
Map List
To manage all of the maps configured in the system, click on
the Configuration menu and the Map List menu item as
shown in Figure 51.
Figure 51
The map browser screen will appear as shown in Figure 52,
showing a list of all of the maps configured in the system.
The Map Task menu will be in the left portion of the
screen. You can create, edit, delete, and monitor the
selected map by choosing the appropriate task from the
menu.
Page 54 of 62
Configuration
Figure 52
If you wish to search for a map, enter the name in the
search box and click on the Search Map button. All maps
matching the name entered will display in the list. To
display all maps, search on a blank name.
To close the Map Browser window, click on the Close
Window button in the Map Task menu.
Set Device Default Map
When a Real-Time alert is received on the Pending Alert
screen, the default map for the device generating the alert,
will display in the lower portion. To set the default map for a
device, click on the Configuration menu and the Set
Device Default Map menu item as shown in Figure 53.
Page 55 of 62
Configuration
Figure 53
The Set Default Map screen will appear as shown in Figure
54. On the left is a list of device types. The grid will display
all of the devices for the selected device type. The Map
Name column, will display the name of the default map for
the device.
Figure 54
Page 56 of 62
Configuration
To set a default map for a device, click on the Set Default
Map button in the row for the device. To clear the default
map for a device, click on the Clear Map button in the row
for the device.
When all changes have been made, click on the Update
button.
To close the Set Default Map window, right click on the tab,
and a menu will appear as shown in Figure 55. Click on the
Close menu choice and the screen will close.
Figure 55
Page 57 of 62
Tools
Customize Icon
To customize the icons used to display Real-Time alerts,
click on the Tools menu and the Customize Icon menu
item as shown in Figure 57.
Figure 57
Page 58 of 62
Tools
The Customize Icon screen will appear as shown in Figure
58. On the left is a list of device types. The grid will display
all of the events for the selected device and the associated
icon to be displayed on the map.
Figure 58
To select a custom icon click on the Select Icon button in
the row for event you wish to change the icon for. An open
file dialog will appear as shown in Figure 59. Supported file
formats are ICO, JPEG, BMP, TIFF and GIF. Supported sizes
are 16x16, 24x24, 32x32 and 48x48.
Page 59 of 62
Tools
Figure 59
Choose a file and click on the Open button. The new icon
will display on the screen.
To restore the default icon, click on Restore Default button
and icon will be restored.
When all changes have been made, click on the Apply
Changes button to save the changes. To undo the changes
click on the Reject Changes button.
To close the Customize Icon screen, click on the Close
button.
Page 60 of 62
Tools
View Map Legend
To view a legend of the different events and their associated
icon, click on the Tools menu and click on the View Map
Legend menu item as shown in Figure 60.
Figure 60
The Map Legend screen will appear on the right side of the
screen as shown in Figure 61. Each event type will display
with the icon that will be used to
show a Real-Time alert on the map.
Page 61 of 62
Tools
Figure 61
Page 62 of 62