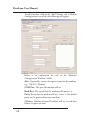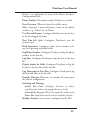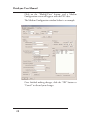
1
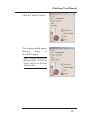
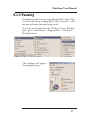
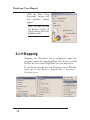
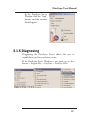
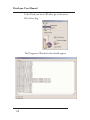
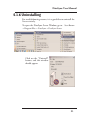
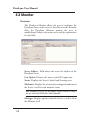
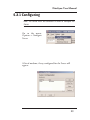
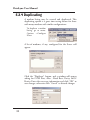
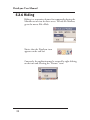
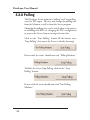
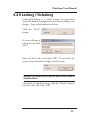
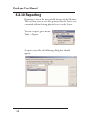
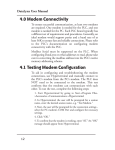
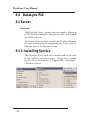
DataLynx User Manual
5.0 DataLynx PLC
5.1 Server
Overview
The DataLynx Server's primary function involves dialing up
to PLC(s) and recording the data into text files in the format
specified by the user.
The format of the text file is set with the DataLynx Monitor.
For more information on configuring the Server with the
Monitor, refer to the Monitor section.
5.1.1 Installing Service
The DataLynx Server needs to be installed and run in order
to run without user intervention. Doing so is a simple
process. Go to: Start Button -> Program Files -> DataLynx > DataLynx Server
14
DataLynx User Manual
Click the "Install" button.
This window should appear
showing
“Status”
as
Installed, Stopped.
Note: This does not start the
DataLynx Server. To start the
Server, refer to the Running
Service section.
15
DataLynx User Manual
5.1.2 Running Service
If you do not already have the DataLynx Server Window
open, go to: Start Button -> Program Files -> DataLynx ->
DataLynx Server
This window will appear
assuming DataLynx is not
installed.
Click
the
"Start/Continue" button.
Note: It may take a couple of
minutes for the Server to start
running.
16
DataLynx User Manual
5.1.3 Pausing
Pausing forces the Server to stop polling for PLC input. This
can be useful when configuring the Server because it will
prevent irrelevant data from being stored.
If you do not already have the DataLynx Server Window
open, go to: Start Button -> Program Files -> DataLynx ->
DataLynx Server
This window will appear Assuming Running
17
DataLynx User Manual
Click the "Pause (Stop
Listening)" button, and
this window should
appear
Note: This does not stop
the DataLynx Server. To
stop the Server refer to the
Stopping section
5.1.4 Stopping
Stopping the DataLynx Server completely stops the
program, instead of stopping polling. This feature is useful
because the Server must stop before you can uninstall it.
If you do not already have the DataLynx Server Window
open, go to: Start Button -> Program Files -> DataLynx ->
DataLynx Server
18
DataLynx User Manual
In the DataLynx Server
Window, click the "Stop"
button, and this window
should appear.
5.1.5 Diagnosing
Diagnosing the DataLynx Server allows the user to
troubleshoot and view real-time events.
If the DataLynx Server Window is not open, go to: Start
Button -> Program Files -> DataLynx -> DataLynx Server
19
DataLynx User Manual
In the DataLynx Server Window, go to the menu:
File->Error Log
The Diagnostics Window below should appear.
20
DataLynx User Manual
5.1.6 Uninstalling
For troubleshooting reasons, it is a good idea to uninstall the
Server entirely.
To open the DataLynx Server Window, go to: Start Button
-> Program Files -> DataLynx -> DataLynx Server
Click on the "Uninstall"
button, and this window
should appear.
21
DataLynx User Manual
5.2 Monitor
Overview
The DataLynx Monitor allows the user to configure the
DataLynx Server and retrieve its data files over the network.
Also, the DataLynx Monitor permits the user to
troubleshoot. Below is the main screen and the explanations
of each field:
Server Address: Field where one enters the address of the
DataLynx Server
Last Update: Denotes the most recent PLC input time
Status: Displays the Server's locked and listening state
Modem(s): Displays list of currently configured modems on
the Server as well as each modem’s status
Note: Modems only lists the last update. Check the date to verify if
you are receiving information when expected.
Messages: Displays updates from the Server as well as from
the Monitor itself
22
DataLynx User Manual
5.2.1 Configuring
Note: The Server must be connected in order to configure the
Server.
Go to the menu:
Options -> Configure
Server
A list of modems, if any, configured for the Server will
appear.
23
DataLynx User Manual
To add a modem, click on the "Add" button, and a Modem
Configuration screen like the following will appear.
Below is an explanation of each of the Modem’s
Configuration Window's fields:
Alias: Optionally, a more descriptive name for the modem,
e.g., “My PC's Modem”
COM Port: The port the modem will use
Baud Rate: The speed that the modem will connect at
Parity: Parity that the modem will use; “none” is the default
parity and is preferred for most modems.
# Retries: Number of times DataLynx will try to read data
before it reports an error
24
DataLynx User Manual
Below is an explanation of each of the Phone Number’s
Configuration fields:
Phone Number: The phone number DataLynx is to dial
Data Directory: Where the data files will be stored
Alias: Optional, a more descriptive name of the phone
number, e.g., “Plant One in Atlanta”
Use Alias in Filename: Configures DataLynx to use the alias
in the data logged file name
New Data file Cycle: Configures DataLynx’s new file
creation cycle
Field Separation: Configures either tab or comma to be
used in separating individual fields
Log Phone Number: Configures DataLynx to log the phone
number in the data file
Log Alias: Configures DataLynx to log the alias in the data
file
Display header for fields: Configures DataLynx to log the
headers in the first line of the data file
Log Timestamp in Data Files: Configures DataLynx to log
the date and time in the data file
Example Filename: Illustrates an example file name given
the current configuration
Archiving and Deleting:
Archive Files Cycle: Configures DataLynx to archive
monthly/yearly. Archives by zipping files into a zip file.
Archived Files Directory: Where the zipped files will be stored
Delete Files Cycle: How often DataLynx will delete the files
Modbus: Station #- the station # configured in the PLC
25
DataLynx User Manual
Diagnostics: One-Dial Test: Allows the user to perform a
trial dial up and poll to confirm that the configuration will
work
Poll Interval:
Timed Interval: allows the user to specify the poll to occur at
specific timed intervals
Note: If you have multiple phone numbers, each poll will dial each
of the phone numbers at the poll interval. In contrast, if each
phone number had an individual poll interval, there eventually
would be a conflict in poll times.
Day Interval: Allows the user to specify the poll to occur at
certain days and times
Fields: User-entered fields that DataLynx will request when
polling
26
DataLynx User Manual
5.2.2 Modifying a Modem
To modify a modem, go to menu:
Options-> Configure Server
A list of modems, if any, configured for the Server will
appear:
27
DataLynx User Manual
Click on the "Modify/View" button, and a Modem
Configuration screen will appear with the PLC data.
The Modem Configuration window below is an example:
Once finished making changes, click the "OK" button or
"Cancel" to discard your changes.
28
DataLynx User Manual
5.2.3 Deleting
To delete modems, go
to menu: Options>Configure Server
A list of modems, if any, configured for the Server will
appear:
Select the modem to delete and click the "Delete" button.
29
DataLynx User Manual
5.2.4 Duplicating
A modem listing may be created and duplicated. This
duplicating option is a great time-saving feature for those
with many modems with similar configurations.
To duplicate a modem
listing, go to menu:
Options ->Configure
Server
A list of modems, if any, configured for the Server will
appear.
Click the "Duplicate" button, and a window will appear
asking for COM Port, Alias , Baud Rate, Parity, and #
Retries. Enter the necessary information and click “OK” to
save changes, otherwise click “Cancel” to discard changes.
30
DataLynx User Manual
5.2.5 Connecting
Connecting to a DataLynx Server is important because it
allows the user to configure the DataLynx Server and
retrieve its data files.
In the main screen portion labeled Server Address: enter the
Address.
Then press the "Connect" button. If the connection has
been made, the "Connect" button text will become
"Disconnect."
31
DataLynx User Manual
5.2.6 Hiding
Hiding is a convenient feature for temporarily placing the
Monitor out of view for later access. To hide the Monitor,
go to the menu: File->Hide
Notice that the DataLynx icon
appears on the task bar:
Conversely, the application may be restored by right clicking
on the icon and selecting the "Restore" item:
32
DataLynx User Manual
5.2.7 Backing Up and Restoring
Backing Up
Backing up the configuration allows the user to safely restore
all changes in the event of a hardware failure. To back up the
configuration, go to the menu: Tools->Backup
Configuration
You will be prompted for a filename. Click "Save" and note
where you saved the file for a possible future restoration.
Restoring
To restore the configuration, go to the menu: Tools->
Restore Configuration The following window should
appear.
You will be prompted for a filename. Click "Open" and the
Server/Monitor should be restored to its original state.
33
DataLynx User Manual
5.2.8 Polling
The DataLynx Server maintains "polling" and "not polling"
states for PLC input. The user may change the polling state
from the Monitor as well as from the Server program.
Changing the polling state can be useful when in the process
of installing new PLCs or changing the PLC configuration
to prevent the Server from receiving irrelevant data.
Click on the "Start Polling" button (If the button states
"Stop Polling" that means the Server is already listening).
If successful, the status should now read "Polling Modems."
To Make the Server Stop Polling, click on the “Stop
Polling” button.
If successful the status should now read "Not Polling
Modems."
34
DataLynx User Manual
5.2.9 Locking / Unlocking
Locking/Unlocking is a useful feature for preventing
unwanted modem configurations and Server polling state
changes. Steps to lock/unlock are below:
Click the "Lock"
button.
A screen will appear
asking for the lock
code.
Enter the lock code, and Click "OK." If successful, the
status section should now display a locked status:
Warning: If you forget/lose the lock code you will NOT be able to
unlock the Server.
Conversely, to unlock the Server, click the "Unlock" button,
enter the code, and Click "OK.”
35
DataLynx User Manual
5.2.10 Reporting
Reporting is one of the most useful features of the Monitor.
The user may view or save files generated by the Server over
a network without having physical access to the Server.
To view a report, go to menu:
Tools -> Report
A report screen like the following dialog box should
appear:
36
DataLynx User Manual
Select the desired PLC data you wish to view in the
modem/phone number list:
Now select a file in the File(s) list and click either the
"Open,” "Open With..." or the "Save" button. There is a
difference between the "Open" and "Open With...."
buttons. "Open" uses the default application to open the
file. "Open With..." prompts you for the application in
which to open the file.
Note: If you open the current log file outside of DataLynx (Example:
log file straight from Excel), it will lock the file and not allow
DataLynx to store data.
37