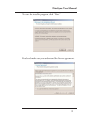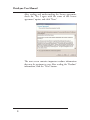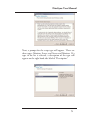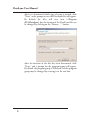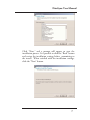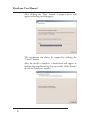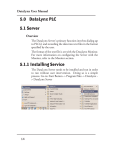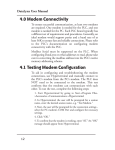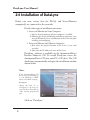
1
DataLynx User Manual
2.0 Installation of DataLynx
Before you start, ensure that the PLC(s) and Server/Monitor
computer(s) are connected to the network.
Decide what type of installation you want:
1. Server and Monitor on Same Computer
a. May be the only option if only one computer is available.
b. If hosting the Server and Monitor on different computers, users
may install both the Server and Monitor on the Server for quick
installing and configuring.
2. Server and Monitor on Different Computers
a. Ideal when the physical location of the Server is not easily
accessible.
b. Must note the IP Address or name of the Server.
DataLynx software is available on the AutomationDirect
Product Showcase CD. To install DataLynx, insert the
AutomationDirect CD into your PC’s CD drive. The CD
should start automatically and open the installation window
shown below.
Note:
If the AutomationDirect CD
does not start automatically, go
to your WindowsTM START
button, select RUN, and type:
E:\setup.exe
Change the letter “E” to
correspond to the letter for
your CD drive. Then click on
“OK,” and the program will
start.
Click on “DataLynx.”
2
DataLynx User Manual
To start the installer program, click “Next.”
Read and make sure you understand the license agreement.
3
DataLynx User Manual
After reading and understanding the license agreement,
check the "Yes, I agree with the terms of this license
agreement" option, and click “Next.”
The next screen contains important readme information
that may be pertinent to you. After reading the “Readme”
information, click the “Next” button.
4
DataLynx User Manual
Next, a prompt for the setup type will appear. There are
three types: Monitor, Server, and Server and Monitor. If a
type in the list is selected, a description of the type will
appear on the right hand side labeled "Description."
5
DataLynx User Manual
After it is determined which type of setup is wanted, click
“Next,” and a prompt to save the DataLynx files will appear.
By default the files will save into c:\Program
Files\DataLynx\, but the location of the DataLynx files can
be changed by clicking on the “Browse…” button.
After the location of the files has been determined, click
“Next,” and a prompt for the program group will appear.
By default, the program group is DataLynx, but the program
group may be changed by entering it in the text box.
6
DataLynx User Manual
Click “Next,” and a prompt will appear to start the
installation process. It is possible to click the “Back” button
and review the installation settings before committing to
the install. When satisfied with the installation settings,
click the “Next” button.
7
DataLynx User Manual
After clicking the “Next” button, a progress meter will
appear indicating install progress.
The installation can always be stopped by clicking the
“Cancel” button.
After the install is complete, a notification will appear to
confirm that installation has been successful. Click "Finish"
to exit the DataLynx installer.
8