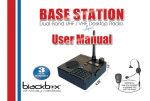
1
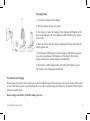
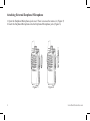
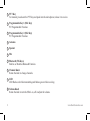
Contents
Safety Matters.....................................2
Charging Steps.................................... 3
Battery Information............................... 4
Antenna Information............................. 5
Belt Clip Information............................ 5
Earphone/Microphone Information...... 6
Radio Overview................................... 7-9
Basic Operation................................... 10
Turn On/Off.......................................... 10
Adjust Volume....................................... 10
Select Channel...................................... 11
Make Call.............................................. 11
Receive Call.......................................... 11
www.blackboxradios.com
Auxiliary Functions............................ 12
PC Programming................................... 12
Bluetooth Functions.............................. 13
Programmable Key Settings................. 13-16
Other Function Settings........................ 17-20
Specification.......................................... 21
Technical Terms.................................... 22
Warranty................................................ 23
FCC Notice........................................... 24
1
Safety
Please read rules below. Nonobservance of these rules may cause danger or violation of law.
• Using this radio must comply with regulations of local government.
• Please turn off the radio before entering a potentially explosive or flammable environment.
• Do not replace or charge battery pack in a potentially explosive or flammable environment.
• Turn off the radio before approaching blast area and detonator area.
• Do not use damaged antenna. Damaged antenna may cause burns.
• Only qualified technicians are allowed to maintain this two-way radio. Do not disassemble the radio.
• To avoid problems caused by electromagnetic interference or electromagnetic compatibility, please turn off the radio in places with a Wireless Communication Transmit Equipment Prohibited ± mark, such as hospitals or other health care facilities. When in a plane, turn off the radio if required.
• Do not put the radio within the possible range of an air bag in a car.
• Do not expose the radio to direct sunlight or near heating devices for a long time.
• Keep the radio vertical and speak near the microphone during transmitting.
• If you carry the radio on the body, please keep the antenna 1 inch (2.5cm) away from the body when transmitting.
2
www.blackboxradios.com
Charging Steps:
1. Connect the adapter to the charger.
3. The charger is ready for charging if the indicator LED lights red for one second and turns off. If the indicator LED is flashing, the charger is not ready.
4. Place the battery into the charger aligning the battery slots with the charger quide rails.
5. The indicator LED lights red when charging. If the battery capacity is too low, the indicator LED flashes red. The battery first trickle charges and turns to normal charging automatically.
6. The battery is fully charged when the battery LED light is green. The charger stops charging automatically.
2. Plug the adapter into an A/C outlet.
Precautions in Charging
Please charge the battery before initial use or after extended storage. Please change or charge the battery if the power
is low. If the battery power is consumed quickly even after a normal charge the battery life is finished. Please replace
with a new battery pack.
Do not charge the battery with the radio power on.
www.blackboxradios.com
3
Attaching and Removing the Battery Pack
Attaching the Battery
Match the two grooves of the battery with the
corresponding guides on the back of the radio. Make
sure the battery is flat against and parallel to the
aluminum chassis.
Removing of Battery:
Before removing, make sure the radio is turned off.
Then push downwards on the battery latch.
Then push the battery along the guide until the battery
latch locks.
Slide the battery towards the bottom of the radio.
4
www.blackboxradios.com
Attaching/Removing the Antenna
Attaching/Removing Belt Clip
Attaching the Antenna (Figure 1)
Screw the antenna into the connector at the top of the
radio by holding the bottom of the antenna, and turning
it clockwise until secure.
Attaching Belt Clip (Figure 3)
Align the screw eyelets of the belt clip with those on
the rear of radio and fasten the belp clip with enclosed
screws.
Removing the Antenna (Figure 2)
Rotate the antenna counter clockwise by holding the
bottom of antenna.
Removing Belt Clip (Figure 4)
Loosen the screws to remove the belt clip.
Figure 3
Figure 4
Figure 1
www.blackboxradios.com
Figure 2
5
Attaching External Earphone/Microphone
1. Open the Earphone/Microphone jack cover. There is no need to remove it. (Figure 5)
2. Insert the Earphone/Microphone into the Earphone/Microphone jack. (Figure 6)
Figure 5
6
Figure 6
www.blackboxradios.com
Radio Overview
www.blackboxradios.com
7
1 PTT Key
To transmit, press down the PTT key and speak into the microphone; release it to receive.
2 Programmable Key 1 (SK1 Key)
PC Programmable Function.
3 Programmable Key 2 (SK2 Key)
PC Programmable Function.
4
Antenna
5
Speaker
6
Mic
7 Bluetooth (TK Keys)
Enables or Disables Bluetooth Function.
8 Channel Knob
Rotate the knob to change channels.
9 LED
LED flashes red while transmitting and flashes green while receiving.
Volume Knob
Rotate the knob to turn the SEAL on, off or adjust the volume.
10
8
www.blackboxradios.com
Overview (continued)
11
Accessory Jack and cover
12
Belt Clip
13
Screws (Belt Clip)
14
Li-poly Battery
15
Charging Contacts
16
Battery Latch
www.blackboxradios.com
9
Basic Operation
Volume Adjustment
Turning the Radio ON/OFF
After the radio is turned on, rotate the Power Switch/
Volume Control knob to adjust volume.
Rotate the Power Switch/Volume Control knob
clockwise until a click sounds to turn on the radio. At
the same time, a voice indication of the current channel
is heard.
Rotate the Power Switch/Volume Control knob counter
clockwise until a click sounds to turn off the radio.
Tip: you can listen to background noise in monitor
mode and adjust the volume.
10
www.blackboxradios.com
Channel Selecting
Transmitting
Rotate the channel to choose your desired channel from
1~16 channels.
To talk, hold down the PTT key and speak into the
microphone with normal voice. Please keep the
microphone at least 2 inches away from your mouth.
You can select the channel according to the number or
symbol mark at the bottom of the knob. Also, you can
operate according to channel annunciation.
Tip:
1. Hold down the PTT button and the LED indicator
glows red, the radio begins to transmit.
2. If the LED indicator flashes red, the battery power is
insufficient. The radio can not transmit when the battery
power is not enough for normal operation.
Receiving
Release the PTT button, the radio begins to receive. You
can hear the other voice if you receive a call on your
current work channel. If call signal is too weak or you
set very high squelch level, you can not hear the call.
www.blackboxradios.com
11
Auxiliary Functions
Auxiliary Functions need to be set through PC software or contact your
dealer for programming.
PC Programming
1. Visit blackboxradios.com to download the Seal™ programming
software (you can also contact your dealer for programming).
2. Turn off the radio and connect it and PC with the programming cable
(see figure on the right).
3. Run the programming software, then turn on the radio. Press “Read”
button and change the parameter data as needed.
4. Press the “Write” button to change parameters in the radio.
5. For parameter setting and operation, please refer to the help documents
of the software.
12
www.blackboxradios.com
Programmable Key Settings
Key Setting menu. The default setting is as follows:
• The default long press duration is 2 seconds.
• Top Key (blue key) long press: on
• Top Key (blue key) is short press: off
• Side Key 2 long press: off
• Side Key 2 short press: monitor
• Side Key 1 long press: off
• Side Key 1 short press: off
You can change the function settings to a function key’s long and short presses using the programming software on
the “Key Settings” Menu.
The keys can be set as: off, monitor, monitor momentary, sound of encrypt, alarm, electricity demand, whisper,
VOX or power.
Bluetooth (Pairing with an Audio Accessory)
* Turn the volume knob clockwise and turn on the radio while holding down the Top Key (Blue button) to put the
SEAL in pairing mode.
You will see the LED turn a solid light green. Once you see a solid light green LED, release Top Key (Blue button)
as the SEAL is now in audio accessory pairing mode.
Next, activate the pairing mode on your compatible wireless audio accessory and wait 15 seconds for connection
with SEAL.
www.blackboxradios.com
13
Connection with BT earpiece is indicated by beep and LED going dark on SEAL radio.
You are now ready to use your BT earpiece with the SEAL.
* If the SEAL does not detect a compatible wireless accessory within 60 seconds of being put into pairing mode,
the SEAL will exit the pairing mode and resume normal operation.
Battery Power (electricity demand)
With this function, the radio will report the battery power by audible indication: “Power High”, “Power Middle”,
“Power Low”, and “Please Charge Battery”.
High/Low Power Switching
You can set the power setting of each channel separately according to your work environment to maximize the use
of battery power. When set at low power, the radio uses less current, thus the battery operating time is prolonged.
High power is 5W and low power is 1W.
• You can select “Power Select” in “Channel Information” menu to set the power as high/low power of each
channel separately.
Monitor
This function can be set as (Top Key) / (Side Key 2) / (Side Key 1) using the programming software on the “Key
Settings” Menu. For operation, press the programmed key to hear a weak signal and to help you adjust the volume
when no signal is received. Press the key again to cancel monitor.
Sound Encrypt (Voice Encryption)
When this function is programmed, the transmit sound is encrypted. The other side needs to decrypt the
transmission. Otherwise, the sound received is noise or unintelligible audio.
1. This function can be set as (Top Key) / (Side Key 2) / (Side Key 1) using the programming software on the “Key
Settings” Menu.
14
www.blackboxradios.com
2. Press the programmed key and the radio will announce “Voice Encrypt On”. Press again to disable and the radio
will announce “Voice Encrypt Off”.
3. You can turn this function on/off on the “Optional Feature” menu at the “Sound of Encryption”. Check the box to
turn on the function and uncheck the box to turn off the function.
Whisper
With this function, you can be clearly heard even if you speak into the radio with a very low voice.
1. This function can be set as (Top Key) / (Side Key 2) / (Side Key 1) using the programming software on the “Key
Settings” Menu.
2. Press the programmed key and the radio will announce “Whisper On”. Press again to disable and the radio will
announce “Whisper Off”.
3. To set the microphone receiving volume level the Whisper level can be set as 1, 2 and 3. 1 is most sensitive, 3 is
least sensitive.
4. You can turn this function on / off on the “Optional Feature” menu at the “ Whisper Function”. Check the box to
turn on the function and uncheck the box to turn off the fuction.
Alarm
With this function programmed, the radio alarm sounds and the LED glows red. At the same time it sends an
emergency signal to other Seal radios on the same channel and the receiving radio will sound an alarm tone.
1. This function can be set as (Top Key) / (Side Key 2) / (Side Key 1) using the programming software on the “Key
Settings” Menu.
2. To stop the local alarm, press the (PTT) key to return to normal operating status. The receiving Seal radio
resumes normal operation after pressing (PTT) key.
3. After sending the emergency signal, the radio will not receive transmissions until the (PTT) key is pressed. The
radio will re-send the emergency signal every 5 seconds until the (PTT) key is pressed.
4. You can turn this function on / off on the “Optioanl Feature” menu at the “Alarm Function”. Check the box to
turn on the function and uncheck the box to turn off the function.
www.blackboxradios.com
15
VOX
With VOX, you can directly speak into the microphone without holding down the (PTT) key. The LED glows red
and your voice will be transmitted. When operating in Whisper VOX mode using earphones, the radio beeps when
VOX is enabled.
1. This function can be set as (Top Key) / (Side Key 2) / (Side Key 1) using the programming software on the “Key
Settings” Menu.
2. Press the programmed key and the radio will announce “VOX On”. Press again to disable and the radio will
announce “VOX Off”.
3. To set the voice control sensitivity of the VOX, the VOX level can be set as 1, 2, 3. 1 is the most sensitive, 3 is
the least sensitive.
4. Whisper VOX (using earphone): Check the box to enable the function and uncheck the box to disable the function.
5. VOX function: Check the box to enable the function and uncheck the box to disable the function.
During the VOX operation, press the (PTT) key to cancel the VOX function. Turn off and then turn on the radio to
re-enable the VOX function.
Note: Checking both “Whisper VOX” and “VOX Function” the VOX is disabled.
16
www.blackboxradios.com
Other Function Settings
Voice Prompts
The default setting for this function is voice prompts in English. You can know the current channel through voice
prompts.
1. In the “Voice/Beep Tone” in “Optional Feature” menu, you can set the prompts as OFF/English/Tone.
2. Channel Annunciation: The radio will report the current channel number when you switch to a channel.
3.Low Battery Alert: The radio will alert you by voice prompts when the battery power becomes low.
4. Scan On Indication: If the current channel is set as the scan channel, the radio will inform you by voice prompts.
Low Battery Alert
When the radio announces the low battery alert either by voice indication “beep/please change the battery” or the
LED flashes red when transmitting the radio will stop transmitting. Please replace with a new battery or charge the
battery.
Battery Save
The receiver circuit will cycle ON and OFF by the selected ratio to reduce power consumption. The radio
automatically enters save mode 5 seconds after no signal is received or transmitted and no key has been pressed.
1. The default save scale is 1:3. You can change the “Save Scale” in the “Optional Feature” menu of the
programming software. You can select off, 1:1, 1:2, 1:3, or 1:4. Selecting “Off” cancels the auto battery save.
Selecting 1:4 offers the highest battery conservation.
www.blackboxradios.com
17
DTMF (PTT ID/ANI)
You can enter a DTMF code (up to 8 digits, consisted with 1234567890ABCD*#) in the “PTT ID” item in the
“Optional Feature” menu. You can also set the code to be sent at the “Begin of Tx”, “End of Tx” and/or as “Side
Tone”. Check the box to enable the function and uncheck the box to disable the fuction.
. These two items are not chosen in default setting.
You can edit the DTMF code setting in the “DTMF” item in the “Optional Feature” menu.
DTMF Speed (digit/s): Setting Range is 4-15. Default is 6.
First Digit Time (ms): Setting Range is 0~100ms. Default is 0ms.
First Digit Delay (ms): Setting Range is 100~1000ms. Default is 100ms.
Lock Check
When this Function is set as “Check”, the radio will sound a continuous “Beep” when the PLL overclocks or is
unable to work normally. When this item is set as “Off”, the radio will not make lock check of PLL.
Busy Channel Lock
This function prevents the radios from transmitting while another radio is transmitting on the same frequency or on
the same frequency with the same CTCSS/CDCSS tone. Pressing (PTT) key while the channel is in use, the radio
will generate alert tone and transmission is prohibited. Release (PTT) key to stop the alert tone. When channel is
not in use, press (PTT) key again and transmission is enabled.
1. Using the programming software in the “Channel Information” menu you can set this function in the “Busy
Lock” column of each channel separately.
“OFF”: the function is disabled.
“Carrier”: the radio will not transmit if signal on the current frequency is being received.
“QT/DQT the radio will not transmit if signal on the current frequency with the same CTCSS/CDCSS tone is being
received.
18
www.blackboxradios.com
Scan
The default setting of this function is off. When this function is enabled, rotate channel selector knob to 16th
channel. The LED flashes green and the radio will check all channels that have the Scan set to YES. The radio
automatically stops at the channel on which a signal is received.
You can enable through “Scan Information” item on the “Optional Feature” menu:
1. Scan Type: Selecting “off”, CH16 is a normal operating channel. Selecting “Carrier Operate” when you rotate
the channel selector to 16th channel, the radio starts scanning.
2. Dropout Delay Time: The Dropout Delay Time is the time from the end of a received call to the time scanning
automatically resumes. Setting range is 0.5~64.5s. The default setting of this item is 3.5s.
3. TX Dwell Time: TX Dwell Time is the time from the end of transmission to the time scanning automatically
resumes. Setting range is 0.5~64.5s. The default setting of this item is 3.5s.
Squelch
Set squelch level to decide how strong a received signal needs to be to unmute the speaker. The lower the squelch
level the weaker the received transmission needs to be to unmute the speaker.
The default setting of this function is Level 4. You can set through “Squelch Level” option in “Optional Feature”
menu. Setting range is 0~9. Selecting “0” causes the squelch to be open. The higher the squelch level, the harder to
open the squelch.
Time Out Timer (TOT)
Time out timer is used to prevent someone from using the same channel for a long time. At the same time to
avoid radio damage, caused by extended continuous transmission. If the transmission exceeds the preset time,
transmission will be inhibited and an alert tone will sound. To stop the alert tone, release the (PTT) key. Press
(PTT) key again and transmission is enabled.
The default setting of this function is 180s. You can set through “Time Out Timer” item in “Optional Feature”
menu. The maximum time is 5 minutes.
www.blackboxradios.com
19
25KHz/12.5KHz
The default setting is 25KHz. You can decide whether the channel works as 25KHz or 6.25KHz through “W/N”
item in “Channel Information” menu.
CTSS/CDCSS
CTSS/CDCSS is a sub-audio signal, mainly used to avoid unwanted conversations on the same channel. With
CTSS/CDCSS set, you can only hear conversations with matched CTSS/CDCSS within effective signal range.
Without CTSS/CDCSS, you will receive all conversations on the same channel within effective signal range. You
can preset CTSS/CDCSS signaling through “CTC/DCS ENC” item in “Channel Information” menu or by your
local dealer.
Invalid Channel Indication
If current operating channel is an invalid channel, the radio will send a continuous alert tone, which means the
current channel is unable to transmit or receive.
Battery Power Indication
This function enables you to know the residual battery power at any time and place.
Turn on the radio and LED will indicate residual battery power L1, L2, L3 and L4 by flash times: 1, 2, 3 and 4.
L4 means the battery power is full. L1 means the battery power is lower than minimum normal operating power
capacity and should be replaced soon.
Power Protection
During use or maintenence, transmission is prohibited if the power source is improper or the working voltage is
higher or lower than normal working voltage.
If the work voltage is lower than 6.2v or higher than 9.5v, transmission is disabled.
20
www.blackboxradios.com
Specification
General
Frequency Range
Channel Capacity
Channel Spacing
Frequency Stability
Operating Temperature
Antenna Impendence
Li-ion Battery
Operating Voltage
Dimension (W×H×D) w/battery
Weight (with antenna & battery)
UHF: 400-470MHz Or VHF: 136-174MHz
16 (15+S)
25.0kHz / 12.5kHz
±2.5PPM
-25~+55°C
50Ω
2600mAh
7.4V
2.3” × 3.75” × 2.17” or 59mm x 96mm x 55mm
6.98 oz. or 198g
Transmitter
RF Power (H/L)
UHF: 4W/2W
Receiver
Audio Distortion
Reference Sensitivity
Adjacent Channel Selectivity
Intermediation Reject Ratio
Audio Power Output
≤5%
0.15uV/ 0.18uV
65dB / 55dB
55dB
Maximum: ≥1.5W
www.blackboxradios.com
VHF: 5W/2W
21
Appendix: Technical Terms
Name
CTCSS / CDCSS Monitor
Scan
BCL
Wired Clone
TOT
Squelch
Squelch Level
VOX
Whisper
Alarm/Emergency Alert
PTT ID
BT
22
Description
CTCSS / CDCSS is a kind of signaling attached to audio signal. If the
CTCSS / CDCSS of the transmitter is the same as that of the Receiver, the speaker
is unmuted and sound comes out. Otherwise sound can not come out.
This function enables you to hear all calls even with unmatched CTCSS / CDCSS.
A way to hear conversations on all channels.
Busy Channel Lockout. When this channel is in use by others, your radio is prohibited from
transmitting on the channel to avoid interference.
This is a way to clone parameters from one radio to another one.
Time out timer is used to prevent someone from using the same channel for a long
time. At the same time to avoid radio damage by continuously transmitting for a long time.
This is to solve problems of talk quality and noise. Squelch suppresses the background
noise and keeps the radio quiet when no signal is received. Squelch mutes the radio when
no signal is received. Turn on the Squelch, and you will hear the sound from the speaker.
Noise strength is inversely proportional with signal stregth. The stronger the
signal, the weaker the noise is. The noise is divided into several levels according
to its strength. The user can select the level to suit the working environment.
Voice Operated eXchange: VOX enables user to speak into the radio without
pressing (PTT) key and the sound is transmitted.
With whisper function on and the radio equipped with earphone, you can speak into
the microphone quietly and your voice still can be clearly heard.
This function enables the user to send emergency alert to other users on the same channel.
Other radios on the same channel will sound an emergency alert after received emergency signal.
With this function on, the radio will send ID code when pressing or releasing the (PTT) key,
allowing another radio and management control centers to identify it.
Bluetooth function for pairing and connecting with Bluetooth accessories.
www.blackboxradios.com
Warranty and Return Policy
If there are any Defects in material or workmanship under normal use and service, radio items will be repaired or replaced
free of charge for 3 Years from date code on product (1 year only for battery). Simply contact your salesperson for
repair or replacement.
Blackbox Radios warrants all products against manufacturer’s defects as long as the product is still under warranty. The
forgoing warranty is limited and is not applicable to: (i) normal wear and tear; (ii) defects or damage caused by misuse, accident
(including without limitation collision, fire and the spillage of food or liquid), neglect, abuse, alteration, unusual stress, modification,
improper or unauthorized repair, installation, alteration, wiring, or testing, improper storage, use in an unapproved device or if the serial
number has been removed; (iii) use not in accordance with the documentation; and (iv) damage caused by the equipment with which the
product is used. Visible physical damage invalidates warranty. Incomplete product kits will not be accepted for replacement or repair.
Shipment errors must be reported within 3 days of receipt of goods in order to get replacements.
Blackbox Radios does not accept returns on custom orders. All custom orders are final. Items may only be returned for credit if they are
unused, in original packaging and purchased within the last thirty (30) days. There will be a 20% restocking fee to ALL items returned
for credit that meet the above stipulations. Blackbox Radios does not issue refunds and we reserve the right to not issue credits.
Non-Warranty Repairs
Blackbox Radios standard labor rate is $60.00 an hour with a minimum requirement of thirty minutes. This does not apply to excessive
damage (i.e. water-damaged units). If excessively damaged unit is deemed repairable, the fee may be up to $85.00 per unit. The cost of parts
varies and is in addition to the labor chargers. Radio Programming fees are set at $5.00 per unit. All goods repaired will require a signature for
authorization to do the labor.
RETURN TO CUSTOMER (RTC ITEMS)
Items returned that are deemed “non manufacturers defect,” have the date code missing, or are not within the proper warranty time-period may
be repaired with a labor fee at the sole discretion of Blackbox Radios Items deemed “RTC” are not covered under Blackbox Radios, warranty
policy and the customer will be responsible for paying the shipping costs to return the products back to the customer. If the customer does not
want to receive the RTC items and pay the shipping costs, Blackbox Radios will dispose of the products.
By returning a product for repair, the owner grants Blackbox Radios permission to open and disassemble the product as required for evaluation.
In all cases, Blackbox Radios has sole responsibility for determining the cause and nature of failure, and Blackbox Radios determination with
regard thereto shall be final.
Customers pay for shipping to and from Blackbox Radios, the cost of the non-warranty repair will require payment in the form of
Visa, MasterCard, American Express or COD. Customers with open account status may be billed directly, if a purchase order for the
repairs and shipping is issued. If the customer does not approve the repairs through issuing a purchase order, the customer will be
responsible for paying the freight charges to ship the product back.
www.blackboxradios.com
23
FCC NOTICE:
This device complies with Part 15 and Part 90 of the FCC Rules and is listed.
Operational is subject to the following two conditions:
1. This device may not cause harmful interference, and
2. this device must accept any interference received, including interference that may cause undesired operation.
This equipment generates RF energy and if not installed or used in accordance with the instructions, may cause
harmful interference to radio communications and other devices. There is no guarantee that interference will not
occur. If this equipment does cause harmful interference, which can be determined by turning the equipment on
or off or transmitting momentarily, the user is encouraged to try to correct the interference by one or more of the
following methods:
• Reorient or relocate the receiving antenna.
• Increase the separation between the equipment and receiver.
• Connect the equipment into an outlet on a circuit that is different from the one that the receiver is connected.
• Consult the dealer or an experienced radio/TV/communications technician.
IC statement
The device has been tested and compliance with SAR limits, users can obtain Canadian information on RF
exposure and compliance.
Après examen de ce matériel aux conformité aux limites DAS et/ou aux limites d’intensité de champ RF,
les utilisateurs peuvent sur l’exposition aux radiofréquences et la conformité and compliance d’acquérir les
informations correspondantes.
24
www.blackboxradios.com
NOTES:
NOTES: