1
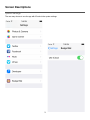
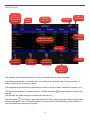
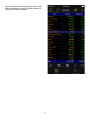
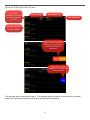
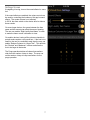
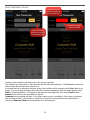
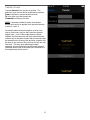
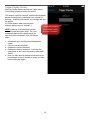
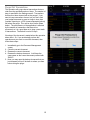
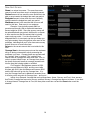
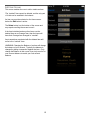
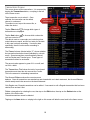
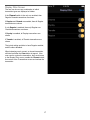
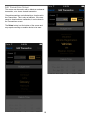
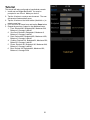
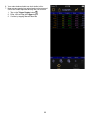
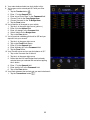
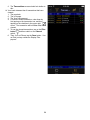
Budget Bal Mobile User Manual
v1.0 Updated 2015 February 25
Table of Contents
Budget Bal Mobile User Manual
1
Table of Contents
1
Synopsis
2
Screen Descriptions
3
System Settings
3
Items Screen
4
Document Management Screen
6
Settings Screen
7
About / Help Screen
8
Sort Items By Screen
9
New Transaction Screen
10
Transfer Screen
11
Trigger Payday Screen
12
Purge Old Transactions
13
New Item Screen
14
Edit Item Screen
15
Transactions Screen
16
Display Filter Screen
17
Sort Transactions By Screen
18
Edit Transactions Screen
19
Example Quick Start
20
Tutorial
21
1
Synopsis
The Budget Bal mobile application is used to record your
financial transactions, where each transaction belongs
to a specific budget item. The goal is to have enough
money for each of the items that one wants money for.
If there’s extra, then it can go towards savings or
niceties. If not, then one can see where the budget
needs adjusted.
This manual will show a typical scenario for budgeting
and balancing one’s bank statement in coordination with
the Budget Bal mobile application. It will also show
some tutorials and examples for daily and payday
activities.
One does not need to follow the processes shown here.
This manual assumes the reader knows terms like debit,
credit, outstanding, balance, etc. and the reader knows
how to balance his/her bank statement in the traditional
sense.
The interface was designed for amounts less than
$999,999,999.99, so if you need amounts larger than
this, this app is probably not for you.
The user may choose to store documents locally or in
iCloud.
The app will synchronize via iCloud with the Budget Bal
app for Mac OS.
The app was designed for iOS 8 and the iPhone, but it
will work on iPads as well.
The app supports landscape and portrait modes.
2
Screen Descriptions
System Settings
The user may choose to use the app with iCloud via the system settings.
3
Items Screen
goto
Document
Management
screen
Activity
(share)
unselect
item row
sort rows
new
transaction
tap row to
select it
swipe left to goto
transactions screen
new item
transfer
operation
trigger
payday
edit item
purge old
transactions
goto
transactions
screen
The *catchall* item will always be the first row. It is the default item and cannot be deleted.
If the balance is below zero, it is shown in red. If it is equal to the maximum, then it is shown in green. If
neither of these is true, it is shown in yellow.
If the budgeted amount matches the desired amount, then it is shown in green, otherwise it is shown in red.
The selected row is shown in a darker blue color. The Edit Item button
selected.
The user may also shake the device to unselect the selected row.
will only be active if an item row is
The Share button
can be used to export the document in CSV (comma-separated values) format via Mail,
AirDrop, Messages, or Copy. This can be useful if one want to see all the transactions in a spreadsheet, or
save old transactions before they are purged.
4
Here is what the items screen looks like on a small
device in portrait mode if the “Reduce Columns for
Larger Text” setting is enabled.
5
Document Management Screen
goto open
document (disabled
if no document is
opened)
goto About/Help
goto settings
new document
open document is
shown in green
swipe left on unopened
document to reveal the
Delete and Rename
operations
swipe left on open
document to reveal the
Close operation
The user may tap on a document to open it. The document does not need to be closed, but it is an option.
Opening an unopened document will close any currently opened document.
6
Settings Screen
If budgeting is boring, turn on the sound effects for some
fun!
If the sound effects are enabled, the volume control can
be used for controlling the loudness of this app’s sound
effects. The system volume is not affected.
In iOS 8, the mute switch on the device will also silence
these sounds.
On some larger devices, the space between the item
name and the amounts can affect the ease of viewing.
The user can enable “Right Justify Item Name” in order
to make the items screen a bit easier to view.
On smaller devices, having all the columns viewable in
portrait mode requires a very small font. If the font is too
small for the user to comfortably read, then the user can
enable “Reduce Columns for Larger Text”. This will hide
the “Desired” and “Maximum” columns and allow the
font to be larger in that mode.
The Purge operation deletes all cleared transactions
older than the number of days to keep. The user can
set the number of days to keep transactions for the
purge operation.
7
About / Help Screen
The user can find general information on this screen as
well as credits to those whose icons and sounds and
hints the author made use of.
version and build number
link to online help
8
Sort Items By Screen
Tap the category to sort by. The first time a category is
tapped, it will sort in ascending order. If the category is
already selected, and the user taps it, the sort order will
reverse for that category.
The *catchall* row will always come first no matter what
the sort order is.
9
New Transaction Screen
tap Done when
ready to commit
the transaction
field will turn red if
input is invalid
choose Credit if
putting funds into
the budget item
Creating a new transaction will likely be the most common operation.
Two examples are shown above. One shows the amount field with invalid input. The Done button will not be
active until the amount field has a valid amount.
If a budget item row is selected in the Items screen, then that item will be selected in the Budget Item list by
default. One can change the Budget Item that will be acted on regardless of what the default selection was.
Debit is selected by default. If one wants to add funds into the budget item, then select Credit instead.
Amount is the amount of the expenditure or deposit.
Comment can be anything you want. If I’m using a check to pay for something, I like to start my comment
with the check number. If you do this, be careful not to enter the check number into the Amount field! :-)
Choose the Date and Time that the transaction did or will take place.
10
Transfer Screen
Transfer Amount from one item to another. The
balance in your account will be unaffected by transfers.
From is the item to remove the Amount from.
To is the item to put the Amount into.
Comment is whatever you want.
NOTE: If a transfer mistake is made, then another
transfer will need to be applied in the opposite direction
in order to “undo” it.
An example where a transfer might be used is if one
uses a credit card to pay for items from two different
budget items. If two of the budget items are Water
Softener and Groceries and one buys bread and water
softener salt on the same receipt, then the amount might
be entered into the Grocery Item and then a transfer can
be done for the amount of the salt from the Salt Item into
Groceries. This way, when balancing the bank
statement, the transaction amount will match the bank
statement amount and at the same time, the balance of
the budget items will be correct.
11
Trigger Payday Screen
Enter the Payday Amount and tap the Trigger button.
You will be prompted to confirm this action.
This amount is put into *catchall* and then the Budgeted
amount for each item is transferred from *catchall* to
that item. As with any transaction, the overages will also
be applied.
It’s a nice situation when one sees item
budgets spilling over into *catchall* :-)
NOTE: A backup of the document is made
before this operation takes effect. So, if you
accidentally perform this operation and you
want to revert the document, then follow these
steps:
Trigger will become
active when a valid
amount is entered
1. Immediately go to the Document Management
screen
2. Close the current document
3. Rename the current document
4. Rename the backup document. It will have the
same name as the current document prefixed with
“BKUP-“
5. Now, you may open the backup document that you
just renamed and you’ll be back to where you were
before pulling the trigger
12
Purge Old Transactions
This operation will purge cleared transactions that are
older than the specified number of days. The number of
days is specified in the Settings screen. Transactions
that have not been cleared will not be purged. If you
want to keep transactions forever, but you don’t want
your budget document to grow too large in size, then
consider exporting to a CSV (comma-separated values)
file before the purge. This can be done via the Share
button. The performance of the application is affected
by the number of transactions that have to be
processed, so it is a good idea not to keep years worth
of transactions. The default is set to 60 days.
A backup of the document is made before this operation
takes effect. So, if you accidentally perform this
operation and you want to revert the document, then
follow these steps:
1. Immediately go to the Document Management
screen
2. Close the current document
3. Rename the current document
4. Rename the backup document. It will have the
same name as the current document prefixed with
“BKUP-“
5. Now, you may open the backup document that you
just renamed and you’ll be back to where you were
before doing the purge.
13
New Item Screen
Name is a unique item name. The same item name
cannot be used more than once in a budget document.
Desired amount is how much the user would like to be
able to save towards the budget item each pay period.
Budgeted amount is how much the user is actually
saving towards the budget item each pay period.
Maximum amount is the most that the user ever will
need for this item. Enter zero for no maximum.
Example: If one typically spends $800 on
groceries each month, then a reasonable maximum
amount might be $1000. Since the grocery money will
be replenished each pay period, then there’s no reason
to have much more than the amount that is typically
spent each pay period. If, on the other hand, the
budgeted item is a Lotus sports car that you dream you
may get someday, then you might just enter zero for the
maximum, indicating that you’ll never have extra money
that will flow over to some other item.
Balance is the current amount that is set aside for this
item.
Overage Item is where any amount over the maximum
will go to during a transaction activity, assuming the
maximum is not zero. Overage Items can cascade until
the *catchall* item is reached. The *catchall* item
cannot have an Overage Item other than itself. Also, in
order to prevent infinite loops, an Overage Item cannot
be chosen that would create an overage cascade back
into the item that is being added or modified.
For Example: If the Maximum amount is $500
and the current Balance is $450, and the user credits
this item with $100, then the Balance will become $500
and the $50 extra will go into the Overage Item. If, in
turn, the Overage Item has its Maximum exceeded, then
it will also put the extra into its Overage Item… and so on…
Infinite Loop Example: Assume that one had three items: Home, Grocery, and Food. Now, assume
that Food’s Overage Item was set to Grocery, and that Grocery’s Overage Item was set to Home. If one tried
to change Home’s Overage Item to Food, the item picker would turn red and the Done button would be
disabled.
14
Edit Item Screen
This screen enables the user to edit or delete an item.
The *catchall* item cannot be deleted, and the only part
of it that can be modified is the balance.
An item row must be selected on the Items screen
before the Edit button is active.
The Delete button is at the bottom of the screen and
may require scrolling the screen to see it.
It the item is deleted and any other items use the
deleted item as an Overage Item, then the items will
have their Overage Item changed to *catchall*.
Any transactions associated with the deleted item will
move to the *catchall* item.
WARNING: Changing the Balance of an item will change
the balance of your account. Typically, the balance is
changed by doing a transaction against the item. Only
change the Balance in this screen if you truly need to for
your account balance to match your real account
balance.
15
sort
Transactions Screen
This screen shows all the transactions. It is accessed by
tapping the Transactions button, or swiping to the left
on the Items screen.
Tap a transaction row to select it. Once
selected, the transaction can be edited,
cleared, or uncleared.
To unselect a row, tap on the screen title, or
shake the device.
edit selected
transaction
unselect
row
clear/unclear
transaction
filter
displayed
transactions
Tap the Filter button to change which types of
transactions are displayed.
Tap the Sort button
to choose which column the
rows are sorted on.
The date is used as a secondary sort order key when
sorted values are equal, and the sort order for the date
in this case is always ascending. If sorted by date
specifically, then the order can be ascending or
descending.
The Cleared column (labeled with a “C”) shows whether
the transaction has been cleared (indicated by a checkmark). Some transactions are automatically cleared
such as Payday and Transfer types. These types of
transactions cannot be uncleared.
The amount value appears in green if it’s a credit, and
red if it’s a debit.
The Transactions Total shows the total of non-cleared
transactions and does take into account the Credits.
This is the amount of outstanding transactions.
The Account Balance shows the current account
balance. Once all transactions are matched up and cleared with one’s bank statement, the Account Balance
should exactly match the amount on the bank statement.
Only Regular non-Cleared transactions can be edited. If one wants to edit a Regular transaction that has been
cleared, then unclear it first.
Delete a transaction by selecting the row, then tap on the Edit button, then tap on the Delete button at the
bottom of the Edit screen.
Cleared transactions cannot be deleted.
Tapping on the Items button or swiping to the right on this screen will take the user back to the Items screen.
16
Display Filter Screen
The user can choose any combination of which
transaction types are displayed or hidden.
If the Cleared switch is the only one enabled, then
Regular Cleared transactions are shown.
If Regular and Cleared are enabled, then all Regular
transactions are shown.
If only Regular is enabled, then only Regular nonCleared transactions are shown.
If Payday is enabled, all Payday transactions are
shown.
If Transfer is enabled, all Transfer transactions are
shown.
The typical setting would be to have Regular enabled,
and the others disabled.
When balancing one’s account, a cleared transaction
will hide itself after the Clear button is tapped. If the
user need to unclear the transaction, they would come
to the Display Filter screen, enable the Cleared switch,
then return to the Transactions screen and unclear the
transaction.
17
Sort Transactions By Screen
Tap the category to sort by. The first time a category is
tapped, it will sort in ascending order. If the category is
already selected, and the user taps it, the sort order will
reverse for that category.
18
Edit Transactions Screen
This screen can be used to edit or delete an uncleared
transaction, or to view a cleared transaction.
Cleared transactions are indicated by a check mark in
the Cleared box. This is only an indicator. If the user
wants to clear/unclear a transaction, it can be done in
the Transactions screen.
The Delete button is at the bottom of the screen and
may require scrolling on smaller device to be seen.
19
Example Quick Start
The easiest way to get started is to begin right after balancing your latest statement. This will minimize the
number of outstanding transactions you need to enter.
1. Add all the Items you want as part of your budget. If you have credit cards, then one of your Items could
be “Credit Card”. If you have more than one, then you could have something like “Visa Credit Card” and
“Sears Credit Card”.
2. Enter all outstanding transactions you currently have (ie, all the transactions that haven’t cleared your
bank). It’s possible that you don’t have any.
3. Edit the *catchall* balance to match your current account balance.
4. At this point, all of your outstanding transactions should be accounted for and your balance should match
your bank account balance.
5. You may transfer funds from *catchall* to any Items now to tidy up your budget.
6. From this point on, you would record any transactions that you make. If you make a payment on a credit
card, just record a debit transaction against that credit card item. If you make a deposit of birthday gift
money into your “Mad Money” budget Item, then make a credit transaction against that item.
20
Tutorial
This tutorial will take you through a hypothetical scenario
1. Install and run Budget Bal mobile. You may be
prompted to use iCloud. Make your choice.
2. Tap the + button to create a new document. The new
document will automatically open.
3. Tap the + button on the lower tab bar (the bluish +) to
create a new Item
4. Fill in the form as shown here and tap the Done button
5. Repeat the previous 2 steps for the additional items:
1. Food, Desired:300, Budgeted:300, Maximum:500,
Balance:0, Overage:*catchall*
2. Visa Card, Desired:0, Budgeted:0, Maximum:0,
Balance:0, Overage:*catchall*
3. Rent, Desired:800, Budgeted:800, Maximum:1600,
Balance:0, Overage:*catchall*
4. Clothing, Desired:100, Budgeted:50, Maximum:500,
Balance:0, Overage:*catchall*
5. Phone, Desired:120, Budgeted:120, Maximum:240,
Balance:0, Overage:*catchall*
6. Beer, Desired: 90, Budgeted:90, Maximum:200,
Balance:0, Overage:Food
21
6. Your main window should now look similar to this:
7. Now, assume payday has arrived and you have earned
$1600 and it was deposited directly into your account.
1. Tap on the Trigger Payday button
2. Enter 1600 and tap the Trigger button
3. Confirm by tapping Yes and then Ok
22
8. Your main window should now look similar to this:
9. You’ve gone out to eat and paid $17 with your Visa
Card.
1. Tap the Transfer button
2. Enter 17 in the Amount field
3. Enter “ate at Tom’s Diner” in the Comment field
4. Choose Food for the From Budget Item
5. Choose Visa card for the To Budget Item
6. Tap the Done button
10. You’ve had the oil changed on your vehicle
1. Tap the + in the upper right corner (yellow +)
2. Enter 34 in the Amount field
3. Enter “oil change” in the Comment field
4. Select Vehicle for the Budget Item
5. Tap on the Done button
11. You’ve received a birthday gift check for $25 and you
deposit it into your account.
1. Tap the + in the upper right corner
2. Tap on the Credit radio button
3. Enter 25 in the Amount field
4. Enter “birthday gift” in the Comment field
5. Tap the Done button
12. Your Visa bill arrives and you pay the balance of $17
1. Tap on the Visa card row to select it
2. Tap the + in the upper right corner
3. Notice that the Visa card Budget Item is already
selected since you selected the row before tapping
the + button
4. Enter 17 in the Amount field
5. Enter “paid in full” in the Comment field
6. Tap on the Done button
13. Your bank statement has arrived and you want to balance it.
1. Tap the Transactions button
23
2. The Transactions screen should look similar to
this:
14. Your bank statement has 3 transactions that have
cleared:
1. The paycheck
2. The oil change
3. The Visa Card payment
4. For each of these transactions, clear them by
first tapping on the transaction row, and then
tapping on the checkbox in the upper right
corner. The transaction will be hidden after it is
cleared.
5. To see the cleared transactions, tap on the Filter
button
and then switch on the Cleared
switch.
6. Then, if on an iPhone, tap the Done button. If on
an iPad, just tap outside the Display Filter
popover.
24
15. The All Transactions window should now look
similar to this:
16. The balance on your bank statement should match
the Account Balance shown here of $1,549.00
25