1
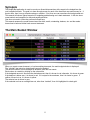
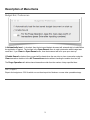
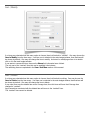
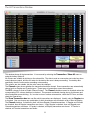
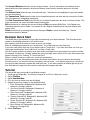
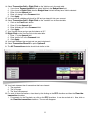
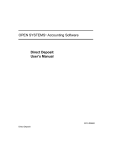
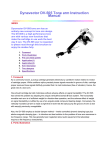
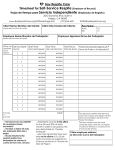
Budget Bal User Manual
v1.0 Updated 2014 October 24
Table of Contents
Budget Bal User Manual
1
Table of Contents
1
Synopsis
2
The Main Budget Window
2
Description of Menu Items
3
Budget Bal / Preferences
3
File / Export
3
Item / Add New
4
Item / Modify
5
Item / Delete
5
Transaction / Add
6
Transaction / Show All
6
Transaction / Transfer
7
Tools / Trigger Payday
7
Tools / Purge
7
The All Transactions Window
8
Example Quick Start
9
Tutorial
9
1
Synopsis
The Budget Bal application is used to record your financial transactions with respect to the budget item the
cost is applied towards. The goal is to have enough money for each of the items that one wants money for. If
there’s extra, then it can go towards savings or niceties. If not, then one can see where the budget needs cut.
This manual will show a typical scenario for budgeting and balancing one’s bank statement. It will also show
some tutorials and examples for daily and payday activities.
One does not need to follow the processes shown here.
This manual assumes the reader knows terms like debit, credit, outstanding, balance, etc. and the reader
knows how to balance his/her bank account statement.
The Main Budget Window
When you create a new document, or load an existing document, the main budget window is displayed.
The *catchall* item exists by default and it cannot be deleted.
The amount columns can be arranged in whatever order the user wants.
Each column is sortable by clicking on the column title.
If the budgeted amount is less than the desired amount, then it is shown in red; otherwise, it is shown in green.
If the balance is below zero, it is shown in red. If it is equal to the maximum, then it is shown in green. If
neither of these is true, it is shown in yellow.
The selected row is shown in grey.
If the selected row has an overage item set, other than *catchall*, then it is highlighted in a dark gold.
2
Description of Menu Items
Budget Bal / Preferences
If Automatically load… is checked, then the last saved budget document will automatically be loaded when
the application is started. The last item in the Open Recent menu is used to determine which budget was
saved last. If you Clear the Open Recent menu, then the document will fail to open upon start-up.
If Enable Sound is checked, then a sound will be heard when the user tries to clear a transaction using the
Clear transaction checkbox in the All Transactions window without checking the enable clear box first.
The Purge Operation will delete cleared transactions older than the number of days specified here.
File / Export
Exports the budget as a CSV file which one can then import into Numbers or some other spreadsheet app.
3
Item / Add New
Name is a unique item name. The same item name can not be used more than once in a budget document.
Desired amount is how much the user would like to be able to save towards the budget item each pay period.
Budgeted amount is how much the user is actually saving towards the budget item each pay period.
Maximum amount is the most that the user ever will need for this item. Enter zero for no maximum.
Example: If one typically spends $800 on groceries each month, then a reasonable maximum amount
might be $1000. Since the grocery money will be replenished each pay period, normally, then there’s no
reason to have much more than the amount that is typically spent each pay period. If, on the other hand, the
budgeted item is a Lotus sports car that you dream you may get someday, then you might just enter zero for
the maximum, indicating that you’ll never have extra money that will flow over to some other item.
Balance is the current amount that is set aside for this item.
Overage Item is where any amount over the maximum will go to during a transaction activity, assuming the
maximum is not zero. Overage Items can cascade until the *catchall* item is reached. The *catchall* item
cannot have an Overage Item other than itself. Also, in order to prevent infinite loops, an Overage Item cannot
be chosen that would create an overage cascade back into the item that is being added or modified.
For Example: If the Maximum amount is $500 and the current Balance is $450, and the user credits this
item with $100, then the Balance will become $500 and the $50 extra will go into the Overage Item. If, in turn,
the Overage Item has its Maximum exceeded, then it will also put the extra into its Overage Item… and so
on…
Infinite Loop Example: Assume that one had three items: Home, Grocery, and Food. Now, assume
that Food’s Overage Item was set to Grocery, and that Grocery’s Overage Item was set to Home. If one tried
to change Home’s Overage Item to Food, an error message would be presented warning of the loop that would
be caused. 4
Item / Modify
If no items are selected when this menu option is chosen, then it will default to *catchall*. One may choose the
Item to Modify from the item menu. If an item row is selected in the main budget window, then that item will
be chosen by default. One may still change the item to modify. A shortcut for modifying an item is to doubleclick on it in the main budget window.
If one wants to rename the item, then use the Name field, otherwise leave it blank.
The only part of the *catchall* item that can be modified is the balance.
The remaining items are explained in the Item / Add New section of this manual.
Item / Delete
If no items are selected when this menu option is chosen, then it will default to nothing. One may choose the
Item to Delete from the item menu. If an item row is selected in the main budget window, then that item will
be chosen by default. One may still change the item to delete.
If any other items use the deleted item as an Overage Item, then this items will have their Overage Item
changed to *catchall*.
Any transactions associated with the deleted item will move to the *catchall* item.
The *catchall* item cannot be deleted.
5
Transaction / Add
This is the most common operation one will do with Budget Bal.
There are three different ways to activate this operation: (1.) The menu item, (2.) right-clicking on a budget item
in the main window, (3.) the hotkey Option+A
If a budget item row is selected in the main table, then that item will be selected in the Budget Item list by
default. One can change the Budget Item that will be acted on regardless of what the default selection was.
Debit is selected by default. If one wants to add funds into the budget item, then select Credit instead.
Amount is the amount of the expenditure or deposit.
Comment can be anything you want. If I’m using a check to pay for something, I like to start my comment
with the check number. If you do this, be careful not to enter the check number into the Amount field! :-)
Choose the Date and Time that the transaction did or will take place.
Transaction / Show All
One may also use the Option+S hotkey to activate this operation.
The All Transactions window will appear. It will be discussed later in this manual.
6
Transaction / Transfer
Transfer Amount from one item to another. The balance in your account will be unaffected by transfers.
From is the item to removed the Amount from.
To is the item to put the Amount into.
Comment is whatever you want.
If you make a mistake when doing a transfer (and you’ve already Applied it), then you can either Revert the
document, or you can just do another transfer in the opposite direction.
Use Option+X as a shortcut for showing the Transfer window.
Tools / Trigger Payday
Enter the Payday Amount. This amount is put into *catchall* and then the Budgeted amount for each item is
transferred from *catchall* to that item. As with any transaction, the overages will also be applied. It’s a nice
situation when one sees item budgets spilling over into *catchall* :-)
Tools / Purge
Purges old cleared transactions. The number of days of transactions to keep is determined by the setting in
Preferences. Transactions that have not been cleared will not be purged. If you want to keep transactions
forever, but you don’t want your budget document to grow too large in size, then consider Exporting to a CSV
file before the purge, or just save a copy of your budget under a different name. The performance of the
application is affected by the number of transactions that have to be processed, so it is a good idea not to keep
years worth of transactions. The default is set to 60 days.
7
The All Transactions Window
This window shows all the transactions. It is accessed by selecting the Transaction / Show All menu or
using the hotkey Option+S.
All columns are sortable by clicking on the column title. The date is used as a secondary sort order key when
sorted values are equal, and the sort order for the date in this case is always ascending. If sorted by date
specifically, then the order can be ascending or descending.
The columns are also sizable, but the order cannot be changed.
The Cleared column shows whether the transaction has been cleared. Some transactions are automatically
cleared such as Payday and Transfer types. These types of transactions cannot be uncleared.
The ECC columns is used to Enable Cleared Column. The Cleared checkbox cannot be checked unless the
corresponding ECC column checkbox is checked. This prevents accidental clearing due to click bounce and
other inadvertent mouse clicking. So, in order to clear or unclear a transaction, check the ECC box, and then
check the Cleared box.
The Show Transaction box lets one filter which transactions are displayed. Usually, only the Regular box
is checked. One can choose any combination of which checkboxes are checked in order to filter the display.
The Cleared checkbox, if checked by itself, will show Regular Cleared transactions. If Regular and Cleared
are checked, then all Regular transactions are shown. If only Regular is checked, then only Regular nonCleared transactions are shown. If Payday is checked, all Payday transactions are shown. If Transfer is
checked, all Transfer transactions are shown.
8
The Account Balance shows the current account balance. Once all transactions are matched up and
cleared with one’s bank statement, the Account Balance should exactly match the amount on the bank
statement.
The Selected Sum shows the sum of the selected rows. Selected rows are highlighted in grey and multiple
rows can be selected.
The Transactions Total shows the total of non-cleared transactions and does take into account the Credits.
This is the amount of outstanding transactions.
The Debt Transactions Total shows the total of non-cleared transactions but does not include Credits. This
is the amount that one owes if all debts became instantly due.
Edit a transaction by selecting the row and clicking on Edit and pressing Shift+Enter. Only Regular nonCleared transactions can be edited. If one wants to edit a Regular transaction that has been cleared, then
unclear it first.
Delete a transaction by selecting the row and clicking on Delete or press the Delete key. Cleared
transactions cannot be deleted.
Example Quick Start
The easiest way to get started is to begin right after balancing your latest statement. This will minimize the
number of outstanding transactions you need to enter.
After installing, add all the Items you want as part of your budget.
Enter all outstanding transactions you currently have. It’s possible that you don’t have any.
If you have credit cards, then one of your Items could be “Credit Card”. If you have more than one, then you
could have something like “Visa Credit Card” and “Sears Credit Card”.
Use the Transfer operation to transfer funds from whichever budget item is appropriate to the credit card Item.
For example, if you have a “Clothing” budget item and you bought shoes with your Visa card, then transfer that
amount of money From “Clothing” To “Visa Credit Card”.
Edit the *catchall* balance to match your current account balance.
At this point, all of your outstanding transactions should be accounted for and your balance should match.
From this point on, you would record any transactions that you make. If you make a payment on a credit card,
just record a debit transaction against that credit card item. If you make a deposit of birthday gift money into
your “Mad Money” budget Item, then make a credit transaction against that item.
Tutorial
This tutorial will take you through a hypothetical scenario
1. Install and run Budget Bal. You may be prompted to use iCloud. Make your choice.
2. Select File/New
3. Select Item/Add New
4. Fill in the form as shown here and click Apply
5. Repeat the previous 2 steps for the additional items:
1. Food, Desired:300, Budgeted:300, Maximum:500,
Balance:0, Overage:*catchall*
2. Visa Card, Desired:0, Budgeted:0, Maximum:0,
Balance:0, Overage:*catchall*
3. Rent, Desired:800, Budgeted:800, Maximum:1600,
Balance:0, Overage:*catchall*
4. Clothing, Desired:100, Budgeted:50, Maximum:500,
Balance:0, Overage:*catchall*
5. Phone, Desired:120, Budgeted:120, Maximum:240,
Balance:0, Overage:*catchall*
6. Beer, Desired: 90, Budgeted:90, Maximum:200,
Balance:0, Overage:Food
6. Select File/Save…
9
7. Enter a filename and click on Save
8. Your main window should now look similar to this:
9. Now, assume payday has arrived and you have earned $1600 and it was deposited directly into your
account.
1. Select Tools/Trigger Payday
2. Enter 1600 and click Apply.
3. Confirm by clicking Ok.
10. Your main window should now look similar to this:
11. You’ve gone out to eat and paid $17 with your Visa Card.
12. Select Transaction/Transfer for press Option+X.
1. Select Food in the From field.
2. Enter 17 in the Amount field.
3. Select Visa Card in the To field.
4. Enter “ate at Tom’s Diner” in the Comment field.
5. Click Apply.
13. You’ve had the oil changed on your vehicle.
10
14. Select Transaction/Add or Right-Click on the Vehicle row in the main table.
1. If you chose Transaction/Add, then select Vehicle in the Budget Item field.
2. If you chose to Right-Click, then the Budget Item field will already have Vehicle selected.
3. Enter 34 in the Amount field
4. Enter “oil change” in the Comment field
5. Click Apply.
15. You’ve received a birthday gift check for $25 and you deposit it into your account.
16. Select Transaction/Add or Right-Click on the *catchall* row in the main table.
1. Click on the Credit radio button.
2. Enter 25 in the Amount field.
3. Enter “birthday gift” in the Comment field.
4. Click Apply.
17. Your Visa bill arrives and you pay the balance of $17.
18. Right-Click on the Visa Card row in the main table.
1. Enter 17 in the Amount field
2. Enter “paid in full” in the Comment field
3. Click Apply.
19. Your bank statement has arrived and you want to balance it.
20. Select Transaction/Show All or press Option+S
21. The All Transactions window should look similar to this:
22. Your bank statement has 3 transactions that have cleared:
1. The paycheck
2. The oil change
3. The Visa Card payment
23. For each of these transactions, clear them by first clicking on the ECC checkbox and then the Clear-thetransaction checkbox.
1. For example, for the Paycheck row, click on the ECC checkbox. It now has a check in it. Now, click on
the Clear-the-transaction checkbox. The row will disappear.
11
24. If the Cleared checkbox in the Show Transactions box is not checked, then the row will disappear
when it has been cleared.The All Transactions window should now look similar to this:
25. The balance on your bank statement should match the Account Balance shown here of $1,549.00
26. That’s it! You may close the window and then choose File/Save and then File/Close and then File/New
to get started with your own budget.
12