1
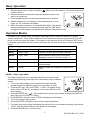
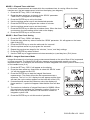
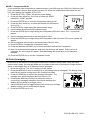
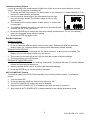
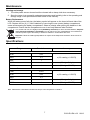
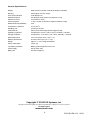
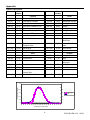
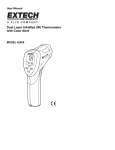
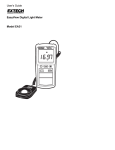
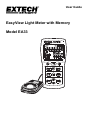
User Guide
EasyView Light Meter with Memory
Model EA33
Introduction
Congratulations on your purchase of the Extech EA33 EasyView Light Meter which measures light
level (luminance). This device measures up to 99,990 Fc and 999,990 Lux and stores up to 50
readings for easy recall. Careful use of this meter will provide years of reliable service.
Meter Description
1.
2.
3.
4.
5.
6.
7.
8.
9.
10.
11.
12.
13.
14.
15.
16.
Light measurement display
Timer display
TIME button
HOLD button
Unit of measure button (Fc/lux)
Enter button
Luminous Intensity (cd) / Comparator button
READ / Right arrow button
Average reading tally display
Power ON/OFF button
Set button
Average button
Relative / Percent button
Light sensor
Left arrow / Memory button
Up / Down arrow buttons
Display
1.
2.
3.
4.
5.
6.
7.
8.
9.
10.
11.
12.
13.
14.
15.
16.
17.
18.
1
Relative Mode
Comparator Mode
Average
Data Hold
% Relative
Candela
% Relative
fc/lx-hours Integral Illuminance
Stray light measurement
Time Hold measurement
ft/m luminance intensity distance
Day-Hour minute-seconds
Memory Read
Memory location
Average Reading tally display
Integration cycles
Low battery
Elapsed time indicator
3
2
4
5
6
7
8
9
10
18
17
16
15
14
11
13 12
2
EA33-EU-EN v2.3 08/13
Basic Operation
1. With the sensor cover in place, press the
a short self-test.
button to turn the meter on. The meter will perform
2. Remove the sensor’s protective cap and place the sensor in the
area to be measured.
3. Press the lux / fc button to select the desired units of measure.
4. Read the light level on the display. If the measurement is out of
range, an “OL” indication will appear.
5. When the meter is turned on, the elapsed timer starts. The elapsed
timer shows days/hours or minutes/seconds. Use the TIME button
to toggle the view between minutes/seconds (M-S) and days/hours (D-H).
Operation Modes
In addition to the normal mode of operation where light level is measured, there are 5 special
modes, listed below. Each mode is explained in the subsequent sections of this manual. The SET
button is used to access the modes. The number on the lower left of the LCD (after the SET button
is pressed) represents the mode currently selected. Use the down arrow key to scroll to the desired
mode.
Programming modes
Mode
Name of mode
Description
SEt 01
Stray+ Light
Cancels out stray light from light under test
SEt 02
Time - Hold
Meter measures while timer counts down.
Reading is held on LCD when counter = 0.
SEt 03
rtC
Set the day and time for internal clock
SEt 04
Int
Lumen-seconds, lux-hour, and fc-hour
measurements
SEt 05
COMP
Measurements are compared to high and low
limits.
MODE 1 - Stray Light Inhibit
This feature allows the user to measure light from one source while
automatically factoring out the light from a secondary (stray) unwanted
source.
1. Turn on the desired light source and face the meter’s sensor
towards this source (the stray light source should be on also).
2. Press the SET key; ‘SEt’ and ‘STRAY + LIGHT ‘will appear at the
center of the LCD and ‘01’ will appear on the lower left of the LCD
(see diagram).
3. Press the ENTER key (
). The measurement at this point consists of the primary AND the
stray light sources (LIGHT + STRAY).
4. Press ENTER to store this value. STRAY will appear on the display
5. Turn off the primary light source.
6. Press the ENTER key again to store only the stray light source.
7. The meter will now compute and display the light level for only the desired (primary) light source.
‘LIGHT’ and ‘DH’ (Data Hold) will also appear on the display.
8. Press the ENTER key to exit this mode.
3
EA33-EU-EN v2.3 08/13
MODE 2 – Elapsed Timer with Hold
In this mode, measurements are made while the countdown timer is running. When the timer
reaches zero, the last measurement is held on the display (see diagram).
1. Press the SET key; ‘SEt 01’ will display.
2. Press the down arrow key to change to the ‘SEt 02’ parameter.
‘TIME-HOLD’ will appear on the display.
3. Press the ENTER key to call up the timer.
4. Use the up/down arrow keys to set the desired seconds.
5. Press the ENTER key to program the number of minutes.
6. Use the up/down arrow keys to set the minutes.
7. Press the ENTER key to start the countdown timer. When the timer
counts down, the last reading will be held on the display.
8. Press the ENTER key to exit this mode.
MODE 3 - Real Time Clock Setting
1. Press the SET key; ‘SEt01’ will display.
2. Press the down arrow key twice to select the ‘SEt03’ parameter. ‘ftc’ will appear on the lower
right of the LCD.
3. Press the ENTER key to enter the edit mode for ‘seconds’.
4. Use the up/down arrow key to program the ‘seconds’.
5. Repeat the previous two steps for the ‘minutes’, ‘hours’, and ‘day’ settings.
6. Press the ENTER key when finished.
7. Use the TIME key to toggle between minutes-seconds (m-s) and day-hour (D-H) views.
MODE 4 - Integral Illuminance Mode
Integral Illuminance is a luminous energy measurement based on the rate of flow of flux (expressed
in lumen-seconds). The Model EA33 can also measure any photometric quantity on a time
dependent basis. For example, the illuminance could be integrated over time to yield lux-hours (lx-h)
or foot candle-hours (fc-h).
1. Press the SET key; ‘SEt 01’ will appear on the display.
2. Press the down arrow key three times to select the ‘SEt 04’ mode.
‘int’ will also appear on the LCD.
3. Press the ENTER key to start the Integral Illuminance
measurement. The meter will set the first measurement as a
reference. The ‘lx-h’ or ‘fc-h’ display icon will appear and the timer
will start (the cycle number appears on the lower left of the LCD).
4. If measurements exceed the reference value, the display will
freeze and the ‘+’ symbol will appear. Note that the timer will also
halt.
5. The maximum indication of integral illuminance is 999999. When
this maximum is exceeded, the integration number (Cycle no. at
lower left of LCD) can be checked. The maximum number of
integration cycles is 99.
6. Press the ENTER key to exit this mode of operation.
4
EA33-EU-EN v2.3 08/13
MODE 5 - Comparator Mode
In this mode the meter compares its measurements to one HIGH and one LOW limit. When the high
limit is exceeded, the plus sign appears on the LCD. When the measurement falls below the low
limit, the negative sign appears on the LCD.
1. Press the SET key; ‘SEt01’ will appear on the display.
2. Press the down arrow key four times to select the ‘SEt05’
parameter. ‘COMP’ appears.
3. Press the ENTER key to enter the Comparator setting mode.
4. Press the down arrow key to select the desired unit of measure
(Lux or Fc).
5. Press ENTER to begin setting the measurement range.
6. Use the down arrow to select the desired range.
7. Press the ENTER key to begin setting the Comparator HIGH limit value. The ‘+’ symbol will
appear.
8. Use the up/down arrow keys to set the high limit value.
9. Press the ENTER key to begin setting the Comparator LOW limit value. The minus symbol will
appear.
10. Use the up/down arrow keys to set the desired LOW limit value.
11. Press ENTER to complete the Comparator setup.
12. Press and hold the cd/COMP key for three seconds to activate the Comparator.
13. Now if a measurement exceeds the high limit, the plus sign will appear. If the low limit is
exceeded, the minus sign will appear. An audible beep will sound when a limit has been
reached.
14. Press the ENTER key to exit the Comparator mode.
99-Point Averaging
Illuminance is the amount of visible light incident upon a specific surface area. Since the EA33
sensor area is small, the Average Mode can be used to measure the illuminance of larger surface
areas; to accomplish this, up to 99 points can be averaged.
1. Press the AVG key. The ‘AVG’ display icon will appear.
2. Press the MEM key to store a reading (up to 99 readings can be averaged). The display at the
lower left will keep a running tally of the readings recorded.
AVG
3. Press the READ key to perform the average calculation. The
average value will be displayed and held on the LCD.
4. Pressing the MEM key at this point allows the meter to
continuously average subsequent illuminance readings (the
display will only show an average value).
5. Use the READ button to toggle between this continuous Average
display and the normal measurement display.
6. Press the ENTER key to exit.
5
EA33-EU-EN v2.3 08/13
Luminous Intensity Feature
Luminous intensity is the measurement of light from a light source at a known distance from the
sensor. The unit of measure is candela (cd).
1. Press the cd/COMP key to begin. The annunciator ‘m’ for meters (for lux measurement) or ‘ft’ for
feet (for Fc measurement) will appear.
2. Use the up/down arrow keys to set the distance from the light
source to the light sensor. The distance range is 0.01 to 9.99
meters or feet.
3. The measurement must be made in a dark room or in a room with
no stray light.
4. The distance between the sensor and light source must be at least
10 times the size of the light source.
5. Press the ENTER key to perform the luminous intensity measurement. The ‘cd’ (for candela)
units icon will appear along with the reading.
6. Press the ENTER key again to exit.
Data Record/Recall
MEMORY CLEAR
1. Turn off the meter.
2. Press and hold the MEM key while turning on the meter. Release the MEM key when the
display reads ‘CLr’ indicating that the memory banks have been cleared (erased).
MANUAL DATA RECORD
1. Each time the MEM key is pressed with the meter turned on, a data record is recorded. The
display will show ‘M’ and an audible tone will sound.
2. The counter on the lower left of the LCD will show the number of stored readings.
3. The total memory size is 50 records.
READING STORED RECORDS
1. Press the READ key to enter the memory recall mode. The display will show ‘R’ and the address
number for the displayed data point.
2. Use the up/down arrow keys to scroll through the stored readings.
3. Press the ENTER key to exit this mode of operation.
AUTO POWER OFF Feature
To conserve battery life, the EA33 automatically turns off after several minutes. To defeat this
feature:
1. Turn the meter OFF.
2. Press and hold the HOLD key while turning the meter ON.
3. The AUTO POWER OFF feature will now be disabled.
4. Note that AUTO POWER OFF is re-enabled each time the meter is turned on.
5. Also note that AUTO POWER OFF is always disabled in the Integral Illuminance mode.
6
EA33-EU-EN v2.3 08/13
Maintenance
Cleaning and storage
1. The white plastic sensor dome should be cleaned with a damp cloth when necessary.
2. Store the meter in an area with moderate temperature and humidity (refer to the operating and
storage range in the specifications chart earlier in this manual).
Battery Replacement
When the battery power falls low, the battery symbol will appear on the lower left-hand side of the
LCD. Replace the six (6) 1.5 ‘AAA’ batteries by removing the rear (center) battery compartment
screw and accessing the battery compartment. Observe polarity when placing the batteries in the
compartment. Ensure that the compartment cover is securely fastened when finished.
You, as the end user, are legally bound (EU Battery ordinance) to return all used batteries, disposal
in the household garbage is prohibited! You can hand over your used batteries / accumulators at
collection points in your community or wherever batteries / accumulators are sold!
Disposal: Follow the valid legal stipulations in respect of the disposal of the device at the end of its
lifecycle
Specifications
Ranges
Resolution
Accuracy
Lux
99.99
0.01
999.9
0.1
9999
1
± (3% reading + 0.5%FS)
99990
1
± (3% rdg + 5 digits)
999900
1
± (3% rdg + 0.5%FS)
Foot candles
9.999
0.001
99.99
0.01
999.9
0.1
± (3% reading + 0.5%FS)
9999
1
± (3% rdg + 5 digits)
99990
1
± (3% rdg + 0.5%FS)
Note: Calibrated to a standard incandescent lamp at color temperature of 2856°K
7
EA33-EU-EN v2.3 08/13
General Specifications
Display
Multi-function LCD with a maximum display of 999900
Ranging
Autoranging over five ranges
Over range indication
LCD displays ‘OL’
Spectral response
CIE photopic (CIE human eye response curve)
Spectral accuracy
Cosine response
Vλ function (f’1 ≤6%)
f’2 ≤2%; Cosine corrected for angular incidence of light
Measurement Repeatability
±2%
Temperature coefficient
±0.1% per oC
Sampling rate
5 times per second
Photo detector
Silicon photo-diode with spectral response filter
Operating conditions
Temperature: 0 to 40oC (32 to 104oF); Humidity: < 80%RH
Storage conditions
Temperature: -10 to 50oC (14 to 140oF); Humidity: < 80%RH
Meter Dimensions
150 x 72 x 35mm (5.91 x 2.8 x 1.4")
Detector Dimensions
92 x 60 x 29mm (3.6 x 2.4 x 1.5”)
Weight
Approx. 11.3 oz. (320g) with battery
Sensor lead length
150cm (5’)
Low battery indication
Battery symbol appears on the LCD
Power supply
Six (6) ‘AAA’ cells
Battery life
200 hours (approx.)
Copyright © 2013 FLIR Systems, Inc. All rights reserved including the right of reproduction in whole or in part in any form ISO‐9001 Certified www.extech.com 8
EA33-EU-EN v2.3 08/13
Appendix
Typical Light Levels
Lux
Foot
Candles
Lux
Foot
Candles
Emergency Stairs, Warehouse
100-150
10-15
Washing
Factories
20-75
2-7
Home
75-150
7-15
Exit/Entrance Passages
150-200
15-20
Recreational Activities
150-300
15-30
Packing Work
200-300
20-30
Drawing Room, Table
300-750
30-75
Visual Work: Production Line
300-500
30-50
Makeup
750-1,500
75-150
Typesetting: Inspection Work
500-1,500
50-150
Reading, Study
1,500-3,000
150-300
Electronic Assembly, Drafting
1,000-2,000
100-200
Sewing
Office
Restaurant
75-100
7-10
Indoor Emergency Stairs
75-150
7-15
Corridor Stairs
100-200
10-20
Corridor Stairs
150-300
15-30
Entrance,
Wash Room
200-750
20-75
Conference,
Reception Room
300-750
30-75
Cooking Room, Dining
Table
750-1,500
75-150
Clerical Work
750-1,500
75-150
Show Window
30-75
3-7
Emergency Stairs
1,500-2,000 150-2000 Typing, Drafting
Store
Hospital
75-150
7-15
Indoors
150-200
15-20
Corridor/Stairs
75-100
7-10
Stairs
200-300
20-30
Reception
100-150
10-15
Sick Room,
Warehouse
300-500
30-50
Display Stand
150-200
15-20
Waiting Room
500-750
50-75
Elevator
200-750
20-75
Medical Exam Room
750-1,500
75-150
Show Window,
Packing Table
750-1,500
75-150
Operating Room
1,500-3,000
150-300
Storefront, Show Window
5,000-10,000 500-1000 Eye Inspection
Spectral Sensitivity
1.2
1.2
1
0.8
0.8
0.6
0.6
0.4
0.4
0.2
0.2
Light Meter
CIE
780
760
740
720
700
680
660
640
620
600
580
560
540
520
500
480
460
440
420
0
400
0
380
Relative Sensitivity (%)
1
Wavelength in Nonometers
9
EA33-EU-EN v2.3 08/13