1
IBM ILOG OPL V6.3
IBM ILOG OPL Getting Started
with the OPL IDE
© Copyright International Business Machines Corporation 1987, 2009
US Government Users Restricted Rights - Use, duplication or disclosure restricted by GSA ADP Schedule Contract with IBM Corp.
Copyright
COPYRIGHT NOTICE
© Copyright International Business Machines Corporation 1987, 2009.
US Government Users Restricted Rights - Use, duplication or disclosure restricted by
GSA ADP Schedule Contract with IBM Corp.
Trademarks
IBM, the IBM logo, ibm.com, WebSphere, ILOG, the ILOG design, and CPLEX are
trademarks or registered trademarks of International Business Machines Corp., registered
in many jurisdictions worldwide. Other product and service names might be trademarks
of IBM or other companies. A current list of IBM trademarks is available on the Web at
"Copyright and trademark information" at http://www.ibm.com/legal/copytrade.shtml
Adobe, the Adobe logo, PostScript, and the PostScript logo are either registered
trademarks or trademarks of Adobe Systems Incorporated in the United States, and/or
other countries.
Linux is a registered trademark of Linus Torvalds in the United States, other countries,
or both.
Microsoft, Windows, Windows NT, and the Windows logo are trademarks of Microsoft
Corporation in the United States, other countries, or both.
Java and all Java-based trademarks and logos are trademarks of Sun Microsystems,
Inc. in the United States, other countries, or both.
Other company, product, or service names may be trademarks or service marks of others.
Acknowledgement
The language manuals are based on, and include substantial material from, The OPL
Optimization Programming Language by Pascal Van Hentenryck, © 1999 Massachusetts
Institute of Technology.
C
O
N
T
E
N
T
S
Table of contents
Getting Started with the OPL IDE.............................................................................5
Introduction to the OPL IDE.......................................................................................................7
Launching the OPL IDE..................................................................................................................................9
Starting the IDE.................................................................................................................................10
The Welcome window.......................................................................................................................11
The Main window..............................................................................................................................14
Opening distributed examples in the OPL IDE.............................................................................................15
Why you should use the New Example wizard.................................................................................16
Working with the New Example wizard.............................................................................................18
Opening projects in the OPL Projects Navigator..........................................................................................21
Importing existing projects into the workspace.................................................................................22
Managing projects in the OPL Projects Navigator............................................................................26
Important concepts and terms......................................................................................................................27
Resources.........................................................................................................................................28
Workspace........................................................................................................................................29
Views.................................................................................................................................................30
The Problem Browser...................................................................................................................................31
Resizing, moving, and hiding IDE views.......................................................................................................33
Working with files in OPL..............................................................................................................................37
Adding existing files to a project........................................................................................................38
Ordering files within a run configuration............................................................................................39
Opening files for editing....................................................................................................................42
Local History and its related features................................................................................................46
© Copyright IBM Corp. 1987, 2009
3
'Compare With' features....................................................................................................................47
'Replace With' features......................................................................................................................50
Executing OPL projects................................................................................................................................53
The Run options................................................................................................................................54
The Status Bar..................................................................................................................................59
The execution toolbar options...........................................................................................................61
Getting Started tutorial.............................................................................................................63
Prerequisites - before you start....................................................................................................................64
Creating a project.........................................................................................................................................65
Purpose.............................................................................................................................................66
The pasta production example..........................................................................................................67
Creating an empty project.................................................................................................................69
Adding the model..............................................................................................................................73
Dealing with errors............................................................................................................................74
Adding data.......................................................................................................................................77
Executing a project.......................................................................................................................................81
What you are going to do..................................................................................................................82
Populating and executing the run configuration................................................................................83
Adding a settings file.........................................................................................................................86
Changing an MP option value...........................................................................................................89
Creating and executing a different configuration...............................................................................90
Examining a solution to the model...............................................................................................................95
Execution results...............................................................................................................................96
The Output tabs................................................................................................................................97
Understanding the Problem Browser..............................................................................................102
Index........................................................................................................................105
4
I B M
O P L
I L O G
I D E
O P L
G E T T I N G
S T A R T E D
W I T H
T H E
Getting Started with the OPL IDE
This manual starts with an Introduction to the OPL IDE, and continues with a Getting Started
tutorial in which you launch the OPL IDE, create an empty project, enter a model, add data
and a settings file, create run configurations and execute the final project.
In this section
Introduction to the OPL IDE
Provides an overview of important concepts and features of the OPL IDE that you should be
familiar with before starting to work with it.
Getting Started tutorial
A tutorial in which you launch the IDE, create an empty project, enter a model, add data,
add a settings file, create run configurations and execute them. More tutorials elaborate on
IDE features in IDE Tutorials.
© Copyright IBM Corp. 1987, 2009
5
6
I B M
O P L
I L O G
I D E
O P L
G E T T I N G
S T A R T E D
W I T H
T H E
Introduction to the OPL IDE
Provides an overview of important concepts and features of the OPL IDE that you should be
familiar with before starting to work with it.
In this section
Launching the OPL IDE
How to launch the OPL IDE, and descriptions of the Welcome window and the OPL main
window.
Opening distributed examples in the OPL IDE
Instructions for browsing and opening the example projects and models distributed with
OPL.
Opening projects in the OPL Projects Navigator
How to open OPL projects and work with them using the OPL Projects Navigator.
Important concepts and terms
Describes some of the terms and concepts that are important to understand about the OPL
IDE.
The Problem Browser
Describes the features of the OPL Problem Browser.
Resizing, moving, and hiding IDE views
Shows how to customize the appearance of the OPL IDE.
Working with files in OPL
Shows how to open, edit, and work with files in the OPL IDE.
I B M
I L O G
O P L
G E T T I N G
S T A R T E D
W I T H
O P L
T H E
I D E
7
Executing OPL projects
Describes the different ways of running and browsing OPL projects.
8
I B M
O P L
I L O G
I D E
O P L
G E T T I N G
S T A R T E D
W I T H
T H E
Launching the OPL IDE
How to launch the OPL IDE, and descriptions of the Welcome window and the OPL main
window.
In this section
Starting the IDE
Starting OPL IDE from Windows.
The Welcome window
Describes the OPL Welcome screen and how to close it and begin working with OPL.
The Main window
Presents the Main window of the OPL IDE, and a brief description of its primary controls
and elements.
I B M
I L O G
O P L
G E T T I N G
S T A R T E D
W I T H
O P L
T H E
I D E
9
Starting the IDE
You can start the IDE from the Windows Start menu, from Windows Explorer, or from the
command line.
To launch the IDE from the Start Menu:
1. Click the Windows Start menu.
2. Select Programs > IBM > IBM ILOG OPL [version_number] > OPL IDE
To launch the IDE from Windows Explorer:
♦
Double-click the IDE executable oplide.exe in the <OPL_dir>\oplide directory, where
<OPL_dir> is your installation directory.
To launch the IDE from the command line:
1. Open a command prompt window.
2. Enter:
oplide
The Welcome window appears, as shown in the next section.
10
I B M
O P L
I L O G
I D E
O P L
G E T T I N G
S T A R T E D
W I T H
T H E
The Welcome window
When you first launch the OPL IDE, a Welcome window displays:
The buttons in the Welcome window provide access to user guides, sample manuals, release
notes, migration information and user forums.
To access the information on the Welcome window:
Move the mouse over a button to see the tooltip.
The buttons lead to information on the release and parts of the OPL documentation you
might frequently refer to.
♦
Overview — displays links to:
●
I B M
I L O G
A quick start to OPL
O P L
G E T T I N G
S T A R T E D
W I T H
O P L
T H E
I D E
11
●
Migrating from previous versions of OPL
♦
Tutorials — displays a set of links to different sections of the IDE Tutorials manual
♦
Samples — displays a set of links to different sections of the Language and Interfaces
Examples manual
♦
What's New — displays a set of links to:
●
The Release Notes, which provide an overview of new and changed features in the
IDE
●
This Introduction to the OPL IDE
●
A set of links to various OPL and ODM user forums. These links are driven by an RSS
feed, so they are constantly updated to reflect the latest information on those forums.
To close the Welcome window and use the OPL IDE:
♦ Click the X in the Welcome window tab to close it.
♦
Or, click the Workbench icon at the top right of the Welcome window.
Closing the Welcome window using the second method displays a toolbar at the bottom
of the IDE, in the Status Bar, as shown below.
Closing the Welcome window by clicking the X in the tab does not display this toolbar.
♦
When you close the Welcome window using either method, the OPL Main window appears.
It is described in the next section.
To return to the Welcome window from the OPL IDE:
♦ Choose Help>Welcome from the main menu.
♦
12
I B M
O P L
Or, click the Restore Welcome icon at the bottom right of the IDE. (It appears when
you click the Workbench arrow.)
I L O G
I D E
O P L
G E T T I N G
S T A R T E D
W I T H
T H E
I B M
I L O G
O P L
G E T T I N G
S T A R T E D
W I T H
O P L
T H E
I D E
13
The Main window
The following illustration details the primary areas and controls of the Main window in the
OPL IDE (Integrated Development Environment). Tooltips appear when you move the pointer
over most elements (or views) of the main window.
14
I B M
O P L
I L O G
I D E
O P L
G E T T I N G
S T A R T E D
W I T H
T H E
Opening distributed examples in the OPL
IDE
Instructions for browsing and opening the example projects and models distributed with
OPL.
In this section
Why you should use the New Example wizard
Why using the New Example wizard is the recommended method of opening distributed
examples.
Working with the New Example wizard
Instructions for using the New Example wizard to open the distributed examples.
I B M
I L O G
O P L
G E T T I N G
S T A R T E D
W I T H
O P L
T H E
I D E
15
Why you should use the New Example wizard
Examples of OPL models are available in the installation directory and can be opened in the
OPL IDE using File > Import > Existing OPL 6.x projects and the Import wizard that
opens.
However, the recommended method of opening distributed examples is to use the File >
New > Example menu command to launch the New Example wizard.
Benefits of using the New Example wizard:
♦ Always working with a copy, not the original — Opening examples using the New
Example wizard ensures that you are always working with a copy of the example.
Therefore, if you make changes and save them, the original example is always available
to you in its original form.
16
I B M
O P L
♦
Flexibility of project destination — Using the New Example wizard, you can specify
any folder in your file system as the destination for the project. Using the Import wizard,
you have only the choice of opening the project in your default Workspace or “in place,”
by opening the example in its original distribution directory. The latter risks the possibility
of overwriting the distributed example by making changes and saving them, or of
accidentally deleting the distributed example.
♦
Enhanced project descriptions — Using the New Example wizard, you see longer,
more explicit descriptions of each project. Using the Import wizard, you see only the
name of each example.
♦
Enhanced sorting and display options — The New Example wizard contains multiple
tabs that allow you to view the examples sorted by complexity, feature being demonstrated,
industry represented, and mathematical programming technique being used.
♦
Built-in Help — By selecting an example and pressing F1 or clicking the Help icon
you can display the documentation for that example in the New Example wizard itself,
and look it over before deciding to open the example.
I L O G
I D E
O P L
G E T T I N G
S T A R T E D
W I T H
T H E
I B M
I L O G
O P L
G E T T I N G
S T A R T E D
W I T H
O P L
T H E
I D E
17
Working with the New Example wizard
To open examples in the OPL IDE using the New Example wizard:
1. In the OPL IDE, choose File > New > Example from the main menu.
The first screen of the New Example wizard is displayed:
Note:
You can also access the New Example wizard by choosing File > Import
> Example. This command launches the same wizard as File > New >
Example.
2. Select the type of example you want to open — IBM ILOG OPL Examples or IBM
ILOG ODM Examples — and click Next.
The next screen of the New Example wizard is displayed:
18
I B M
O P L
I L O G
I D E
O P L
G E T T I N G
S T A R T E D
W I T H
T H E
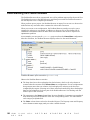
3. To see the description of a project, select that project in the display area. A description
of the selected project is shown at the top of the New Example wizard.
4. To sort the list of examples, click one of the tabs:
♦
Sorted by Complexity — to display examples grouped by complexity (Basic,
Intermediate, Advanced, Demo, etc.)
♦
Sorted by Feature — to display examples grouped by feature (OPL Model, OPL
Project, OPL Script, etc.)
♦
Sorted by Industry — to display examples grouped by industry (Finance,
Manufacturing, Transportation, etc.)
♦
Sorted by Technique — to display examples grouped by technique (Constraint
Programming, Decomposition, Search, etc.)
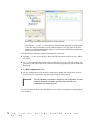
5. To filter the display, type the text you are looking for in the field at the top of the
wizard. The display is filtered to display only examples that contain the text you enter.
I B M
I L O G
O P L
G E T T I N G
S T A R T E D
W I T H
O P L
T H E
I D E
19
6. To obtain help for an example, select that example and press F1 or click the Help
icon
to display the documentation for that example in the wizard.
7. To select a destination for the opened project, type a path into the Choose copy
location field or use the Browse button to search for one. The default location is your
workspace.
8. When you click Finish, the example appears in the OPL Projects Navigator. Expand
the project and double-click the model name to display the model contents.
Tip: Once you begin working with the New Example wizard, if you already know the name
of the example you are searching for and you always open examples in your default
OPL IDE workspace, you will find that the fastest way to use it is the following:
1. On the second screen of the New Example wizard (step #2 above), type the name
of the example you are searching for in the filter field.
The example will be displayed in the selection window.
2. If the example displayed in the selection window is the one you want, simply press
Enter twice to open it in the OPL IDE.
20
I B M
O P L
I L O G
I D E
O P L
G E T T I N G
S T A R T E D
W I T H
T H E
Opening projects in the OPL Projects
Navigator
How to open OPL projects and work with them using the OPL Projects Navigator.
In this section
Importing existing projects into the workspace
Shows how to load OPL projects into the OPL IDE.
Managing projects in the OPL Projects Navigator
Explains how to work with your projects once you have imported them.
I B M
I L O G
O P L
G E T T I N G
S T A R T E D
W I T H
O P L
T H E
I D E
21
Importing existing projects into the workspace
Use the following procedure to import an existing OPL project into the OPL Projects
Navigator.
Note: This procedure is only for OPL projects. For importing projects from previous releases
of OPL, see Migrating from previous versions of OPL.
In addition to the procedures detailed below, you can double-click on the files contained
in an OPL project folder to open that project in the OPL IDE:
♦ If the project has already been added to the OPL Projects Navigator, double-clicking
any model (.mod), data (.dat), or settings (.ops) file will open that project in the
OPL IDE.
♦ If the project has not already been added to the OPL Projects Navigator,
double-clicking on the file oplproject in
<OPL_dir>\examples\opl\<example_name>
will launch the Import Wizard discussed in the following procedures.
1. To open an existing project from the OPL IDE, choose File>Import, or right-click in
the OPL Projects Navigator and choose Import.
2. Select Existing OPL 6.x projects.
The first screen of the Import Wizard is displayed:
22
I B M
O P L
I L O G
I D E
O P L
G E T T I N G
S T A R T E D
W I T H
T H E
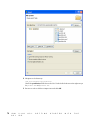
This screen can be used to load one or more OPL projects into the OPL Projects
Navigator. The general procedure for doing this is to:
♦
Select a root directory (this is the directory on your file system where your existing
OPL project is located). Alternatively you can select an archive file (JAR, ZIP, TAR)
where the project has been stored.
♦
Select a project (or projects, if the root directory contains more than one project)
to be imported.
♦
Indicate whether you want to copy the projects into the workspace. The default
workspace is:
C:\Documents and Settings\<username>\Application Data\ILOG\OPL Studio
IDE\<version_number\<project_name>
I B M
I L O G
O P L
G E T T I N G
S T A R T E D
W I T H
O P L
T H E
I D E
23
Warning:
If you don't copy the project into a workspace and work with the
original, there is a risk of modifying or deleting the original
example.
The next steps walk you through each of the general procedures above, using the
warehouse example from the OPL distribution.
3. In the Select root directory field, enter the pathname of the directory that contains
the project(s) you want to import. You can type in the pathname or use the Browse
button to search for it.
Alternatively, you can use the Select archive file field and enter the pathname of a
JAR, ZIP, TAR or other compressed file that contains your project(s).
After you have selected a root directory (or archive file), the OPL projects under that
directory that do not currently exist in your workspace are listed in the Projects view.
4. Check the box of each of the projects you want to import. (In the example used in this
procedure, there is only one, warehouse.)
24
I B M
O P L
I L O G
I D E
O P L
G E T T I N G
S T A R T E D
W I T H
T H E
5. Leave the Copy projects into workspace box unchecked if you want to work with
the project “in place” in its current location, or check the box to copy it to your
workspace (recommended), and click Finish to import the project(s) into your OPL
Projects Navigator.
I B M
I L O G
O P L
G E T T I N G
S T A R T E D
W I T H
O P L
T H E
I D E
25
Managing projects in the OPL Projects Navigator
After you have migrated OPL 5.x projects or imported or created new OPL 6.x projects, you
can leave them in your OPL Projects Navigator. If you exit from OPL, when you next launch
the OPL IDE, they will be there, ready to use.
If you have loaded a number of projects and the OPL Projects Navigator starts to get
“crowded,” there are two ways to save memory or space in the Navigator window — by
closing (collapsing) the projects or by deleting them.
Closing/Opening projects
Projects are either open or closed. When a project is closed, it cannot be changed, but its
resources still reside on the local file system. Because they are not examined during builds,
closed projects require less memory. Therefore, closing projects you are not working with
can improve build time.
♦
Right-click on the project name and choose Close project from the context menu to close
the project. The plus sign next to the project name disappears, but it remains in the OPL
Projects Navigator.
♦
To reopen the project, right-click on the project name and choose Open project from
the context menu.
Deleting projects
If you are not currently working with a project, you can also safely delete it from the OPL
Projects Navigator, without deleting it from the file system.
To remove a project from the OPL Projects Navigator, right-click on the project name and
choose Delete from the context menu.
A popup message appears asking whether you want to delete the project only from the
navigator, or from the hard disk as well.
26
I B M
O P L
♦
If you do not check the box, you remove the project from the OPL Projects Navigator but
leave it on the file system.
♦
If you check the box Delete project contents on disk (cannot be undone), the project
will be completely deleted, and cannot later be recovered using Undo or the
Import>Existing OPL 6.x projects menu command.
I L O G
I D E
O P L
G E T T I N G
S T A R T E D
W I T H
T H E
Important concepts and terms
Describes some of the terms and concepts that are important to understand about the OPL
IDE.
In this section
Resources
Describes what resources are in OPL.
Workspace
Describes the OPL workspace.
Views
Explains the different types of views in the OPL IDE.
I B M
I L O G
O P L
G E T T I N G
S T A R T E D
W I T H
O P L
T H E
I D E
27
Resources
Resources refers to the projects, folders, and files that exist in the OPL IDE. The OPL Projects
Navigator provides a hierarchical view of these resources and allows you to open them for
editing.
There are three basic types of resources:
28
I B M
O P L
♦
Files — Similar to files in the file system.
♦
Folders — Similar to folders in the file system.
♦
Projects — Used for builds, version management, sharing, and resource organization.
Projects are comprised of folders and files, and map to directories in the file system.
I L O G
I D E
O P L
G E T T I N G
S T A R T E D
W I T H
T H E
Workspace
The workspace is the working directory in which you store and work with your resources.
The workspace can be located anywhere on the file system, but its default location is C:\
Documents and Settings\<user>\Application Data\ILOG\OPL Studio IDE\6.x\.
I B M
I L O G
O P L
G E T T I N G
S T A R T E D
W I T H
O P L
T H E
I D E
29
Views
The various panes or windows within the OPL IDE are referred to as Views.
Views can be editors or navigators or provide alternative ways to visualize and work with
your projects. For example, the OPL Projects Navigator view displays the resources in your
OPL projects, and allows you to open them in editor views.
Views may also have their own menus and some views have their own toolbars.
30
I B M
O P L
I L O G
I D E
O P L
G E T T I N G
S T A R T E D
W I T H
T H E
The Problem Browser
Describes the OPL Problem Browser.
Some of the features of the Problem Browser are described briefly below:
♦
Hide the properties to conserve space.
♦
Sort the items of each displayed element.
♦
I B M
Filter the displayed element types.
I L O G
O P L
G E T T I N G
S T A R T E D
W I T H
O P L
T H E
I D E
31
♦
See the solution status in the drop-down list at the top of the view.
When solving MIP problems several solutions may be displayed in this drop-down list.
Choosing one of them displays data for that solution in the lower part of the Problem
Browser. A definition of MIP can be found in the Glossary: mixed integer programming
(MIP).
32
I B M
O P L
♦
Tooltips show data that is too wide to display.
♦
Double-clicking on an item opens an editor for that item.
♦
For Decision Variables, some information formerly shown in the properties view has been
moved to the editor view itself, so one can safely hide the properties view.
I L O G
I D E
O P L
G E T T I N G
S T A R T E D
W I T H
T H E
Resizing, moving, and hiding IDE views
All views are resizable, movable, and detachable. Movable means that you can drag a view
from one location and drop it in another, even within another view. For example, you could
drag the Outline view into the Output Area, and it would become another tab there.
Detachable means that you can drag a view outside the OPL IDE frame and it becomes its
own standalone window. When you do this, to put the view back into the frame you need to
right-click in the tab area of the detached view and uncheck the Detached item in the
context menu:
When you do this, the detached view will return to the frame.
Resizing views
To resize views, click on one of its borders or corners and drag it to the desired size.
Or, to temporarily expand a view to the full size of the IDE frame, double-click its tab.
Double-click again to shrink it back to original size.
Moving views
To move a view, right-click its top border and drag it to the desired location. A black border
appears as you drag the view around the frame, to tell you where the view will be placed if
you release the mouse button in that location.
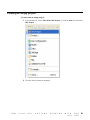
Hiding views
To hide a view, click its Close box
.
To display a view that has been closed, in the main menu choose Window>Show View and
select the name of the view you want to display:
I B M
I L O G
O P L
G E T T I N G
S T A R T E D
W I T H
O P L
T H E
I D E
33
If the view you want to display is not shown in that menu, click Other to display more views:
34
I B M
O P L
I L O G
I D E
O P L
G E T T I N G
S T A R T E D
W I T H
T H E
I B M
I L O G
O P L
G E T T I N G
S T A R T E D
W I T H
O P L
T H E
I D E
35
36
I B M
O P L
I L O G
I D E
O P L
G E T T I N G
S T A R T E D
W I T H
T H E
Working with files in OPL
Shows how to open, edit, and work with files in the OPL IDE.
In this section
Adding existing files to a project
How to add files to your OPL project.
Ordering files within a run configuration
How to specify the order of data or settings files in a run configuration.
Opening files for editing
Shows how to open and edit your files in the OPL IDE.
Local History and its related features
How to track and compare different versions of your files as you edit them in the OPL IDE.
'Compare With' features
How to compare files with each other and with Local History.
'Replace With' features
How to compare files with each other and replace the contents from other versions of the
file in Local History.
I B M
I L O G
O P L
G E T T I N G
S T A R T E D
W I T H
O P L
T H E
I D E
37
Adding existing files to a project
You can use the File>Copy Files to Project command to open a dialog box that allows you
to open files and import them into selected projects.
You can also drag existing files from a Windows Explorer window and drop them onto the
project folder in your OPL Projects Navigator. This is always a copy operation, not a move.
38
I B M
O P L
I L O G
I D E
O P L
G E T T I N G
S T A R T E D
W I T H
T H E
Ordering files within a run configuration
When you execute a run configuration, the order of the data or settings files relative to each
other is important. Since some data in a .dat file may depend on other data in a different
.dat file, if the data files are in the wrong order it may cause an error at execution time.
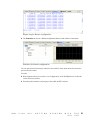
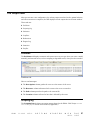
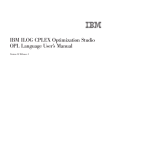
As an example of this, look at the following screenshot of a run configuration,
Configuration2:
In Configuration2, the four data files are intended to be executed in numerical order.
However, as you can see, they are sorted in ASCII order. This would cause them to be
executed in the wrong sequence.
You can set the order of multiple data or settings files in a run configuration using the
following procedure.
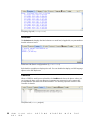
1. Right-click on the configuration name and choose Properties from the context menu:
I B M
I L O G
O P L
G E T T I N G
S T A R T E D
W I T H
O P L
T H E
I D E
39
2. A properties window appears for the run configuration:
40
I B M
O P L
I L O G
I D E
O P L
G E T T I N G
S T A R T E D
W I T H
T H E
You can use the Up and Down buttons to rearrange the order of your data files and
settings files.
I B M
I L O G
O P L
G E T T I N G
S T A R T E D
W I T H
O P L
T H E
I D E
41
Opening files for editing
In general, you open your model files, data files and settings files for editing by
double-clicking on the file in OPL Projects Navigator.
Several editors can be open in the Editing Area at once. You can switch back and forth
between the open views by clicking the tabs of the views that are visible in the Editing Area.
If so many edit views are open that all of their tabs cannot be displayed, a “more views” icon
becomes visible. Click it and a list of the other views appears:
Click any of the views in the popup list to view them.
Line numbers in the Editor
By default, line numbers appear in the text editor. However, you can hide them in one of
the following ways:
42
I B M
O P L
♦
From the menu bar select Window>Preferences, then General>Editors>Text Editors.
Uncheck the box for Show line numbers.
♦
Inside the Editing Area, right-click and select Preferences, then General>Editors>Text
Editors. Uncheck the box for Show line numbers.
♦
Inside the Editing Area, right-click in the left margin to display the popup that allows you
to uncheck the option Show line numbers.
I L O G
I D E
O P L
G E T T I N G
S T A R T E D
W I T H
T H E
Opening external files in the Editor
To open files that are not currently in any open project in OPL Projects Navigator, use the
File>Open File in Editor menu command.
This does not add the files to any project, but allows you to view or edit them in the Editing
Area. To add external files to a project, see the Adding existing files to a project section.
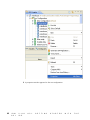
Editing commands and shortcuts
The common commands you need to use while editing can be found on two menus:
♦
I B M
The main menu Edit menu:
I L O G
O P L
G E T T I N G
S T A R T E D
W I T H
O P L
T H E
I D E
43
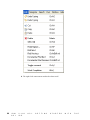
♦
44
I B M
O P L
The right-click context menu within the editor itself:
I L O G
I D E
O P L
G E T T I N G
S T A R T E D
W I T H
T H E
I B M
I L O G
O P L
G E T T I N G
S T A R T E D
W I T H
O P L
T H E
I D E
45
Local History and its related features
OPL 6.x provides a limited form of version control called Local History that allows you to
track and compare different versions of your files as you edit them.
For example, if you edit the same model file several times, all versions of the file are still
available to you. You can use the Compare With and Replace With commands to compare
different versions of a file or revert to previous versions of a file or its contents.
Each of these features is described in the following sections.
46
I B M
O P L
I L O G
I D E
O P L
G E T T I N G
S T A R T E D
W I T H
T H E
'Compare With' features
♦
Compare With Each Other
♦
Compare With Local History
Compare With Each Other
To compare two files in the same project with each other:
1. In the OPL Projects Navigator, highlight the two files you want to compare, right-click
and choose Compare With>Each Other.
2. The files are opened in the Editing Area in a special view that allows you to see them
side by side, with the differences between the two files highlighted:
I B M
I L O G
O P L
G E T T I N G
S T A R T E D
W I T H
O P L
T H E
I D E
47
Compare With Local History
To compare a file with another version of itself in Local History:
1. In the OPL Projects Navigator, highlight the file you want to compare with its own
Local History versions, right-click and choose Compare With>Local History.
2. A list of the different versions of the file is displayed in the History tab.
3. Double-click on the version of the file that you want to compare with the current
version.
The files are opened in the Editing Area in a special view that allows you to see them
side by side, with the differences between the two versions highlighted.
48
I B M
O P L
I L O G
I D E
O P L
G E T T I N G
S T A R T E D
W I T H
T H E
I B M
I L O G
O P L
G E T T I N G
S T A R T E D
W I T H
O P L
T H E
I D E
49
'Replace With' features
♦
Replace With Local History
♦
Replace With Previous Version
Replace With Local History
To replace a file with a selected version of itself from Local History:
1. In the OPL Projects Navigator, highlight the file you want to revert to one of its Local
History versions, right-click and choose Replace With>Local History.
2. A popup window appears in which you can view the different versions of this file in
Local History.
50
I B M
O P L
I L O G
I D E
O P L
G E T T I N G
S T A R T E D
W I T H
T H E
Double-click on the version of the file that you want to compare with the current
version and use as a candidate for replacement.
The files are opened in a special view that allows you to see them side by side, with
the differences between the two versions highlighted.
You can use the icons that appear in the Text Compare area to move to the next and
previous differences in the files, and thus determine whether you want to replace the
contents of the current file with the contents of the version you are comparing it to.
Replace With Previous Version
To replace a file with its previous version in Local History:
1. In the OPL Projects Navigator, highlight the file you want to revert to its previous
version, right-click and choose Replace With>Previous Version.
2. The file is automatically replaced with the version of the file from Local History that
immediately precedes it. This creates a new version in Local History.
I B M
I L O G
O P L
G E T T I N G
S T A R T E D
W I T H
O P L
T H E
I D E
51
52
I B M
O P L
I L O G
I D E
O P L
G E T T I N G
S T A R T E D
W I T H
T H E
Executing OPL projects
Describes the different ways of running and browsing OPL projects.
In this section
The Run options
Explains how to use the menus to run projects in the OPL IDE.
The Status Bar
Describes the area that displays messages about the current execution status of the IDE
and information about files being edited.
The execution toolbar options
Explains how to use the menus to run projects in the OPL IDE.
I B M
I L O G
O P L
G E T T I N G
S T A R T E D
W I T H
O P L
T H E
I D E
53
The Run options
You can solve an OPL model by clicking the Run
button in the execution toolbar.
You can also use right-click context menus.
How the Run button works
The behavior of the Run
♦
button in the execution toolbar depends on your “run history.”
As runs are executed, they are added to a numbered list that is visible by clicking the
arrow button to the right of the Run
♦
button.
If you have just launched OPL and no model has been run yet, clicking the Run
button for the first time may produce the following message:
In this case, you should try again by right-clicking on the run configuration name (left
panel) and selecting Run this.
54
I B M
O P L
I L O G
I D E
O P L
G E T T I N G
S T A R T E D
W I T H
T H E
♦
Once the list is populated, clicking the Run
button launches the most recently
launched run configuration in the list, no matter what project is selected in the OPL
Projects Navigator.
Note:
Obviously, this does not make it possible to just click a project in the Projects
Navigator and launch its default run configuration by simply clicking the Run
button. For this reason, many OPL users prefer the right-click context
menus to launch their models.
The default behavior of the Run button is configurable. See Run, Debug, Browse,
and External Tools button options for more information.
How the Run context menus work
There are additional ways to run your projects in OPL. This section describes the context
menu options that can be used to launch your projects directly from the OPL Projects
Navigator.
To set a default run configuration, right-click a run configuration in the project folder and
select Set as Default.
I B M
I L O G
O P L
G E T T I N G
S T A R T E D
W I T H
O P L
T H E
I D E
55
To run your projects from the OPL Projects Navigator:
♦ If you right-click on the project folder, you see the following context menu:
56
I B M
O P L
I L O G
I D E
O P L
G E T T I N G
S T A R T E D
W I T H
T H E
Two run options are listed:
♦
I B M
●
Run > Default Run Configuration — this option executes the run configuration that
is currently set as the default for this project.
●
Run > <list_of_run_configurations> — this option displays all run configurations
for the project, so that you can choose which one you want to launch, whether it is
currently the default run configuration or not.
If you right-click on an individual run configuration for a project, you see the option Run
this, which enables you to run only that run configuration.
I L O G
O P L
G E T T I N G
S T A R T E D
W I T H
O P L
T H E
I D E
57
58
I B M
O P L
I L O G
I D E
O P L
G E T T I N G
S T A R T E D
W I T H
T H E
The Status Bar
As you solve, this area displays the execution status of projects being solved and the elapsed
time of the solve.
Status Bar (partial view during a solve)
The Status Bar also shows the status of documents being edited in the Editing Area, and
the current line and column number of the cursor.
Status Bar (partial view while editing)
The middle part of the Status Bar indicates that the file currently being edited is Writable
(as opposed to Read-Only) and that the editor is in Insert mode (as opposed to Overwrite
mode). The numbers indicate the line number and column number of the current cursor
location in the file.
The box at the right of the Status Bar displays an animated graphic while a project is running,
and a message is displayed beside the graphic indicating progress.
Run progress messages in the Status Bar
Whether the model is running in standard run mode or in debug, browse, or background
mode, you can see messages about the progress of the run in the OPL IDE Status Bar:
♦
When the solve begins, a Launching <run configuration name> message appears at
the right of the Status Bar.
♦
As the solve progresses, the message changes to <run configuration name> <percent>,
with a percentage displayed to indicate progress.
♦
When the solve is finished, the message changes to <run configuration name> 100%,
to indicate that the run has completed
♦
In addition, as the model is solving, the run indicator
♦
If you click the Shows background operations icon
at the extreme right of the
toolbar, a Progress tab appears in the Output Area. If the solve is still running, you see
a display similar to the following:
becomes animated.
When the solve has finished, you see a display similar to this:
I B M
I L O G
O P L
G E T T I N G
S T A R T E D
W I T H
O P L
T H E
I D E
59
60
I B M
O P L
I L O G
I D E
O P L
G E T T I N G
S T A R T E D
W I T H
T H E
The execution toolbar options
In addition to the Run context menu in the OPL Projects Navigator, there are buttons in the
execution toolbar that can be used to run your projects in different ways. These are explained
in the IDE Reference Manual; see The execution toolbar.
I B M
I L O G
O P L
G E T T I N G
S T A R T E D
W I T H
O P L
T H E
I D E
61
62
I B M
O P L
I L O G
I D E
O P L
G E T T I N G
S T A R T E D
W I T H
T H E
Getting Started tutorial
A tutorial in which you launch the IDE, create an empty project, enter a model, add data,
add a settings file, create run configurations and execute them. More tutorials elaborate on
IDE features in IDE Tutorials.
In this section
Prerequisites - before you start
Before you start the OPL IDE.
Creating a project
Walks you through creating a project file, adding model and data, and setting mathematical
programming options.
Executing a project
Walks you through populating and executing the run configuration, creating a different
configuration, and understanding project execution.
Examining a solution to the model
Explains how to read the solutions in the output tabs and read details of the executed model
in the Problem Browser.
I B M
I L O G
O P L
G E T T I N G
S T A R T E D
W I T H
O P L
T H E
I D E
63
Prerequisites - before you start
At this stage, it is assumed that you have already successfully installed IBM® ILOG® OPL
on your platform.
At this point you are ready to launch the IBM ILOG OPL IDE (or the IDE for short) as
explained in the Launching the OPL IDE section of Introduction to the OPL IDE.
Once the IDE is open, you can read:
♦
Tour of the OPL Graphical User Interface in the IDE Reference to discover the graphical
user interface.
♦
Creating a project if you feel familiar enough with the interface and want to start working
on a project immediately.
Other useful documents to read are:
64
I B M
O P L
♦
A quick start to OPL for an introduction to how OPL handles optimization problems.
♦
Introduction to the OPL IDE, the first section of this manual.
♦
How to read the OPL documentation for details of prerequisites, conventions,
documentation formats, and other general information.
I L O G
I D E
O P L
G E T T I N G
S T A R T E D
W I T H
T H E
Creating a project
Walks you through creating a project file, adding model and data, and setting mathematical
programming options.
In this section
Purpose
What you are going to do in the tutorial.
The pasta production example
Presents the production problem and shows the code for the model and data.
Creating an empty project
Walks you through creating a project “from scratch” and defining a model using the editing
capabilities of the IDE.
Adding the model
Walks you through entering a model in an IDE project.
Dealing with errors
Describes how to take advantage of the automatic error detection feature.
Adding data
Explains how to add a data file to an OPL project and fill it with data.
I B M
I L O G
O P L
G E T T I N G
S T A R T E D
W I T H
O P L
T H E
I D E
65
Purpose
After launching the IBM® ILOG® OPL IDE as described in the Launching the OPL IDE
section, you will want to solve a problem of your own. For this, you will first have to define
a working document in the IDE. You can do this either by editing an existing project (see
Reusing existing files and projects in the IDE Reference) or by starting your own project.
In this tutorial, you will start your own project. To do this, you will:
♦
Create a project: see Creating an empty project.
♦
Add an existing model or write a new one: see The pasta production example.
♦
Add one or more existing data files or write new ones: see Adding data.
♦
Set mathematical programming options, if applicable: see Changing an MP option value.
Once your project is built, you will populate a run configuration, execute it, and study the
results as explained in Executing a project and Examining a solution to the model.
66
I B M
O P L
I L O G
I D E
O P L
G E T T I N G
S T A R T E D
W I T H
T H E
The pasta production example
You could write your own model from scratch by following the syntax rules from the Language
Reference Manual and the Language User’s Manual, but since this tutorial does not aim at
teaching you the modeling or scripting languages, you are going to reuse the pasta production
example, described in A production problem in the Language User’s Manual, for the purpose
of this exercise.
Note: The pasta production model is designed to be solved by the CPLEX® engine. However,
the content of this section would be the same for a model solved by the CP Optimizer
engine, except where explicitly mentioned.
The problem is as follows. To meet the demands of its customers, a company manufactures
its products in its own factories (inside production) or buys the products from other companies
(outside production).
The inside production is subject to resource constraints: each product consumes a certain
amount of each resource. In contrast, the outside production is theoretically unlimited. The
problem is to determine how much of each product should be produced inside the company
and how much outside, while minimizing the overall production cost, meeting the demand,
and satisfying the resource constraints.
The code extract below (product.mod file) shows an OPL model (the tuple version) for this
example. This model is part of the production project, which is available at the following
location:
<OPL_dir>\examples\opl\production
where <OPL_dir> is your installation directory.
OPL model for the production planning example (product.mod)
{string} Products = ...;
{string} Resources = ...;
tuple productData {
float demand;
float insideCost;
float outsideCost;
float consumption[Resources];
}
productData Product[Products] = ...;
float Capacity[Resources] = ...;
dvar float+ Inside[Products];
dvar float+ Outside[Products];
execute CPX_PARAM {
cplex.preind = 0;
cplex.simdisplay = 2;
}
I B M
I L O G
O P L
G E T T I N G
S T A R T E D
W I T H
O P L
T H E
I D E
67
minimize
sum( p in Products )
(Product[p].insideCost * Inside[p] +
Product[p].outsideCost * Outside[p] );
subject to {
forall( r in Resources )
ctInside:
sum( p in Products )
Product[p].consumption[r] * Inside[p] <= Capacity[r];
forall( p in Products )
ctDemand:
Inside[p] + Outside[p] >= Product[p].demand;
}
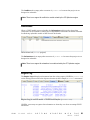
The following code extract (product.dat file) shows the data declaration for the problem.
OPL data for the production planning example (product.dat)
Products = { "kluski", "capellini", "fettucine" };
Resources = { "flour", "eggs" };
Product = #[
kluski : < 100, 0.6, 0.8, [ 0.5, 0.2 ] >,
capellini : < 200, 0.8, 0.9, [ 0.4, 0.4 ] >,
fettucine : < 300, 0.3, 0.4, [ 0.3, 0.6 ] >
]#;
Capacity = [ 20, 40 ];
68
I B M
O P L
I L O G
I D E
O P L
G E T T I N G
S T A R T E D
W I T H
T H E
Creating an empty project
To start from an empty project:
1. In the main menu, choose File>New>OPL Project, or click the New icon and select
OPL Project.
2. The New Project wizard is displayed.
I B M
I L O G
O P L
G E T T I N G
S T A R T E D
W I T H
O P L
T H E
I D E
69
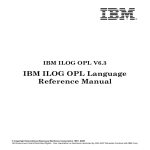
3. Enter the following information in the New Project window:
♦
Type myFirstProject as the Project Name of your new project.
♦
Enter a destination Project Location for the project, other than the OPL examples
directory. For example, create a directory named C:\OPL_projects and browse to
select the directory.
A folder with the project name is created in this directory.
♦
In the Options field:
●
Enter a Description for the project.
●
Check all the boxes except Create Data, because you will later be adding existing
data files to the project rather than creating an empty one.
Your window should look similar to the one shown below.
70
I B M
O P L
I L O G
I D E
O P L
G E T T I N G
S T A R T E D
W I T H
T H E
Creating a project
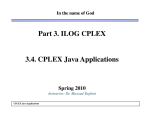
4. When you have entered all the information, click Finish.
Note:
If a project with the same name already exists in OPL, a message warns
you and the Finish button remains greyed out as long as you don’t enter
a unique name.
The project is created, containing the model and settings files you specified, and
appears in the OPL Projects Navigator. The new empty model file is displayed in the
Editing Area:
I B M
I L O G
O P L
G E T T I N G
S T A R T E D
W I T H
O P L
T H E
I D E
71
New project and new empty model in main window
Note that the .mod and .ops extensions are automatically appended to the file names
in the OPL Projects Navigator and in Windows Explorer (see File types in the IDE
Reference and Understanding OPL projects in A quick start to OPL for more information
on file name extensions in OPL).
The OPL Projects Navigator displays a minimal tree containing:
♦
an empty .mod file: you are going to fill it with OPL statements in the next step, Adding
the model
♦
an .ops file containing the default values for MP and CP options, and OPL settings: see
Changing an MP option value in this manual and Setting programming options in the IDE
Reference.
♦
the Run Configurations folder
♦
one run configuration (set to default) containing the model and settings files you have
just created (see New project and new empty model in main window).
Important:
The only mandatory component in a project or run configuration is a valid
model file. A project can contain more than one model, but a run
configuration can contain only one.
See also The main window in the IDE Reference for reference information on the graphical
user interface.
72
I B M
O P L
I L O G
I D E
O P L
G E T T I N G
S T A R T E D
W I T H
T H E
Adding the model
You are going to copy-paste the pasta production model into the Editing Area.
To add the pasta production model to the project:
1. Choose File>Open File in Editor, and browse to
<OPL_dir>\examples\opl\production\product.mod
then double-click the filename in the dialog box or select it and click Open.
Note:
There are two model files in this project. Make sure that you open
product.mod and not production.mod.
The OPL statements of the product.mod file appear in the Editing Area, in a separate
window. If you click the tab of the myFirstProject.mod file, you can see that your
empty model is in a different editor.
2. Click in the product.mod window and press Ctrl-A to select all the text, then Ctrl-C
to copy the contents of the file.
3. Click the tab of the myFirstProject.mod file to redisplay the empty editing window
for your own project.
4. Place your cursor after the header comments and press Ctrl-V to paste the copied
statements into the file myfirstproject.mod.
Note that an asterisk (* ) appears in the tab of this window.
This indicates that the file is unsaved. Click the Save button
to save the file.
5. Close the open window for the product.mod file in the Editing Area by clicking the
button to the right of its tab. Leave the edit window for the myFirstProject.mod file
open for the next exercise.
I B M
I L O G
O P L
G E T T I N G
S T A R T E D
W I T H
O P L
T H E
I D E
73
Dealing with errors
For this very first start with OPL, you have copied and pasted an existing model for quicker
results. In your real business life, however, you will enter OPL statements from the keyboard.
By default, the IDE checks for syntax and semantic errors automatically as you type and
error messages are displayed in the Problems tab at the bottom of the IDE.
To observe the default behavior:
1. In the second line of product.mod displayed in the Editing Area, remove the “s” from
the end of the word “Resources”.
74
I B M
O P L
I L O G
I D E
O P L
G E T T I N G
S T A R T E D
W I T H
T H E
A syntax error
The line containing the error is highlighted and for this line any other line affected by
the error, a red error symbol appears in the margin
. The Problems tab
immediately displays the corresponding error messages, indicating the description,
location, and source.
I B M
I L O G
O P L
G E T T I N G
S T A R T E D
W I T H
O P L
T H E
I D E
75
Problems tab
2. Remove the mistake. The error message disappears and the indicators in the editor
disappear.
3. Press Ctrl+S or choose File>Save or press the Save button
in the standard toolbar
to save your work.
In the next step, you will add two data files to the project.
76
I B M
O P L
I L O G
I D E
O P L
G E T T I N G
S T A R T E D
W I T H
T H E
Adding data
You can add more than one data file to a project or run configuration. If you do so, their
order is meaningful. See Ordering files within a run configuration in the Introduction to the
OPL IDE. You can either add existing data files or create them as you add them. In this
tutorial, you are going to add two existing data files to your project.
Note: 1. Until you add it to a project, a data file does not appear in the project tree.
2. All files pertaining to the same project must be stored within the same parent
project directory.
This part of the tutorial assumes you have created a project and is meaningful only if the
model is not empty.
To add a data file to the project:
1. Select File>Copy Files to Project to display the Import window.
I B M
I L O G
O P L
G E T T I N G
S T A R T E D
W I T H
O P L
T H E
I D E
77
2. Navigate to the directory:
<OPL_dir>\examples\opl\production
Check the production folder box on the left. Uncheck all the boxes on the right except
for product.dat and productn.dat.
3. Browse to select a folder to import into and click OK.
78
I B M
O P L
I L O G
I D E
O P L
G E T T I N G
S T A R T E D
W I T H
T H E
4. Click Finish in the Import window.
The data file is added to the project but is not automatically added to the run
configuration. You will do this later, as described in Populating and executing the run
configuration.
Note:
You could also drag the data files file from Windows Explorer into the OPL
Projects Navigator, and drop them in the myFirstProject project folder.
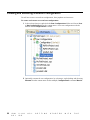
5. Your OPL Projects Navigator should now look like this:
I B M
I L O G
O P L
G E T T I N G
S T A R T E D
W I T H
O P L
T H E
I D E
79
Adding data files to a project
You are now going to execute your project. Later, you will modify the settings file so that
you can use it to execute different run configurations of your project (see Creating and
executing a different configuration).
80
I B M
O P L
I L O G
I D E
O P L
G E T T I N G
S T A R T E D
W I T H
T H E
Executing a project
Walks you through populating and executing the run configuration, creating a different
configuration, and understanding project execution.
In this section
What you are going to do
Describes the purpose of this part of the tutorial.
Populating and executing the run configuration
Describes how to add files to a run configuration and execute that configuration.
Adding a settings file
Explains how to add a settings file to a project so as to be able to change the values of OPL
options for language output, mathematical programming, or constraint programming.
Changing an MP option value
Gives an example of how to use the IDE settings editor to change an option value.
Creating and executing a different configuration
Describes how to create a second run configuration, then populate and execute it.
I B M
I L O G
O P L
G E T T I N G
S T A R T E D
W I T H
O P L
T H E
I D E
81
What you are going to do
The OPL IDE has a Run button
which starts the solving engine to find a solution to
the problem expressed in the active model. Solving a model in IBM® ILOG® OPL consists
of executing the corresponding project, more precisely a run configuration of it; that is, a
subset of the model, data, and settings files that make up your project.
Clicking the Run button
executes the last run configuration launched.
If you want to execute any run configuration other than the last run configuration you
launched, it is probably better to use the Run option of the right-click context menus in the
OPL Projects Navigator to launch the exact run configuration you want. See The Run options
section for more details.
Note: To execute a run configuration in debugging mode with breakpoints, you would use
the Debug button
OPL in IDE Tutorials.
instead of the Run button. See Using IBM ILOG Script for
To continue with the production planning tutorial, you are now going to:
82
I B M
O P L
♦
Populate the run configuration of your project: see Populating and executing the run
configuration
♦
Create more configurations to execute your model with different data and/or settings:
see Creating and executing a different configuration
♦
Learn more about model solving: see also What happens when you execute a run
configuration in the IDE Reference.
I L O G
I D E
O P L
G E T T I N G
S T A R T E D
W I T H
T H E
Populating and executing the run configuration
When you are finished creating an OPL project, the OPL Projects Navigator should typically
look as shown in the figure . You have defined the project as a set of model, data, and settings
but the run configuration contains only the .mod and .ops files. You need to add the data
you want to try with your model. Populating a run configuration consists therefore in adding
data and/or settings files to the run configuration subtree.
A run configuration must contain at least a model and can contain only one model.
To populate a run configuration:
1. In the OPL Projects Navigator, drag and drop the product.dat file to the
Configuration1 run configuration.
Note:
If you inadvertently drop the wrong file or drop a file to the wrong place,
you can at any time right-click it and choose Delete, then confirm. This
does not remove the file from the disk.
2. The OPL Projects Navigator now displays the data file name in the run configuration:
Adding a data file to a run configuration
I B M
I L O G
O P L
G E T T I N G
S T A R T E D
W I T H
O P L
T H E
I D E
83
3. Right-click Run Configurations and select Run>Configuration1. Alternatively,
right-click Configuration1 and select Run this.
Note:
A project can contain more than one run configuration. To make a
configuration the default, right-click its name and choose Set as Default.
But you can execute any of the other run configurations using the Run
option.
You can also execute any run configuration, whether default or not, by
clicking the arrow next to the Run button
from the Run option.
and selecting its name
See The Run options for more information on running OPL models.
See The Status Bar for more information on obtaining run status information
during the run.
4. Observe the Output Area.
The highlighted tab names show which output panels have received content during execution.
The pasta production model uses CPLEX® as the solving engine.
♦
The Solutions tab displays one solution.
Solution for Configuration1
♦
The Engine Log tab displays details for each iteration.
Engine Log for BasicConfiguration (MP)
84
I B M
O P L
I L O G
I D E
O P L
G E T T I N G
S T A R T E D
W I T H
T H E
♦
The Statistics tab shows, among other information, the algorithm and the number of
iterations.
Statistics for BasicConfiguration (MP)
♦
Also, notice that the Problem Browser now contains data for the problem, including the
solution, displayed in the drop-down at the top.
You will learn more about the Problem Browser in later sections of this tutorial and in the
IDE Tutorials. See also The Output Area in the IDE Reference, and Understanding solving
statistics and progress (MP models) in IDE Tutorials, for more information.
You can now continue with the tutorial and create another run configuration to learn more
about project settings, or you may want to go first to What happens when you execute a run
configuration in the IDE Reference to learn more on the execution process, then proceed
to Examining a solution to the model to understand results.
I B M
I L O G
O P L
G E T T I N G
S T A R T E D
W I T H
O P L
T H E
I D E
85
Adding a settings file
A settings file is where you store user-defined values of OPL options for language output,
mathematical programming, or constraint programming. It gives you access to the solver
parameters and allows you to modify them. For more information, see Preferences and
options in the IDE Reference.
Note: If your model contains a main flow control script, the OPL values you set in the .ops
file, as well as the settings set within the main script, apply to the current model only,
not to the submodels loaded and solved at execution time.
Because you left the Create settings option checked in Step 2 of Creating an empty project,
a default settings file already exists for your project and this is the one you used in Populating
and executing the run configuration.
To practice with a different run configuration without losing your default settings, you are
now going to add a second settings file to your project and use it to set a different value to
one mathematical programming option.
This stage of the tutorial assumes you have at least a model in your project and want to be
able to modify OPL, CPLEX® , or CP Optimizer parameters.
To add a settings file to an existing project:
1. Select the project name in the OPL Projects Navigator, then right-click and select
New>Settings.
2. In the dialog box, select the parent project and provide a name for the new settings
file. Then click Finish. The.ops extension will be added automatically.
86
I B M
O P L
I L O G
I D E
O P L
G E T T I N G
S T A R T E D
W I T H
T H E
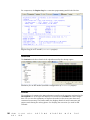
3. Notice the changes in IDE window:
I B M
I L O G
♦
The newsettings.ops file is added to the project in the OPL Projects Navigator.
♦
The settings editor appears.
♦
The Outline window displays the settings outline. You can later access the modified
settings directly from this window.
O P L
G E T T I N G
S T A R T E D
W I T H
O P L
T H E
I D E
87
Each option available in the settings file is documented individually in OPL language options,
Constraint programming options, and Mathematical programming options, in the IDE
Reference.
You are now ready to use the new settings file to set a mathematical programming option
with which you will then execute the model.
88
I B M
O P L
I L O G
I D E
O P L
G E T T I N G
S T A R T E D
W I T H
T H E
Changing an MP option value
You are now going to modify the default value of one of the MP options.
To change an option value in the IDE:
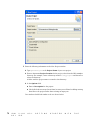
1. Double-click the new .ops file in the OPL Projects Navigator, if it is not already open.
The panel for mathematical programming options is displayed in the Editing Area.
2. In the Mathematical Programming /General category, choose Algorithm for
continuous problems and select Barrier from the dropdown list.
Notice the red exclamation mark indicating that a default value has been changed.
3. Choose File>Save.
Your project now includes a model file, two data files, and two settings files. In the next
step, Creating and executing a different configuration, you will create a second run
configuration to execute the model with different data and different settings.
I B M
I L O G
O P L
G E T T I N G
S T A R T E D
W I T H
O P L
T H E
I D E
89
Creating and executing a different configuration
You will now create a second run configuration, then populate and execute it.
To create and execute a second run configuration:
1. In the selected project, right-click the Run Configurations folder and choose New
> Run Configuration from the context menu. A new run configuration with the
default name Configuration2 is added.
2. Optionally, rename the run configuration, by selecting it, right-clicking and choosing
Rename from the context menu. In this example, Configuration2 is renamed Barrier.
90
I B M
O P L
I L O G
I D E
O P L
G E T T I N G
S T A R T E D
W I T H
T H E
3. Drag and drop the files myFirstProject.mod, product.dat, and your new settings
filenewsettings.ops into the new Barrier run configuration.
The OPL Projects Navigator should look like this.
I B M
I L O G
O P L
G E T T I N G
S T A R T E D
W I T H
O P L
T H E
I D E
91
A run configuration with different settings
4. Right-click in the project and select Run>Barrier from the context menu to execute
the model with changed settings.
The CPLEX® engine now uses Barrier as the value of the algorithm for continuous
problems.
Observe the differences in the output tabs.
92
I B M
O P L
♦
The Solutions tab displays the same solution (see Solution for Configuration1).
♦
The Engine Log tab shows a different report.
I L O G
I D E
O P L
G E T T I N G
S T A R T E D
W I T H
T H E
Engine Log for Barrier configuration
♦
The Statistics tab shows a different algorithm (Barrier) and number of iterations.
Statistics for Barrier configuration
You can proceed to Examining a solution to the model to learn more about the execution
process and its results.
See also:
I B M
♦
What happens when you execute a run configuration, in the IDE Reference, for details
on the execution process.
♦
Examining the statistics and progress chart (MP) in IDE Tutorials.
I L O G
O P L
G E T T I N G
S T A R T E D
W I T H
O P L
T H E
I D E
93
94
I B M
O P L
I L O G
I D E
O P L
G E T T I N G
S T A R T E D
W I T H
T H E
Examining a solution to the model
Explains how to read the solutions in the output tabs and read details of the executed model
in the Problem Browser.
In this section
Execution results
Explains how to examine the results in the IDE after executing a run configuration.
The Output tabs
Describes how the IDE output tabs reflect the result of project execution.
Understanding the Problem Browser
Describes the information displayed in the Problem Browser before and after execution.
I B M
I L O G
O P L
G E T T I N G
S T A R T E D
W I T H
O P L
T H E
I D E
95
Execution results
When you execute a run configuration to find the solutions to the problem expressed by the
model, the IDE provides facilities for examining results — one for examining the solution
and one for examining the details of your model.
♦
To examine the solution, browse the output tabs in the lower half of the main window,
as explained in the next section The Output tabs.
You can customize the solution display: see OPL language options in the IDE Reference.
♦
To examine the structure of the model as solved by the engine, use the Problem Browser:
see Understanding the Problem Browser and Doing more with the Problem Browser in
the IDE Reference.
♦
Tuning parameters: When working on a MIP project, possibly by trying various run
configurations, you may want to test the performance of your model before deployment.
The Tune model button in the IDE standard toolbar offers a convenient way to do so.
See Using the performance tuning tool in IDE Tutorials.
Note: For demonstration purposes, the illustrations used in this section are taken from various
code samples from the product distribution. However, you can continue with the project
you have just created.
96
I B M
O P L
I L O G
I D E
O P L
G E T T I N G
S T A R T E D
W I T H
T H E
The Output tabs
After you execute a run configuration, the solving engine searches for the optimal solution,
and when execution is complete, the IDE displays several output tabs in the main window.
These tabs are:
♦
Problems
♦
Scripting log
♦
Solutions
♦
Conflicts
♦
Relaxations
♦
Engine Log
♦
Statistics
♦
Profiler
Problems
The Problems tab displays semantic and syntax errors as you type when you write a model
manually, and internal errors, such as scripting or algorithm errors, when you solve a model.
Problems tab
How to read messages:
♦
The Description column guides the user as to the nature of the error.
♦
The Resource column indicates which resource the error occurred in.
♦
The Path column provides the path to the current file.
♦
The Location column reflects the line that’s affected by the error.
Scripting log
The Scripting log tab shows execution output related to the IBM® ILOG Script main or
execute or prepare blocks of the model (if applicable).
I B M
I L O G
O P L
G E T T I N G
S T A R T E D
W I T H
O P L
T H E
I D E
97
Scripting log tab (transp4.mod)
Solutions
The Solutions tab displays the final solution to a model and, if applicable, any intermediate
feasible solutions found.
Solutions tab (basic configuration of product.mod)
By default the variables are displayed as well. You can disable this display, see OPL language
options in the IDE Reference.
Conflicts
When a CPLEX® model proves infeasible, the Conflicts tab shows the places where you
can change the data or the way filtering constraints are expressed so as to remove the
incompatibilities that made the model infeasible. See Relaxing infeasible models in IDE
Tutorials for details.
Conflicts tab (nurses project)
98
I B M
O P L
I L O G
I D E
O P L
G E T T I N G
S T A R T E D
W I T H
T H E
The Conflicts tab is empty after execution of product.mod because that project is not
designed as infeasible.
Note: There is no support for conflicts in models solved by the CP Optimizer engine.
Relaxations
When a CPLEX model proves infeasible, the Relaxations tab shows the places that
constraints can be relaxed to remove the incompatibilities that made the model infeasible.
See Relaxing infeasible models in IDE Tutorials for details.
Relaxations tab (nurses project)
The Relaxations tab is empty after execution of product.mod because that project is not
designed as infeasible.
Note: There is no support for relaxations in models solved by the CP Optimizer engine.
Engine Log
The Engine Log tab displays information from the solving engine (CPLEX for product.mod)
on the solving process and on the objective function (in this example, a minimize statement).
Engine Log for an MP model - CPLEX Dual Simplex (product.mod)
CPLEX® users may recognize this information as what they see when executing CPLEX
Interactive.
I B M
I L O G
O P L
G E T T I N G
S T A R T E D
W I T H
O P L
T H E
I D E
99
For comparison, the Engine Log for a constraint programming model looks like this:
Engine Log for a CP model (steelmill project)
Statistics
The Statistics tab shows details of the algorithm used by the solving engine.
Statistics for an MP model (scalable configuration of warehouse project)
Profiler
The profiling tool computes the time and memory used by each execution step listed in the
Description tree on the right and displays it as a table in the Profiler tab of the Output
Area. You can use this information to improve the model so that it executes faster and
consumes less memory. The Profiler table also displays details of model extraction and
engine search during the solving phase. See Profiling the execution of a model in IDE
Tutorials.
100
I B M
O P L
I L O G
I D E
O P L
G E T T I N G
S T A R T E D
W I T H
T H E
Profiler table for an MP model (scalable configuration of warehouse project)
Profiler table for a CP model (steelmill.mod)
I B M
I L O G
O P L
G E T T I N G
S T A R T E D
W I T H
O P L
T H E
I D E
101
Understanding the Problem Browser
The Problem Browser shows a structured view of the problem expressed by the model. See
The Problem browser in the IDE Reference and Doing more with the Problem Browser in
the IDE Reference for a complete presentation.
When you first open a project, the Problem Browser is empty. You can use it to browse the
model before any execution and to examine the values after execution.
When you execute a run configuration, the Problem Browser provides a way for you to
examine the solution to your model, in addition to what you see in The Output tabs. It
summarizes information about the data structures defined in the model to express the
optimization problem.
As an example, you can open the production project and run the Named data configuration.
After the execution, the Problem Browser displays values for the model elements.
Problem Browser after execution (product.mod)
Observe the Problem Browser window.
102
I B M
O P L
♦
The drop-down list at the top displays the final solution, which is the only solution it
contains after the execution of the Named data run configuration. For run configurations
that generate more than one solution, the list displays the solution pools that were
computed by the engine. Selecting one of these solutions from the drop-down list displays
data for that solution in the lower part of the Problem Browser. See Working with the
solution pool in IDE Tutorials.
♦
The categories in the Name column (Data, Decision Variables, Constraints) are populated
with model objects and expanded to show the corresponding values. The order within
each category is alphabetical.
♦
The Value column shows values for the model objects. The Property name and Property
value columns remain empty until you select a model element.
I L O G
I D E
O P L
G E T T I N G
S T A R T E D
W I T H
T H E
♦
If you select an item in the main Problem Browser window (in this case, Capacity),
properties for that object are shown in the lower part of the window. This area may be
hidden by using the Hide Properties
♦
button.
If you slide the cursor over a data object (in this case, Products), a Show data view
button appears (shown below with its tooltip visible):
Clicking this button displays the data view in the main editing area:
I B M
I L O G
O P L
G E T T I N G
S T A R T E D
W I T H
O P L
T H E
I D E
103
For a large tuple set, the values may not all be visible within the window. In this case, an
ellipsis appears at the end of the cell. Pass the cursor over the column to display all the
values in a tooltip.
Note: If the model has only unlabeled constraints, the Constraints line is empty. To observe
this, comment out the constraint labels and execute the project again. See Constraint
labels in the Language Reference Manual.
104
I B M
O P L
I L O G
I D E
O P L
G E T T I N G
S T A R T E D
W I T H
T H E
I
N
D
E
X
Index
ellipsis
in the Problem Browser 102
Engine Log output tab 99
error checking 81
examining solutions 96
examples
opening 16
using the New Example wizard 16
execution
of projects and models 81
toolbar 81
C
code samples
product.dat 67
product.mod 67
column number for cursor position, in Status Bar
59
command line
launching the IDE from 10
Compare With 46
conflicts and relaxations
not supported by CP engine 98, 99
Conflicts output tab 98, 99
Conflicts tab in IDE 97
Console output tab 97
constraint programming
conflicts and relaxations not supported 98,
99
CP Optimizer
no support for conflicts and relaxations 98,
99
Create settings, option 69
creating projects 65
F
data
L
D
adding to a project 77
data files in a run configuration 39
decision variables
display option, or/off 98
Description column
in Problems output tab 74
display conflicts 97
displaying
decision variables 98
draft projects 65
E
editing files in the IDE 42
© Copyright IBM Corp. 1987, 2009
files
.ops 89
product.dat file 67
product.dat/productn.dat 77
product.mod file 67
H
hiding line numbers in text editor 42
I
IDE (Integrated Develop Environment) 14
infeasibility 81
line numbers
for cursor position, in Status Bar 59
line numbers in text editor 42
Local History 46
M
Main window 14
main window
line number, column number 59
name of current file 59
Status Bar 59
minimize statement 99
model, creating 69
105
models
execution 81
production planning 67, 73
solving 81
results 81
run configuration, order of files 39
run configurations 81
populating and executing 83
N
S
New Example wizard
using to open examples 16
vs. using the Import wizard 16
settings file
adding to a project 86
settings file, creating 69
settings files
modifying MP option value 89
settings files in a run configuration 39
solutions
examining 95
Solutions tab 98
standalone models 65
Statistics tab 100
Status Bar 59
run indicator 59
see run status 59
show background operations button 59
Status Bar description 59
system requirements for the OPL IDE 64
O
objective function
and Engine Log tab 99
oplide 10
optimal solution 97
order
in Problem Browser 102
order of files in a run configuration 39
OS requirements for OPL IDE 64
Output Area
Conflicts 98, 99
Console 97
Engine Log 99
Problems 97
Profiler 100
Relaxations 98, 99
Solutions 98
Statistics 100
output tabs 97
T
text editor 14
hiding line numbers 42
toolbars
execution 81
tooltips
values in tuple set 102
tuple sets
in call stack 102
P
Problem Browser
description 102
order of elements 102
using 102
Problems output tab 74, 97
product.dat file 67, 77
product.mod file 67
production planning example 67, 73
productn.dat file 77
Profiler tab 100
project, creating 69
projects
adding a settings file 86
adding data files 77
creating 65
execution 81
settings file 89
V
Version list 46
W
Welcome window 11
workspace, definition 29
R
red star and exclamation mark 89
relaxations
in Output Area 98, 99
Relaxations output tab 98, 99
removing
items from run configurations or projects 83
Replace With 46
106
I B M
O P L
I L O G
I D E
O P L
G E T T I N G
S T A R T E D
W I T H
T H E