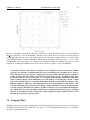
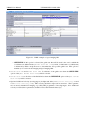
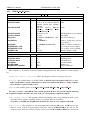
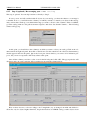
1
EUROPEAN SOUTHERN OBSERVATORY
Organisation Européene pour des Recherches Astronomiques dans l’Hémisphère Austral
Europäische Organisation für astronomische Forschung in der südlichen Hemisphäre
ESO - European Southern Observatory
Karl-Schwarzschild Str. 2, D-85748 Garching bei München
Very Large Telescope
Paranal Science Operations
VIMOS User Manual
Doc. No. VLT-MAN-ESO-14610-3509
Issue 94.0, Date 24/05/2014
VIMOS IOT/S. Mieske/F. Selman
Prepared/Edited by . . . . . . . . . . . . . . . . . . . . . . . . . . . . . . . . . . . . . . . . . .
Date
Signature
A. Smette
Approved . . . . . . . . . . . . . . . . . . . . . . . . . . . . . . . . . . . . . . . . . .
Date
Signature
C. Dumas
Released . . . . . . . . . . . . . . . . . . . . . . . . . . . . . . . . . . . . . . . . . .
Date
Signature
ii
VIMOS User Manual
This page was intentionally left blank
VLT-MAN-ESO-14610-3509
VIMOS User Manual
VLT-MAN-ESO-14610-3509
iii
The list of people that have contributed to the preparation of this document, at different times, includes:
Stefano Bagnulo
Stephane Brillant
Paul Bristow
Peter Hammersley
Gianni Marconi
Steffen Mieske
Marina Rejkuba
Ruben Sanchez-Janssen
Fernando J. Selman
VIRMOS Consortium
Burkhard Wolff
iv
VIMOS User Manual
This page was intentionally left blank
VLT-MAN-ESO-14610-3509
VIMOS User Manual
VLT-MAN-ESO-14610-3509
Table 1: Change Record
Issue/Rev.
Date
94.0
May 24, 2014
92.2
May 28, 2013
92.1
May 23, 2013
92.0
Feb 25, 2013
91.1
Nov 24, 2012
Section/Parag. affected
3.4.1, 3.5.7, 6.3.2,
7.2.1, 7.2.4
2.4.1, 2.8.5, 3.5.3,
3.6.1
Sec.
1.4.1, 2.1,
2.2.2 (Fig. 2.3),
2.4, 2.4.1 (Fig.
2.6), 2.8.5, 3.4.1,
3.5.3, 3.6.1, 6.2.1,
6.2.3, 6.2.8, 7.3.1
Tables 2.6, 2.7, 2.9,
and 2.10
6.2.6
91.0
90.1
90.0
89.0
Sep 3, 2012
May 29, 2012
Feb 24, 2012
Dec 28, 2011
2.3, 2.4, and 2.8
88.0
87.1
Sept 15, 2010
Dec 12, 2010
several
several
87.0
Aug 28, 2010
all
86.1
Mar 03, 2010
Ch. 2, 3
86.0
Feb 27, 2010
Ch. 2, 3
85.2
Nov 30, 2009
Chapter 4
85.1
Nov 29, 2009
Chapter 4
85.0
Sep 1, 2009
1.5, 3.4.3, 4.7.7
84.4
July 1, 2009
3.4.3, 4.6.x
84.3
84.2
March 26, 2009
March 26, 2009
4.5.1, 4.6.1
4.5.1, 4.6.1
continued on next page
Reason/Initiation/Documents/Remarks
Minor changes after MHI feedback.
Minor changes after MHI feedback.
Version for P92 Phase II.
Version for P92 Phase I. Corrected wavelength coverage of new HR blue grism.
Modified recomendations for reference objects.
(MRE 2012-09-14 email). Version for P91 Phase
II
Version for P91, Phase I.
Added PILMOS chapter. Released for P90 Phase II.
released for P90 Phase I.
released for P89 Phase II. Added new HR blue
grism info. Added subsections in 2.8
Released for P88 Phase I and II.
Released for P87 Phase II. Section 2.2.4 with characteristics of band passes with new detectors. Several places: AFC update. Instrument shortcomings
section added.
Modified for new detectors and AFC system. To be
used in Phase I P87.
Incorporated some of the feedback from IOT. Added
QE graph of new CCDs.
Phase I P86. Info about new CCDs and upgrade
project. New policy for waivers for OB duration in
SM.
Further descriptions of the SkyFlat templates. Release for P85 Phase II.
Added automatic IP tables to P85 template description. Added img SkyFlat templates and description.
Added further explanation to Chapter 4 Introduction. Release for P85 Phase II.
Added VIMOS IFU TwFlat template description.
Normal update for P85 Phase I.
Further offsets description and other minor fixes for
Phase II.
Minor fixes
Fixed wrong description of offsets and created new
Figs 4.4 and 4.5
v
vi
VIMOS User Manual
VLT-MAN-ESO-14610-3509
Table 1: continued
Issue/Rev.
Date
84.1
March 11, 2009
83.0
Aug 31, 2008
82.1
81.0
79.1
Mar 05, 2008
Aug 31, 2007
Dec 13, 2006
Section/Parag. affected
4.5.1, 4.6.1, 4.6.2,
4.6.3
79.0
Aug 23, 2006
78.1
78.0
77.2
77.0
76.1
Jun 06, 2006
Mar 01, 2006
Dec 01, 2005
Aug 31, 2005
June 30, 2005
76.0
Mar 21, 2005
5.0
1.3
1.2
1.1
1.0
Nov 26, 2004
Jun 14, 2004
Jan 12, 2004
July 14 2003
Feb 11, 2003
Added
clarifications about
instrument
FoV
(Phase II)
front page and
fonts
all
none
Appendix
3.6.1, 3.7.2
2.1;2.2;2.3;2.6;3.4;
3.5;3.6;3.7;4.6
2.7; 3.5.7; 3.6.6;
3.7.7
all
all
all
all
all
draft
Oct 24, 2002
all
Reason/Initiation/Documents/Remarks
Clarified offsets description. Modified reference object position recommendation..
Pre-imaging validity comment and release for P83
Phase I
release for P82 Phase I and II
release for P81 (Phase I and II)
release for P79 (Phase II)
release for P79 (Phase I)
release for P78 (Phase II)
release for P78 (Phase I)
release for P77 (Phase II)
release for P77 (Phase I)
release for P76 (Phase II)
release for P76 (Phase I)
release for P75 (phase II) and P76 (Phase I)
release for P74 (phase II) and P75 (Phase I)
release for P73 (phase II) and P74 (Phase I)
release for P72 (phase II) and P73 (Phase I)
first release for P71 (phase II)
and P72 (Phase I)
Draft delivered by VIRMOS Consortium
Contents
1
2
Introduction
1.1 Scope . . . . . . . . . . . . .
1.2 More Information on VIMOS .
1.3 Contact Information . . . . . .
1.4 Version notes, change track . .
1.4.1 Version 94.0 . . . . .
1.4.2 Version 92.1 . . . . .
1.4.3 Version 92.0 . . . . .
1.4.4 Version 90.1 . . . . .
1.4.5 Version 89.0 . . . . .
1.4.6 Version 88.0 . . . . .
1.4.7 Version 87.0 . . . . .
1.4.8 Version 86.0 . . . . .
1.4.9 Version 85.0 . . . . .
1.4.10 Version 84.0 . . . . .
1.4.11 Version 80.0 . . . . .
1.4.12 Version 79.1 . . . . .
1.4.13 Version 79.0 . . . . .
1.4.14 Version 78.1 . . . . .
1.5 Acknowledgments . . . . . .
.
.
.
.
.
.
.
.
.
.
.
.
.
.
.
.
.
.
.
.
.
.
.
.
.
.
.
.
.
.
.
.
.
.
.
.
.
.
.
.
.
.
.
.
.
.
.
.
.
.
.
.
.
.
.
.
.
.
.
.
.
.
.
.
.
.
.
.
.
.
.
.
.
.
.
.
.
.
.
.
.
.
.
.
.
.
.
.
.
.
.
.
.
.
.
.
.
.
.
.
.
.
.
.
.
.
.
.
.
.
.
.
.
.
.
.
.
.
.
.
.
.
.
.
.
.
.
.
.
.
.
.
.
.
.
.
.
.
.
.
.
.
.
.
.
.
.
.
.
.
.
.
.
.
.
.
.
.
.
.
.
.
.
.
.
.
.
.
.
.
.
.
.
.
.
.
.
.
.
.
.
.
.
.
.
.
.
.
.
.
.
.
.
.
.
.
.
.
.
.
.
.
.
.
.
.
.
.
.
Instrument Characteristics
2.1 Overview . . . . . . . . . . . . . . . . . . . . . .
2.1.1 Instrument modes . . . . . . . . . . . . . .
2.2 Imaging . . . . . . . . . . . . . . . . . . . . . . .
2.2.1 IMG mode: orientation of the field of view
2.2.2 Image Quality . . . . . . . . . . . . . . . .
2.2.3 Imaging Filters . . . . . . . . . . . . . . .
2.2.4 Zero points . . . . . . . . . . . . . . . . .
2.3 Multi-Object Spectroscopy (MOS) . . . . . . . . .
2.3.1 Spectral range . . . . . . . . . . . . . . . .
2.3.2 Spectral resolution . . . . . . . . . . . . .
2.3.3 Multiplex characteristics . . . . . . . . . .
2.3.4 MOS mode: orientation of the field of view
2.4 Integral Field Unit (IFU) . . . . . . . . . . . . . .
vii
.
.
.
.
.
.
.
.
.
.
.
.
.
.
.
.
.
.
.
.
.
.
.
.
.
.
.
.
.
.
.
.
.
.
.
.
.
.
.
.
.
.
.
.
.
.
.
.
.
.
.
.
.
.
.
.
.
.
.
.
.
.
.
.
.
.
.
.
.
.
.
.
.
.
.
.
.
.
.
.
.
.
.
.
.
.
.
.
.
.
.
.
.
.
.
.
.
.
.
.
.
.
.
.
.
.
.
.
.
.
.
.
.
.
.
.
.
.
.
.
.
.
.
.
.
.
.
.
.
.
.
.
.
.
.
.
.
.
.
.
.
.
.
.
.
.
.
.
.
.
.
.
.
.
.
.
.
.
.
.
.
.
.
.
.
.
.
.
.
.
.
.
.
.
.
.
.
.
.
.
.
.
.
.
.
.
.
.
.
.
.
.
.
.
.
.
.
.
.
.
.
.
.
.
.
.
.
.
.
.
.
.
.
.
.
.
.
.
.
.
.
.
.
.
.
.
.
.
.
.
.
.
.
.
.
.
.
.
.
.
.
.
.
.
.
.
.
.
.
.
.
.
.
.
.
.
.
.
.
.
.
.
.
.
.
.
.
.
.
.
.
.
.
.
.
.
.
.
.
.
.
.
.
.
.
.
.
.
.
.
.
.
.
.
.
.
.
.
.
.
.
.
.
.
.
.
.
.
.
.
.
.
.
.
.
.
.
.
.
.
.
.
.
.
.
.
.
.
.
.
.
.
.
.
.
.
.
.
.
.
.
.
.
.
.
.
.
.
.
.
.
.
.
.
.
.
.
.
.
.
.
.
.
.
.
.
.
.
.
.
.
.
.
.
.
.
.
.
.
.
.
.
.
.
.
.
.
.
.
.
.
.
.
.
.
.
.
.
.
.
.
.
.
.
.
.
.
.
.
.
.
.
.
.
.
.
.
.
.
.
.
.
.
.
.
.
.
.
.
.
.
.
.
.
.
.
.
.
.
.
.
.
.
.
.
.
.
.
.
.
.
.
.
.
.
.
.
.
.
.
.
.
.
.
.
.
.
.
.
.
.
.
.
.
.
.
.
.
.
.
.
.
.
.
.
.
.
.
.
.
.
.
.
.
.
.
.
.
.
.
.
.
.
.
.
.
.
.
.
.
.
.
.
.
.
.
.
.
.
.
.
.
.
.
.
.
.
.
.
.
.
.
.
.
.
.
.
.
.
.
.
.
.
.
.
.
.
.
.
.
.
.
.
.
.
.
.
.
.
.
.
.
.
.
.
.
.
.
.
.
.
.
.
.
.
.
.
.
.
.
.
.
.
.
.
.
.
.
.
.
.
.
.
.
.
.
.
.
.
.
.
.
.
.
.
.
.
.
.
.
.
.
.
.
.
.
.
.
.
.
.
.
.
.
.
.
.
.
.
.
.
.
.
.
.
.
.
.
.
.
.
.
.
.
.
.
.
.
.
.
.
.
.
.
.
.
.
.
.
.
.
.
.
.
.
.
.
.
.
.
.
.
.
.
.
.
.
.
.
.
.
.
.
.
.
.
.
.
.
.
.
.
.
.
.
.
.
.
.
.
.
.
.
.
.
.
.
.
.
.
.
.
.
.
.
.
.
.
.
.
.
.
.
1
1
1
1
2
2
2
2
3
3
3
3
3
4
4
4
4
4
4
4
.
.
.
.
.
.
.
.
.
.
.
.
.
5
5
7
7
8
8
8
8
12
12
12
12
13
13
viii
VIMOS User Manual
2.5
2.6
2.7
2.8
3
2.4.1 IFU mode: orientation of the field of view . . .
2.4.2 Fiber arrangement and spatial characteristics .
2.4.3 Spectral range . . . . . . . . . . . . . . . . . .
2.4.4 Spectral resolution . . . . . . . . . . . . . . .
2.4.5 Multiplex characteristics . . . . . . . . . . . .
Detectors . . . . . . . . . . . . . . . . . . . . . . . .
2.5.1 Detector system . . . . . . . . . . . . . . . . .
2.5.2 More information . . . . . . . . . . . . . . . .
Calibration Units . . . . . . . . . . . . . . . . . . . .
AFC: Active Flexure Compensation . . . . . . . . . .
Known shortcomings of the instrument . . . . . . . . .
2.8.1 IFU masks vignetting in IMG and MOS mode .
2.8.2 IFU fringing . . . . . . . . . . . . . . . . . .
2.8.3 [SOLVED] Non-optimal focus for some grisms
2.8.4 [SOLVED] Defocusing at some adapter angles
2.8.5 [SOLVED] IFU focusing issues . . . . . . . .
2.8.6 Spectrum rotation . . . . . . . . . . . . . . . .
2.8.7 Temperature dependent bias level . . . . . . .
2.8.8 Temperature dependent image scale . . . . . .
Observing with VIMOS
3.1 Interactions with the telescope . . . . . . . . . . . . .
3.1.1 Guide stars and Guidecam software tool . . . .
3.1.2 Cumulative offsets . . . . . . . . . . . . . . .
3.1.3 Telescope and Instrument Focus . . . . . . . .
3.2 Atmospheric Dispersion . . . . . . . . . . . . . . . .
3.3 Fringing and Flexures . . . . . . . . . . . . . . . . . .
3.4 Imaging (IMG) . . . . . . . . . . . . . . . . . . . . .
3.4.1 Pre-imaging . . . . . . . . . . . . . . . . . . .
3.4.2 Science imaging . . . . . . . . . . . . . . . .
3.4.3 IMG mode: calibration plan . . . . . . . . . .
3.4.4 IMG mode: pipeline . . . . . . . . . . . . . .
3.4.5 IMG mode: Exposure Time Calculator . . . .
3.5 Multi-Object Spectroscopy (MOS) . . . . . . . . . . .
3.5.1 Pre-imaging . . . . . . . . . . . . . . . . . . .
3.5.2 PILMOS: Pre-imageless MOS observations . .
3.5.3 Rotator on sky . . . . . . . . . . . . . . . . .
3.5.4 VIMOS Mask Preparation Software (VMMPS)
3.5.5 Finding charts . . . . . . . . . . . . . . . . .
3.5.6 Visitors using MOS . . . . . . . . . . . . . . .
3.5.7 MOS mode: grism+filter setup . . . . . . . . .
3.5.8 MOS mode: attached night time calibrations .
3.5.9 MOS mode: calibration plan . . . . . . . . . .
3.5.10 MOS mode: pipeline . . . . . . . . . . . . . .
VLT-MAN-ESO-14610-3509
.
.
.
.
.
.
.
.
.
.
.
.
.
.
.
.
.
.
.
.
.
.
.
.
.
.
.
.
.
.
.
.
.
.
.
.
.
.
.
.
.
.
.
.
.
.
.
.
.
.
.
.
.
.
.
.
.
.
.
.
.
.
.
.
.
.
.
.
.
.
.
.
.
.
.
.
.
.
.
.
.
.
.
.
.
.
.
.
.
.
.
.
.
.
.
.
.
.
.
.
.
.
.
.
.
.
.
.
.
.
.
.
.
.
.
.
.
.
.
.
.
.
.
.
.
.
.
.
.
.
.
.
.
.
.
.
.
.
.
.
.
.
.
.
.
.
.
.
.
.
.
.
.
.
.
.
.
.
.
.
.
.
.
.
.
.
.
.
.
.
.
.
.
.
.
.
.
.
.
.
.
.
.
.
.
.
.
.
.
.
.
.
.
.
.
.
.
.
.
.
.
.
.
.
.
.
.
.
.
.
.
.
.
.
.
.
.
.
.
.
.
.
.
.
.
.
.
.
.
.
.
.
.
.
.
.
.
.
.
.
.
.
.
.
.
.
.
.
.
.
.
.
.
.
.
.
.
.
.
.
.
.
.
.
.
.
.
.
.
.
.
.
.
.
.
.
.
.
.
.
.
.
.
.
.
.
.
.
.
.
.
.
.
.
.
.
.
.
.
.
.
.
.
.
.
.
.
.
.
.
.
.
.
.
.
.
.
.
.
.
.
.
.
.
.
.
.
.
.
.
.
.
.
.
.
.
.
.
.
.
.
.
.
.
.
.
.
.
.
.
.
.
.
.
.
.
.
.
.
.
.
.
.
.
.
.
.
.
.
.
.
.
.
.
.
.
.
.
.
.
.
.
.
.
.
.
.
.
.
.
.
.
.
.
.
.
.
.
.
.
.
.
.
.
.
.
.
.
.
.
.
.
.
.
.
.
.
.
.
.
.
.
.
.
.
.
.
.
.
.
.
.
.
.
.
.
.
.
.
.
.
.
.
.
.
.
.
.
.
.
.
.
.
.
.
.
.
.
.
.
.
.
.
.
.
.
.
.
.
.
.
.
.
.
.
.
.
.
.
.
.
.
.
.
.
.
.
.
.
.
.
.
.
.
.
.
.
.
.
.
.
.
.
.
.
.
.
.
.
.
.
.
.
.
.
.
.
.
.
.
.
.
.
.
.
.
.
.
.
.
.
.
.
.
.
.
.
.
.
.
.
.
.
.
.
.
.
.
.
.
.
.
.
.
.
.
.
.
.
.
.
.
.
.
.
.
.
.
.
.
.
.
.
.
.
.
.
.
.
.
.
.
.
.
.
.
.
.
.
.
.
.
.
.
.
.
.
.
.
.
.
.
.
.
.
.
.
.
.
.
.
.
.
.
.
.
.
.
.
.
.
.
.
.
.
.
.
.
.
.
.
.
.
.
.
.
.
.
.
.
.
.
.
.
.
.
.
.
.
.
.
.
.
.
.
.
.
.
.
.
.
.
.
.
.
.
.
.
.
.
.
.
.
.
.
.
.
.
.
.
.
.
.
.
.
.
.
.
.
.
.
.
.
.
.
.
.
.
.
.
.
.
.
.
.
.
.
.
.
.
.
.
.
.
.
.
.
.
.
.
.
.
.
.
.
.
.
.
.
.
.
.
.
.
.
.
.
.
.
.
.
.
.
.
.
.
.
.
.
.
.
.
.
.
.
.
.
.
.
.
.
.
.
.
.
.
.
.
.
.
.
.
.
.
.
.
.
.
.
.
.
.
.
.
.
.
.
.
.
.
.
.
.
.
.
.
.
.
.
.
.
.
.
.
.
.
.
.
.
.
.
.
.
.
.
.
.
.
.
.
.
.
.
.
.
.
.
.
.
.
.
.
.
.
.
.
.
.
.
.
.
.
.
.
.
.
.
.
.
.
.
.
.
.
.
.
.
.
.
14
14
17
17
17
19
19
21
21
22
22
22
22
22
23
23
23
24
24
.
.
.
.
.
.
.
.
.
.
.
.
.
.
.
.
.
.
.
.
.
.
.
25
25
25
26
26
26
26
27
28
28
29
29
29
29
29
30
30
30
31
32
32
32
32
32
VIMOS User Manual
3.6
3.7
4
5
6
VLT-MAN-ESO-14610-3509
3.5.11 MOS mode: Exposure Time Calculator . .
Integral Field Unit (IFU) . . . . . . . . . . . . . .
3.6.1 Acquisition accuracy . . . . . . . . . . . .
3.6.2 Dithering/jitter pattern . . . . . . . . . . .
3.6.3 IFU mode: grism + filter setup . . . . . . .
3.6.4 IFU mode: attached night time calibrations
3.6.5 IFU mode: calibration plan . . . . . . . . .
3.6.6 IFU mode: pipeline . . . . . . . . . . . . .
3.6.7 IFU mode: Exposure Time Calculator . . .
VIMOS overheads and OB duration . . . . . . . .
User Guide to the VIMOS Templates
4.1 Introduction . . . . . . . . . . . . .
4.2 Template names . . . . . . . . . . .
4.3 Things to know - Reminder . . . . .
4.4 List of templates . . . . . . . . . .
4.5 Acquisition templates . . . . . . . .
4.5.1 VIMOS img acq Preset . .
4.5.2 VIMOS img acq FlatSky .
4.5.3 VIMOS mos acq Mask . .
4.5.4 VIMOS mos acq Standard .
4.5.5 VIMOS ifu acq Preset . . .
4.6 Science templates . . . . . . . . . .
4.6.1 VIMOS img obs Offset . .
4.6.2 VIMOS mos obs Offset . .
4.6.3 VIMOS ifu obs Offset . . .
4.7 Calibration Templates . . . . . . . .
4.7.1 VIMOS img cal FlatSky . .
4.7.2 VIMOS img cal Photom . .
4.7.3 VIMOS img cal Astrom . .
4.7.4 VIMOS mos cal NightCalib
4.7.5 VIMOS mos cal Standard .
4.7.6 VIMOS ifu cal Specphot .
4.7.7 VIMOS ifu cal NightCalib
4.7.8 VIMOS ifu cal TwFlat . . .
Guidecam Tutorial
5.1 Getting started with Guidecam
5.2 The main ‘Guidecam’ GUI . .
5.3 The ‘USNO at ESO’ panel . .
5.4 Selecting the Guide Star . . .
5.5 Generating Finding Charts . .
5.6 Guide Stars: Policy . . . . . .
VMMPS Tutorial
.
.
.
.
.
.
.
.
.
.
.
.
.
.
.
.
.
.
.
.
.
.
.
.
.
.
.
.
.
.
.
.
.
.
.
.
.
.
.
.
.
.
.
.
.
.
.
.
.
.
.
.
.
.
.
.
.
.
.
.
.
.
.
.
.
.
.
.
.
.
.
.
.
.
.
.
.
.
.
.
.
.
.
.
.
.
.
.
.
.
.
.
.
.
.
.
.
.
.
.
.
.
.
.
.
.
.
.
.
.
.
.
.
.
.
.
.
.
.
.
.
.
.
.
.
.
.
.
.
.
.
.
.
.
.
.
.
.
.
.
.
.
.
.
.
.
.
.
.
.
.
.
.
.
.
.
.
.
.
.
.
.
.
.
.
.
.
.
.
.
.
.
.
.
.
.
.
.
.
.
.
.
.
.
.
.
.
.
.
.
.
.
.
.
.
.
.
.
.
.
.
.
.
.
.
.
.
.
.
.
.
.
.
.
.
.
.
.
.
.
.
.
.
.
.
.
.
.
.
.
.
.
.
.
.
.
.
.
.
.
.
.
.
.
.
.
.
.
.
.
.
.
.
.
.
.
.
.
.
.
.
.
.
.
.
.
.
.
.
.
.
.
.
.
.
.
.
.
.
.
.
.
.
.
.
.
.
.
.
.
.
.
.
.
.
.
.
.
.
.
.
.
.
.
.
.
.
.
.
.
.
.
.
.
.
.
.
.
.
.
.
.
.
.
.
.
.
.
.
.
.
.
.
.
.
.
.
.
.
.
.
.
.
.
.
.
.
.
.
.
.
.
.
.
.
.
.
.
.
.
.
.
.
.
.
.
.
.
.
.
.
.
.
.
.
.
.
.
.
.
.
.
.
.
.
.
.
.
.
.
.
.
.
.
.
.
.
.
.
.
.
.
.
.
.
.
.
.
.
.
.
.
.
.
.
.
.
.
.
.
.
.
.
.
.
.
.
.
.
.
.
.
.
.
.
.
.
.
.
.
.
.
.
.
.
.
.
.
.
.
.
.
.
.
.
.
.
.
.
.
.
.
.
.
.
.
.
.
.
.
.
.
.
.
.
.
.
.
.
.
.
.
.
.
.
.
.
.
.
.
.
.
.
.
.
.
.
.
.
.
.
.
.
.
.
.
.
.
.
.
.
.
.
.
.
.
.
.
.
.
.
.
.
.
.
.
.
.
.
.
.
.
.
.
.
.
.
.
.
.
.
.
.
.
.
.
.
.
.
.
.
.
.
.
.
.
.
.
.
.
.
.
.
.
.
.
.
.
.
.
.
.
.
.
.
.
.
.
.
.
.
.
.
.
.
.
.
.
.
.
.
.
.
.
.
.
.
.
.
.
.
.
.
.
.
.
.
.
.
.
.
.
.
.
.
.
.
.
.
.
.
.
.
.
.
.
.
.
.
.
.
.
.
.
.
.
.
.
.
.
ix
.
.
.
.
.
.
.
.
.
.
.
.
.
.
.
.
.
.
.
.
.
.
.
.
.
.
.
.
.
.
.
.
.
.
.
.
.
.
.
.
.
.
.
.
.
.
.
.
.
.
.
.
.
.
.
.
.
.
.
.
.
.
.
.
.
.
.
.
.
.
.
.
.
.
.
.
.
.
.
.
.
.
.
.
.
.
.
.
.
.
.
.
.
.
.
.
.
.
.
.
.
.
.
.
.
.
.
.
.
.
.
.
.
.
.
.
.
.
.
.
.
.
.
.
.
.
.
.
.
.
.
.
.
.
.
.
.
.
.
.
.
.
.
.
.
.
.
.
.
.
.
.
.
.
.
.
.
.
.
.
.
.
.
.
.
.
.
.
.
.
.
.
.
.
.
.
.
.
.
.
.
.
.
.
.
.
.
.
.
.
.
.
.
.
.
.
.
.
.
.
.
.
.
.
.
.
.
.
.
.
.
.
.
.
.
.
.
.
.
.
.
.
.
.
.
.
.
.
.
.
.
.
.
.
.
.
.
.
.
.
.
.
.
.
.
.
.
.
.
.
.
.
.
.
.
.
.
.
.
.
.
.
.
.
.
.
.
.
.
.
.
.
.
.
.
.
.
.
.
.
.
.
.
.
.
.
.
.
.
.
.
.
.
.
.
.
.
.
.
.
.
.
.
.
.
.
.
.
.
.
.
.
.
.
.
.
.
.
.
.
.
.
.
.
.
.
.
.
.
.
.
.
.
.
.
.
.
.
.
.
.
.
.
.
.
.
.
.
.
.
.
.
.
.
.
.
.
.
.
.
.
.
.
.
.
.
.
.
.
.
.
.
.
.
.
.
.
.
.
.
.
.
.
.
.
.
.
.
.
.
.
.
.
.
.
.
.
.
.
.
.
.
.
.
.
.
.
.
.
.
.
.
.
.
.
.
.
.
.
.
.
.
.
.
.
.
.
.
.
.
.
.
.
.
.
.
.
.
.
.
.
.
.
.
.
.
.
.
.
.
.
.
.
.
.
.
.
.
.
.
.
.
.
.
.
.
.
.
.
.
.
.
.
.
.
.
.
.
33
33
33
33
33
34
34
34
34
35
.
.
.
.
.
.
.
.
.
.
.
.
.
.
.
.
.
.
.
.
.
.
.
37
37
37
37
38
40
40
42
43
46
48
50
50
53
55
57
57
58
59
60
61
62
64
65
.
.
.
.
.
.
67
67
67
68
69
70
70
73
x
VIMOS User Manual
6.1
6.2
6.3
6.4
6.5
7
VLT-MAN-ESO-14610-3509
The VMMPS philosophy . . . . . . . . . . . . . . . . . . . . . . . . . .
6.1.1 What does VMMPS do? . . . . . . . . . . . . . . . . . . . . . .
6.1.2 This is not FIMS - you have little chance for interaction . . . . .
6.1.3 The importance of your catalog . . . . . . . . . . . . . . . . . .
6.1.4 The different catalogs that you can come with . . . . . . . . . . .
Step-by-step guide . . . . . . . . . . . . . . . . . . . . . . . . . . . . .
6.2.1 Step 0 (most crucial): Getting ready – preparing your catalogs . .
6.2.2 Step 1: What is your starting point? . . . . . . . . . . . . . . . .
6.2.3 Step 2: Transforming your contributed catalog into a VIMOS
6.2.4 Step 3: Starting VMMPS for mask definition . . . . . . . . . . .
6.2.5 Step 4 (optional): Re-arranging your VIMOS catalog . . . . .
6.2.6 Step 5: First pass – defining special objects . . . . . . . . . . . .
6.2.7 Step 6: The automatic slit assignment – your first ADP draft . . .
6.2.8 Step 7 (optional): Fine tuning / last corrections . . . . . . . . . .
6.2.9 Step 8: Writing your final ADP – you have succeeded . . . . . .
6.2.10 Loading/verifying previously defined mask . . . . . . . . . . . .
Troubleshooting and known problems. . . . . . . . . . . . . . . . . . . .
6.3.1 Cross-correlation task . . . . . . . . . . . . . . . . . . . . . . .
6.3.2 Automatic slit assignment . . . . . . . . . . . . . . . . . . . . .
6.3.3 Problems with checksum in ADP files . . . . . . . . . . . . . . .
6.3.4 ADP files and FITS headers . . . . . . . . . . . . . . . . . . . .
6.3.5 Other problems . . . . . . . . . . . . . . . . . . . . . . . . . . .
Examples of catalogs . . . . . . . . . . . . . . . . . . . . . . . . . . . .
6.4.1 A contributed catalog . . . . . . . . . . . . . . . . . . . . . . . .
6.4.2 A VIMOS pre-image catalog . . . . . . . . . . . . . . . . . . . .
6.4.3 A VIMOS catalog . . . . . . . . . . . . . . . . . . . . . . . . .
6.4.4 Example of an ADP file . . . . . . . . . . . . . . . . . . . . . .
User check list . . . . . . . . . . . . . . . . . . . . . . . . . . . . . . . .
PILMOS Tutorial
7.1 Introduction . . . . . . . . . . . . . . . . . . . .
7.2 Requirements and Restrictions for PILMOS usage
7.2.1 Restrictions . . . . . . . . . . . . . . . .
7.2.2 Catalogue requirements . . . . . . . . .
7.2.3 Other Considerations . . . . . . . . . . .
7.2.4 PILMOS features to be aware of . . . . .
7.3 Preparation of MOS Masks without a Pre-Image .
7.3.1 Step 1: PILMOS (Guidecam) Application
7.3.2 Step 2: VMMPS . . . . . . . . . . . . .
.
.
.
.
.
.
.
.
.
.
.
.
.
.
.
.
.
.
.
.
.
.
.
.
.
.
.
.
.
.
.
.
.
.
.
.
.
.
.
.
.
.
.
.
.
.
.
.
.
.
.
.
.
.
.
.
.
.
.
.
.
.
.
.
.
.
.
.
.
.
.
.
.
.
.
.
.
.
.
.
.
.
.
.
.
.
.
.
.
.
.
.
.
.
.
.
.
.
.
.
.
.
.
.
.
.
.
.
.
.
.
.
.
.
.
.
.
. . . . . . .
. . . . . . .
. . . . . . .
. . . . . . .
. . . . . . .
. . . . . . .
. . . . . . .
. . . . . . .
catalog .
. . . . . . .
. . . . . . .
. . . . . . .
. . . . . . .
. . . . . . .
. . . . . . .
. . . . . . .
. . . . . . .
. . . . . . .
. . . . . . .
. . . . . . .
. . . . . . .
. . . . . . .
. . . . . . .
. . . . . . .
. . . . . . .
. . . . . . .
. . . . . . .
. . . . . . .
.
.
.
.
.
.
.
.
.
.
.
.
.
.
.
.
.
.
.
.
.
.
.
.
.
.
.
.
.
.
.
.
.
.
.
.
.
.
.
.
.
.
.
.
.
.
.
.
.
.
.
.
.
.
.
.
.
.
.
.
.
.
.
.
.
.
.
.
.
.
.
.
.
.
.
.
.
.
.
.
.
.
.
.
.
.
.
.
.
.
.
.
.
.
.
.
.
.
.
.
.
.
.
.
.
.
.
.
.
.
.
.
.
.
.
.
.
.
.
.
.
.
.
.
.
.
.
.
.
.
.
.
.
.
.
.
.
.
.
.
.
.
.
.
.
.
.
.
.
.
.
.
.
.
.
.
.
.
.
.
.
.
.
.
.
.
.
.
.
.
.
.
.
.
.
.
.
.
.
.
.
.
.
.
.
.
.
.
.
.
.
.
.
.
.
.
.
.
.
.
.
.
73
73
73
74
74
75
75
80
82
85
87
89
96
99
102
103
104
104
104
105
105
106
107
107
108
109
110
114
.
.
.
.
.
.
.
.
.
115
115
115
115
115
116
116
117
117
119
Appendices
123
A VIMOS Filters
123
B VIMOS Grisms
129
VIMOS User Manual
C Old detector system: until May 2010
C.1 Detector read-out modes . . . . . .
C.2 Controllers . . . . . . . . . . . . .
C.3 Read-out noise and conversion factor
C.4 Fringing . . . . . . . . . . . . . . .
VLT-MAN-ESO-14610-3509
.
.
.
.
.
.
.
.
.
.
.
.
.
.
.
.
.
.
.
.
.
.
.
.
.
.
.
.
.
.
.
.
.
.
.
.
.
.
.
.
.
.
.
.
.
.
.
.
.
.
.
.
.
.
.
.
.
.
.
.
.
.
.
.
.
.
.
.
.
.
.
.
xi
.
.
.
.
.
.
.
.
.
.
.
.
.
.
.
.
.
.
.
.
.
.
.
.
.
.
.
.
.
.
.
.
.
.
.
.
.
.
.
.
.
.
.
.
.
.
.
.
.
.
.
.
135
135
136
136
136
D Abbreviations and Acronyms
137
Index
139
xii
VIMOS User Manual
VLT-MAN-ESO-14610-3509
List of Figures
2.1
2.2
2.3
2.4
2.5
2.6
2.7
2.8
2.9
2.10
VIMOS Optical layout . . . . . . . . . . . . . . . .
VIMOS Opto-Mechanical layout . . . . . . . . . . .
VIMOS FoV orientation: relative positioning on sky
VIMOS FoV orientation . . . . . . . . . . . . . . .
VIMOS IFU FoV orientation . . . . . . . . . . . . .
VIMOS IFU FoV orientation 2 . . . . . . . . . . . .
IFU details of the fiber modules . . . . . . . . . . .
IFU fiber numbering scheme . . . . . . . . . . . . .
Quantum efficiency vs λ for new detectors . . . . . .
IFU Vignetting . . . . . . . . . . . . . . . . . . . .
3.1
3.2
Atmospheric Dispersion: Example . . . . . . . . . . . . . . . . . . . . . . . . . . . . . . . . 27
VMMPS Graphical User Interface . . . . . . . . . . . . . . . . . . . . . . . . . . . . . . . . 31
4.1
4.2
4.3
4.4
4.5
P2PP: example of a pre-imaging OB . . . . . . . . . .
P2PP: Example of a MOS OB . . . . . . . . . . . . .
P2PP: VIMOS ADP browser window. . . . . . . . . .
VIMOS img obs Offset: Offsets in DETECTOR mode
VIMOS img obs Offset: Offsets in SKY mode . . . .
5.1
5.2
5.3
Guidecam main panel . . . . . . . . . . . . . . . . . . . . . . . . . . . . . . . . . . . . . . . 68
Guidecam: Guide Probe Settings panel . . . . . . . . . . . . . . . . . . . . . . . . . . . . . . 69
Guidecam: USNO at ESO panel . . . . . . . . . . . . . . . . . . . . . . . . . . . . . . . . . 70
7.1
Guide probe setting panel: Contributed catalogue button . . . . . . . . . . . . . . . . . . . . 117
A.1
A.2
A.3
A.4
filter transmission curves . . . . . . . .
filter transmission curves . . . . . . . .
Order Sorting Filter transmission curves
Order Sorting Filter transmission curves
.
.
.
.
.
.
.
.
.
.
.
.
.
.
.
.
.
.
.
.
.
.
.
.
.
.
.
.
.
.
.
.
.
.
.
.
.
.
.
.
.
.
.
.
.
.
.
.
.
.
.
.
.
.
.
.
.
.
.
.
.
.
.
.
.
.
.
.
.
.
.
.
.
.
.
.
.
.
.
.
.
.
.
.
.
.
.
.
.
.
.
.
.
.
.
.
.
.
.
.
124
125
126
127
B.1
B.2
B.3
B.4
B.5
Efficiency curve of the low resolution grisms. . .
Efficiency curve of the medium resolution grism.
Efficiency curve of the high resolution grisms. . .
Efficiency curve of the high resolution grisms. . .
Efficiency curve of the high resolution grisms. . .
.
.
.
.
.
.
.
.
.
.
.
.
.
.
.
.
.
.
.
.
.
.
.
.
.
.
.
.
.
.
.
.
.
.
.
.
.
.
.
.
.
.
.
.
.
.
.
.
.
.
.
.
.
.
.
.
.
.
.
.
.
.
.
.
.
.
.
.
.
.
.
.
.
.
.
.
.
.
.
.
.
.
.
.
.
.
.
.
.
.
.
.
.
.
.
.
.
.
.
.
.
.
.
.
.
.
.
.
.
.
.
.
.
.
.
.
.
.
.
.
130
131
132
133
133
.
.
.
.
.
.
.
.
.
.
.
.
xiii
.
.
.
.
.
.
.
.
.
.
.
.
.
.
.
.
.
.
.
.
.
.
.
.
.
.
.
.
.
.
.
.
.
.
.
.
.
.
.
.
.
.
.
.
.
.
.
.
.
.
.
.
.
.
.
.
.
.
.
.
.
.
.
.
.
.
.
.
.
.
.
.
.
.
.
.
.
.
.
.
.
.
.
.
.
.
.
.
.
.
.
.
.
.
.
.
.
.
.
.
.
.
.
.
.
.
.
.
.
.
.
.
.
.
.
.
.
.
.
.
.
.
.
.
.
.
.
.
.
.
.
.
.
.
.
.
.
.
.
.
.
.
.
.
.
.
.
.
.
.
.
.
.
.
.
.
.
.
.
.
.
.
.
.
.
.
.
.
.
.
.
.
.
.
.
.
.
.
.
.
.
.
.
.
.
.
.
.
.
.
.
.
.
.
.
.
.
.
.
.
.
.
.
.
.
.
.
.
.
.
.
.
.
.
.
.
.
.
.
.
.
.
.
.
.
.
.
.
.
.
.
.
.
.
.
.
.
.
.
.
.
.
.
.
.
.
.
.
.
.
.
.
.
.
.
.
.
.
.
.
.
.
.
.
.
.
.
.
.
.
.
.
.
.
.
.
.
.
.
.
.
.
.
.
.
.
.
.
.
.
.
.
.
.
.
.
.
.
.
.
.
.
.
.
.
.
.
.
.
.
.
.
.
.
.
.
.
.
.
.
.
.
.
.
.
.
.
.
.
5
7
9
10
15
15
16
16
19
23
41
44
45
52
52
xiv
VIMOS User Manual
VLT-MAN-ESO-14610-3509
List of Tables
1
Change record . . . . . . . . . . . . . . . . . . . . . . . . . . . . . . . . . . . . . . . . . . .
v
2.1
2.2
2.3
2.4
2.5
2.6
2.7
2.8
2.9
2.10
2.11
2.12
2.13
VIMOS opto-mechanical characteristics . . . . . . . . . . . . . . . . . . . . . . . . . . . .
VIMOS Imaging characteristics and performance . . . . . . . . . . . . . . . . . . . . . . .
Measured imaging zero points . . . . . . . . . . . . . . . . . . . . . . . . . . . . . . . . .
Calculated isophotal fluxes and wavelengths . . . . . . . . . . . . . . . . . . . . . . . . . .
Standard grism / filter combinations . . . . . . . . . . . . . . . . . . . . . . . . . . . . . .
MOS: spectral resolution and spectral ranges observed using the mask for spectrophotometric
standard stars . . . . . . . . . . . . . . . . . . . . . . . . . . . . . . . . . . . . . . . . . .
Spectral coverage ∆λ for three positions of the slit in field of view (MOS mode) . . . . . . .
IFU Modes . . . . . . . . . . . . . . . . . . . . . . . . . . . . . . . . . . . . . . . . . . .
Spectral characteristics in IFU mode . . . . . . . . . . . . . . . . . . . . . . . . . . . . . .
IFU: spectral coverage in the various quadrants . . . . . . . . . . . . . . . . . . . . . . . .
Basic characteristics of the new VIMOS CCDs . . . . . . . . . . . . . . . . . . . . . . . .
New Detector Readout Modes . . . . . . . . . . . . . . . . . . . . . . . . . . . . . . . . .
New detector read-out noise and conversion factors . . . . . . . . . . . . . . . . . . . . . .
3.1
3.2
3.3
VIMOS Calibration Plan: IMG Mode . . . . . . . . . . . . . . . . . . . . . . . . . . . . . . 29
VIMOS Calibration Plan: MOS Mode . . . . . . . . . . . . . . . . . . . . . . . . . . . . . . 33
VIMOS Calibration Plan: IFU Mode . . . . . . . . . . . . . . . . . . . . . . . . . . . . . . . 34
. 6
. 8
. 11
. 11
. 12
.
.
.
.
.
.
.
.
13
14
17
18
18
20
20
20
A.1 Characteristics of the VIMOS filters . . . . . . . . . . . . . . . . . . . . . . . . . . . . . . . 123
C.1 Basic characteristics of the (old) VIMOS CCDs . . . . . . . . . . . . . . . . . . . . . . . . . 135
C.2 Detector Readout Modes . . . . . . . . . . . . . . . . . . . . . . . . . . . . . . . . . . . . . 135
C.3 Old detectors read-out noise and conversion factors . . . . . . . . . . . . . . . . . . . . . . . 136
xv
xvi
VIMOS User Manual
VLT-MAN-ESO-14610-3509
Chapter 1
Introduction
1.1
Scope
The VIMOS User’s Manual is intended to provide information on the following topics:
• Overall description of the instrument (Sect. 2)
• Observing with VIMOS (Sect. 3)
• Observing and calibration templates (Sect. 4)
1.2
More Information on VIMOS
All VIMOS Manuals are available on the VIMOS instrument WEB pages together with the most updated
informations on the instrument:
http://www.eso.org/sci/facilities/paranal/instruments/vimos/
Information and software tools for the preparation of service and visitor mode observations with VIMOS
are available at:
http://www.eso.org/sci/observing/phase2
http://www.eso.org/sci/observing/phase2/SMGuidelines.html
In particular, information concerning mask preparation with VMMPS and guide star selection with Guidecam is given in the following additional pages:
http://www.eso.org/sci/observing/phase2/SMGuidelines/VMMPS.VIMOS.html
http://www.eso.org/sci/observing/phase2/SMGuidelines/GuidecamVIMOS.VIMOS.html
Visiting astronomers will find further instructions on the Paranal Science Operations WEB page and the
Paranal Observatory home page:
http://www.eso.org/sci/facilities/paranal/
http://www.eso.org/sci/facilities/paranal/sciops/
1.3
Contact Information
In case of specific questions related to Service Mode observations and proposal preparation please contact the
ESO User Support Department:
1
2
VIMOS User Manual
VLT-MAN-ESO-14610-3509
[email protected]
For visitor mode observations please contact the Paranal Science Operations Team:
[email protected]
1.4
Version notes, change track
The first edition of this User Manual was delivered by the VIRMOS Consortium (P.I.: O. Le Fèvre).
1.4.1
Version 94.0
For Phase II, P94
• Pre-imaging users are requested to indicate whether they need a photometric standard in the same night
• MOS users are reminded to use similar wavelength in aquisition and science
• Clarification of a core dump bug message in VMMPS
• Added list of PILMOS features to be aware of
1.4.2
Version 92.1
For Phase II, P92.
• Added recommendation to use slit-width below 400 to avoid saturating screen flats.
• Added recommendation to use fewer than 500 stars for cross-correlation in VMMPS.
• Now PILMOS observations can be used for the same orientations on sky as the observations prepared
with pre-imaging.
• Added date of validity of pre-imaging:
– As a consequence of the CCD upgrade, all pre-images taken before the intervention are not
valid anymore for MOS follow up observations after the CCD upgrade (i.e. after 31 August
2010).
– The use of pre-imaging taken between 31 August 2010 and 24 May 2011 can result in a
systematic overall offset affecting all quadrants the same way, but making field acquisition
difficult, specially in crowded fields.
• Added information about new keywords giving coordinates of actual IFU FoV center.
• Added warnings about IFU pointing in declinations close to the south celestial pole.
1.4.3
Version 92.0
For Phase I, P92. Updated the wavelength coverage of the new HR blue grism can be found in tables 2.6, 2.7,
2.9, and 2.10.
VIMOS User Manual
1.4.4
VLT-MAN-ESO-14610-3509
3
Version 90.1
This is the version of the VIMOS manual for P90, phase I and phase II. The new HR blue grisms were installed.
The peak overall efficiency has been measured to be approximately 25%, compared with 15% previously. See
MOS curves at:
http://www.eso.org/sci/facilities/paranal/instruments/vimos/img/VIMOS newHR blueHolog moseff.png.
During P89 we have tested the new Pre-Imageless MOS (PILMOS) mode. This new mode will offer to
take multi-object spectroscopic observations with 4 VIMOS masks without the previously mandatory preimaging. The fake pre-images will be simulated based on the users contributed catalogue to be used in input
for mask creation with VMMPS. We expect to make this mode available fully from P91. If requested via
waiver it will also be available for P90 Phase 2 preparation.
Starting during Period 90 we have relaxed the constraint that forces MOS slits to be oriented N-S as
follow: for targets at declinations in the range −45◦ < δ < −5◦ we permit observations with slits oriented
E-W, with rotator angle set at 0◦ , and with HA within ± 3 hrs from meridian. Note that this is still not allowed
with PILMOS. Users planning to request slits oriented in this way need to request a pre-imaging run. For a
full report see Sanchez-Janssen et al. (2012) in the mos section of the VIMOS web pages..
1.4.5
Version 89.0
This is the version of the VIMOS manual for P89 and later. We expect two major changes in VIMOS affecting
users in P89. The first one is the commissioning of new volume-phase holographic HR blue grisms with
increased efficiency compared to the current ones (albeit somewhat reduced resolution). The second is a
redesign of the focusing mechanism in all quadrants that we hope will be able to keep correct focus at all
rotator angles. The new focusing mechanism will come with new focusing logic that will allow to adjust
focus depending on the grism used. These changes will conclude the VIMOS upgrade project.
1.4.6
Version 88.0
This is the version of the document for P88 and later. VIMOS has been running stably after the intervention.
Only remaining work to be done are improvements to the focusing units, to ensure proper image quality (and
spectral resolution) at any rotator angle, and the installation of the new VPH high resolution blue grism.
1.4.7
Version 87.0
The first part of the VIMOS upgrade project is almost finalized. The instrument has been furnished with
the new set of red sensitive detectors, new bi-stable shutters, and an active flexure compensation system. As
usually happens in a project like this we could expect things to initially evolve before the finally stabilize, so
please visit the VIMOS web pages for the latest news.
1.4.8
Version 86.0
As of this writing (Feb 2010) the new detectors have been characterized, and the upgrade is planned to take
place between the months of June and July 2010. If everything goes according to schedule we will have the
new detectors and new shutters in normal use during P86. The upgrade project includes the implementation UP
of an active flexure compensation mechanism which nevertheless will need to be tested before we can commit
to a final date for its installation and commissioning.
The Service Mode policy for granting a waiver for OB duration longer than 1h has been clarified. See
Sec. 3.7.
4
VIMOS User Manual
1.4.9
VLT-MAN-ESO-14610-3509
Version 85.0
This manual is for P85 preparation. As of this writing (1 Sep 2009) there is an ongoing project that aims to
upgrade the instrument. It is foreseen that the detectors will be changed by new deep depletion e2v detectors
which will increase the red response and reduce fringing. The changes to the instrument will imply that once
VIMOS is upgraded current MOS OBs might need to be redone with new pre-image. Also, the ETC for the
current detectors will give discrepant results, specially redward of 700nm. Please look for information in the
instrument web pages. We apologize for the problems that this project will generate to the users during P85.
1.4.10
Version 84.0
VMMPS and Guidecam documents were merged into this manual. All the links have been updated to reflect
the 2008 changes in the ESO web.
1.4.11
Version 80.0
Some changes in the night time calibration plan
1.4.12
Version 79.1
Substantial chances to the description of the instrument field of view. Changes by S. Bagnulo and M. Rejkuba.
Dr. S.L. Morris is acknowledged for having improved Fig. 2.7. An error in Table 5 has been corrected.
1.4.13
Version 79.0
VIMOS manual has been ported to the standard format for VLT manuals. Changes by S. Bagnulo
1.4.14
Version 78.1
Version 78.1 contains more detailed and accurate information about the spectral range that can be observed in
spectroscopic modes (MOS and IFU) with the various grisms. Table C.3 has been updated. Hyperlinks have
been added to the text. The various sections of the manual have been re-arranged. All changes by S. Bagnulo
and M. Rejkuba, comments received by G. Marconi and L. Christensen.
1.5
Acknowledgments
The following institutes have participated to the development of VIMOS:
• Laboratoire d’Astrophysique de Marseille, Marseille, France
• Observatoire de Haute-Provence, Saint-Michel l’Observatoire, France
• Laboratoire d’Astrophysique de l’Observatoire Midi-Pyrénées, Toulouse, France
• Osservatorio Astronomico di Capodimonte, Napoli, Italy
• Istituto di Fisica Cosmica e Tecnologie Relative, Milano, Italy
• Osservatorio Astronomico di Brera, Milano, Italy
• Istituto di Radioastronomia, Bologna, Italy
• Osservatorio Astronomico di Bologna, Bologna, Italy
Chapter 2
Instrument Characteristics
Figure 2.1: VIMOS Optical layout
2.1
Overview
VIMOS is the Visible Multi-Object Spectrograph for the Very Large Telescope (VLT) of the European
Southern Observatory (ESO). This instrument has been built to provide the ESO community with a wide
field spectrograph with high throughput and multiplex, dedicated to deep surveys.
VIMOS operates in the 0.37–1.0 µm domain in three main observing modes: direct imaging (IMG), multislit spectroscopy (MOS), and integral field spectroscopy (IFU). Because of the large field of view, VIMOS
optical path is split into four channels. The four quadrants of the instrument are operated in parallel (i.e., it is
not possible to mix modes or filters or grisms between quadrants).
The field of view of the four channels is 4 × 70 × 80 in IMG and MOS and up to 5400 × 5400 in IFU mode
in low resolution spectroscopy. It provides an image scale of 0.205”/pixel in MOS and IMG and 0.67” or
0.33” per resolution element in IFU mode depending on the elongator setting used.
Until June 2010 each of the four channels was equipped with a 2048 × 4096 pixels EEV 44-82, backside
illuminated, single layer coating, CCD. Henceforth these will be the old CCD. Since August 1st, 2010, each
5
6
VIMOS User Manual
VLT-MAN-ESO-14610-3509
Table 2.1: VIMOS opto-mechanical characteristics
Instrument Location
Opto-mechanical layout
Wavelength coverage
Detectors
Spectral Resolution
Filters
Grisms
Flexures
Masks
Multiplex
Integral Field Unit
Nasmyth B VLT-UT3 (Melipal)
4 beams, each a complete focal-reducer, F/1.88 output
0.37 to 1 microns
4 × 2048 × 4096, 15 µm/pixel Deep-depletion E2V 44-82 (new)
R = 180 to 2500 (1 arcsec slit)
10 per channel, U’BVRIz, OS-red, OS-blue, GG435, GG475,
170mm diameter
6 per channel, LR red, LR blue, MR, HR blue [1] , HR orange,
HR red [2]
Active[3] compensation: positioning accuracy <0.3 pix during acquisition
10 masks simultaneously loaded in instrument (practical) maximum
(per channel) [4] .
Slits of any position and shape, width > 0.600 , length < 30”.
840 simultaneous slits, 10” long at R = 200
210 simultaneous slits, 10” long at R = 2000-2500
5400 × 5400 field, 6400 fibers with 0.6700 sampling
2700 × 2700 field, 6400 fibers with 0.3300 sampling
[1]
In March 2012 a new set of HR blue VPH grisms were installed. Their peak efficiency is ≈25% compared
to 15% with the old grisms. The old grisms are not available any more. [2] From October 2005, a set of four
new and more efficient HR red VPHG grisms is installed and available in the 4 channels.
[3] The value quoted is the precision with which we can center a reference fiber in each quadrant. The reference
fiber is attached to the frames that hold the masks in place. Thus, the motion of the masks is larger than this
by an amount yet to be determined, but close to 1.5 pix peak-to-valley.
[4] Some restrictions apply in operations; currently the number of user masks that can be mounted at the
instrument cabinet is 8 as 2 slots are used by calibration masks. Please refer to the VIMOS web pages for
updates.
channel is equipped with a new deep depletion, E2V 44-820-1-D42 device (henceforth new CCDs), with
exactly the same format but with higher throughput in the red and reduced fringing. The 4k pixels
are arranged along the dispersion direction to maximize the spectral coverage. VIMOS is installed on the
Nasmyth B focus of UT3 (Melipal). The VIMOS mechanical and optical characteristics are summarized in
Table 2.1.
A schematic optical and opto-mechanical layout is shown in Figs. 2.1 and 2.2.
• The focal plane is divided in 4 identical channels and is equipped with: the mask exchange units (MEU)
which host up to 8 pre-punched masks for MOS spectroscopy per quadrant; the IFU fiber-head, and the
IFU masks.
• The Focal Plane Adaptation Lens (FPAL) reduces field curvature from 2m to 4.1m; partially corrects
astigmatism; and make the the field curvature concentric with the new exit pupil;
• The Pupil Relay Lens (PRL), correct for pupil chromatism in combination with FPAL, and is the first
element of the collimator;
• The folding mirror section hosts the four folding mirrors and the active flexure compensation system
(AFC).
• The Filter/Camera Section: the beam section hosts optical analyzers (filters and/or grisms), the camera,
and the exposure shutter in front of the CCD.
VIMOS User Manual
VLT-MAN-ESO-14610-3509
7
Figure 2.2: VIMOS Opto-Mechanical layout
• FEU: the filter exchange units (one for each channel) are located below the main body of the instrument
below the Filter/Camera Section; each unit hosts a juke-box of 10 filters permanently mounted.
• GEU: the grism exchange units are located below the Filter/Camera Section; they host a carousel of six
grisms permanently mounted.
2.1.1
Instrument modes
VIMOS offers the following modes for observations:
• Imaging (IMG) (see Sect. 2.2)
• Multi-Object Spectroscopy (MOS) (see Sect. 2.3)
• Integral Field Spectroscopy (IFU) (see Sect. 2.4)
IMG mode uses broadband filters U’BVRIz. MOS and IFU modes share the set of grisms and order sorting
filters given in Table 2.5. In MOS mode, a set of four laser punched masks made of INVAR is inserted in the
focal plane. In IFU mode, fibers are arranged along pseudo-slits in the so-called “IFU masks”. IFU masks may
be inserted in the instrument focal plane (in the same position as occupied by the INVAR masks in the MOS
mode). The spectral characteristics of the two spectroscopic modes are therefore similar, but not identical.
2.2
Imaging
Direct imaging is used to produce wide field images (VIMOS is the largest imager on the VLT) using broad
band filters. This mode has two functions: produce science images, and produce the mandatory pre-images
needed to prepare masks (see Sect. 3).
Table 2.2 summarizes the main characteristics of the imaging mode.
8
VIMOS User Manual
VLT-MAN-ESO-14610-3509
Table 2.2: VIMOS Imaging characteristics and performance
Field of view
Pixel scale
Image Quality
Filters
F-ratio
Limiting Magnitudes in 1h[1]
4×70 × 80 separated by 2’ gaps
illuminated CCD area: 2048 × 2350 pix2
slightly vignetted on the corners outside 8’
0.205”/pixel
80 % encircled energy in 0.4” within the whole field
U 0 , Bessel BVRI, Gunn z (see section A)
1.88
U=26.2 B=27.4 V=27.0 R=26.6 I=25.5 z=25.1
[1] 5σ detection for an A0 star
2.2.1
IMG mode: orientation of the field of view
Figure 2.3 shows the orientation of the instrument field of view. At 0◦ rotator angle the x axes of the CCDs
are oriented E and the y axes are oriented N (top panels). Increasing rotator angle moves the compass counterclockwise. At 90◦ rotator angle the x axes are oriented S and the y axes are oriented E (bottom panels).
Note that position angle increases as rotator angle.
Figure 2.4 shows the instrument FoV keeping fixed the detectors with x axes increasing to the right, and y
axes increasing to the top. Top right panels refer to the situation with the rotator at 0◦ , and bottom right panels
refer to the situation with rotator at 90◦ . The corresponding positions of the detectors on sky are shown in the
left panels.
The gap between the quadrants is approximately 2’. The pointing coordinates correspond approximately
to the center of the gap.
2.2.2
Image Quality
For the most updated information please have a look at the Quality Control and Data Flow Operations Web
pages.
The focal plane of VIMOS is not strictly flat because of the complexity of the optical elements involved.
This results in slight focus variations across the field, which translates in a variable PSF from the center to
the periphery. The sky concentration effects are in any case small and negligible for flat-field and photometric
calibrations.
2.2.3
Imaging Filters
VIMOS provides positions for 10 broadband filters in any of the four channels. Presently installed filters
inside the instruments are U 0 , Bessel BVRI, Gunn z, and some order separation filters. Only the U’BVRIz
filters are available for imaging programmes. The special U 0 is not a standard Bessel filter (see Figure A.1).
With the Bessel I and Gunn z filters the CCDs show no fringes.
The complete list of filters together with the transmission curves are presented in Appendix A (see Table A.1, and Figs. A.1 to A.4).
ESO will not accept requests for user’s supplied filters for VIMOS.
2.2.4
Zero points
The measured zero points with the new detectors, referred to airmass 1, are given in Table 2.3. We have
estimated isophotal magnitudes and effective wavelengths for Vega, and are given in Table 2.4, together with
the expected zero points.
VIMOS User Manual
VLT-MAN-ESO-14610-3509
9
Figure 2.3: Orientation of the VIMOS field of view on sky for position angles 0◦ and 90◦ , in IMG and MOS
mode. Uncertainties, due to the poorly defined distortion solution at the very edges of the detectors and the
fact that the edges are not straight when projected onto the sky, are of the order of 1” (5 pixels). Distances are
not shown to scale, refer to the given values.
10
VIMOS User Manual
VLT-MAN-ESO-14610-3509
Figure 2.4: A comparison of the orientation of the VIMOS field of view as seen on sky (left panels) and on
detector (right panels) for position angles 0◦ and 90◦ , in IMG and MOS mode.
VIMOS User Manual
VLT-MAN-ESO-14610-3509
11
Table 2.3: Measured imaging zero points
Filter
U
BBESS
VBESS
RBESS
I
zGunn
Q1
26.18
28.13
27.88
28.00
27.70
-
Q2
26.12
28.12
27.79
27.92
27.57
-
Q3
26.38
28.18
27.91
28.02
27.76
-
Q4
26.38
28.25
27.85
27.99
27.63
-
Table 2.4: Calculated isophotal fluxes and wavelengths
Filter
U
BBESS
VBESS
RBESS
I
zGunn
(1)
(1)
λiso
nm
378.0
431.2
544.1
639.8
814.2
900.2
(1)
Fλ
W
m−2
µm−1
4.89E-08
6.51E-08
3.63E-08
2.19E-08
1.06E-08
0.83E-08
Expected zero point
mag
26.25
28.10
27.80
27.98
27.60
26.79
(2)
λ1/2
nm
370.9
431.3
547.5
646.3
828.7
935.5
∆λ(3)
nm
42.1
96.0
86.7
133
186
178
For Vega, as defined in Tokunaga and Vacca PASP 117, 421 (2005).
Wavelength at which half the transmission is at shorter wavelengths (filter profile only).
(3) Band width, as defined by the distance between the half transmissions (filter profile only).
(2)
12
2.3
VIMOS User Manual
VLT-MAN-ESO-14610-3509
Multi-Object Spectroscopy (MOS)
A variety of grisms with different wavelength ranges and dispersions is available in MOS mode. Order separating filters are available to eliminate the overlap, for a given slit, between orders 1 (the order used for
science) and order 2 (always present on the detector). This is done by restricting the wavelength range of
a particular grism to less than one octave in wavelength. The 0th order contamination is present only in
multi-layered mode, i.e., when observing with the LR and the MR grisms.
Table 2.5 indicates the recommended and allowed grism + filter combinations. Any other combinations
of grisms and filters should be requested with a waiver. Defining in the OBs combinations not allowed and
for which a waiver was not requested will result in these OBs being rejected by the User Support Department.
ESO will not accept requests for user’s supplied grisms or filters for VIMOS.
Table 2.5: Standard grism / filter combinations for MOS and IFU modes
Grism
LR blue
LR red
MR
HR blue
HR red
HR orange
1
Default
OS-blue
OS-red
GG475
Free
GG475
GG435
Filter
Allowed
Free
Free
OS-red, OS-blue1
–
–
–
The grism-filter configuration MR+OS-blue is not supported by the pipeline
Transmission curves are available in Appendix A for the filters, and Appendix B for the grisms.
Table 2.6 shows the spectral range covered in MOS modes by the various grisms, as obtained by the
automatic pipeline when reducing the spectrophotometric standard star. This spectral range is valid for slits
close to the center of the field.
2.3.1
Spectral range
In MOS mode, slits can be positioned at any position in the imaging field of view. With high-resolution
grisms, the observed spectral range changes slightly according to the position of the slit. Table 2.7 shows the
spectral ranges covered by the detector for each grism (and default order sorting filter) for the slits located at
three different positions in the field of view. With low resolution grisms, the spectral coverage is independent
of the position of the slit.
2.3.2
Spectral resolution
The spectral resolution obtained with a 1” slit width with the various grisms is given in Table 2.6.
2.3.3
Multiplex characteristics
A particular feature of the MOS mode is the possibility of stacking multiple layers of slits along the dispersion
direction. This is only possible with the low resolution grisms (up to four slits along the dispersion direction)
and the intermediate resolution grisms (up to two slits), for which the spectra are short enough (in number of
pixels) to allow stacking. With the high-resolution grisms, only one slit can be placed along the dispersion
direction.
VIMOS User Manual
VLT-MAN-ESO-14610-3509
13
Table 2.6: MOS: spectral resolution and spectral ranges observed using the mask for spectrophotometric
standard stars
Grism
LR blue
LR red
MR
MR
HR blueN EW
HR blueOLD
HR orange
HR red4
Default Order
sorting filter
OS-Blue
OS-Red
GG475
OS red
Free
Free
GG435
GG475
Spectral
range
370-670 nm
550-950 nm
480-1000 nm
550-970 nm
370-535 nm1
415-620 nm1
520-760 nm2
630-870 nm3
Number
of pixels
550
550
2000
2000
2324
4096
4096
4096
Undeviated
wavelength (nm)
480
750
700
700
402
510
631
740
Spectral Res.
(1” slit)
180
210
580
580
1150
2050
2150
2500
Dispersion
(Å/ pixel)
5.3
7.3
2.5
2.5
0.71
0.51
0.6
0.6
Spectral
multiplex
4
4
2
2
1
1
1
1
1
New VPH HR blue grisms are in use since March 2012. The old grisms are not available any more. Their
characteristics are given here for comparison purpose. The spectral resolution for the HR blue grism is for
the undeviated wavelength, 402 nm. Notice that for the old HR blue grism the resolution was measured at
587.5 nm. At this wavelength we have for the new VPH HR blue R≈1680. The wavelength range for the new
grism is given for a slit at position y=1220 in acquisition image in Q1 and is common for all quadrants.
2 With HR orange grism the spectral range in quadrant 1 (for a standard star) is 505-745 nm
3 With HR red grisms the spectral range in quadrant 1 (for a standard star) is 650-865 nm
4 New HR red VPHG grisms have been installed from October 5, 2005.
However, please note that in the multi-layer mode there is some order overlap: the second order of one slit
may overlap with the first order of the adjacent slit. There is also 0th order contamination between different
layers of slits.
For faint objects, order overlap is usually not a problem: only the sky will contribute significantly to
the overlap, with a contribution that cannot be distinguished from the first order. This however constrains the
positioning of the slits in the focal plane: stacked slits along the dispersion direction have to be strictly parallel
and of the same length to allow the second orders to overlap nicely with the first order of the adjacent slits.
With the low-resolution grisms, the use of no filter instead of the default order sorting filters OS-blue and
OS-red will result in longer spectra and second order overlap. It is strongly recommended to reduce the
multiplex/number of slits along the dispersion direction to avoid/reduce multiple overlaps. The multiplex
can be reduced by increasing the distance between slits.
2.3.4
MOS mode: orientation of the field of view
The orientation of the instrument field of view in MOS mode can be inferred from Figs. 2.3 and 2.4, taking
into account that not tilted slits are oriented along the x-axes, and that wavelength dispersion is along the y
axis, with wavelength increasing with y.
2.4
Integral Field Unit (IFU)
The Integral Field Unit (IFU) is a dedicated opto-mechanical system aimed at producing spectra of a contiguous area of up to 54 × 54 arcsec2 . For VIMOS set at PA=0◦ the center of the FoV of the IFU is located
approximately 66700 due west, and 1.600 due south of the VIMOS center field (See Fig. 2.3). The sky image is
projected onto a micro-lens array with a choice of two spatial samplings (magnifications): 0.33” or 0.67” per
resolution element (fibre). Each 2D input micro-lens is coupled to an optical fiber. The output of the fibers is
re-arranged on a linear set of micro-lenses to produce an entrance slit to the spectrograph, at the mask focal
14
VIMOS User Manual
VLT-MAN-ESO-14610-3509
Table 2.7: Spectral coverage ∆λ for three positions of the slit in field of view (MOS mode)
Grism
LR red
LR blue
MR
HR blueN EW
HR blueOLD 2
HR red
HR orange
Order sorting
filter
OS-red
OS-blue
GG475
Free
Free
GG475
GG435
∆λ
CCD center
550 - 950 nm
360 - 670 nm
500 - 1000 nm
370 - 535 nm1
370 - 552 nm
630 - 870 nm
520 - 760 nm
∆λ
CCD bottom
550 - 950 nm
360 - 670 nm
500 - 1000 nm
370 - 624 nm1
468 - 674 nm
690 - 930 nm
577 - 817 nm
∆λ
CCD top
550 - 950 nm
360 - 670 nm
500 - 950 nm
370 - 451 nm1
370 - 566 nm
570 - 805 nm
463 - 703 nm
1
HR blueN EW The ranges correspond to Q1 for slits positioned at y=50, 1220, and 2390 in the acquisition
image for the bottom, center, and top ranges, and it is common to all quadrants. For other quadrants visit the
VIMOS web pages.
2 HR blueOLD not available after March 2012. Info given for reference.
plane location. Each IFU mask (one for each channel of VIMOS) has a set of 4 fibre-slits (or pseudo-slits),
for a total of 6400 fibers.
2.4.1
IFU mode: orientation of the field of view
Figure 2.5 shows the orientation of the instrument field of view in IFU mode for the four quadrants. On the
detectors, wavelength dispersion is along the y axis, with wavelength increasing with y. An actual example
for PA=0◦ is shown in Fig. 2.6. The increasing position angle on the sky (east of north) corresponds to the
positive rotator angle. Spatial characteristics are described in the Section below.
As for IMG/MOS modes, the pointing coordinates in the header correspond to the center of the VIMOS
field of view. Due to the offset position of IFU with respect to the center, the keywords RA and DEC in
the headers do not refer to the IFU pointing, but rather to the center of the VIMOS FoV. Prior to P91 the
only way to determine the actual position of the IFU was using the center coordinates, together with the IFU
offset position, coded in the keywords ”HIERARCH ESO OCS CON WCS IFUCENX”, and ”HIERARCH
ESO OCS CON WCS IFUCENY”, and the PA on sky (after some spherical trigonometry). This was needed
because the only other relevant information on the headers was ”HIERARCH ESO TEL TARG ALPHA”, and
”HIERARCH ESO TEL TARG DELTA”, which contained the coordinates of the target. Any offsets from the
original pointing would result in an IFU pointing that would differ from these keywords. Starting in P91 the
relevant header keywords which contain the information of the actual pointing of the IFU are ”HIERARCH
ESO INS IFU RA” and ”HIERARCH ESO INS IFU DEC”. Notice that the whole ESO archive of IFU data
has been retro-fitted with these keywords, so now it is possible to search for IFU observations simply queryng
by target coordinates.
2.4.2
Fiber arrangement and spatial characteristics
The special arrangement of fibers for VIMOS IFU head is shown in Fig. 2.7. The fibers numbering has been
arranged following the scheme: mask - line - module -fiber (i.e. 4 - B - 5 - 67). The arrangement of the fibers
into the 4 pseudo-slits mask (one for each channel) is reported in Fig. 2.8. The detailed IFU table is distributed
to the users together with the data release.
A masking-shutter (IFU shutter) is provided in front of the input micro-lens array; this allows the exclusive
use of the central 1/4th of the field when IFU is used with intermediate and high spectral resolution grisms. In
this configuration, only 1 fiber-slit per quadrant (mask) is used, for a total of 1600 fibers. The templates for
IFU mode offer the option to insert a shutter to limit the field to the central part also for low resolution grisms.
VIMOS User Manual
VLT-MAN-ESO-14610-3509
15
Figure 2.5: Orientation of the VIMOS IFU field of view on sky for position angles 0◦ and 90◦ , in IFU mode.
Figure 2.6: (a, left) Image of M25 showing the IFU field of view for position angle 0◦ , after pipeline reconstruction. Notice the quadrant ordering starting from top right, counterclockwise: Q1, Q2, Q3, and Q4.
(b, right) The same field with North up and East to the left from the DSS. The total FoV is approximately 1
arcmin for both images.
16
VIMOS User Manual
VLT-MAN-ESO-14610-3509
Figure 2.7: IFU head: details of the fiber modules. Low transmission fiber blocks are marked with white
rectangles. For rotator angle = 0◦ , North is to the right, East to the top.
Figure 2.8: IFU mode: fibers numbering on the masks
VIMOS User Manual
VLT-MAN-ESO-14610-3509
17
Table 2.8: Integral Field Unit: spatial characteristics
Grism
LR blue, LR red
LR blue, LR red
LR blue, LR red
LR blue, LR red
MR, HR blue, HR orange, HR red
MR, HR blue, HR orange, HR red
Shutter
OFF
ON
OFF
ON
ON
ON
Spatial sampling
(arcsec/fibre)
0.67”/fibre
0.67”/fibre
0.33”/fibre
0.33”/fibre
0.67”/fibre
0.33”/fibre
Field of view
arcsec2
54” x 54”
27” x 27”
27” x 27”
13” x 13”
27” x 27”
13” x 13”
Number
of fibres
80 x 80
40 x 40
80 x 80
40 x 40
40 x 40
40 x 40
Pseudo-slits
per quadrant
4
1
4
1
1
1
When small field can be accommodated, this avoids second order contamination by the sky or background
objects from the 3 pseudo-slits corresponding to the outer part of the field of view.
Table 2.8 shows the spatial characteristics of the IFU mode.
2.4.3
Spectral range
Table 2.9 shows the spectral range covered in IFU modes by the various grisms, as obtained by the automatic
pipeline when reducing the spectrophotometric standard star.
With low and intermediate resolution grisms the spectral coverage is independent of the position of the
IFU pseudo-slits. With the high-resolution grisms, the spectral coverage is determined also by the (fixed)
positions of the pseudo-slits in the focal plane, but it varies slightly from quadrant to quadrant. The spectral
coverage for each quadrant derived from the automatic reduction of standard star observations with VIMOS
pipeline is listed in the Table 2.10.
2.4.4
Spectral resolution
In IFU mode, spectral resolution is fixed by the combination grism + fiber size (the fiber FWHM is about 3.2
pixels, corresponding to 0.67”). The spectral resolution is about 1.25 times the spectral resolution obtained
in MOS mode with a 1” slit width. The spectral resolution for various grism+filter combinations is given in
Table 2.9.
2.4.5
Multiplex characteristics
The same multiplex capability described in MOS mode is also used in IFU mode. With the low-resolution
grisms there are 4 pseudo slits of fibers along the dispersion direction. With intermediate and high-resolution
grisms only the central pseudo-slit is used (in practice by masking the entrance field of the IFU so that the
other pseudo-slits do not receive sky light).
18
VIMOS User Manual
VLT-MAN-ESO-14610-3509
Table 2.9: Spectral characteristics in IFU mode
Grism
LR blue
LR red
MR
HR blueN EW
HR blueOLD
HR orange
HR red
Default Order
sorting filter
OS-Blue
OS-Red
GG475
Free
Free
GG435
GG475
Spectral range
common to all quadrants
400-670 nm
590-915 nm
490-1015 nm
370-535 nm
415-620 nm
525-740 nm
645-870 nm
Spectral Res.
(0.67” fiber)
220
260
720
1440
2550
2650
3100
Dispersion
(Å / pixel)
5.3
7.3
2.5
0.71
0.51
0.6
0.6
Spectral
multiplex
4
4
1
1
1
1
1
Note: new HR red VPHG grisms have been installed in October 5, 2005.
Note: New VPH HR blue grisms are in use since March 2012. The old grisms are not available any more.
Their characteristics are given here for comparison purpose. The resolution for the new VPH HR blue grism
is given for the undeviated wavelength of 401.6 nm, which corresponds to 2100 at 587.5 nm, the wavelength
for the old grism R value.
Table 2.10: IFU: spectral coverage in the various quadrants
Grism
LR blue + OS blue
LR red + OS red
MR + GG475
HR blue + free
HR orange + GG435
HR red + GG475
Q1
390 - 670 nm
570 - 915 nm
485 - 1015 nm
370 - 537 nm
525 - 745 nm
635 - 860 nm
Q2
395 - 675 nm
580 - 930 nm
490 - 1020 nm
370 - 535 nm
525 - 745 nm
635 - 865 nm
Q3
400 - 680 nm
590 - 930 nm
490 - 1020 nm
370 - 550 nm
525 - 745 nm
635 - 860 nm
Q4
400 - 680 nm
585 - 930 nm
490 - 1015 nm
370 - 563 nm
525 - 740 nm
645 - 875 nm
VIMOS User Manual
2.5
VLT-MAN-ESO-14610-3509
19
Detectors
Figure 2.9: QE curves of the new (thick line) and old (dashed line) VIMOS CCDs. Notice that the QE of the
new CCDs correspond to a single detector (Tom).
2.5.1
Detector system
Since August 1st 2010 VIMOS has four new red-sensitive detectors. They are E2V CCD-44-82-1-D42, backilluminated, non-inverted mode operation, deep-depletion devices. The new devices have exactly the same
format as the old ones, that is, 2k×4k. Their main difference compared to the old ones is an increased quantum
efficiency in the red and reduced fringing. The response of the new detectors is comparable to the old ones
in the range 400-600 nm where it starts to increase, reaching a factor of two improvement at approximately
850 nm. At the U-band there is a loss of 30% Please check the VIMOS news pages and/or contact ESO’s
User Support Department for further news.
Table 2.11 indicates the basic characteristics of the VIMOS CCDs. Figure 2.9 shows the quantum efficiency curve of one of the CCDs.
Detector read-out modes and format
The CCDs have two read-out ports but only one is used. This increases the read-out time but, as a benefit, the
gain, offset, and read-out noise are constant along the entire CCD.
In spectroscopic mode, the full CCDs (2048×4096 pixels2 are read-out; in imaging mode, readout is
windowed to 2048×2400 pixels2 . In fact, in both spectroscopic mode and in imaging mode, the CCDs are
20
VIMOS User Manual
VLT-MAN-ESO-14610-3509
Table 2.11: Basic characteristics of the new VIMOS CCDs
Parameter
Number of pixels
Pixel size (µm)
Dark current at –120◦ C (e− /px/h)
Deviation from Linearity (Full well; %)
Charge transfer efficiency
Value
2048×4096
15
<7
< 0.5
>0.999995
vignetted by some hardware. In spectroscopic mode, the illuminated area is about 1970×4096 pixels2 , and in
imaging mode the illuminated area is about 1970×2300 pixels2 . The actual values depend on the individual
CCDs. The default readout modes are indicated in Table 2.12.
Table 2.12: New Detector System Readout Modes and Characteristics1
VIMOS Mode
Imaging
Spectroscopy
1 The
Size
4×2k×2k
4×2k×4k
Speed
225kpx s−1
225kpx s−1
Binning
1×1
1×1
Gain
Low
High
Port
1-port
1-port
Windowing
Not supported
Not supported
Readout time
1m
1m
old detector system had exactly these same modes.
Controllers
The 4 CCDs are controlled by two FIERA controllers. The detectors of channel 2 and 3 are controlled by
FIERA A (VIMOSA), the detectors of channel 1 and 4 by FIERA B (VIMOSB).
Read-out noise and conversion factor
Table 2.13 indicates the readout noise and gain values for the 4 chips. Note that these values are subject to
change and are indicated here only for reference. Exact values to be found in the image headers under the
following keywords: HIERARCH ESO DET OUT1 GAIN, and HIERARCH ESO DET OUT1 RON (the
number x in OUTx could change depending on the output amplifier used).
Table 2.13: New detectors read-out noise and conversion factors. For reference only, subject to change
Chip
CCD 1
CCD 2
CCD 3
CCD 4
CCD 1
CCD 2
CCD 3
CCD 4
Read-out Mode
225 kpx s−1 , low gain (IMG mode)
225 kpx s−1 , low gain
225 kpx s−1 , low gain
225 kpx s−1 , low gain
225 kpx s−1 , high gain (MOS/IFU)
225 kpx s−1 , high gain
225 kpx s−1 , high gain
225 kpx s−1 , high gain
RON [e− rms]
3.9
3.8
3.6
3.6
3.2
3.1
3.1
3.1
K [e− /adu]
1.76
1.79
1.79
1.71
0.53
0.55
0.56
0.54
RON and conversion factor monitoring is available through the QC1 WEB pages
VIMOS User Manual
VLT-MAN-ESO-14610-3509
21
Fringing
The new detectors have substantially reduced fringing - it is negligibly small in I and z-band imaging mode.
In spectroscopic mode there is some residual fringing that depends on the slit width and grism used: for a
100 slit fringing at 900nm is only 1% in the high resolution grating (growing in nearly a linear fashion with the
inverse of the slit width). For the low resolution grating it is not detectable.
Red leaks
With CCDs with much higher sensitivity in the red the issue of red leaks needs to be studied with care. Imaging
observations with the U or B filter might be affected to a degree still to be determined.
New shutters
As part of the VIMOS upgrade project a new set of bi-stable shutters, i.e. they do not draw current in the open
nor in the closed position, has been installed. The exact properties of these shutters, i.e. shutter delay, still
need to be determined.
The shutter (one for each CCD camera) guarantees uniform illumination of the CCD to the 1 % level or
better for exposure times as short as 1 sec (the shortest possible exposure time).
2.5.2
More information
More (updated) information on detector characteristics, cosmetics, and performance on sky at:
http://www.eso.org/sci/facilities/develop/detectors/optdet/instruments.html
http://www.eso.org/observing/dfo/quality/
2.6
Calibration Units
VIMOS has three calibration units illuminating a calibration screen at the back of the Nasmyth shutter (closing
the Nasmyth tunnel).
Each unit has the following lamps:
• Flatfield lamps:
– QTH10 halogen lamp for imaging screen flats in VRIz, and MOS spectroscopic screen flats in LR
red and blue
– QTH50 halogen lamp for imaging screen flats in U’B, MOS screen flats in MR, HR red and blue,
and all IFU screen flats
• Arc lamps:
– He
– Ar
– Ne
In the web an updated atlas of spectral lines for the different grisms can be found.
22
VIMOS User Manual
2.7
VLT-MAN-ESO-14610-3509
AFC: Active Flexure Compensation
Since 1st August 2010 VIMOS counts with an active flexure compensation system (AFC). With this system
we can position the the image of the FoV onto the detectors to better than 0.3 pixels at the start of the exposure
in all quadrants, and maintain it there to within ≈1.5 pixels for the duration of a typical exposure. Previously
VIMOS had astatic compensation systems installed only in quadrants 2, 3, and 4. Image motion due to
instrument flexures under gravity were approximately 4 pixels peak-to-valley for the channels 2, 3 and 4, and
6 pixels peak-to-valley for channel 1 (for the whole rotator range).
With the new AFC we can control flexures to better than ≈1.5 pixels peak-to-valley, for the range of A/R
rotations in typical exposures.
2.8
Known shortcomings of the instrument
VIMOS problems, issues and hints related to data reduction and observations are summarized on the VIMOS
QC page:
http://www.eso.org/observing/dfo/quality/VIMOS/ServiceMode/ServiceMode.
html#problems
Here we list some shortcomings that should be be kept in mind when planning the observations.
2.8.1
IFU masks vignetting in IMG and MOS mode
When using VIMOS in IMG or MOS mode the IFU masks are stowed. The mechanism that hold the heavy
masks in place have some play and, depending on rotator angle, they could be seen vigneeting the FoV. When
stowed the IFU masks are folded into the center of VIMOS, that is, the area between Q1/Q4 and Q2/Q3. The
hinge is near the focal plane while the far end of the masks are approximately 27 cm from the hinge, into the
instrument. The quadrants to be mostly affected depends on the rotator angle. The areas likely to be vignetted
have Y pixels <200 in Q 1 and 2 and >2200 for Q3 and Q4. To ensure that no MOS slits are vignetted users
should not place slits in the area likely to be vignetted.
2.8.2
IFU fringing
There is interference produced by internal reflexions in the IFU unit which origin is not completely understood.
For details see:
Jullo et al. (2008)
Lagerholm et al. (2012)
,
.
The fringing is nearly zero at 400nm and progressively increases to longer wavelengths.
This problem will probably remain for the life of the instrument.
2.8.3
[SOLVED] Non-optimal focus for some grisms
It has been found that the optimal focus depends on what grism is in the light path. This means that spectroscopic observations have not been carried out with the optimal focus. This situation has been solved since
March 2012. Starting in April 2012 the instrumental focus is corrected depending on which grism is in the
light path.
VIMOS User Manual
VLT-MAN-ESO-14610-3509
23
Figure 2.10: Vignetting of the IMG FoV by IFU masks flexures as a function of absolute rotator angle.
2.8.4
[SOLVED] Defocusing at some adapter angles
The focusing mechanisms, specially that of Q3, suffers from flexures which are particluarly large at some
adapter rotator angles. This has resulted in a defocus which affects image quality and, in spectroscopic modes,
resolution. The degradation can reach 10-20% larger FWHM in IMG, or a 20-30% decreased resolution R in
MOS or IFU, at absolute A/R angles of ≈ 116 ± 50 degrees.
Starting 1st April 2012 we correct focus for A/R angle and the above situation has been much alleviated.
2.8.5
[SOLVED] IFU focusing issues
It has been found during the March 2012 focus improvement intervention that the focusing range of the VIMOS camera did not allow for proper focusing of the IFU units for all temperatures in the normal range for
Paranal (5-20 ◦ C). The defocusing is particularly bad when temperatures go above 10 degrees. An intervention to improve this was successfully carried out in Q4 2012. This defocusing was there since the start of
operations.
2.8.6
Spectrum rotation
The blocking mechanism of the grism units, the mechanism that fix the grism in place, is not perfect and allow
for some spectrum rotation as a function of A/R angle. The peak-to-valley effect depends of the particular
grism used, but for a whole rotation of the A/R the spectrum can rotate by 10 pix over 4000 pix.
A redesign of the grism blocking mechanism is under study.
24
2.8.7
VIMOS User Manual
VLT-MAN-ESO-14610-3509
Temperature dependent bias level
Although this is a common problem, for Quadrant 2 the temperature sensitivity is particularly large. We
thus strongly recommend to use the overscan region on each image to determine the best bias level to be
substracted.
2.8.8
Temperature dependent image scale
During the VIMOS upgrade project we found that the image scale depended on temperature. This is the
result of the changing optical configuration needed to keep the instrument in focus at all temperatures, that is,
VIMOS is not telecentric. The effect was discovered once we started to use the active flexure compensation
mechanism. Every day we take an image of a pinhole mask with the instrument at the same rotation angle.
This image is taken after acquiring a reference fiber, located in the instrument frame and not in the pinhole
mask, at the edge of the FoV and positioning it at the same pixel position. We found that the position of the
central pinhole of the mask depended on temperature. Starting on December 2011 we correct the reference
pixel position depending on temperature to counterbalance this effect. With this we can ensure that the central
position of the masks do not depend on temperature, but we can not change the effect on scale. Between 5
degrees and 15 degrees the effect was approximately 2 pixels. With the temperature compensation scheme
that we have implemented we can expect a maximum shift of only 0.5 pixels for the slits located at the top or
bottom of the FoVs.
Chapter 3
Observing with VIMOS
All observations with VIMOS are done via “observing blocks” (OBs). OBs consist of one acquisition template
including target information followed by “observing templates” related to the observing mode. The users will
fill out the parameter fields (“keywords”) of the templates (e.g. grisms, filters, etc). All the preparations are
done with the Phase II proposal preparation tool p2pp.
In addition, VIMOS masks have to be prepared with the VIMOS mask manufacturing preparation software
VVMPS.
The strategy behind observing blocks and templates is to prepare the observations well in advance to
minimize any interactive steps during the observations (optimization and service mode compatibility). The
execution of the OBs will be mostly automatic and the execution will be done by telescope and instrument
operators and staff astronomers. Direct interaction at execution time is only required for the target acquisition
and to assess the quality of the data.
The preparation of visitor and service mode observations requires special care, and the relevant documentation should be consulted. See Sect. 1 for instructions on how to retrieve the corresponding information.
3.1
3.1.1
Interactions with the telescope
Guide stars and Guidecam software tool
For telescope guiding and active optics correction it is necessary to find a guide star of magnitude in the range
11-13.5 within the Nasmyth field of view. The guide star is picked up by the Guide Probe, which is attached
to the telescope adapter. (Note that the adapter is independent of the telescope rotator to which the instrument
is attached.)
In IMG and MOS mode, it is not always possible to find a guide star such that the Telescope Guide
Probe is not vignetting the VIMOS field of view. Therefore, users are asked to select the guide star for their
observations. The choice of the guide star is mandatory for pre-imaging, for imaging, and for MOS programs.
In fact, the guide star for MOS is selected at the time of pre-imaging: guide star coordinates and position of
guide probe (whether positive or negative) is stored in the pre-image headers, and subsequently propagated
by VMMPS (see Sect. 3.5.4), the VIMOS Mask Preparation Software, into the Aperture Definition in Pixel
(ADP) files. At the time of the MOS acquisition, this information is extracted from the ADP and the same
guide star as used for pre-imaging will be re-used for the MOS observations. Only in some exceptional cases,
the telescope operator may have to select another guide star: see Sect. 5.6. Users need not select the guiding
star for observations carried out in IFU mode.
The position and the amount of the vignetting introduced in the field of view by the guide probe can be
controlled with the help of the Guidecam software, that allows one to visualize the geometry of the VIMOS
field of view and of the Telescope Guide Probe, and allows users to select the guide star most suitable to their
observation.
For a tutorial on the use of the Guidecam tool see Chapter 5
25
26
VIMOS User Manual
3.1.2
VLT-MAN-ESO-14610-3509
Cumulative offsets
For small telescope offsets, the telescope may keep the same guide star. However, observations involving
cumulative offsets greater than about 30” often result in significant vignetting of the guide probe, or even in
the loss of the guiding star. For these reasons, all dither positions for offset patterns used in the OBs must
fit inside a 3000 × 3000 size box. If larger offsets are necessary, users need to prepare separate OBs and use
appropriate guide star for each of them.
3.1.3
Telescope and Instrument Focus
The telescope focus is automatically set by the active optics system. No intervention is required by the observer. Defocusing of the telescope is not possible during the observations. The instrument focus is corrected
automatically for the different thickness of the various filters, and for temperature variations (autofocus).
3.2
Atmospheric Dispersion
VIMOS is not equipped with Atmospheric Dispersion Corrector in none of its modes. The impact of atmospheric dispersion will be mostly noticed in MOS mode. In imaging, some image elongation may be noticed
at high airmasses in the U or B band. In IFU, the effect will mostly be noticed with the LR blue grism and
with the 0.3300 /fiber sampling.
In MOS mode, the effects can lead to severe slit losses if some precautions are not taken. To minimize
atmospheric dispersion effects at high airmass, and assuming that the observations are performed close to
meridian, we have historically requested that the slits be oriented N-S, forcing the rotator angle to be set at
90◦ . This rotator angle is the default one to be used for pre-imaging, and the same rotator angle will be
used during spectroscopic follow-up. The normal VIMOS operational scenario has been to carry out MOS
observations as close as possible to Meridian, within ± 2 hrs. Starting during Period 90 for pre-image based
MOS observations, and starting P92 also for PILMOS observations, we have relaxed this constraint as follow:
for targets at declinations in the range −45◦ < δ < −5◦ we permit observations with slits oriented E-W, with
rotator angle set at 0◦ , and with HA within ± 3 hrs from meridian. Notice that increasing the allowed HA
range permits observations at higher airmasses, which increases the FWHM of the images, leading also to
increased slit-losses. For a full report see Sanchez-Janssen et al. (2012) in the VIMOS web.
More information and simulations can be found on the VIMOS web. Figure 3.1 shows a worst case
scenario of MOS observations with LR blue (spectral coverage 370 – 670 nm) for a field with declination
+20◦ . For details see also Cuby et al. Proc. SPIE 3355, p36-47 (1998). For a different view on the optimal
orientation see Szokoly, G. P. A&A 443, 703 (2005).
3.3
Fringing and Flexures
The amount of uncorrected flexures has a number of operational consequences:
• The accuracy of the slit positions determined from pre-imaging depends on the rotator position. This is
for the time being one of the reasons why slit widths narrower than 0.6” are not allowed.
• Accuracy of sky subtraction / flat fielding: accuracy of sky subtraction / flat fielding may be limited by
flexures. With dithering / jittering sequences, median running sky frames can be built in imaging or
spectroscopy allowing accurate sky subtraction and/or flat fielding of the data
• In spectroscopy, arcs and flats are taken during daytime and at constant rotator angle. Depending on
the variation in rotator angle between daytime calibrations and night time observations, some flat field
residuals and wavelength calibration offsets may be introduced due to the flexures. In order to minimize/eliminate these effects, night time calibrations can be taken with an adequate template (see Sect. 4).
VIMOS User Manual
VLT-MAN-ESO-14610-3509
27
Figure 3.1: Example of atmospheric dispersion at Paranal for a field at declination +20◦ , observed with the
LR blue grism from ± 2 hrs from Meridian. The blue and red trails show the evolution of the blue and red
wavelengths during the exposure. Atmospheric spectra start with N-E orientation and move to N-W through
a N-S orientation while crossing the Meridian. The maximum amplitude of the dispersion is ∼ 2” at ± 2 hrs
from Meridian. Slits clearly have to be oriented N-S as a default orientation to minimize the slit losses at this
declination, assuming that all MOS observations will be carried out within ± 2 hrs from Meridian.
Attached flat and arc calibrations are mandatory for all IFU observations. During the VIMOS
upgrade, one attached arc and three flats have also been mandatory for all MOS science observations. The first part of the upgrade, completed by 1st August 2010, included changes of shutters,
CCDs, and the installation of the Active Flexure Compensation system. In addition many other
mechanical parts are closely monitored. A second part of the upgrade, finished by April 2011,
improved image quality and its uniformity accross the field by recentering the cryostats. A third
part of the upgrade has been completed during March 2012, and included the exchange of the
HR-blue grisms by VPH ones, and a full upgrade of the focusing hardware and software. The
last and remaining part of the upgrade took place during Q4 2012 was aimed at improving the
focusing range for the IFU mode. All these activities required access to the instrument during the
day, which cannot be done if the MOS calibrations are running in the morning. We are analyzing
the data to determine in which circumstances night calibrations will be required. Please see the
instrument web pages for the latest news.
3.4
Imaging (IMG)
Imaging mode is used for both pre-imaging runs and science imaging runs. In both cases, users are requested to
use Guidecam for the selection of guide stars. See Sect. 3.1.1 concerning Guidecam and Sect. 5.6 concerning
the policy regarding Guide Stars.
28
VIMOS User Manual
3.4.1
VLT-MAN-ESO-14610-3509
Pre-imaging
Since summer 2012 pre-imaging is no longer mandatory prior to a MOS follow-up, however there are still
many types of observation for which it is advisable/essential, see Sections 3.5.1 and 3.5.2.
• As a consequence of the CCD upgrade, all pre-images taken before the intervention are not valid
anymore for MOS follow up observations after the CCD upgrade (i.e. after 31 August 2010).
• The use of pre-imaging taken between 31 August 2010 and 24 May 2011 can result in a systematic
overall offset affecting all quadrants the same way, but making field acquisition difficult, specially
in crowded fields.
Pre-imaging is carried out in service mode only. The following instructions for preparation of pre-imaging
OBs should be strictly followed.
Program ID It is mandatory for Phase I to request a specific pre-imaging run in the proposal form, and for
Phase II to prepare the pre-imaging OBs by using the corresponding Program ID.
Filter used The correction of the distortions is derived from R filter observations only. To minimize the
slit losses due the distortion of the instrument (which do depend on the filter), the use of the R filter for preimaging is mandatory. Although pre-imaging with filters other than R is not permitted, users may request
with a waiver to include in the pre-image OB templates with other filters. Note that no waiver will be granted
to design MOS masks based on observations done with any other filter but R.
Observation Category: PRE-IMAGE It is mandatory to set the Observation Category to PRE-IMAGE in
the observation template VIMOS img obs Offset (see Sect. 4). Failure to do so will result in delays to process
and deliver the pre-imaging data, and may result in MOS observations not being carried out.
Standard star requirements Users requesting CLR sky transparency for their pre-images are requested to
specify in the README whether they need a photometric standard taken in the same night.
Rotator on sky The rotator on sky, otherwise called position angle on sky, cannot be freely selected by the
user. This is in order to minimize the slit losses due to atmospheric dispersion (Sect. 3.2). The default value is
90◦ , and corresponds to an orientation of the field with E to the top, N to the left (see Fig. 2.3). For declinations
in the range -45◦ < δ < −5◦ , this parameter can be set to 0◦ . In special cases it may be possible to deviate
from these rules if there is a valid scientific reason; in that case a waiver must be specifically requested to ESO
before you submit your Phase II information. For a full report see Sanchez-Janssen et al. (2012) in the mos
section of the VIMOS web pages. and the corresponding 2014 A&A paper.
3.4.2
Science imaging
Observation Category: SCIENCE It is mandatory to set the Observation Category to SCIENCE in the
observation template VIMOS img obs Offset (see Sect. 4), otherwise data will be treated as pre-imaging and
will not be processed as regular imaging data.
Rotator on sky Users are encouraged, but not forced, to use the default value of the rotator angle, i.e., 90◦ .
VIMOS User Manual
VLT-MAN-ESO-14610-3509
29
Table 3.1: VIMOS Calibration Plan: IMG Mode
Calibration
Bias
Darks
Sky Flats
Photom. Std.
Photom. Std.
high airmass
Astrometric fields
3.4.3
Number
5
3
5
4 quadrants
1 quadrant
Frequency
Daily
Monthly
3-7 days
See text
Weekly
When?
Day time
Day time
Twilight time
Night time
Night time
Products
Master Bias
Dark current
Master Flat
Zero Point
Extinction coeff.
Accuracy
RON
Comment
2%
5%
10%
U’BVRIz
U’BVRI
U’BVRI
4
6 months
Night time
Distortion map
1 pixel
R filter
IMG mode: calibration plan
Observations of IMG photometric standard stars during the same night as science observations are guaranteed
for programs that requires photometric conditions, and performed on a best-effort basis during all clear nights.
Table 3.1 indicates the nature, frequency and accuracy of VIMOS calibrations expected to be taken as part of
the calibration plan. Only calibration frames required for the reduction of science data are reported. More
calibrations will be taken by the operation staff for the purpose of maintaining and monitoring the instrument
configuration and performance, e.g. mask to CCD transformations etc. These calibrations are not reported
here. Calibration monitoring, including photometric zero points, can be found on the pages of the Quality
Control group:
http://www.eso.org/observing/dfo/quality/
3.4.4
IMG mode: pipeline
See http://www.eso.org/qc/pipeline-status.html for the information concerning the latest status of the ESO
pipeline.
3.4.5
IMG mode: Exposure Time Calculator
The approximate limiting magnitudes in direct imaging mode can be obtained from the exposure time calculator available on the ESO WEB pages http://www.eso.org/observing/etc/.
3.5
3.5.1
Multi-Object Spectroscopy (MOS)
Pre-imaging
Pre-imaging must be used to prepare MOS observations when
• no suitably accurate astrometric catalogue of the targets is available,
• or when curved or tilted slits are desired on specific targets
In addition, if a long total MOS exposure time is expected per pre-image field, then there is not much to be
gained from skipping pre-imaging.
Pre-imaging is carried out in service mode (see Sect. 3.4.1).
30
VIMOS User Manual
3.5.2
VLT-MAN-ESO-14610-3509
PILMOS: Pre-imageless MOS observations
As of June 2012 Pre-ImageLess Multi Object Spectroscopy (PILMOS) is being offered as an option to VIMOS users. However, currently there are restrictions for MOS observations in PILMOS mode. Constraints
that must be met are detailed in Section 7.2.1. In addition we encourage users to take note of the expected
PILMOS performance as described in reference [1] of Chapter 7. The implementation of the PILMOS option for mask preparation utilises tools and procedures that were already in place for pre-image based mask
preparation, consequently Section 7.3 describes the procedure with particular emphasis on the new PILMOS
specific aspects.
Assuming that the constraints detailed in Section 7.2.1 can be met then PILMOS may be particularly
appropriate if:
• There is a lack of suitable stars for cross correlation in the field
• Sources are in any case too faint to be identified on VIMOS pre-images
• Each pre-image field has a relatively low total MOS exposure time associated with it
• astrometry accurate to ±0.200 is available
• Wide slits (≥ 100 ) are to be used
Nevertheless, since PILMOS is a new mode, we do not yet recommend this strategy to inexperienced VIMOS
users.
3.5.3
Rotator on sky
Because of the atmospheric dispersion effects (Sect. 3.2), the orientation on sky for MOS and pre-imaging
observations is restricted to:
• PA=0◦ (E-W slits), Hour Angle within ±3h, -45◦ < δ <-5◦ ;
• PA=90◦ (N-S slits), Hour Angle within ±2h, any observable δ.
These restrictions could be lifted with a waiver but it should be very well justified. Notice that the default
value for pre-imaging is set to PA=90◦ . All service and visitor mode users who have particular constraints for
the orientation of their fields should request a waiver.
3.5.4
VIMOS Mask Preparation Software (VMMPS)
The use of VMMPS (Chapter 6) is compulsory for the creation of the so-called ADP (Aperture Definition in
Pixels) files which are subsequently loaded into p2pp when preparing Observation Blocks. ADP files will be
used in Paranal to manufacture the masks. ADP files should never be edited by hand.
Here are some general features of VMMPS, for a quick reference guide. Consult the VMMPS web page
for instructions on how to retrieve the package and the documentation.
• VMMPS allows to define a mask in two situations:
– From a contributed catalogue, consisting of list of targets with accurate relative astrometry (better
than 0.3” rms). Input catalog is a list of RA-DEC coordinates. This catalogue needs to have,
with the same relative astrometric accuracy, coordinates of bright objects / stars in the field of
view. These objects / stars, after detection on the pre-images, will be used to register the target
coordinates to the VIMOS coordinate reference frame. Some of these bright stars will be used as
reference for acquisition.
VIMOS User Manual
VLT-MAN-ESO-14610-3509
31
Figure 3.2: VMMPS Graphical User Interface: Example of ADP file superimposed to field of view
– From a catalog of target positions (in pixel coordinates) extracted from a VIMOS image.
• VMMPS maximizes the number of slits that can be assigned to the targets in the input catalogue, in one
or more masks, depending on user’s choice.
• Upon realization of a first mask definition, VMMPS allows manual interaction to unselect targets, define
curved slits, tilted slits, etc. However, note that manual modification of the mask definition should be
done only by experienced users and with care.
• VMMPS allows to define some objects as compulsory
• VMMPS requires that some bright stars are defined as reference targets for acquisition purposes.
Figure 3.2 shows the VMMPS Graphical User Interface.
3.5.5
Finding charts
Finding charts for service mode OBs must be prepared with VMMPS. One finding chart for each quadrant
must be attached showing all targets with overplotted slits (see Fig. 3.2). In addition, the first finding chart
in P2PP should be a finding chart made with Guidecam showing the guide star and the orientation of
the guide probe (see Fig. 5.1).
32
3.5.6
VIMOS User Manual
VLT-MAN-ESO-14610-3509
Visitors using MOS
Visitors using the MOS mode are requested to prepare Observation Blocks ahead of their scheduled visitor
run, and upon completion of their pre-imaging observations (like in service mode). This is to guarantee that
visitors will have a sufficient knowledge of the VIMOS Mask Preparation Software (VMMPS, Sect. 3.5.4)
prior to their visit at Paranal, and to allow mask manufacturing ahead of time. Limited additional support
is guaranteed for mask preparation on the mountain, up to 3 masks per night, to be prepared at least 48 hrs
in advance. The instrument has a capacity of 10 masks (per quadrant) loaded simultaneously (one slot is
normally occupied by a mask dedicated to observations of spectrophotometric standard stars, and a second
one for a pinhole mask used for daily instrument health check). However, some restrictions may apply for
technical reasons in the number of masks which can be hosted simultaneously into the cabinets. Please refer
to the Call for Proposals and to the instrument WEB pages for the updated status of the instrument situation.
Note that masks cannot be exchanged at night.
3.5.7
MOS mode: grism+filter setup
In MOS mode only one filter+grism combination per OB is permitted (the only filter exchange allowed is the
one between acquisition and science template). Users who want to observe the same targets with different
filter+grism combinations are requested to submit separate OBs for different filter+grism combinations and to
consider the respective overheads.
Another important thing to keep in mind is that the filter in the acquisition template should overlap in
wavelength with the central wavelength of the grism used in the science exposures.
3.5.8
MOS mode: attached night time calibrations
To correct for the effect of instrument flexures it has been mandatory in previous periods to attach nighttime
arcs (see Sect. 3.5.9) for all MOS OBs using LR blue and HR blue grisms. During the VIMOS upgrade, one
attached arc and three flats have been mandatory for all MOS science observations. The upgrade has been
finished and the new HR blue grisms have been commissioned. We are currently (P93) analysing day- and
nighttime calibrations taken since the upgrade for all grisms to analyse whether nighttime calibrations can be
skipped in future periods as of P95. Look at the instrument web pages for the latest information on required
calibrations.
3.5.9
MOS mode: calibration plan
Observations of spectro-photometric standard stars with the same setting used for science observations are
normally performed within a few nights from the science observations.
Table 3.2 indicates the nature, frequency and accuracy of VIMOS calibrations expected to be taken as part
of the calibration plan. Only calibration frames required for the reduction of science data are reported. More
calibrations will be taken by the operation staff for the purpose of maintaining and monitoring the instrument
configuration and performance, e.g. mask to CCD transformations etc. These calibrations are not reported
here. Calibration monitoring data can be found on the pages of the Quality Control group:
http://www.eso.org/observing/dfo/quality/
3.5.10
MOS mode: pipeline
See http://www.eso.org/qc/pipeline-status.html for the information concerning the latest status of the ESO
pipeline.
VIMOS User Manual
VLT-MAN-ESO-14610-3509
33
Table 3.2: VIMOS Calibration Plan: MOS Mode
Calibration
Bias
Darks
Screen Flats
Number
5
3
≥32
Screen Arcs
1
Specphot.
Standard Star
4
quadrants
Frequency When?
Daily
Day time
Monthly
Day time
Attached to all
science OBs
Attached to all
science OBs
Weekly
Night time
Products
Master Bias
Dark current
MOS Flat
Accuracy1
RON
Comment
5%
All used masks
All used masks
Dispersion coeff.
0.3 pix
Response
function
10%
All grism+filter
setups used
1
Internal accuracy, not considering instrument flexures (see Sect. 2.7).
During the VIMOS Upgrade Project, starting February 1st 2010, all MOS science settings must be calibrated at night
with at least 3 flats and 1 arc.
2
3.5.11
MOS mode: Exposure Time Calculator
The approximate limiting magnitudes in MOS mode can be obtained from the exposure time calculator available on the ESO WEB pages http://www.eso.org/observing/etc/.
3.6
3.6.1
Integral Field Unit (IFU)
Acquisition accuracy
In IFU mode acquisition is “blind”, i.e., limited by the accuracy of the telescope pointing (∼ 300 accuracy). In
addition to this the pointing accuracy degrades for targets with declination closer to the South Celestial Pole.
At -70◦ the uncertainty introduced by the current WCS model for the IFU is also ∼ 300 , increasing rapidly
further south. We are working to improve the current model. If you plan to observe very southern targets
please be aware that we cannot currently guarantee a very accurate pointing, i.e. the target might fall (partly)
out of the IFU FOV.
3.6.2
Dithering/jitter pattern
With the large field of view of the VIMOS-IFU, techniques equivalent to ”shift-and-add” classically used in
imaging, are a possible mode of operations. Dithering/jitter pattern is a list of differential pointing positions
around a central position. Several short images (with exposure times set to have sky background limited
exposures) are taken at each position of a dithering pattern, which are combined to reconstruct an image with
the total required exposure time. This allows to eliminate the sky contribution, cosmic rays, fringing, cosmetic
defects on the detectors, and to produce very accurate flat fielding for correction of pixel to pixel variations.
The dithering pattern depends on the mean size of the observed objects: it should be larger than the mean size
of the objects for the method to work efficiently.
3.6.3
IFU mode: grism + filter setup
In IFU mode, only one filter+grism combination per OB is permitted. Users who want to observe the same
targets with different filter+grism combinations are requested to submit separate OBs for different filter+grism
combinations and to consider the respective overheads.
34
VIMOS User Manual
VLT-MAN-ESO-14610-3509
Table 3.3: VIMOS Calibration Plan: IFU Mode
Calibration
Bias
Darks
Screen Flats
Number
5
3
3
Frequency
Daily
Monthly
Daily
When?
Day time
Day time
Day time
Screen Arc
1
Daily
Day time
Screen Flats
1 to 32
Screen Arcs
1
Specphot.
Standard Star
4
quadrants
Attached to all
science OBs
Attached to all
science OBs
Weekly
Night time
Products
Master Bias
Dark current
IFU Flat with
HR Orange
IFU Arc with
HR Orange
IFU Flat
Accuracy1
RON
Dispersion coeff.
0.3 pix
Response
function
10%
Comment
Monitoring
Monitoring
5%
All grism+filter
setups used
1
Internal accuracy, not considering instrument flexures (see Sect. 2.7).
With grism HR blue, 3 screen flats are always mandatory.
IMPORTANT NOTE The execution time for all IFU attached night time calibrations (screen-flats and arcs) is subtracted
from the total allocated time.
2
3.6.4
IFU mode: attached night time calibrations
To better take into account the effects of instrument flexure the use of attached nighttime calibrations, arcs and
flats (see Sect. 3.6.5), is MANDATORY for all IFU OBs. This template will provide 1 or 3 flat-field images
(for HR grism: 3 screen-flats are mandatory, for the other cases, the user can choose the number) as well as
1 arc, taken at the same rotator position of the science target. The execution time for these IFU nighttime
calibrations is always subtracted from the total allocated time.
3.6.5
IFU mode: calibration plan
Observations of spectro-photometric standard stars with the same setting used for science observations are normally performed within a few nights from the science observations. Table 3.3 indicates the nature, frequency
and accuracy of VIMOS calibrations expected to be taken as part of the calibration plan. Only calibration
frames required for the reduction of science data are reported. More calibrations will be taken by the operation staff for the purpose of maintaining and monitoring the instrument configuration and performance, e.g.
mask to CCD transformations etc. These calibrations are not reported here. Calibration monitoring data can
be found on the pages of the Quality Control group:
http://www.eso.org/observing/dfo/quality/
3.6.6
IFU mode: pipeline
See http://www.eso.org/qc/pipeline-status.html for the information concerning the latest status of the ESO
pipeline.
3.6.7
IFU mode: Exposure Time Calculator
The approximate limiting magnitudes in IFU mode can be obtained from the exposure time calculator available
on the ESO WEB pages http://www.eso.org/observing/etc/.
VIMOS User Manual
3.7
VLT-MAN-ESO-14610-3509
35
VIMOS overheads and OB duration
The current overall efficiency of VIMOS is around 55%. The actual efficiency depends strongly on which
instrumental mode is used, and on which observational mode (service vs visitor). The way in which some
functions are operated may change at any time. Consequently, we cannot give here an estimate of the overheads that is reliable on the long term. The user is referred to the current Call for Proposals and to the VIMOS
web pages for the most updated estimate of the overheads:
http://www.eso.org/sci/facilities/paranal/instruments/vimos/overview.html
It is important during Phase I to be very explicit in the ESO proposal section Justification of requested
observing time and observing conditions specifying the ETC input parameters used calculating the total ontarget time. Then to use a realistic split of that time into OBs of appropriate duration. It is possible to use the
the Phase 2 Preparation Tool (P2PP) tutorial account for simulation of example OBs (see P2PP User Manual
or VIMOS Phase 2 web pages).
Waiver requests for Service Mode OB duration longer than 1h will be rejected unless a sound scientific
argument for longer OBs is presented. In addition, the need for OBs longer than 1h must be explicitly present
(and justified) also in Phase I proposal. Sometimes waivers for OB durations of up to 1.5h could be granted
if the following conditions are met: (1) it was announced in the Phase I proposal that the waiver was going to
be requested; (2) overheads were estimated during Phase I with both 1h and 1.5h OBs and the same on-target
total integration time; (3) the seeing constraint is not better than 1.200 ; (4) the target does not come too close to
the zenith at Paranal; (5) there is no scheduling conflict with other programmes at similar RA; and (6) the user
accepts that the observatory guarantees only the first 1h of execution time to be executed within constraints.
36
VIMOS User Manual
VLT-MAN-ESO-14610-3509
Chapter 4
User Guide to the VIMOS Templates
4.1
Introduction
This section describes the VIMOS templates. Templates are to be used during phase II for service and visitor
programmes. Templates are high-level subroutines, writen in TcL to carry out observation subtasks, such as
preset telescope or take an image. Each template has an associated signature file which defines the data type,
value ranges, and information label for each argument to the template (e.g. filter to use, integration time,
dither pattern, etc). The observer then use P2PP to assign values to the different arguments.
Templates are grouped together to build an Observation Block (OB), which typically consists of one
acquisition template and one or more observing or calibration templates. At the telescope, OBs are passed to
the instrument and executed according to the user defined parameter values.
Unless specified otherwise, the information provided in this part applies to both service and visitor modes.
4.2
Template names
VIMOS templates are divided in groups according to the instrument mode and to the observations to be
performed. This is reflected in the name of the various templates.
The template naming scheme is the following:
VIMOS <mode> <type> <description >.tsf
where
mode
type
description
4.3
is the mode of the instrument (either : img, mos, ifu)
is the type of the template (either: acq, obs or cal )
is a string identifying the purpose of the template
( Offset for an observation, Preset for a preset,
NightCal for attached night calibrations, etc.)
Things to know - Reminder
• See Sect. 2.2.1 for a description of the orientation on sky of VIMOS.
• The default orientation on sky for MOS and pre-imaging templates is 90◦ (see Sect. 3.2). Any departure
from this value should be requested with a waiver.
• Offset convention. The templates make extensive use of telescope offsets, which are entered manually
as lists. The convention is that offsets are relative to the previous position, and that the first exposure is
37
38
VIMOS User Manual
VLT-MAN-ESO-14610-3509
executed after the first offset is applied. Thus, if the first exposure is desired at the position of the preset
then the first offset should be (0,0). In some templates, the offsets can be defined in detector coordinates
(e.g. X, Y), or in RA / DEC. All offsets are to be defined in arcseconds. The offsets refer to the target,
so that the target is offset by the requested amount by moving the telescope in the direction opposite to
the offset values1 . Examples are provided further down in the description of the templates.
• Only some combinations of filters and grisms are allowed. See Sect. 2.3 and Table 2.5.
4.4
List of templates
Table 4.4 lists the VIMOS templates.
The description of the templates given in the following pages consist in a table giving all the parameters
(keywords) of each template, whether hidden or visible, their range of values, and the label used in P2PP.
The hidden parameters have default values which cannot be changed by the users in P2PP. After each table a
description of some of the important parameters follow using the P2PP label as heading.
1
In other words if the preset coordinates are RA 0, DEC 0, then the first pointing of the telescope will center the field at
R 1=RA 0−offsetRA 1, DEC 1=DEC 0−offsetDEC 1, (where offsetRA/DEC 1 are the first couple of offset keyword values) and
after N offsets the telescope will be pointing to RA N=RA N-1−offsetRA N, DEC N=DEC N-1−offsetDEC N
: only available at the telescope
MOS observation of spectro photometric standard star (no need to specify
masks)
MOS observation of spectro photometric standard star (need to specify masks)
: distributed to users
VIMOS
VIMOS
VIMOS
VIMOS
VIMOS
VIMOS
VIMOS
VIMOS
VIMOS
VIMOS
VIMOS
img cal Dark
img cal Dark
spec cal Dark
spec cal Dark
img cal ScreenFlat
ifu cal ScreenFlat
ifu cal Arc
ifu cal DayCalib
mos cal ScreenFlat
mos cal Arc
mos cal DayCalib
VIMOS MOS STD
VIMOS MOS STD
VIMOS mos cal Specphot
-same as DayCalib -
VIMOS IFU STD
- same as DayCalib -
VIMOS IMG STD
VIMOS IMG SKY
VIMOS IMG BIAS
VIMOS IMG DARK
VIMOS SPEC BIAS
VIMOS SPEC DARK
VIMOS IMG LAMP
VIMOS IFU LAMP
VIMOS IFU WAVE
- same as Arc and ScreenFlat VIMOS MOS LAMP
VIMOS MOS WAVE
- same as Arc and ScreenFlat -
VIMOS MOS OBS
VIMOS IFU OBS
VIMOS IMG OBS
VIMOS IMG OBS
VIMOS MOS SLIT
VIMOS MOS SLIT
VIMOS MOS SLIT
- no images created -
- no images created -
- no images created -
- no images created -
- no images created -
- no images created -
Prefix of image name
VIMOS mos cal Standard
VIMOS mos cal NightCalib
VIMOS ifu cal Specphot
VIMOS ifu cal NightCalib
VIMOS ifu cal TwFlat
VIMOS img cal Astrom
VIMOS img cal Photom
VIMOS img cal FlatSky
NIGHTIME CALIBRATION OBSERVATIONS
Attached flats and arcs in MOS mode (no specification of exposure times)
IFU observation of spectro photometric standard star
VIMOS mos obs Offset
VIMOS ifu obs Offset
VIMOS img obs Offset
VIMOS img obs Offset
DAYTIME CALIBRATION OBSERVATIONS
Attached flats and arcs in IFU mode (no specification of exposure times)
IFU twilight flat field (telecope at zenith, no tracking)
Imaging observations of astrometric standard field
Imaging observations of photometric standards
Imaging skyflats poiting to empty fields
Bias frame in IMG mode
Dark frame in IMG mode
Bias frame in IFU or MOS mode
Dark frame in IFU or MOS mode
Imaging screen flats
IFU Screen flats (specify exposure time)
IFU Screen arcs (specify exposure time)
IFU Screen flats and arcs (no specification of exposure time)
MOS Screen flats (specify exposure time)
MOS Screen arcs (specify exposure time)
MOS Screen arcs (specify exposure time)
Observation in MOS mode
Observation in IFU mode
Observation in IMG mode: pre-imaging
SCIENCE OBSERVATIONS
VIMOS mos acq Specphot
Acquisition for mos standard observation specifying the mask
Observation in IMG mode
VIMOS mos acq Standard
VIMOS mos acq Mask
VIMOS ifu acq Preset
VIMOS ifu acq Preset
None (at zenith)
VIMOS img acq Preset
VIMOS img acq Preset
VIMOS img acq FlatSky
ACQUISITIONS
Name of template
Acquisition for mos standard observation without specifying the mask
Acquisition for mos science observation
Acquisition for ifu specphot standard
Acquisition for ifu science observation
Acquisition for ifu twilight flat
Acquisition for imaging standard obs
Acquisition for imaging science obs
Acquisition for imaging sky flat
What needs to be done
MOS
MOS
MOS
IFU
IFU
IMAGE
IMAGE
IMAGE
IMAGE
IMAGE
IMAGE
IMAGE
IFU
IFU
IFU
MOS
MOS
MOS
MOS
IFU
IMAGE,PRE
IMAGE
IMAGE
IMAGE
IMAGE
TECH
STD
STD
- same -
STD
- same -
STD
FLAT,SKY
BIAS
DARK
BIAS
DARK
FLAT,LAMP
FLAT,LAMP
WAVE,LAMP
- same FLAT,LAMP
WAVE,LAMP
- same -
OBJECT
OBJECT
OBJECT
OBJECT
SLIT,OBJECT
SLIT,OBJECT
SLIT,OBJECT
TYPE
CALIB
CALIB
CALIB
CALIB
CALIB
CALIB
CALIB
CALIB
CALIB
CALIB
CALIB
CALIB
CALIB
CALIB
CALIB
CALIB
CALIB
CALIB
SCIENCE
SCIENCE
SCIENCE
SCIENCE
ACQUISITION
ACQUISITION
ACQUISITION
CATG
VLT-MAN-ESO-14610-3509
√
√
√
√
√
√
√
√
√
√
√
√
√
√
√
√
√
√
√
√
√
√
VIMOS User Manual
39
40
VIMOS User Manual
4.5
Acquisition templates
4.5.1
VIMOS img acq Preset
VLT-MAN-ESO-14610-3509
VIMOS img acq Preset.tsf
To be specified:
Parameter
INS.FILT.NAME
TEL.AG.GUIDESTAR
Hidden
no
no
TEL.GS1.ALPHA
TEL.GS1.DELTA
TEL.GS1.PPOS
no
no
no
Range (Default)
U B V R I z Free (NODEFAULT)
SETUPFILE
CATALOGUE
(CATALOGUE)
0..240000 (0)
-900000..900000 (0)
POS NEG (POS)
TEL.ROT.OFFANGLE
TEL.TARG.ADDVELALPHA
TEL.TARG.ADDVELDELTA
TEL.TARG.ALPHA
TEL.TARG.DELTA
TEL.TARG.EPOCH
TEL.TARG.EQUINOX
TEL.TARG.OFFSETALPHA
TEL.TARG.OFFSETDELTA
TEL.TARG.PMA
TEL.TARG.PMD
Fixed values:
Parameter
INS.MODE
SEQ.PRESET
no
yes
yes
no
no
no
no
no
no
no
no
-180..180” (90)
-15..15 (0)
-15..15 (0)
()
()
-2000..3000 (2000)
-2000..3000 (2000)
-3600000..3600000 (0.)
-3600000..3600000 (0.)
-10..10 (0)
-10..10 (0)
Hidden
no
no
Value
IMG
T
Label
Filter
Get Guide Star from
Guide Star RA
Guide Start DEC
Selected probe position (POS
NEG)
Rotator on sky
Additional Velocity RA
Additional Velocity DEC
Epoch
Equinox
Alpha offset
Delta offset
Proper Motion Alpha
Proper Motion Delta
Label
Instrument Mode
Preset Telescope ? (T/F)
This template is used for acquisition of a field in imaging mode, for both imaging and pre-imaging OBs.
Figure 4.1 shows the P2PP window with an example of a pre-imaging Observing Block (OB).
The coordinates of the target have to be entered in the Target window at the bottom of the P2PP window.
The parameters for this template are the following:
• Filter. This filter should be the same as for the subsequent imaging template. The available filters
are: U, B, V, R, I, z.
• Rotator on sky. This parameter defines the orientation of the instrument on sky. For pre-imaging
templates this parameter should be set either to 0◦ (if declination δ lies in -45◦ < δ <-5◦ ) or to
90◦ (for any declination), unless a waiver is requested. The orientation corresponding to 90◦ is such
that the slits will be oriented N-S for the spectroscopic follow-up.
• Alpha offset and Delta offset. These are optional additional offsets in alpha and delta added
to the coordinates of the object specified in the target panel at the bottom of the main p2pp window.
The coordinates at the center of the instrument (i.e. the central point between the four quadrants) are
the coordinates specified in the Target Package plus the offsets here specified.
• Get Guide Star From. Two options are offered for this parameter:
– CATALOGUE. This is the default option for which the guide star will be searched through a
catalog and will be selected at the telescope by the Telescope Operator. If this option is selected
the subsequent fields (Guide Star RA / DEC) will be ignored.
VIMOS User Manual
VLT-MAN-ESO-14610-3509
41
Figure 4.1: P2PP: example of a pre-imaging OB
– SETUPFILE. If this option is selected, the guide star that will be used is the one for which the
coordinates are defined in the (Guide Star RA / DEC) fields. A dedicated tool (Guidecam)
is delivered by ESO to help the users to determine the best possible guide star. This option is
mandatory for service mode imaging and pre-imaging OBs.
• Guide Star RA and Guide Star DEC. Coordinates of the guide star when the SETUPFILE
option of the (Get Guide Star From) field is selected.
• Guide Star PPOS. Position of the Guide Probe when the SETUPFILE option of the (Get Guide
Star From) field is selected.
• Optional additional velocity (moving targets) in alpha and delta (Additional Velocity RA and
Additional Velocity DEC). This velocity should be expressed in arcsec/sec. These parameters are mostly intended for imaging or possibly IFU programmes of moving targets. If no additional
velocity is needed, these parameters should be left to their default values (0.).
42
VIMOS User Manual
4.5.2
VLT-MAN-ESO-14610-3509
VIMOS img acq FlatSky
VIMOS img acq FlatSky.tsf
To be specified:
Parameter
INS.FILT.NAME
TEL.GS1.PPOS
Hidden
no
no
Range (Default)
U B V R I z Free (NODEFAULT)
POS NEG (POS)
TEL.ROT.OFFANGLE
TEL.ROTATIO
no
no
-180..180” (0.)
SKY ABSOLUTE (SKY)
TEL.TARG.ADDVELALPHA
TEL.TARG.ADDVELDELTA
TEL.TARG.ALPHA
TEL.TARG.DELTA
TEL.TARG.EPOCH
TEL.TARG.EQUINOX
TEL.TARG.OFFSETALPHA
TEL.TARG.OFFSETDELTA
TEL.TARG.PMA
TEL.TARG.PMD
Fixed values:
Parameter
DET.READ.MODE
INS.MODE
SEQ.PRESET
yes
yes
no
no
no
no
no
no
no
no
-15..15 (0)
-15..15 (0)
()
()
-2000..3000 (2000)
-2000..3000 (2000)
-3600000..3600000 (0.)
-3600000..3600000 (0.)
-10..10 (0)
-10..10 (0)
Hidden
no
no
no
Value
Medium
IMG
T
Label
Filter
Selected probe position (POS
NEG)
Rotator angle
Rotator angle mode (SKY ABSOLUTE)
Additional Velocity RA
Additional Velocity DEC
Epoch
Equinox
Alpha offset
Delta offset
Proper Motion Alpha
Proper Motion Delta
Label
Readout mode
Instrument Mode
Preset Telescope ? (T/F)
This template is used to preset telescope to acquire an empty field to obtain twilight flat field exposures. It
differ from the normal imaging acquisition in its handling of guiding and active optics which are impossible
during twilight. Only offered in visitor mode.
The coordinates of the empty field have to be entered in the Target window at the bottom of the P2PP
window.
• Filter. The available filters are: U, B, V, R, I, z.
• Rotator angle. The rotator angle at which the frames will be obtained. For normal use this is the
angle on the sky.
• Rotator angle mode. Whether the rotator angle refers to angles on sky or to absolute adapter
rotator value. These last option is for tests only and should not be used by visitors.
VIMOS User Manual
4.5.3
VLT-MAN-ESO-14610-3509
43
VIMOS mos acq Mask
VIMOS mos acq Mask.tsf
To be specified:
Parameter
DET.WIN1.UIT1
INS.ADM1
INS.ADM2
INS.ADM3
INS.ADM4
INS.ADP1
INS.ADP2
INS.ADP3
INS.ADP4
INS.FILT.NAME
INS.MASK1.ID
INS.MASK1.NO
INS.MASK2.ID
INS.MASK2.NO
INS.MASK3.ID
INS.MASK3.NO
INS.MASK4.ID
INS.MASK4.NO
TEL.TARG.ADDVELALPHA
TEL.TARG.ADDVELDELTA
TEL.TARG.ALPHA
TEL.TARG.DELTA
TEL.TARG.EPOCH
TEL.TARG.EQUINOX
TEL.TARG.PMA
TEL.TARG.PMD
Fixed values:
Parameter
DET.READ.MODE
DET.WIN1.BINX
DET.WIN1.BINY
INS.MODE
SEQ.PRESET
Hidden
no
yes
yes
yes
yes
no
no
no
no
no
Range (Default)
1..100000 (NODEFAULT)
yes
yes
yes
yes
yes
yes
yes
yes
yes
yes
no
no
no
no
no
no
U B V R I z OS-blue OS-red
GG475 GG435 Free (NODEFAULT)
100000..499999 -99 (-99)
0..15 -99 (-99)
100000..499999 -99 (-99)
0..15 -99 (-99)
100000..499999 -99 (-99)
0..15 -99 (-99)
100000..499999 -99 (-99)
0..15 -99 (-99)
-15..15 (0)
-15..15 (0)
()
()
-2000..3000 (2000)
-2000..3000 (2000)
-10..10 (0)
-10..10 (0)
Hidden
no
no
no
no
no
Value
Medium
1
1
MOS
T
Label
Exposure time (seconds)
ADM File 1
ADM File 2
ADM File 3
ADM File 4
ADP File 1
ADP File 2
ADP File 3
ADP File 4
Filter
Mask ID
Cabinet Slot No
Mask ID
Cabinet Slot No
Mask ID
Cabinet Slot No
Mask ID
Cabinet Slot No
Additional Velocity RA
Additional Velocity DEC
Epoch
Equinox
Proper Motion Alpha
Proper Motion Delta
Label
Readout mode
X binning factor
Y binning factor
Instrument Mode
Preset Telescope ? (T/F)
This template is used for the acquisition of a field to be observed in MOS mode. Note that the acquisition
image covers only the central 2048×2400 pixels of each of the 4 CCDs, whereas the spectroscopic images
use the full CCD size (2048×4096 pixels).
Preparing a MOS acquisition template requires that masks have been prepared with VMMPS. The output
of VMMPS are ‘Aperture Definition Files in Pixels’ (ADP files). Information concerning the target (coordinates and equinox) are taken from the ADP files and are automatically loaded in the P2PP target package
when including the first ADP file in the template.
Figure 4.2 shows the P2PP window with an example of a MOS Acquisition.
The parameters specific to this template are:
44
VIMOS User Manual
VLT-MAN-ESO-14610-3509
Figure 4.2: P2PP: Example of a MOS OB
• Exposure time in (seconds). This is the integration time for the acquisition image that will
be taken through the mask to check the position of the reference stars and of the science target. A typical
value is 60s, depending on the brightness of the reference stars defined with VMMPS.
• Filter. This filter is the one to be used for the acquisition image. It is highly recommended to
choose the same filter as the one used for the pre-imaging: R.2
• Optional additional velocity (moving targets) in alpha and delta (Additional Velocity RA and
Additional Velocity DEC). This velocity should be expressed in arcsec/sec. These parameters
are mostly intended for imaging and possibly IFU programmes of moving targets and a priori unlikely
to be of much use in MOS mode. If no additional velocity is needed, these parameters should be left to
their default values.
• ADP files 1 to ADP file 4. These 4 parameters are the names of the ADP files produced by
VMMPS. The files 1 to 4 correspond to the 4 quadrants of the instrument and should be set in the right
order. When selecting an ADP file entry in P2PP, a browser window opens up allowing to locate the file
on the local disk. This window is presented in Figure 4.3.
2
The available filters are: U, B, V, R, I, z, OS-blue, OS-red, GG435, GG475 and no filter, Free.
VIMOS User Manual
VLT-MAN-ESO-14610-3509
Figure 4.3: P2PP: VIMOS ADP browser window.
45
46
4.5.4
VIMOS User Manual
VLT-MAN-ESO-14610-3509
VIMOS mos acq Standard
VIMOS mos acq Standard.tsf
To be specified:
Parameter
DET.WIN1.UIT1
INS.ADM1
INS.ADM2
INS.ADM3
INS.ADM4
INS.ADP1
INS.ADP2
INS.ADP3
INS.ADP4
INS.FILT.NAME
INS.MASK1.ID
INS.MASK1.NO
INS.MASK2.ID
INS.MASK2.NO
INS.MASK3.ID
INS.MASK3.NO
INS.MASK4.ID
INS.MASK4.NO
TEL.TARG.ADDVELALPHA
TEL.TARG.ADDVELDELTA
TEL.TARG.ALPHA
TEL.TARG.DELTA
TEL.TARG.EPOCH
TEL.TARG.EQUINOX
TEL.TARG.PMA
TEL.TARG.PMD
Fixed values:
Parameter
DET.READ.MODE
DET.WIN1.BINX
DET.WIN1.BINY
INS.MODE
SEQ.HEADER
SEQ.PRESET
TEL.AG.GUIDESTAR
TEL.ROT.OFFANGLE
Hidden
no
yes
yes
yes
yes
yes
yes
yes
yes
no
Range (Default)
1..100000 (NODEFAULT)
yes
yes
yes
yes
yes
yes
yes
yes
yes
yes
no
no
no
no
no
no
U B V R I z OS-blue OS-red
GG475 GG435 Free (NODEFAULT)
100000..499999 -99 (-99)
0..15 -99 (-99)
100000..499999 -99 (-99)
0..15 -99 (-99)
100000..499999 -99 (-99)
0..15 -99 (-99)
100000..499999 -99 (-99)
0..15 -99 (-99)
-15..15 (0)
-15..15 (0)
()
()
-2000..3000 (2000)
-2000..3000 (2000)
-10..10 (0)
-10..10 (0)
Hidden
no
no
no
no
no
no
no
no
Value
Medium
1
1
MOS
F
T
CATALOGUE
90
Label
Exposure time (seconds)
ADM File 1
ADM File 2
ADM File 3
ADM File 4
ADP File 1
ADP File 2
ADP File 3
ADP File 4
Filter
Mask ID
Cabinet Slot No
Mask ID
Cabinet Slot No
Mask ID
Cabinet Slot No
Mask ID
Cabinet Slot No
Additional Velocity RA
Additional Velocity DEC
Epoch
Equinox
Proper Motion Alpha
Proper Motion Delta
Label
Readout mode
X binning factor
Y binning factor
Instrument Mode
Header type
Preset Telescope ? (T/F)
Get Guide Star from
Rotator on sky
This template is used for the acquisition in mode MOS, using the specially designed set of calibrations
masks provided by Paranal. This set of masks contains a series of slits of different width that can be used for
all calibrations that requires the use of a standard star (i.e spectrophotometric, radial velocity or metallicity
standard). Since the template is using a pre-defined set of masks no ADP need to be provided by the user. No
reference stars are used for the acquisition.
IMPORTANT: the coordinates of the standard star should be accurate to better than 100 , including
proper motion effects; the star has to be visible within a 1000 ×1000 acquisition box;
VIMOS User Manual
VLT-MAN-ESO-14610-3509
47
Note: the coordinates of the standard star should be set by the user in the target sub-window in
P2PP;
Note: the rotator angle is fixed for this template at 90◦ corresponding to the set of slits in the masks
oriented along the N-S direction.
The parameters of the template are:
• Exposure time (seconds). This is the integration time for the acquisition image that will be
taken through the mask to check its positioning.
• Filter. This filter is the one to be used for the acquisition image. It is recommended to choose the
right combination filter/exptime to avoid the saturation of the star in the acquisition image
The available filters are: U, B, V, R, I, z, OS-blue, OS-red, GG435, GG475 and no filter.
• Optional additional velocity (moving targets) in alpha and delta (Additional Velocity RA and
Additional Velocity DEC). This velocity should be expressed in arcsec/sec. These parameters
are mostly intended for imaging and possibly IFU programs of moving targets and a priori unlikely to
be of much use in MOS mode. If no additional velocity is needed, these parameters should be left to
their default values.
48
VIMOS User Manual
4.5.5
VLT-MAN-ESO-14610-3509
VIMOS ifu acq Preset
VIMOS ifu acq Preset.tsf
To be specified:
Parameter
INS.FILT.NAME
Hidden
no
INS.GRIS.NAME
no
INS.IFUE.NAME
INS.IFUS.MODE
TEL.AG.GUIDESTAR
no
no
no
TEL.GS1.ALPHA
TEL.GS1.DELTA
TEL.ROT.OFFANGLE
TEL.TARG.ADDVELALPHA
TEL.TARG.ADDVELDELTA
TEL.TARG.ALPHA
TEL.TARG.DELTA
TEL.TARG.EPOCH
TEL.TARG.EQUINOX
TEL.TARG.OFFSETALPHA
TEL.TARG.OFFSETDELTA
TEL.TARG.PMA
TEL.TARG.PMD
Fixed values:
Parameter
INS.MODE
SEQ.PRESET
Label
Filter
no
no
no
yes
yes
no
no
no
no
no
no
no
no
Range (Default)
U B V R I z OS-blue OS-red
GG475 GG435 Free (NODEFAULT)
LR blue
LR red
HR blue
HR red
HR orange
MR
(NODEFAULT)
0.33 0.67 (0.67)
T F (F)
SETUPFILE
CATALOGUE
(CATALOGUE)
0..240000 (0)
-900000..900000 (0)
-180..180” (0.)
-15..15 (0)
-15..15 (0)
()
()
-2000..3000 (2000)
-2000..3000 (2000)
-3600000..3600000 (0.)
-3600000..3600000 (0.)
-10..10 (0)
-10..10 (0)
Hidden
no
no
Value
IFU
T
Label
Instrument Mode
Preset Telescope ? (T/F)
Grism
IFU Magnification (arcsec/fiber)
IFU Shutter
Get Guide Star from
Guide Star RA
Guide Start DEC
Rotator on sky
Additional Velocity RA
Additional Velocity DEC
Epoch
Equinox
Alpha offset
Delta offset
Proper Motion Alpha
Proper Motion Delta
This template is for the acquisition of a field to be observed with the Integral Field Unit. Unlike the MOS
acquisition template, the IFU acquisition template requires to define the filter / grism combination that will be
used in the following observation template. This is to optimize the setup of the instrument at acquisition time.
The coordinates of the field at the center of the IFU need to be entered in the Target Package at the bottom
left of the main P2PP window.
The parameters for this template are:
• Filter. This should be the same filter as the one used in the first observation template following this
acquisition template. In order to produce a valid OB, the filter in the first observation template
following this acquisition template should be the same. The available filters are: U, B, V, R, I, z,
OS-blue, OS-red, GG435, GG475 and no filter.
Only standard filter / grism combinations are allowed, as indicated in Table 2.5. Other combinations should be requested with a waiver.
• Grism. This is the grism that is used in the first observation template following this acquisition template. In order to produce a valid OB, the grism in the first observation template following this
acquisition template should be the same.
The available grisms are: LR blue, LR red, MR, HR blue, HR orange, HR red.
VIMOS User Manual
VLT-MAN-ESO-14610-3509
49
• IFU Magnification. This parameter defines the sampling, and correspondingly the field of view
of the IFU. The 2 available samplings are 0.67 arcsec/fiber and 0.33 arcsec/fiber. To produce a valid
OB, the magnification should be the same in every template of the OB. Observations requiring
different samplings on the same field should resort to several OBs.
• IFU Shutter. This parameter is only meaningful when using the LR grisms. In LR spectroscopy,
there are 4 rows of fibers along the dispersion direction, whereas in MR and HR modes only one ’slit’
of fibers is used, hence the variation of field of view between LR and MR and HR modes. In case the
object of interest is of limited size in LR mode, and if only the central 1/4 × 1/4 of the field of view is
needed, it is possible with the IFU Shutter option to mask the outer part of the IFU (always masked
in MR and HR modes). This allows to avoid second order overlap due to sky and / or background
objects between the 4 adjacent slits along the dispersion direction. True means that the shutter is in
place and masks the external part of the IFU, False (the default value) means that the mask is not in
place and the full IFU field of view is available. To produce a valid OB, the mask shutter option
should be the same in every template of the OB. This parameter is ignored when MR or HR grisms
are used.
• Rotator on Sky. This parameter defines the orientation of the instrument on sky. The IFU has a
square geometry with the sides oriented N-S and E-W. With a rotator angle of zero the orientation of
the IFU on the sky is with the North up and the East to the left. The increasing (positive) position angle
on the sky (east of north) corresponds to the positive rotator angle. Therefore the value of this keyword
should be equal to the desired position angle (PA) on the sky (see Fig. 2.5).
• Optional additional offsets in alpha and delta (Alpha Offset and Delta offset) with respect
to the coordinates of the object. The coordinates at the center of the IFU are the coordinates specified
in the Target Package plus the offsets here specified. This can be useful e.g. to define small offsets
between the initial pointings on the same field over several OBs.
• Get Guide Star From. Two options are offered for this parameter:
– CATALOGUE. This is the default option for which the guide star will be searched through a
catalog and will be selected at the telescope by the Telescope Operator. If this option is selected
the subsequent fields (Guide Star RA / DEC) will be ignored. Given that the quasi-total
Nasmyth field of view is accessible to choose a guide star in IFU mode, the users can safely use
this option.
– SETUPFILE. If this option is selected, the guide star that will be used is the one for which
the coordinates are defined in the (Guide Star RA / DEC) fields. As indicated above, it is
unlikely that this option is required in IFU mode. Note that Guidecam tool is not intended to be
used to select guide stars for the IFU mode, but only for the IMG and MOS mode of VIMOS.
• Guide Star RA and Guide Star DEC. Coordinates of the guide star when the SETUPFILE
option of the Get Guide Star From field is selected.
• Optional additional velocity (moving targets) in alpha and delta (Additional Velocity RA and
Additional Velocity DEC) This velocity should be expressed in arcsec/sec. If no additional
velocity is needed, these parameters should be left to their default values.
50
VIMOS User Manual
4.6
4.6.1
VLT-MAN-ESO-14610-3509
Science templates
VIMOS img obs Offset
VIMOS img obs Offset.tsf
To be specified:
Parameter
DET.WIN1.UIT1
INS.FILT.NAME
SEQ.CATG
Hidden
no
no
no
SEQ.NEXPO
no
SEQ.NOFF
SEQ.OFFSET.COORDS
no
no
SEQ.OFFSET1.LIST
no
1..1000000 (NODEFAULT)
SKY DETECTOR (NODEFAULT)
(0)
SEQ.OFFSET2.LIST
no
(0)
SEQ.RETURN
Fixed values:
Parameter
DET.READ.MODE
DET.WIN1.BINX
DET.WIN1.BINY
INS.MODE
SEQ.HEADER
no
F T (T)
List of offsets (arcsec) in X or
RA
List of offsets (arcsec) in Y or
DEC
Return to Origin ? (T/F)
Hidden
no
no
no
no
no
Value
Medium
1
1
IMG
F
Label
Readout mode
X binning factor
Y binning factor
Instrument Mode
Header type
Range (Default)
1..100000 (NODEFAULT)
U B V R I z Free (NODEFAULT)
PRE-IMAGE SCIENCE TECHNICAL (SCIENCE)
1..1000000 (1)
Label
Exposure time (seconds)
Filter
Observation Category
Number of Exposures per Telescope Offset ?
Number of Telescope Offsets ?
Offset Coordinates?
This template is used for Imaging mode observation both for Science and Pre-imaging. The parameters
of this template are the following:
• Exposure time in (seconds). This is the integration time in seconds per exposure.
• Filter. The available filters are: U, B, V, R, I, z. In order to produce a valid OB the filter in
the first observation template following the acquisition template should be the same as the one
selected in the acquisition template. For pre-imaging the use of R filter is mandatory.
• Return to Origin? (T/F). This parameter defines whether or not, after a dithered set of observations, the telescope will return to the position at the beginning of template. As an example, this
parameter should be set to ’T’ when the aim of the OB is to execute multi-color imaging observations
with the same pattern of offsets on the same field using different templates. This parameter is in general
to be left to its default value (T) in service mode. If another value is desired in service mode a waiver
should be requested.
• Number of Telescope Offsets?. This parameter defines the number of telescope offsets during the template. The number of exposures taken at each telescope position is determined by the
next parameter (Number of exposures per telescope offset ?). The pattern of offsets is defined in the parameters (List of offsets (arcsec) in X or RA) and (List of
offsets (arcsec) in Y or DEC). Offsets are defined relative to the previous position.
• Number of exposures per telescope offset?. This parameter defines how many exposures are taken at each offset position.
VIMOS User Manual
VLT-MAN-ESO-14610-3509
51
• Offset coordinates?. This parameter defines the coordinate system used to define telescope
offsets. If the SKY option is selected, telescope offsets are in RA and DEC, if DETECTOR is selected,
telescope offsets are in X and Y on the detector. In both cases the offsets are given in arcsec.
• List of offsets (arcsec) in X or RA and List of offsets (arcsec) in Y or
DEC. List of offsets between exposures. Offsets are defined relative to the previous position. The offsets are defined in RA/DEC or X/Y on detector depending on which option is selected for the (Offset
coordinates) field. If the first image is to be taken at the preset coordinates, the first set of offsets
should be 0,0. If there are less offset values than the defined number of offset positions, the template
will return at the beginning of the list of offsets and apply them again.
IMPORTANT: We stress that, in contrast with other ESO instruments, the offsets defined by the
user in P2PP refer to the apparent movement of the target on the detector independently of the
choice of Offset coordinates (SKY or DETECTOR), and not to the offsets applied to the
telecope:
For example, if 5 telescopes offsets are defined (number of telescope offsets?) together with the following series of offsets (apparent movement of the target on the detector):
RA or X
DEC or Y
0
2
-10
7
-5
the offsets applied to the telescope will be:
RA or X
DEC or Y
0
-2
10
-7
5
-2
0
-7
10
-2
If SKY option for coordinates is selected, then after the preset the first offset will be applied to place
the target 2 arcsec North with respect to its previous position on the detector by moving the telescope 2
arcsec to the South (0 offset in RA). At this position the first exposure will be taken. After that the target
will be moved further 10 arcsec West and 7 arcsec North with respect to the position of the previous
exposure, etc. until the number of exposures is reached.
If DETECTOR option for coordinates is selected, then the directions of the offsets on sky depends on
the actual rotator angle. If we assume that the orientation is such that the positive x-axis points to the
East, and positive y-axis points to the North (see Figure 2.3) then: if the target falls at pixel x = 0,
y = 0, after the telescope preset then the first exposure will be taken with the target at pixels x = 0,
y = 10 (offset is 200 , which is approximately 10 pixels). In other words, the telescope was moved 10
pixels in the directions of the negative y axis of the detector. Then the target will move to the pixel
position x = −50 and y = 45 on the detector, which corresponds in this case (PA=0) to a movement
of the telescope of 1000 East and 700 South with respect to the previous position, etc., until the number of
exposures is reached.
If the rotator angle is different than zero, for example PA=-45, and the offset defined in P2PP are
RA or X
DEC or Y
0
0
2
0
0
5
-2
0
0
-5
0
-5
-2
0
0
5
then Figure 4.4 and Figure 4.5 give the performed offsets in the case of DETECTOR and SKY coordinates respectively.
52
VIMOS User Manual
VLT-MAN-ESO-14610-3509
• Observation Category. PRE-IMAGE is for a pre-imaging program, SCIENCE is for a regular
science imaging program. Never choose TECHNICAL.
It is critical that users define PRE-IMAGE for pre-imaging programs. Failure to do so will result
in slow processing and delivery (possibly till the end of the period) of the data.
Figure 4.4: Illustration of the VIMOS img obs Offset template. The black dots represent the position of a
star, which was originally at the center of the field. In this example the DETECTOR option is selected, and
the star (not the telescope) is moved in X and Y according to the list of offsets.
Figure 4.5: Illustration of the VIMOS img obs Offset template. The black dots represent the position of
a star, which was originally at the center of the field. In this example, the SKY option is selected, and the
telescope is moved in RA and DEC in the opposite direction of the offsets in the list so that the star moves in
RA/DEC according to the offset list.
VIMOS User Manual
4.6.2
VLT-MAN-ESO-14610-3509
53
VIMOS mos obs Offset
VIMOS mos obs Offset.tsf
To be specified:
Parameter
DET.WIN1.UIT1
INS.FILT.NAME
Hidden
no
no
INS.GRIS.NAME
no
SEQ.CATG
no
SEQ.NEXPO
no
Range (Default)
1..100000 (NODEFAULT)
U B V R I z OS-blue OS-red
GG475 GG435 Free (NODEFAULT)
LR blue
LR red
HR blue
HR red
HR orange
MR
(NODEFAULT)
SCIENCE TECHNICAL (SCIENCE)
1..1000000 (1)
SEQ.NOFF
SEQ.OFFSET1.LIST
no
no
1..1000000 (NODEFAULT)
(NODEFAULT)
SEQ.OFFSET2.LIST
no
(0)
SEQ.RETURN
Fixed values:
Parameter
DET.READ.MODE
DET.WIN1.BINX
DET.WIN1.BINY
INS.MODE
SEQ.HEADER
no
F T (T)
Number of Exposures per Telescope Offset ?
Number of Telescope Offsets ?
List of offsets (arcsec) along the
slit
List of offsets (arcsec) perpendicular to the slit
Return to Origin ? (T/F)
Hidden
no
no
no
no
no
Value
Medium
1
1
MOS
F
Label
Readout mode
X binning factor
Y binning factor
Instrument Mode
Header type
Label
Exposure time (seconds)
Filter
Grism
Observation Category
The parameters of this template are:
• Exposure time in (seconds). This is the integration time in seconds per exposure.
• Filter. The available filters are: U, B, V, R, I, z, OS-blue, OS-red, GG435, GG475 and no filter.
The standard grism / filter configurations are given in Table 2.5.
Only standard filter / grism combinations are allowed, as indicated in Table 2.5. Other combinations should be requested with a waiver.
• Grism. The available grisms are: LR blue, LR red, MR, HR blue, HR orange, HR red.
• Return to Origin? (T/F). This parameter defines whether or not, after a dithered set of observations, the telescope will return at the position at beginning of the template. This parameter is in
general to be left in the default value (T) in service mode. If another value is desired in service
mode a waiver should be requested.
• Number of Telescope Offsets?. This parameter defines the number of telescope offsets during the template. The number of exposures taken at each telescope position is determined by the
next parameter (Number of exposures per telescope offset ?). The pattern of offset
is defined in the List of offsets (arcsec) along the slit and List of offsets
(arcsec) perpendicular to the slit parameters.
• Number of exposures per telescope offset?. This parameter defines how many exposures are taken at each offset position.
54
VIMOS User Manual
VLT-MAN-ESO-14610-3509
• List of offsets (arcsec) along the slit and List of offsets (arcsec)
perpendicular to the slit. Offsets are defined relative to the previous position. Offsets are
defined in DETECTOR coordinates, along or perpendicular to the slits. Usually, only offsets along the
slits need to be defined. If the first image is to be taken at the preset coordinates, the first set of offset
should be 0,0. If there are less offset values than the required number of offset position, the template
will return at the beginning of the list of offsets and apply them again.
For example, if 3 telescope offsets are defined (Number of Telescope Offsets?) together
with the following series of offsets (apparent movement of the target on the detector):
List of offsets (arcsec) along the slit
List of offsets (arcsec) perpendicular to the slit
-1
0
2
0
the offsets applied to the telescope will be:
Offsets (arcsec) along the slit
Offsets (arcsec) perpendicular to the slit
1
0
-2
0
0
0
(i.e., the first exposure is taken at −100 from the pointing position along the slit, then the second exposure
is taken 200 up along the slit with respect to the previous exposure, and the third exposure is taken at the
same position as the second.)
• Observation Category. SCIENCE is for a regular science MOS program. Never choose TECHNICAL.
VIMOS User Manual
4.6.3
VLT-MAN-ESO-14610-3509
55
VIMOS ifu obs Offset
VIMOS ifu obs Offset.tsf
To be specified:
Parameter
DET.WIN1.UIT1
INS.FILT.NAME
Hidden
no
no
INS.GRIS.NAME
no
INS.IFUE.NAME
INS.IFUS.MODE
SEQ.CATG
no
no
no
SEQ.NEXPO
no
Range (Default)
1..100000 (NODEFAULT)
U B V R I z OS-blue OS-red
GG475 GG435 Free (NODEFAULT)
LR blue
LR red
HR blue
HR red
HR orange
MR
(NODEFAULT)
0.33 0.67 (0.67)
T F (F)
SCIENCE TECHNICAL (SCIENCE)
1..1000000 (1)
SEQ.NOFF
SEQ.OFFSET1.LIST
SEQ.OFFSET2.LIST
SEQ.RETURN
Fixed values:
Parameter
DET.READ.MODE
DET.WIN1.BINX
DET.WIN1.BINY
INS.MODE
SEQ.HEADER
SEQ.OFFSET.COORDS
no
no
no
no
1..1000000 (NODEFAULT)
(0)
(0)
F T (T)
Number of Exposures per Telescope Offset ?
Number of Telescope Offsets ?
List of offsets (arcsec) in RA
List of offsets (arcsec) in DEC
Return to Origin ? (T/F)
Hidden
no
no
no
no
no
no
Value
Medium
1
1
IFU
F
SKY
Label
Readout mode
X binning factor
Y binning factor
Instrument Mode
Header type
Offset Coordinate?
Label
Exposure time (seconds)
Filter
Grism
IFU Magnification (arcsec/fiber)
IFU Shutter
Observation Category
This template is to be used for observation with the Integral Field Unit. The parameters of this template
are:
• Exposure time in (seconds). This is the integration time in seconds per exposure.
• Filter. The available filters are: U, B, V, R, I, z, OS-blue, OS-red, GG435, GG475 and no filter.
Only standard filter / grism combinations are allowed, as indicated in Table 2.5. Other combinations should be requested with a waiver.
• Grism. The available grisms are: LR blue, LR red, MR, HR blue, HR orange, HR red.
In order to produce a valid OB the filter and the grism in the first observation template following
the acquisition template should be the same as the one selected in the acquisition template.
• IFU Magnification. This parameter defines the sampling, and correspondingly the field of view
of the IFU. The 2 available samplings are 0.67 arcsec/fiber and 0.33 arcsec/fiber.
To produce a valid OB, the magnification should be the same in every template of the OB.
• IFU Shutter. This parameter is only meaningful when using the LR grisms. In LR spectroscopy,
there are 4 rows of fibers along the dispersion direction, whereas in MR and HR modes only one ’slit’
of fibers is used, hence the variation of field of view between LR and MR and HR modes. In case the
56
VIMOS User Manual
VLT-MAN-ESO-14610-3509
object of interest is of limited size in LR mode, and if only the central 1/4 × 1/4 of the field of view is
needed, it is possible with the IFU Shutter option to mask the outer part of the IFU (always masked
in MR and HR modes). This allows to avoid second order overlap due to sky and / or background
objects between the 4 adjacent slits along the dispersion direction. True means that the shutter is in
place and masks the external part of the IFU, False (the default value) means that the mask is not in
place and the full IFU field of view is available. To produce a valid OB, the mask shutter option
should be the same in every template of the OB. This parameter is ignored when MR or HR grisms
are used.
• Return to Origin? (T/F). This parameter defines whether or not, after a dithered set of observations, the telescope will return to the reference position. This parameter is in general to be left in
the default value (T) in service mode. If another value is desired in service mode a waiver should be
requested.
• Number of Telescope Offsets?. This parameter defines the number of telescope offsets during the template. The number of exposures taken at each telescope position is determined by the
next parameter (Number of exposures per telescope offset ?). The pattern of offset
is defined in the List of offsets (arcsec) CORRECT LABEL and List of offsets
(arcsec) CORRECT LABEL parameters.
• Number of exposures per telescope offset?. This parameter defines how many exposures are taken for each offset position.
• List of offsets (arcsec) List of offsets between exposures. Offsets are defined relative to
the previous position. The offsets are defined in RA/DEC. If the first image is to be taken at the preset
coordinates, the first set of offsets should be 0,0. If there are less offset values than the defined number
of offset positions, the template will return at the beginning of the list of offsets and apply them again.
For example, if 5 telescope offsets are defined (Number of Telescope Offsets?) together
with the following series of offsets ( apparent movement of the target on the detector in RA/DEC):
RA
DEC
0
0
-10
5
-5
10
the offsets applied to the telescope will be (see also Sect. 4.6.1):
RA
DEC
0
0
10
-5
5
-10
0
0
10
-5
• Observation Category. SCIENCE is for a regular science IFU program. Never choose TECHNICAL.
VIMOS User Manual
VLT-MAN-ESO-14610-3509
4.7
Calibration Templates
4.7.1
VIMOS img cal FlatSky
57
VIMOS img cal FlatSky.tsf
To be specified:
Parameter
INS.FILT.NAME
SEQ.EXPLEVEL
SEQ.NEXPO
SEQ.OFFSET1.LIST
Hidden
no
no
no
no
Range (Default)
U B V R I z Free (NODEFAULT)
200..40000 (10000)
1..1000000 (1)
(0)
SEQ.OFFSET2.LIST
no
(0)
TEL.ROT.OFFANGLE
TEL.ROTATIO
no
no
-180..180” (0.)
NONE ABSOLUTE (NONE)
Fixed values:
Parameter
DET.READ.MODE
DET.WIN1.BINX
DET.WIN1.BINY
INS.MODE
SEQ.HEADER
SEQ.NOFF
Hidden
no
no
no
no
no
no
Value
Medium
1
1
IMG
F
1
Label
Filter
Exposure Level
Number of exposure?
List of offsets (arcsec) in X or
RA
List of offsets (arcsec) in Y or
DEC
Rotator angle
Rotator angle mode (SKY ABSOLUTE)
Label
Readout mode
X binning factor
Y binning factor
Instrument Mode
Header type
Number of Telescope Offsets ?
This template takes SEQ.NEXPO, dithered, sky flat frames. The user can specify the desired exposure
level. Offered only in visitor mode.
The parameters of this template are:
• Exposure Level (ADU). This is the desired exposure level which the template will attempt to
keep constant.
• Filter. The available filters are: U, B, V, R, I, z.
• Number of exposures?. This parameter defines how many exposures are taken. The telescope
should be offseted between exposures.
• List of offsets. These parameters are used to specify offsets, in arcsecond, in SKY coordinates.
The offsets should be large enough so that halos of bright stars do not affect the data (we attempt to use
only empty fields, buth the VIMOS FoV is large so sometime this is not possible. The offsets should be
at least 15” in size.
• Rotator angle. The rotator angle at which the frames will be obtained. For normal use this is the
angle on the sky.
• Rotator angle mode. Whether the rotator angle refers to angles on sky or to absolute adapter
rotator value. These last option is for tests only and should not be used by visitors.
58
VIMOS User Manual
4.7.2
VLT-MAN-ESO-14610-3509
VIMOS img cal Photom
VIMOS img cal Photom.tsf
To be specified:
Parameter
DET.WIN1.UIT1
INS.FILT.NAME
SEQ.CAL.FLAG
SEQ.NEXPO
Hidden
no
no
no
no
Range (Default)
1..100000 (NODEFAULT)
U B V R I z Free (NODEFAULT)
1 4 (1)
1..1000000 (1)
Label
Exposure time (seconds)
Filter
1 or 4 quadrants?
Number of Exposures per Telescope Offset ?
Fixed values:
Parameter
DET.READ.MODE
DET.WIN1.BINX
DET.WIN1.BINY
INS.MODE
SEQ.HEADER
Hidden
no
no
no
no
no
Value
Medium
1
1
IMG
F
Label
Readout mode
X binning factor
Y binning factor
Instrument Mode
Header type
This template is for acquisition of photometric data (zero points) in Imaging mode. The acquisition
template to use with this template is VIMOS img acq Preset. The coordinates to define in the acquisition
template are those of the standard star / field. Offsets from these coordinates to position the star / field in one
or the four quadrants of the instrument will be applied automatically by the template.
The parameters of this template are:
• Exposure time (seconds). This is the integration time in seconds per exposure.
• Filter. The available filters are: U, B, V, R, I, z. To produce a valid calibration OB the filter in
the first observation template following the acquisition template should be the same as the one in
the acquisition template.
• Number of exposures per telescope offset ?. This parameter defines how many exposures are taken at each offset position (1 or 4).
• 1 or 4 quadrants. This parameter allows to define if the standard star image will be taken in 1 or
4 quadrants. If the 1 quadrant option is selected, the standard star field will be positioned in only one
quadrant by applying an appropriate offset from the coordinates of the star / field defined in the target
package of the acquisition template.
If the 4 quadrant option is selected, the standard star field will be positioned sequentially in the 4
quadrants by applying the appropriate offsets from the coordinates of the star / field defined in the target
package of the acquisition template.
As many exposures as defined in (Number of exposures per telescope offset ?) will
be taken at each telescope position (1 or 4).
At the end of the template the telescope will offset again to return to its position at the beginning of the
template.
VIMOS User Manual
4.7.3
VLT-MAN-ESO-14610-3509
59
VIMOS img cal Astrom
VIMOS img cal Astrom.tsf
To be specified:
Parameter
DET.WIN1.UIT1
INS.FILT.NAME
SEQ.CAL.FLAG
SEQ.NEXPO
Hidden
no
no
no
no
Range (Default)
1..100000 (NODEFAULT)
U B V R I z Free (NODEFAULT)
1 4 (1)
1..1000000 (1)
Label
Exposure time (seconds)
Filter
1 or 4 quadrants?
Number of Exposures per Telescope Offset ?
Fixed values:
Parameter
DET.READ.MODE
DET.WIN1.BINX
DET.WIN1.BINY
INS.MODE
SEQ.HEADER
Hidden
no
no
no
no
no
Value
Medium
1
1
IMG
F
Label
Readout mode
X binning factor
Y binning factor
Instrument Mode
Header type
This template is for acquisition of astrometric data in Imaging mode. The acquisition template to use with
this template is VIMOS img acq Preset. The coordinates to define in the acquisition template are those of
the astrometric field. Offsets from these coordinates to position the field in one or the four quadrants of the
instrument will be applied automatically by the template.
The parameters of the template are:
• Exposure time (seconds). This is the integration time in seconds per exposure.
• Filter. The available filters are: U, B, V, R, I, z. To produce a valid calibration OB the filter in
the first observation template following the acquisition template should be the same as the one in
the acquisition template.
• Number of exposures per telescope offset ?. This parameter defines how many exposures are taken at each offset position (1 or 4).
• 1 or 4 quadrants. This parameter allows to define if the astrometric field image will be taken in
1 or 4 quadrants. If the 1 quadrant option is selected, the astrometric field will be positioned in only
one quadrant by applying an appropriate offset from the coordinates of the field defined in the target
package of the acquisition template.
If the 4 quadrant option is selected, the astrometric field will be positioned sequentially in the 4 quadrants by applying the appropriate offsets from the coordinates of the field defined in the target package
of the acquisition template.
As many exposures as defined in (Number of exposures telescopes offset ?) will be
taken at each telescope position (1 or 4).
At the end of the template the telescope will offset again to return to its position at the beginning of the
template.
60
VIMOS User Manual
4.7.4
VLT-MAN-ESO-14610-3509
VIMOS mos cal NightCalib
VIMOS mos cal NightCalib.tsf
To be specified:
Parameter
SEQ.ARC
SEQ.FLATFIELD
SEQ.NARCS
SEQ.NFLATS
Fixed values:
Parameter
SEQ.HEADER
Hidden
no
no
no
no
Range (Default)
F T (T)
F T (T)
1..1000000 (1)
1..1000000 (3)
Label
Night Arc ?
Night Flat field ?
Number of Arcs ?
Number of Flats ?
Hidden
no
Value
F
Label
Header type
This template is to be used when screen flats or wavelength calibrations are needed during the night right
after a science observation. This template doesn’t contain any setup definition and the data will be taken
with exactly the same instrument setup as used in the previous science template.
This template is to be used in a science OB after a science templates. It can not be used alone in an
OB after an acquisition template. The exposure time parameters are automatically defined by the current
instrument setup. The parameters of the template are:
• Night Flat Field ?
• Night Arc ?
(T/F). If set to ’T’, 3 screen flats will be taken.
(T/F). If ’T’ an arc spectrum will be taken.
VIMOS User Manual
4.7.5
VLT-MAN-ESO-14610-3509
61
VIMOS mos cal Standard
VIMOS mos cal Standard.tsf
To be specified:
Parameter
DET.WIN1.UIT1
INS.FILT.NAME
Hidden
no
no
INS.GRIS.NAME
no
INS.SLIT.NAID
SEQ.CAL.FLAG
SEQ.NEXPO
Fixed values:
Parameter
DET.READ.MODE
DET.WIN1.BINX
DET.WIN1.BINY
INS.MODE
SEQ.HEADER
Label
Exposure time (seconds)
Filter
no
no
no
Range (Default)
1..100000 (NODEFAULT)
U B V R I z OS-blue OS-red
GG475 GG435 Free (NODEFAULT)
LR blue
LR red
HR blue
HR red
HR orange
MR
(NODEFAULT)
0.8 1.0 1.2 1.5 1.8 2 2.5 5.0 (1.0)
1 4 (1)
1..1000000 (1)
Hidden
no
no
no
no
no
Value
Medium
1
1
MOS
F
Label
Readout mode
X binning factor
Y binning factor
Instrument Mode
Header type
Grism
Slit Width
1 or 4 quadrants?
Number of Exposures per Telescope Offset ?
This template is used for the observation of a standard star in mode MOS. This template can only be
used following the VIMOS mos acq Standard acquisition template and not using the VIMOS mos acq Mask.
This template can only use the specifically designed standard mask from the repository.
The parameters of this template are:
• Exposure time (seconds). This is the integration time in seconds per exposure.
• Filter. The available filters are: U, B, V, R, I, z, OS-blue, OS-red, GG435, GG475.
• Grism. The available grisms are: LR blue, LR red, MR, HR blue, HR orange, HR red.
• Number of exposures per telescope offset ?. This parameter defines how many exposures are taken for each offset position.
• 1 or 4 quadrants?. This determines whether the standard star will be positioned in one or four
of the quadrants of the instrument. As many exposures as defined in (Number of exposures per
telescope offset ?) will be taken at each telescope position (1 or 4).
• Slit Width. Define which of the slits available in the masks will be used. The width of the available
slits are: 0.8, 1.0, 1.2, 1.5, 1.8, 2.0, 2.5, 5.0. Once the user select the slit width the rest is totally
automatic; the star will be offset from the acquisition box to the selected slit in the first quadrant and
then moved to the same slit in the other quadrants.
62
VIMOS User Manual
4.7.6
VLT-MAN-ESO-14610-3509
VIMOS ifu cal Specphot
VIMOS ifu cal Specphot.tsf
To be specified:
Parameter
DET.WIN1.UIT1
INS.FILT.NAME
Hidden
no
no
INS.GRIS.NAME
no
INS.IFUE.NAME
INS.IFUS.MODE
SEQ.CAL.FLAG
SEQ.NEXPO
Fixed values:
Parameter
DET.READ.MODE
DET.WIN1.BINX
DET.WIN1.BINY
INS.MODE
SEQ.HEADER
Label
Exposure time (seconds)
Filter
no
no
no
no
Range (Default)
1..100000 (NODEFAULT)
U B V R I z OS-blue OS-red
GG475 GG435 Free (NODEFAULT)
LR blue
LR red
HR blue
HR red
HR orange
MR
(NODEFAULT)
0.33 0.67 (0.67)
T F (F)
1 4 (1)
1..1000000 (1)
Hidden
no
no
no
no
no
Value
Medium
1
1
IFU
F
Label
Readout mode
X binning factor
Y binning factor
Instrument Mode
Header type
Grism
IFU Magnification (arcsec/fiber)
IFU Shutter
1 or 4 quadrants?
Number of Exposures per Telescope Offset ?
This template is used for the observation of a spectrophotometric standard star in IFU mode. It is to be
used in a OB with the VIMOS ifu acq Preset acquisition template.
The parameters of the template are:
• Exposure time (seconds). This is the integration time in seconds per exposure.
• Filter. The available filters are: U, B, V, R, I, z, OS-blue, OS-red, GG435, GG475.
• Grism. The available grisms are: LR blue, LR red, MR, HR blue, HR orange, HR red.
In order to produce a valid OB the filter and the grism in the first observation template following
the acquisition template should be the same as the one selected in the acquisition template.
• IFU Magnification. This parameter defines the sampling, and correspondingly the field of view
of the IFU. The 2 available samplings are 0.67 arcsec/fiber and 0.33 arcsec/fiber.
To produce a valid OB, the magnification should be the same in every template of the OB.
• IFU Shutter. This parameter is only meaningful when using the LR grisms. In LR spectroscopy,
there are 4 rows of fibers along the dispersion direction, whereas in MR and HR modes only one ’slit’
of fibers is used, hence the variation of field of view between LR and MR and HR modes. In case the
object of interest is of limited size in LR mode, and if only the central 1/4 × 1/4 of the field of view is
needed, it is possible with the IFU Shutter option to mask the outer part of the IFU (always masked
in MR and HR modes). This allows to avoid second order overlap due to sky and / or background
objects between the 4 adjacent slits along the dispersion direction. True means that the shutter is in
place and masks the external part of the IFU, False (the default value) means that the mask is not in
place and the full IFU field of view is available. To produce a valid OB, the mask shutter option
should be the same in every template of the OB. This parameter is ignored when MR or HR grisms
are used.
VIMOS User Manual
VLT-MAN-ESO-14610-3509
63
• Number of exposures per telescope offset ?. This parameter defines how many exposures are taken for each offset position.
• 1 or 4 quadrants?. This determines whether the standard star / field will be positioned in one or
four of the quadrants of the IFU. As many exposures as defined in (Number of exposures per
telescope offset ?) will be taken at each telescope position (1 or 4).
64
VIMOS User Manual
4.7.7
VLT-MAN-ESO-14610-3509
VIMOS ifu cal NightCalib
VIMOS ifu cal NightCalib.tsf
To be specified:
Parameter
SEQ.ARC
SEQ.FLATFIELD
SEQ.NARCS
SEQ.NFLATS
Fixed values:
Parameter
SEQ.HEADER
Hidden
no
no
no
no
Range (Default)
F T (T)
F T (T)
1..1000000 (1)
1..1000000 (3)
Label
Night Arc ?
Night Flat field ?
Number of Arcs ?
Number of Flats ?
Hidden
no
Value
F
Label
Header type
This template is to be used when screen flats or wavelength calibrations are needed during the night right
after a science observation. This template doesn’t contain any setup definition and the data will be taken
with exactly the same instrument setup as used in the previous observation template.
This template is to be used in a science OB after observation templates. It can not be used alone in an
OB after an acquisition template. The exposure time parameters are automatically defined by the instrument
setup. The parameters of the template are:
• Night Flat Field ?
• Night Arc ?
(T/F). If set to ’T’, 3 screen flats will be taken.
(T/F). If ’T’ an arc spectrum will be taken.
VIMOS User Manual
4.7.8
VLT-MAN-ESO-14610-3509
65
VIMOS ifu cal TwFlat
VIMOS ifu cal TwFlat.tsf
To be specified:
Parameter
DET.WIN1.UIT1
DPR.CATG
INS.FILT.NAME
Hidden
no
yes
no
INS.GRIS.NAME
no
INS.IFUE.NAME
INS.IFUS.MODE
SEQ.NEXPO
Fixed values:
Parameter
DET.READ.MODE
DET.WIN1.BINX
DET.WIN1.BINY
INS.MODE
SEQ.HEADER
Label
Exposure time (seconds)
no
no
no
Range (Default)
1..100000 (NODEFAULT)
CALIB TEST (CALIB)
U B V R I z OS-blue OS-red
GG475 GG435 Free (NODEFAULT)
LR blue
LR red
HR blue
HR red
HR orange
MR
(NODEFAULT)
0.33 0.67 (0.67)
T F (F)
1..1000000 (1)
Hidden
no
no
no
no
no
Value
Medium
1
1
IFU
F
Label
Readout mode
X binning factor
Y binning factor
Instrument Mode
Header type
Filter
Grism
IFU Magnification (arcsec/fiber)
IFU Shutter
Nunber of Exposure?
This template is used for the observation of twilight flats in IFU mode. It is only offered in visitor mode.
It should go together with an attached arc.
The parameters of the template are:
• Exposure time (seconds). This is the integration time in seconds per exposure.
• Number of exposures?. This parameter defines how many exposures are taken.
• Filter. The available filters are: U, B, V, R, I, z, OS-blue, OS-red, GG435, GG475.
• Grism. The available grisms are: LR blue, LR red, MR, HR blue, HR orange, HR red.
• IFU Magnification. This parameter defines the sampling, and correspondingly the field of view
of the IFU. The 2 available samplings are 0.67 arcsec/fiber and 0.33 arcsec/fiber.
To produce a valid OB, the magnification should be the same in every template of the OB.
• IFU Shutter. This parameter is only meaningful when using the LR grisms. In LR spectroscopy,
there are 4 rows of fibers along the dispersion direction, whereas in MR and HR modes only one ’slit’
of fibers is used, hence the variation of field of view between LR and MR and HR modes. In case the
object of interest is of limited size in LR mode, and if only the central 1/4 × 1/4 of the field of view is
needed, it is possible with the IFU Shutter option to mask the outer part of the IFU (always masked
in MR and HR modes). This allows to avoid second order overlap due to sky and / or background
objects between the 4 adjacent slits along the dispersion direction. True means that the shutter is in
place and masks the external part of the IFU, False (the default value) means that the mask is not in
place and the full IFU field of view is available. To produce a valid OB, the mask shutter option
should be the same in every template of the OB. This parameter is ignored when MR or HR grisms
are used.
66
VIMOS User Manual
VLT-MAN-ESO-14610-3509
Chapter 5
Guidecam Tutorial
This chapter contains the information about the Guidecam software tool, which was in the past present as
a separate document entitled “Vimos Guidecam User Manual,” VLT-MAN-ESO-14610-3512, written by S.
Brillant.
Note that users wanting to take advantage of the new pre-imagless MOS mode should use the new
PILMOS application (instead of) the Guidecam application. The PILMOS application is essentially an
enhanced version of the Guidecam application that allows field and guide star selection in exactly the same
way as described in this chapter but also has some additional functionality for creating VIMOS catalogues
and simulated pre-images from contributed catalogues. See the instructions in Chapter 7.
5.1
Getting started with Guidecam
Using Guidecam is fairly simple:
• Start Guidecam by issuing the command guidecamLite after installation. This opens up a skycat
GUI with a specific Guide-Probe pull-down menu. Figure 5.1 shows the main Guidecam panel.
• Select the Settings option of the Guide-Probe menu. This opens up the Guide Probe Settings
panel which is represented in Figure 5.2
• Enter the coordinates of the target in the ’Telescope’ section of the panel. Note that the coordinates
have to be in J2000, and the format should be as indicated. For pre-imaging observations preparation
the default value of 90 degrees for the rotation angle on sky should not be modified unless a waiver is
requested.
When pressing the Apply button, Guidecam will download from the ESO archive the DSS image of
the field and open a panel USNO at ESO displaying the USNO star catalog of the field. This panel
is represented figure 5.3. Allow for a few seconds to a few tens of seconds for the image to be
downloaded.
• At this point on, it is possible to position the Guide Probe on the available catalog stars and to evaluate
if vignetting occurs.
5.2
The main ‘Guidecam’ GUI
The Guidecam GUI (figure 5.1) displays:
• the image of the field
• the projected shadow of the Telescope Guide Probe (yellow) onto the telescope focal plane
67
68
VIMOS User Manual
VLT-MAN-ESO-14610-3509
Figure 5.1: Guidecam main panel (skycat). Superimposed to the DSS image of the field is in yellow
the projected shadow of the Telescope Guide Probe, in green the VIMOS field of view (rectangle), and
in green and red the 11 and 13.5 arcminute radii corresponding respectively to the unvignetted Nasmyth
field of view and to the maximum search radius for guide stars
• the VIMOS field of view (green), with the arrow pointing to the N
• a circle of 11 arcminutes radius (green) corresponding to the unvignetted telescope focal plane. Beyond
this radius there is vignetting by the tertiary mirror of the telescope
• a circle of 13.5 arcminute radius (red) corresponding to the maximum search radius for guide stars
• in blue the rotation axis of the Guide Probe arm
• the position of the USNO stars selected in the USNO at ESO panel (figure 5.3). The stars are indicated
with white circles.
5.3
The ‘USNO at ESO’ panel
The USNO at ESO panel (figure 5.3) provides for the following entries:
• Search radii (min and max). The default value for the maximum radius is 12 arcminutes with a maximum permitted value of 13.5. Below 11 arcminutes, i.e., within the green circle, the Nasmyth field of
VIMOS User Manual
VLT-MAN-ESO-14610-3509
69
Figure 5.2: Guidecam: the Guide Probe Settings panel
view is vignetted by the tertiary mirror (M3) of the telescope. Therefore the aberrations of the telescope
cannot be measured with the same accuracy. In some cases, this may degrade the image quality.
• Magnitude range. The default minimum and maximum values are 11 and 13.5 whereas the minimum
and maximum permitted values are 10 and 14. With the faintest guide stars, some degradation of the
active optics correction might take place, depending on seeing, airmass, Moon, possible extinction by
thin cirruses, and position of the guide star in the field of view (vignetting beyond 11 arcminutes). To
the extent this is possible, stars brighter than 13.5 magnitude should be chosen. Too bright objects may
result in poorer correction as well.
• In the “USNO at ESO” pane, the maximum number of objects can be changed to either limit or increase
the number of stars to be displayed
Note : whenever a value is changed and entered a new search takes place and the results are displayed
on the images while the updated list of stars appears on the Search Results panel. Pressing the Search
button after changing more than one value will also start a new search and display the results.
5.4
Selecting the Guide Star
To select a guide star:
• Click with the left mouse button on one of the white circles identifying the USNO stars
• This opens a small panel asking Move to the selected guide star?. Pressing Accept will move the
guide probe to the star. Vignetting of the VIMOS field of view takes place whenever the guide probe
(yellow) intercepts the VIMOS field of view (green rectangle). If there is vignetting, it is possible to
select another star and to repeat the operation, until a suitable guide star is found.
• The guide probe can be positioned on a given guide star in 2 positions (called positive and negative
(POS and NEG)). This is referenced to as Alternate position. By selecting the corresponding button
in the Guide Probe Settings panel (figure 5.2) and pressing the Apply button, the guide probe
will be positioned on the same star on its alternate position. This option may allow to reduce or even
remove the vignetting that may be present in the other position.
70
VIMOS User Manual
VLT-MAN-ESO-14610-3509
Figure 5.3: GuideCam: the USNO at ESO panel
• Once a suitable guide star has been identified, you can take note of its position by pressing the Get
Guide Star Coords of the Guide Probe Settings panel. This popups an information panel containing the RA and DEC of the selected guide star and indicating whether the position of the guide
probe is positive or negative (alternate position). These coordinates, as well as the guide probe position,
should be noted and further entered manually into P2PP in the corresponding fields: Guide Star
RA, Guide Star DEC and Guide Probe Position of the VIMOS img acq Preset template.
Finally, the Get Guide Star From should be set to SETUPFILE (see VIMOS Template Reference Guide).
5.5
Generating Finding Charts
Guidecam should be used to generate finding charts for VIMOS imaging and pre-imaging modes. Under the
File menu, select the Make finding charts... option. A new pop window will appears, to be filled
with Run ID, P.I. name, and OB name(s). Click on Draw to obtain a preview of a finding chart compliant with
the rules defined for phase 2 proposal preparation, Then, press Save to produce a postscript file. Detailed and
updated instructions are given at
http://www.eso.org/observing/p2pp/P2PP-FC-cookbook.html
5.6
Guide Stars: Policy
Starting from P72, ESO applies the following policy regarding guide stars:
• Selection of a Guide Star for VIMOS observations is mandatory for MOS and IMG mode, to assess
VIMOS User Manual
VLT-MAN-ESO-14610-3509
71
and control the amount and position of vignetting that may be introduced by the Guide Probe. When
the guide star is selected, the coordinate should be properly entered in the acquisition template, together
with the position of the guide probe, and the guide star option have to be selected properly (see 4.4). If
this is not done properly your OB will not pas validation and will not be scheduled for observation.
See Phase 2 Web pages for detailed information.
• In case of observation involving offsets, it is the responsibility of the user to check with guidecam
that the chosen guide star does not produce unacceptable vignetting in any of the frame produced by the
execution of the OB. ESO will consider as executed within specification an OB producing vignetted
frames, implicitly assuming that the vignetting was already verified by the user.
• If no guide star is provided by the user (i.e. the option CATALOGUE of the Get Guide Star
From P2PP parameter of the VIMOS ifu acq Preset template is selected), the guide star will be selected
by the Telescope Operator at execution time.
• If the user provides a guide star (by selecting the option SETUPFILE of the Get Guide Star
From P2PP parameter of the VIMOS img acq Preset template), efforts will be made to use this guide
star for imaging, pre-imaging and for the subsequent MOS observations, although this cannot be entirely
guaranteed. Observing conditions (seeing, Moon, etc.) may indeed force to select a different guide star
than the one selected by the user. In addition, it may happen that a guide star suitable for pre-imaging
observations will not be usable for the spectroscopic follow-up if e.g. the seeing has changed. ESO
reserves the right to charge to the time allocated to the run the time spent in identifying and
setting up the alternative guide star.
• The use of the guidecam tool is mandatory also for the preparation of the finding charts to be delivered
as part of their Phase II material. The finding charts should clearly indicate the guide star to be used.
72
VIMOS User Manual
VLT-MAN-ESO-14610-3509
Chapter 6
VMMPS Tutorial
6.1
The VMMPS philosophy
This chapter contains the info from the VMMPS Cookbook by M. Kissler-Patig and G. Marconi, VLT-MANESO-14610-3511 formatted to fit in this manual.
6.1.1
What does VMMPS do?
VMMPS is a software that, in the end, produces a file that you must attach to any of your VIMOS multiobject spectroscopy OBs. That file, called Aperture Definitions in Pixels (ADP) file, contains the list of all
slits (positions, sizes, shapes) that will be milled into that particular mask. The file contains this information in
pixels coordinates, and hosts in addition the transformation (that it got from the pre-image header) on how to
transform that particular x,y values into millimeters on the mask. Further, that file has as well all the necessary
pointing information obtained from the pre-imaging.
Creating these ADP files is your goal. As an input, you need the VIMOS pre-image and a catalog of
objects. And how to get from there to your desired output product is all explained step by step below...
NOTE that VMMPS handles separately each quadrant. You will have to run VMMPS 4 times to
produce one full set of masks to be attached to 1 OB (the software helps you somewhat to do that). The
important point here is that you will have to prepare for VMMPS an input set (catalogs(s) and image) for each
quadrant.
6.1.2
This is not FIMS - you have little chance for interaction
Many MOS users will be familiar with FIMS, the software that helps you defining masks for FORS. VMMPS
is very different. The main reason being that VMMPS was conceived as a tool to define masks for surveys.
Unlike FIMS it will hardly allow you to allocate slits manually. Instead, it will automatically optimize the
slit assignment for object in your catalog. Of course, you can pick some or even all objects by hand, but it
will cost you time and nerves and the allocation will not be optimized in terms of numbers. It is long term
objective of ESO to harmonize the mask preparation tools between VIMOS and FORS after a few periods of
VIMOS observations, of experience and of feedback from the users.
At the heart of vmmps is SPOC, the Slit Positioning Optimization Code, described by Bottini et al. (PASP
117, 996 (2005)). Given a catalog of objects, SPOC maximizes the number of observable objects in a single
exposure and computes the corresponding slit positions. It does so by solving a very complex 2D combinatorial problem.
73
74
VIMOS User Manual
6.1.3
VLT-MAN-ESO-14610-3509
The importance of your catalog
VMMPS fully relies on your catalog to contain exactly the objects that you want to observe. In VMMPS
you have hardly any freedom to set priorities for your preferred objects. Your catalog should contain all and
only the objects you really want to observe. VMMPS will optimize the allocation of slits for you such as to
maximize the number of objects observed from your catalog, assuming that you have no favorites.
In summary, VMMPS relies heavily on your catalog. Thus, instead of using your brain intensively while
running VMMPS, rather use your intellectual power and scientific judgment to create a smart input catalog.
Your catalog is the most important item in the process.
6.1.4
The different catalogs that you can come with
We distinguish between two different scenarios.
1. Contributed + pre-image catalog case Prior to pre-imaging with VIMOS you know already which
objects you want to obtain spectroscopy for and have precise astrometry for them. E.g. you were
running an imaging survey with a wide field imager and have identified your candidates on a given
astrometric system.
This catalog must have precise relative astrometry for all objects and for a number of reference stars.
It is important that the astrometry of the science objects and the reference stars are on the same system.
You will now obtain pre-imaging with VIMOS, extract from there a short list of objects detected on
the VIMOS image (the VIMOS pre-image catalog) and VMMPS will help you to bring your
contributed catalog onto the VIMOS coordinate system.
2. VIMOS catalog case You only know which objects or type of objects you are after, but have no list
with precise RA,DEC for your objects. E.g. you rely on the VIMOS pre-image to determine the objects
you will obtain spectroscopy for.
This catalog is obtained directly from the VIMOS image using your favorite analysis tools 1 . It takes
coordinates in detector x,y as well as any other parameter you want to convey and can be used right
away by VMMPS (provided that it has the right format, see below).
3. PILMOS case Chapter 7 describes the pre-imagless MOS mode that is available since June 2012.
VMMPS handles this case in the same way as the Contributed + pre-image catalog case. PILMOS
essentially provides an alternative way to arrive at Step 3 (6.2.4) below. We nevertheless encourage
PILMOS users to read through the full procedure in this chapter as well as Chapter 7 in order to gain an
understanding of the requirements and assumptions of both strategies.
1
We recommend Sextractor (Bertin & Arnouts 1996, A&AS 117, 393) without getting any royalties for it, but because it serves
well the purpose and you will recognize some similar structures/parameters
VIMOS User Manual
6.2
6.2.1
VLT-MAN-ESO-14610-3509
75
Step-by-step guide
Step 0 (most crucial): Getting ready – preparing your catalogs
This step is done outside VMMPS. But as mentioned above, it is the most important one.
What you need
• for each quadrant one VIMOS pre-image processed by the ESO pipeline, and
• EITHER for each quadrant a VIMOS catalog
• OR a contributed catalog (it can be one catalog including objects on all 4 quadrants, or be four
catalogs – one per quadrant), together with, for each quadrant a VIMOS pre-image catalog
The format of the catalogs
All catalogs accepted by VMMPS have plain ASCII format. The file name should not use the extension
.dat as this causes the program to crash. Use of .cat or .data should work.
Some example are given in Section 6.4.
The input format is:
• a header line with column names in upper case.
There is no preferred order for the columns, but see below for mandatory and reserved columns and
names.
The first line is interpreted as the header line.
Header entries are separated by any number of blanks or tabs.
A <return> marks the end of the header line.
• the data sorted in columns.
Columns on a given row are separated by any number of blanks/tabs.
The number of columns and their order is defined by the number of entries and their order in the header.
No empty field is allowed, you will get a friendly warning if some are present.
The first row after the header line defines the beginning of the data, the last row defines the end of data.
Each row must end with a <return>.
Note that no blank lines are allowed in the catalogs, and you will get a friendly warning if any is present.
76
VIMOS User Manual
VLT-MAN-ESO-14610-3509
Getting your contributed catalog into the right format
Assuming that you are in case 1, you need to prepare the two catalogs described in the this and the next
section.
The contributed catalog contains all the objects that you wish to observe, plus (or including) enough bright
objects that can serve for the cross-correlation with the VIMOS pre-image catalog and as reference stars for
aligning the mask on the sky. All objects shall have very good (±0.1”) relative astrometric coordinates
(RA,DEC) on a single astrometric system. Further, all objects should have good (±2”) absolute astrometry.
The mandatory columns in the contributed catalog are (in upper case and in the following order):
• ID defining an identifier which must be unique and integer number.
• RA, the right ascension of the object.
• DEC, the declination of the object. RA and DEC entries are allowed in 2 formats:
- decimal degrees
- hh:mm:ss.s (including semi-colons)
The optional columns whose names are reserved are:
• CROSS is, for each object, either 1 if that object shall be used for the cross correlations, or 0 if it shall
not (e.g. if it is too faint, too elongated, ...). We recommend not to flag more than 500 stars with
CROSS=1.
• FLAG shall be one of (upper or lower case) C - compulsory2 ; R - reference; F - forbidden; S - select-able
(no blank entry is supported, any other flag will be replaced by S - select-able)
• A ARCSEC the semi-major axis in arcsec
• B ARCSEC the semi-minor axis in arcsec
• PA the position angle (E of N in degrees)
The latter three will be used to compute the object size in pixels along the x direction of the detector
(i.e. along the slit).
Any other columns whose names do not match the above ones.
Notice only that the names X IMAGE and Y IMAGE are forbidden in the contributed catalog
– they are used/computed later. If these are present, the software will kindly reject your catalog until you
removed them.
All columns present in the contributed (input) catalog will be carried over to the output catalog. Some
columns will be used to generate new columns in the output catalog (see below Step 2).
The example of a contributed catalog is given in Section 6.4.1.
2
Sometimes a large number of ”C” compulsory targets in the input catalogue results in crashing VMMPS during slit assignment.
See Sec. 6.3.2.
VIMOS User Manual
VLT-MAN-ESO-14610-3509
77
Preparing your VIMOS pre-image catalog
The VIMOS pre-image catalog accompanies the contributed catalog with the only purpose
to transform the RA,DEC coordinates into x,y coordinates. This automatically corrects for any distortion in
the VIMOS optics, and most importantly for the mask manufacturing: for x,y the transformation into mm on a
physical mask is known (we have determined that for you and stored the information in the pre-image header).
You need in the VIMOS pre-image catalog a small number (e.g. 50 or more) of objects that are
also in your contributed catalog. In the VIMOS pre-image catalog you shall have the x,y
coordinates of these objects obtained from exactly the same VIMOS pre-image as you will input into VMMPS.
Note that the more good objects are in common between the two catalogs, the better the result of the crosscorrelation, i.e. the transformation from RA,DEC to pixels will be.
Since the objects will be used for cross-correlation, their position in pixel coordinates shall be as good as
possible. Therefore, make sure that you selected bright (S/N>10), unsaturated, if possible point like objects
on the VIMOS pre-image.
This comparatively short list of objects shall be written in an ASCII file with the mandatory columns (in
upper case, and in the following order):
• ID an identifier which must be unique and integer number,
• X IMAGE the x–coordinate in pixels on the VIMOS pre-image
• Y IMAGE the y–coordinate in pixels on the VIMOS pre-image
Any other column is allowed but will be ignored and not carried over to the output catalog of the crosscorrelation (see Step 2).
The example of a VIMOS pre-image catalog is given in Section 6.4.
78
VIMOS User Manual
VLT-MAN-ESO-14610-3509
Getting your VIMOS catalog into the right format
Assuming that you are in case 2, you only need to prepare a VIMOS catalog.
The VIMOS catalog can:
• either be obtained as an output of the cross-correlation task (in which case you do not have to worry: it
will have the right format)
• or be produced directly by the user (that’s you) from the VIMOS pre-image.
The mandatory columns are (in upper case and in the following order):
• ID an identifier which must be unique and integer number,
• X IMAGE the x–coordinate in pixels on the VIMOS pre-image
• Y IMAGE the y–coordinate in pixels on the VIMOS pre-image
The optional columns whose names are reserved are:
• FLAG shall be one off C - compulsory3 ; R - reference; F - forbidden; S - select-able (no blank entry is
supported, any other flag will be replaced by S - select-able)
• X WORLD
• Y WORLD, the coordinates of the object in the world coordinate system (not used by VMMPS)
• A IMAGE the semi-major axis in pixels
• B IMAGE the semi-minor axis in pixels
• THETA IMAGE the position angle (in degrees positive x-axis is 0, positive counter-clockwise) of the
object
• X RADIUS the object size in the x (spatial) direction of the detector.
A IMAGE, B IMAGE and THETA IMAGE are used to compute X RADIUS. The column X RADIUS is
used when one or more of A IMAGE, B IMAGE, THETA IMAGE are not given, otherwise it is overwritten.
If X RADIUS, and any one of A IMAGE, B IMAGE, THETA IMAGE is missing, the object size in x is set
to 10 pixels. If X RADIUS > 45 pixels, the object is automatically flagged as forbidden by the software. 4
Any other columns can be added with any names. The catalog later allows to constrain with any number
of criteria on any number of columns the select-able objects. So typically, you might want to add color, magnitude or may other columns that you might want to use as selection criteria to the catalog.
An example is given in Section 6.4.
3
Sometimes a large number of ”C” compulsory targets in the input catalogue results in crashing VMMPS during slit assignment.
See Sec. 6.3.2.
4
The reason for this is that the manufacturing machine can cut slits of max. 20” length, which translate into 150 pixels, and that
you are allowed to add 10” (50 pixels) sky on each side.
VIMOS User Manual
VLT-MAN-ESO-14610-3509
79
Getting your input VIMOS pre-image ready
Good news: your VIMOS pre-image processed by the ESO pipeline is ready as it is to be accepted by
VMMPS.
Bad news: if your image is not a VIMOS pre-image, or if the VIMOS pre-image was not processed by
the ESO pipeline, or if you had the bad idea to modify the pre-image even in the slightest detail (e.g. you had
3 dithered pre-images and combined them), etc... VMMPS will not work, or in the worse case will seem to
work but you will never see your objects through your slits. Indeed, your x,y coordinates will be transformed
into mm for the mask manufacturing using the transformation in the image header, assuming that we deal
with original x,y system. If you have translated, re-scaled, re-binned the image, this transformation will not
be valid anymore.
Just make sure that your input to VMMPS is an original, untouched VIMOS pre-image processed
by the ESO pipeline. Also make sure that this pre-image is the one you used to obtain the coordinates
for your VIMOS pre-image catalog or VIMOS catalog.
If you would like to learn a little about the background of all this, read further this section. If you are just
lazy and happy with the information so far, go ahead and jump now to Step 1.
Some Background: One of the VIMOS calibrations consists of using a pinhole mask to determine accurately the transformation between millimeters on mask and coordinates on the CCD (we know at which mm
we cut the holes in the mask, and we measure the x,y coordinates of the holes on the image processed by the
ESO pipeline). This transformation is stored and updated on the instrument workstation. Now, when your
VIMOS pre-image gets taken, this transformation, valid at that particular moment, is stored in the header of
your VIMOS pre-image. Thus, with the help of that transformation, you (or rather VMMPS) know how to go
from the x,y coordinates of that image to position in mm on the mask (i.e. position on the focal plane). The
combination of the transformation in that header and the coordinates in that image allows to determine the
precise mm coordinates for the mask. Should you use transformation and x,y from different images, the result
would not be correct anymore. Thus the importance to derive the coordinates from exactly the image that will
be fed to VMMPS and from which the transformation will be taken.
80
VIMOS User Manual
6.2.2
VLT-MAN-ESO-14610-3509
Step 1: What is your starting point?
Are your sure you fulfilled Step 0? If you have not suffered at least a little bit while preparing your catalog,
if you have not thought twice whether you had the right objects in there, there is a good chance that you will
suffer a serious headache before Step 8. So take your time re-thinking about your catalog. Read through Step
0 again, it is worth it, we believe that it will actually save you time.
OK, enough warnings, if you went carefully through Step 0, you are ready to start VMMPS. To do so,
type:
>
vmmps &
and you should see the following window pop-up (if you are a regular skycat/RTD user, this will look very
familiar to you, but notice the new plug-in in the top bar – ‘VIMOS-MPS’ or VMMPS for people who like
acronyms of acronyms):
What to do next depends on the type of catalog you have prepared.
You have your own “pre-VIMOS” catalog: the contributed catalog case
• proceed with Step 2
The VMMPS task of defining slits only accepts VIMOS catalogs, and you need to produce one. Do not
panic, VMMPS has a built-in task to help you doing so using your contributed catalog together with
a VIMOS pre-image catalog and a VIMOS pre-image.
What you have is a list of RA and DEC of your objects (a contributed catalog), and the VIMOS
pre-image freshly out of the ESO pipeline. Make sure that the relative astrometry in your catalog is very good
and that your list actually also contains, on the same astrometric system, a good number of objects that appear
on the VIMOS pre-image (e.g. a list of only z = 6 emission line galaxies will probably not allow you to do a
nice cross-correlation with the VIMOS pre-image catalog – you might want to add a few V = 12 − 16 mag
stars).
Run your favorite source detection algorithm on the original, pipeline processed VIMOS pre-image. Make
sure that you retain only point source with S/N>20 or so, and store all this in a VIMOS pre-image
catalog.
Make sure that you prepared the three above ingredients according to Step 0, and move now to Step 2.
VIMOS User Manual
VLT-MAN-ESO-14610-3509
81
Your catalog comes from a VIMOS pre-image: the VIMOS catalog case
• Jump to Step 3
If you are sure that you have a VIMOS catalog for each quadrant fulfilling the requirements of Step 0, just
identify the corresponding associated VIMOS pre-image for each of the 4 quadrants. You are ready to jump
right into the mask definition, move to Step 3.
82
VIMOS User Manual
6.2.3
VLT-MAN-ESO-14610-3509
Step 2: Transforming your contributed catalog into a VIMOS catalog
This is a necessary step, but quite painless if you followed the instructions of Step 0.
From the pull-down menu ‘VIMOS-MPS’ (see Step 1), select the task ‘Cross correlate Contributed and
VIMOS pre-image catalogs’. You will see popping up the following ‘VIMOS: Cross Correlation sequence’
window (here under KDE/Linux):
This window asks you to input (in that order) the catalogs and the image. Just click from top to bottom
and follow the instruction. Once you have filled the last item:
• that window will look as shown below,
• the selected VIMOS pre-image will appear in the display
and after you have clicked on the button ‘Cross-correlate’:
• the above window will disappear, and
• the window ‘vmmps cross’ will pop-up
VIMOS User Manual
VLT-MAN-ESO-14610-3509
83
You will then get something like this:
The ‘vmmps cross’ window summarizes your input (top part) and awaits your tuning of the cross-correlation
parameters. At the beginning, the bottom part is empty.
The cross-correlation parameters are:
• the matching tolerance in arcsec: what is the maximum difference in position that you want to allow
between VIMOS pre-image and contributed catalog to still consider two objects to be the same?
If your astrometry in the contributed catalog is perfect, pick a small value (you are sure that if VIMOS
pre-image and contributed catalog position do not agree by say 2” the objects cannot be the same).
Remember, however, that the VIMOS pre-image suffers from optical distortion, differential atmospheric
refraction etc, i.e. the position in the VIMOS pre-image catalog will not be perfect.
If you suspect the absolute astrometry of your contributed catalog to have a systematic offset, use a
larger value (e.g. 5”). This should take care of it and allow to find matching stars. The danger are
mis-identifications: if the RMS of the final transformation is large, this might have happened. Try then
to go back to smaller values.
• the Sigma clipping for residuals: the task will find a number of objects in common between VIMOS
pre-image and contributed catalog. It will compute the position difference in the two catalogs and some
objects (e.g. mismatches) will show high values. Define with this parameter when such an object will
be rejected from the final fit.
84
VIMOS User Manual
VLT-MAN-ESO-14610-3509
• the Number of iterations: the task will compute a first transformation for the objects in the contributed
catalog, applied it and if the number of iterations is > 1 restart the cross-correlation to compute a new
transformation. Depending on the number of out-layers, distortions in the field, the final transformation
might significantly improve with a few iterations. If you see no clear improvement in RMS between
two successive passes, you probably reached the necessary number of iterations.
Once you have set the parameters, click ‘Run Cross’ to run the cross correlation. You will get the
log/output of the task display in the lower part of the window.
The log tells you how many objects were found in your VIMOS pre-image (nref) and contributed (ncross)
catalog, respectively. Do not forget that you can set a column CROSS in your contributed catalog and only
the objects with CROSS=1 will be used for the matching and counted in ncross. E.g. you can safely put any
faint high-z galaxy to CROSS=0 in the contributed catalog since it is unlikely to find a match in the VIMOS
pre-image catalog. We recommend to flag fewer than 500 stars with CROSS=1 in the contributed catalog
otherwise the cross-correlation procedure can crash.
On the display, you will find marked the objects finally used for the transformation nmatch (green), as
well as the objects that were found to have a counter-part in the first pass but were rejected later (red). This
helps you to visually inspect whether the task did something meaningful.
The log tells you further, for each iteration, how many objects were found to match, and what the RMS of
the transformation (in arcsec) is for these objects.
You can readjust the parameters and run the task again and again and again until you are satisfied (if you
cannot reach that spiritual stage, press ‘Quit’). Once you are happy with the precision of the transformation
(we recommend a RMS of the order of 0.2” or lower), click on ‘Save Vimos Catalog’ and, guess what, it will
save your contributed catalog as a VIMOS catalog. The name of the output is composed of the name of your
contributed catalog followed by vm.cat, that is
<name of contributed catalog> vm.cat.
You can now use this catalog to define slits (Step 3).
A brief word on the output: it has a format complying with the one described in Step 0. It will contain all
the objects of your contributed catalog. It will still have all the columns that you defined in the contributed
catalog, plus two columns (X IMAGE, Y IMAGE) giving in pixels the object coordinates in the reference
system of the pre-image. The advantage is that these latter coordinates can now be transformed into mm in the
focal plane, i.e. mm coordinates on the mask, by using the CCD-to-Mask transformation present in the header
of the pre-image.
VIMOS User Manual
6.2.4
VLT-MAN-ESO-14610-3509
85
Step 3: Starting VMMPS for mask definition
At the beginning of this step, make sure that your display is blank (safest way) by selecting ’Clear’ in the
’File’ pull-down menu of skycat or be sure that the image displayed is indeed the pre-image that you want
to use for this step.
You have your VIMOS catalog ready? Then go ahead and selected in the main window from the pulldown menu ‘VIMOS-MPS’ the task ‘Assign slits from a Vimos catalog / produce ADP’.
You will be asked to select your VIMOS catalog and the associated VIMOS pre-image. The latter will
appear in the display and all objects in your catalog will be marked as white circles. The VIMOS catalog will
be shown in a separate window5 .
Your screen will look like this:
5
There are reports of a possible bug loading the image in some circumstances. See Section 6.3.
86
VIMOS User Manual
VLT-MAN-ESO-14610-3509
Let’s focus on the catalog window. We dragged it a little wider to see all columns. That window displaying
your catalog might look like this:
Your catalog has internally been transformed into skycat format and is now displayed with the standard
skycat catalog window.
This window shows all objects in given radius (5.45 arcmin by default) from the center of your pre-image.
The data section in the middle of the window allows you to look at your catalog, check values for given objects, etc. A click on an object in the image display will highlight that object in the catalog an allows you to
examine its entries.
The main purpose of the catalog window is to edit interactively the column ‘FLAG’, that was added by
VMMPS (and set to ‘S’: select-able for all objects) if not present in your input catalog. How and why to edit
this column is explained in Step 5, and uses the lower part of the window (‘Modify Flags’).
The other purpose of this window is to allow you all operations permitted on skycat catalogs (editing
values for selected objects, searching for objects, etc). We do not expect you to need these and therefore
recommend to you not to use, mis-use or ab-use of them. Except maybe for an object selection explained in
Step 4, but this is optional. If you are satisfied with what you see, move directly to Step 5.
VIMOS User Manual
6.2.5
VLT-MAN-ESO-14610-3509
87
Step 4 (optional): Re-arranging your VIMOS catalog
This step is optional. You can skip it and move directly to Step 5.
In case you are not fully satisfied with all objects in your catalog, you have the chance to re-arrange it
somewhat. To do so, you must have the column(s) on which you want to constrain your objects in the catalog,
and you must have made up your mind which range you want to allow for this columns. If this is fulfilled,
go in the catalog window to the pull-down menu ‘Options’ and select ‘Set Search Columns...’. The following
window will pop-up:
At this point, you should chose the column(s) on which you want to select your catalog. Click on the column name in the right sub-panel, then click on the left arrow in the central bar: the selected column name(s)
should appear in the left sub-panel. Ignore the lower part of that window, you can use it for indicative purposes, but you are not expected to fill in any values at this point.
Once all the columns you wish to select on are in the left sub-panel, click ‘OK’. The pop-up window will
disappear, and your catalog window will get updated as shown in the example below:
Here we have chosen to select according to the R magnitude (say we changed our mind and decided to
allow slits only for objects brighter than 22.5, despite the fact that our VIMOS catalog contains objects down
88
VIMOS User Manual
VLT-MAN-ESO-14610-3509
to R ∼ 24).
Notice the two new fields in the upper part of the window saying “Min R MAG” and “Max R MAG”.
Enter there the values on which you want to select the catalog and hit return, or click on ‘Search’ below the
data field.
The catalog display will be updated, as well as the overlay on the image. They will now show only objects
fulfilling the new selection criteria. And only these objects will be used for assigning slits in the next step.
VIMOS User Manual
6.2.6
VLT-MAN-ESO-14610-3509
89
Step 5: First pass – defining special objects
Alright, if you made it to here, you are ready to assign some slits to some objects. You are doing well so far.
In VMMPS, you will first assign all special objects before the rest of the space will be filled automatically
with objects. We have 5 types of special objects:
• reference objects (cyan diamonds)
• new reference objects (cyan diamonds)
• compulsory objects (blue triangles)
• forbidden objects (yellow crosses)
• curved slits (green squares)
They are all illustrated in the example below.
90
VIMOS User Manual
VLT-MAN-ESO-14610-3509
The way to assign one of these is the same for all types:
• in the image display, click on the object you want to assign a special type. That object must be in the
catalog, i.e. have a white circle around it (exception: new reference objects). The white circle will be
highlighted
• in the catalog window, under “Modify Flags”, click on the button corresponding to the type you want
to assign to the object (e.g. you just clicked in the image on a object that you want to be a reference, so
click now on the button ‘Ref’) – curved slit is a special case described in more details below
• in the catalog window, the object will be highlighted. You can check whether in the column ‘FLAG’
the type was changed from S (select-able) to the new type (e.g. R for reference)
• repeat the above steps as often as you need
After this operation, you will have updated the ‘FLAG’ column in you catalog. You are ready to pass to
Step 6. Be reminded that at this point all objects with X RADIUS > 45 pix will be flagged as forbidden.
Note that instead of doing this interactively inside VMMPS, you could have created earlier in the input
catalog the column ‘FLAG’ and assigned the right types (except for curved slits) to the objects.
E.g. if you knew in advance which ones would be your reference objects, you could have created a column
‘FLAG’ in the input catalog and set it to ‘R’ for these objects, ‘S’ for all others.
Once you launch the automatic slit assignment (Step 6), the task will allocate the slits in the above order
of priority, i.e. first put boxes around the reference objects, then try to fit all compulsory objects, then try to fit
all curved slits, and than finally assign ‘normal’ slits as many other objects as possible (the latter is described
in Step 6).
But first, let’s have a closer look at each type of special objects.
Reference objects
Reference targets should be stellar and typically have R 15-18. The acquisition exposure time should be
checked assuming imaging mode with the VIMOS ETC, requiring high S/N ( 50-100). It is important to
check that they do not saturate in good conditions (seeing ≈0.500 ). The spectra of these objects are sometime the only spectra available to estimate the image quality. If reference targets are fainter (which is allowed),
longer acquisition time will be necessary, thus limiting the available science time.
When selected, the reference objects gets its FLAG parameter set to ‘R’. These objects are put by the
software in each mask produced for that quadrant before any other object gets allocated a slit. The reference
objects are assigned a 4”×4” box.
Remember that in VIMOS the masks of the 4 quadrant are absolutely stiff with respect to each other. Thus,
in theory, it would be enough to have 1 reference object per quadrant, or even only 1 quadrant with reference
objects. The software only checks for 1 reference object in your catalog and lets you get away with it.
However, we recommend to allocate 3 to 4 reference objects per quadrant in a triangular pattern. With
some experience, you will also ‘put them out of the way’ of slits or slit rows (e.g. in a triangular pattern away
from the field center but avoiding the field corners and edges where optical distortions can be large). These
reference stars will allow you or the astronomer on duty to verify that indeed no single mask is tilted with
respect to the three other ones. Make sure that these reference objects are centered in their respective boxes
as the acquisition software will use the position of these objects for a first estimate of the offset needed to be
VIMOS User Manual
VLT-MAN-ESO-14610-3509
91
applied to the telescope to center the mask.
If you intend to observe very faint objects which will only become visible after the combination of many
exposures then assign a few slits per quadrant to brighter objects which will serve as a sanity check for the
observer. The presence of those objects in the resulting spectral frame will indicate that indeed everything
went fine with the observations.
New reference objects
It can happen, that no object in your catalog is suited as reference star. In that case, you can add reference stars
directly from the image. This should not be the default mode, since the centering algorithm used by skycat
is a simple Gaussian fit and might not return as accurate coordinates as your favorite source detection program.
The whole alignment procedure on sky might become less precise than with a well prepared catalog including
reference stars on the same system as your scientific targets.
The procedure to pick new reference stars is a little different than the one described above, since obviously
you cannot click on a highlighted object in the image display.
In order to select new reference stars, just click on the button ‘New Ref’. This will pop-up a ‘Pick New
Object’ window (see below). Move the cursor in the image display onto the object you want to select and
click. Then select ‘ENTER’ in the panel below, to enter the object in the catalog.
You will be asked to confirm the ID for this object (taken as the highest current ID+1):
92
VIMOS User Manual
VLT-MAN-ESO-14610-3509
And you have the opportunity to change from the default values all other entries for all columns:
The new object appears at the bottom of your object list in the catalog window.
Note that the task is called ‘New Ref’ because this is the only case we consider useful, but in principle,
once the object is in the catalog, you could change its flag to any allowed value.
Compulsory objects
You can flag a few objects as being the top priority. These objects will be allocated slits immediately after
reference objects have been defined on the mask, i.e. VMMPS will make sure that they get slits allocated if
not blocked by a reference object. If two compulsory object block each other, VMMPS will allocate one in
this mask and the other in the next mask of the series (if applicable).
To flag an object as compulsory, select the button ‘Comp’ after having clicked on the object in the image
display. The ‘FLAG’ of the object will be set to ‘C’ (Compulsory) in the catalog.
If you added a column ‘FLAG’ in your input catalog, this flag can be used to set high priorities.
Sometimes a large number of ”C” compulsory targets in the input catalogue results in crashing
VMMPS during slit assignment. See Sec. 6.3.2 for details.
Forbidden objects
You can exclude individual objects from the automatic slit assignment task. To do so, select the button ‘Forb’
after having clicked on the object in the image display.
VIMOS User Manual
VLT-MAN-ESO-14610-3509
93
If the ‘FLAG’ of an object is set of ‘F’ (Forbidden), that object will not be considered for slit assignment.
This has the same effect as removing the object from the catalog.
The cases in which you might need this are rare, it application useful when you use the same catalog
for different purposes. E.g. imagine that you use a single catalog to prepare masks for two different grisms
and that you have a few objects for which blue spectra are useless. These objects could be flagged manually
forbidden when preparing the masks for the blue grisms and save you the time to duplicate the catalog.
Curved slits
You have the possibility to define curved or tilted slits. To do so, click on the button ‘Curved’. This will
pop-up the ‘Curved Slit’ window (essentially a Pick Object skycat window with several special features):
Once you clicked on the object in the image, it appears in the ‘Curved Slit’ window and you can define the
curved slit. To do this, click in the little display to define the points through which the curved slit should pass
94
VIMOS User Manual
VLT-MAN-ESO-14610-3509
(start with a point centered on your object maybe). Once you have defined a few points, click on ‘View/Fit’
and the slit will appear.
Note that at any given x, the ∆y is kept constant to warranty constant slit width / dispersion along the slit.
You can modify the slit width by using the slit width bar (or type in directly the value in the associated box)
and click ‘View/Fit’ again.
If you wished a straight slit, just click ‘Straighten+Rotate’ after having clicked ‘View/Fit’. If you wish to
give the slit a given position angle, use the ‘Straighten+Rotate Angle’ bar (or type in directly the value in the
associated box) and click on ‘Rotate’. Remember that in normal pre-imaging, North is left (-x on detector)
and East is up (+y on detector), thus a positive angle here is measured from north (0) to west (+90, which by
the way would make very limited sense).
Once you are happy with you curved slit, click ‘Save’. This will update the ‘FLAG’ of the object to ‘A’
and store the fit parameters.
VIMOS User Manual
VLT-MAN-ESO-14610-3509
95
Unselecting objects
You can, at any time, reset a ‘FLAG’ to ‘S’ (select-able), i.e. erase the special flag you allocated to a object.
To do this: click on a special object then click on the button ‘UNSEL’. If you look now in the catalog, the
‘FLAG’ has been reset to ‘S’.
96
VIMOS User Manual
6.2.7
VLT-MAN-ESO-14610-3509
Step 6: The automatic slit assignment – your first ADP draft
Once you have at least defined a few reference objects, and modified all other flags of your choice in Step 5,
you can let VMMPS assign all the slit automatically (the relaxing part).
Select in the catalog window, at the very bottom, ‘Automatic Slit Assignment’. This will open the following pop-up window (with the central sub-panel empty to start with):
Here you should define several parameters:
VIMOS User Manual
VLT-MAN-ESO-14610-3509
97
• The Code Method: Maximum or Normal Optimization (yeah, you think maximum is always best but
wait). The Maximum optimization mode is more efficient in terms of number of placed slits, but favors
the smallest (X RADIUS) objects. The Normal Optimization is less efficient in terms of number of slits
(∼ 10% less) but does not bias against large objects. If you have only point source, go for Maximum.
If you have extended objects, you might want to use the Normal optimization to avoid biases in your
survey.
• The Grism: the task needs to know the Grism for two reason. First, in order to define correctly the
wavelength range; second in order to define the multiplexity (LR grism allow up to 4 slits in dispersion
direction, the MR grism up to 2). The selection of the grism will automatically set-up the minimum and
maximum wavelengths in the widgets below, such that your spectra have the maximum length on the
detector around the zero-deviation wavelength of the grism.
• The slit width (arcsec): this will define the slit width for all objects (except for reference objects defined
by a fixed 4” box and curved slits for which you have defined the slit width separately).
• Sky Region (arcsec): defines the minimum sky region that VMMPS will allocated on each side of your
object in the slit. The pipeline requires at least 1.8 arcsec. More will reduce the number of position-able
slits, but increase your sky subtraction capabilities later.
• Low / High Cut (Å): define the wavelength range that you need, i.e. the common length of the spectra.
As mentioned under ’Grism’ the value set are giving you the maximum spectral length (∼500 pixels
in LR mode, ∼2000 pix in MR mode, ∼4000 pix in HR mode), centered around the zero-deviation
wavelength of the grism. The software will guarantee that length for all spectra. On the other hand, this
will constrain the physical region on the mask in which it can place slits. E.g. if you pick the full range
in HR mode, only sources in a narrow band in the middle of the detector will be picked. It is thus a
good idea to reduce the range to the strict minimum you need. This will allow to select more objects.
• The Number of Masks: you can produce one or more masks for a given field. If more than one mask
is selected, the reference objects will be placed in all masks, the other special objects allocated in order
of priority. The task will fill the first masks with slits, then the second with objects that have not been
allocated yet and so forth.
• The Main Name of your ADP: this name will be extended by the quadrant number, the mask number
and the grism name when your ADP files get written on disk.
Once you have set up all the above parameters, you can ‘Assign Slits’ at the bottom of the window. This
will produce a log, shown in the middle sub-panel, telling you how many select-able stars were found in the
catalog, the number of special objects, the total of different placed slits6 .
If you are satisfied with the results, click ‘Close and Save’ and move on to Step 7.
If you wish to change parameters again, just do so and run ‘Assign Slits’ again. If you think that you
screwed something fundamental up (hey, you really forgot reference objects?) then go back to Step 5 by
clicking ‘Back to Changing FLAGS’.
• Dirty Trick: with that title, it will be the most read section of the cookbook, but beware!
If you are interested in a redder or bluer spectral region than offered by default by the software, you can,
instead of using the widget bar in ’Low/High Cut’, type in numbers directly in the boxes. If this results in a
larger range than offered by default, the software will not be able to allocate any slit. However, if you are, say,
only interested in the very blue part of the spectra, you could type in e.g. lower cut 3700 Å and upper cut 4500
6
Sometimes the algorithm fails with an ungraceful core dump. See Section 6.3.
98
VIMOS User Manual
VLT-MAN-ESO-14610-3509
Å. The software will then place the slits in a band at the top of the detector (dispersion direction is y, with red
at top) and this will make sure that the full blue end of all spectra lands on the detector 7 .
A word of caution: the values you type in here will only constrain the positioning of the slits by the
software, but of course, they will not influence the physical length of the spectrae (for that you would need
new blocking filters). Thus, in case of multiplexity in the dispersion direction, handle these parameters with
care in order to avoid contamination along the dispersion direction.
If you have no clue of what this is all about, you should probably not try the dirty trick.
7
The VIMOS instrument web pages give a good overview of the wavelength range you can expect for each grism as a function of
the slit position on the mask. For details see
http://www.eso.org/sci/facilities/paranal/instruments/vimos/inst/mos.html
VIMOS User Manual
6.2.8
VLT-MAN-ESO-14610-3509
99
Step 7 (optional): Fine tuning / last corrections
This step is optional. You can skip it and move directly to Step 8.
The end of Step 6 triggers your old catalog window to disappear and a new one to appear, as well as the
display to be updated.
The new catalog window looks as below, and is composed of as many virtual layers as you defined masks
for this quadrant. You can step from window to window under ‘Modify Slits:’, ‘Choose Mask’ and use the
pull-down widget that also indicates on which mask you are currently working.
At this point your ADP has been written, and you could proceed without changes to Step 8. Optionally, if
you have the feeling that you should modify a few slits, proceed with this Step but be careful (you are about
to try to optimize an optimization).
The window lists all objects that have been allocated slits in this mask. You can now do the final (careful!)
fine tuning by unselecting some slits (‘Unsel’) and/or adding some slits (‘New Slit’), following the procedure
that should start to be familiar to you by now, interacting with the display (finish by pressing ‘Enter’ in the
Pick-Object window). The new slit will be created with default values: the slit width will be the one that
you defined in Step 6 during the automatic slit assignment; the slit length defined by the X RADIUS of
the new object added to the minimum sky region defined in Step 6. Note that in low resolution slits that
overlap in dispersion direction get common slit width in Step 6 (to facilitate sky subtraction with second
order contamination), but this is not automatically done here. Also, there is no check for slit overlap, so be
extremely careful.
You can edit/modify the values for the new object. A new row with that object will appear at the end of
the catalog in main catalog window and the entries for this object can be modified by you. To do this, click on
the row with the new object (that gets highlighted then) and go to the pull-down menu ‘Edit’ to choose ‘Edit
selected object...’. This opens a window that allows you to change any entry for that object – typically you
want to change only the values of DIMX SLIT (slit length) and DIMY SLIT (slit width). For science targets
you should keep DIMY SLIT below 400 as wider slits will probably result in saturated screen flat calibrations
(to use wider slits you will need a special waiver). If in doubt, use the values of the other objects in the catalog
as reference. Once you are done, click on ‘Enter’, verify that the values have been updated in the catalog, and
click on ‘Close’. A good practice is then to ‘Plot Slits’ and visually inspect whether your new slit has the right
length (i.e. dimension in x) or whether it is overlapping/touching other slits. Remember to be generous with
100
VIMOS User Manual
VLT-MAN-ESO-14610-3509
space between slits, as you have to respect some physical mask stability criteria.
We caution again from doing to many modifications at this point (none should be necessary!) since it is
much easier to screw things up here than to improve them. Remember that the task already optimized the allocation. If you modify anything, be sure that you are still respecting all constraints (including contamination
issues along the dispersion direction, calibration issues, pipeline requirements, ...). If you have any doubts, do
not modify anything, that mask is certainly good enough already.
The software will not check whether your new slits are overlapping in the spatial or spectral direction with
already allocated ones.
The display now shows all objects in your input catalog marked with white circles, and the objects for
which slits were allocated in this mask with yellow squares (special objects are not marked any longer as
such).
VIMOS User Manual
VLT-MAN-ESO-14610-3509
101
You can use the button ‘Plot Slits’ and ‘Clear Slits’ to overlay the actual slits and expected spectral range.
Once you have made the last modifications you can move on to the next mask of the series as described
above (‘Choose Mask’), and once you are through with all masks, proceed to Step 8. You are almost there...
102
6.2.9
VIMOS User Manual
VLT-MAN-ESO-14610-3509
Step 8: Writing your final ADP – you have succeeded
Once you are happy with all slits in all masks for this quadrant, click on ‘Make final X ADPs’ where X
indicates the number of masks you have defined and for which ADP files will be written.
A last pop-up window will appear:
and ask you whether you want to restart a VMMPS pass e.g. with the next quadrant; exit VMMPS after
saving all results; go back to Step 7 (you forgot something...).
Depending on your choice, you will go back to Step 1, go have a coffee or go back to Step 7, respectively.
In the first two cases, you will have created ADP files ready to be attached to OBs.
CONGRATULATIONS!
IMPORTANT: note that an APD file edited “by hand” (e.g., changing the slit width with a text editor)
will not be accepted by p2pp. Based on the slitlets position and size, a checksum parameter is calculated
when you create the ADP files, and verified again when the ADP file is attached to an OB. If an inconsistency
is found, the ADP file will not be accepted by p2pp.
VIMOS User Manual
6.2.10
VLT-MAN-ESO-14610-3509
103
Loading/verifying previously defined mask
A simple way to come check the ADP your produced is offered in the ’VMMPS’ pull-down menu (3rd item):
’Verify ADP file’.
By selecting this task, you will be asked for an input ADP file and the corresponding pre-image. Similar
to the slit assignment task, it will display the pre-image and open a catalog window, this time containing only
the objects allocated in that given Mask.
You can then as in Step 7 overlay/clear the slits with the buttons ’Plot Slits’ and ’Clear Slits’.
Under no circumstances edit the ADP file by hand8 .
8
ADP file that has been once saved cannot be later modified.
104
6.3
VIMOS User Manual
VLT-MAN-ESO-14610-3509
Troubleshooting and known problems.
Here are some ’features’ that we have encountered for you. We are grateful for anyone sending us more ’features’. Remember that an expert is the one who has already made all mistakes himself, you can save some
time by using this list in case of problems...
We only assume that you have install the software properly. Especially checked whether your command
skycat points indeed to the right version, that your environment variables have been set correctly, the right
Tcl/Tk libraries are being used,etc. Since these have been our main sources of frustration when we debugged
the software. These will typically have the effect of not opening some windows, not showing the plug-in in
skycat, etc.
OK, so let’s assume that you have used your particular version of VMMPS successfully in the past, but
now you are in trouble with that particular $#%@#!! set of catalogs/images.
6.3.1
Cross-correlation task
• Process crashes during cross correlation. Check that the number of stars with CROSS=1 is below 500.
• The circles surrounding the objects used and discarded during the cross-correlation are not properly
displayed in the image. See section 6.2.3. This does not mean that the cross-correlation went wrong,
you need to go to step 3 to visualize further the results of the transformation of your contributed
catalog.
• You have run the cross-correlation but not objects were found in common (Bummer!).
Check if:
– your input catalogs have all the mandatory columns
– there is an overlap of objects between your contributed and your VIMOS pre-image catalog
– you have up-loaded the right pre-image, which is used to make the link between contributed and
VIMOS pre-image catalog coordinates.
• Your final transformation gives RMS> 1” (hmmm....)
– are you sure that your contributed catalog has a good astrometry? Especially that it does not suffer
from any distortions? Also, check that your pre-image catalog does not contain many spurious detections around the edges of the images. This may confuse the cross-correlation software.
6.3.2
Automatic slit assignment
• VMMPS currently does not check for the presence of reference objects (see section 6.2.6). It is required
that at least one reference object is defined per ADP file, and your OBs will be rejected by the User
Support Department if this is not the case.
• You loaded pre-image and catalog, but hardly any (no) object appears in the catalog window or is
marked in the display.
– check in the catalog window the ’Max Radius’. It happened to us that with the columns X WORLD
and Y WORLD in the catalog, skycat decided to pick its own Max Radius, which produced the
funniest effect (OK, you are not in a mood of laughing right now, never mind). Try changing by hand
the Max Radius to something really big (2700?).
• The classical one: you pressed during step 6 the button ’Assign Slits’ but of the gazillion of objects in
the catalog, none was assigned a slit.
VIMOS User Manual
VLT-MAN-ESO-14610-3509
105
– you might have been too ambitious in the common wavelength range. Try reducing it.
– check the flags in your catalog (they are not all F for some reason, are they?)
• Curved slits: you picked the object and are now clicking madly in the ’Curved Slit’ window to determine
the fancy curved slit, but no little dots appear. We have not found out why this happens every now and
then, but we know that even if you do not see them, they are there (spooky). Try defining a few (virtual)
points and click ’View/Fit’ that should work.
• There are occasions in which the subroutine/algorithm used to optimize the slit positioning, SPOC, does
not converge. In such cases you will see a core dump message saying ’Child process killed’. It does
not only happen if there are too many compulsory (”C”) targets but also if there are too many reference
(”R”) or forbidden (”F”) targets. One of the possible reasons is that the number of compulsory (”C”)
targets is too large. Try to solve this problem by reducing the number of (”C”) targets changing the flag
from ”C” to ”S” for a subset of them. If you still have problems please contact ESO’s User Support at
[email protected] for a possible workaround.
6.3.3
Problems with checksum in ADP files
• When attaching the ADP file, created with VMMPS, to an OB in P2PP I get the message that the file
is corrupt. What does it mean? Answer: The P2PP reports that the file is corrupt due to inconsistent
CHECKSUM value. This may happen due to opening the file with some editors which add some
invisible characters (e.g. end of line character), or sometimes by transferring files between windows and
linux computers (depending on the protocol and encoding used for the transfer). Additionally, recently
a bug was identified in the step where VMMPS writes the final ADP file. If the button ”Make 1 final
ADP” is selected, the pop-up window is displayed asking whether to overwrite and save the resulting
file .adp. The users should answer ”yes” to this question in order to have the correct CHECKSUM
written in the ADP file. However, at this point it is not possible to make any more modifications to
the mask design. If the button ”Make 1 final ADP file” is selected again and the file saved again the
resulting .adp file will have incorrect CHECKSUM saved, even if no modifications are made.
• The ADP file created with VMMPS has empty CHECKSUM, which then results in an error when I try
to submit the OBs. Answer: Make an ADP file by following the usual procedure and at the end when
your reach the step where the button ”Make 1 final ADP” has to be selected, a window is popped-up
saying that the file .adp exists and asking whether you want to overwrite it. If you say NO, the adp file
will still be there (because it was created before the question was issued) but it has empty checksum
value. ADP files with empty checksum are not accepted when submitting OBs. Please make sure that
when you create ADP files, you answer YES to the question whether to overwrite the file. However,
never do this step twice, because this will write an incorrect CHECKSUM.
6.3.4
ADP files and FITS headers
• The coordinates of MOS targets in the FITS headers make no sense. They are different from those
in the VMMPS ADP files. Answer: If, after the automatic slit adjustments, a slit is modified interactively (manually), then the coordinates written in the ADP file are in format: hh:mm:ss.ddd for RA
and dd:mm:ss.ddd for DEC. Instead for all slits automatically assigned the coordinates are written in
decimal degrees. Then when the FITS header is written the coordinate keywords: HIERARCH ESO
INS SLIT7 OBJ RA HIERARCH ESO INS SLIT7 OBJ DEC get truncated just before the first ”:”
and therefore have incorrect values. This may create problems for some data reduction pipelines (e.g.
VIPGI).
106
6.3.5
VIMOS User Manual
VLT-MAN-ESO-14610-3509
Other problems
• There are reports of a possible bug: the image is displayed but a pop-up message appears stating ”ERROR: Fits file VIMOS image”, after which one can not proceed with the cross-correlation. If that
happens the user can try to load the image again using the Open sub-menu of the File menu in the
skycat main window. If that does not work, please contact ESO’s User Support at [email protected].
VIMOS User Manual
6.4
6.4.1
VLT-MAN-ESO-14610-3509
107
Examples of catalogs
A contributed catalog
The following shows an example of a contributed catalog. Note that all mandatory columns (ID, RA, DEC)
are in, as well as a couple of optional reserved columns (X IMAGE,Y IMAGE), and a few user columns
(VI color, V MAG). All these will be carried over to the output of the Cross-correlation task (i.e. stored in the
resulting VIMOS catalog that will serve as input to VMMPS).
ID
1
2
3
4
5
6
7
8
9
10
11
12
13
14
15
16
17
18
19
20
21
22
23
24
25
26
27
28
29
30
...
RA
3:21:46.54
3:21:49.01
3:21:50.53
3:21:56.17
3:21:56.27
3:21:57.11
3:21:58.51
3:21:58.65
3:22:02.05
3:22:03.02
3:22:03.31
3:22:03.69
3:22:03.98
3:22:04.55
3:22:05.18
3:22:06.29
3:22:08.03
3:22:08.23
3:22:08.47
3:22:10.81
3:22:11.01
3:22:11.92
3:22:12.28
3:22:12.39
3:22:13.73
3:22:14.66
3:22:15.96
3:22:15.99
3:22:16.20
3:22:19.93
DEC
-37:13:43.9
-37:11:32.2
-37:15:04.7
-37:07:29.6
-37:16:22.5
-37:13:26.3
-37:11:34.0
-37:13:54.4
-37:05:41.3
-37:08:21.6
-37:08:08.7
-37:11:45.7
-37:07:01.0
-37:10:33.4
-37:09:13.1
-37:20:40.4
-37:05:37.7
-37:06:39.4
-37:13:56.4
-37:14:42.0
-37:16:31.6
-37:17:40.3
-37:18:52.5
-37:11:01.7
-37:11:56.5
-37:15:55.2
-37:13:32.6
-37:10:53.6
-37:15:47.4
-37:17:35.5
VI_color
1.751
1.948
1.774
1.599
1.927
1.063
1.198
1.372
1.399
1.924
0.8833
0.9918
1.462
1.101
1.393
1.095
1.592
0.9589
1.662
1.694
1.664
1.725
1.103
1.383
1.203
0.8767
1.283
1.441
1.217
1.712
V_MAG
23.26
23.35
23.53
23.17
23.37
23.26
23.44
22.83
23.3
22.41
23.15
23.31
23.08
23.39
22.9
23.09
23.19
22.85
22.5
23.58
23.53
23.41
23.54
22.79
23.3
23.32
22.39
23.32
22.99
23.24
108
6.4.2
VIMOS User Manual
VLT-MAN-ESO-14610-3509
A VIMOS pre-image catalog
The VIMOS pre-image catalog was obtained by running our favorite source detection algorithm on the original
VIMOS pre-image processed by the ESO pipeline. The output was just plain x,y detector coordinates, we
added manually a unique ID. That list, together with the transformation matrix in the header of the pre-image,
will be transformed into ra,dec and cross-correlated with the contributed catalog. This will in turn allow to
determine the best transformation from ra,dec of the contributed catalog to x,y in pixel coordinates.
ID
1
2
3
4
5
6
7
8
9
10
11
12
13
14
15
16
17
18
19
20
21
22
23
24
25
...
X_IMAGE
76.554
78.566
100.714
445.282
1589.924
767.057
1391.149
229.290
800.180
1010.375
1351.326
980.319
548.496
1534.235
1310.024
823.662
209.727
706.188
1797.688
1936.794
1996.330
1046.128
1737.622
2018.013
1851.735
Y_IMAGE
497.854
258.963
83.548
69.524
51.424
126.705
121.832
137.767
157.851
156.611
177.466
184.649
182.759
204.140
208.284
233.845
220.367
228.008
243.397
250.302
245.786
251.701
249.215
246.191
266.140
VIMOS User Manual
6.4.3
VLT-MAN-ESO-14610-3509
A VIMOS catalog
The following shows an example of a VIMOS catalog.
ID X_IMAGE
1
233.036
2
891.844
3
100.238
4
601.006
5 1708.843
6
978.752
7 1209.031
8 1212.790
9 1127.769
10 1146.020
11 797.370
12 456.249
13 993.617
14 2036.250
15 281.472
16 412.076
17 882.229
18 179.795
19 1205.669
20 1527.264
21 871.428
22 1458.521
23 370.528
24 472.827
25 934.416
26 385.186
27 1317.302
28 926.796
29 832.140
30 975.537
...
Y_IMAGE A_IMAGE B_IMAGE THETA_IMAGE
MAG
MAGERR
549.141 66.651 4.305
-89.9
7.4464 0.0001
360.569 53.105 7.911
-87.4
7.9803 0.0002
84.054 60.828 24.763
-10.0
11.2455 0.0053
67.561 428.910 9.910
-0.6
9.9766 0.0027
51.041 104.712 12.829
-1.9
99.0000 99.0000
48.620 12.126 4.303
-12.4
12.7846 0.0047
74.048 28.632 6.684
-2.3
10.1976 0.0008
59.548 18.403 5.147
-5.5
10.3681 0.0007
61.476 21.994 6.201
-89.3
8.5845 0.0002
73.446 10.094 8.440
-36.7
9.5569 0.0003
124.978
4.882 3.866
-87.6
10.2443 0.0003
66.226 35.585 7.872
3.8
10.2253 0.0010
51.635 19.266 10.830
16.2
99.0000 99.0000
59.659 58.085 8.955
-0.7
10.4253 0.0012
76.981 10.187 7.927
-33.5
10.6445 0.0008
102.149
4.210 3.252
89.7
11.2830 0.0006
477.262 35.568 3.459
89.9
8.0405 0.0001
30.820
1.176 0.901
8.0
17.1447 0.0356
89.548
4.645 2.893
6.0
11.3859 0.0007
133.530
3.779 3.458
-75.3
10.6818 0.0003
246.348
9.820 4.277
89.1
9.4710 0.0002
103.164
2.132 2.078
-22.0
13.4509 0.0025
123.550
2.785 2.643
-55.8
11.4401 0.0005
106.763
2.265 2.148
-53.4
12.7780 0.0014
137.586
3.261 2.952
52.2
11.0887 0.0004
121.721
2.487 2.315
-55.9
12.1251 0.0008
113.621
2.276 2.197
-3.6
12.4142 0.0010
142.882
3.188 2.830
63.5
11.0968 0.0004
129.522
2.786 2.713
-17.4
11.4509 0.0005
113.508
2.163 2.068
-10.8
13.0277 0.0017
109
110
6.4.4
VIMOS User Manual
VLT-MAN-ESO-14610-3509
Example of an ADP file
Your final ADP file should look something like this. It starts with a few PAF/INS keywords defining the file
itself. In then adds the crucial telescope/pointing parameters, before describing for which instrument configuration the ADP has been created. It then gives the most important part: the CCD to Mask transformation.
Only then comes the part describing first the reference objects and then all slits defined for this mask, with all
curved slits appearing at the very end (and an example is appended here).
PAF.HDR.START
PAF.TYPE "paramfile"
PAF.ID "073.A-0602C+3.18+2004-05-12T15:50:59.001+1"
PAF.NAME "wfi16_vm_LR_Red_M1Q1.adp"
PAF.DESC "ADP: Aperture Definition File in Pixel"
PAF.CRTE.NAME "vmmps-3.22+"
PAF.CRTE.DAYTIM "2004-05-12T15:50:59.001"
PAF.LCHG.NAME ""
PAF.LCHG.DAYTIM ""
PAF.CHCK.NAME ""
PAF.CHCK.DAYTIM ""
PAF.CHCK.CHECKSUM "954768746"
PAF.HDR.END
INSTRUME "VIMOS"
OCS.CON.QUAD "1"
INS.FOCU1.TEMP "12.31496"
INS.ADF.TYPE "MOS"
INS.ADF.VERSION "3.22+"
INS.ADF.UNIT "PIXEL"
INS.ADF.ID "wfi16_vm_LR_Red_M1Q1.adp"
INS.ADF.COMMENT ""
INS.MASK1.ID "-1"
TPL.FILE.DIRNAME "$INS_ROOT/$INS_USER/ADF"
TPL.FILE.KEEP "T"
DATE-OBS "2004-04-20T06:57:05.802"
TEL.GS1.ALPHA "191457.06000"
TEL.GS1.DELTA "-460255.35599"
TEL.GS1.PPOS "NEG"
ADA.POSANG "90"
TEL.TARG.ALPHA "191427.80880"
TEL.TARG.DELTA "-460426.61600"
TEL.TARG.EQUINOX "2000."
TEL.TARG.NAME ""
INS.ADF.GRISM.NAME "LR_Red"
INS.ADF.GRISM.SPECTLEN "640"
INS.ADF.SKYREG "1.8"
INS.REF.NO "1"
INS.ARC.NO "0"
INS.SLIT.NO "46"
INS.SHU.NO "4"
INS.SHU1.POSL "0"
INS.SHU1.POSH "769"
INS.SHU2.POSL "769"
VIMOS User Manual
VLT-MAN-ESO-14610-3509
INS.SHU2.POSH "1549"
INS.SHU3.POSL "1549"
INS.SHU3.POSH "2249"
INS.SHU4.POSL "2249"
INS.SHU4.POSH "2440"
PRO.CCD.MASK.DAYTIM "2004-03-25T19:21:18.334"
PRO.CCD.MASK.TEMP "14.490387"
PRO.CCD.MASK.X0 "-131.872451572"
PRO.CCD.MASK.XX "0.11921553"
PRO.CCD.MASK.XY "-0.00010888833"
PRO.CCD.MASK.X_0_0 "-0.18869123"
PRO.CCD.MASK.X_0_1 "0.00054856849"
PRO.CCD.MASK.X_0_2 "-4.812277e-07"
PRO.CCD.MASK.X_0_3 "1.3219545e-10"
PRO.CCD.MASK.X_1_0 "0.00022477421"
PRO.CCD.MASK.X_1_1 "-5.4715579e-07"
PRO.CCD.MASK.X_1_2 "5.5136728e-10"
PRO.CCD.MASK.X_1_3 "-1.8931227e-13"
PRO.CCD.MASK.X_2_0 "-8.3582309e-08"
PRO.CCD.MASK.X_2_1 "3.428154e-10"
PRO.CCD.MASK.X_2_2 "-4.1386207e-13"
PRO.CCD.MASK.X_2_3 "1.420323e-16"
PRO.CCD.MASK.X_3_0 "-6.977006e-12"
PRO.CCD.MASK.X_3_1 "-5.0065001e-14"
PRO.CCD.MASK.X_3_2 "8.499529799999999e-17"
PRO.CCD.MASK.X_3_3 "-2.9409612e-20"
PRO.CCD.MASK.Y0 "-126.018852108"
PRO.CCD.MASK.YY "0.11921683"
PRO.CCD.MASK.YX "7.9496414e-05"
PRO.CCD.MASK.Y_0_0 "-0.20919197"
PRO.CCD.MASK.Y_0_1 "0.00026838485"
PRO.CCD.MASK.Y_0_2 "-6.4661712e-08"
PRO.CCD.MASK.Y_0_3 "-1.2921672e-11"
PRO.CCD.MASK.Y_1_0 "0.00039152516"
PRO.CCD.MASK.Y_1_1 "-1.644576e-07"
PRO.CCD.MASK.Y_1_2 "-7.9799032e-11"
PRO.CCD.MASK.Y_1_3 "6.9466793e-14"
PRO.CCD.MASK.Y_2_0 "-2.9800619e-07"
PRO.CCD.MASK.Y_2_1 "-4.8490222e-11"
PRO.CCD.MASK.Y_2_2 "1.4704649e-13"
PRO.CCD.MASK.Y_2_3 "-6.7603913e-17"
PRO.CCD.MASK.Y_3_0 "8.9077175e-11"
PRO.CCD.MASK.Y_3_1 "7.827672800000001e-15"
PRO.CCD.MASK.Y_3_2 "-3.7850445e-17"
PRO.CCD.MASK.Y_3_3 "1.8410463e-20"
INS.REF1.TYPE "SQUARE"
INS.REF1.ID "22595"
INS.REF1.OBJ.RA "243.9472351074219"
INS.REF1.OBJ.DEC "-6.144344329833984"
INS.REF1.X "1017.37"
INS.REF1.Y "1153.78"
111
112
VIMOS User Manual
INS.REF1.DIMX "30"
INS.REF1.DIMY "30"
INS.SLIT1.TYPE "RECTANGLE"
INS.SLIT1.ID "27467"
INS.SLIT1.OBJ.RA "244.0057983398438"
INS.SLIT1.OBJ.DEC "-6.09309196472168"
INS.SLIT1.X "108"
INS.SLIT1.Y "2175.15"
INS.SLIT1.DIMX "58"
INS.SLIT1.DIMY "4.88"
INS.SLIT2.TYPE "RECTANGLE"
INS.SLIT2.ID "27313"
INS.SLIT2.OBJ.RA "243.9036865234375"
INS.SLIT2.OBJ.DEC "-6.095680713653564"
INS.SLIT2.X "161"
INS.SLIT2.Y "394.478"
INS.SLIT2.DIMX "44"
INS.SLIT2.DIMY "4.88"
INS.SLIT3.TYPE "RECTANGLE"
INS.SLIT3.ID "26930"
INS.SLIT3.OBJ.RA "243.9173889160156"
INS.SLIT3.OBJ.DEC "-6.101338863372803"
INS.SLIT3.X "263"
INS.SLIT3.Y "633.422"
INS.SLIT3.DIMX "38"
INS.SLIT3.DIMY "4.88"
INS.SLIT4.TYPE "RECTANGLE"
INS.SLIT4.ID "26695"
INS.SLIT4.OBJ.RA "243.9308166503906"
INS.SLIT4.OBJ.DEC "-6.104647159576416"
INS.SLIT4.X "312"
INS.SLIT4.Y "867.445"
INS.SLIT4.DIMX "56"
INS.SLIT4.DIMY "4.88"
INS.SLIT5.TYPE "RECTANGLE"
INS.SLIT5.ID "26710"
INS.SLIT5.OBJ.RA "243.9892578125"
INS.SLIT5.OBJ.DEC "-6.10461950302124"
INS.SLIT5.X "312"
INS.SLIT5.Y "1886.62"
INS.SLIT5.DIMX "56"
INS.SLIT5.DIMY "4.88"
....
....
INS.SLIT38.TYPE "CURVE"
INS.SLIT38.ID "1294"
INS.SLIT38.OBJ.RA "54.63366317749023"
INS.SLIT38.OBJ.DEC "-35.58836364746094"
INS.SLIT38.X "1934.2"
VLT-MAN-ESO-14610-3509
VIMOS User Manual
VLT-MAN-ESO-14610-3509
INS.SLIT38.Y "1748.86"
INS.SLIT38.DIMX "72.6812"
INS.SLIT38.DIMY "72.68"
INS.SLIT38.BEZIER.DY "3.41463"
INS.SLIT38.BEZIER.AX "0"
INS.SLIT38.BEZIER.BX "0"
INS.SLIT38.BEZIER.CX "72.6812"
INS.SLIT38.BEZIER.XX "1897.86"
INS.SLIT38.BEZIER.AY "0"
INS.SLIT38.BEZIER.BY "0"
INS.SLIT38.BEZIER.CY "37.0329"
INS.SLIT38.BEZIER.YY "1734.33"
....
....
INS.SLIT46.TYPE "RECTANGLE"
INS.SLIT46.ID "26017"
INS.SLIT46.OBJ.RA "243.9325103759766"
INS.SLIT46.OBJ.DEC "-6.108108043670654"
INS.SLIT46.X "381.9"
INS.SLIT46.Y "897"
INS.SLIT46.DIMX "18.78"
INS.SLIT46.DIMY "9"
113
114
VIMOS User Manual
6.5
VLT-MAN-ESO-14610-3509
User check list
You can use this list to go step by step through the process and tick off each step one by one.
2 Step 0 (most crucial): Prepare you catalog(s) and image(s)
You have prepared carefully your catalog(s) and have the corresponding VIMOS pre-images ready. You
thought carefully of the objects in your catalog: only objects you do not mind having a slit allocated to them
are in there, VIMOS pre-image and contributed catalogs have common objects, you did not modify your
VIMOS pre-image, ...
2 Step 1: Chose the right task to start with
According to your input catalog you go – to Step 2 if you have a VIMOS pre-image and contributed
catalog; to Step 3 if you have a VIMOS catalog
2 Step 2: From VIMOS pre-image and contributed catalog create a VIMOS catalog
Skip this step if you have already a VIMOS catalog
2 Step 3: Starting VMMPS for mask definition
(2 Step 4 (optional): re-arranging your VIMOS catalog)
2 Step 5: First pass – defining special objects
Have you been careful and defined at least 3 reference objects per quadrant?
2 Step 6: The automatic slit assignment – your first ADP draft
Spend some time thinking of your parameters. Tip: select only the wavelength range you really need.
(2 Step 7 (optional): Fine tuning / last corrections)
Only go through this step if you are sure to know what you are doing.
2 Step 8: Writing your final ADP
And remember never to edit this file by hand. Make finding charts after pressing ”Plot Slit” button, by
selecting ”File->Make Finding Chart” menu.
2 Step 9: Make finding chart for each quadrant
For each quadrant the finding chart has to be prepared with VMMPS using the plotSlit button and
selecting the File -> Make Finding Chart option.
YOU ARE DONE!
Chapter 7
PILMOS Tutorial
7.1
Introduction
Until 2011 VIMOS MOS observations have required mandatory pre-image observations to be carried out
(usually several months) before the actual MOS exposures in order to ensure accurate positioning of the slits
on the MOS masks. This conservative approach was adopted because there are significant technical difficulties
involved in accurately predicting slit positions without a pre-image. However recent upgrades to VIMOS have
improved its stability and a detailed investigation into the accuracy to which slit positions could be predicted
concluded that for many realistic observing programmes it would indeed be a valid approach. As of June
2012 Pre-ImageLess Multi Object Spectroscopy (PILMOS) is being offered as an option to VIMOS users.
Currently there are restrictions for MOS observations in PILMOS mode. In addition we encourage users to
take note of the expected PILMOS performance as described in [1]. The implementation of the PILMOS
option for mask preparation utilises tools and procedures that were already in place for pre-image based mask
preparation, consequently section 7.3 describes the procedure with particular emphasis on the new PILMOS
specific aspects and directs the reader to existing documentation for the unchanged aspects of the procedure.
7.2
Requirements and Restrictions for PILMOS usage
The initial PILMOS release is subject to conservative restrictions, some of which we expect to relax in future
periods. The priority is clearly that the PILMOS option does not lead to slit losses that are greater than would
have been experienced via the pre-imaging approach.
7.2.1
Restrictions
In addition to the normal restrictions for MOS/Pre-image, PILMOS observations must abide by the following
constraints:
• Slit widths ≥100 .
• No curved or tilted slits.
Observations that cannot be made within these constraints must use the conventional pre-image approach.
There is currently no plan to support curved or tilted slits in PILMOS mode.
7.2.2
Catalogue requirements
The catalogue requirements are identical to those currently stipulated in the VMMPS documentation (section 6.2.1 of the VIMOS user manual [1]), namely:
115
116
VIMOS User Manual
VLT-MAN-ESO-14610-3509
• All objects shall have very good (<0.200 ) relative astrometric coordinates (RA,DEC) on a single astrometric system. Notice that this constraint differs from the one in sec 6.2.1, as in that section we refer to
the relative positioning accuracy within a quadrant, while here we refer to all sources to be observed in
all quadrants.
• All objects shall have good (200 ) absolute astrometry.
In addition, the guide star should be chosen with the Guidecam software (see Chapter 5) and be on the
same astrometric system as the contributed catalogue. This may mean applying an offset to the contributed
catalogue in order to make it consistent with the guide star catalogue selected in Guidecam.
7.2.3
Other Considerations
PILMOS is not intended to replace completely the conventional pre-image approach; there will be many
observations for which PILMOS will not be appropriate. The most obvious is any observation for which a
good astrometric catalogue of sources is not available a priori and the pre-image is intended to be used in order
to obtain accurate astrometry. The accurate placing of curved or tilted slits on extended sources is also likely
to require a pre-image. On the other hand, if you have good astrometry for faint targets, but few good stars
for astrometric calibration of the pre-image, PILMOS may be a good option. Moreover, if your observations
can be arranged such that targets are not close (<200pix) to the detector edges and, in particular, the edges of
the total FoV then slit losses will be minimised. Also,if wide slits (>1.500 ) can be used then there is little to
be gained from taking pre-images. The expected performance of PILMOS as compared to conventional preimaging is presented in detail in [1]. Users who are concerned about the implications of source centroiding
accuracy offered by the two methods should consult that document.
Another consideration is the ratio of the total MOS integration time to the pre-image integration time.
Observations where one pre-image can provide masks for multiple MOS follow-ups do not pay much penalty
in pre-image integration time and may, in some circumstances, benefit from the extra check of a pre-image.
On the other hand, an observation that will consist of just one relatively short MOS follow-up, for which the
pre-image is in any case unlikely to reveal faint sources, would be well served by the PILMOS option.
7.2.4
PILMOS features to be aware of
• PILMOS does not work if the reference objects have entries in the ID column that are not integers,
and/or if their is another format inconsistency (e.g. in a number of rows some of the fields have merged).
It is the user’s responsibility to check that their catalogs are properly formatted.
• after starting PILMOS and entering the pointing coordinates into it, no image is displayed and a dialog
box pops up with the error message: ”Can’t find host IP address for: wvgarc” Normally it can be solved
by restarting the tool. This is not related to the PILMOS functionality, but rather an issue of the regular
Guidecam tool as well.
• if the magnitude column (containing the string ’mag’ or ’MAG’ as column description) is the last
column of the catalog and is the only magnitude column, PILMOS does not display the targets in the
’fake’ PILMOS finding charts. However, note that the VIMOS catalogue generation is not affected by
this, it is only the simulated fields (which are no more than a crude visual aid anyway) that are affected.
(The magnitudes are propagated properly, they just don’t get ”recognised” as magnitudes and used to
scale the flux in the simulated images, instead zero flux is used and the images are empty apart from
the guide probe vignette). The work around is to just add another column to the catalaog that is not a
magnitude column.
VIMOS User Manual
7.3
7.3.1
VLT-MAN-ESO-14610-3509
117
Preparation of MOS Masks without a Pre-Image
Step 1: PILMOS (Guidecam) Application
The PILMOS application is very similar to the existing Guidecam application described in Chapter 5. The
difference is that it includes the possibility of supplying a contributed catalogue from which a VIMOS catalogue and simple simulated pre-image are generated. For pre-imageless observations the PILMOS application
should be used instead of the Guidecam application to choose a guide star for your observations, the procedure is however identical to that described in Chapter 5. The only difference is that in order to take advantage
of the pre-imageless option, then you will need to supply the filename of your contributed catalogue in the
appropriate field of the Guide Probe Settings panel and click the “PILMOS button”.
The PILMOS application includes instrumental calibration parameters that are continually monitored and
will be updated with each release of the application (expected to be once per VLT period). Hence it is essential
that you have the latest version of the PILMOS application. A link to the official USD Phase 2 page for
downloading the PILMOS tool is available at:
http://www.eso.org/sci/facilities/paranal/instruments/vimos/tools
The tar file includes comprehensive installation instructions.
Figure 7.1: Guide Probe Settings window with ”Cont. Cat.” button (bottom middle) and PILMOS button
(bottom, 2nd from right)
Required Input
Figure 7.1 shows the Guide Probe Settings interface from the PILMOS application. The required input when
setting up PILMOS observations is then:
• Telescope (Co-ordinates): Nothing is changed here relative to conventional guidecam/pre-image use.
These are the co-ordinates of the centre of the field (located at the point where the four detectors meet):
118
VIMOS User Manual
VLT-MAN-ESO-14610-3509
– Preset RA: HH:MM:SS.sss
– Preset Dec: DD:MM:SS.sss
– Rot on sky: Currently the only allowed orientations are 0◦ , for -45◦ < δ <-5◦ , and 90◦ for any
observable δ. No waivers will be granted for PILMOS observations for any other PA setup.
• Guide Star Co-ordinates: Nothing is changed here relative to conventional guidecam/pre-image use.
Choose a guide star and its co-ordinates will be reflected in the Guide Star and Guide Probe fields.
• Guide Probe Orientation: Nothing is changed here relative to conventional guidecam/pre-image use.
By default the guide probe will be set to the NEG position and its silhouette drawn accordingly. Clicking
Alternate position will set the probe to the POS position, its silhouette and the Adaptor and Turn Table
fields will be updated to reflect this.
• Cont. Cat. button: This is a new functionality required for PILMOS observations. This brings up a file
system navigation window that should be used to locate the contributed catalogue file. The contributed
catalogue should be a text file with the coordinates of spectroscopic targets in exactly the same format
as described in Section 6.2.1 of this manual.
• APPLY button: This button should be clicked after changes to any of the above fields, including after
entry of a contributed catalogue file name, otherwise the file name will not be passed to the PILMOS
simulation.
• PILMOS button: Pressing this button will send the field and guide probe co-ordinates and the contributed catalogue to the PILMOS simulation.
Finding charts should be prepared as described in Chapter 5.5.
Format of contributed catalogue
The following is reproduced from Chapter 6 except for some exceptional information for PILMOS (emphasized):
The contributed catalogue contains all the objects that you wish to observe. Note that for PILMOS few
bright objects to be used as reference targets for each quadrant need to be included in the contributed catalogue, but there do not need to be many bright targets for cross correlation. All objects shall have very good
(±0.200 ) relative astrometric coordinates (RA,DEC) on a single astrometric system. Further, all objects should
have good (±200 ) absolute astrometry.
The mandatory columns in the contributed catalogue are (in upper case and in the following order):
• ID defining an identifier which must be unique and integer number.
• RA defining the right ascension of the object.
• DEC defining the declination of the object. RA and DEC entries are allowed in 2 formats:
– decimal degrees
– hh:mm:ss.s (including semi-colons)
The optional columns whose names are reserved are:
• CROSS is, for each object, either 1 if that object shall be used for the cross correlations, or 0 if it shall
not (e.g. if it is too faint, too elongated, etc.). Note that this is not relevant for PILMOS.
VIMOS User Manual
VLT-MAN-ESO-14610-3509
119
• FLAG shall be one of (upper or lowercase) C-compulsory; R-reference; F-forbidden; S-selectable (no
blank entry is supported, any other flag will be replaced by S). Though not mandatory in the sense that
the PILMOS code will not complain if it is not provided, PILMOS users are advised to select reference
stars based upon their astrometric source data.
• A ARCSEC the semi-major axis in arcsec
• B ARCSEC the semi-minor axis in arcsec
• PA the position angle (E of N in degrees) [These three are not used by the PILMOS code to compute
the object size in pixels along the x direction of the detector (i.e. along the slit).]
• Any other columns whose names do not match the above ones.
Notice only that the names X IMAGE and Y IMAGE are forbidden in the contributed catalogue—they
are used/computed later. If these are present, the software will kindly reject your catalogue until you remove
them (well... perhaps not too kindly).
All columns present in the contributed (input) catalogue will be carried over to the output catalogue. Some
columns will be used to generate new columns in the output catalogue.
PILMOS Output
The PILMOS application will produce the following output files and write them in the /̃.pilmos directory:
• VIMOS catalogues. One catalogue for each quadrant is created. The catalogues ave the same format
as produced by Step 1 of VMMPS, by the cross-correlation of the contributed and VIMOS Pre-image
catalogues (see Section 6.2.1). However it will not contain any A IMAGE, B IMAGE, THETA IMAGE
or X RADIUS columns. The filename will be: <filein> <quad> vm.cat where filein is the root name
of your contributed catalogue and quad is the quadrant identifier (B.1, A.2, A.3 or B.4).
• A PILMOS source chart for each quadrant. This is a FITS file containing:
– an image with the targets in the contributed catalogue shown at the appropriate detector coordinates, the outline of the guide probe vignette and the fixed vignetting in the detector corners.
– A header that contains all of the essential keywords that would have been in a pre-image of your
field
This is essentially a simplistic fake pre-image based upon your contributed catalogue with the WCS appropriate for the co-ordinates entered into Guidecam and with an indication of the guide probe vignette
for the chosen guide star . The filename will be pilmos [quad] sim [N].fits where quad is the quadrant
identifier (B.1, A.2, A.3 or B.4) and N is a counter that allows differentiation between the output of
multiple uses of the PILMOS application. These are the files required by Step 3 of VMMPS, Assign
slits from a VIMOS catalogue/produce ADP, of VMMPS (see Section 6.2.4)
7.3.2
Step 2: VMMPS
If the PILMOS application has been used successfully to generate the files described in Section 7.3, then the
Step 2 of VMMPS, Cross-correlate Contributed and VIMOS Pre-Image catalogues, which requires measured
source centroids from a pre-image, can be skipped. Instead it is possible to go straight to VMMPS Step 3,
Assign slits from a VIMOS catalogue/produce ADP which can now be executed exactly as described in Section 6.2.4. The PILMOS source chart is essentially a fake pre-image that should be used in this step. Sources
will be identified by VMMPS and can be selected for slit allocation in the same way as for a real pre-image.
ADPs will be produced as described in subsequent sections of [1] and header information from the PILMOS
120
VIMOS User Manual
VLT-MAN-ESO-14610-3509
source chart will be propagated to the ADPs just as it would have been from a real pre-image.
[1] Bristow. P. et al., PILMOS Implementation and Testing, available from the VIMOS web pages:
http://www.eso.org/sci/facilities/paranal/instruments/vimos/inst/mos.html
[2] VIMOS Pipeline User Manual, VLT-MAN-ESO-19500-3355 Issue 6.2
Appendices
121
Appendix A
VIMOS Filters
Table A.1 lists the characteristics of the VIMOS filters. The original transmission curves delivered by the
consortium are given in the following figures. The zero points and band-pass characteristics valid for the new
set of detectors can be found in Section 2.2.4
Table A.1:
Characteristics of the VIMOS filters. Updated filter characteristics can be found in
http://www.eso.org/sci/facilities/paranal/instruments/vimos/inst/imaging.html
Filter
λ0 (nm)
FWHM (nm)
U’
370
50
B BESS
430
97.0
V BESS
546
89.0
R BESS
648.5
130.0
I
830
180.0
z GUNN
950
160
GG475
edge filter high pass (> 475 nm)
GG435
edge filter high pass (> 435 nm)
OS-red
box filter
band pass 550-950
OS-blue
box filter
band pass 370-670
123
124
Figure A.1: U’,B,V filter transmission curves
125
Figure A.2: R,I,z filter transmission curves
126
Figure A.3: OS-blue, OS-red transmission curves
127
Figure A.4: GG435, GG475 transmission curves
128
Appendix B
VIMOS Grisms
This appendix contains the efficiency curves of all standard grisms available for VIMOS and the approximate
wavelength range for a slit which is located in the field centre. Where it applies (e.g. wavelength range) the
info presented in this Chapter relates to the old detectors.
129
130
Figure B.1: Efficiency curve of the low resolution grisms LR red, LR blue. The vertical lines mark the
desired blaze and the central wavelengths. The spectral range refers to the slit in the center of the field. The
cutoff wavelength is in most cases given by the order separation filters, the red CCD limit or the limit of the
VIMOS optics in the blue.
131
Figure B.2: Efficiency curve of the medium resolution grisms MR. The vertical lines mark the desired blaze
and the central wavelengths. The spectral range refers to the slit in the center of the field. The cutoff wavelength is in most cases given by the order separation filters, the red CCD limit or the limit of the VIMOS
optics in the blue.
132
Figure B.3: Efficiency curve of the high resolution grisms HR blueN EW , HR blueOLD . The vertical lines
mark the desired blaze and the central wavelengths. The spectral range refers to the slit in the center of the
field.
133
Figure B.4: Efficiency curve of the high resolution grism HR orange. The vertical lines mark the desired
blaze and the central wavelengths. The spectral range refers to the slit in the center of the field. The cutoff
wavelength is in most cases given by the order separation filters, the red CCD limit or the limit of the VIMOS
optics in the blue.
Figure B.5: Efficiency curve of the high resolution grisms HR red VPHG. The spectral range and efficiency
refers to the slit in the center of the field. The cutoff wavelength is in most cases given by the order separation
filters, the red CCD limit or the limit of the VIMOS optics in the blue.
134
Appendix C
Old detector system: until May 2010
The old detector mosaic of VIMOS consists of four 2k×4k EEV 44-82 CCDs, thinned and back side illuminated, single layer coating. It will be in use until May 2010 (if the VIMOS detector upgrade goes according
to plan).
Table C.1 indicates the basic characteristics of the VIMOS CCDs. Figure 2.9 shows the quantum efficiency
curve of one of the CCDs.
Table C.1: Basic characteristics of the (old) VIMOS CCDs
Parameter
Number of pixels
Pixel size (µm)
Dark current at –120◦ C (e− /px/h)
Deviation from Linearity (Full well; %)
Charge transfer efficiency
C.1
Value
2048×4096
15
<7
< 0.5
>0.999999
Detector read-out modes
The CCDs have two read-out ports but only one is used. This increases the read-out time but, as a benefit, the
gain, offset, and read-out noise are constant along the entire CCD.
In spectroscopic mode, the full CCDs (2048×4096 pixels2 are read-out; in imaging mode, readout is
windowed to 2048×2400 pixels2 . In fact, in both spectroscopic mode and in imaging mode, the CCDs are
vignetted by some hardware. In spectroscopic mode, the illuminated area is about 1970×4096 pixels2 , and in
imaging mode the illuminated area is about 1970×2300 pixels2 . The actual values depend on the individual
CCDs.
The default readout modes are indicated in Table C.2.
Table C.2: Old Detector System Readout Modes and Characteristics1
VIMOS Mode
Imaging
Spectroscopy
1 The
Size
4×2k×2k
4×2k×4k
Speed
225kpx s−1
225kpx s−1
Binning
1×1
1×1
new detector system should have these same modes.
135
Gain
Low
High
Port
1-port
1-port
Windowing
Not supported
Not supported
Readout time
1m
1m
136
C.2
Controllers
The 4 CCDs are controlled by two FIERA controllers. The detectors of channel 2 and 3 are controlled by
FIERA A (VIMOSA), the detectors of channel 1 and 4 by FIERA B (VIMOSB).
C.3
Read-out noise and conversion factor
Table C.3 indicates the readout noise and gain values for the 4 chips. Note that these values are subject to
change and are indicated here only for reference. Exact values to be found in the image headers under the
following keywords: HIERARCH ESO DET OUT1 GAIN, and HIERARCH ESO DET OUT1 RON (the
number x in OUTx could change depending on the output amplifier used).
Table C.3: Detector read-out noise and conversion factors. For reference only, subject to change
Chip
CCD 1
CCD 2
CCD 3
CCD 4
CCD 1
CCD 2
CCD 3
CCD 4
Read-out Mode
225 kpx s−1 , low gain (IMG mode)
225 kpx s−1 , low gain
225 kpx s−1 , low gain
225 kpx s−1 , low gain
225 kpx s−1 , high gain (MOS and IFU modes)
225 kpx s−1 , high gain
225 kpx s−1 , high gain
225 kpx s−1 , high gain
RON [e− rms]
5.3
5.2
5.3
4.9
4.3
4.6
4.7
4.3
K [e− /adu]
1.70
1.86
1.95
1.80
0.51
0.56
0.57
0.52
RON and conversion factor monitoring is available through the QC1 WEB pages
C.4
Fringing
These old detectors suffer from strong fringing in the red. With the z Gunn and Bessel I filters the fringing
amplitude is around 7% in imaging and in spectroscopy the amplitude of fringing for the HR grisms reaches
in 900nm 40% for slits of 1”.
This strong fringing was responsible for most of the flat fielding and sky subtraction woes in the red with
these old detectors.
Appendix D
Abbreviations and Acronyms
The following abbreviations and acronyms are used in this manual:
ACQ
ADP
ADU
AFC
A/R
AT
BOB
CCD
DEC
ESO
ETC
FEU
FIERA
FOMPU
FPAL
FWHM
GEU
GUI
HR
IFU
IOT
IMG
MEU
MOS
OB
OS
PRL
PSF
PTV
P2PP
RA
RMS
RON
TIO
TSF
VIMOS
VMMPS
Acquisition
Aperture Definition in Pixels
Analogue-to-Digital Unit
Active Flexure Compensation
Adapter/Rotator
Acquisition Template
Broker of Observation Blocks
Charge Coupled Device
Declination
European Southern Observatory
Exposure Time Calculator
Filter Exchange Unit
Fast Imager Electronic Readout Assembly
Folding Mirror Positioning Unit
Focal Plane Adaptation Lens
Full Width Half Maximum
Grism Exchange Unit
Grafical User Interface
High Resolution
Integral Field Unit
Instrument Operation Team
Imaging Mode
Mask Exchange Unit
Multi Object Spectroscopy Mode
Observation Block
Order Sorting
Pupil Relay Lens
Point Spread Function
Peak-To-Valley
Phase 2 Proposal Preparation
Right Ascension
Root Mean Square
Read Out Noise
Telescope Instrument Operator
Template Signature File
Visible Multi-Object Spectrograph
Vimos Mask-Manifacturing Preparation Software
137
138
VLT
Very Large Telescope
Å
e−
cm
h
kpx
min
mm
nm
px
s
µm
Ångstrom
Electron
Centimeter
Hour
KiloPixel
Minute
Millimeter
Nanometer
Pixel
Second
Micrometer
Index
HR-orange, 13
HR-red, 13
low resolution, 13
LR, 12
LR blue, 26
MR, 12
MR+OS-blue, 12
multiplex, 12
multiplex (IFU), 17
resolution, 13
spectral coverage (IFU), 18
spectral coverage and position in FoV, 14
spectral coverage in different quadrants (IFU), 18
spectral range, 12, 13
spectral range (IFU), 17
spectral resolution, 12
spectral resolution (IFU), 17
spectrum rotation, 23
standard grism/filter combinations, 12
VPH, 6
VPH HR-red, 13
VPH HR red, 18
active flexure compensation, 22
Aperture definition in pixels
ADP files, 25, 30, 31
calibration units, 21
CCD, 5
charge transfer efficiency, 20
controller, 20
dark current, 20
exposure shutter, 21
format, 19, 20
full well, 20
gain, 19, 20
number of pixels, 20
pixel size, 20
QE curve, 19
readout modes, 20
RON, 19, 20
exposure shutter, 21
field of view, 5
filters, 5–8, 11, 21, 25, 123–127
allowed combinations with grisms, 12
broad band filters, 8, 123
focus, 26
no filter with LR grisms, 13
order separation, 12
order sorting, 12, 14, 130, 131, 133
pre-imaging, 28
resolutions with grisms, 17
standard grism/filter combinations, 12
user supplied, 12
fringing, 21
grisms, 4–7, 12, 14, 25, 33, 129
allowed filter combinations, 12
allowed filter combinations per OB (MOS), 32
atlas of lines, 21
atmospheric dispersion, 26, 27
attached calibrations, 32
blocking mechanism, 23
calibration plan (IFU), 34
exchange unit (GEU), 7
fringing, 21
IFU masks, 14
fiber arrangement, 14
image scale, 5
IFU, 5
IMG, 5
MOS, 5
imaging, 7
broad band filters, 8, 123
filters, 123
zero points, 8
IMG mode, 7
isophotal magnitudes, 8, 11
manuals, 1
masks, 7, 30, 31
acquisition, 43
ADP files, 44
exchange at night, 32
exchange unit (MEU), 6
for spectrophotometric standard observation, 13
manufacture in visitor mode, 32
139
140
mask-to-ccd matrix, 29, 32
number simultaneous, 6
pre-images for preparation of, 7
preparation software (VMMPS), 25
spectrophotometric, 46
observing, 25
observing modes, 5
direct imaging, 5
integral field spectroscopy, 5
multi-slit spectroscopy, 5
overheads, 32, 33, 35
P2PP
WEB page, 1
p2pp, 25
Paranal Science Operations
contact information, 1
WEB page, 1
Phase I, 35
PILMOS, 115
Application (Guidecam), 117
contributed catalogue, 118
GuideProbe Settings, 117
requirements, 115
restrictions, 115
source chart, 119
Proposal preparation
Phase I, 28, 35
Phase II, 28
red leak, 21
service mode observations
contact information, 1
observing with VIMOS, 25
shortcomings, 22
grism blocking, 23
grism induced defocusing, 22
IFU fringing, 22
IFU masks vignetting, 22
rotator angle induced defocusing, 23
spectrum rotation, 23
temperature dependent bias level, 24
temperature dependent image scale, 24
spectroscopy
grisms response, 129
standard instrument characteristics
VIMOS, 6
VIMOS
instrument components, 6
WEBpage, 1
VIMOS Upgrade Project
new CCD, 6
old CCD, 5
visiting astronomers
general informations, 1
observing with VIMOS, 25
WEB page, 1
zero points, 8