1
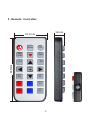
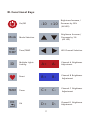
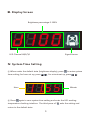
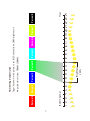
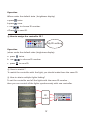
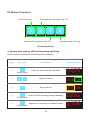
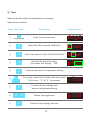
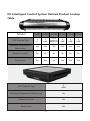
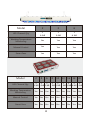
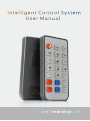
Intelligent Control System
User Manual
Mode
TIME
TEMP
ID
TIMER
+1 0
-10
OK
D+
D-
A+
B+
C+
A-
B-
C-
1
Enjoy
Technology Life
1
Contents
Ⅰ. Remote Controller
1
Ⅱ. Functional Keys
2
Ⅲ. Display Screen
3
Ⅳ. System Time Setting
3
Ⅴ. Standby Mode
4
Ⅵ. Brightness Intensity Adjustment LED
4
Ⅶ. Timer
4
Ⅷ. Auto Run Mode
7
Ⅸ. Memory Function
9
Ⅹ. Multiple Lights Linking
9
Ⅺ. Manual Control
11
Ⅻ. Working Temperature Monitoring
13
XIII. Smart Fans
13
XIV. Restore to Factory Settings
14
XV. Intelligent Control System Related Product Lookup Table
15
2
Ⅰ. Remote Controller
12mm
41.5mm
Mode
ID
TIMER
+10
-10
91.5mm
TIME
TEMP
OK
D+
D-
A+
B+
C+
A-
B-
C-
3
Ⅱ. Functional Keys
Brightness Increase /
On/Off
-10 +10
Decrease by 10%
(All LED)
Brightness Increase /
Mode
Decrease by 1%
Mode Selection
(All LED)
TIME
TEMP
ID
TIMER
OK
Time/TEMP
Multiple Lights
LED Channel Selection
A+
A-
Reset
B+
B-
Timer
C+
C-
Ok
D+
D-
Linking
4
Channel A Brightness
Adjustment
Channel B Brightness
Adjustment
Channel C Brightness
Adjustment
Channel D Brightness
Adjustment
Ⅲ. Display Screen
Brightness percentage 0-100%
8 8 8008
Signal Sensor
LED Channel A\B\C\D
Ⅳ. System Time Setting
① When under the default state (brightness display), press
time setting, for hour set up, press
Hour
TIME
TEMP
to enter system
, for minute set up, press
8 8 85 85
.
Minute
TIME
② Press TEMP
again to save system time setting and enter the LED working
temperature checking interface. The third press of
return to the default state.
5
TIME
TEMP
exits the setting and
Ⅴ. Standby Mode
①When press
, all LEDs will stop working but the power still
maintained within the system, the whole fixture is then under standby
mode . If you intend to stopthe light for a long time, pls turn off the switch
so as to save energy.
②The light will be awakend when
was pressed again and all the
previous settings will be recovered.The system automatically saves the
current settings ever y 45s.
Ⅵ. Brightness Intensity Adjustment
①Press
, the brightness of all LEDs will be changed gradually by 1%,
press +10
the brightness of all LEDs will be changed by 10% .
-10
②Press
A+
A-
to adjust the brightness of LED channel A.
③Press
B+
B-
to adjust the brightness of LED channel B.
④Press
C+
C-
to adjust the brightness of LED channel C.
⑤Press
D+
D-
to adjust the brightness of LED channel D.
Ⅶ. Timer
There are 8 var ying brightness periods available for each LED channel
in a 24-hour circle , the brightness and duration of each period can be
adjusted according to user ’
s preference. (PS: The timer function is base
on the system time, please ensure the accuracy of the system time before
you go for the timer setting.)
Notice: Timer function is valid only under the default state (brightness display).
6
7
Period 2
Period 3
Period 4
Period 5
Period 6
Period 7
Hour
Period 8
Brightness
100%
1 2 3 4 5 6 7 8 9 10 11 12 13 14 15 16 17 18 19 20 21 22 23 24
B LED Channel
Period 1
4th period which is from 7:00AM-12:00AM.
Target: As shown in the picture, to set B LED channel to be 100% brightness in
Timer Setting Demonstration
Operations as below
Steps
Key used
Procedures
①
TIMER
Enter timer setting
②
Choose LED channel B
③
Choose the period number 4
④
Activate the timer function
⑤
OK
8A 8 8 F8
8 8 8 F8
8 84 8 F8
8 84 8 8
Confirm and move on
To set the started time
⑥
Display Screen
of period 4, that is 7:00
8 87.80 80
(The started time of period 5 is the termination of period 4, so the started
time of period 5 should be set 12:00, which makes the period 4 duration
from 7:00 to 12:00. Left key/right key for minute setting, Up key/down key
for hour setting)
⑦
OK
enter to brightness setting
To set the LED brightness to be 100%
⑧
⑨
Confirm above settings and
UP (increase) /Down (decrease)
OK
Done all the settings
8
8 8 80 80
Ⅷ. Auto Run Mode
① How to choose auto run mode?
When under the default state (brightness display), press Mode to activate auto run
82 83 84 85
mode.
When dots are flashing , auto run mode is selected.
press Mode again to exit the auto run mode.
② How does auto run mode work ?
Auto run mode imitates the natural lighting effect, from sun rise to sun set, it
offers an lively lighting environment for all aquarium creatures.
(Lighting schedule graph of auto run mode)
Brightness
100%
90%
80%
70%
Section 1
60%
50%
Lighting
schedule
40%
30%
20%
10%
0%
0
2
4
6
8
10
12
14
16
18
20
22
24
0
2
4
6
8
10
12
14
16
18
Hour
Brightness
100%
90%
80%
Section 2
70%
Lighting
schedule
50%
60%
40%
30%
20%
10%
0%
9
20
22
24
Hour
Lighting schedule table of auto run mode
Section 1
Time
am
pm
Section 2
Brightness
Brightness
00-01
0%
0%
00-01
01-02
0%
0%
01-02
02-03
0%
0%
02-03
03-04
3%
3%
03-04
04-05
5%
5%
04-05
05-06
20%
20%
05-06
06-07
50%
If LED channels= A&B
50%
06-07
07-08
60%
Left A
60%
07-08
08-09
70%
B Right
70%
08-09
09-10
80%
80%
09-10
10-11
90%
90%
10-11
11-12
95%
95%
11-12
12-14
100%
100%
12-14
14-15
90%
90%
14-15
15-16
80%
80%
15-16
16-17
70%
70%
16-17
17-18
60%
50%
17-18
18-19
50%
30%
18-19
19-20
40%
10%
19-20
20-21
30%
3%
20-21
21-22
20%
0%
21-22
22-23
10%
0%
22-23
23-24
5%
0%
23-24
If LED channels= A
Left A
If LED channels= A&B&C
Left AC
B Right
If LED channels=
A&B&C&D
Left AC
BD Right
10
Time
am
pm
Ⅸ. Memor y Function
① The intelligent control system automatically saves the current settings
every 120s. If there is a power interruption, the system will recover the
latest settings in next start-up.
② The system memory can last for three months without power recharge.
There is no need to replace the built in battery, it is permanent.
Ⅹ. Multiple Lights Linking
① To activate the remote control function, you should match the controller
ID with the light fixture ID first.
Mode
TIME
TEMP
ID
match
+10
-10
OK
D+
D-
A+
B+
C+
A-
B-
C-
② How to assign the light fixture ID ?
My ID setting
11
ID
TIMER
Operation
When under the default state ( brightness display)
a.press
TIME
TEMP
twice.
b.press
ID
once.
c. use
d.Press
to choose ID number .
OK
to save ID.
③ How to assign the controller ID?
TIME
TEMP
+10
A-
A+
D+
Mode
OK
ID
-10
TIMER
C-
C+
D-
B-
B+
My ID setting
Operation
(when under the default state (brightness display)
a. press
ID
twice .
OK
to save ID.
b. use
c. press
to choose ID number.
④ How to match ?
To match the controller with the light, you should make them the same ID.
⑤ How to attain multiple lights linking?
To set the controller and all the lights with the same ID number ,
12
A-
C-
D-
C+
B-
A+
OK
B+
D+
-10
ID
TIMER
Mode
TIME
TEMP
ID
match
+10
then you can control all the lights synchronously with one controller.
Ⅺ. Manual Control
Timer setting
Decrease brightness by 1%
1
3
2
4
Increase brightness by 1%
System time setting
(Control panel )
① System time setting, LED working temp checking
when under the default state(brightness display):
Steps
Key used
8 8 85 85
Adjust minute
8 8 85 85
1
Adjust hour
8 8 85 85
4
Enter to LED working temp checking
08 82 89 8
Returns to interface to default state
8 8 80 80
Long press
②
③
④
3
2
Long press
⑤
Display Screen
Enter to time setting interface
4
①
Procedures
4
Long press
13
② Timer
when under the default state(brightness display):
Operations as below
Steps Key used
Procedures
Display Screen
Long press
Enter to timer function
8A 8 8 F8
②
4
Select the LED channels (A/B/C/D)
8 8 8 F8
③
3
Select the period order (1/2/3/4/5/6/7/8)
8 84 8 F8
④
2
Activate the timer function,
the screen will display “ON”
8 84 8 8
⑤
1
Confirm and enter to brightness setting
①
1
4
⑥
⑨
“4"for hour, “2" &“3”for minute
enter to brightness setting
3
2
1
8 87.80 80
Confirm above settings and
1
⑦
⑧
To set the started time of the selected period
3
2
Define the brightness
Finish all the settings and exit
14
8 8 80 80
③LED brightness adjustment
Operations as below
When under the default state (brightness display):
Steps
Key used
①
4
②
3
③
2
Procedures
select LED channels
(A/B/C/D)
Increase the brightness
intensity
Decrease the brightness
intensity
Display Screen
8 08 86 80
8 08 8 80
8 08 84 80
XII. Working Temperature Monitoring
Overheat Proofing: The system automatically monitors the LED woking
temperature, ensuring it is lower than 70℃.
XIII. Smart Fans
When the LED working temperature is lower than 35℃, smart fans will stop
running so as to save energy.
15
XIV. Restore to Factor y Settings
Operation:
when under the default state(brightness display):
Key used
TIMER
Procedures
Start procedure
Display Screen
8 84 8 8F
Step
②
Display Screen
①
Key used
Turn on the timer
8 84 8 8
Procedures
Display Screen
Step
Key used
Procedures
Step
Recover the factory settings
8 84 8 8F
16
③
XV. Intelligent Control System Related Product Lookup
Table
Model
50W
100W 150W 200W 250W 300W
LED Channel Qty
1
A
2
A&B
3 or 4
A&B&C or
A&B&C&D
2
A&B
2
A&B
2
A&B
Working Temperature
Monitoring
Yes
Yes
Yes
Yes
Yes
Yes
Manual Control
No
No
No
No
No
No
Smart Fans
Yes
Yes
Yes
Yes
Yes
Yes
LED Channel Qty
2
A&B
Working Temperature Monitoring
Yes
Manual Control
No
Smart Fans
Yes
17
Model
2
3
6
LED Channel Qty
2
A &B
2
A &B
2
A &B
Working Temperature
Monitoring
Yes
Yes
Yes
Manual Control
Yes
Yes
Yes
Smart Fans
Yes
Yes
Yes
Model
LED Channel Qty
2
4
6
8
10
12
16
18
20
2
2
2
2
2
2
2
2
2
A &B A &B A &B A &B A &B A &B A &B A &B A &B
Working Temperature
Monitoring
Yes
Yes
Yes
Yes
Yes
Yes
Yes
Yes
Yes
Manual Control
Yes
Yes
Yes
Yes
Yes
Yes
Yes
Yes
Yes
Smart Fans
Yes
Yes
Yes
Yes
Yes
Yes
Yes
Yes
Yes
18
Intelligent Control System Related Product
19