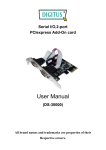
1
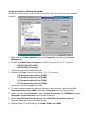
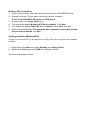
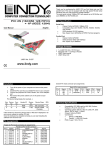
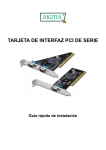
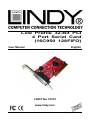
Low Profile 32-Bit PCI
4 Port Serial Card
(16C950 128FIFO)
User Manual
English
LINDY No. 51274
www.lindy.com
© LINDY ELECTRONICS LIMITED & LINDY-ELEKTRONIK GMBH - FIRST EDITION (February 2010)
Introduction
This PCI Host Adapter is a PCI controller board which can upgrade your desktop computer
to provide multiple RS232 (UART) ports.
The board supports a 32-bit 33 MHz PCI bus revision 3.0, RS232 transfer rate of 920
Kbps.
The low profile form factor can support both low profile and standard expansion slots.
It comes with drivers for Windows 98, ME, 2000, NT4.0, XP, VISTA &7.
Features
PCI Interface
Compliant with PCI Specification, revision 3.0 and PCI Power Management
Specification 1.1
32 Bit/33MHz fully compliant PCI host interface
3.3V Operation
Low Profile PCI Form Factor
Includes low profile & regular size PCI brackets
RS232 (UART) Serial Port
Multiple 16C950 high-performance RS232 UART DB9 channels
Superset and backward compatible to 16C550, 16C650, 16C750 and 16C850
128-byte FIFO per transmitter and receiver
Supports 5V DC output on Pin9 of each DB9 connector (Total 2A, 5V DC supply from
the card) for POS application
5V DC output can be individually enabled / disabled for each DB9 Port
Supports data transfer rate up to 920 Kbps
128 Rx interrupt thresholds
128 Tx interrupt thresholds
128 flow control thresholds
Supports Windows 98, ME, 2000, NT4.0, XP, VISTA, 7 and Linux
Package Contents
RS232 PCI Adapter Card
This manual
Low Profile & Standard PCI Brackets
Driver CD
Breakout cable (for 4 Port and 8 Port cards only)
5V Jumper Settings for each RS232 Port
DC5V on Pin9 of DB9 Connector = 5V Short
Normal RI function on Pin9 of DB9 Connector = RI Short
Installation
After driver installation, for proper operation, please setup the correct Data Rate to
14.745MHz frequency or by automatic frequency detection
Windows 2000 / XP installation
1. Power off the system. Remove the case covers and carefully insert the PCI Card into an
available PCI slot.
2. Replace the case covers, power up the system, and insert the driver CD into your
CD-ROM/DVD drive.
3. Windows will display the Found New Hardware Wizard, Click Next.
4. Select Search for a suitable driver for my device (Recommended) and click Next.
Make sure the Driver CD is in your CD-ROM/DVD.
5. Ensure Specify a location is checked and click Next.
6. Type in E:\ (where ‘E’ refers to your CD-ROM/DVD drive ) and click Browse.
7. Specify the driver location, e.g. E:\PCI IO Host \OXmPCI \Windows, and click OK.
8. When the wizard indicates that it has found a driver for the device click Next, then click
Finish.
9. Repeat Steps 3 – 8 until all the relevant files have been installed.
Verifying correct installation (Windows 2000 and XP)
Follow the instructions in this section to verify that the controller was installed
correctly.
1. Click Start and then select Control Panel. Double click System then select the
Hardware tab. Click on the Device Manager button.
2. Double click Multifunction adapters. If there is no yellow “!” or “?” in front of
OX16PCI954 PCI UARTs
OX16PCI95x PCI bridge
the driver has been installed correctly.
3. Double click Ports, if there is no yellow “!” or “?” in front of
PCI Communications Port (COM3)
PCI Communications Port (COM4)
PCI Communications Port (COM5)
PCI Communications Port (COM6)
the driver has been installed correctly.
4. To view information about the devices attached to the controller, right click the PCI
Communications Port (COM3) and select Properties from the context menu.
5. Select the tab labeled Data rate. Select Crystal Frequency at 14.745MHz or select
Detect Crystal Frequency for automatic selection.
6. Select Use default baud rate under Baud rate configuration options.
7. Repeat Step 4 - 6 for the setting of COM4, COM5 and COM6.
Windows 98 / ME installation
1. Power off the system. Remove the case covers and carefully insert the PCI Card into an
available PCI slot. Replace the covers and power up the system.
2. The Hardware wizard will display the Found New Hardware Wizard. Select Specify
the location of the driver (Advanced) and insert the driver CD into your
CD-ROM/DVD drive. Click Next.
3. Make sure the Search for the best driver for your device (Recommended), and
Specify a location options are both selected, uncheck the other boxes, and type in E:\
(If your CD-ROM/DVD is E:\) and click Browse.
4. Specify the driver location, example E:\PCI IO Host \OXmPCI\Windows. Click OK, and
click Next. (If your CD-ROM/DVD drive is E:)
5. When the wizard indicates that it found a driver for the device, click Next. Then click
Finish to exit the wizard.
6. Repeat Steps 2 – 5 until all the relevant files have been installed.
7. When the driver installation is complete, remove the driver CD and click Yes to restart
your computer.
Verifying installation (Windows 98 and ME)
Follow the instructions in this section to verify that the controller was installed
correctly.
1. Right click on the My Computer icon, select Properties, left click on the Device
Manager tab.
2. Double click Multifunction adapters, If there is no yellow “!” or “?” in front of
OX16PCI954 PCI UARTs
OX16PCI95x PCI bridge
the driver has been installed correctly.
3. Double click Ports, If there is no yellow “!” or “?” in front of
PCI Communications Port (COM3)
PCI Communications Port (COM4)
PCI Communications Port (COM5)
PCI Communications Port (COM6)
the driver has been installed correctly.
4. To view information about the devices attached to the controller, right click the PCI
Communications Port (COM3) and select Properties from the context menu.
5. Select the tab labeled Data Rate. Select Crystal Frequency at 14.7456MHz or Select
Automatic Crystal Detection for automatic selecttion.
6. Select User Defined Override Speed under Baud Rate Generation options.
7. Drag the speed bar to the correct baud rate.
8. Repeat steps 4-7 for the settings of COM4, COM5 and COM6.
Windows NT4.0 installation
1.
2.
3.
4.
5.
9.
Power up the system, and insert the driver CD into your CD-ROM/DVD drive.
Browse the driver CD, and specify the driver location, example:
E:\PCI IO Host\OXmPCI \Windows exe \NT4_Serial.
Double click on the Install_Serial icon.
The wizard will display Windows NT4 Device Installer. Click Next.
The wizard will display OxSer.INF. Select Install and click Next then Yes
When the wizard displays The operation was completed successfully and the
driver has been started, click Exit.
Verifying installation (Windows NT4.0)
Follow the instructions in this section to verify that the controller was installed
correctly.
1. Right click on the Start icon. Select Settings then Control Panel.
2. Double click Ports and select COM Port, example “COM3”.
The driver has started correctly.
LINUX Installation Procedures
For Linux Kernel 2.4.18 and above (including RedHat V8.0), IO-104 serial ports can be
automatically detected and installed. The following descriptions show the necessary steps
to double check that the IO-104 serial ports have been configured correctly by the Linux
platform:
1. Plug in the IO-104 card and start the system. After boot up, log in as supervisor, or use
'su' as shown below:
[test@lnx test]$ su
Password:
2. Check the PCI device status:
[root@lnx test]# lspci -v
....
00:0d.0 Serial controller: Oxford Semiconductor Ltd OX16PCI954 (Quad 16950
UART function 0 (prog-if 06 [16950])
Subsystem: Oxford Semiconductor Ltd: Unknown device 0000
Flags: medium devsel, IRQ 9
I/O ports at c400 [size=32]
Memory at dfffc000 (32-bit, non-prefetchable) [size=4K]
I/O ports at c000 [size=32]
Memory at dfffb000 (32-bit, non-prefetchable) [size=4K]
Capabilities: [40] Power Management version 2
....
If output of the lspci -v shows something like above, your PCI IO-104 card has been
correctly detected by the system.
3. Next we will check that the available serial ports reside in the system:
[root@lnx test]# more /proc/tty/driver/serial
serinfo:1.0 driver revision:
0: uart:16550A port:000003F8 irq:4 tx:0 rx:0
1: uart:16550A port:000002F8 irq:3 tx:0 rx:0
2: uart:16450 port:0000CC00 irq:9 tx:0 rx:0
3: uart:16450 port:0000CC08 irq:9 tx:0 rx:0
4: uart:16C950/954 port:0000C400 irq:9 tx:0 rx:0
5: uart:16C950/954 port:0000C408 irq:9 tx:0 rx:0
6: uart:16C950/954 port:0000C410 irq:9 tx:0 rx:0
7: uart:16C950/954 port:0000C418 irq:9 tx:0 rx:0
[root@lnx test]#
Listed as the UART 4~7 now are the serial ports from IO-104, and are assigned as
ttyS4 ~ ttyS7. The number may vary depending upon how many serial ports you
have originally installed.
The four IO-104 UARTs are now ready to use.
MS-DOS installation
This is a DOS command line program that sets the PCI IO card's UART/parallel
address to available COM/LPT ports.
To start the setup automatically, add SETIO.EXE to autoexec.bat file and copy SETIO.EXE
to c:\. Simply delete the SETIO.EXE line in the autoexec.bat file if you later decide not to
run it automatically.
To run the program manually, after bootup, type SETIO at the command prompt and hit
enter key.
Usage: setio [/option]
Options:
none :no parameters, set up system COM/LPT ports
Set PCIIO card's uart/parallel ports to available COM/LPT slots.
/u x :set uart starting address, x=io address in hex.
Assign uarts' starting address before setting up the COM ports.
eg. c:\>setio /u c400
/c
:show card's config. info.
Display card's PCI bus information, IRQ, its port address and
mapping to system COM/LPT.
/s
:show seg40 system resources.
Show system COM/LPT ports' address.
/h, /?:display help message.
This device complies with Part 15 of the FCC Rules.
Operation is subject to the following two conditions:
(1) this device may not cause harmful interference,
and (2) this device must accept any interference
received, including interference that may cause
undesired operations.