1
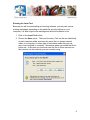
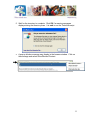
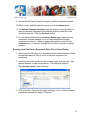
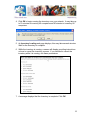
Using the TechAtlas Inventory Tools: An Introductory Guide Table of Contents Introduction ...........................................................................................................2 Additional Resources ............................................................................................2 Accessing the Inventory Tools ..............................................................................3 How do the Tools Work?.......................................................................................4 Selecting a Computer Inventory Tool....................................................................4 Manual Inventory Tool ..........................................................................................6 Local Inventory Tool..............................................................................................8 Running the Local Tool .........................................................................................9 Running Local Tool from a Removable Drive File or Shared Folder ...................13 Network Inventory Tool .......................................................................................14 Running the Network Tool ..................................................................................14 Copying a Profile.................................................................................................17 Editing a Computer Profile ..................................................................................18 Download and Print the Inventory Spreadsheet..................................................18 1 Introduction TechAtlas is a suite of online technology management and planning tools for libraries. Among many other features, TechAtlas includes inventory functions which can be used to record details on the hardware, software, networks, and support contacts for technology used in your library. This guide provides an introduction to the TechAtlas inventory tools. Additional Resources In addition to this user manual, WebJunction also offers free on-line access to the technology planning section of WebJunction including instruction on all features in TechAtlas: http://webjunction.org/TechPlan You may access TechAtlas technical support from WebJunction by sending an email message to the following address: [email protected] 2 Accessing the Inventory Tools To login to TechAtlas, point your web browser to the following address: http://webjunction.techatlas.org Login with your TechAtlas account information. If you are unsure whether your library already has a TechAtlas account, contact your State Library or intermediary or email the TechAtlas technical support team. When you have successfully logged into TechAtlas for the first time, you will be placed on the TechAtlas Home page. Click on the Inventory tab at the top of the page or select the Inventory link to access the TechAtlas computer inventory tools. You will then be placed on the Inventory page, from which you can access each of the tools described below. 3 How do the Tools Work? All of the TechAtlas inventory tools are web (HTML) forms, which present you with a series of text boxes to be filled out. Once you have entered all of the relevant information in the form, it is saved and added to the overall profile of your library’s technology stored in TechAtlas. The exception to this rule is the TechAtlas computer inventory tool. This tool can be accessed as a web form (as described above), or it can be run as an automated script. The automated script version of the computer inventory tool can be used on any computer running a version of the Microsoft Windows operating system. If run as a script, the computer inventory tool can automatically record details about the hardware and software installed on each computer without any direct intervention from the user. There are two versions of the automated inventory tool, known as the Local Tool and the Network Tool. Detailed instructions are available below for each of these tools, as well as the Manual Tool, which is the web form version of the computer inventory tool. Selecting a Computer Inventory Tool There are three different computer inventory tools available in TechAtlas. Depending on your library’s specific situation, you may use one, two or all three of the tools. 1. Make sure you are positioned on the Computer Inventory page in TechAtlas. 2. To begin the inventory, click the Inventory Computers button. The Inventory Paths page appears. 3. There are three different inventory paths to choose from: a. Wizard. Taking this path will lead to a series of questions designed to guide you to the best tool for your particular situation. This is the best option if you would like help choosing the right tool. b. Manual. This will take you to a web form, where you can manually enter details about each computer. It can be the quickest method if you intend to enter only the computer name and operating system 4 and you know what these are for your computers. This form can be used to inventory computers with the following conditions: • non-Windows operating systems such as Linux, Unix or Mac operating systems • no Internet Explorer access c. Advanced. This path leads you to a page with detailed information on each of the three available tools in order to help you choose the one that is most appropriate for your situation. 4. Choose a path and click Continue >. Follow the path to one of the three tools. Detailed instructions for each of the three available tools follow. 5 Manual Inventory Tool The manual tool consists of the New Computer Profile web form with fields allowing you to enter technical details about your computer (see image below). In completing the New Computer Profile, pay particular attention to the following required fields denoted with a red (*). • Computer Name. Every computer has a name that identifies it on the network. If you do not know how to find the name, click on Help in the upper right corner of any page in TechAtlas and then choose Where to find Computer names. • OS (Operating System). The majority of computers in your library will very likely be running some version of Windows. The particular version is normally displayed when you first turn on the computer. Make sure to choose only one OS here. Additional Optional information can be entered in the form, but is not required. • Public Access Computer checkbox in the Optional section is used to for some grant application and reporting processes. This is checked by 6 default. Be sure to uncheck this box for staff computers, server computers, etc. • Date Acquired: Enter your best estimate of the date this computer was manufactured. The goal here is to record the age of the computer itself, and not necessarily the date on which your library purchased or received the equipment. • Internet Access: Indicate the type of internet connection used. When you have made your entries, click the Save button. An Upload Complete confirmation screen appears, and then the Inventory Wizard screen appears. • If you have more computers to inventory, choose Yes and click Continue. o You will be asked if you would like to use the automated inventory tool or manual entry. If you choose Local Inventory Tool and click Continue: The Inventory Wizard screen appears with additional instructions (see Local Inventory Tool below) o If you choose Manual Inventory Tool and click Continue: • The Inventory Wizard screen appears. Click the Manual Tool button to open a New Computer Profile page. If this was your last computer or you wish to come back later to finish inventorying other computers, choose No and then click Continue >. You are returned to the Computer Inventory page. 7 Local Inventory Tool The Local Tool is a downloadable application that scans the computer it is running on and automatically records detailed technical information on that computer. It is recommended for anyone wanting to create a detailed inventory of both the hardware and software on your library computers. Important things to know about the Local Tool: • It only works on Windows computers – it will not work on computers running Linux, Unix, or versions of the Apple Macintosh operating system. • You must run it while logged in with administrative level access on the computer. o Verify this by going to the Windows Control Panel>User Account>User tab. Your user account should be listed in the User Name column for the Group titled Administrators for the appropriate domain. • Using Internet Explore is a requirement. • If you have very similar computers, you can run the Local Tool on one computer, and then copy that profile and change just the details that are different. • In order to get complete details on computers running Windows 95, 98, or NT, you will need to download and install Windows Management Instrumentation first. This is a Windows component that is included in later versions of Windows, but needs to be added to earlier versions. Without WMI, the Local Tool will only record the computer name and operating system. There is a link to WMI on the page where you download the Local Tool. • If you download the tool on one computer, you can save it to a floppy or shared folder to run it from your other computers without having to download it again. 8 Running the Local Tool Because you will be downloading and running software, you may see various warning messages, depending on the particular security settings on your computer. It is safe to ignore the warnings and allow the software to run. 1. Click on the Local Tool button. 2. Choose the Save option. The Local Inventory Tool can be run individually on each computer either by storing the script file in a shared network folder, or by copying it to some type of removable media that you can carry from computer to computer. Remember where you saved the file for future use. At this time you can both save the file for future use and run the inventory on the computer you are currently using. 9 3. Click Open 4. Select Run. If you do not see the Run option after saving, browse to the location where you saved the file and double-click on it. 10 5. Wait for the inventory to complete. Click OK if a warning messages displays during the inventory scan. It is safe to run the TechAtlas script. • A pop-up blocker message may display in the browser window. Click on the message and select Allow Blocked Content. 11 6. While the inventory is running, a screen will display providing instructions on how to cancel the inventory process. If you decided to cancel the inventory while it is running, use these procedures. 7. A message displays that the inventory is complete. Click OK. 8. A web page displays, listing details of hardware and software installed on the computer that was inventoried (see image below). Review the list of inventory details and make any additions or corrections you wish. 12 9. Ensure that the Public Access Computer checkbox is properly marked. 10. When you are satisfied with the inventory, click the Upload button. 11. The Upload Computer Inventory page will display, confirming that you have successfully transferred the computer inventory detail file to the TechAtlas web site. Click the Continue button. 12. You will be placed back at the Inventory Wizard page, where you are prompted to indicate whether or not you have additional Windows computers to inventory. Make an appropriate selection and click the Continue button to continue through the TechAtlas computer inventory process. Running Local Tool from a Removable Drive File or Shared Folder 1. After saving the VB script to a removable media or shared network folder as described above in step 2, move to the next computer to be inventoried. 2. Insert the removable media into the computer drive, if being used. Use Internet Explorer to open the saved file. The default file name is TS_Inventory_local_(name of library) 3. Click on the file. The script will open and begin to run. Follow the same procedures described in steps 5-12 above. 13 Network Inventory Tool The Network Tool is a downloadable application that will scan your computer network and collect information about the computers connected to it in the same way the Local Tool collects information about one computer. This tool does not work with all computers and networks, but if applicable, it can quickly gather detailed information on many computers at once. Important things to know about the Network Tool: • The Network Tool works on a Windows domain network with a server running Windows 2000 or 2003. It will also run on a Windows NT server if Microsoft WMI has been installed on it. • It will inventory computers running Windows Vista, XP, 2000 or NT (NT only if WMI is installed on each) that are joined to the domain and logged on. • Download and run the tool on any one computer on the network. • You must be logged in as a domain administrator to run the tool. • Using Internet Explorer is a requirement. • Running the tool should take less than a minute per networked computer. • Each computer to be inventoried should be turned on and accessible. Running the Network Tool Because you will be downloading and running software, you may see various warning messages, depending on the particular security settings on your computer. See Running the Local Tool for examples of the messages and pop-up windows. It is safe to ignore the warnings and allow the software to run. 1. Click on the Network Tool button. 2. Choose Open or Save the Visual Basic script to a designated folder for reference. 3. Click Run to continue or Cancel to discontinue the process. 14 4. Click OK to begin running the inventory over your network. It may take up to 15 minutes to inventory 40 computers and 80 minutes to inventory 80 computers. 5. An Inventory Loading web page displays, this may take several minutes. Wait for the inventory to complete. 6. While the inventory is running, a screen will display providing instructions on how to cancel the inventory process. If you decided to cancel the inventory while it is running, use these procedures. 7. A message displays that the Inventory is complete. Click OK. 15 8. A list of all computers found will display. Review the list. Computers not turned on or inaccessible will be indicated. Click on the link for a specific computer to review the inventory details. Make any additions or corrections you wish. . 9. When you are satisfied with the inventory, click the Upload button. 10. The Upload Computer Inventory page will display, confirming that you have successfully transferred the computer inventory detail file to the TechAtlas web site. Click the Continue button. 11. You will be placed back at the Inventory Wizard page, where you are prompted to indicate whether or not you have additional Windows computers to inventory. Make an appropriate selection and click the Continue button to continue through the TechAtlas computer inventory process. 16 Copying a Profile You can copy a computer profile to quickly create additional profiles for nearly identical computers, such as those originally granted from the Bill & Melinda Gates Foundation. 1. On the Computer Inventory page, identify the computer profile to be copied, and click on the View/Edit link in the Details column of the computer profile that you wish to copy (see image below). 2. The Computer Profile screen appears. 3. Scroll to the bottom of the page. 4. Click the Duplicate this computer profile button. 5. In the list of computers on the Computer Inventory page, you will now see a new computer added. The name will similar to the name of the computer that was copied, with “_Copy” appended to the end of the name. 6. Click on the View/Edit link for the copied profile. 7. Change the Computer Name field to the correct name. 8. Change any other fields that may be different for this computer. 9. If you wish to make another duplicate of the profile, click on the Duplicate this computer profile button to save changes and duplicate at the same time. You are returned to the Computer Inventory screen and can repeat these steps as many times as needed. 10. If this is the final duplicate, click the Save button. You are returned to the Computer Inventory screen. 17 Editing a Computer Profile You can edit the details within a computer profile in order to add, delete or update data. 1. On the Computer Inventory page, identify the computer profile to be edited and click on the View/Edit link in the Details column of the computer profile that you wish to edit. 2. Add, change or delete data as needed. 3. In the Optional section of the page, verify that the checkbox for Public Access Computer is properly indicated. 4. In the Manually Entered Information section, select from the dropdown box the Internet access service used, if not already indicated. 5. Enter the Date Acquired and Price Paid for a computer, if needed for grant application or tracking purposes. 6. Click Save. Download and Print the Inventory Spreadsheet The computer inventory data can be viewed and edited in a spreadsheet format: 1. Click on the Computer Inventory Spreadsheet link on the Computer Inventory page. 2. An Excel spreadsheet will open which can then be printed and/or saved to your directory folder. The document can be edited and used for technology planning or grant funding application use. 3. To return to the TechAtlas features, click the Back button on your Internet browser. 18