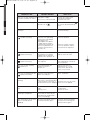
1
INGL.Hor05BN 29/3/05 12:01 Página 1
INGL.Hor05BN 29/3/05 12:01 Página 2
INGL.Hor05BN 29/3/05 12:01 Página 3
OVENS
CONTENTS
2.1.
GREETING
1. SAFETY NOTICES............................................................................................... 6
1.1. Installation and assembly............................................................................... 6
1.2. Use and operation..........................................................................................7
1.3. Safety for children.......................................................................................... 8
1.4. Care and cleaning......................................................................................... 8
2. INSTALLATION AND ASSEMBLY....................................................................... 9
2.1. Unpacking..................................................................................................... 9
2.2. Connection to the mains electricity................................................................ 9
3. USE OF THE OVEN AND PRACTICAL TIPS.......................................................14
3.1. Before using the oven for the first time.......................................................... 14
3.2. General description....................................................................................... 15
3.3. Operation of the oven.....................................................................................17
3.4. Accessories....................................................................................................18
3.5. Rotating spit................................................................................................... 22
3.6. Practical tips and cooking table.................................................................... 23
4. CLEANING AND MAINTENANCE........................................................................28
4.1. How to clean…...............................................................................................28
4.1.1. The outside of the oven.........................................................................28
4.1.2. The inside of the oven...........................................................................29
4.1.3. Accessories...........................................................................................32
4.1.4. Side grilles............................................................................................ 32
4.2. How to replace the bulb in the interior light...................................................33
5. TROUBLESHOOTING.......................................................................................... 34
6. ENVIRONMENTAL NOTE.....................................................................................36
6.1. Protecting the environmen............................................................................. 36
6.2. Energy-saving tips..........................................................................................37
INGL.Hor05BN 29/3/05 12:01 Página 4
INGL.Hor05BN 29/3/05 12:01 Página 5
GREETING
Dear client,
You are now the proud owner of a FAGOR oven and we would like to thank you for
the confidence you have shown in us.
FAGOR provides you with a new generation of domestic appliances that contribute
to an improvement in your quality of life thanks to our range of innovative, easy to use
and environmentally-friendly products.
The range of FAGOR products offers you a wide selection of cooking hobs, extractor fans, microwave ovens, dishwashers, washing machines, and refrigerators that
you can combine with your new oven.
When it comes to our products, it is our wish to respond to your demands as best we
can round the clock, for this reason we will be at your full disposal through our
Customer Service. In addition, you will be able to contact us via the Internet on our
web page, www.fagor.com, where you will also be able to find updated information
about the latest innovations from the FAGOR brand. Don’t hesitate to ask us.
Before using your oven for the first time, we recommend you read the user manuals
carefully. You will find there the information you will need to make the most of your
new FAGOR oven. Please pay special attention to all the safety advice and to the
comments on how to use and care for your oven correctly.
At the same time, we recommend you keep these manuals in a safe place as you
may find them useful in the future if you need to consult any doubt that might arise.
If you pass the appliance on to another person, please be sure to enclose the
manuals.
Warm greetings and welcome to the family of FAGOR clients.
The FAGOR brand.
5
INGL.Hor05BN 29/3/05 12:01 Página 6
1. SAFETY NOTICES
1.1. INSTALLATION AND ASSEMBLY
•
Once all the packaging materials have been removed, check that the oven is
not damaged and that the power cable is in perfect condition. If you detect any
damage or minor problems due to the transportation of the oven, do not use it
and call the Customer Service Centre.
•
Any work required for installing and repairing this oven must be done solely and
exclusively by an authorised fitter and following the manufacturer’s instructions.
The manufacturer declines any and all liability if the current standards are not
complied with.
•
The identification plate on the lower front part of the oven provides the technical
details and identification number of the apparatus. This must be consulted
before proceeding with any electrical connections.
•
It is dangerous to alter the characteristics or modify the product in any way.
•
For reasons of electrical safety, installable ovens must be fitted into appropriate
units and these must comply with the standards currently in force for this
purpose.
IMPORTANT
Any manipulation of the oven or cooking hob for the purposes of installation,
maintenance, etc. must be carried out with the oven disconnected from the
mains electricity.
6
INGL.Hor05BN 29/3/05 12:01 Página 7
1.2. USE AND OPERATION
•
This oven has been designed solely for domestic use. Use it solely and
exclusively for cooking food, never for any other purpose.
•
The oven must always be operated with the door closed, no matter which
programme you choose, including the grill.
•
Open the oven door carefully, hot steam may come out.
•
Never pour water directly onto the inside of a hot oven, the enamel might be
damaged.
•
After cooking, never pick up the bowls or pans used with your bare hands; always
use an insulating cloth or oven glove.
•
Do not leave the oven to cool down with the door open. Even if the oven door is
only left a little ajar, the front panels of the adjacent units may be damaged over
time.
•
Never store inflammable objects inside the oven.
•
Never place food or dishes directly onto the base of the oven. Always use a tray
or rack.
•
Do not sit or lean on the oven door, it might lead to problems with the door
closure adjustment.
•
After using the oven, all the controls must be turned back to the “0” position.
•
If the oven stops working for any reason, disconnect it and call the Technical
Service.
•
Your oven is equipped with a fan that helps to ensure a better evacuation of
vapours and guarantees the refrigeration of the furniture unit. The fan is working all
the time while you are cooking with the oven, and once you turn off the oven, the
fan will continue operating for some time to reduce the external temperature of the
oven. It is possible to feel the air emerging from the oven’s door and front panel.
7
INGL.Hor05BN 29/3/05 12:01 Página 8
1.3. SAFETY FOR CHILDREN
•
Always keep children at a safe distance and make sure that they do not manipulate the appliance without supervision.
•
Never allow small children to play with the oven or turn the control knobs. If the
programmer on your oven includes a child-safety mechanism, be sure to use it.
1.4. CARE AND CLEANING
•
For reasons of safety and hygiene, always keep the oven clean. The formation
of dried grease or other food remains may lead to a bad smell.
•
For a longer working life of your oven, it is recommended that general cleaning
be carried out frequently.
•
The oven must be turned off and sufficiently cooled down before any cleaning
or maintenance work is done on the oven, so that it can be touched without
danger.
•
The oven door must always close tight shut. Keep the door seal clean at all
times.
•
Never clean the oven with high-pressure cleaners or steam-cleaning machines.
•
Do not use corrosive or abrasive cleaners. If a product of this type comes into
contact with the oven front, wash it off immediately with water.
•
Avoid the use of sponges or scouring pads on the inside of the oven, as they
might damage the enamel. Follow the instructions provided in part “4. Cleaning
and Maintenance”.
8
INGL.Hor05BN 29/3/05 12:01 Página 9
2. INSTALLATION AND ASSEMBLY
2.1. UNPACKING
1. Cut the plastic film covering the entire package.
2. Carefully remove all the oven’s protective elements: top cover, edge protection
and polystyrene base.
With respect to the conservation of the environment, we recommend you follow the
advice given in part “6. Environmental Note”.
2.2. CONNECTION TO THE MAINS ELECTRICITY
a
Free-Standing Ovens
1. The measurements of the furniture unit in which
the oven is to be mounted must coincide with
those indicated in the diagrams, depending on
whether the unit is wall-mounted or floor-based.
-Figure 19
INGL.Hor05BN 29/3/05 12:01 Página 10
2. At the back of the oven you will find cable “A” which is used to make the
electrical connection.
WARNING: before starting to make any connections, check the following:
• that the mains voltage corresponds to the voltage indicated on the feature
identification plate.
• that the electrical mains the oven is to be connected to is powerful enough for
the maximum power the oven absorbs, indicated on the feature identification
plate.
Connect the cable to a socket with a good earth connection. This is essential to
ensure the correct operation of the electronic elements.
3. After it is plugged in, place the oven into the gap, taking special care not to leave
any surplus cable on top of the oven.
4. A switch must be placed in the most accessible site possible in order to
disconnect the oven, with a minimum of 3 mm between the contacts.
5. Fasten the oven to the unit with the 2 screws you will find in the bag of
accessories.
-Figure 26. If the cooking function selector is not at position “0”, turn it to “0” and set the time
on the oven.
10
INGL.Hor05BN 29/3/05 12:01 Página 11
b
Multi-purpose Models
b.1 GAS, MIXED, INDUCTION AND 4 ELECTRIC HOBS
1. The measurements of the furniture unit in which the oven is to be mounted
must coincide with those indicated in the figure.
2. Screw in the 4 cardans on the hob using the corresponding screws.
-Figure 3-
11
INGL.Hor05BN 29/3/05 12:01 Página 12
3. Next you must place the cooking hob on the worktop, leaving it disconnected until the oven is installed as the oven is connected through the hob.
Respect the hob installation requirements (refer to the hob instruction manual).
4. Install the boltholder part by slot
ting it onto the 2
bolts on the oven
and fix it in place
with 2 screws, as
shown in the figu
re. All of these items will be found in the bag of accessories that comes
with the cooking hob.
5. Lift the cardans and the cable off the hob,
insert the oven into the furniture unit leaving
enough space to house the cardans on the
bolts, screw them in tight and put the cable
into its connection socket.
6. Push the oven towards the inside and fasten it to the unit with the 2 screws
(Figure 2) that you will find in the bag of accessories that came with the oven.
7. Push the control knob supplements into place depending on the corresponding type of heat. All the supplements are in the bag of accessories that
came with the oven or the cooking hob. Next put the control knobs in place.
You will find these in the bag of accessories that came with the oven.
8. If the cooking function selector is not at position “0”, turn it to “0” and set the
time on the oven.
b.2 VITROCERAMIC HOBS
1. The measurements of the furniture unit in which the oven is to be mounted
must coincide with those indicated in Figure 3.
12
INGL.Hor05BN 29/3/05 12:01 Página 13
2. Place the cooking hob
on top of the worktop.
3. Release the switch box
that goes under the
cooking hob.
4. Next you must install the hob over the gap in the worktop, bearing in mind
that the switch box is hanging from the hob. Respect the hob installation
requirements (refer to the hob instruction manual).
5. Insert the oven into the gap in the furniture
unit leaving the switch box on top of the oven.
6. Insert the cable into the oven connector.
7. Insert the switch box over the centring bolts of
the component carrier as far as it will go and
fasten the 2 screws on the top.
8. Push the oven towards the inside and fasten it to the unit with the 2 screws
(Figure 2) that you will find in the bag of accessories that came with the oven.
9. Push the control knob supplements into place depending on the corresponding type of heat. All the supplements are in the bag of accessories that
came with the oven or the cooking hob. Next put the control knobs in place.
You will find these in the bag of accessories that came with the oven.
1
6
0
5
2
3
4
10. If the cooking function selector is not at position “0”, turn it to “0” and set the
time on the oven.
13
INGL.Hor05BN 29/3/05 12:01 Página 14
3. USE OF THE OVEN AND PRACTICAL TIPS
3.1. BEFORE USING THE OVEN FOR THE FIRST TIME
Adjusting the Clock
If the programmer on your new oven includes a clock, we recommend that you set
the correct time after connecting the oven to the mains electricity or after a cut in the
power supply.
First Cleaning
Before using your new oven for the first time, heat it up with nothing in it for about 30
minutes, with the door closed. Adjust the cooking functions selector in position
and set a temperature of 2500C. Make sure you have removed any possible labels or
protective plastic.
At the beginning, the oven may give off a strange smell. Furthermore, you may notice a little smoke. All of this is normal. This is the way to remove any possible remains
of grease from the inside of the oven left over from the manufacturing process. Once
the oven has cooled down, clean it following the instructions given in part
“4. Cleaning and Maintenance”.
Before using any of the accessories included with your new oven for the first time,
clean then with water, a little soap and a cloth.
14
INGL.Hor05BN 29/3/05 12:01 Página 15
3.2. GENERAL DESCRIPTION
FREE-STANDING OVENS
MULTI-PURPOSE OVENS
3
1.
2.
3.
4.
1
a
3
4
4
4
4
1
2
Function Selector
Temperature Selector
Programmer
Hob Operation Controls
2
Cooking Function Selector
Your oven offers different cooking functions. With the cooking function selector, you
will be able to select the most suitable cooking function at any time for the preparation of the food in question.
If the oven has fixed controls, the cooking function
selector can be turned to the left or right without any
problem.
If your oven has controls that can be hidden away, the
cooking function selector can be turned to the left
or right without any problem. These controls can be
hidden and revealed again in any position just by
pushing them.
15
*Different number of functions depending on
the model.
INGL.Hor05BN 29/3/05 12:01 Página 16
Now read below only the description of those functions coinciding with the symbols
appearing on your function selector:
Traditional Heat: With this function, the heat comes from both above and below,
heating the food in the traditional way.
Bottom Heat: The heat comes from the lower part of the oven. This is the most
appropriate function for finishing off the cooking of your food.
Gentle Grill or Gentle Grill with rotating spit: Only the central part of the grill
resistance is connected, allowing you to save power when toasting smaller portions of food. Place the items in the central part of the grill. (Rotating spit available in certain models only).
Strong Grill: The action of the grill covers the entire surface of the tray, allowing
you to toast large trays or several items of food at the same time. This setting is
suitable for cooking the same food as with the gentle grill but covering the whole
of the tray surface. Very appropriate for all types of toasting.
Bottom Heat with Fan: The fan uniformly distributes the temperature generated
at the bottom of the oven.
Strong Grill with Fan: Special option that allows toasting of food and an even
distribution of the heat with a fan. Ideal for grilling large roasts. In this way, roast
meats take on a golden colour all over
Traditional Heat with Fan: The heat comes from both the top and the bottom of
the oven and the fan distributes the temperature evenly. You can cook different
dishes on different levels at the same time without mixing smells or flavours.
Thawing: This heats the resistances to a very low temperature, so as to achieve
an even and fast thawing of frozen food. The thawing function can be used with
any type of frozen food.
Turbo Plus: The oven is heated with the circular resistance located at the back.
The fan drives the hot air around the oven to distribute the heat more evenly.
Ideal for working with different trays at various heights.
Celeris: Suitable for those dishes that need the oven to be pre-heated. With this
function the oven is heated to the chosen temperature in as little time as possible.
Once the oven has reached the temperature set, the thermostat pilot light goes
out, indicating that the oven is ready to be used for any other cooking function.
Pizza: The strong heat coming from the bottom area and the even distribution
of the temperature with the fan gives pizzas a particularly crisp base.
16
INGL.Hor05BN 29/3/05 12:01 Página 17
The general power pilot light will remain on whenever
any cooking function is selected.
b
Temperature Selector
Using the temperature selector, you can adjust the cooking temperature at any time
to the most suitable for preparing the food in question. The control turns to the right
from 500C up to 2500C.
If your oven has no temperature selection control,
follow the instructions given in the section entitled
“Electronic temperature control” in the timer manual.
The thermostat pilot light will go out when the
selected temperature is reached and then it will come
on and off from time to time while cooking to keep the
right temperature.
3.3. OPERATION OF THE OVEN
Follow these steps to turn on your oven:
5
4
3
1. Place the food in the oven, on the recommended
tray and level (see tables).
2
1
250
50
17
0
20
0
150
10
3. Set a temperature by turning the temperature
selector or following the instructions given in the
timer operating manual (see tables).
For example: 1500C.
0
2. Select a cooking function using the cooking
function selector (see tables). For example:
INGL.Hor05BN 29/3/05 12:01 Página 18
4. To set the programmer, follow the instructions provided in the specific user
manual (separate manual).
5. Once the cooking is finished, do not forget to turn the function selector back
to the “0” position and the temperature selector to the lowest position “ “
3.4. ACCESSORIES
For those models identified with an
on the identification plate, FAGOR can
provide an optional “Extra Safety Door”. If you would like to purchase it, please
contact your distributor: Reference: 991990324 EAN - Code: 84138880140797
The oven has 5 different levels on which to place the accessories. These levels are
engraved at the entrance to the cavity. If you wish, you can acquire additional accessories by requesting them from our Official Technical Service.
Your oven comes from the factory with some of the accessories described below:
Baking Tray
Aluminium tray ideal for baking.
Standard Tray
For all kinds of food.
Deep Tray
The new deep tray is suitable for cooking dishes with
a large amount of sauce or gravy, ideal for juicy
cakes, frozen food and large roasts.
18
INGL.Hor05BN 29/3/05 12:01 Página 19
Grille with Non-Tip Safety Catch
The new grille with its non-tip safety catch can be slid
out of its housing about three quarters of the way
without it tipping over. In this way, you will be able to
remove food easily from inside the oven. In addition,
it gives you the possibility of using it at any of the 5
levels available in the oven.
Catch
This grille can be used to hold any kind of container with food to be roasted or
toasted. It is also used for making roasts directly on the slats of the grille, in
which case we recommend you place a tray underneath the grille to collect
any juices given off by the meat and to keep your oven clean.
The grille has to be slid into place on the side slots with the catches facing
down, as indicated in the figure.
Pull System
The new “Pull System” design ensures a safe and
convenient handling of the food, which can be placed
at any of the 5 levels of the oven. The trays can be
pulled out of their housing about three quarters of the
way without tipping over or wobbling, thus reducing
the risk of burns. In this way, you will be able to remove food easily from inside the oven.
To insert the trays into the oven:
1. Insert the “Pull System” into the side slots until it
reaches the limits; you will have to raise it slightly
to pass it over the catches.
19
INGL.Hor05BN 29/3/05 12:01 Página 20
2. Next insert any of the trays onto the upper part of
the “Pull System”, fitting it between the four upper
catches.
If you wish you can also insert the grille with its
non-tip safety feature on the combination of the
“Pull System” and tray but with its catches facing
upwards.
3. Insert the whole set inside the oven completely.
To remove the trays from inside the oven:
Once cooking has been completed, slide the tray and grille set out until it reaches
the limit, once there you can do one of two things, as required:
a. Extract only the tray from inside the oven.
b. Extract the whole set from inside the oven. To do so, you will have to lift the
“Pull System” slightly to get past the catches that prevent it from tipping over.
Remember that the “Pull System” set of tray and/or grille with its non-tip safety
feature can be placed on any of the 5 levels.
Removable tray, Total Accessibility
With the new “Removable tray, Total Accessibility”,
food handling is more convenient and easier thanks
to the carefully studied design allowing the trays to
slide in and out smoothly.
The trays can be taken completely out of their housing for total accessibility. In addition, they remain totally stable so that you can work and handle them in total safety,
reducing the risk of burns. This will make it easier for you to remove food from inside
the oven.
This new total extraction system can be placed on any of the bottom 4 levels of the
oven, multiplying the cooking potential even more.
20
INGL.Hor05BN 29/3/05 12:01 Página 21
To insert the trays inside the oven:
1. Insert the “Removable tray, Total Accessibility”
onto the side slots as far as it will go; you will
have to raise it lightly to get past the catches.
Bear in mind that the round pegs go at the
back.
2. Next, pull out the telescopic runners as far as
they will go.
3. Then fit any of the trays inside the 4 upper catches
on the telescopic runners.
If you wish you can also insert the grille with its
non-tip safety feature on top of the combination
of the “Removable Tray”, but with the catches
facing upwards.
4. Insert the whole set inside the oven completely.
To remove the trays from inside the oven:
Once cooking has been completed, slide the tray and grille set out, once there you
can do one of two things, as required:
a. Extract only the tray from inside the oven.
b. Extract the whole set from inside the oven. To do so, you will have to lift the
“Removable tray, Total Accessibility” slightly to get past the catches that prevent
it from tipping over.
Remember that the “Removable tray, Total Accessibility” set of tray and/or grille with
its non-tip safety feature can be placed on any of the 5 lower levels.
21
INGL.Hor05BN 29/3/05 12:01 Página 22
3.5. ROTATING SPIT
If your oven is fitted with a rotating spit, follow the steps described below:
2
1. Place the spit hook “A” on the spit support “B”,
as shown in Figure 1 and then place it inside the
oven as shown in Figure 2.
1
2. Insert the spit in the food you want to roast and
hold it in place with the sliding jabs.
3. Insert the spit into the hole at the back of the oven
and place the other end on the spit support. Place
a tray on the lowest level to catch any juices
dripping off the food and unscrew the handle of
the spit to be able to close the door.
4. Switch the oven on using the Grill with Spit
programme
and set the temperature selector
at 2000C.
5. When the roast is ready, screw the handle back
onto the spit and take it out of the oven. Release
the sliding jabs and pull the spit out of the food.
22
INGL.Hor05BN 29/3/05 12:01 Página 23
3.6. PRACTICAL ADVICE AND COOKING TABLE
a
Suggestions and Practical Tips for Baking
PROBLEM
Cakes and pastries do not
rise enough
POSSIBLE REASON
•Wrong function selected
•The oven has not been
pre-heated enough
The roast or the baking is
very pale
•Temperature too low
•Inappropriate mould
material
SOLUTION
•Check the function selected
against the temperature
shown in the table
•Check the table for any preheating recommendations
•Check the temperature
selected against the
temperature shown in the
table; increase it slightly if
necessary
•Use only dark moulds
The roast or the baking is
very dark
•Temperature too high
•Check the temperature
selected against the
temperature shown in the
table; reduce it slightly if
necessary
The roast or the baking is
very dry
•The cooking time is very
long because the
temperature selected is
too low
•Check the temperature
selected against the
temperature shown in the
table
The roast or the baking is
very wet
•Too much liquid in the
dough
23
•Check the temperature
selected against the
temperature shown in the
table; increase it slightly if
necessary.
•Prepare the dough with less
liquid.
INGL.Hor05BN 29/3/05 12:01 Página 24
b
Tables
FOOD
PROGRAMME TEMPERATURE
TIME
POSITION
FOOD
PREHEATING
MEAT AND POULTRY
Veal
1,5 kg
210o
50-60 min
No
Pork loin
1,5 kg
220o
50-60 min
No
Roast chicken
1,25 kg
230o
50-60 min
No
Roast rabbit
1,2 kg
210o
25-35 min
No
Roast lamb
1 kg
220o
40-50 min
No
Pork leg
1,5 kg
180o
85-95 min
No
Pork ribs
1,5 kg
220o
30-40 min
No
Turkey
legs (2)
170o
40-50 min
No
Turkey
4 kg
190o
115-125 min
No
Caramel
custard
150o
30-40 min
No
Sponge cake
180o
25-35 min
Yes
Pears baked
in wine
240o
50-60 min
No
Pastries
220o
8-12 min
No
DESSERTS
24
ACCESSORIES
INGL.Hor05BN 29/3/05 12:01 Página 25
FOOD
PROGRAMME TEMPERATURE
TIME
POSITION
FOOD
PREHEATING
STARTERS AND VEGETABLES
Stuffed
aubergines
220o
12-16 min
Yes
Roast red
peppers1,25 kg
210o
30-40 min
No
Stuffed
tomatoes (4)
220o
15-19 min
No
Stuffed
courgettes (2)
200o
25-35 min
No
Roast
hake 1,5 kg
230o
7-9 min
Yes
Baked
prawns 1 kg
240o
4 min
Yes
Trout
1 kg
250o
9-11 min
Yes
Tuna
fillets
230o
10-14 min
No
Roast
fish 1kg
220o
13-17 min
No
Baked
salmon (4)
250o
8-10 min
Yes
Baked
cod 1,5 kg
220o
7-9 min
Yes
Pizza
220o
18-22 min
Yes
Bread
220o
18-22 min
No
Buns
210o
15-19 min
Yes
FISH AND SEAFOOD
VARIOUS
25
ACCESSORIES
INGL.Hor05BN 29/3/05 12:01 Página 26
FOOD
PROGRAMME TEMPERATURE
TIME
POSITION
FOOD
PREHEATING
MEAT AND POULTRY
Veal
1,5 kg
190o
50-60 min
No
Pork loin
1,5 kg
200o
50-60 min
No
Roast chicken
1,25 kg
210o
50-60 min
No
Roast rabbit
1,2 kg
230o
25-35 min
No
Roast lamb
1 kg
200o
40-55 min
No
Pork leg
1,5 kg
150o
85-95 min
No
Pork ribs
1,5 kg
200o
30-40 min
No
Turkey legs
pavo (2)
150o
40-50 min
No
Turkey
4 kg
170o
115-125 min
No
Caramel
custard
150o
30-40min
No
Sponge
cake
180o
15-25min
No
Pears baked
in wine
220o
50-60min
No
Pastries
200o
8-12min
No
DESSERTS
THAWING
For all kinds
of food
No
75o
26
ACCESSORIES
INGL.Hor05BN 29/3/05 12:01 Página 27
FOOD
PROGRAMME TEMPERATURE
TIME
POSITION
FOOD
PREHEATING
STARTERS AND VEGETABLES
Stuffed
aubergines
200o
12-16 min
Yes
Roast red
peppers1,25 kg
190o
30-40 min
No
Stuffed
tomatoes (4)
200o
15-19 min
No
Stuffed
courgettes (2)
180o
25-35 min
No
Roast
hake 1,5 kg
210o
7-9 min
Yes
Baked
prawns 1 kg
220o
4 min
Yes
Trout
1 kg
240o
9-11 min
Yes
Tuna
fillets
250o
10-14 min
No
Roast
fish 1kg
200o
13-17 min
Yes
Baked
salmon (4)
240o
8-10 min
Yes
Baked
cod 1,5 kg
210o
7-9 min
Yes
Pizza
200o
18-22 min
No
Bread
200o
18-22 min
No
Buns
220o
13-17 min
Yes
FISH AND SEAFOOD
VARIOUS
27
ACCESSORIES
INGL.Hor05BN 29/3/05 12:01 Página 28
4. CLEANING AND MAINTENANCE OF THE OVEN
4.1. HOW TO CLEAN...
4.1.1.
The Outside of the Oven
a. Ovens with an enamelled front:
Clean the outside of the oven preferably with warm soapy water. Abundant rinsing
is recommended. Dry it immediately afterwards with a soft cloth.
b. Ovens with stainless-steel front:
Clean the outside of the oven preferably with warm water and a little washingup liquid. Abundant rinsing is recommended. Dry it immediately afterwards with
a soft cloth.
If any stains are difficult to remove we recommend you use products specifically
designed for stainless steel. Test the product on a small area before you apply
it to the entire surface. Follow the manufacturer's indications closely.
Si las manchas son difíciles de eliminar le recomendamos que use productos
específicos para acero inoxidable. Pruebe el producto en áreas pequeñas
antes de aplicarlo a toda la superficie. Siga escrupulosamente las indicaciones
del fabricante.
c. Ovens with aluminium front:
Clean the outside of the oven with warm soapy water and a soft sponge.
Abundant rinsing is recommended. Dry it immediately afterwards with a soft
cloth.
Aggressive detergents, scouring pads and rough cloths should not be used.
d. Ovens with glass front:
Use a mild window cleaner. Clean the surface with a soft window-cloth or a lintfree cloth with microscopic fibres without applying too much pressure.
28
INGL.Hor05BN 29/3/05 12:01 Página 29
4.1.2.
The Inside of the Oven
In order to ensure the continued aesthetic attractiveness of your oven in the long term,
you should clean the inside of it regularly, preferably every time you use it; this way
you will avoid the generation of smoke and unpleasant odours in subsequent uses.
a. Ovens with “Slide” enamel:
Our new “Slide” enamel ensures minimal adherence of any food to the internal
surfaces of the oven, so this enamel is easy to clean. Clean the inside of the oven
while it is still warm using hot water with a little soap or a solution of water and
vinegar; after cleaning, dry the inner walls thoroughly with a soft cloth.
For in-depth cleaning or if the dirt is particularly difficult to remove, we recommend
the use of specialised oven-cleaners, following the manufacturer’s instructions.
Only ever use specialised oven-cleaners on a cold oven.
b. Ovens with self-cleaning panels:
In ovens with self-cleaning panels the rear plate
and the side panels are coated with a self-cleaning
enamel that eliminates fat and grease while the
oven is operating. These side panels are reversible,
which doubles the lifetime of their catalytic coating.
Sometimes, the largest splashes do not disappear until the oven has been turned
on and off several times. When the self-cleaning elements of your oven no longer
clean themselves well enough, it will be necessary to regenerate them. To do so,
please follow the steps outlined below:
1.
2.
3.
4.
5.
Remove the accessories and containers from the inside of the oven.
Thoroughly clean the oven surfaces that are not self-cleaning.
Place the function selector to position
.
Adjust the oven temperature to 2500C.
We recommend you leave the oven operating for between 30 and 60 minutes,
depending on the degree of dirt and grime on the self-cleaning parts.
6. Clean off any remnants of salt from the self-cleaning elements using a slightly
damp sponge (water only).
The self-cleaning elements of the oven will be completely functional again.
29
INGL.Hor05BN 29/3/05 12:01 Página 30
WARNING: Never clean the rear plate or the side panels with specialist oven-cleaners.
If you wish to clean the side walls on the inside of the oven, you will first have to take
out the grilles and the self-cleaning panels located behind them (follow the instructions
given in sub-part “4.1.4. How to clean the side grilles”).
Clean the side walls on the inside of the oven while it is still warm using hot water with
a little soap; dry the walls carefully with a soft cloth.
For in-depth cleaning or if the dirt is particularly difficult to remove, we recommend
the use of specialised oven-cleaners, following the manufacturer’s instructions. Only
ever use specialised oven-cleaners on a cold oven.
WARNING: Never apply this product to the oven’s self-cleaning surfaces.
To make the cleaning of the inside of the oven easier:
•
Connect the interior lamp. To do so: turn the temperature selector to the “0”
position and the function selector to any function, the light will then be on.
•
If you want to clean the glass cover protecting
the oven lamp: unscrew the cover and clean it,
preferably with washing-up liquid.
Once it is clean, replace the lamp cover following the procedure described.
30
INGL.Hor05BN 29/3/05 12:01 Página 31
•
It is possible to remove the oven door easily. Follow the steps described below
very carefully:
How to remove the door:
1. Open the door fully.
2. Completely raise
the bolts in the
hinges.
3. Close the oven door gently until you hear the catch engage; once you reach
the position of the catch, take hold of the door with both hands and continue
to push it closed while pulling upwards at the same time to lift the hinges from
their slots. The door will then be released.
How to install the door after cleaning:
1. Align the hinges with their slots until they
hook into place, as indicated in the figures.
2. Open the door fully, and push the bolts down
completely to their original position. The door
will then be correctly installed.
31
INGL.Hor05BN 29/3/05 12:01 Página 32
•
In some ovens it is possible to fold down the grill in the roof of the oven.
WARNING: the oven must be cold.
How to fold the grill down:
1. Lift up the grill rod.
2. Press it in towards
the back of the
oven.
How to re-insert the grill after cleaning:
1. Press the grill’s rod towards the back of the oven and hook the grill back
into place in its support.
4.1.3.
Accessories
Soak the accessories immediately after use in a normal household detergent. In this
way, any adhered food scraps can be easily removed with a sponge or a soft brush.
4.1.4.
Side Grilles
The grilles can be removed for cleaning. To do so, follow the steps described below:
How to remove the grilles:
1. Press the grille’s upper rod downwards to
unhook it from the support on the side panel.
32
INGL.Hor05BN 29/3/05 12:01 Página 33
2. Turn the grille as shown in the figure and pull
it outwards to extract it.
3. If your oven is self-cleaning, unhook the panel located behind the grille.
Clean the grilles in the dishwasher. To eliminate any stubborn dirt you can use
rougher cleaning sponges or brushes.
How to re-insert the grilles after cleaning:
Replace the grilles on the side walls by following the steps indicated above but
in reverse order.
4.2. HOW TO REPLACE THE BULB IN THE INTERIOR LIGHT
You can replace the bulb for the oven’s interior light by yourself if it stops working.
You can obtain these heat-resistant 25W replacement bulbs capable of with standing
3000C from the Official Technical Service or from a specialised electrical store. To
replace the bulb do the following:
1. Disconnect the oven from the power mains. If necessary, let the oven cool
down.
2. Unscrew the cover over the lamp by turning
it to the left.
3. Replace the bulb with one of the same type.
4. Replace the glass cover on the lamp following the procedure described.
5. Re-connect the oven to the power mains.
33
INGL.Hor05BN 29/3/05 12:01 Página 34
5. TROUBLESHOOTING
There may be small anomalies that do not necessarily mean the existence of a product
failure and so do not require a Technical Service call-out.
These small anomalies are often easy to correct. In order to avoid an unnecessary callout of a Service Engineer, check to see if the failure you have encountered is included
in the table below:
If your oven is still not working correctly after checking the points indicated in the table,
call the Technical Service department indicating the type of failure, the appliance model,
the product number and the serial number indicated on the features identification plate.
This plate is on the lower front face of the oven cavity.
Any repairs necessary must be carried out by Service Engineers from an Official
Technical Service. Any repairs made incorrectly might give rise to serious risk for users.
To resolve a doubt, make a query, or lodge a complaint in connection with the guarantee
or report a failure of your oven, contact FAGOR or, if you prefer, visit our web site:
www.fagor.com.
34
INGL.Hor05BN 29/3/05 12:01 Página 35
YOU NOTICE THAT...
POSSIBLE REASONS
The oven is NOT working. The •No power supply.
luminous symbols are not lit.
•The oven is not connected.
WHAT TO DO
•Check the status of the
electrical installation.
•Connect the oven.
The oven is NOT working.
•The timer control is in
position “0” or
•Turn the selector manually
or set the desired cooking
time.
The oven is making a series
of beeps.
•Several reasons.
•Read the timer’s user
manual carefully.
The oven is NOT working.
symbol is flashing.
•Several hours have passed
with the oven operating,
without any timer button
being pressed.
•Interruption of the power
supply, with the function
selector not in position “0”.
•Oven installed with the
function selector not in
position “0”.
•Turn the function selector
to the “0” position.
The oven is NOT working.
symbol is flashing.
Oven just installed, or
interruption in the power
supply, with the function
selector not in position “0”.
Set the clock to the right time
and the oven will start.
The oven is NOT working.
symbol is flashing.
The time pre-set for cooking
has elapsed.
Turn the function selector and
The temperature selector to
the “0” position.
The oven is NOT working.
symbol is lit.
Oven blocked with the
function selector in
position “0”.
Release the timer as
indicated in the “Child
Safety Lock” part of the
timer’s user manual.
The oven IS working, but the
symbol is flashing.
The time set for the oven
alarm has elapsed.
Press any button.
The oven light is NOT
working.
•The lamp is not operational. •Change the bulb.
•The oven is not connected or
•Connect the oven or check
your electrical system has a
fault and the fuse has tripped. if the fuse has tripped.
Smoke comes out when in
use.
•Oven temperature is too
high.
•Greasy oven.
•Turn the function selector
to the “0” position and set
the clock to the right time.
•Reduce the oven
temperature.
•Clean the oven.
The oven makes a noise after The oven fan is operating
cooking is completed.
(even with the oven off), to
cool down the temperature
in the surroundings.
This is absolutely normal.
The interior glass of the oven
door is misted up and
dripping.
Push the accessory further
in to prevent it coming into
contact with the glass.
An accessory (grille, tray) is
in contact with the glass.
35
INGL.Hor05BN 29/3/05 12:01 Página 36
6. ENVIRONMENTAL NOTE
6.1. PROTECTING THE ENVIRONMENT
Our company strives permanently to develop technologies and solutions aimed at
reducing energy consumption and preserving natural resources, thus effectively
contributing to a reduction in the aggressions suffered by the environment.
Disposing of the packaging from your new oven
Your new oven is covered by protective packaging during its transportation to your
home. All of the packaging materials used are environmentally-friendly and can be
recycled or re-used.
Make an active contribution to protecting the environment by using appropriate
methods for recycling and disposing of packaging materials. Your local council will
be pleased to inform you of the most efficient and up to date possibilities available
for the elimination of these materials.
36
INGL.Hor05BN 29/3/05 12:01 Página 37
6.2. ENERGY-SAVING TIPS
•
Pre-heat the oven only where this is indicated in the recipe or in the cooking
table for the dish you want to make.
•
It is better to use dark baking moulds, preferably enamelled in black, as these
materials absorb heat particularly well.
•
If you wish to bake a batch of several cakes, you should do so one after the
other. As the oven is already hot, the baking times of second and subsequent
cakes are shorter. You can also prepare two cakes simultaneously by placing
rectangular moulds side by side.
•
If using the oven continuously for a long time, you can switch it off 5 or 10
minutes before the time indicated and take advantage of the residual heat to
finish preparing the food.
•
If your oven includes the “Gentle Grill”
function, use it to prepare small
amounts of grilled food, placing the food in the central part of the tray or grille.
37
INGL.Hor05BN 29/3/05 12:01 Página 38
ENVIRONMENTAL TIPS
In order to protect the environment, deliver your used appliance to an official
collection centre or recyclable material recovery centre.
Before you dispose of your used appliance, make it unusable by cutting the
power cable.
38
INGL.Hor05BN 29/3/05 12:01 Página 39
INGL.Hor05BN 29/3/05 12:01 Página 40
03-05
C60T206A9
Printed on recycled paper