1
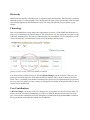
Creating a Page
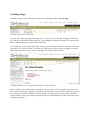
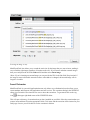
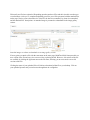
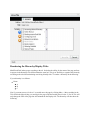
Creating a new page can be done with a single click. On the page toolbar click New page.
Creating a page is just a click away
You have just created a sub-page of the page you were previously viewing. This new page is titled Page
Title and you see the editor is already open for you to change the contents of this page. You can now click
Save or add the content you desire and then click Save.
Let’s assume you were viewing a page titled "Project" and you decide to add a new sub-page. You create
a page titled "Jim’s Seed Company” and click save. What you just did was create a sub-page, or a child
page, to the page titled "Project". This is a hierarchy. We’ll discuss this more later.
A sub-page makes it easy to organize information in a logical manner
There is another way to easily create a new page too. If you create a link to a page that doesn’t exist you
have created a wanted page. This page is denoted by the link being in red text with an underline as you see
above. If any user clicks on a link to a wanted page they will browse to the new page and be presented
with the editor as if they just created a new page. If the user clicks Save they have just created a new page
from the wanted page.
Editing a Page
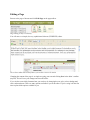
Browse to the page of interest and click Edit Page on the page toolbar.
Page editing is only a click away
You will now see a simple, but very sophisticated rich text (WYSIWYG) editor.
The rich text editor has all the features you need to create rich content
Changing the content of the page is as simple as typing your text and clicking Save in the editor’s toolbar
(top left). This will save your changes and close the editor.
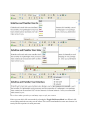
If you wish to create richly formatted text you can do so by changing the text style, color or background
color, and much more. There are many options available to you in the editor. If you’re using it for the first
time explore all the options available to you.
The rich text editor provides you with many ways to style your content
Notice you can edit in full screen mode by selecting the Toggle Full Screen Mode icon. When in full
screen editing mode the user only sees the editor. This is more comfortable for some users because it is
exactly like the experience in word processors.
Full screen mode simplifies the interface
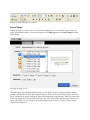
Insert Image
Adding an image to a page is easy. You can insert an image that you’ve attached to a page or insert an
image from external resource. To insert an image first click Edit page then select Insert image from the
editor toolbar.
Inserting an image is easy
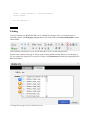
One of the many ways MindTouch Deki stands out is the ability to browse all pages and their contents,
just like a word processor. In the insert image dialog box, browse to the location of the image you wish to
insert. You browse by double-clicking the pages and navigating the page hierarchy. When you single-click
to select an image you will be presented with a preview of the image in the right most pane. When you’ve
selected the image you wish to insert you can then change aspects of how it is inserted. These include
alignment and image size.
Inserting an image is easy
MindTouch Deki also allows you to search the entire site for the image that you want to insert, making it
easy to find the right image regardless of location on the wiki. If you want to embed an external image*
then you would paste the url in the Link to field and then select Insert image.
*Note: If you’re inserting an external image you can provide the URL in the link field. Keep in mind, if
the image is removed from this external resource or the address is changed, the inserted image will no
longer be viewable.
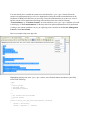
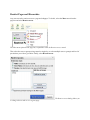
Insert Extension
MindTouch Deki is a powerful application that not only allows easy collaboration but also allows you to
create mashups and integrate with applications and web services. The extensions dialog in the WYSISYG
editor gives an intuitive user interface for users to insert the extensions. To get started click on the cog
icon
in the upper right hand corner of the WYSIWYG editor.
This will open a directory of extensions that you have installed on your Deki. Select the extension that you
want to insert and then fill out the appropriate fields. Click insert and the extension will be inserted in your
Deki page. On save you will be able to see the extension in fruition.
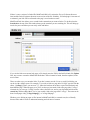
In the screenshot seen below we have selected to embed an RSS feed in a wiki page. After selecting
Atom/RSS Feeds we then choose between the way we want the feed to be displayed, in a table or a list,
and finally we copy and paste the feed into the feed field. We can then select Insert Extension to embed
the extension in the page. Extensions have varying requirements and setup. Consult the extension
documentation to learn more about the specifics of each extension.
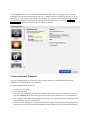
Create and Insert Templates
One way of adding content to your wiki while ensuring it abides by certain formatting and layout
standards is to use MindTouch Deki Templates.
To create a template do the following:
1. Go to Tools -> Templates
2. Next click New Page
3. This will create a New Page with the title Template: Page Title, to use it as a template you need to
keep the Template: in the title of the page otherwise the system will perceive it as a normal page.
4. If you’d like to add subpages to the template you can do so by clicking New Page while being on the
parent Template: page for your template
5. Once you create your page(s) you can add content like images, attachments, and dekiscript that will
dynamically react to the location of the template or other variables once it is inserted into the main
hierarchy.
6. Once your Template is created you can use it by going to a page and clicking the insert Template
button which looks like this: template.png and then selecting the template from the dropdown
Tips
You can add subpages with your Templates so that you can insert subtrees
Add Dekiscript to dynamically pull in the page name or username to provide a customized experience
**Notes: If you tag pages in a template, those will not be inserted when you select the template.
Permissions will also not be inserted if you try to apply them to the Template. Permissions and Tags can
be added after the Template is inserted. **
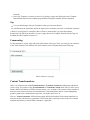
Commenting
To add comments to a page, login and scroll to the bottom of the page. There you can type your comment
in the "Add Comment" box and then click Add Comment to have it update and posted to the page.
Add a comment to any page
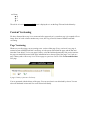
Content Transformations
There is an edit menu item called Transformations or Transform Content depending upon which skin
you are using. The purpose of this Transformations or Transform Content menu item is to allow you to
attach a Dekiscript function to HTML elements (mostly <pre> elements). The content of these elements is
then sent to the extension function for transformation. Content transforms include: syntax highlighting,
graphviz graph scripts, mathematical expressions, silverlight, spoiler text, etc.
How are "content transforms" different from regular DekiScript functions? Each content transform is a
function, but not each function is a transform. The function has to explicitly declare itself to be a content
transform and identify to which HTML elements it’s applicable.
You must already have encoded the content to be transformed in a <pre></pre> element. Select the
content to be transformed and you will see a dropdown box listing the available transformations in the
installation of MindTouch Deki that you are using. Choose the transformation you wish to use, select it
and the content will be transformed according to the function which was selected. Selecting
"Transformations" or "Transform Content" for items which are not in <pre></pre> elements will result
in the display of "No Transformations" in the drop down box and no transformation will be performed.
Creating a new content transform is as easy as registering a new extension in the Services Management
Console of the Control Panel.
Here is an example using some php code:
Highlighting the php code in the <pre></pre> section, select Transformations and choose syntax.Php
results in the following:
<?php
/**
* Smarty plugin
* @package Smarty
* @subpackage plugins
*/
/**
* Get seconds and microseconds
* @return double
*/
function smarty_core_get_microtime($params, &$smarty)
{
$mtime = microtime();
$mtime = explode(" ", $mtime);
$mtime = (double)($mtime[1]) + (double)($mtime[0]);
return ($mtime);
}
/* vim: set expandtab: */
?>
Go to top
Linking
Linking is another way MindTouch Deki excels. Adding links to pages, files, or external resources is
pleasantly simple. Click Edit page, highlight the text you wish to link, select Insert/modify link from the
editor toolbar.
Links establish relationships in your content that makes it easier to understand meaning
Browse to the location of the page or file you wish to link by double-clicking. When you see the page or
file you wish to link single-click it to select it. Finally, click Update link to commit your change and click
Save in the Editor.
Creating links to pages or files could not be easier
If there is a new version of a linked file, MindTouch Deki will version the file (we’ll discuss this more
later) and the link will point to the most recent version of the file. Similarly, if a linked page is later moved
or renamed, your link will be redirected to the page’s new location or name.
MindTouch Deki also allows you to search for the content that you want to link to. To do this select the
Search tab at the top of the link window then type the term that you are searching for. This will bring up
results for your search that you can easily select and link to.
If you wish to link to an external web page or file simply paste the URL in the link field and click Update
link. Any resource external to MindTouch Deki that is moved cannot be found, therefore updated, in the
new location.
There are other ways you can make links. If you don’t want to use the Create or modify link dialog you
can do it with a simple syntax. For example, if you wish to link to a page titled "A Page" type this into the
editor: [ [A Page] ] (Note: you must use "[[", where the brackets do not have a space between them) and
then Save the page. When the page saves you’ll see that you just made a link to the page titled "A Page".
Alternatively you can type "A Page" into the editor, select the text, and on your keyboard hold down the
control key and the w key, Save. You’ve just created a link to the page titled "A Page". The same can be
done for subpages with [ [A Page/Subpage] ] or "A Page/Subpage".
Whether you’re linking to pages or files internal to MindTouch Deki or external ones, do so liberally
because links make it easier to understand meaning and relevance of content.
Multiple Edits - Merge Conflicts
MindTouch Deki has a sophisticated merging engine that will recognize separate changes down to the
word and accurately merge the revisions together. This helps with collaboration as there are less chances
that if more than one user is editing a page there will be conflicts.
First let’s examine at a high level how MindTouch Deki handles a merge.
Say you have the following set of sentences:
The dog ran along the fence while the boy biked away.
The boy was heading off to college to pursue his lifelong dream of being a developer.
Bob edits the first sentence to read this: The black dog ran along the white fence while the boy biked
away.
And Tim edits the second sentence to read: The boy was heading off to college to pursue his lifelong
dream of being a baker.
These edits occur at the same time but are saved at different times. Regardless of who started the edit first
and who saved first, MindTouch Deki will merge the sentences together to form a comprehensive set of
sentences as it is intended:
The black dog ran along the white fence while the boy biked away.
The boy was heading off to college to pursue his lifelong dream of being a baker.
This is also true on a Section and Page level.
Now if Bob and Tim’s edits were to overlap then both edits will still be saved, but the last person to save
will have the opportunity to review and compare the edits and confirm that nothing has been lost that
should be kept.
Example:
Using the same sentences from above. Bob edits the first sentence to read:
The black duck waddled next to the white fence while the boy biked away.
While Tim edits the first sentence to read:
The black cat walked on top of the white fence while the boy biked away.
Bob saves his changes first which is accepted by the system. Tim saves his changes which is also accepted
by the system. The system notices that there is some overlap and notifies Tim that there is a difference
between his edit and what Bob had changed along with prompting him to compare versions to see the
difference. This allows Tim to review Bob’s changes at a glance. If Bob’s changes need to be
reincorporated, Tim can do so by re-edting the page. Otherwise Tim can also chose to leave the page as is.
We have put a lot of work into our conflict merging to ensure that you don’t lose content and to maintain
the integrity of edits so that they can be integrated manually by the user as opposed to removing the edit
because of a conflict.
File Attachments
MindTouch Deki allows users to easily attach files to any page. This is significant because it makes
capturing and sharing information quick and easy and the consumption of that information quicker than
traditional methods. Let’s see how this would work.
Classic File Uploader - Attach File or Image
At the bottom of every page you see a Files section. To the bottom right click Attach file or image.
Attaching files to a page and adding additional information is an easy to use and powerful way to share
information
Now you’ll see the Attach file dialog. Click Browse. This opens a dialog that allows you to browse your
computer locally for the file(s) you wish to attach. You can select as many files as you like, but you must
do so one at a time. Click the + sign to add more rows if you have more than three files you wish to attach.
Once you’ve selected all of the files you wish to attach you may opt to add a Description. When you are
satisfied click Upload now.
You can attach as many files as you like to a page
Wait until your files have uploaded. Depending upon the number of files and their size this can take up to
several minutes. After you’ve completed uploading your files you will be presented with the attached files
on the page. Notice you are shown the size of the file, the date it was attached, by whom it was attached,
and the attached files’ descriptions. An attached image is presented as a thumbnail in the image gallery
section.
Attached images are shown as thumbnails in an image gallery section
If at any point you attach a file with the same name to the same page, MindTouch Deki interprets this as a
new version of the file and saves it as a new revision, replacing the old. However, old versions of the file
are available by clicking the [+] button next to the file name, allowing you to access and revert to old
versions of the file.
Clicking the name of your uploaded files will initiate a download of that file to your desktop. Click on
your uploaded pictures and you can browse through them in our lightbox.
Microsoft Office documents can be previewed too by clicking the preview link next to the attachment.
This will open ThinkFree, a web based document viewer. Currently this is setup for view only and any
changes made will not be saved back to the wiki or anywhere else.
Managing Attachments
After a file is attached you can move it to another page or change the description by using the file action
menu. If you wish to change the description select Actions adjacent to the file in question. Click Edit
description to add the description and click Save description. Likewise, if you wish to move a file, select
Actions adjacent to the file in question, Move, then using the Move file dialog navigate to the page you
wish to move the file.
Attached files can be moved using the File Actions menu
If you wish to delete a file, you may do so by selecting Actions > Delete > Ok.
New Flash Uploader- Attach File or Image
MindTouch has another option for uploading attachments, the new Flash uploader. The Flash uploader
gives a progress bar of the upload to Deki along with allowing you to easily upload multiple files at once.
By default both the classic uploader and the flash uploader are enabled. To use the flash uploader click
Attach File or Image and then select the Flash Uploader tab within the dialog. To see a demo of the flash
uploaded click here.
Desktop Connector
The Desktop Connector allows you to drag and drop files and entire folder structures into the wiki. If you
drag a folder with subfolders, the folders will be converted to pages in the wiki and attach the files in that
folder to the bottom of the page. This is a great tool to use when setting up your Wiki and
moving/uploading content.
Managing Content
MindTouch Deki makes it pretty easy to manage pages and files. Here we’ll look at how this is done.
Deleting Pages
Browse to the page you wish to delete, click “More” on the page toolbar and then select “Delete.”
Delete Files
Files or images that have been attached to a page can also be deleted. Just like with pages though, an
administrator can restore deleted files. To delete a file, scroll to the Files section at the bottom of the page.
Click the Actions menu to the right of the attached file or image. Select Delete, confirm the deletion with
Ok.
*Note: When you delete a file you will delete all of the versions of that file too. To restore a file you can
do so through the Deleted Files page in the Control Panel
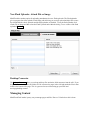
Move Page
Browse to the page you wish to move, click “More” on the page toolbar and select “Move.”
When you move a page, you also move that page’s sub-pages
A dialog box will prompt you to choose the new destination. You may browse all pages of MindTouch
Deki by double-clicking and single-clicking to select. If you move a page, you also move all its sub-pages.
When you’ve selected the page you wish to be the new parent of the page(s) you’re moving click Move
page.
You can browse all pages of MindTouch Deki in the Move dialog
Move File
You can move a file by selecting the Actions item and then select Move.
Reordering the Hierarchy/Display Titles
MindTouch Deki orders pages according to the url. It also has the ability for the name of the page and how
it appears in the hierarchy to be different than the actual url. This gives flexibility to organize the hierarchy
according to the url while maintaining user facing friendly titles. To reorder a hierarchy do the following:
If your hierarchy is as follows:
Home
A
B
C
Now if you want to move A below C we would move the page by clicking More -> Move and then in the
Title field in the Move dialog you would give the page a title that would place it below C, like D. This will
only change the URL of the page but still maintain the the Display title. The hierarchy will then show the
following:
Home
B
C
A
The url for A is now http://yourwiki/D but it is displayed as A on the Page Title and in the hierarchy.
Content Versioning
We have discussed how easy it is to create and edit a page and you’ve seen how easy it is to attach a file or
image. Now let’s take a look at another easy to use, but very powerful, feature of MindTouch Deki:
versioning.
Page Versioning
Whenever you edit a page you are creating a new version of that page. Every version of every page is
retained as part of MindTouch Deki’s audit log, as is the person who edited the page, and the date and
time that it was edited. To view any page’s history, select the link that dynamically tells you the last time
the page was modified (located in the page information box to the top right of the page). Let’s look at a
page’s history and see how easy it is to revert a page to a previous version. Click the last modified date
on a page.
A page’s history is just one click away
You are presented with the history of the page. You can see when it was edited and by whom. You can
also walk backward in time and view each version individually.
Every edit on every page is retained and acts as an audit trail
Or you can view a comparison between two pages by clicking Revision comparison, which will present
you the differences between these two page versions.
Comparing versions of a page is as easy as it is to revert to an older version
Finally, you can Revert to the older of these two versions by clicking the button.
File Versioning
If you attach a file with the same name to the same page more than once you are creating a new version of
this file. MindTouch Deki by default retains every version of the file and the links that point to it.
MindTouch Deki always point to the most recent version of the file. You’ll know there is another file if
you see a plus icon adjacent to the file.
Attached files are automatically versioned
If you wish to view every version of a given file click the [+] sign adjacent to the file in question. You’ll
be presented with every version of this file attached to the page you’re viewing. You can also see each
version’s original file details.
Page links to files always point to the most recent version of the file
Search and Discovery
We’ve seen how easy it is to capture information and files in MindTouch Deki. Now let’s take a look at
how easy it is to organize information so anyone can find and discover useful content that has been
contributed.
Search
Searching is as easy as providing your query in the search field at the top left of MindTouch Deki. Your
result set can include pages, the contents of many types of attached files, and the descriptions of files and
images. When you’re presented with your result set those that rank at the top are determined by relevance
and how recent they are. You can view only pages, only files, or only images if you wish to narrow the
result set.
Linking
A great way to organize content is by linking. When you create links to pages or files you’re creating
relationships in the content that make it easier for users to understand and establish relevance. This is one
of many ways MindTouch Deki excels. It is really easy to link pages and files, making it really easy to see
how content relates. When these relationships in data are established, it makes it very easy to consume the
information. This allows users to understand if and how something is relevant to them and their work.
Hierarchy
MindTouch Deki provides a flexible means of organizing pages hierarchically. The hierarchy is created by
adding New Pages. To add a subpage, select the page that you want as the parent and then click New Page.
This will help segment out the information in your wiki along with allowing easy navigation of your
content.
Chronology
How recent information is often impacts how important or relevant it is. With MindTouch Deki there are
many ways to determine how current content is. The most obvious way is to look at the top right of a page
at the page information bar. This tells you when the page was last modified. For files and images you can
see how recently they were attached as well by reviewing the date and time stamp.
Quickly see how recently content was added or modified
You can also look at a page’s history by selecting Recent Changes from the menu bar. This give you a
global view of which pages have been edited or had files attached, and by whom, in order of newest to
oldest. This is a commonly used method of tracking what’s going on in an organization and is a powerful
discovery tool. At a glance you can see what your colleagues are working on and quickly realize if there is
content you can benefit from.
User Contributions
In Recent Changes you can also elect to see changes on a per user basis in order of newest to oldest. To
do this, select the user whose contributions you wish to see from the drop down menu at the top of the
page. You may then walk backward in time through these contributions using the Next 100 >> control at
the top and bottom of the table that contains the contributions.
By reviewing other users’ contributions chronologically you are able to very quickly find information that
can benefit you. For example, if you are working on a project and know a colleague has experience that
could benefit you from their work months ago you can quickly find that information. Or, in the event
you’re new to a position you can quickly get up to speed by reusing established content.
Watch List
Every user is able to create a list of watched pages. Then they can see whenever changes are made to these
pages. This is useful in monitoring projects or topics of interest. To add a page to your watch list, click
More from the page tool bar.
Adding a page to your watch list is easy
To review your watched pages click Tools, then Watched Pages. This shows you all the pages you are
watching, when they were last modified, and by whom. This is a great way to discover information and
topics of interest. To monitor your WatchList, Select Tools -> RSS Feeds -> then select the Watchlist link
next to your name. You can then put this RSS feed into your favorite reader.
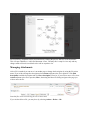
Tags
Tags are added to a page through the "Tags" option under the "More" menu:
The tags dialog accepts all text, with the condition of each tag being on its own line. Tags are
automatically stripped of HTML tags, trimmed of whitespace (extra spaces before and after the tags are
removed), and are converted to lowercase characters for visual consistency.
Display
The tag list appears after a page’s contents if tags exist for a page. Tags are sorted first by tag types, with
define: and date: types taking precedence over "normal" (no special types) tags. Each tag links to the
tag explorer view, which provides a list of all pages with the same tag - this allows for discoverability of
related pages outside of the hierarchical structure of Deki.
1. An example of a defined tag ("define:dekiwiki") - any page which has this tag now links to this page
2. An example of a chronotag - converted to a consistency user-friendly output format
3. Since this page has defined dekiwiki, it has a list of Related Pages, which is a list of all pages which
are tagged "dekiwiki"
Tag types
There are two special classes of tags: define and date. Tags which are prefixed with these two types
become assigned to these special types (for example, "define:tagging" would be input into the dialog to
create a "tagging" define tag).
definition tags (define:)
define takes ownership of a tag; all references to that tag in other pages automatically link to the page
which holds the definition of the tag instead of the explorer view. The page which holds the define tag
also displays a "Related Pages" list, which contains a list of pages which contain the defined tag. Only one
page may hold the definition for a tag, but one page can have multiple defined tags.
chronotags (date:)
date are tags which are associated specifically with a date. The input form accepts most natural language
inputs: date:now, date:tomorrow, date:2007/08/13, date:January 12th, 2005.
Clicking a chronotag link exposes an events view. Much like the explorer view, the events view displays
all pages with the same date, but it also allows the selection of a dates to display all pages that fall within a
range of dates. Sometimes the natural language processor will fail to convert your input into a date
(example: "date:oaiwjeoifajf") - in that case, the whole tag is treated as a normal-class of tags.
Misc notes
Tags are indexed by the search engine and appear on the recent changes log when updated.
Alerts and Notifications
In addition to the web interfaces for content changes, watch lists, and user contributions, MindTouch Deki
provides a plethora of feeds that can be consumed by any RSS reader. To access the RSS feeds select
Tools then RSS feeds. To subscribe to the feed simply right-click (option click on Mac) the link to the
feed you wish to subscribe to and select Copy Link Location (in Firefox) or Copy Shortcut (in IE). Then
launch your RSS reader and paste the URL to the feed.
If you aren’t sure what RSS is, it’s a way for you to be notified of changes on webpages of interest and be
provided with these changes. To really understand this, you should probably run an Internet search for
"What is RSS" and you’ll find many resources to explain this further. If you don’t have an RSS reader,
don’t worry because there are dozens of free RSS readers you can download and install.
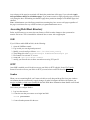
Advanced Access Controls
There are many ways to grant access to Deki including integration with a current authentication server,
HTTP authentication against the Web Server, or using Deki’s Authentication Settings.
LDAP
HTTP
Internal Auth
Restrict Pages and Hierarchies
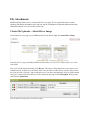
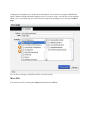
Any user can easily restrict access to a page and subpages. To do this, select the More menu from the
page bar and select Restrict access.
The More menu (found on the page bar) expanded to show the Restrict access control
Then select the users or groups (using control or Apple key to select multiple users or groups) and level of
permissions you wish to give them. Finally, select Restrict access.
The Restrict access dialog allows you
to change who can edit or view a given page
Any sub-page of the page just restricted will inherit the permissions of this page if you select the Apply
these permission changes to all children pages. If you want to restrict a single page/sub-page you can do
so by doing the above and making sure that the Apply these permission changes to all children pages isn’t
checked.
Note: Administrators override all page permissions, meaning they have access to all pages regardless of
the page’s restrictions. Be very careful to whom you grant administrator access.
Accessing Deki Root directory
Below are different ways to access the root directory of Deki to make changes to the system and to
transfer files in/out. This is intended for Advanced users or users with a support plan.
SSH
If you’d like to enable SSH on Deki, do the following:
1.
2.
3.
4.
5.
6.
7.
Open the VMWare console
Log in with your root login and password
Modify your ssh config as follows: nano /etc/ssh/sshd_config
Then change this value: PermitRootLogin no to: PermitRootLogin yes
Hit Control-X to exit and "Y" to save
restart ssh: /etc/init.d/ssh restart
modify your firewall rules to allow external access using TCP port 22
SFTP
Once SSH is enabled you will be able to access your Deki via SFTP which is Secure File Transfer
Protocol. In order to access your Deki via SFTP you need to have an SFTP client like FileZilla.
Samba
When you are customizing Deki you’ll want to be able to easily drag and drop files from your windows
environment into the root directory to apply changes. In order to integrate the Deki with Explorer you
need to use Samba, which comes installed on the Deki WM. More information about Samba can be found
at Wikipedia and the official Samba website.
Here is how you configure Samba:
1. Log in as the root user.
2. Create the user that you want to use to login into Deki:
useradd yourusername
3. Create a Samba password for the user:
smbpasswd -a yourusername
NOTE: if you want to use the root password then yourusername=root and use the same password
that you have for your root password account.
4. Update the Samba configuration file (/etc/samba/smb.conf):
workgroup = WORKGROUP (replace by your Windows value)
# File creation mask is set to 0700 for security reasons. If you want to
# create files with group=rw permissions, set next parameter to 0775.
create mask = 0644
# Directory creation mask is set to 0700 for security reasons. If you want to
# create dirs. with group=rw permissions, set next parameter to 0775.
directory mask = 0775
[MyWWW]
comment = Deki /var/www folder
path = /var/www
public = yes
writeable = yes
read only = no
valid users = yourusername
create mode = 0666
Note for users not familiar with the smb.conf file: the directory mask and create mask lines exist in
the default smb.conf file, and they must be modified. The [MyWWW] section does not. Add the
[MyWWW] section at the very end of the smb.conf file to make sure that you are not interrupting
another already existing section.
If you want to connect as the root user, make sure to comment the following line like this:
;invalid users = root
5. Restart Samba: /etc/init.d/samba restart
If Vista is Host Operating System
If Vista is your Host operating system that VM Player is running on then you’ll want to update Samba to
the most recent version to avoid a glitch that slows transfer to a trickle. Run the following code to update
Samba:
apt-get install samba samba-common samba-client
Control Panel
Any changes in the Control Panel should be performed by the Administrator of the wiki.
Service Management
Service Management allows you to add Deki extensions that integrate with external applications, services,
and external authentication. By default the following extensions come pre-installed on Deki
RSS/Atom Reader
Digg
Flickr
Gabbly
Multimedia
WidgetBox
Windows Live
Syntax Highlighter
Adding Extensions
Unlike other applications, Deki doesn’t require you to upload an extension but instead you add certain
information within Service Management which will call the extensions XML file.
To Add an Extension to Deki click on either Local or Remote which is found at the top of the screen. For
more information on adding Extensions check out our documentation.
Local vs Remote
A majority of the extensions that you will be referencing will be considered as Local. A Local extension is
an extension that is started by Deki and ended by Deki. A Remote Extension runs on external server and is
embedded within Deki.
Authentication
There are many authentication systems available like Active Directory, LDAP, Novell E-directory, and
authentication through a third party software application like Wordpress, Joomla or Drupal. Integrating
authentication systems with Deki will allow your users to maintain their current login credentials, allow
the admin to effectively manage the user base that has access to the wiki, and allows you to configure
groups within the authentication system which can then be applied to your Deki.
To add authentication to your Deki visit the setup instructions.
UnusedRedirects
Anytime you move a page in Deki a Redirect occurs in the background so that anyone that clicks on the
old link is automatically pointed to the new location as opposed to receiving a Page not available error.
The Unused Redirects allows you to delete these connections if you have pages that you know that the
redirect isn’t necessary. This increases response time of the pages that people are accessing as the redirect
isn’t occurring. Delete with caution because if there are links outside of your system that users are
accustomed to and you remove the redirect then you’ll have to recommunicate the new url.
Configuration
The Configuration page in the Control Panel allows you to make changes to the MySQL config table
through an interface. Any changes to the Configuration values should be made with caution and only
by the Admin. Here is an explanation of all of the configuration settings.
admin/email string - available in PHP as $wgAdminEmail
Email address of person to contact for technical problems
admin/contact-threshold integer - available in PHP as $wgAdminContactThreshold
Number of hours before emailing admin in ca se of a 502 "Service Not Available" error
editor/safe-html boolean
Whether or not to remove potentially unsafe html tags
files/blocked-extensions string, as comma separated list
Unallowed extensions as file attachments
files/imagemagick-extensions string, as comma separated list
File extensions that will generate image previews
files/imagemagick-max-size integer
Maximum image size for preview generation (setting this value too high may choke your memory
usage)
files/max-file-size integer
Maximum file size for file attachments (checked on upload); ensure that this value matches
post_max_size and upload_max_filesize in php.ini
mail/smtp-serversstring - available in PHP as $wgSMTPServers
SMTP servers; separate multiple servers with semicolons
mail/smtp-usernamestring - available in PHP as $wgSMTPUser
SMTP authentication username
mail/smtp-passwordstring - available in PHP as $wgSMTPPwd
SMTP authentication password
security/allow-anon-account-creation boolean
Whether or not new accounts can be self-created from the login page
security/cookie-expire-secs integer
Sets the authentication expiration time in seconds
security/new-account-role string
Default role for new accounts
storage/fs/cache-path string
Location for storing image previews on disk. Default is {deki-path}/attachments/.cache
storage/fs/path string
Location for storing file attachments on disk. Default is {deki-path}/attachments
storage/s3/bucket string
S3 bucket to use for storage (ensure this exists)
storage/s3/privatekey string
Secret access key for your S3 account
storage/s3/publickey string
Access key for your S3 account
storage/s3/prefix string
Directory within your bucket that contains all attachments. You can set this to the name of your wiki.
storage/s3/timeout integer
Timeout in seconds for S3 requests
storage/typestring
File storage type: filesystem (fs) or Amazon S3 (s3)
ui/analytics-key string
Google Analytics account key for traffic logging
site/search-disabled string - available in PHP as $wgDisableTextSearch
Disable site searching
ui/banned-words string, as comma separated list
Comma seperated list of words not allowed in page content - these values will be automatically
stripped out
ui/default-auth-service int, available in PHP as $wgDefaultAuthServiceId
service_id of default authentication service (pre-selects the auth service when logging in)
ui/language string - available in PHP as $wgLanguageCode
Language to use for the user interface of the wiki in the format language-variant (example: en-us for
English or de-de for German)
ui/comment-count integer - available in PHP as $wgCommentCount
The number of comments to show on first page
ui/custom/css string - available in PHP as $wgCustomCss
CSS styles that define the template’s styles (not used for loading the editor)
ui/custom/bodycss string - available in PHP as $wgCustomBodyCss
CSS styles that define the content’s body styles (used for viewing & editing)
ui/dynamic-nav string - available in PHP as $wgNavPaneEnabled
Enable dynamic behavior of navigation pane
ui/logo-uri string - available in PHP as $wgLogo
Path to site logo
ui/max-nav-items integer
Max number of items to show in the navigation pane
ui/sitename string - available in PHP as $wgSitename
Site title
ui/skin string - available in PHP as $wgActiveSkin
Name of template skin to use
ui/template string - available in PHP as $wgActiveTemplate
Name of template to use
ui/use-cdn string - available in PHP as $wgUseCDN
Enabling will use Yahoo!’s CDN to speed up delivery of Javascript files - this may not work
depending on your ability to access Yahoo!’s servers.
Group Management
Group Management allows you to add Local and External Groups. To create a Group do the following:
Local Groups
1.
2.
3.
4.
5.
Add the Name of your group in the Step 1 Text area
Select the Role for your Group. To specify Roles view Role Management in the Control Panel
Make sure that Local is selected under Service
Then Select Add Groups
Once the Group is created you’ll scroll down to the newly created group and select Edit Users to add
users to this group. Currently nested groups aren’t supported for Local Groups.
External Groups
1. Add the Name of the Group that you want to Add to Deki. The group name must be the exact name
of the group in your External auth service
2. Select the Role for your Group. To specify Roles view Role Management in the Control Panel
3. Select the appropriate External auth Service under Choose Service
4. Then Select Add Groups - The users will be automatically added as the settings for the group(s) are
being imported.
Deleted Files
Anytime a user deletes a file in Deki it ends up in the Deleted Files bin where the Admin can stipulate if it
is deleted permanently or if it needs to be restored. To restore a file, select it and then click the Restore
files button. If you want to delete the file permanently then select the file and then click Delete
Permanently.
Double Redirects
Double Redirects are managed the same way the redirects are. A Double Redirect is when a page is moved
and then moved again. To delete a Redirect select it and click Delete.
Role Management
Role Management allows you to specify the Roles for users and Groups. Each Role has the following role
attribute that can be applied to a Role:
LOGIN
The Login Attribute stipulates if a user is able to login when they reach the site. This, with READ, are the
most fundamental of roles.
BROWSE
The BROWSE Attribute stipulates if a user is able to browse the hierarchy or discover content within the
wiki via search.
READ
The READ Attribute stipulates if a user is able to view a page, comments, or attachments.
SUBSCRIBE
The Subscribe Attribute stipulates if a user is able to subscribe to the RSS feeds of the system which will
show pages changes
UPDATE
The UPDATE Attribute stipulates if a user is able to make changes to a page or attach files in the wiki
CREATE
The CREATE Attribute stipulates if a user is able to create a New Page within the wiki
DELETE
The DELETE Attribute stipulates if a user is able to Delete an existing page within the wiki
CHANGE PERMISSIONS
The CHANGE PERMISSIONS Attribute stipulates if a user is able to Change or Add Permissions of a
page
CONTROL PANEL
The CONTROL PANEL Attribute stipulates if a user has access to the Control Panel - This should only be
accessible to the Admins of the wiki, use sparingly
UNSAFE CONTENT
The UNSAFE CONTENT Attribute stipulates if a user is able to add unsafe scripts or HTML into a wiki
page without it being stripped out. If you want the users to be able to add some Unsafe Content then take a
look at adding an extension for it.
ADMIN
The ADMIN Attribute stipulates if a user has Admin privledges which overrides all other permissions and
restrictions. Use sparingly.
Site Settings
Site Settings includes the following settings that can be changed for your Deki:
Set Site Language
This is the Default Language for your Deki and will convert the interface into the selected
Language, with Jay Cooke the user can select what language they use so that each user can
specify their native language.
Set Site Name
Change the name of the site that appears at the top of the hierarchy
Rebuild Search Index
This will rebuild your search index. Use if your search reults are missing content or if content
hasn’t been indexed yet.
Site Options
Allow Anonymous Account Creation - Adds a link to the login page that allows anonymous
visitors to your site to create there own account on your wiki
Disable Searching - This will stop indexing your site/files and will return nothing if a user tries
searching on your site.
Use content distribution networks for Javascript libraries - Uses remotely hosted Javascript
libraries which creates faster load times for sites across the web using Yahoo’s optimized,
geo-distributed, and reliable data centers.
Google Analytics - Put your Google Analytics Account ID in this field if you want to track your
wiki’s traffic and want advanced analytics on your wiki
Visual Appearance
Site Logo
You can upload your own custom logo which will appear in the upper left hand corner of the wiki. The
logo size is restricted to 500 x 50 px.
Customize Site Styles
This section allows you to override the Site and Content styles for the site using CSS.
Change your Styles
This is where you select the type of Skin you want for your wiki. If you create your own skin and upload
it, it will appear here.
Custom Site HTML
Custom Site HTML are custom HTML areas that are strategically placed around the skin of the site to
include widgets, scripts, and custom images.
User Management
User Management is where you are able to Add, Deactivate, and update users. To add a user do the
following:
1. Add the username of the user you want to Add
2. Add the email of the user you want to add
3. The Password is optional, if you don’t put one in here then one will be created for the user
automatically
4. Select the Role for the User, see Role Management for more info about Roles.
5. Then Select Add User
Bans
Bans allows you to ban a user or ip address because of the behavior of the user or because of another
reason deemed appropriate to ban them. In order to ban a person of IP do the following:
1.
2.
3.
4.
Select the ban type: IP address or Username
Specify the username or IP address
Select duration of Ban which can range from one day to Forever
Finally add a note about the reasoning behind the ban and click Save
A list of Banned users will show on this page so that you can remove bans or update the bans.
Restore
Restore allows you to restore deleted pages in the system. To restore a page find it within the interface and
then Select Restore. The page along with its attachments will be restored. This is assuming that the
attachments haven’t been removed permanantley from the system through the Delete Files page.
Attached Files
Attached Images