1
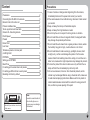
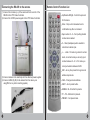
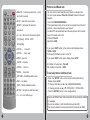
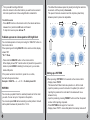
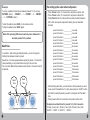
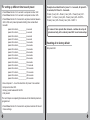
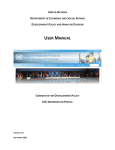
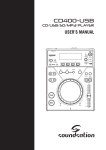
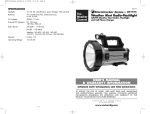
EN
ES
PTZ Dome Controller
(PTC-01)
MANUAL
English / Spanish
www.provision-isr.com
www.provision-isr.com
Content
EN
English Manual
1
ES
Manual en Español
15
WARNING
RISK OF ELECTRIC SHOCK
DO NOT OPEN
Note: Only professional technicians is
allowed to open the front or back cover
of this camera.
ADVERTENCIA
PELIGRO DE CHOQUES
NO ABRIR
NotA: Solo técnicos profesionales
pueden abrir las cubiertas frontal o
posterior de esta cámara.
I
Note:
In order to avoid electrical
shock or fire, please use
proper power according to
the manual.
Nota:
Para prevención de choques
electricos o fuego, por favor
use la corriente apropiada,
acorde con el manual.
II
Precautions
Content
Precautions
Connecting the RS-485 to the camera
Remote Control Function List
Protocol and Baud rate
To set up protocol and baud rate
Camera ID – Selecting camera
Pan/tilt speed
Presets
Home Point
Line Scan
To delete a preset or a home point
or left/right limit
PATTERN
Setting up a PATTERN
Dwell Time
For setting up the same time to all presets
For setting up different time to each preset
Resetting all to factory default
WARNING
RISK OF ELECTRIC SHOCK
DO NOT OPEN
Note: Only professional technicians is
allowed to open the front or back cover
of this camera.
1
2
3
4
6
6
7
7
7
8
8
9
9
10
11
12
13
14
1.In case of smoke or strange smell originating from the camera,
immediately disconnect the power and consult your vendor.
2.If the camera seems to be malfunctioning, disconnect it and consult
your vendor.
3.Keep unit away from sharp or flammable objects.
4.Keep unit away from high moisture or water
5.Do not drop the unit or subject it to strong shock or vibration.
6.Do not install this unit close to magnetic fields; the magnetic fields
may damage the products performance.
7.Do not install the unit where there is greasy smoke or steam, where
the humidity may get too high, or where there is a lot of dust.
8.Do not install close to heat sources (eg. spotlights, stoves, direct
sunlight, etc.), as this could damage the product. For the same
reason refrain from installing close to the ceiling or in a kitchen or a
boiler room, because the high temperature may damage the product.
9.To clean the product from dust or stains use a dry soft cloth then a
damp soft cloth then immediately dry with a dry cloth.
10.do not use benzene, thinner or other chemical products, as the
cabinet may be damaged. Before using a chemical cloth, make sure
to read all accompanying instructions. Make sure that no plastic or
rubber material makes contact with the cabinet for a long period of
time, as this may cause peeling of the paint.
Note:
In order to avoid electrical
shock or fire, please use
proper power according to
the manual.
2
Connecting the RS-485 to the camera
1) Connect the 2 cables (+/-) of the camera to the B- and A+ of the
RS485 on the PTZ Dome Controller.
2) Connect the 12VDC power supplier to the PTZ Dome Controller.
Remote Control Function List
Up/Down/Left/Right - Control the pan and
tilt of camera.
Enter – Stop current movement and a
confirmation key after a command.
(2)
+
Keys number 0 – 9 – For inputting desired
Power
Cable
(1)
number when needed.
C – Clear (backspace) when needed to
correct last number input.
-/-- - stats +10 mode or go back to normal
mode, in normal mode you can only input
number between 0 – 9. In 10+ mode you
can input numbers between 0-255.
ESC – at any time press this to go back to
3) Connect camera to the electricity with the attached power supplier.
4) Connect a BNC (Rj-59) to the camera from the device your
using(DVR or any other recording system).
address input mode.
CAM – Change camera address.
SHOT – Go to preset button.
HOME A / B – Shortcut for presets.
(3)
P1 – P8 – Shortcuts for presets.
(4)
3
PRESET – Set preset mode.
4
Protocol and Baud rate
DELETE – To clear a preset point – press
and hold 3 seconds.
AUTO – start auto cruise mode.
SPEED – Set speed of camera’s
movement.
S1 – S4 – Shortcut for movement speed
(S1=8[slow] , S2=40 , S3=51 ,
S4=63[fast]).
FOCUS +
- focus far.
FOCUS - - focus near.
OPEN – open iris.
CLOSE – close iris.
ZOOM+ - Zoom In.
ZOOM - - Zoom Out.
PATTERN – Start/Stop pattern learn.
RUN – run pattern.
DISP – Display software version.
SETUP – Set protocol and baud rate.
You can check current baud rate and protocol or change them.
You can choose between Pelco/D or Pelco/P protocol and select
between
baud rate 1200/2400/4800/9600.
This 2 parameters needs to be set like the camera’s baud rate and
protocol – check manufacture’s user manual.
Our Mini-PTZ camera default baud rate and protocol are the same
as our IR remote control unit:
Protocol: Pelco/D.
Baud Rate: 2400.
If you press DISP button on the remote control display shows
“U008 or U010”
Its means that software version is 8 or 18.
If you press DISP button again- display shows “d=24”
D - Refers to the protocol – Pelco/D.
24 – Refers to baud rate – 2400.
To set up protocol and baud rate
- Press the SETUP button on the remote control (Red button),
Display shows “d=24”.
- To change baud rate use ◄ or ► (1200/2400/4800/9600).
- To change protocol use ▲ or ▼ (P=PELCO/P , D=PELCO/D).
- Press the ENTER button to save configurations.
F1 – F4 – User define keys.
You can set different baud rate and protocol for each camera address.
For example:
You can set address 1 with Pelco/D and baud rate 2400,
Then choose address 2 and set it as Pelco/P and baud rate 9600.
5
6
Camera ID – Selecting camera
When powered on, the display will mark the camera’s ID A001,
Example - “ A001”
“A“ = Represents the cameras ID address, means it shows you that
current camera being controlled is #001.
To change camera press CAM on the remote,
If the camera number is higher than 9, press the -/-- button,
And write the camera number.
Example: CAM - -/-- - 9 - 0 - ENTER - To select camera
number 90.
Pan/tilt speed
You can control the speed of pan/tilt movement.
When pressing SPEED on the remote, the display shows “S-63”.
S=Speed, 63 speed value, you can change the value between 1 to
63, when 63 is the fastest.
To change the speed:
- Press SPEED button and then a number between 1 to 63.
- When using a value higher then 9, press the -/-- button,
and write the camera number.
- Press ENTER to confirm.
Presets
To set a preset:
- Press and hold PRESET button for 3 second or until display
shows “SET“
- Enter a number between 1-9, if you want to use higher number
then 9, Press the -/-- button after pressing PRESET
- After typing a number press “ENTER” to confirm.
Example: PRESET - -/-- - 1 - 5 - ENTER - To set preset 15.
7
To switch between presets press SHOT, Then press the desired
preset number.
To move to the preset you programmed
- Press SHOT on the remote and then the desired preset number.
- If you want to use higher number then 9, Press the -/-- button after
pressing SHOT.
Example To call preset 15 SHOT - -/-- - 1 - 5.
Home Point
When pressing HOME on the remote control the display shows
HOME
You can set a home point preset, so that when you press HOME
on the remote control, the camera will move to your pre-selected
home point from any position she is in.
To set a home point:
- Move the camera to desired location.
- Press and hold PRESET button on the remote control.
When the display shows “SET“, press HOME.
Line Scan
You can set 2 points for the camera to perform a scan between them.
These two points are A and B on the remote control.
When pressing A on the remote- display shows “LF-A”
When pressing B on the remote- display shows “LF-B”
To set the left/right limits:
- Set the camera to the desired location.
- Press and hold PRESET button for 3 seconds until display shows
“SET“.
8
- Then press A for settings first limit.
- Move the camera to the other location you want to set as second
limit and repeat the last 2 lines using B button instead of A
To start line scan
- Press AUTO button on the remote control, the camera will move
between the 2 points A and B back and forward.
To stop the line scan press ◄/►/▲/▼.
- The default time between preset to preset (Including the camera’s
movement until the preset) is 8 seconds.
The speed of camera movement and the stop time (dwell time)
between preset to preset are adjustable.
Preset
1
Preset
2
Preset
3
Preset
4
To delete a preset or a home point or left/right limit
You can delete presets or home point using the “DELETE” button on
the remote control.
When pressing and holding DELETE on the remote control, display
shows “Clr“
“Clr-“= Clear.
- Press and hold DELETE button on the remote control.
When display shows “Clr“ inserts number of preset that you want to
delete or press HOME for deleting the home point, you can also
delete A/B points.
If the preset number is more then 9, press the -/-- button,
And write the preset number.
Example: DELETE – -/-- – 2 - 5 - To delete preset 25.
PATTERN
You can set up a pattern from the selected presets and in the order
you wish. You can set up to 16 presets in the pattern.
You can also press RUN without selecting a certain pattern- that will
start a pattern between all presets from 1 to 16.
9
Preset
8
Preset
7
Preset
6
Preset
5
Setting up a PATTERN
When pressing PATTERN for 3 seconds on the remote control
- Display shows “PSTA”
That means that Pattern track setup mode is on. At this mode
- input the presets you want to include in the pattern (the order of
inputting the presets is the order which the camera will move
between them).
- Input the presets by pressing PRESET button and then the preset
number. After inputting all presets
- Press PATTERN button again for 3 seconds
- Display shows “PST0”- means that pattern track setup mode is off.
10
Example:
To set up a pattern that will move between presets 1-5-3 in a loop.
PATTERN (3sec’) – PRESET – 1 – PRESET – 5 – PRESET
– 3 – PATTERN (3sec’)
To start the pattern press RUN on the remote control,
To stop the pattern press “RUN” again.
Note: After pressing RUN camera will only move between the
selected presets for the pattern.
Dwell Time
In a pattern , after setting all desired presets- you can change the
holding time between preset to preset.
Dwell time - the time spaces between preset to preset – The time the
camera will stay on the preset before moving to the next one.
You can set a different time between each preset or the same time for
all presets.
Dwell
Time
Preset
1
11
Dwell
Time
Preset
2
Preset
3
For setting up the same time to all presets
- Press Preset button for 3 seconds to set preset number 242.
- Press Preset button for 3 seconds to set preset number 245.
- Press Preset button for 3 seconds to set preset number between
224 to 239, each preset represents holding time as described
beneath:
preset 224 refers to ____________2 seconds
preset 225 refers to ____________4 seconds
preset 226 refers to ____________6 seconds
preset 227 refers to ____________8 seconds
preset 228 refers to ____________16 seconds
preset 229 refers to ____________24 seconds
preset 230 refers to ____________32 seconds
preset 231 refers to ____________48 seconds
preset 232 refers to ____________64 seconds
preset 233 refers to ____________80 seconds
preset 234 refers to ____________96 seconds
preset 235 refers to ____________112 seconds
preset 236 refers to ____________128 seconds
preset 237 refers to ____________176 seconds
preset 238 refers to ____________208 seconds
preset 239 refers to ____________255 seconds
- After selecting dwell time, you will need to call the presets you want
to set up with the dwell time. To call a preset press on SHOT button
and then the desired presets you want to configure with this dwell
time.
- Press preset button for 3 seconds to set preset number 243.
Example to set dwell time for presets 1,2,3,4 for 6 seconds.
Preset (3 sec’) 242 – Preset (3 sec’) 245 - Preset (3 sec’) 226 SHOT 1 – SHOT 2 – SHOT 3 – SHOT 4.
12
For setting up different time to each preset
- Press Preset button for 3 seconds to set preset number 242.
- Press Preset button for 3 seconds to set preset number 245.
- Press Preset button for 3 seconds to set preset number between
224 to 239, each preset represents holding time as described
beneath:
preset 224 refers to ____________2 seconds
preset 225 refers to ____________4 seconds
preset 226 refers to ____________6 seconds
preset 227 refers to ____________8 seconds
preset 228 refers to ____________16 seconds
preset 229 refers to ____________24 seconds
preset 230 refers to ____________32 seconds
preset 231 refers to ____________48 seconds
preset 232 refers to ____________64 seconds
preset 233 refers to ____________80 seconds
preset 234 refers to ____________96 seconds
preset 235 refers to ____________112 seconds
preset 236 refers to ____________128 seconds
preset 237 refers to ____________176 seconds
preset 238 refers to ____________208 seconds
preset 239 refers to ____________255 seconds
Example to set dwell time for preset 1 – 8 seconds, for preset 5 4 seconds, for Preset 2 – 2 seconds.
Preset (3 sec’) 242 – Preset (3 sec’) 245 - Preset (3 sec’) 227 SHOT 1 – Preset (3 sec’) 245 - Preset (3 sec’) 225 – SHOT 5 –
Preset (3 sec’) 245 - Preset (3 sec’) 224 – SHOT 2.
• In cases of more presets then showed – continue to set up all
presets and only in the end set preset 243 to end cruise setup.
Resetting all to factory default
Set preset 240.
- Now call preset 1 – to set the dwell time for preset 1 as selected.
- Set preset number 245.
- Set any preset between224 to 239.
- Call preset 2
The last 3 steps are repeating themselves until all desired preset are
programmed.
- Press Preset button for 3 seconds to set preset number 243 to end
Cruise settings.
13
14