1
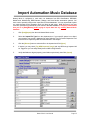
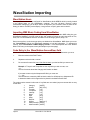
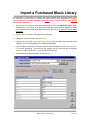
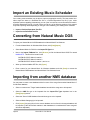
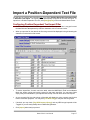
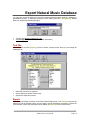
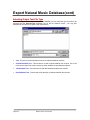
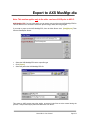
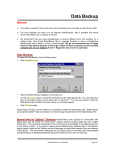
Data Backup
Beware:
q
Your data is valuable! Think of how much time it will take you to manually re-enter all your data!
q
The only protection you have is to do frequent Data-Backups, daily if possible! We cannot
recover lost data for you so please do not ask.
q
We recommend that you save Data-Backups to several different discs and locations on a
rotating basis. Save these Data-Backup files in separate locations in case a Data-Backup
diskette goes bad or there is a fire or natural disaster. We do not recommend use of floppy
discs for data backup because of the large number of discs necessary and the resulting
complete loss of your database if even 1 floppy disc has an error or goes bad.
Data Backup
To begin the Data-Backup, from the Main screen:
§
Click [Data][BackUp]
§
Select the Natural Music Database to be backed up.
§
Use the [Browse] button to select the destination for the Data-Backup file. You may select any
type of removable media such as floppy disc or Zip-Disc™. You may also select to send the
Data-Backup file to another computer across a Local Area Network.
§
Click [Start] to begin.
Natural Music will let you know whether it successfully created the Data-Backup file. Natural Music
uses standard pkZip™ data compression to reduce storage requirements for the Data-Backup files.
Special Note for ZipDisc™ Backups Natural Music sees ZipDiscs as "removable" (like
floppy discs) and will enable the "multi-volume" support needed to backup large files onto multiple
floppy discs. This causes all existing files in the root directory of the ZipDisc to be deleted each time
a new backup is done. If you want to backup several Natural Music database files to one ZipDisc,
simply create a folder on the ZipDisc and do all backups into that folder instead of the root directory
of the ZipDisc. This will prevent existing files on the ZipDisc (those in the folder) from being deleted
during the backup of additional databases because the files are not in the root directory.
Natural Music User Manual
Page 9-1
Data Restore
Beware:
q
You should ONLY consider a Data-Restore if your database is hopelessly corrupted.
q
Data-Restore will return your data to its status as of the last Data-Backup date.
q
It will erase any data from the restored database that was entered since the last Data-Backup of
that database.
Data-Restore
To begin the Data-Restore, from the Main screen:
§
Click [Data][Restore]
§
Use the [Browse] button to select the Data-Backup file to be restored.
§
Click [Start] to be the Data-Restore process.
Page 9-2
Natural Music User Manual
Import Automation Music Database
Natural Music is configured to read audio cut databases from BSI WaveStation, DRS2006,
MediaTouch, MusicReady, RDS-Phantom, Raduga, and Scott Studios automation systems. You
don't need to specially configure the import filter for these databases. You may import data anytime
you make changes to the automation audio cut library to add songs. NM5 will scan for any new
"Sources" (audio file ID's) and add any new entries to the NM5 database. It is highly recommended
that you do a [Data][Backup] before trying to import data into any existing Natural Music
database.
1.
Click [Data][Import] from the main Natural Music screen.
2.
Select the Import File Type from the dropdown box. If your specific system is not listed,
most systems can provide a database file using Delimited Text or Position-Dependent Text
files that can be imported by NM5 as described later in this chapter
3.
Click the [Browse] button to select the file to be imported and Click [Open]
4.
If desired, you may check [Tag NEW Imported Songs] and any NEW songs imported will
be 'Tagged' so you can easily identify them in NM5's Song Browser.
5.
Verify data fields are aligned properly (some fields may be blank), then Click [Import]
Natural Music User Manual
Page 9-3
WaveStation Importing
WaveStation Users
The import filter is automatically configured for WaveStations Audio.MDB file which is usually located
in the /BSI32 folder on your WaveStation computer. You may Un-check 'Genre(s)' and/or
'WaveStation Category(s)' you do NOT want to be imported. This is useful if there are items in the
library you want to exclude (such as Spots). Just give them a "Spot" genre and un-check it.
Importing NM5 Music Coding from WaveStation
This section is only important if you want to include gender, tempo, and other NM5 coding into your
WaveStation database. Very few users do this, and usually just import the main data such as Title,
Artist, etc. from WaveStation and then use NM5 to code the song's gender, tempo, etc.
Some users prefer to code the songs as they are dubbed into WaveStation. NM5 allows you to use
the "AccountExec" field in the WaveStation database to hold this information. To activate this
function, select "AccountExec = NM5 Category, Gender..." in the last dropdown box in the "Natural
Music Field" entry on the Import screen (see sample on previous page).
Code Entry in the WaveStation AccountExec field
Within the "AccountExec" field in WaveStation, you may put NM5 codes. Remember you must:
1.
Enter the codes in this EXACT order
2.
Separate each code with a comma
3.
Put a comma for each field, even if the field is blank, up to the last field you want to use.
Example: If TempoIn and TempoOut are the only fields you wish to enter, use:
,,1,1
The first 2 commas show that Category and Gender are blank.
If you want to enter only the Alsoprotect1ID field, you must use:
,,,,,,,,,,AA.
The commas are counted by NM5 as blank entries for all fields prior to Alsoprotect1ID
to determine that the AA is supposed to be placed in the AlsoProtect1ID field.
The codes must be entered in this order. If any fields are not needed just put a comma with no entry
for that field.
1.
Category
[AA-ZZ]
2.
Gender
[M,F,G,D,I]
3.
TempoIn
[1-5]
4.
TempoOut
[1-5]
5.
Intensity
[1-5]
6.
Mood
[1-5]
7.
Style
[A-Z]
8.
Other
[A-Z]
9.
DayPart
[A-Z]
10.
Opener
[blank or Y]
11.
AlsoProtect1ID [AA-ZZ]
12.
AlsoProtect2ID [AA-ZZ]
Page 9-4
Natural Music User Manual
Import a Purchased Music Library
If you purchase a music library from a vendor listed below, Natural Music can automatically import
the data files. You don't need to configure the import filter for these databases. It is highly
recommended that you do a [Data][Backup] before trying to import data into any existing
Natural Music database.
§
Click [Data][Import] from the main Natural Music screen. Select the Import File Type from the
dropdown box. If your vendor is not listed, the vendor can usually provide a database file using
Comma-Delimited or Position-Dependent text and you will need to configure the Natural Music
import filter.
§
Click the [Browse] button to select the file to be imported.
§
Highlight the desired import file and Click [Open]
§
If desired, you may check [Tag NEW Imported Songs] and any NEW songs imported will be
'Tagged' so you can easily identify them in NM5's Song Browser.
§
If you'd modify the import filter and want to save the modified settings for future use, click [Save
Filter] before proceeding. If you save the filer settings, you may reuse the filter by selecting
"[Use your SAVED Import Filter---]" from the Import FileType box.
§
Verify data fields are aligned properly, and Click [Import]
Natural Music User Manual
Page 9-5
Import an Existing Music Scheduler
Your existing music scheduler may be able to output an appropriate text file. The best method is to
either export the data to a Delimited-Text file or a Position-Dependent-Text file (if your music
scheduler has that capability). Alternatively you can "print" a music list to a text file which will result in
a Position-Dependent-Text file. You will need to see the one of the following sections of this manual
for specific importing details depending on the type of file created by your existing music scheduler.
Ø
Ø
Import a Position-Dependent Text File
Import from a Delimited Text File
Converting from Natural Music DOS
To import your Natural Music for DOS database into Natural Music 5 for Windows:
§
From the Natural Music for Windows Main Screen, click [Data][Import]
§
Select Natural Music for DOS from the Import FileType box.
§
Next to the Import FileName Box, click [Browse] to find the Natural Music DOS File named
NatMus.STP. This file will be located in the
\NATMUS-1\FILES folder for station 1
\NATMUS-2\FILES folder for station 2
\NATMUS-3\FILES folder for station 3, and so on.
§
When you find the NatMus.STP file, click [Open].
§
Enter a name for your Natural Music for Windows database and click [Start] to convert the
Natural Music DOS database into Natural Music 5 for Windows format.
Importing from another NM5 database
You may want to create a new database with all or some of the songs from another Natural Music 5
for Windows database.
§
Select or create a new "Target" station database into which the songs are to be imported.
§
Select the NM5 file type to be imported from the Import File Type dropdown box in the
[Data][Import] section.
§
Select the "Source" NM5 database from which songs are to be imported.
§
Select all Music Category(s) to be imported.
§
Click [Import] Any song found in the source database and not found in the target database will
be imported. (If the Source field matches in both databases it is considered the same song and
will not be duplicated).
Page 9-6
Natural Music User Manual
Import a Position-Dependent Text File
You will have to configure the import filter only if you select Position Dependent Text Import Filter
or Delimited Text Import. The import filter is automatically configured for all other file types. To
import from a Position Dependent Text File, click [Data][Import] on the main Natural Music screen.
Configuring Position Dependent Text Import Filter
§
Select Position Dependent Text File type if the text file to be imported has 1 song per line and
the data fields are not separated by delimiter characters such as commas or tabs.
§
When you open the file, the data for the first song record will be displayed in the grid showing the
character in each column of the record.
§
To set the import filter, for each row in the table, select the NM5 'Music Field' and tell Natural
Music the starting column and ending column for that row's data field. You may leave fields
empty if they are unavailable in your imported data except Title and Artist1 which are required.
§
As you set each field, the right column of the table will display the value currently read for that
field for verification purposes. You may click [Test Next Song] to verify the next song's data.
§
If desired, you may check [Tag NEW Imported Songs] and any NEW songs imported will be
'Tagged' so you can easily identify them in NM5's Song Browser.
§
Click [Import] when ready to proceed.
Natural Music User Manual
Page 9-7
Import from a Delimited Text File
You will have to configure the import filter only if you select Position Dependent Text Import Filter
or Delimited Text Import. The import filter is automatically configured for all other file types. To
import from a Position Dependent Text File, click [Data][Import] on the main Natural Music screen.
Configuring Delimited Text Import Filter
§
Select this file if the file to be imported has each data field separated by a delimiter character
such as a comma, tab, or pipe character. This file usually will have a .txt or .csv [commaseparated-value] extension and can be commonly created by database programs.
§
When you open the file, the data for the first song record will be displayed in the grid showing the
field value in each column of the record.
§
To set the import filter, for each row in the table, select the NM5 'Music Field' and tell Natural
Music the record column and for that row's data field. You may leave fields empty if they are
unavailable in your imported data except Title and Artist fields are required.
§
As you set each field, the right column of the table will display the value currently read for that
field for verification purposes. Click [Test Next Song] to verify additional song entries.
§
If desired, you may check [Tag NEW Imported Songs] and any NEW songs imported will be
'Tagged' so you can easily identify them in NM5's Song Browser. Click [Import] when ready to
proceed.
Page 9-8
Natural Music User Manual
Export Natural Music Database
You may have a need to export your song list to another software program such as a database or
spreadsheet program. To begin this process from the Main screen click [Data][Export]. Natural
Music can export to the following file types:
§
§
Text File See Selecting Output File Type
AXS MusMgr.DTA [for the Scott Studios AXS Automation]
Text File
Select Text File and click [Export], you will be shown a design screen where you can design the
data export file.
§
§
§
Select the columns to be exported
Set any filtering to exclude certain songs
Set how the export file is sorted
Export
After making the design selections on the Data Export Design screen, click [Export] to preview the
data export. On the Preview screen, you can drag the column boundaries to expand or contract the
column widths. When done setting the column widths click [Export] on the Preview screen.
Natural Music User Manual
Page 9-9
Export Natural Music Database(cont)
Selecting Output Text File Type
When exporting the Natural Music database to a Text File, you may select the type of text file to be
exported from the Save-As-Type dropdown box on the file selection screen. You may also
designate the file name to be given to the output text file.
§
Text - This is the normal text without commas or delimiters between columns.
§
Comma-Delimited Text - This will write a file with commas between the columns. This is the
most common type of file used to import into other database or spreadsheet programs.
§
Tab-Delimited Text - This will write a file with tab characters between the columns.
§
Pipe-Delimited Text - This will write a file with pipe | characters between the columns.
Page 9-10
Natural Music User Manual
Export to AXS MusMgr.dta
Note: This section applies only to the older versions of AXS prior to AXS-3.
AXS MusMgr.DTA If you are using AXS, you can export your song list to the AXS MusMgr.DTA file.
This file allows DJ's to use AXS to search for specific songs, artists, and song lengths.
If you wish to export to the AXS MusMgr.DTA, from the Main Screen click [Data][Export]. Then
from the Data Export Screen:
§
§
§
Select the AXS MusMgr.DTA as the output file type
Click [Export]
Select the path to the AXS MusMgr.DTA file.
This export to AXS process may take awhile, as several index files are also created during the
process. This process may be performed while AXS is on the air.
Natural Music User Manual
Page 9-11
Database Repair
Not all database corruption problems can be repaired so it is still vitally important that you do
frequent Data Backups!
Corrupted Database
When you attempt to open or compact a database which has been corrupted, a run-time error
usually occurs. In some situations, however, a corrupted database may not be detected, and no error
occurs, but the database acts oddly. Database corruption can occur if:
§
The Natural Music program is closed unexpectedly because of a power outage or computer
hardware problem,
§
Microsoft Windows doesn't have a chance to write data caches to disk because it freezes or is
restarted in a hard reboot.
§
In MultiUser LAN environments, if the network connection is prematurely terminated.
Avoid DataBase Corruption
To avoid corrupt databases, always do a normal exit from Natural Music. In some cases, power
supplies that can't be interrupted may be necessary to prevent accidental data loss during power
fluctuations.
Database Repair
This function attempts to repair a database that was marked as possibly corrupt by an incomplete
write operation or other problems with your hardware or operating system.
§
§
§
§
The Data Repair function attempts to validate all system tables and all indexes.
Any data that can't be repaired is discarded.
If the database can't be repaired, a run-time error occurs.
After repairing a database, it's also a good idea to compact the database using the [Database
Utilities][Compact Database] function method to defragment the file and to recover disk space.
To begin Data Repair, click [Data][Database Utilitites][Repair Database] from the main Natural
Music screen and select the Database to be repaired.
Page 9-12
Natural Music User Manual
Compact Database
It is vitally important that you do a Data Backup before doing this Compact Database function
in case something goes wrong during this process!
Compact Database
After many data operations such as deleting songs and play histories, the Natural Music database
may become rather large and fragmented. This can cause database performance to become
markedly slower. You may want to occasionally use the [Data][Database Utilitites][Compact
Database] function from the main Natural Music screen to defragment the file and to recover disk
space.
Natural Music User Manual
Page 9-13
This page intentionally left blank
Page 9-14
Natural Music User Manual