1
mAirList Radio Automation Software
Version 3.1
User Manual
(PRELIMINARY)
UK English version written by
Cad Delworth CEng MBCS CITP
Original German language version written by
Dr. Torben Weibert
Credits and Acknowledgements
The mAirList, mAirListConfig, mAirListDB, and mAirListTag programs, and the original
German language User Manual are written by Dr. Torben Weibert, with artwork by Hannes Lambert.
mAirList, mAirListConfig, mAirListDB, and mAirListTag are trademarks of
Broadcast Solutions and Software Development, Dortmund, Germany.
The mAirList, mAirListConfig, mAirListDB, and mAirListTag programs include icons from the
Nuvola project’s icon library, which are used under an LGPL licence. For more details, including
your rights under the LGPL licence, please visit http://www.icon-king.com.
The mAirList, mAirListConfig, mAirListDB, and mAirListTag programs include components and/or
code portions from the following projects, whose home pages are shown below:
BASS — http://www.un4seen.com
JCL — http://www.homepages.borland.com/jedi/jcl/
JVCL — http://vcl.sourceforge.net
OmniXML — http://www.omnixml.com
RemObjects PascalScript and RemObjects SDK — http://www.remobjects.com
TRegExpr — http://RegExpStudio.com
All other trademarks and product names are acknowledged as the property of the respective owners,
and are used within this Manual and within the mAirList, mAirListConfig, mAirListDB, and
mAirListTag programs purely for descriptive and explanatory purposes.
Copying
As a convenience to mAirList users, this Manual is provided as an ‘editable’ PDF document.
Provided that you include the citation below in your customised version, you may copy any or all of
the text and graphics in this Manual, and amend them as necessary, for the sole purpose of
producing and providing customised documentation for yourself or other users of the mAirList,
mAirListConfig, mAirListDB, or mAirListTag programs within your organisation.
The citation you must provide in any customised version of this Manual, or in any other
documentation based wholly or partly on the contents of this Manual, must read as follows:
This documentation contains text which is based on the mAirList User Manual (English Version)
written by Cad Delworth.
This manual is current as of mAirList version 3.1.7, build 974.
This manual is typeset in Utopia and URW Classico fonts.
Cad Delworth has asserted his moral right to be identified as the author of this manual.
i
ii
Contents
A Personal Note From The Author...............................................................................................................................1
Terms Used Throughout This Manual ........................................................................................................................1
1.
Getting Started ...................................................................................................................................................3
1.1
Installing mAirList ....................................................................................................................................... 3
1.2
Licences........................................................................................................................................................ 5
1.3
Licence Manager ......................................................................................................................................... 5
Figure 1.1: The mAirList Licence Manager dialog ...................................................................................................... 5
1.3.1
Types Of Licence......................................................................................................................................... 6
1.3.2
Installing A Purchased Licence Or ‘Personal Demo’ Licence ................................................................. 6
1.3.3
Importing A Purchased Licence Or ‘Personal’ Demo Licence ................................................................ 7
1.3.4
Installing A Free Licence Or ‘Non-Personal’ Demo Licence ................................................................... 7
1.4
1.5
USB Dongle (Hardware Licence Key) ........................................................................................................ 8
Software Updates And Upgrades ............................................................................................................... 9
1.5.1
1.5.2
2.
Update (within mAirList Version 3.1) ....................................................................................................... 9
Upgrade (from mAirList Version 3.0.x or earlier) ................................................................................... 10
1.6
Uninstalling mAirList ................................................................................................................................ 11
Introduction To mAirList.................................................................................................................................13
2.1
The Main Window ..................................................................................................................................... 13
Figure 2.1: The default mAirList window layout....................................................................................................... 13
2.1.1
Browser, Playlist, Players, Cartwall ......................................................................................................... 14
Figure 2.2: The main areas of the default mAirList window layout......................................................................... 14
3.
2.2
Working With The Browser....................................................................................................................... 15
2.3
Working With The Playlist And Its Players .............................................................................................. 17
2.4
Working With The Cartwall ...................................................................................................................... 19
2.5
What Next? ................................................................................................................................................. 21
Advanced Operator Controls And Features ....................................................................................................23
3.1
Player Time Display................................................................................................................................... 23
3.2
Loop And Hook Modes ............................................................................................................................. 23
3.3
Special Playlist Items................................................................................................................................. 23
3.3.1
3.3.2
3.3.3
3.3.4
3.3.5
3.3.6
3.3.7
3.3.8
3.3.9
4.
Actions And The Event Scheduler ...................................................................................................................25
4.1
Actions ........................................................................................................................................................ 25
4.1.1
4.1.2
4.2
Options tab ............................................................................................................................................... 25
List Of Actions By Category...................................................................................................................... 26
Event Scheduler ......................................................................................................................................... 29
4.2.1
4.2.2
5.
Automation Break Point........................................................................................................................... 23
Command ................................................................................................................................................. 23
Container .................................................................................................................................................. 23
Dummy ..................................................................................................................................................... 24
Hook Container ........................................................................................................................................ 24
Network File.............................................................................................................................................. 24
Region Container...................................................................................................................................... 24
Silence ....................................................................................................................................................... 24
Stream and Stream (infinite) ................................................................................................................... 24
Event Date And Time Settings ................................................................................................................. 30
Event Scheduler Tips................................................................................................................................ 31
mAirList Data File Types..................................................................................................................................32
5.1
.mla—Action List ....................................................................................................................................... 32
5.2
.mlc—Cart Set ............................................................................................................................................ 32
5.3
.mld—Desktop........................................................................................................................................... 32
5.4
.mle—Event List......................................................................................................................................... 32
5.5
.mlp—Single Playlist ................................................................................................................................. 32
iii
6.
5.6
.mlpe—Exported Playlist .......................................................................................................................... 33
5.7
.mls—Script................................................................................................................................................ 33
5.8
.mlt—Desktop Template........................................................................................................................... 33
5.9
.mmd—MetaData...................................................................................................................................... 33
5.10
.xml—mAirListDB Hour Templates and Template Assignments ......................................................... 33
Operator’s Reference .......................................................................................................................................35
6.1
Toolbar ....................................................................................................................................................... 35
6.2
Browser....................................................................................................................................................... 36
6.2.1
6.3
6.4
Player .......................................................................................................................................................... 37
Playlist ........................................................................................................................................................ 37
6.4.1
6.5
Playlist Control Bar................................................................................................................................... 37
Cartwall ...................................................................................................................................................... 37
6.5.1
6.5.2
7.
Browser Toolbar ....................................................................................................................................... 37
Cartwall Toolbar ....................................................................................................................................... 37
Cartwall Player.......................................................................................................................................... 37
6.6
Status Bar ................................................................................................................................................... 37
Configuration...................................................................................................................................................39
Figure 7.1: The mAirList configuration program (mAirListConfig) window .......................................................... 39
7.1
Playlists....................................................................................................................................................... 40
7.1.1
General tab................................................................................................................................................ 40
7.1.2
Options tab ............................................................................................................................................... 40
7.1.3
GUI Options tab........................................................................................................................................ 41
7.1.4
Control Bar tab ......................................................................................................................................... 43
7.1.5
Progress Bar tab ........................................................................................................................................ 43
7.1.6
Display tab ................................................................................................................................................ 43
Table 7.1: Backtiming Prefix Characters ................................................................................................................... 43
Table 7.2: Time Format String Characters ................................................................................................................ 44
7.2
Players ........................................................................................................................................................ 45
7.2.1
General tab................................................................................................................................................ 45
Table 7.3: Time Display Modes.................................................................................................................................. 45
7.2.2
Options tab ............................................................................................................................................... 46
7.2.3
GUI Options tab........................................................................................................................................ 48
7.2.4
Buttons tab................................................................................................................................................ 49
7.2.5
Progress Bar tab ........................................................................................................................................ 49
7.3
Cartwall ...................................................................................................................................................... 50
7.3.1
7.3.2
7.3.3
7.3.4
7.3.5
7.3.6
7.3.7
7.4
7.5
PFL Player................................................................................................................................................... 52
Audio Devices ............................................................................................................................................ 52
7.5.1
7.5.2
7.6
Options, Options tab ................................................................................................................................ 50
Options, GUI Options tab ........................................................................................................................ 50
Options, Player GUI Options tab............................................................................................................. 51
Options, Buttons tab ................................................................................................................................ 51
Options, Progress Bar tab ........................................................................................................................ 51
Window ..................................................................................................................................................... 51
Favourites.................................................................................................................................................. 52
Choosing A Device.................................................................................................................................... 52
Troubleshooting Output Problems ......................................................................................................... 53
GUI.............................................................................................................................................................. 55
7.6.1
Settings...................................................................................................................................................... 55
7.6.2
Options...................................................................................................................................................... 55
7.6.3
Browser...................................................................................................................................................... 56
7.6.4
Progress Bar (global progress bar)........................................................................................................... 57
7.6.5
Custom Screen Objects ............................................................................................................................ 58
Table 7.4: Custom Screen Object Types.................................................................................................................... 58
7.7
iv
Remote Control ......................................................................................................................................... 59
7.7.1
7.7.2
7.7.3
7.7.4
7.7.5
7.7.6
7.7.7
7.7.8
7.7.9
7.7.10
7.8
Hotkeys (local) .......................................................................................................................................... 60
Hotkeys (system-wide)............................................................................................................................. 60
Serial Port .................................................................................................................................................. 60
MIDI .......................................................................................................................................................... 60
Joystick/Gamepad .................................................................................................................................... 61
IO-Warrior................................................................................................................................................. 61
SAS ............................................................................................................................................................. 61
SAS over IP ................................................................................................................................................ 61
Window Message Client........................................................................................................................... 61
Barth D.MAX Serial Interface................................................................................................................... 61
Logging ....................................................................................................................................................... 62
7.8.1
Log Types .................................................................................................................................................. 62
7.8.2
Logging Variables ..................................................................................................................................... 63
Table 7.5: Logging Variables....................................................................................................................................... 63
7.8.3
Log File ...................................................................................................................................................... 64
7.8.4
SQL Database............................................................................................................................................ 64
7.8.5
HTTP GET ................................................................................................................................................. 65
7.8.6
Shoutcast................................................................................................................................................... 65
7.8.7
Icecast2...................................................................................................................................................... 65
7.9
Databases ................................................................................................................................................... 66
7.9.1
7.9.2
7.9.3
7.9.4
7.9.5
7.9.6
7.9.7
7.9.8
7.9.9
7.10
7.11
7.12
Notification Scripts ................................................................................................................................... 68
Actions ........................................................................................................................................................ 68
Miscellaneous ............................................................................................................................................ 69
7.12.1
7.12.2
7.12.3
7.12.4
7.12.5
7.12.6
7.12.7
7.12.8
7.12.9
7.12.10
7.13
BASS.DLL .................................................................................................................................................. 73
WDM Audio .............................................................................................................................................. 74
ASIO Audio................................................................................................................................................ 75
Auto Cue.................................................................................................................................................... 75
Mixdown ................................................................................................................................................... 76
Encoder ..................................................................................................................................................... 76
Regionalisation ......................................................................................................................................... 76
Advanced.................................................................................................................................................... 77
7.14.1
8.
File Import ................................................................................................................................................ 69
File Repository .......................................................................................................................................... 70
Attributes................................................................................................................................................... 70
File Management...................................................................................................................................... 70
Runtime Features ..................................................................................................................................... 71
Serial Ports ................................................................................................................................................ 71
Settings...................................................................................................................................................... 72
Options...................................................................................................................................................... 72
Passwords.................................................................................................................................................. 73
System Log ................................................................................................................................................ 73
Modules...................................................................................................................................................... 73
7.13.1
7.13.2
7.13.3
7.13.4
7.13.5
7.13.6
7.13.7
7.14
mAirListDB (network mode) ................................................................................................................... 66
mAirListDB (local mode) ......................................................................................................................... 66
Script ......................................................................................................................................................... 66
eldoDB....................................................................................................................................................... 66
radioDB2 ................................................................................................................................................... 66
SAM Broadcaster V4 ................................................................................................................................. 67
On The Fly ................................................................................................................................................. 67
iTunes........................................................................................................................................................ 67
audimark ................................................................................................................................................... 68
Data Folders.............................................................................................................................................. 77
Advanced Configuration..................................................................................................................................79
8.1
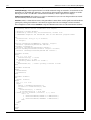
skin.ini File ................................................................................................................................................. 79
Figure 8.1: Contents and Structure of skin.ini file.................................................................................................... 79
v
8.1.1
8.1.2
8.1.3
8.1.4
8.1.5
8.1.6
8.1.7
8.1.8
8.1.9
8.1.10
8.1.11
8.1.12
8.2
Changing mAirList Icon Graphics............................................................................................................ 88
8.2.1
8.2.2
8.3
skin.ini Setting Names and Conflicts ...................................................................................................... 80
skin.ini Values........................................................................................................................................... 81
Main Window ........................................................................................................................................... 83
Toolbar ...................................................................................................................................................... 83
Browser Section ........................................................................................................................................ 83
Player ......................................................................................................................................................... 84
Playerx_y ................................................................................................................................................... 85
ExtraPFL .................................................................................................................................................... 85
Cartwall ..................................................................................................................................................... 85
Playlist ....................................................................................................................................................... 86
Playlistx ..................................................................................................................................................... 87
ProgressBar ............................................................................................................................................... 87
Replacing Common Icon Graphics ......................................................................................................... 88
Replacing Other Icon Graphics ............................................................................................................... 90
Setting Default Folders For mAirList Dialogs.......................................................................................... 91
Figure 8.2: Contents and Structure of DefaultDirectories.ini file ............................................................................ 91
9.
Working With Audio Files ................................................................................................................................93
9.1
Planning Your Audio Library .................................................................................................................... 93
9.2
Audio File Formats: BASS Add-Ins........................................................................................................... 93
9.3
Importing Files .......................................................................................................................................... 93
9.4
File Tagging And Metadata....................................................................................................................... 95
9.4.1
9.5
File Tagger Program (mAirListTag).......................................................................................................... 95
9.5.1
9.5.2
9.6
Properties in Playlists ............................................................................................................................... 95
mAirListTag Browser ................................................................................................................................ 96
mAirListTag Item Properties Dialog........................................................................................................ 96
Item Properties Dialog .............................................................................................................................. 97
9.6.1
General tab................................................................................................................................................ 97
9.6.2
Audio File tab............................................................................................................................................ 97
9.6.3
Options tab ............................................................................................................................................... 98
9.6.4
Attributes tab ............................................................................................................................................ 98
9.6.5
Actions tab ................................................................................................................................................ 99
9.6.6
Cue Data tab ............................................................................................................................................. 99
9.6.7
PFL tab....................................................................................................................................................... 99
Figure 9.2: mAirListTag PFL tab and optional controls ........................................................................................... 99
10.
Layout Designer .............................................................................................................................................103
Figure 10.1: The mAirList Layout Designer window .............................................................................................. 103
11.
10.1
Using The Mouse..................................................................................................................................... 103
10.2
Using The Layout Designer Dialog ........................................................................................................ 104
10.3
Closing The Layout Designer ................................................................................................................. 104
mAirListDB Audio Database..........................................................................................................................105
11.1
About mAirListDB ................................................................................................................................... 105
11.2
How To Create A New mAirListDB Database ....................................................................................... 105
11.2.1
11.2.2
11.3
Managing Your Audio Library ................................................................................................................ 108
11.3.1
11.3.2
11.3.3
11.3.4
11.4
11.5
Adding Storages ...................................................................................................................................... 108
Adding Virtual Folders ........................................................................................................................... 108
Synchronising a Storage......................................................................................................................... 109
VACUUM Command (Compact/Defrag) ............................................................................................. 109
Working With The Library Tab ............................................................................................................... 110
Managing Database Playlists.................................................................................................................. 111
11.5.1
11.5.2
vi
Local Mode.............................................................................................................................................. 105
Network Mode ........................................................................................................................................ 106
Working With The Playlist Tab .............................................................................................................. 111
Creating Database Playlists ................................................................................................................... 112
11.5.3
11.6
Using mAirListDB Databases In mAirList ............................................................................................. 116
11.6.1
11.6.2
11.6.3
11.7
11.8
11.9
B.
Adding External IDs To mAirListDB Databases ................................................................................... 118
mAirListScript Scripting Language ................................................................................................................119
12.1
Types Of Script: Action Scripts vs. Notification Scripts ....................................................................... 119
12.2
Basic Script Design and mairlistscript.chm .......................................................................................... 119
12.3
Writing Action Scripts ............................................................................................................................. 120
12.3.1
12.3.2
12.3.3
12.3.4
12.3.5
A.
Browser Database Panes........................................................................................................................ 116
Database (Playlist) Actions And Event Scheduling .............................................................................. 117
Database Button (Main Toolbar) .......................................................................................................... 117
Changing The Appearance Of Library Item Lists ................................................................................. 117
Importing Audio File Information From Other Products .................................................................... 117
ID And External ID Fields ....................................................................................................................... 118
11.9.1
12.
Using the Mini Scheduler ...................................................................................................................... 113
Understanding mAirList Time Values................................................................................................... 120
Playlists And PlaybackControls ............................................................................................................. 121
PlaylistItems And FilePlaylistItems....................................................................................................... 121
PlayerControls ........................................................................................................................................ 121
CartWallControl and CartPlayerControls ............................................................................................. 121
12.4
Writing Notification Scripts.................................................................................................................... 121
mAirList Commands......................................................................................................................................125
About The Command List ................................................................................................................................... 125
ALL PLAYERS Commands ................................................................................................................................... 126
AUTOMATION Commands................................................................................................................................. 126
BROWSER Commands......................................................................................................................................... 126
CARTWALL Player Commands ........................................................................................................................... 126
CARTWALL General Commands ........................................................................................................................ 127
ENCODER Commands ........................................................................................................................................ 127
EXTRAPFL Commands ........................................................................................................................................ 127
ON/OFF AIR Commands ..................................................................................................................................... 127
PFL Commands .................................................................................................................................................... 127
PLAYER Commands ............................................................................................................................................. 128
PLAYLIST Commands.......................................................................................................................................... 129
Module Descriptions .....................................................................................................................................131
audimark ............................................................................................................................................................... 131
AudioFileTypes ..................................................................................................................................................... 131
AutoCue................................................................................................................................................................. 131
BassASIO ............................................................................................................................................................... 131
BassAudio.............................................................................................................................................................. 131
BassStreaming ...................................................................................................................................................... 131
BassVST ................................................................................................................................................................. 131
Core ....................................................................................................................................................................... 131
CoreGUI ................................................................................................................................................................ 131
CoreLogging.......................................................................................................................................................... 131
CoreRemote .......................................................................................................................................................... 131
DBLite.................................................................................................................................................................... 131
DBPro .................................................................................................................................................................... 131
DHD....................................................................................................................................................................... 131
DigAS ..................................................................................................................................................................... 131
DMAX .................................................................................................................................................................... 131
DRS2006 ................................................................................................................................................................ 132
HTTP...................................................................................................................................................................... 132
InpOut32 ............................................................................................................................................................... 132
vii
C.
viii
IOWarrior .............................................................................................................................................................. 132
LayoutSkin ............................................................................................................................................................ 132
MiscDatabases...................................................................................................................................................... 132
Mixdown ............................................................................................................................................................... 132
Playout................................................................................................................................................................... 132
Powergold ............................................................................................................................................................. 132
Regions .................................................................................................................................................................. 132
REST....................................................................................................................................................................... 132
SAS ......................................................................................................................................................................... 132
Scripting ................................................................................................................................................................ 132
SQLDatabases....................................................................................................................................................... 132
WindowsJoystick .................................................................................................................................................. 132
WindowsMidi........................................................................................................................................................ 132
WindowsMixer...................................................................................................................................................... 132
WMClient .............................................................................................................................................................. 132
Nuvola Icon Graphics Files Used By mAirList...............................................................................................133
mAirList Version 3.1 User Manual (UK English)
1
A Personal Note From The Author
The Operation Manual for a brand of professional PA digital mixing consoles famously began with a
page containing the single sentence: Throw a six to start. Although it is true that mAirList is an
enormously configurable application, I hope you will find this Manual a helpful and, above all,
reliable companion and guide to all of mAirList’s ‘nooks and crannies.’
Please don’t be misled by the size of this User Manual: you can simply install mAirList and put it live
on air in just a few minutes, using its default settings; and after reading maybe ten pages of this
manual or less. But as I hope you will discover, mAirList is unique in the almost total flexibility it
gives you to customise the program into the radio playout and automation software you want. I like
to think of mAirList as probably the ultimate ‘radio automation software construction set.’
Working on this User Manual for mAirList has been an extremely enjoyable project, and I sincerely
hope that you, as a user or potential user of mAirList, find the Manual informative, complete, and
accurate. I suspect that experienced mAirList users will often think ‘Oh! I didn’t know that!’ as they
explore these pages, just as I did while I was writing them.
I am one of those strange types of people who enjoys writing technical manuals, and as I am my own
fiercest critic, please do let me know if you discover any mistakes or typographic errors, no matter
how ‘minor.’ The best way to do this is in the mAirList forums online.
Cad Delworth
Edinburgh,
Scotland
6 July 2011
Terms Used Throughout This Manual
The devil is in the detail, as they say, so rest assured that throughout this Manual, we always use the
same form of words to describe the same action. For example, you won’t see ‘press Enter’ on one
page and ‘hit the Return key’ on another page.
•
‘Press …’ always means ‘press the keyboard key …’
•
‘Click …’ always means
‘press and release the left mouse button while the mouse pointer is over …’
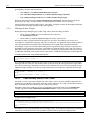
Verbs which refer to mouse actions have the meanings listed below.
Verb
Meaning
Click
Press and release the left mouse button.
Ctrl-click
Hold down either Ctrl key, press and release the left mouse
button, then release the Ctrl key.
Ctrl-drag
While holding down either Ctrl key, press and hold the left mouse
button while moving the pointer.
Double-click
Press and release the left mouse button twice in quick succession.
Drag
Press and hold the left mouse button while moving the pointer.
Drop
Release the left mouse button after dragging an item or items.
Right-click
Press and release the right mouse button.
Scroll
Rotate the mouse wheel.
Shift-click
Hold down either Shift key, press and release the left mouse
button, then release the Shift key.
We assume throughout this Manual that you are a reasonably experienced Windows user
who is familiar with standard terms for Windows features: for example, drive, folder and subfolder.
We also assume that you are experienced in working with computer drives, folders, and files;
with knowledge of how to use Explorer or My Computer to work with your files and folders.
Saved at 02:16:00 on 6 Jul 2011
Revision 19
2
Revision 19
mAirList Version 3.1 User Manual (UK English)
Saved at 02:16:00 on 6 Jul 2011
mAirList Version 3.1 User Manual (UK English)
1.
3
Getting Started
Welcome to mAirList, which is arguably the most flexible and configurable radio playout and
automation system available today. We would like to sincerely thank all our users for their
thousands of questions, suggestions, and ideas: these have helped shape mAirList into the powerful,
professional application that it is today. From our users’ feedback, we are confident that mAirList
meets the actual needs of any kind of radio station, whether large or small, local or national.
Please note that the features available in your installed copy of mAirList depend on the type of
mAirList licence you have purchased. Therefore, some features described in this Manual may not be
available in your installed copy of mAirList.
We hope you find this Manual helpful, informative, and easy to use. We welcome your comments
and ideas to improve future editions of this Manual: please use the mAirList forums to do so.
This chapter lists the steps required to install mAirList on your computer. This includes the
installation of the software itself. and how to use the mAirList Licence Manager to import your
purchased or demo licence to unlock the software.
1.1
Installing mAirList
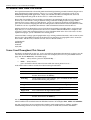
To install mAirList, download the latest .exe setup file from the mAirList Web site. There is also a
ZIPfile version of the setup, which experienced mAirList users may prefer.
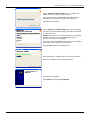
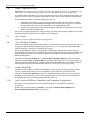
When you open the setup program, you see this dialog:
The language should default to English.
If it doesn’t, select English from the dropdown.
Click OK to continue.
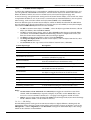
The Setup Wizard opens.
Click Next > to continue.
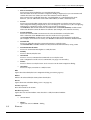
On the Choose Components page, you can choose not to
install the Example mAirList Scripts if you prefer.
However, we recommend that you leave all boxes ticked,
especially if this is your first mAirList install.
Click Next > to continue.
Saved at 02:16:00 on 6 Jul 2011
Revision 19
4
mAirList Version 3.1 User Manual (UK English)
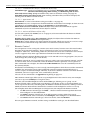
On the Choose Install Location page, you choose the
folder where you wish to install mAirList.
We suggest that you do not change the folder from its
default unless you have a specific reason to do so.
Click Next > to continue.
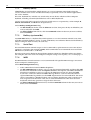
On the Choose Start Menu Folder page, you choose the
Windows Start Menu folder where you wish to install the
mAirList shortcuts.
NOTE: Only Windows Start Menu shortcuts are installed.
No other shortcuts are installed (desktop icons or
Quick Launch icons, for example).
We suggest that you do not change the Start Menu folder
unless you have a specific reason to do so.
Click Install to begin the install process.
The install process typically takes less than one minute.
When it is complete, you see the page below.
Installation is complete.
Click Finish to close the Setup Wizard.
Revision 19
Saved at 02:16:00 on 6 Jul 2011
mAirList Version 3.1 User Manual (UK English)
1.2
5
Licences
There is only one mAirList program (EXE) file: there are no separate ‘demo’ and
‘licensed’ versions. However, you do need to obtain a licence to be able to open
the mAirList program. If you open mAirList without installing a licence first, you
see the Licence error message box shown on the right and mAirList does not
open (when you click OK, the mAirList Licence Manager opens).
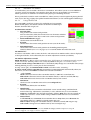
There are several types of licence available, including: free licences which offer basic playout
features only, demo licences which are identical to purchased licences but with some limitations,
and purchased licences which are available in several ‘editions’ that offer different sets of features.
Free licences are strictly for personal home use only, and must not be used for any commercial or
broadcast purpose (which includes club DJing and Internet streaming).
If you are evaluating mAirList, we recommend that you obtain a demo licence. This allows you to
test mAirList features and decide which licensed edition of mAirList is best for your station. Demo
licences are strictly for evaluation use only, and must not be used for any commercial or broadcast
purpose (which includes club DJing and Internet streaming).
To use mAirList for any purpose other than personal home use or evaluation, you must purchase a
separate licence for each computer which has mAirList installed on it, including computers where
mAirList is used for scheduling, production, or programming.
For full details and feature comparisons of the demo and purchased mAirList licence editions,
please visit the mAirList web site: http://www.mairlist.com.
1.3
Licence Manager
To use mAirList for any commercial or broadcast purpose,
you must purchase a licence for each computer where mAirList is installed.
To manage the mAirList licence on a computer, open the mAirList Licence Manager by doubleclicking its icon in the mAirList group in your computer’s Start Menu, or by running the
LicenseManager.bat file in your mAirList program folder.
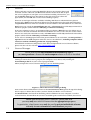
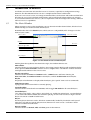
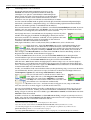
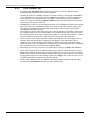
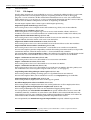
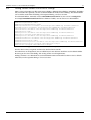
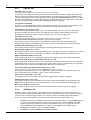
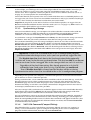
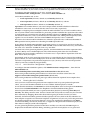
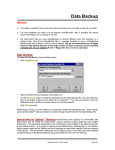
When you open the mAirList Licence Manager, you see the dialog below.
Figure 1.1: The mAirList Licence Manager dialog
Your current licence information is shown in the Current Licence Data grid at the top of the dialog.
This is empty (as shown above) unless you have already installed a mAirList licence.
The Hardware ID at the bottom of the dialog, which is different for every computer, is used to
activate licences. The Hardware ID you use is recorded against each licence number you activate.
Before you install any mAirList licences, please note that
you may only use mAirList licences for the appropriate purposes.
In particular, a free licence may only be used by private individuals at home,
and only for non-commercial, non-broadcast purposes.
Saved at 02:16:00 on 6 Jul 2011
Revision 19
6
mAirList Version 3.1 User Manual (UK English)
1.3.1
Types Of Licence
There are four types of mAirList licences. You download and install all mAirList licences—regardless
of type—using similar steps, which are described below.
1.3.1.1
Purchased Licences and ‘Personal’ Demo Licences
If you purchase a mAirList licence (or request a ‘personal’ demo licence, which allows you to run
mAirList unrestricted for a fixed number of days), it is ‘personalised’ with your station or company
name (or your own name), and it is also specific to one computer. To download these types of
licences, you need a login name and password for the customer area of the mAirList web site, and
the Hardware ID (see section 1.3.3) of each computer you are licensing.
1.3.1.2
Free Licences and ‘Non-Personal’ Demo Licences
Anyone can download and use a free mAirList licence, which is strictly for personal home use only,
for non-commercial and non-broadcast purposes; or a ‘non-personal’ demo licence, which allows
you to run mAirList for a fixed time, after which all audio output stops and mAirList closes.
1.3.2
Installing A Purchased Licence Or ‘Personal Demo’ Licence
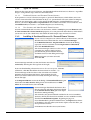
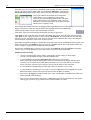
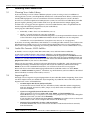
If your mAirList computer can connect directly to the Internet, you can
download its licence data from the mAirList Licence Manager.
In the Download Licence - Registered Users section of the dialog,
type your mAirList customer account Login name and Password,
then click Download licence.
The Licence Manager connects to the mAirList
customer site, retrieves the list of your
purchased and ‘personal demo’ licences,
and shows the list in the dialog on the right.
Select the licence you want to install,
then click OK.
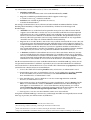
Licence Manager reminds you that the licence must first be
activated by showing the message box on the right.
If you are downloading a licence for use on the same computer, click Yes.
(Otherwise, click No, then follow the instructions in section 1.3.3).
Licence Manager sends the data to the activation server which
performs the activation of the licence, then confirms that the
licence you selected has been activated by showing the message
box on the right.
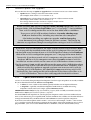
In the Registered Users section of the dialog, click Download licence again.
Notice that the Select Licence dialog shows activated licences in bold.
Select the activated licence, then click OK.
Licence Manager downloads the licence data
file you selected, and shows the licence details
in the Current Licence Data grid at the top of
the Licence Manager dialog.
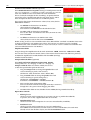
This includes your personal details and the list of mAirList modules
(features) which your licence has enabled. mAirList modules are fully
described in Module Descriptions, beginning on page 131.
If you downloaded a ‘personal’ demo licence, the Expires date shown
in the dialog is the date when your licence expires. After this date, you
must purchase a licence.
Click Save to install and activate your licence.
Revision 19
Saved at 02:16:00 on 6 Jul 2011
mAirList Version 3.1 User Manual (UK English)
1.3.3
7
Importing A Purchased Licence Or ‘Personal’ Demo Licence
If your mAirList computer does not have an Internet connection, or if you plan to activate and
download its licence on a different computer for any reason, open Licence Manager on your
mAirList computer and click Copy to copy its Hardware ID. Open Notepad (or any similar text
editor), paste the copied Hardware ID into a new text file, then save the file.
Because you will need to open the saved file on another computer to activate and download the
licence, we strongly suggest that you give the text file a unique and meaningful name, especially if
you are ‘collecting’ Hardware IDs from two or more mAirList computers.
On any computer which has an Internet connection, browse to the mAirList web site, log in to the
customer area using your supplied user ID and password, then browse the My Licenses page. For
each computer requiring a licence, choose any licence with an Activate link beside it, then click the
Activate link. Note that each licence can only be activated once: you cannot ‘re-activate’ a licence
unless you contact mAirList customer support. On the page which opens, paste the Hardware ID
from your saved text file to activate that licence, then download and save the activated licence file.
If you are activating and downloading more than one licence file, make sure that you note which
mAirList computer each licence file has been activated for. You may find it helpful to give each
downloaded licence file a unique name to help you identify it later.
After you have downloaded the licence file or files,
perform the following steps on each mAirList computer:
1.
Open Licence Manager.
2.
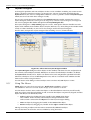
Click Import from file…
3.
On the Import Licence File dialog,
navigate to and select the correct licence file.
4.
Click Open.
Your licence data is shown in the Current Licence Data grid at the top of the Licence Manager
dialog. Click Save to install your licence.
If you use the wrong Hardware ID when downloading any licence,
please contact mAirList Customer Support immediately.
1.3.4
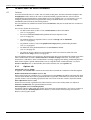
Installing A Free Licence Or ‘Non-Personal’ Demo Licence
This is similar to the process for installing purchased licences, except that you click
Download Licence in the Download a Free or Demo Licence section of the Licence Manager dialog.
When you do this, Licence Manager connects to the mAirList site, retrieves the
list of free and ‘non-personal’ demo licences, and shows the list in the dialog
shown on the right. Select the type of licence you want to install, then click OK.
Licence Manager downloads the licence data file you selected and
shows the details in the Current Licence Data grid at the top of the
Licence Manager dialog.
If you downloaded a ‘non-personal’ demo licence, the TimeLimit
shown in the dialog is the number of minutes you can use mAirList
before it stops all audio output and then closes.
Click Save to install and activate your licence.
If your mAirList computer does not have an Internet connection, you can download a free or
‘non-personal’ demo licence data file on another computer, then transfer and import it in exactly
the same way as described above in section 1.3.3.
Saved at 02:16:00 on 6 Jul 2011
Revision 19
8
1.4
mAirList Version 3.1 User Manual (UK English)
USB Dongle (Hardware Licence Key)
Instead of using licences which are permanently ‘locked’ to specific computers, you can optionally
purchase USB dongles (hardware ‘licence keys’). You can freely move any USB dongle to any
computer, which you may find more convenient if you frequently change or upgrade computers.
Please see the customer area of the mAirList web site for more details.
Revision 19
Saved at 02:16:00 on 6 Jul 2011
mAirList Version 3.1 User Manual (UK English)
1.5
9
Software Updates And Upgrades
This section lists the steps to update or upgrade from a version of mAirList to a later version.
•
Update means a change within the same minor version
(for example, from version 3.1.1 to version 3.1.2).
•
Upgrade means a change from one minor version to a different minor version
(for example, from version 3.0.x to version 3.1.x)
or a change from one major version to a different major version
(for example, from version 2.x.x to version 3.x.x).
Before installing any update or upgrade, make a backup copy of your mAirList
program folder, and your Root Data Folder (see 7.14.1 on page 77) and subfolders.
Your mAirList configuration files are in the data folder and its subfolders.
If you use a mAirListDB (or other) database, also make a backup copy
of all your database files, including any stored on other computers.
Also before installing any update or upgrade, read its change log
(a text document listing changes from the previous version). The change log
contains any significant changes to configuration settings or mAirList features.
If you use a mAirListDB database, the table schema (layouts and structures) must
be in step with the installed version of the mAirList program. You can view the
required and actual version of your mAirListDB database schema in the Databases
node of the mAirList configuration program (see 7.9 on page 66 for more details).
Conversely, if you have several mAirList computers using the same mAirListDB
database, all the mAirList computers must have the same version of mAirList
installed (or versions which use the same mAirListDB database schema version).
For this reason, it’s not usually possible to use the same mAirListDB database from
computers with different versions of mAirList installed on them. Therefore, if you
plan to install a new update or upgrade, and you want to test or trial it with an
existing mAirListDB database, you should first copy your existing mAirListDB
database files, then configure the trial installation to use those copied files as its
mAirListDB database. You can then safely upgrade the database schema.
1.5.1
Update (within mAirList Version 3.1)
mAirList is constantly being developed and improved, and two types of updates are usually available
for you to download and install: releases and snapshots.
•
•
A release is a new, stable version which typically includes new or improved features.
A snapshot is a possibly unstable development build which is available for testing.
Snapshots usually consist of a single, updated mAirList.exe file
IMPORTANT NOTE: Always backup your mAirList program folder and all your mAirList data files
and databases before you install an update or snapshot.
You should not install snapshots on your live playout computers unless you have conducted your
own ‘as-live soak testing’ of a snapshot build, and are confident of its stability: on the other hand, we
strongly recommend that you do install new stable releases on your live playout computers.
If you want to install an update within version 3.1 of mAirList (for example, version 3.1.0 to version
3.1.1), you don’t need to do anything to prepare for the update, other than backing up your mAirList
program folder, your mAirList data folder and all its subfolders, and your database files (if any).
Saved at 02:16:00 on 6 Jul 2011
Revision 19
10
mAirList Version 3.1 User Manual (UK English)
To perform an update:
1.
Make backup copies of your existing mAirList program folder, data folder and all subfolders, and
all database files.
2.
Download either the installer (.exe file) or ZIPfile of the new version of mAirList.
3.
If you downloaded the installer:
Open the file, which overwrites your existing version of the mAirList program file (.exe file) but
leaves your configuration files unchanged.
If you downloaded the ZIPfile:
Extract it into your existing mAirList program folder and data folder (and its subfolders).
Overwrite existing files in all folders except the config subfolder of your data folder,
and extract files ‘using folder names’ (i.e. extract using the subfolder names within the ZIPfile).
4.
Open the mAirList configuration program and check all settings, especially any new or changed
settings as detailed in the change log.
5.
If you have an existing mAirListDB database, check your database schema version (see 7.9 on
page 66 for details) and upgrade it if necessary.
6.
When all configuration settings are correct, click Save to save your changes and close the
mAirList configuration program.
7.
Open the updated mAirList and test it thoroughly before using it for broadcast.
1.5.2
Upgrade (from mAirList Version 3.0.x or earlier)
Before you upgrade, check that all your mAirList licences
are valid for the version you are upgrading to.
mAirList licences are usually valid for any version within
the current major version (for example, all 3.x.x versions).
Upgrading from a version earlier than 3.1.x (for example, from 3.0.x) is slightly more complicated
than installing an update.
You will usually need to manually copy the existing configuration files into the new version’s
program folders (and copy any mAirListDB files, as described earlier).
You may need to manually edit configuration files, and you will definitely need to check all
configuration settings, as features may have been changed, added, or removed.
It’s especially important that you read the change log before installing an upgrade.
To perform an upgrade:
1.
Make backup copies of your existing mAirList program folder, data folder and all subfolders, and
all database files.
2.
Download either the installer (.exe file) or ZIPfile of the new version of mAirList.
3.
If you downloaded the installer:
Run the file, which installs the new version of mAirList.
If you downloaded the ZIPfile:
Extract it into a new folder, making sure you extract all files ‘using folder names’ (i.e. extract
using the subfolder names within the ZIPfile).
Revision 19
4.
Copy the contents of the previous version’s data folder into the new version’s data folder,
but do not copy the previous version’s license.lic file.
5.
Open the mAirList Licence Manager (see 1.3 on page 5) and activate the licence.
6.
Open the mAirList configuration program and check all settings, especially any new or changed
settings as detailed in the change log, and adjust the paths of all database connections.
7.
When all configuration settings are correct, click Save to save your changes and close the
mAirList configuration program.
8.
Open the new version of mAirList and test it thoroughly before using it for broadcast.
Saved at 02:16:00 on 6 Jul 2011
mAirList Version 3.1 User Manual (UK English)
1.6
11
Uninstalling mAirList
NOTE: If you uninstall mAirList, this does not delete any mAirList data files (such as .mmd and .mlp
files) or mAirList databases. If you wish to delete these files, you must do so yourself after the uninstall.
If you need to uninstall mAirList (because you have ‘moved’ it to a new computer, for example),
double-click the Uninstall icon in the mAirList folder in your Windows Start Menu.
If you did not create a mAirList folder in your Windows Start Menu when you installed mAirList,
navigate to the folder where mAirList is installed, then open the Uninstall program.
You see the mAirList Uninstall Wizard:
Click Next > to continue.
Check that the folder shown is the folder where you
originally installed mAirList.
Click Uninstall to begin the uninstall process.
When you see this page, mAirList has been uninstalled.
Click Finish to close the Uninstall Wizard.
Saved at 02:16:00 on 6 Jul 2011
Revision 19
12
Revision 19
mAirList Version 3.1 User Manual (UK English)
Saved at 02:16:00 on 6 Jul 2011
mAirList Version 3.1 User Manual (UK English)
2.
13
Introduction To mAirList
It will take you some time to learn all of mAirList’s features, especially its configuration settings.
However, this does not mean that mAirList is complicated to learn or understand.
If you are a new mAirList user, we strongly recommend that you first learn and understand the basic
functions of mAirList in its default configuration, and in some detail, before making any changes.
As you become familiar with mAirList, you can experiment with the configuration settings and learn
more of mAirList’s capabilities.
2.1
The Main Window
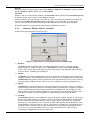
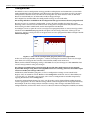
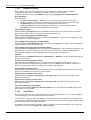
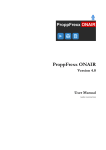
When you open mAirList after installation, you see the main window shown below, which we have
labelled to help you understand the default layout.
Remember that this is the default layout, which you can—and probably will—change to suit the
needs of your station.
Browser toolbar
Main toolbar
Playlist Control bar
Playlist
Browser
Global Progress Bar
Cartwall toolbar
(six) Cartwall Players
(two) Players
Figure 2.1: The default mAirList window layout
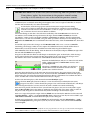
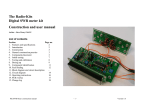
Working from the top down, then from left to right, the window elements are:
Main toolbar
Contains buttons to Open and Save playlists, Insert items into the Playlist, Edit and Delete Playlist
items, open the Event Scheduler, and run mAirList scripts. Most—but not all—of these functions
are duplicated elsewhere in the mAirList GUI.
Playlist Control bar
Contains buttons for AUTO and ASSIST modes, a NEXT button, and boxes showing the
Next event time, the number of items in the Playlist, and the total duration of the Playlist.
Playlist
The playlist of audio items to be played in the Players, plus ‘special’ items such as Commands.
Global Progress Bar
A progress bar for the item which is currently playing.
Cartwall toolbar
Contains buttons to load and save Cart Sets, and to toggle PFL mode for all Cartwall Players.
Cartwall Players
‘Cart’ players for jingles, stings, effects, music beds, etc. Unlike the main Players, a Cartwall Player
re-cues itself and remains loaded after it finishes playing an item. Also note that a single Cartwall
Player can contain a ‘stack’ of audio items.
Players
The main players for music tracks, which are automatically ‘loaded’ by the Playlist and ‘ejected’
when they stop. Players contain only one item, however an ‘item’ can be a ‘container’ which
contains a number of audio items.
Browser toolbar
Contains buttons to Refresh, Add, and Close panes in the Browser.
Saved at 02:16:00 on 6 Jul 2011
Revision 19
14
mAirList Version 3.1 User Manual (UK English)
Browser
A browser which can contain panes showing file folders or folder trees, databases, database search,
database playlists, clocks, and the mAirList Recycle Bin.
Status Bar
Finally, at the very bottom of the window is the Status Bar, which contains the System Message area
on the left and the mAirList time-of-day clock on the right.
Double-clicking the System Message area opens the mAirList System Log, and double-clicking the
clock opens the Adjust Internal Time dialog, which allows you to manually set or change the
mAirList ‘internal’ date and time (note that this does not affect the Windows date and time).
All of these elements are explained in more detail in the following sections.
2.1.1
Browser, Playlist, Players, Cartwall
The four main operational areas of mAirList are:
Figure 2.2: The main areas of the default mAirList window layout
1. Browser
The browser contains panes, which can contain file folders, databases, database search,
database playlists, clocks, and the mAirList Recycle Bin. By default, only the Recycle Bin is
shown. You can drag audio items from any pane in the Browser and drop them on the Playlist
or on any Player, including Cartwall Players.
2. Playlist
The Playlist is the central component of mAirList. Audio items in the Playlist are automatically
loaded in sequence into available Players for manual (‘live assist’ or assist mode) or automated
(automation mode) playout. Items in the Playlist are listed with the first (‘next’) item at the top,
and show projected playout times and current status, which Player they are loaded into, etc.
3. Players
The Players are separate audio players which play the items in the Playlist. Players are loaded
automatically by the Playlist. When an item ends (unlike Cartwall Players: see below), the Player
‘ejects’ it and the Playlist loads the Player with the next available item. The two Players in the
default configuration are named A and B. If you use mAirList (as we recommend) with a mixer,
each Player is usually set up to correspond to a separate fader (channel) on the mixer.
4. Cartwall
The Cartwall comprises a set of additional ‘single shot’ players (called ‘cartwall’ or ‘cart’ players
because they mimic hardware cart players), which can be played independently of the Playlist.
Use the Cartwall for your short elements such as jingles, effects, music beds, etc. Unlike the
main Players, Cartwall Players ‘reset’ after use and the audio item remains loaded and re-cued.
Cartwall Players can also contain a ‘stack’ or ‘mini-playlist’ of audio items. Cartwall Players are
numbered from 1 upwards. There are six Cartwall Players in the default configuration. If you
use mAirList (as we recommend) with a mixer, all Cartwall Players are usually set up to
correspond to a single fader (channel) on the mixer.
Revision 19
Saved at 02:16:00 on 6 Jul 2011
mAirList Version 3.1 User Manual (UK English)
15
The following three sections are short, carefully designed ‘hands-on’ tutorials
which we created to help you learn the mAirList ‘basics’ as quickly as possible.
If you are a new mAirList user, we strongly recommend
that you complete all three tutorials yourself,
in a single continuous session on your own installed copy of mAirList.
The full set of three tutorials should take you much less time to complete
than the 30 minutes of audio output allowed in demo versions of mAirList.
More detailed instructions follow, but you will find those instructions
much clearer and easier to understand if you complete these short tutorials first.
2.2
Working With The Browser
Open mAirList if it is not already open, and make sure assist mode is selected
(if not, click ASSIST on the Playlist Control bar).
The Browser is, as it implies, an area where you can view several ‘pages’ or panes of information,
including things like clocks and saved playlists. More importantly, it can browse your audio
database if you have one, and can show folders containing your audio files.
By default, the Browser contains a single Recycle Bin pane (of which, more later).
As an example, we’ll add a Browser pane which lists the mAirList program folder, which contains the
single audio file (test.ogg) for testing purposes.
On the Browser toolbar (just above the Browser), click Add to open a
Browse for Folder dialog.
If a different dialog appears, click Cancel, then click Add—not the
dropdown arrow to its right—and don’t proceed until you have a
Browse for Folder dialog open, as shown on the left.
On the Browse for Folder dialog, navigate to and select the folder
1
C:\Program Files\mAirList 3.1 , then click OK.
The Browser opens a new pane and you see
the test.ogg file in the pane. Note that folder
panes in the Browser list only audio files,
even if there are other files in the folder.
You now have two panes in the Browser.
To choose the pane you want to view, click its
name in the pane stack just below the main
Browser window. This is known as making a
pane the ‘active pane.’
The active pane expands to fill the Browser, and the previous active pane
returns to the pane stack.
Note that you can’t change the order of panes in the stack.
2
The new pane has the name C:\Program Files\mAirList 3.1, which
happens to be fully visible in the Browser.
But what happens if you open a folder with a much longer path, like
C:\Audio Library\For broadcast\Music\E-K for example, in the Browser?
That path does not fit in the Browser pane header, so it is truncated.
It would be useful if you could change the pane name to something more
sensible, like Music Library E-K.
As you will learn on the next page, mAirList allows you to do this.
1
If your computer won’t let you navigate to the mAirList program files folder, navigate instead to any folder which contains
short audio items, like station jingles or presenter IDs, and use that folder for the rest of this tutorial.
2
If you had to use a folder other than the mAirList program files folder, its full drive and path are shown instead.
Saved at 02:16:00 on 6 Jul 2011
Revision 19
16
mAirList Version 3.1 User Manual (UK English)
Type in a better name for the folder pane.
Right-click the pane header, then click Rename.
mAirList opens a small empty text box.
3
4
In the box, type Demo jingle and press Enter.
Notice that the pane name changes both in the pane header and in the
‘stack’ of pane names at the foot of the Browser, as shown on the right.
You can change the name of any Browser pane in the same way.
For practice, change the Recycle Bin pane name to Played Items.
The names of renamed panes are not remembered if you close and re-open
the pane. To demonstrate, make your renamed Played Items pane the
active pane, then on the Browser toolbar, click Close.
Now open a Recycle Bin pane. On the Browser toolbar, click the
dropdown arrow immediately to the right of the Add button, then
click Recycle Bin on the dropdown menu.
Hopefully, you are not surprised to see that the pane you opened
is named Recycle Bin.
To save Browser changes, create a mAirList Desktop file. On the mAirList
toolbar, click Save, and on the Save Desktop dialog, navigate to your
My Documents folder, type a File name of tutorial, and click Save.
Let’s check this worked. On the mAirList toolbar, click New. This ‘resets’
mAirList to its startup condition. On the mAirList toolbar, click Open, and
on the Open Desktop dialog, navigate to your My Documents folder, select
the file tutorial, and click Open. The Browser contents are restored.
Click your Demo jingle pane caption in the pane stack to make sure
5
6
it is the active pane. You see the file test.ogg . Drag this file around the
mAirList window, but do not drop it yet. Note that you could drop it almost
anywhere: on the Playlist, or directly on any Player or Cartwall Player.
Drop the file on a blank area of the Demo jingle Browser pane.
You see a message box warning you that you cannot move the file.
Click OK to clear the message box.
Drag the test file from the Browser again and drop it on the Playlist.
Note that the file also loads into Player A, and the boxes at the top right of
the Playlist now show 1 item and the total duration of the Playlist.
Leave everything as it is, ready for the next tutorial section on the following page.
Summary of the Browser:
3
•
The Browser is principally an ‘audio-focussed’ version of Explorer, but it can contain other
things like database search panes and time-of-day clock panes.
•
The Browser can contain any number of panes. Pane names are listed in the pane stack
under the Browser. Click a name in the pane stack to make it the active (visible) pane.
•
You can rename any Browser pane to give it a more readable or meaningful name.
•
You can Save the Browser contents, including pane name changes, in mAirList Desktop
(.mld) files which you can Open later.
•
You can drag any audio file from any Browser pane and drop it on the Playlist, or on any
Player, or on any Cartwall Player.
If you open one of these boxes by mistake, press Esc to close it without making any changes.
4
Even if you had to use a folder other than the mAirList program folder, please type the name Demo jingle anyway: it makes
the rest of the tutorial easier to follow.
Revision 19
5
If you had to use a folder other than the mAirList program folder, the audio file(s) within it are listed instead.
6
If you had to use a folder other than the mAirList program folder, choose any audio file you see in the Browser pane.
Saved at 02:16:00 on 6 Jul 2011
mAirList Version 3.1 User Manual (UK English)
2.3
17
Working With The Playlist And Its Players
IMPORTANT NOTE: We assume that you are continuing from the previous tutorial.
If not, please ‘replay’ the instructions in the previous tutorial section
to set up mAirList exactly as it was at the end of the previous tutorial.
As you have seen, audio files in the Playlist are automatically loaded into Players until all the
available Players are loaded. Something else happens when mAirList opens audio files: it analyses
the files and automatically sets some Cue Markers.
In the Playlist, click the large quaver (musical note) icon to open the PFL dialog.
The mAirList jingle (or other file) plays in the PFL player, and the list of Cue Markers
contains Fade Out and Cue Out Cue Markers. As this is a jingle, you won’t want it to fade
out, so remove the Fade Out Cue Marker as follows.
On the PFL dialog (its title bar is the title of the audio file), click the Fade Out row in the list of
Cue Markers, then click 0 (the large button on the right, between SET and TEST) to clear the
Cue Marker. A more useful Cue Marker would be a Start Next Cue Marker, which in automation
mode means ‘start the next item now.’ Drag the slider (just below the Player on the dialog) so that
Elapsed reads 0:00:01.00 (one second before the end of the item), click the Start Next row, then click
SET.
7
It would be a pity to lose this change, so click Metadata File. This saves a mAirList .mmd file
containing your changes. When mAirList opens the audio file in future, it loads all file-related
information (metadata) from the .mmd file instead of analysing the audio file again.
Click Cancel to close the PFL dialog, click the test row in the Playlist and press Delete (or right-click
the row and click Delete if you prefer).
Drag the test file from the Browser and drop it on the Playlist again. In the Playlist, click the large
quaver (musical note) icon to open the PFL player dialog again. Note that your changes to the
Cue Markers have been ‘remembered.’ Click Cancel to close the PFL dialog.
Examine the loaded Player, Player A. It shows the title of the
audio, a NEXT indicator, a remain time counter, and a
green progress bar.
The Player’s controls are also visible. One of these is
another PFL control: the leftmost button with the
speaker icon. Click this button.
Note that when the file plays in the mini-PFL player which opens, the green progress bars in the
Player and Playlist Item (row) move in sync. If you missed that, click PLAY on the mini-PFL player
and watch again. Also note that the PFL button on the Player is ‘illuminated’ to confirm that PFL is
active, and that PFL is shown beside NEXT on the Player’s display.
To close the mini-PFL player, click the PFL button on the Player again.
Click the Start (play) button on Player A. Note that the Player and Playlist Item (row)
progress bars move, as does the Playlist progress bar at the bottom of the Playlist. The Player
background flashes to warn you that the item is within ten seconds of finishing.
Now that it has played, the file has been ‘ejected’ from the player, but you can easily load it again
from the Recycle Bin pane in the Browser. Make the Recycle Bin the active pane (click its name in
the pane stack). Drag the test file from the Recycle Bin and drop it on the Playlist again.
Now save a copy of the playlist. Right-click any blank area on the Playlist (not the test file row) and
click This Playlist…, Save… On the Save playlist dialog, navigate to your My Documents folder, type
a File name of tutorial1, and click Save. Now play the test file again.
To load your saved playlist, right-click a blank area of the Playlist and click This Playlist…, Load…
On the Load playlist dialog, navigate to your My Documents folder, select the file named tutorial1,
and click Open.
7
On Window s Vista and Windows 7, this usually fails because program folders are write-protected by default. If this happens,
choose a different folder (see footnote 1 on page 15) and use a file in that folder as your test audio file.
Saved at 02:16:00 on 6 Jul 2011
Revision 19
18
mAirList Version 3.1 User Manual (UK English)
Add another Folder pane to the Browser. Choose any folder on your computer that contains music
tracks. Drag any file from your music folder pane in the Browser and drop it on the blank Playlist
area below the test file. Save the playlist again, naming the file tutorial2 this time.
On the Playlist Control bar, immediately to the right of the ASSIST and AUTO buttons,
is the Next button. Click Next, and while the test file is playing, click Next again. Note
that you can play items from Players A and B at the same time, and that mAirList plays
items in Playlist order, from top to bottom.
To stop your music track, click the Stop button or Fade button on the Player.
Load the tutorial2 playlist, add another music track to the end of it, then save the playlist again,
naming it tutorial3. Click Next twice, to play the first two items (the test file and your first music
track). Let the music track play for a little while, then click Next again. mAirList segues the tracks by
fading out the first track under the beginning of the following track. After a little while, click Next
again. Nothing happens, because the Playlist is empty.
Another useful assist mode feature: you can link items so that they all play in the same Player.
Load the tutorial3 playlist, then click the Link column in the top row. Several things happen: the top
row shows a green lamp in the Link column, and the second row shows a red lamp. The first music
track has ‘disappeared’ from the Players and the second music track (the final item in the Playlist)
has loaded into Player B. mAirList plays all the items from the first linked item to the last in the same
Player; and segues the items according to their Cue Markers.
You can link any number of items. Click the Link column in the second row of the Playlist (the one
with the red lamp in it currently) a few times and note what happens. First click: the item below is
added to the list of linked Playlist items; second click: the item below is removed from the linked list;
and so on. You see the second music track disappear from, and reappear in, Player B as you make
the clicks. The red lamp always indicates the last item in the linked list. Linking tracks, especially
with sweepers or jingles in the list, is a good way to ‘automate’ a self-operated show temporarily.
Link all three tracks together and click Next. While the second item (first music track) is playing,
click Next. Nothing happens, because although there is another item in the Playlist, it is no longer a
separate item because it is linked to other items. In other words, mAirList treats a set of linked items
as a single item. Remove the link and clear the Playlist and the Players.
Load the tutorial3 playlist, then click the Playlist AUTO
button. Two buttons—to stop/start automated playout—
replace the Next button on the Playlist Control bar.
Click the Auto Start button. The test file plays, followed by the first music track. Note that AUTO
flashes as a reminder, the Next button is visible again, and Player controls are not visible. Click Next
and note that the currently playing track segues smoothly into the next track. After a little while, click
Next again. Unlike in assist mode, this fades out the current track, even though the Playlist is empty.
Drag another audio file into the Playlist and note that it plays immediately. In automation mode,
mAirList plays tracks until it is stopped or the Playlist is empty. If you use mAirList as a fully
automated system, it is easy to set up mAirList to load a playlist (or ‘hourly log’) once an hour.
To stop automated playout, click the Playlist Auto Stop button, or click ASSIST and then click the
Player’s Fade button. Whichever method you use, the track fades out.
Summary of the Playlist and Players:
Revision 19
•
The Playlist ‘feeds’ items into the Players, in Playlist order.
•
In automation mode, the Playlist plays and segues items until the Playlist is empty or until it
is stopped; in assist mode, you must start Players manually unless they are linked.
•
You can save the playlist at any time, and Load (or Append) any saved playlist later.
•
You can start PFL from the Playlist or a Player, and change an item’s Cue Markers.
Cue point marker changes are temporary unless you either save the Playlist (which saves the
changes in that Playlist file only), or you save the changes permanently in one or more of
the audio file’s tags, a Metadata (.mmd) file, or a mAirListDB database.
•
Played items are ‘saved’ in the Recycle Bin pane in the Browser.
Saved at 02:16:00 on 6 Jul 2011
mAirList Version 3.1 User Manual (UK English)
2.4
19
Working With The Cartwall
The fourth and final main component of mAirList is the
8
Cartwall : the software equivalent of hardware NAB tape
cartridge or ‘cart’ players. Cartwall Players look and operate
almost exactly the same as the main Players you learned about
in the previous tutorial, so this tutorial concentrates on those
differences. To save space, we will refer to Cartwall Players as Carts.
Use the Cartwall in assist mode to quickly and easily play items like station ID and promo jingles,
music beds, sound effects, competition stings, etc. without needing to plan them into the Playlist
(however, ad. breaks typically are scheduled into the Playlist).
The Cartwall contains a toolbar and—by default—six numbered Cartwall Players or Carts. If you are
thinking ‘only six?’ remember this is the default—you can easily change the number of Carts later;
and six Carts are enough for you to learn how to use the Cartwall.
Load a jingle into Cart 1 (Cartwall Player 1) by opening a Windows Explorer
window, then dragging an audio file and dropping it directly on to Cart 1.
If the item you load is an ‘unknown’ audio file, mAirList performs the same
file analysis and automatic setting of Cue Markers it does when an
‘unknown’ audio file is loaded into a main Player.
With jingles and effects, this is usually exactly what you don’t want, so let’s fix this now.
Right-click Cart 1, then click Extra PFL. You see the standard PFL dialog for the
audio item. As you did in the last tutorial on Players: clear the item’s Fade Out
point; add a Start Next point at roughly one second before the end of the item; and
if a Cue In point is showing as 0:00:00, clear that as well. When you’ve made all
those changes, click Metadata File to save them; then click OK to close the PFL dialog. (If you’ve
forgotten how to do all this, all the details are on page 17.)
As well as the PFL button on each Cart, you can click the PFL mode button at the right of the
Cartwall toolbar to put all Carts into PFL mode. In this mode, you can click PFL or Start (play) on
any Cart to listen to it. Click the PFL mode button again to switch Cartwall PFL off.
Click the Cart 1 Start button and let the jingle play out. When it stops, Cart 1 re-cues the jingle: it
does not ‘eject’ it. Now load a long music bed (a five-minute news or traffic news bed is ideal) into
Cart 2, and a closing sting into Cart 3. Again, use Extra PFL on these audio items as described above
to remove their Fade Out Cue Markers and so on.
Usually, you would fast-fade a music bed out when you fire the closing sting. mAirList can do this for
9
you automatically, but first you have to set up a fast fade out on the music bed. Right-click Cart 2,
click Properties, Options tab, and change Fade duration to 750 (mS).
Now you can tell mAirList to fade out Cart 2 when Cart 3
starts. Right-click Cart 3, click Triggers, FADE, FADE 2.
Notice that Cart 3 now shows TRIGGER, as a reminder.
Now Play Cart 2, let it run for a while, then start Cart 3 and
you will hear Cart 2 fast fade out automatically.
10
Triggers work only when a Cart starts , and you can only set triggers to start, stop, or fade other
Carts, but you can set as many triggers as you like on the same Cart.
You can save and load the entire Cartwall as a cart set file. You can create as many cart sets as you
11
like, ready for near-instant loading. On the Cartwall toolbar, click Save set. On the Save cart set
dialog, navigate to your My Documents folder, type a File name of tutorial, and click Save. Now click
Close all to clear the Cartwall.
To load a saved cart set, click Load set. On the Load cart set dialog, navigate to your My Documents
folder, select the file named tutorial, and click Open. Notice that the Cart 3 trigger and the changed
fade duration for Cart 2 were both saved in the cart set.
8
This is the same feature as ‘jingle decks’ or ‘instant players’ in other software.
9
If you don’t do this, mAirList will use the Default automation fade time, which by default is five seconds.
10
To make things ‘happen’ when a Cartwall Player stops, or for anything more sophisticated, you will need to use
Actions On Start/Stop, which you can read about later on page 25.
11
By setting up Favourite Cart Sets (see 7.3.7 on page 52 and 7.3.2 on page 50), you can make this process even faster.
Saved at 02:16:00 on 6 Jul 2011
Revision 19
20
mAirList Version 3.1 User Manual (UK English)
The final distinct feature of Carts is that you can load more than one audio item
into each Cart, just as you can on a hardware NAB cartridge: if it helps, think of
this as a virtual CD player. Right-click Cart 4 and click Edit Stack… to open the
Cart Stack dialog shown on the right. Notice that this resembles a mini-playlist.
Drag some talkover music beds or instrumental
tracks from a mAirList browser pane (or from
Windows Explorer)and drop them on the Cart Stack
dialog. Notice that as you add more tracks, the Cart
also shows you how many items are in the stack, and
which item is currently cued.
Now change the order of the items by dragging them up or down the list in the dialog. When you are
happy with your list, click the Close button at the top right of the Cart Stack dialog.
Notice also that there are now two extra buttons in Cart 4:
click these to move one item back or forward in the stack, respectively.
Click Start in Cart 4 and after a few seconds, click Stop. The Cart re-cues the item you just played.
Click Start in Cart 4 again, and after a few seconds, click Fadeout. The item fades out, but this time,
the Cart cues the next item in the stack, because the Cart treats a fadeout the same as reaching the
end of the item; therefore it ‘moves on’ to the next item.
Now make sure the final (highest numbered) item in the stack is cued, click Start in Cart 4 again, and
after a few seconds, click Fadeout. The Cart now cues the first item in the stack: in other words, the
stack is ‘endless,’ again just like a hardware NAB cartridge.
For practice, click Save set to save the cart set again, click Close all, then click Load set to load the
cart set you just saved. Check that your stack in Cart 4 has been saved and loaded.
Summary of the Cartwall:
Revision 19
•
Use the Cartwall to play jingles, effects, and similar ‘instant’ items; or music beds.
Usually, you would only use the Cartwall in assist mode.
•
A Cartwall Player can contain more than one audio item (a ‘cart stack’).
This is especially useful for music beds, or for sets of station IDs or jingles (like alternate
versions, cuts, or mixes of the same ident). Basically, use a cart stack for any set of items
where you won’t need or want to play out any two of the items at the same time.
•
A Cartwall Player re-cues when its item ends, unless it contains a ‘cart stack.’
•
A Cartwall Player containing a ‘cart stack’ re-cues the same item when Stopped; it cues the
next item when it reaches the end of an item or when Fadeout is clicked.
•
You can set up triggers to automatically start, stop, or fade other Cartwall Players when you
start a specific Cartwall Player.
•
You can save the Cartwall at any time as a Cart Set. Saved Cart Sets include any ‘cart stacks’
and triggers you have set up, and Cart Sets can be loaded at any time.
Saved at 02:16:00 on 6 Jul 2011
mAirList Version 3.1 User Manual (UK English)
2.5
21
What Next?
If you have completed the tutorials in the preceding sections, you now have a good working
knowledge of mAirList and you also now know enough to use it on air for your live shows.
We stressed many times during those tutorials that we were describing the default mAirList setup,
and you are probably already keen to learn what else mAirList can do, and what you can change.
For example, you can easily change the numbers of Players or Cartwall Players, and many more
subtle aspects of the way mAirList operates. With only a little more effort, you can also change things
like the screen layout and the colour scheme. You can create scheduled events to perform actions
automatically for you at pre-set times, and you can also create an audio database to contain all the
information about every item in your audio library. You can add remote controls, to operate
mAirList directly from your mixer faders or from other hardware, such as programmable keyboards.
In short, and unlike most other radio playout systems, you can change almost every aspect of
mAirList, how it operates, and the way it looks; and you can do all of this yourself, without needing
to contact the software company for expensive and time-consuming ‘custom tweaks’ to make the
system exactly suit the way your station works.
We suggest that you first decide how many Players and Cartwall Players you require for your station,
then decide which stereo output pair on your computer’s sound card(s) you want to ‘attach’ to each
Player, and to the Cartwall, to allow you to connect mAirList Players and the Cartwall to the channels
on your studio mixer.
Once you have made those changes, probably the next thing you will want to change is the screen
layout. After that—or perhaps instead of changing the layout—you may want to change the colour
scheme; and after that, you will probably want to set up a database, possibly importing the
information from another playout system or your music scheduling software, or perhaps starting
from scratch by simply ‘synchronising’ (‘importing’) the files in your audio library.
Finally, you will probably want to set up automated playout for some or all of your broadcast day.
Again, mAirList has all the tools you need to do this quickly and easily, especially so if you create
your playlists using the mAirListDB database.
All of the information you are likely to need to do all of these things (and many more) is in the
chapters and sections which follow.
Please also remember that if you need any help, the mAirList forum is always available online, and if
the answer is not there already, the many forum users—and the program’s author, Dr. Weibert—will
always be happy to help you quickly solve any queries or problems you may have.
Saved at 02:16:00 on 6 Jul 2011
Revision 19
22
Revision 19
mAirList Version 3.1 User Manual (UK English)
Saved at 02:16:00 on 6 Jul 2011
mAirList Version 3.1 User Manual (UK English)
3.
Advanced Operator Controls And Features
3.1
Player Time Display
23
To change a Player’s time display:
•
Click the time display to cycle between remain, elapsed, and elapsed/remain modes,
or to cancel backtiming mode (see below).
•
Double-click the time display to select backtiming mode, which shows the time when the
item loaded in the Player will end.
Note that this works only in loaded Players and does not work in Cartwall Players.
3.2
Loop And Hook Modes
By default, Players contain Loop and Hook mode buttons; Cartwall Players contain Loop buttons.
To enable or disable either mode, click its button: when it is on, a mode button ‘lights up.’
3.3
•
Loop mode loops the item until it is stopped, either: manually; or by a command, Action, or
Event; or by a ‘hard’ fixed-time item in Auto mode.
•
Hook mode plays only the item’s ‘hook section,’ as defined by its Hook In, Hook Fade, and
Hook Out cue markers. If these cue markers are not set, the entire item is played.
Special Playlist Items
As well as audio file items, a Playlist can contain any of the following special items.
3.3.1
Automation Break Point
In Auto mode, a Break item stops Auto mode playout (identical to an AUTOMATION STOP
command). You can add information the presenter will see (for example: Trail next show) by
changing the Artists in the item’s Properties to . Break items are most often used in stations where
presenters use mAirList in Auto mode, to indicate points in the playlist where the presenter should
be talking.
Break items have no effect in Assist mode.
3.3.2
Command
In Auto mode, a command item contains one or more mAirList commands (see mAirList
Commands, starting on page 125) which are processed immediately. Command items are useful if
you need to run commands (especially timed commands) during Auto mode, and are more visible
and flexible than adding Actions to Playlist items.
Because they cannot be loaded into Players, command items have no effect in Assist mode.
3.3.3
Container
A container item, similar to a Cart Stack, is a ‘mini Playlist’ of one or more items. The container is
treated by mAirList as one Playlist item (except for logging). Usually, the items in a container are all
audio files, but any type of item is allowed. Items in a container are played out in a single Player (as if
in Auto mode), using any Start Next and Fade Out cue markers in the container’s items for segues.
Note that after you add an item to a container, you cannot view or change any Properties of any of
the ‘contained’ items—including cue markers—which means the only way to adjust segues in
containers is to delete items, adjust their cue markers, then add them to the container again.
Usually, the easiest way to load and create a container is to add the items you want in your container
to the Playlist, select all those items, then right-click and click Create Container.
You can ‘name’ a container by changing the Title in its Properties dialog from the default Container.
During playout, the container’s Title is shown in the Player after the playing item’s Title, but only the
container’s Artists (if you added any Artists in its Properties dialog) is shown: the playing item’s
Artists are never shown in the Player.
Items played from inside a container item are still logged as individual Playlist items, so if your
station uses mAirList logging to send ‘now playing’ information (for example, to a web site), this will
still work properly. However, the container’s start and stop are also logged, so you will probably
want to exclude log entries with a Type of Container from your ‘now playing’ processing.
Saved at 02:16:00 on 6 Jul 2011
Revision 19
24
mAirList Version 3.1 User Manual (UK English)
3.3.4
Dummy
A dummy item is exactly that. Its only purpose is to allow someone working on a Playlist to add a
‘comment’ to the Playlist, by changing the Artist and/or Title in its Properties.
You can use dummy items as visual ‘markers’ (Top Of The Hour or Competition, for example), or to
provide information or instructions to the operator.
TIP: Use the Comments in the dummy item’s Properties if you need to add more text.
3.3.5
Hook Container
If you use hook cue markers, you can use hook container items to quickly create ‘hook sweeps’
which will play as a series of hooks without needing Players to be put into Hook mode.
A hook container item is a container item, but with two important differences:
•
The selected Playlist items are added to the hook container with:
the Cue In cue marker set to the Hook In cue marker value,
the Fade Out cue marker set to the Hook Fade cue marker value, and
the Cue Out cue marker set to the Hook Out cue marker value.
•
If you have configured them (see 7.12.2 on page 70),
and after all the selected Playlist items have been added to the hook container:
a Hook Opener is added at the start of the Container list,
a Hook Sweeper is added between each Playlist item in the Container list, and
a Hook Closer is added at the end of the list.
To create a hook container item, select the Playlist items whose hooks you want to play,
then right-click and click Create Hook Container.
3.3.6
Network File
A network file is an audio file which can only be located and retrieved by using a URL.
For example, a file stored in a central audio library on a Web server. Obviously (?), your mAirList
computer has to be able to access the network location to be able to play files stored on it.
3.3.7
Region Container
A region container item is a special type of container which allows ‘split outputs’ (see 7.13.7 on page
76 for more details about regions and split outputs). Within a region container are one container for
each region set up in mAirList. When the region container is played, all of these ‘sub-containers’ are
played simultaneously and sent to their specified sets of audio outputs.
In the region container’s Properties dialog, the Region Container tab contains a tabbed dialog with
one tab for each region. The duration of the items in each ‘sub-container’ is also shown on its tab.
Add items to each region’s container and adjust Cue Markers etc. to ensure that each region’s
container has the same duration.
The broadcast duration of a region container is the largest of the durations of its ‘sub-containers,’
and each region’s ‘sub-container’ plays for that length of time. This is why it is so important to make
each region’s ‘sub-container’ have the same duration: otherwise, when each region with a shorter
‘sub-container’ ends, it will be fed silence until every ‘sub-container’ has ended.
3.3.8
Silence
A silence item is exactly that: audio silence of the Duration specified on its Properties dialog.
3.3.9
Stream and Stream (infinite)
Stream Playlist items ‘play’ audio from an externally-streamed source.
Revision 19
Saved at 02:16:00 on 6 Jul 2011
mAirList Version 3.1 User Manual (UK English)
4.
Actions And The Event Scheduler
4.1
Actions
25
An Action is literally that: an ‘action’ that you wish to take place. The most common example is the
Load playlist Action, which is the same as manually loading a playlist from the mAirList menu.
Unlike their manual equivalents, Actions allow you to use variables (see 7.8.2 on page 63), so as an
example, provided you name your playlist files using a standard format, you can use a single
scheduled Action to load all your hourly playlists.
You can combine any number of Actions into an Action List, and you can load and save Action Lists
as .mla files.
You can use Actions in several ways:
•
To add custom items to the mAirList Actions menu on the main toolbar
(see 7.11 on page 68).
•
To create scheduled events which perform routine or repetitive tasks
(see 4.2 on page 29) .
•
To perform routine or repetitive tasks at mAirList startup and/or shutdown
(see 7.11 on page 68).
•
To perform ‘recovery’ tasks if the playlist runs empty during Automation playback
(see 7.11 on page 68).
•
To define the tasks performed when a custom button is clicked
(see 7.6.5 on page 58).
•
To make an item in a Playlist or Cartwall Player ‘work’ an Action List when the item
Starts and/or Stops (see 9.6.5 on page 99).
You can add any Action to any Action List, but please note that several Actions have little or no effect
when ‘worked’ from an item’s Actions on Start or Actions on Stop Action Lists, and a few ‘play’
Actions have ‘side effects’ when ‘worked’ from a starting/stopping item during automated playback.
Each Action requires specific information (such as script file name, command name, etc.) on its
Action or Database tab, as shown below; but each Action has the same Options tab:
4.1.1
Options tab
Custom title (default: blank)
If supplied, the Custom title is shown in the Action list instead of the ‘standard’ Action description.
Enable substitution of variables (default: off)
If this setting is on, any variables (see 7.8.2 on page 63) in the Actions tab will be substituted by their
current values before the Action is performed. This is especially useful when you create time or date
specific Actions, such as loading a playlist for the ‘next’ hour, or for the ‘current’ day of the month.
Time adjustment (default: zero)
If non-zero, the Action is performed as if the internal mAirList time-of-day clock was adjusted
forward or backward by the specified amount of time.
Affected playlist (default: Default playlist)
The Playlist which is affected by the Action. If you have two or more Playlists, you can use Actions to
control any Playlist. Default playlist means Playlist 1, or for Actions on Start/Stop, it means the
Playlist containing the Action.
Saved at 02:16:00 on 6 Jul 2011
Revision 19
26
mAirList Version 3.1 User Manual (UK English)
4.1.2
List Of Actions By Category
The Actions are listed and described below, by category.
4.1.2.1
Miscellaneous Actions
Send data to serial port
Sends the specified Data to the specified serial Port.
(If the specified serial port is not already open, this Action may fail.)
Execute command
Execute the command(s) specified. A list of mAirList commands is in Appendix A on page 125.
You cannot execute external programs or commands with this Action: to do so, create a mAirList
script which executes the program or command, then use the Run script Action.
Run script
Runs the mAirList script (.mls file) specified in Filename.
4.1.2.2
File Actions
Play file
This Action only works in Automation mode.
12
It is not recommended for use as an Action on Start/Stop.
Inserts the file named in Filename at the top of the Playlist and plays the file immediately.
Insert file
Inserts (adds) the file named in Filename at the top of the Playlist.
4.1.2.3
Network File Actions
Play network file
13
Not recommended for use as an Action on Start/Stop in Automation mode.
Inserts the file named in URL at the top of the Playlist and plays the file immediately.
You can optionally type in a Title for the network file (the default Title is the URL).
Insert network file
Inserts (adds) the file named in URL at the top of the Playlist.
You can optionally type in a Title for the network file (the default Title is the URL).
4.1.2.4
Stream Actions
Play stream
14
Not recommended for use as an Action on Start/Stop in Automation mode.
Inserts a Stream item for the audio stream specified by URL at the top of the Playlist and plays the
item immediately. You can specify an unlimited or Fixed Duration, and optionally type in a Title for
the stream (the default Title is the URL).
Insert stream
Inserts a Stream item for the audio stream specified by URL at the top of the Playlist.
You can specify an unlimited or Fixed Duration, and optionally type in a Title for the stream
(the default Title is the URL).
4.1.2.5
Playlist Actions
Playlist Actions are not recommended for use as Actions on Start/Stop: they are intended for use in
scheduled events, typically with substitution of date and time variables.
Load
Loads the Playlist with the playlist file specified in Filename. Except for items currently playing,
existing items in the Playlist are deleted before the playlist file is loaded.
Load and play
Loads the Playlist with the playlist file specified in Filename and plays it immediately. Except for
items currently playing, existing items in the Playlist are deleted before the playlist file is loaded.
12
In Automation mode, and when specified as an Action on Start or Action on Stop in an item’s Properties; this Action usually
causes the following item to end prematurely. This is a natural but non-obvious consequence of immediately ‘adding and
playing’ an item in Automation mode, and is not a bug in mAirList.
Revision 19
13
See footnote 12 above.
14
See footnote 12 above.
Saved at 02:16:00 on 6 Jul 2011
mAirList Version 3.1 User Manual (UK English)
27
Insert
Inserts the playlist file specified in Filename at the top of the Playlist.
Insert and play
Inserts the playlist file specified in Filename at the top of the Playlist and plays it immediately.
Append
Appends the playlist file specified in Filename to the end of the Playlist.
4.1.2.6
Automation Actions
Enable automation
Switches to Automation mode (same as the Playlist Control bar AUTO button).
Disable automation
Switches to Assist mode (same as the Playlist Control bar ASSIST button).
Start automation playback
Starts automated playout (same as the Playlist Control bar Start button).
Fade to next item
Starts the next item and fades the current item (same as the Playlist Control bar Next button).
Stop automation playback
Stops automated playout and fades the current item (same as the Playlist Control bar Stop button).
4.1.2.7
Database (Playlist) Actions
Database Actions are not recommended for use as Actions on Start/Stop: they are intended for use in
scheduled events. Playlists are loaded from the database selected in Database Connection (see below).
All Database Actions have a Database tab, where you can select these settings:
Database Connection: the database from which the playlist will be loaded.
Load the playlist for the next hour (instead of the current hour): self-explanatory.
Set fixed time on first element:
mark the first loaded playlist element with a fixed time of ‘the hour’ (‘o’clock’),
Use soft fixed time: mark the first loaded playlist element with a ‘soft’ fixed time
(has no effect unless Set fixed time on first element is also selected).
Use an extra dummy element for fixed time: add a DUMMY element with a fixed time of
‘the hour’ (has no effect unless Set fixed time on first element is also selected).
Report an error if the playlist is empty:
if the playlist being loaded is empty, report this as an error.
15
Load
†
Loads the Playlist with the database playlist for the current hour. Except for items currently playing,
existing items in the Playlist are deleted before the playlist file is loaded.
Load and play
†
Loads the Playlist with the database playlist for the current hour and plays it immediately. Except
for items currently playing, existing items in the Playlist are deleted before the playlist file is loaded.
Insert
†
Inserts the database playlist for the current hour at the top of the Playlist.
Insert and play
†
Inserts the database playlist for the current hour at the top of the Playlist and plays it immediately.
Append
†
Appends the database playlist for the current hour to the end of the Playlist.
Generate playlists
Generates database playlists (see 11.5.3.6 on page 115) for a number of hours in advance.
†
Unless you select the setting Load the playlist for the next hour (instead of the current hour),
and/or specify a Time adjustment on the Options tab.
15
The marked item will start at, or as soon as possible after, the ‘soft’ fixed time. Playing items will continue playing to the end,
but items not yet played, and before the ‘soft’ fixed item in the Playlist, will be skipped over, and will not be played.
Saved at 02:16:00 on 6 Jul 2011
Revision 19
28
mAirList Version 3.1 User Manual (UK English)
4.1.2.8
Encoder Actions
To use these Actions, you must first set up one or more Encoders (see 7.13.6 on page 76).
Use these Actions to connect/disconnect the Encoder, or enable/disable live feed and local output.
4.1.2.9
(Windows) Mixer Actions
These Actions are often used to manage live feeds on an input of the computer’s sound card.
The Mute mixer channel and Unmute mixer channel Actions are self-explanatory, and both have a
Mixer tab on their Configure Action dialog. On the Mixer tab, you select the Device (sound card),
Destination (usually Volume Control for output, or Recording Control for input), and the
Source (one or all sound card mixer channels) you want to mute/un-mute.
4.1.2.10
SAS Actions
These Actions are specific to the Lawo series of digital mixing consoles.
If you use a Lawo digital console, mAirList offers several Actions specific to these consoles, such as
setting a fader level, toggling PFL and fader start button lights, and switching GPIs on/off.
4.1.2.11
Work an action list Action
Use this Action to ‘nest’ one Action List within another. Often used to ‘include’ the Actions in a
saved .mla file within an Action List by Loading the file in the Work an action list Action’s list.
4.1.2.12
Emergency actions Action
The Emergency actions Action is a separate ‘sub-’Action List which mAirList will only ‘work’ if any
preceding Action fails. In other words, an Emergency actions Action is a list of ‘fallback’ Actions for
all preceding Actions; or if you prefer, it is an ‘on error’ Action List.
For example, if a Load database playlist Action fails, you could load an ‘emergency’ playlist file
instead: to do this, add an Emergency actions Action after the Load database playlist Action, and
add a Load playlist Action to the Action List in the Emergency actions dialog.
If you use an Emergency actions Action, we recommend it is the final Action in an Action List.
However, you can if you wish add two (or more) Emergency actions Actions to an Action List, to
provide different ‘fallback’ or ‘on error’ Actions at different points in the Action List.
4.1.2.13
No action Action
A ‘dummy’ Action you can use to add comments or descriptions to Action Lists.
Revision 19
Saved at 02:16:00 on 6 Jul 2011
mAirList Version 3.1 User Manual (UK English)
4.2
29
Event Scheduler
The mAirList Event Scheduler runs Action Lists at fixed times, according to a schedule you specify.
You can usually set up even apparently complex date/time schedules using just one event per
Action List. The scheduler is built-in to the mAirList program and it runs in the background all the
time mAirList is open: you cannot ‘switch the scheduler off.’ The Next event time box on the
Playlist Control bar shows the time of the next scheduled event, or blank if no events are scheduled.
To open the Event Scheduler,
click Events on the toolbar,
or click inside the Next event time box on the Playlist Control bar.
The Event Scheduler dialog opens, showing the Event List.
Note that you can resize this dialog.
On the Event Scheduler dialog:
•
Click New to clear the event list.
A confirmation dialog is displayed.
•
Click Open to load an event list file (.mle).
The current event list is cleared,
without any confirmation dialog.
•
Click Save to save the current event list as a .mle file.
•
Click Add to add an event to the list using the Event Editor.
•
Click Edit to edit the selected event using the Event Editor.
If more than one event is selected, the event which has focus is opened in the Event Editor.
•
Click Delete to delete the selected event(s). A confirmation dialog is displayed.
The columns in the Event List show, for each event in the list: its Next Execution date and time,
Last Execution date and time, Description (if any), and a list of its Actions. By default, the Event List
is sorted by Next Execution (ascending): click any column heading to sort by that column instead.
When you Add or Edit an event, the Event Editor dialog opens.
On the Event Editor dialog:
•
Type an optional Description.
We recommend that you give every event a Description.
•
Specify the Date(s) and Time(s) when the event is to be run
(explained in detail in 4.2.1 on page 30).
•
Optionally, tick Event expires at and specify a date and time.
If you do so, the event will not be run after that date/time.
•
In the Scope box, specify whether the event should be run
if mAirList is in Automation or Assist mode (or both)
when the event is due (default: Automation mode only).
•
Actions is an Action List (see 4.1 on page 25), containing the Actions to be run for the event.
When building new events, we suggest that you:
1. Create the Action List you want to run, then save it as a new .mla file.
2. Test your Action List thoroughly, saving any changes to the .mla file.
3. Think through what would happen if each of the Actions in your list failed, and whether you
need to add an Emergency actions Action to the end of the Action List to ‘recover.’
4. When your Action List is fully tested, carefully plan its run dates and times. Could it ‘clash’
with any existing events? We suggest that you leave at least thirty seconds between events.
5. Open the Event Scheduler, Add a new event; set up the date, time, scope, etc. in the
Event Editor; Load your .mla file; and click OK.
6. Test your new event in conjunction with all your other scheduled events on a non-production
mAirList computer before putting it ‘live.’
Saved at 02:16:00 on 6 Jul 2011
Revision 19
30
mAirList Version 3.1 User Manual (UK English)
4.2.1
Event Date And Time Settings
You must supply a Date setting and a Time setting for every event (default is ‘every day, at midnight’).
The event will run only when the current date and time matches all the Date and Time settings,
and the current date and time is before the event’s Expiration date and time (if it has one).
4.2.1.1
Date Settings
each day (default): run every day.
each: run only on the ticked days of the week.
only once, on: run once,
on the date you specify (default: ‘today’).
user defined: run only on the days, months, and weekdays you specify (see below).
4.2.1.2
User-defined Date Setting
Use the user defined Date setting to create ‘irregular’ date schedules. The event runs on days which
match all three of the days, months, and weekdays you specify (and all Time setting values):
if you do not specify all three values, the event will never be scheduled.
You specify days, months, and weekdays as comma-separated numbers and/or number ranges.
For example: days might be 1-7,15-21; months might be 3,6,10-12; weekdays might be 1,4,7
(weekdays range from 1 for Monday through to 7 for Sunday).
The defaults of 1-31, 1-12, 1-7 mean ‘every day,’ and do the same as the each day Date setting.
Change only the days, months, and weekdays values needed to ‘limit’ dates and/or weekdays to the
dates and/or weekdays you want: leave the others at their default values. For example:
•
first day of each month: change days to 1 but leave months as 1-12 and weekdays as 1-7.
•
first Sunday of each month: change days to 1-7 and weekdays to 7,but leave months as 1-12.
•
10th January, 10th April, 10th July, and 10th September:
change days to 10 and months to 1,4,7,10 but leave weekdays as 1-7.
4.2.1.3
Time Settings
each hour: run every hour of the day,
at the same time past the hour, defined
by the minutes and seconds you specify.
only once (default): run only once a day,
at the time (default: 00:00:00) you specify.
user defined: run only at times defined by the hours, minutes, and seconds you specify (see below).
4.2.1.4
User-defined Time Setting
Use the user defined Time setting to create ‘irregular’ time schedules. The event runs at times which
match all three of the hours, minutes, and seconds you specify (and all Date setting values):
if you do not specify all three values, the event will never be scheduled.
You specify hours, minutes, and seconds as comma-separated numbers and/or number ranges.
For example: hours might be 0,7-17,21; minutes might be 16,36,56. seconds is usually left at its
default of 0 unless the event is especially time-critical. We do not recommend more than one value
in seconds, though the dialog does allow this if you genuinely need that option. If you do supply
multiple seconds values, we strongly recommend that you test your new event in conjunction with
all your other scheduled events on a non-production mAirList computer before putting it ‘live.’
The defaults of 0, 0, 0 mean ‘midnight,’ and do the same as the only once, at 00:00:00 Time setting.
Change only the hours, minutes, and seconds values needed to ‘include’ all the times you want:
leave the others at their default values. For example (leave seconds as 0 in all these examples):
Revision 19
•
at 15, 30, and 45 past every hour: change hours to 0-23 and minutes to 15,30,45.
•
on the half-hour, 23:30 to 06:30: change hours to 0-6,23 and minutes to 30.
•
at 57 past alternate hours, 11:57 to 17:57: change hours to 11,13,15,17 and minutes to 57.
Saved at 02:16:00 on 6 Jul 2011
mAirList Version 3.1 User Manual (UK English)
4.2.2
31
Event Scheduler Tips
•
If at all possible, thoroughly test all changes to events on an ‘off air’ computer before
making the same changes to your ‘on air’ computers.
•
Develop the Action List of every event first, to ensure it works as you intended; click Run to
test it, then Save it as a separate Action List (.mla) file. This makes it easier to schedule the
same Action List as two or more events (see below); and you can also combine different
Action Lists easily, by creating a Work an action list Action for each Action List you want to
include as part of a larger Action List.
•
You don’t have to use just one event which specifies every scheduled occurrence of an Action
List. If an Action List’s schedule is complex, set it up as two or more separate events: each
with different and simpler sets of Date and Time settings, which together specify all the
scheduled occurrences you need.
For example: to run the same Action List at 07:15, 09:30, and 10:15 on Saturdays, and at halfpast the hour from 07:30 to 21:30 on weekdays, we recommend that you create three events:
one for the weekday occurrences, one for the Saturday 07:15 and 10:15 occurrences, and one
for the Saturday 09:30 occurrence; with each event running the same Action List.
•
When testing an event’s Date and Time settings, remember that you can change mAirList’s
‘internal’ date and time of day by clicking the time display at the right of the mAirList
window status bar, that the Next event time box (E box) in the Playlist control bar always
shows the ‘next’ event’s scheduled time, and that you can always check the ‘next’ scheduled
date and time of each event on the Event Scheduler dialog.
•
Remember you can ‘stop’ an event at any future time by giving it an Expiry date and time.
•
When you set up new events or amend existing events, always consider the effects on your
entire event schedule. Ensure that no changes would result in a ‘clash’ (two events running
within a minute or less of each other): if they do, either separate the events by a few minutes,
or merge the Action Lists in the ‘clashing’ events into a single event, so that you can control
the order in which the combined set of Actions will run.
•
Finally, always Save the event list (.mle file) after every change you make, and give every
Event List file a meaningful name that you will recognise later.
Saved at 02:16:00 on 6 Jul 2011
Revision 19
32
5.
mAirList Version 3.1 User Manual (UK English)
mAirList Data File Types
All mAirList data files are XML documents stored as plain text files. Although you can view or edit
these files in any plain text viewing/editing application, an XML viewer or editor application makes
the internal file structures easier to see and understand. We recommend that you use an XML viewer
or editor application (several freeware programs are available) if you need or wish to edit or view the
contents of these files regularly.
5.1
.mla—Action List
Contains a list of Actions (see 4.1 on page 25).
Created by clicking Save on any Action List.
Opened by clicking Load on any Action List.
Edited by clicking Configure on any Action List.
5.2
.mlc—Cart Set
Contains a snapshot of a Cartwall’s contents and Cartwall Player settings, including any Cart Stacks,
Triggers, and Actions on Stop/Start; and all saved changes to any Cartwall Player item’s Properties
(such as a fixed time or Cue Markers).
Created by clicking Save Set on the Cartwall toolbar.
Opened by clicking a Favourites button or tab on the Cartwall;
or by clicking a Cart Set in the Favourites dropdown on the Cartwall toolbar;
or by clicking Load Set on the Cartwall toolbar.
Edited indirectly by changing the Cartwall contents, then clicking Save Set on the Cartwall toolbar.
5.3
.mld—Desktop
Contains a snapshot of the contents of the Playlist, (optionally) the contents of the Cartwall (see
7.3.1 on page 50), and (by default) the open Browser panes (see 7.6.3.1 on page 56). The file does not
contain any Player, Cartwall, or Cartwall Player settings.
Created by clicking Save (but see 7.6.2 on page on page 55), Save desktop, or Save desktop as… on
the main toolbar.
Opened by clicking Open (but see 7.2.2 on page on page 55) or Open desktop on the main toolbar.
Note that opening a desktop file or a desktop template file overwrites the current Playlist (and the
Cartwall, if the Cartwall is stored in the file) without any warning or confirmation dialog.
5.4
.mle—Event List
Contains a list of scheduled events (see 4.2 on page 29).
Created by clicking Save on the Event Scheduler.
Opened by clicking Open on the Event Scheduler.
Edited by clicking Add…, Edit, and Delete on the Event Scheduler.
5.5
.mlp—Single Playlist
Contains a snapshot of a Playlist’s contents (not the Playlist’s settings), including all saved changes
to the playlist’s items’ Properties (such as adding or changing a fixed time or Cue Markers).
Created by right-clicking a Playlist, then clicking This Playlist…, Save…;
or by clicking Save Playlist… in the main Toolbar (but see 7.6.2 on page on page 55).
Opened by right-clicking a Playlist, then clicking This Playlist…, Load… (or Insert… or Append…);
or by clicking Open, Open Playlist… on the main Toolbar (but see 7.6.2 on page on page 55);
or by clicking Insert, Playlist… on the main Toolbar.
Loading a playlist file clears all existing Playlist entries (except for playing items) and then adds the
playlist file contents to the Playlist.
Inserting a playlist file adds the playlist file contents above the currently selected Playlist item.
Appending a playlist file adds the playlist file contents to the end of the Playlist.
Revision 19
Saved at 02:16:00 on 6 Jul 2011
mAirList Version 3.1 User Manual (UK English)
5.6
33
.mlpe—Exported Playlist
NOTE: Because creating an exported playlist file also copies all the audio items in the Playlist to the
same folder, we recommend that you always save exported playlist files into an empty folder.
An exported playlist file allows you to save a playlist and a copy of each audio file in the Playlist, so
you can use it on a mAirList computer which does not have access to the audio files in the Playlist.
The only differences from a standard single playlist file are:
1.
Audio file name references in an exported playlist file do not contain any drive or folder
information; they contain only the file name and extension. This is because it is assumed
that all audio items will be in the same folder as the exported playlist file.
2.
Creating an exported playlist file also copies all the audio files in the Playlist into the same
folder as the exported playlist file.
After saving an exported playlist file, and presuming you started with an empty folder, you can copy
the folder and play the Playlist on any other mAirList computer.
5.7
.mls—Script
Contains a mAirList script (see section 12 on page 119).
5.8
.mlt—Desktop Template
Contains a snapshot of the contents of the Playlist, (by default) the contents of the Cartwall (see 7.3.1
on page 50), and (by default) the open Browser panes (see 7.6.3.1 on page 56). The file does not
contain any Player, Cartwall, or Cartwall Player settings.
The principal difference between a desktop file and a desktop template file is that by default, a
desktop template file contains Cartwall contents and a desktop file does not. Desktop template files
are intended to be used as a ‘standard base’ which you can open, then make changes and save
different desktop files.
Created by clicking Save desktop as… or Save desktop as default template on the main toolbar.
Opened by clicking Open or Open desktop on the main toolbar (but see 7.6.2 on page on page 55).
Note that opening a desktop file or a desktop template file overwrites the current Playlist (and the
Cartwall, if the Cartwall is saved in the file) without any warning or confirmation dialog.
5.9
.mmd—MetaData
Contains metadata about an audio item, including its file type, artist and title, duration, and all
mAirList-specific item settings (such as Cue Markers, Type, fixed time, and custom icon).
Created by clicking Save Metadata on an item’s Properties dialog (within any mAirList program
including mAirListDB and the mAirList file tagging program mAirListTag), or on any PFL Player.
Existing MetaData files are edited (indirectly) in the same way.
5.10
.xml—mAirListDB Hour Templates and Template Assignments
These files contain snapshots of mAirListDB hour templates, and template assignments,
respectively.
The files are created by clicking the Export… button in the Manage Hour Template and
Hour Template Assignment dialogs, respectively.
Saved at 02:16:00 on 6 Jul 2011
Revision 19
34
Revision 19
mAirList Version 3.1 User Manual (UK English)
Saved at 02:16:00 on 6 Jul 2011
mAirList Version 3.1 User Manual (UK English)
6.
35
Operator’s Reference
This chapter lists all the operations, menu items, and other operator actions available in mAirList.
6.1
Toolbar
Note that some toolbar buttons have a small dropdown arrow ‘extension’ beside them.
Click the arrow to open the button’s menu, or click the button to select the default menu item.
New
Opens a new desktop. If a default desktop template file (standard.mlt) exists, it is Opened.
Open
•
Open desktop (Ctrl+O, default)
Opens a saved desktop (.mld) file or desktop template (.mlt) file.
•
Open playlist…
See 7.6.2 on page on page 55 if you want Open Playlist to be the default Open button action.
Opens a saved playlist file (mAirList or M3U) or music scheduler log file as Playlist items.
Any current Playlist items which are not playing are deleted.
After the file is Opened, you cannot manipulate it as an ‘item’ in the Playlist: you must
instead select the Playlist items you want to manipulate.
The current supported ‘playlist’ file types and their file extensions are:
•
mAirList playlist files (.mlp and .mlpe);
mAirList desktop and desktop template files (.mld and .mlt);
M3U playlist files (.m3u);
DigAS show files (.xml); and
Powergold automation files (.ptm).
Run script
Runs a mAirList script (.mls) file.
Save
•
Save desktop (Ctrl+S, default)
Saves the current desktop (.mld) file or desktop template (.mlt) file. If no desktop or desktop
template file has been loaded, or if a New template is open but has not been saved yet, this is
identical to clicking Save Desktop as…
•
Save desktop as…
Saves the current desktop as a desktop (.mld) file or desktop template (.mlt) file.
•
Save desktop as default template
Saves the current desktop as the ‘default’ desktop template file (standard.mlt).
•
Save playlist…
See 7.6.2 on page on page 55 if you want Save Playlist to be the default Save button action.
Saves the current Playlist as a single Playlist (.mlp) file.
Insert
The item or items are inserted above the current selected Playlist item.
If no Playlist item is currently selected, the item or items are appended to the end of the Playlist.
•
File(s)… (default)
Inserts one or more audio files as Playlist items.
•
Playlist…
Inserts the items within a saved playlist file or music scheduler log file as Playlist items.
After the playlist files is Inserted, you cannot manipulate it as an ‘item’ in the Playlist:
you must instead select the Playlist items you want to manipulate.
See above for the current supported ‘playlist’ file types and their file extensions.
Saved at 02:16:00 on 6 Jul 2011
Revision 19
36
mAirList Version 3.1 User Manual (UK English)
The following ‘special’ Playlist items are all described in detail in 3.3 on page 23.
•
Files as Container…
Inserts one or more audio files as a container Playlist item.
The Container tab in the container’s Properties dialog is displayed, so you can rename and
reorder the items in it before you insert the container into the Playlist.
You can only insert audio files from the same disk folder as a container Playlist item;
however, you can add further items from other folders (or from a database) later.
•
Stream
Inserts an external audio stream source of known duration as a Playlist item. The stream
item’s Properties dialog is displayed, so you can change its Title and Artists (for ‘now playing’
and logging), URL of the stream, and its Duration (for automation).
Use Stream to add streams of known, fixed duration; use Stream (infinite) to add streams
where the duration cannot be known in advance (for example, a live concert or event).
•
Stream (infinite)
Inserts an external audio stream source of unknown duration as a Playlist item.
This is identical to the Stream menu item, but with Duration greyed out.
Use Stream (infinite) to add streams where the duration cannot be known in advance
(for example, a live concert or event); use Stream to add streams of known, fixed duration.
•
Network file
Inserts an audio file stored on a network resource as a Playlist item.
Use Network file to add files which can only be located and retrieved by using a URL.
•
Automation Break Point
Inserts an automation Break point as a Playlist item.
•
Dummy
Inserts a dummy Playlist item.
•
Command
Inserts a mAirList command or command set as a Playlist item.
(For a complete list of all mAirList commands, see pages 125 onwards.)
•
Silence
Inserts a silence as a Playlist item. Set its Duration in the item’s Properties dialog.
•
Container
Inserts an empty container as a Playlist item.
Edit
Opens the selected Playlist item’s Properties dialog (see 9.6 on page 97).
Delete
Deletes the selected Playlist item(s) from the Playlist.
Events
Opens the Event Scheduler dialog (see 4.2 on page 29).
Actions (optional)
Runs the named set of Actions.
Database (optional)
Opens the mAirListDB window. Note that this is a fully functional window.
mAirList
6.2
Revision 19
•
Control Panel
•
About…
Opens the mAirList About… dialog.
Browser
Saved at 02:16:00 on 6 Jul 2011
mAirList Version 3.1 User Manual (UK English)
6.2.1
6.3
Player
6.4
Playlist
6.4.1
6.5
6.6
37
Browser Toolbar
Playlist Control Bar
Cartwall
6.5.1
Cartwall Toolbar
6.5.2
Cartwall Player
Status Bar
System Log
Internal Time
Saved at 02:16:00 on 6 Jul 2011
Revision 19
38
Revision 19
mAirList Version 3.1 User Manual (UK English)
Saved at 02:16:00 on 6 Jul 2011
mAirList Version 3.1 User Manual (UK English)
7.
39
Configuration
The default mAirList configuration settings provide a radio playout and automation system which
works immediately after installation, with all features operational. As you learn mAirList’s features
and operation, sooner or later you will want to change the way some features work, or add more
Players or Cartwall Players, or make other small (or large!) changes.
This chapter lists and describes the configuration settings, in tree node order.
The settings which are available in the tree depend on the type of mAirList licence you purchased.
Because mAirList is a uniquely ‘configurable’ system, the large number of settings may seem
daunting at first. The best way to learn what the settings do is to explore them for yourself; but if you
find a setting you don’t understand, read its description in this Manual.
To configure mAirList, open the mAirList Configuration program (known as mAirListConfig), which
is built in to the mAirList.exe program file. To open mAirListConfig, click Start, All Programs (or
Programs), mAirList, Configuration; or navigate to the mAirList program files folder and open the file
mAirListConfig.bat.
Figure 7.1: The mAirList configuration program (mAirListConfig) window
In the mAirListConfig window (see Figure 7.1 above), the left pane contains a menu tree; the right
pane shows the settings for the currently-selected item (node) in the menu tree.
When you have finished changing settings, click Save to save your changes; or click Cancel to close
mAirListConfig without saving any changes.
Any changes you make using mAirListConfig do not take effect until mAirList is next opened.
If you make changes using mAirListConfig while mAirList is running, you must close and re-open
mAirList to make your changes take effect.
Unlike many other Windows programs, mAirList configuration settings are not stored in the
Registry: they are stored in several .ini files in the config folder under the mAirList data folder (see
7.14.1 on page 77). Therefore, you can copy your mAirList configuration to another computer by
copying the contents of the config folder.
To prevent unintentional changes by users, not all settings can be changed from within the main
mAirList program by the user; and the settings which can be changed are not changed permanently.
For example, if the user changes Player or Playlist settings, those changes are not written to the
configuration files, and are lost when mAirList is closed, or when a Desktop file is loaded (see below).
Saved at 02:16:00 on 6 Jul 2011
Revision 19
40
7.1
mAirList Version 3.1 User Manual (UK English)
Playlists
The Playlist contains the items to be played out by the associated Players. Most users use a single
Playlist, but you can set up more than one Playlist (and associated Players) if you wish; you may
want to do this if for example you have split outputs to play different regional ads. during ad. breaks.
You can even have no Playlists, if you want to use mAirList purely as a Cartwall.
On the Playlists node, choose the number of Playlists you want (default: 1). The menu tree contains
a node (Playlist 1, Playlist 2, …) for each Playlist. Each of these nodes shows a page containing a tab
named General, Options, GUI Options, Control Bar, Progress Bar, and Display.
7.1.1
General tab
Player Count (default: 2) is the first setting on the General tab. This is the number of associated
Players you want for the Playlist. Each Playlist has one or more associated Players which the Playlist
uses to play out its contents.
The number of Players you choose determines the number of items you can play simultaneously,
so if you want to segue between items, you need at least two Players. Depending on your needs and
preference, you might use three (or more) Players, with the third used for jingles, music beds, etc.
Three Players are also useful in automation mode, especially if you use voice tracks or sweepers
which play out ‘over’ a music track. However, you can run automation using only a single Player.
If you use a mixer in your studio, you should assign each Player to a separate mixer channel, and
also route each Player’s output to a separate audio card output (see 7.5 on page 52), so that you can
control the level of each Player independently.
Number of items to keep in the playlist history (default: 0) sets the number of played items which
remain ‘greyed out’ at the top of the Playlist before (usually) being moved to the mAirList
Recycle Bin (this depends on the Options tab settings: see 7.1.2 below). ‘Greyed out’ items in the
Playlist are known as the Playlist history.
This allows the user to see the last few items played, as well as those coming up.
For example, if set to 3, the top three items in the Playlist are ‘greyed out’ when they have been
played; when the fourth item ends, the top item moves from the history to the mAirList Recycle Bin.
If this setting is 0, the Playlist history is disabled. Played items are still moved to the mAirList
Recycle Bin unless you disable this as well (see Move deleted items into Recycle Bin below).
7.1.2
Options tab
These settings affect the behaviour of the Playlist; as opposed to the GUI Options tab settings (see
7.1.3 below), which affect the appearance of the Playlist.
Allow automation mode (default: on)
If this setting is off, you cannot select automation mode for this Playlist.
Use only a single player in automation mode (default: off)
Automation mode normally uses all available Players. If this setting is on, Automation uses only one
Player—either the first available Player, or the Player which is playing when automation mode is
selected. This can be useful for automated overnight playout, because only one channel on the
mixer needs to be left faded up.
Auto clean-up history (default: on)
Played items are usually automatically deleted from the top of the Playlist history and are either
moved to the mAirList Recycle Bin or just deleted. If this setting is off, you must manually Delete all
played items (this overrides the Number of items to keep in the playlist history setting).
Auto clean-up history only if item is at top of playlist (default: on)
This setting has no effect if Auto clean-up history is off.
If this setting is on, a played item can only be automatically deleted from the Playlist history—and
(usually) moved to the mAirList Recycle Bin—if it is the top item in the Playlist: otherwise, the item
remains in the Playlist. This setting takes precedence over Number of items to keep in the playlist
history setting.
If this setting is off, a played item can be automatically deleted from any position in the Playlist.
When the number of items in the Playlist history exceeds the Number of items to keep in the
playlist history setting, the topmost history item in the Playlist is automatically deleted.
Revision 19
Saved at 02:16:00 on 6 Jul 2011
mAirList Version 3.1 User Manual (UK English)
41
Auto-move non-playable items to history in assist mode (default: off)
In assist mode, non-playable items in the Playlist (such as COMMAND, SILENCE, and BREAK items)
are not executed; this is to ensure that they do not ‘disappear’ from the Playlist before they are acted
upon. When this setting is on, all non-playable items in the Playlist are automatically marked as
‘played’ when they reach the top of the Playlist, and are immediately moved to the Playlist history.
Save event list along with desktop files and templates (.mld/.mlt) (default: off)
Each Playlist has its own list of scheduled events (see Event Scheduler on page 29). Normally, when
you save a Desktop (.mld) or Desktop Template (.mlt) file, the Event list is not included as part of
these files. When this setting is on, this Playlist’s Event list is included in these files.
Automatically save event list at shutdown (default: on)
Self-explanatory. The auto-saved file name is standard0.mle for the first Playlist,
standard1.mle for the second Playlist, and so on.
Move deleted items into Recycle Bin (default: on)
Deleted items, and items in the Playlist history, are usually moved to the mAirList Recycle Bin.
If this setting is off, played items are deleted permanently.
Automatically jump to fixed-time items in automation mode (default: on)
In automation mode, mAirList normally ‘jumps’ to Playlist items which have a fixed (or ‘soft’ fixed)
playout time. If this setting is off, mAirList does not ‘jump’ to these items.
Update backtiming with current time when idle (default: off)
mAirList has a background routine which calculates the estimated start time of all the remaining
items in the Playlist (beginning initially at 00:00:00 if no Players are playing). When a Player starts,
mAirList updates these times, but does not update them again until another Player starts.
If this setting is on, and no Players are playing, mAirList updates these times continuously, using the
current time of day as the start time of the first item in the Playlist.
7.1.3
GUI Options tab
These settings affect the appearance of the Playlist; as opposed to the Options tab settings (see page
40), which affect the behaviour of the Playlist.
Show column headers (default: on)
If this setting is off, the Playlist’s column headings (Title, Artist, Duration, Ramp, etc.) are not shown.
You may wish to do this to save screen space.
Extended display mode (default: on)
If this setting is off, the Title and Artist are shown on the same line in the Playlist instead of on two
separate lines. You may wish to do this to show more items on the screen.
Swap artist and title in extended display mode (default: off)
If this setting is on, and Extended display mode is also on, the Artist is shown above the Title instead
of below the Title.
Backtiming display (default: on)
If this setting is off, the fixed and estimated start times of items are not shown.
Display remaining time and ramp for playing items (default: on)
If this setting is off, the Duration and Ramp columns do not ‘count down’ while an item is playing.
Show ramp countdown overlay (default: on)
If this setting is off, the overlay countdown to Ramp(s) of the currently playing item is not shown.
Show only nearest ramp (default: off)
If this setting is on, the overlay countdown to Ramp(s) of the currently playing item shows a single
countdown to the nearest Ramp (instead of a multiple countdown to all Ramps).
Show EOF warning countdown overlay (default: off)
If this setting is on, an overlay countdown to the end of the currently playing item is shown during
the Player’s EOF warning period (see 7.2.1 on page 45).
Show comment expand/collapse buttons (default: on)
If this setting is off, the button which toggles the display of Comments for the item is not shown.
Always expand comments (default: off)
If this setting is on, item Comments are always shown.
Saved at 02:16:00 on 6 Jul 2011
Revision 19
42
mAirList Version 3.1 User Manual (UK English)
Use playlist icons (default: on)
If this setting is off, the icons indicating item types (Music, COMMAND, BREAK, etc.) are not shown.
Click on playlist icon toggles Extra PFL (default: on)
If this setting is off, clicking a Playlist icon does not toggle the Extra PFL Player for that item.
Use player colours (default: on)
Normally, the background colour of each Player is also used as the background colour of the Player
column for a Playlist item while it is loaded into a Player. If this setting is off, the current State colour
of the Player is used as the background colour of the Player column for a Playlist item while it is
loaded into a Player.
Show player name in any state (default: on)
If this setting is off, the Player column in the Playlist shows only the Player name (instead of the
Player name and Player State.
Always show duration (default: off)
If this setting is on, items with unknown Durations (for example, a BREAK with no Duration
specified) are shown with a Duration of 0.
Always show ramp (default: off)
If this setting is on, items with no Ramps set are shown with a Ramp of 0.
Auto-truncate time (default: on)
If this setting is off, Duration and Ramp times are shown including leading zeros.
Automatically scroll to playing item (default: on)
If this setting is off, the Playlist does not automatically scroll so that the playing item is visible.
Spacebar triggers AUTOMATION NEXT (default: off)
If this setting is on, pressing the Spacebar performs an AUTOMATION NEXT Command. This setting
is provided for compatibility with other playout software, because the Spacebar cannot be used as a
Remote Control Hotkey in mAirList.
Escape triggers AUTOMATION BREAK (default: off)
If this setting is on, pressing Esc performs an AUTOMATION BREAK Command. This setting is
provided for compatibility with other playout software, because the Esc key cannot be used as a
Remote Control Hotkey in mAirList.
Escape triggers AUTOMATION STOP (default: off)
If this setting is on, pressing Esc performs an AUTOMATION STOP Command. This setting is
provided for compatibility with other playout software, because the Esc key cannot be used as a
Remote Control Hotkey in mAirList.
Item-specific colours have priority over skin.ini (default: off)
If you assign colours to Player States in the skin.ini file, these may conflict with colours you have
assigned to specific items. Normally, the skin.ini Player State colour takes precedence; if this setting
is on, the item colour takes precedence.
Show break duration (default: on)
If this setting is on, the (actual or estimated) Duration of BREAK items is shown in the Duration
column.
If this setting is off, BREAK items are shown with a blank Duration column.
Revision 19
Saved at 02:16:00 on 6 Jul 2011
mAirList Version 3.1 User Manual (UK English)
7.1.4
43
Control Bar tab
The Control Bar is the ‘toolbar’ at the top (or bottom, see the second setting below) of the Playlist
which contains the AUTO, ASSIST, NEXT, and automation control buttons.
Show control bar (default: on)
If this setting is off, the Control Bar is not shown.
Position at bottom (default is at top) (default: off)
If this setting is on, the Control Bar is shown below the Playlist instead of above it.
Separate ASSIST/AUTO buttons (default: on)
If this setting is off, the ASSIST and AUTO buttons are shown as a single toggle button.
Show NEXT button in assist mode (default: on)
If this setting is off, the NEXT button is not shown in assist mode.
Use graphic buttons (default: on)
If this setting is off, the Automation STOP, PLAY, and NEXT buttons are shown with text labels
instead of graphic images.
AUTO button flashes while playing (default: on)
If this setting is off, the AUTO button does not flash while Automation is playing items.
Show next event time box (default: on)
If this setting is off, the Playlist Next event time box (the ‘E’ box) is not shown.
Show item count and duration boxes (default: on)
If this setting is off, the Playlist item count box and Playlist total duration box are not shown.
7.1.5
Progress Bar tab
These settings affect the Progress Bar which you can optionally show within the Playlist.
Enable progress bar (default: on)
If this setting is off, no Progress Bars are shown for playing items within the Playlist.
Show ramp in progress bar (default: on)
If this setting is off, the Progress Bar does not show Ramps as separate coloured sections.
Split progress bar during ramp (default: on)
If this setting is off, the Progress Bar shows Ramps at the left of the normal bar; if this setting is on,
the bar is split vertically, with the top half of the bar showing the Ramps.
Show only nearest ramp (default: off)
If this setting is on, the bar shows only the nearest Ramp; if this setting is off, the bar shows all
Ramps.
7.1.6
Display tab
These settings affect the format of the backtiming display which is normally shown
(see Backtiming display on page 41) in the leftmost column of the Playlist, and the time formats
used to show times in the Duration and Ramp columns.
7.1.6.1
Backtiming Prefixes
These settings specify the characters used to prefix the backtiming display, which indicates whether
the time shown is a fixed or estimated time. There are four types of times:
Type
Default prefix characters
Description
Fixed
= followed by a space
Item with a (‘hard’) fixed playout time.
Fixed (soft)
~ followed by a space
Item with a ‘soft’ fixed playout time.
Absolute
none (empty)
Relative
+ followed by a space
Actual start time (item has been played or is playing).
Estimated start time, calculated using actual
start times and durations of preceding items.
Table 7.1: Backtiming Prefix Characters
Saved at 02:16:00 on 6 Jul 2011
Revision 19
44
mAirList Version 3.1 User Manual (UK English)
7.1.6.2
Time Formats
The strings in the Duration, Ramp, Ramp Overlay, and EOF Warning Overlay settings are
time format strings (see below).
If the Ramp Overlay string is empty, Ramp Overlays use the Ramp time format string; if the
EOF Warning Overlay string is empty, EOF Warning Overlays use the Duration time format string.
The dropdown boxes contain some commonly used time format strings for each setting,
but you can type in a custom string if the format you want is not one of the presets.
The following table lists the characters you can use to compose a custom time format string.
You can add any characters not in the table (except ‘) to the format string: these are shown ‘as is.’
Characters
Description
Year (last two digits)
yy
yyyy
Year (four digits)
Month (one or two digits)
m
mm
mmm
mmmm
Month (two digits with leading zero)
Month (short name, e.g. Feb)
Month (long name, e.g. February)
Day (one or two digits)
d
Day (two digits with leading zero)
dd
ddd
dddd
Day (short name, e.g. Sun)
Day (full name, e.g. Sunday)
ddddd
Date (Windows short date* format)
dddddd
Date (Windows long date* format)
h
hh
n
nn
Hours (one or two digits)
Hours (two digits with leading zero)
Minutes (one or two digits)
Minutes (two digits with leading zero)
s
Seconds (one or two digits)
ss
Seconds (two digits with leading zero)
u
Tenths of seconds (one digit)
zzz
!
Milliseconds (three digits with leading zeros)
Truncation point ‘marker’ (see below)
Table 7.2: Time Format String Characters
* These formats use the date formats specified in the Regional and Language Options in your
Windows Control Panel or Settings.
The ! character marks the truncation point: everything following the ! character in the string
will always be shown, even when the time is ‘truncated’ (the ! character itself is never shown).
You would not normally use day. month, or year in a Duration, Ramp or Overlay time format
string: they are included in the table because you can use them in logging (see 7.8.2 on page 63).
The custom format string n:ss.u shows Durations as (for example) 4:07.5 and 11:38.0.
The preset format string nn:s!s shows the same Durations as 04:07 and 11:38.
The custom format string n:s!s.u shows Durations as (for example) 9.5 and 12.8.
The custom format string n!n:ss shows the same Durations as 0:09 and 0:12.
Finally, the custom format string n!n’ss” shows the same Durations as 0’09” and 0’12”.
Note that you must type this string using typographic quote characters (Alt+0146 and Alt+0148).
Revision 19
Saved at 02:16:00 on 6 Jul 2011
mAirList Version 3.1 User Manual (UK English)
7.2
45
Players
Each Player in each Playlist has its own node in the menu tree. Each of these nodes shows a page
containing tabs named General, Options, GUI Options, Buttons, and Progress Bar.
Note that you must configure each Player separately. If you want the same settings for each Player in
a Playlist, we suggest that you begin by setting up the first Player in the Playlist the way you want,
then configure the other Players to match the settings of the first Player.
The quickest way to do this is to click the first Player’s node in the menu tree, click a tab, set
everything on it the way you want, then click other Players’ nodes in the menu tree.
The same tab is shown, so you can quickly compare the settings of all the Players.
7.2.1
General tab
7.2.1.1
Appearance
These settings control the general ‘look and feel’ of a Player. Each Player is initially assigned a
Caption matching its number (1, 2, 3, …) and the Colour red. By default, a Player’s Caption and
Colour are shown in the Playlist when an item is loaded into the Player.
Caption is a Player’s ‘name.’ You can use any characters as a Player’s Caption. For example, you
could use letters (A, B, C, …) instead of numbers. Although Captions can be any length you like, we
suggest that you keep them to one or two characters in length.
Unless you use a skin.ini file to assign colours to Players, we suggest that you give each Player a
different Colour to make it easier to tell them apart. For example, if you have different coloured
faders on your mixer, you could make each Player match the colour of the corresponding fader.
The Default time display mode is similar to the elapsed/remain time display option on a CD deck.
In the table below, the time format used for the Examples is n:ss.u:
Mode
Description
Example
Elapsed time
Time from start of item
+0:09.5
Remaining time
Time remaining to end of item
-3:55.9
Elapsed and remaining time
Both of the above, separated by a slash
0:09.5 / 3:55.9
Backtiming mode
Time of day when the item ends
(this updates until the Player is started)
16:22:34
Table 7.3: Time Display Modes
The Default time display mode (default: Remaining time) is the mode mAirList uses when it opens.
However, the user can change the mode by clicking the time display (or Shift+clicking it, if the Player
has a mouse-click Command assigned to it: see below). Clicking the time display cycles through the
first three time display modes in the table above.
The user can also double-click (or Shift+double-click) the time display to select Backtiming mode.
Use EOF warning to set the number of seconds (default: 10 seconds) before EOF when you want the
Player to start flashing, as a warning to the user that the item is about to end. This value is also used
to start the large EOF overlay countdown on the Playlist, unless you have switched that feature off.
To disable EOF warning, set it to 0.
Use Command when clicked (default: (none)) to select the Command you want the Player to
perform when clicked—or if you have a touch screen, when the Player is touched.
7.2.1.2
Time Formats
The time format settings for Remaining time, Elapsed time, and Ramp are the same as those used
for the Playlist’s time formats. The dropdowns contain six commonly used formats, or you can
compose your own (see Table 7.2 on page 44).
The default formats for Remaining time and Elapsed time are nn:ss; the default for Ramp is ss.
Saved at 02:16:00 on 6 Jul 2011
Revision 19
46
mAirList Version 3.1 User Manual (UK English)
7.2.2
Options tab
These settings affect the behaviour of the Player; as opposed to the GUI Options tab settings
(see 7.2.3 below), which affect the appearance of the Player.
The term close is used for consistency with the Player button label, mAirList commands, and the
mAirListScript scripting language. Depending on the other Player Options settings which you select,
closing a Player means ‘the act of doing all of the following:’
• stop the Player if it is playing
• mark the loaded item as ‘played’
• unload the loaded item from the Player
• move the item to the Playlist history and/or the mAirList Recycle Bin.
Hence for example, ‘Auto close at EOF’ means ‘“eject” the Player when it reaches the end of an item.’
Auto load in assist mode (default: on)
If you want to use the Playlist Control Bar NEXT button in assist mode, this setting must be on.
If this setting is on, the Player auto-loads in assist mode if the Player is empty and there are items in
the Playlist which are not already loaded in any Player.
If this setting is off, you must manually load the Player in assist mode.
Auto load on demand (default: off)
If this setting is on, the Player auto-loads in assist mode if the Player is empty, and there are items in
the Playlist which are not already loaded in a Player, and a Start command is issued.
If this setting is off, you must manually load the Player in assist mode.
Only auto-load if all other players are empty (default: off)
If this setting is on, the Player does not auto-load unless all other Players in the Playlist are empty.
Only auto-load items marked as ‘special’ (default: off)
If this setting is on, the Player only auto-loads items marked as ‘special items’ in their Properties.
You can use this feature to ‘reserve’ a Player for talkover beds, news clips, programme replays, or any
other ‘special’ purpose.
Auto close on STOP in assist mode (default: on)
This setting applies only to STOP Commands and not to FADEOUT Commands nor reaching EOF,
even if Auto stop at EOF in assist mode is on.
If this setting is on, stopping the Player closes it.
If this setting is off, stopping the Player ‘resets’ to the beginning of the item.
When combined with remote control by fader start, this is useful for repeated plays of the same item
in quick succession—for example, a ’timer’ bed for a phone-in competition.
Auto close at EOF in assist mode (default: on)
If you want to use the Playlist Control Bar NEXT button in assist mode, this setting must be on.
If this setting is on, the Player closes when it reaches EOF.
If this setting is off, the Player ‘resets’ to the beginning of the item when it reaches EOF.
16
Tip: if a Player is ‘stuck’ at EOF , switch this setting on to close it.
Auto rewind at EOF in assist mode (default: on)
This setting has no effect if Auto close at EOF in assist mode is on.
If this setting is on, the Player ‘resets’ to the beginning of the item when it reaches EOF.
Tip: if a Player is ‘stuck’ at EOF, switch this setting on to ‘reset’ it.
Auto release PAUSE when other player is playing or started (default: off)
If this setting is on, and the Player is paused, it starts playing when any other Player is started.
Auto PFL OFF on START (default: off)
This setting has no effect if Allow simultaneous playback and PFL is off,
because the START button is not visible.
If this setting is on, starting the Player stops PFL playout (if any) and closes the PFL Player, even if
Allow simultaneous playback and PFL is on.
If this setting is off, starting the Player does not close the PFL Player; PFL playout (if any) continues.
Auto close PFL at EOF (default: off)
If this setting is on, the PFL Player closes when it reaches EOF.
16
Revision 19
Some combinations of Player settings can leave the Player stopped and open (‘stuck’) at EOF.
Saved at 02:16:00 on 6 Jul 2011
mAirList Version 3.1 User Manual (UK English)
47
Auto fadeout at Fade Out marker in assist mode (default: off)
If this setting is on, when the Player reaches an item’s Fade Out Cue Marker in assist mode, the
Player fades out and closes (as it does in automation mode).
If this setting is off, Fade Out points are ignored in assist mode.
Use in automation mode (default: on)
To be able to automate a Playlist, at least one Player in the Playlist must have this setting on.
If this setting is on, the Playlist can use the Player to load and play items in automation mode.
If this setting is off, the Playlist cannot use the Player to play items in automation mode; if the Player
is playing when automation mode is selected, the Player continues playing until it reaches Fade Out
or EOF (whichever comes first); if the Player is loaded but stopped when automation mode is
selected, the loaded item is Recycled and the Player closes.
Move item to history when closing paused/EOF player (default: on)
If this setting is off, items remain in the Playlist when they end.
Move item to history when closing loaded player (default: off)
If this setting is on, items are moved to the Playlist history when the Player is closed.
Include in logging (default: on)
If this setting is off, no log entries are written for any item played in the Player.
Allow simultaneous playback and PFL (default: off)
If this setting is on, all Player buttons remain visible and active while the PFL Player is open, and the
Player and PFL Player operate independently. If Auto PFL OFF on START is also on, starting the
Player stops and closes the PFL Player.
If this setting is off, the Player’s PFL button is hidden while the Player is playing, and the Player’s
transport buttons (STOP, PAUSE, PLAY, etc.) are hidden while the PFL Player is open. You can
operate the Player or the PFL Player, but not both at the same time.
Only use PFL audio device while Player is playing (default: off)
This setting has no effect if Allow simultaneous playback and PFL is off.
If this setting is on, the Player’s PFL audio device is only used while the Player is playing: at all other
times, the Player’s PFL output is routed to the Player’s Playback audio device. This provides a
separate ‘PFL during playback’ audio output which you could connect to a pair of ‘squawk-box’
speakers, or to an input of a headphone amplifier system, for example.
PFL during playback starts End Mon (default: on)
This setting has no effect if Allow simultaneous playback and PFL is off.
If this setting is on, selecting PFL while the Player is playing plays the ending of the item in the
PFL Player (see 7.12.7 on page 72).
Loop audio (default: off)
If this setting is on, the Player’s Loop mode is on when mAirList opens.
Hook mode (default: off)
If this setting is on, the Player’s Hook mode is on when mAirList opens.
Switch off loop mode when player is closed (default: off)
If this setting is on, the Player’s Loop mode switches off each time the Player closes.
Switch off hook mode when player is closed (default: off)
If this setting is on, the Player’s Hook mode switches off each time the Player closes.
Saved at 02:16:00 on 6 Jul 2011
Revision 19
48
mAirList Version 3.1 User Manual (UK English)
7.2.3
GUI Options tab
These settings affect the appearance of the Player; as opposed to the Options tab settings (see 7.2.2
above), which affect the behaviour of the Player.
Auto-truncate time (default: off)
If this setting is off, Duration and Ramp times are shown including leading zeros.
Show PFL cue dialog (default: on)
This setting applies to the PFL Player which opens when the Player’s PFL button is clicked.
If this setting is on, the PFL Player contains a cue dialog which you can use to create or alter
Cue Markers ‘on the fly.’
Show save buttons in PFL cue dialog (default: off)
This setting applies to the PFL Player which opens when the Player’s PFL button is clicked.
If this setting is off, the Save buttons on the PFL Player are hidden, preventing users accidentally
overwriting any item settings. To protect your data more thoroughly, see 7.12.5 on page 71.
Flash during EOF warning (default: on)
If this setting is on, the Player’s background colour flashes during the Player’s EOF warning period
(see 7.2.1 on page 45).
Show ramp when idle (default: off)
If this setting is on, loading the Player shows the item’s Ramp (if any) instead of the usual
time display (remaining, elapsed, etc.). This is particularly useful in assist mode.
Show only nearest ramp (default: off)
If this setting is on, and Show ramp when idle is on, the Player’s time display shows a single
countdown to the nearest Ramp (instead of a multiple countdown to all Ramps).
Hide buttons in automation mode (default: on)
If this setting is on, the Player’s buttons are hidden in automation mode. This acts as an extra visual
confirmation to the user that mAirList is in automation mode and manual operation of the Player is
not possible.
If this setting is off, the Player’s buttons are visible in automation mode. The Hook and Loop mode
buttons work normally; the PFL button works only if Allow simultaneous playback and PFL is on;
and all transport buttons (Stop, Play, etc .) are disabled.
Swap artist and title (default: off)
If this setting is on, the Artist is shown above the Title instead of below the Title.
Use cue category colours (default: on)
If this setting is off, the cue dialog shows all Cue Marker names and values on the same background
colour, instead of using background colours for different Cue Marker categories.
Enable alternative cue points (default: off)
If this setting is on, the cue dialog shows extra controls which allow you to see, use, and edit
‘alternative’ (multiple) values for each Cue Marker.
Use item colour when idle (default: off)
If you assign colours to Player States in the skin.ini file, these may conflict with colours you have
assigned to specific items. Normally, the skin.ini Player State colour takes precedence; if this setting
is on, the item colour takes precedence.
Show cue list in seconds (instead of 1/100s) (default: on)
If this setting is off, the cue dialog shows values in full 1/100s accuracy.
Use “stutter” mode during cueing (default: on)
If this setting is on, changing the value of any Cue Marker in the PFL Player plays a very short loop of
that section of the item (hence “stutter” mode), which mimics the cueing features on professional
CD decks.
If this setting is off, the PFL Player does not use “stutter” mode.
Revision 19
Saved at 02:16:00 on 6 Jul 2011
mAirList Version 3.1 User Manual (UK English)
7.2.4
49
Buttons tab
These settings show or hide each of the Player’s buttons.
The available buttons are: Start, Stop, Pause, Close, PFL, Loop, Hook, Fade Out. and Reset.
The default is to show all buttons.
We recommend that you hide any Player buttons you don’t use. For example, to ‘force’ your users to
control mAirList only from faders on a mixer, hide all the Player buttons.
If you hide all the buttons on a Player, its height is reduced and you can use the extra screen space
for other purposes.
7.2.5
Progress Bar tab
These settings affect the Progress Bar which you can optionally show within the Player.
Enable progress bar (default: on)
If this setting is off, the Player does not show a Progress Bar. If this setting is off for all Players in the
Playlist, the Players’ heights are reduced and you can use the extra screen space for other purposes.
Show ramp in progress bar (default: on)
If this setting is off, the Progress Bar does not show Ramps as separate coloured sections.
Split progress bar during ramp (default: on)
If this setting is off, the Progress Bar shows Ramps at the left of the bar; if this setting is on, the bar is
split vertically, with the top half of the bar showing the Ramps.
Show only nearest ramp (default: off)
If this setting is on, the bar shows only the nearest Ramp; if this setting is off, the bar shows all
Ramps.
Saved at 02:16:00 on 6 Jul 2011
Revision 19
50
7.3
mAirList Version 3.1 User Manual (UK English)
Cartwall
The optional mAirList Cartwall is the digital equivalent of traditional cart players; other software
names the equivalent feature Carts, Cartwall, Instants, Spot Players, One-Shots, or Single Players.
The Cartwall node in the menu tree contains the basic settings for the optional Cartwall.
These settings control the basic ‘look and feel’ of the Cartwall.
If you don’t want a Cartwall, clear the Enable Cartwall check box (default is ticked).
Use the (across) and (down) Player count settings (defaults: 3 and 2) to define the shape of the
Cartwall, as well as the number of Cartwall Players it contains. Cartwall Players are numbered from 1
upwards, and are coloured red unless you create a skin.ini file and specify a different colour, and/or
set the Player GUI Options setting Use item colour when idle to on. (see 7.3.3 on page 51).
Use Default cart set (default: blank) to enter the path and name of the Cart set file you want to be
automatically loaded when mAirList opens (or click Browse… to select a Cart set file).
To have an empty Cartwall when mAirList opens, blank out Default cart set.
If you allow the Cartwall to be saved in Desktop files (see 7.3.1 below), every user can set up the
Cartwall contents and settings as they prefer, then save and load this as part of their Desktop, in
effect giving each user their own Default cart set. Saving alternative Cartwall content layouts in
Desktop files is also a good way to test them out before deciding which ones to save as cart set files.
All other settings on the Cartwall node are identical to those on a Player node (see 7.2.1 on page 45).
7.3.1
Options, Options tab
These settings are identical to those on the Options tab for a Player (see 7.2.2 on page 46),
with three extra settings:
Save cartwall content in desktop files (.mld) (default: off)
If this setting is on, the Cartwall contents and settings are saved as part of a Desktop file.
Save cartwall content in desktop templates (.mlt) (default: on)
If this setting is on, the Cartwall contents and settings are saved as part of a Desktop Template file.
Keep open when starting a new desktop (default: on)
If this setting is on, the Cartwall is unaffected when the New button on the main Toolbar is clicked.
If this setting is off, all Cartwall Players’ contents and settings are cleared when the New button on
the main Toolbar is clicked.
7.3.2
Options, GUI Options tab
These settings affect the Cartwall Toolbar and the appearance of the Favourite Cart Set list.
Show toolbar (default: on)
If this setting is off, the Cartwall toolbar is hidden; the Cartwall’s height is reduced and you can use
the extra screen space for other purposes.
Note that the following three settings are not mutually exclusive.
To create or change the list of Favourite Cart Sets, see 7.3.7 on page 52.
Show favourites as a drop-down (default: off)
This setting has no effect if Show toolbar is off.
If this setting is on, Favourite Cart Sets are shown in a drop-down box on the Cartwall toolbar.
Show favourites as tabs (default: on)
If this setting is on, Favourite Cart Sets are shown as tabs along the bottom of the Cartwall, which
may slightly reduce the height of the Cartwall Players.
Show favourites as buttons (default: off)
If this setting is on, Favourite Cart Sets are shown as buttons down the left side of the Cartwall ,
which reduces the width of the Cartwall Players.
Revision 19
Saved at 02:16:00 on 6 Jul 2011
mAirList Version 3.1 User Manual (UK English)
7.3.3
51
Options, Player GUI Options tab
These settings are identical to those on the GUI Options tab for a Player (see 7.2.3 on page 49),
with one extra setting:
Allow dragging (default: on)
This setting has no effect if a Command when clicked is specified on the Cartwall node.
If this setting is on, an item in a Cartwall Player can be dragged and dropped on a Playlist or Player.
7.3.4
Options, Buttons tab
These settings are identical to those on the Buttons tab for a Player (see 7.2.4 on page 49), but with
two extra buttons—Previous and Next—which are used to control cart player stacks.
7.3.5
Options, Progress Bar tab
These settings are identical to those on the Progress Bar tab for a Player (see 7.2.5 on page 49).
If Enable progress bar is off, each Cartwall Player’s size is reduced and you can use the extra screen
space for other purposes.
7.3.6
Window
These settings affect the Cartwall window’s position and appearance.
Use the Cartwall Window Type setting to choose whether you want to show the cartwall embedded
as a ‘screen object’ within the main mAirList window, or a separate Cartwall window.
17
An embedded Cartwall is usually shown below the Playlist(s) in the main mAirList window;
a separate Cartwall window is best suited to computers which have multiple monitors.
The other Window settings apply separately to embedded Cartwalls and Cartwall windows.
7.3.6.1
Embedded Cartwall Settings
Visible at startup (default: on)
If this setting is off, the Cartwall is not shown when mAirList opens, and the Playlist(s) ‘expand’ to fill
the available window space.
Show Cartwall button in toolbar (default: off)
If this setting is on, the main mAirList toolbar includes a Cartwall ‘toggle’ button which shows or
hides the Cartwall. When not using the Cartwall, you can hide it to ‘reclaim’ space for the Playlist(s).
(Note: The toolbar always includes a Cartwall button if the Cartwall is in a separate window.)
Automatically stretch if no Playlists are configured (default: off)
If this setting is on, and Number of playlists on the Playlists node is zero, the Cartwall stretches to
fill the entire mAirList window.
7.3.6.2
Cartwall Window Settings
Window position (default: Default)
If your mAirList computer has two or more monitors, you can change this setting to
Maximise on monitor 1, Maximise on monitor 2, … etc.
Visible at startup (default: on)
If this setting is off, the Cartwall window is not shown when mAirList opens.
Always on top (default: off)
If this setting is on, the Cartwall window stays on top of all other applications and windows.
Remember window position and size (default: off)
If this setting is on, the window size and position are saved in the positions.ini file, and are restored
when mAirList opens.
17
You can use the mAirList Layout Designer program to change the position and size of any object in the mAirList window.
Saved at 02:16:00 on 6 Jul 2011
Revision 19
52
mAirList Version 3.1 User Manual (UK English)
7.3.7
Favourites
Use this page to create and edit the list of Favourite Cart Sets which are shown in the Favourites
drop-down box, or as tabs, or as buttons (see 7.3.2 on page 50).
•
•
•
7.4
To add a single Cart Set, click Add set…, then choose a .mlc file and click Open.
To add every Cart Set in a folder, click Add folder…, then choose a folder and click OK.
To remove an entry, select the entry and then click Remove.
PFL Player
These settings affect the PFL Player shown on an item’s Properties dialog, and in the mAirListTag
window. All these settings are identical to those on the corresponding tabs for a Player.
7.5
Audio Devices
The Audio Devices settings ‘connect’ mAirList Players to the physical audio devices in your
computer. In other words, these settings are the mAirList ‘patch bay’ or ‘routing matrix.’
‘Device’ means ‘any stereo output of a physical audio device.’ This includes each output pair on a
multi-output audio card (see 7.5.1 on page 52), and digital outputs such as optical S/PDIF.
When you install mAirList, all mAirList Players are set to connect to your computer’s current default
device. This is the device shown as the default device for sound playback in your Windows Settings
(or Control Panel), in the Sound and Audio Devices Properties. Use the Audio Devices settings if you
want to route mAirList Players to other devices in your computer (including digital audio outputs).
The Audio Devices settings are a tree-structured list of all the mAirList Players in the following
order, showing the Device each Player is ‘connected’ to:
•
•
•
•
•
Playlist Players
Cartwall (global settings)
Cartwall Players (individual settings)
PFL Player
Error Checking
Playlist and Cartwall Players have both Player and PFL settings; other Players have a Player setting.
To change any setting, select an entry from the dropdown in the Device column beside the setting
you want to change. For example, to change the PFL Device for Playlist 1–Player 1, expand the tree to
Playlist 1, Player 1, PFL; drop down the Device column box; and select a device.
If you use a mixer, you usually set each Playlist Player’s Player and PFL settings to the same device,
and connect this device to an input channel on the mixer. You would use a separate device for each
Playlist Player, and for the Cartwall.
The Cartwall global settings are listed just above the individual Cartwall Player settings.
The global settings apply to all Cartwall Players, but any changes you make to an individual
Cartwall Player’s settings take precedence over the ‘global’ settings.
The Error Checking Player is never visible. mAirList uses this Player internally to check items for
errors before loading them into a Playlist or on-screen Player. Although the Error Checking Player
almost never produces any audio output, we still suggest that you do assign it to a device which you
do not use, to prevent any possibility of its output being broadcast on air.
7.5.1
Choosing A Device
For each physical audio device (sound card, etc.) in your computer, mAirList adds a default device
for it to the dropdown in the Device column, in addition to its named outputs. The default device is
the device’s default output pair (for a 5.1 audio card, usually the Front or (1/2) outputs). So, a sound
card with four analogue output pairs and a digital optical output would show as six devices in the
Device dropdown: its default device followed by its five ‘named’ outputs (see the list below).
mAirList adds two more items to the Device dropdown: (default), which is your computer’s default
audio device (see 7.5 above); and Encoder (only shown if you have a mAirList Professional licence) is
mAirList’s built-in audio stream encoder (see 7.13.6 on page 76).
Revision 19
Saved at 02:16:00 on 6 Jul 2011
mAirList Version 3.1 User Manual (UK English)
53
So, the full list of possible devices in the Device dropdown are (from top to bottom):
•
•
•
•
•
•
•
•
•
•
•
•
•
(default)
devicename1 - default
devicename1 - outputname1
devicename1 - outputname2
…
devicename2 - default
devicename2 - outputname1
devicename2 - outputname2
…
ASIO: ASIOdevicename1 - outputname1
ASIO: ASIOdevicename2 - outputname2
…
Encoder
Lines shown in bold type are always present (subject to your mAirList licence); the presence of other
lines depends on the physical audio devices installed in your computer. Text in italics is replaced by
the device driver and output names of your physical audio devices. For example,
the devicename1 - outputname1 line might read VIA AC’97 Audio (WAVE) - front (1/2) on your
computer.
18
mAirList can use standard Windows Device Model (WDM) drivers or ASIO drivers to communicate
with physical audio devices. Don’t use ASIO drivers unless you need to (for example, to send an
encoded audio stream directly to a Web server).
To use the ‘main’ (or only) output of a physical audio device, choose its default device
(devicename - default) in preference to its equivalent ‘named’ output (devicename - outputname).
Incidentally, if you have multi-channel audio files such as 5.1 files in Ogg Vorbis format, mAirList
can play these out in full 5.1 stereo if you select the default output of the 5.1 card for the Players.
Obviously this means you cannot also use the same 5.1 card as three separate output pairs.
7.5.2
Troubleshooting Output Problems
Most output problems occur either when you change device settings, or ‘suddenly’ at a later time.
‘Sudden’ problems with a device output which has proved reliable are invariably solved by normal
audio fault-finding: check cables for continuity, check the sound card itself is not faulty, etc.
Changing device settings in mAirList can reveal other ‘problems’ which are more subtle but are
equally easy to solve. Obviously we cannot cover every potential problem in this Manual, but we list
a few well-known ones below.
7.5.2.1
Multi-channel Sound Cards
The two most frequent problems with multi-channel sound cards are: a) some channels are not
shown in the Devices dropdown; and b) no output from ‘some’ channels on the card. You can
usually solve both of these problems by following the steps below, in the order shown.
18
1.
In Windows Settings (or Control Panel), check the Speakers selected for the sound card.
For example, for a 5.1 card, make sure it has a 5.1 Speakers setup instead of (for example)
Desktop stereo speakers. Windows can ‘hide’ the extra outputs from applications
(including mAirList) if you select a two-channel speaker configuration.
2.
If the Windows Speakers setup is correct, but there is still no output from mAirList, (or if the
outputs are still not shown as Device selections), close mAirList, switch on
Force multichannel output for the card (see 7.13.2 on page 74), then re-open mAirList.
3.
If the Windows Speakers setup is correct, but there is still no output from mAirList, (or if the
outputs are still not shown as Device selections), close mAirList, switch on the Ignore
speaker assignment setting for the card (see 7.13.2 on page 74), then re-open mAirList.
4.
If there is still a problem, try the suggestions below for All Sound Cards. If one of those
solves your problem, try switching off the two settings above (one at a time) to see whether
either setting is still required; if not, leave them switched off.
Strictly speaking, mAirList uses the Windows DirectSound interface, so older MME drivers are also supported.
Saved at 02:16:00 on 6 Jul 2011
Revision 19
54
mAirList Version 3.1 User Manual (UK English)
7.5.2.2
All Sound Cards
Output is non-existent, noisy, or ‘scratchy’ (WDM drivers only)
Some sound cards (including some sound ‘cards’ built in to the computer’s motherboard) do not
produce audio output correctly unless specific features of the BASS audio engine used internally by
mAirList are enabled or disabled. Because every sound card is different, this is a ‘trial and error’
process. The settings to try (change these one at a time) are described in section 7.13.2 on page 74:
•
•
•
•
Disable hardware mixing (BASS_SAMPLE_SOFTWARE)
Use application-level software mixing
Use single multichannel link for software mixing
Use floating point data (BASS_SAMPLE_FLOAT)
Output pairs are ‘mixed up’ (WDM and ASIO drivers)
mAirList numbers output channels on a sound card in the order Windows reports them, which is the
order the sound card’s device driver reports the channels to Windows. Sometimes, this order is
‘wrong:’ for example, the channels listed as front 1/2 in the mAirList Devices dropdown may actually
be the Rear (3/4) speaker outputs on the card; or testing shows that left and right channels are
reversed. Although annoying and frustrating, these are not mAirList or Windows problems or bugs;
however, check that you are using the most recent driver software for your sound card.
Noticeable delay and/or large CPU overhead when starting items (WDM drivers only)
Some sound cards take a few (or few hundred) milliseconds to ‘open’ before they can play audio.
If you have this problem, one solution to try is to force your sound card to remain ‘open’ in the BASS
audio engine used by mAirList even if the card is idle, thus avoiding the delay when it is re-opened.
To do this, switch on the Keep device open setting for the card (see 7.13.2 on page 74).
NOTE: If CPU overhead is the problem, your video card might be too slow to cope with all the
redraws when items start, especially if you use countdown overlays and multiple progress bars, and
particularly in automation mode. If you are using a video ‘card’ built-in to your computer’s
motherboard, this is definitely worth checking. Consider installing a faster video card or, if you have
a spare video card available, try it out and see if it makes a difference.
Cue Point markers and/or item durations are ‘wrong’ (WDM and ASIO drivers)
This is not a sound card problem, it is an inherent problem if you use variable bit-rate audio files.
BASS almost always reports inaccurate durations, and inaccurate Cue Markers, for variable bit rate
audio files unless the High precision cueing for VBR files (BASS_STREAM_PRESCAN) setting for
your sound card (see 7.13.2 on page 74 for WDM, 7.13.3 on page 75 for ASIO) is on.
Revision 19
Saved at 02:16:00 on 6 Jul 2011
mAirList Version 3.1 User Manual (UK English)
7.6
55
GUI
These settings affect the general appearance of the mAirList GUI.
7.6.1
Settings
If your mAirList computer has two or more monitors, you can change the Window position setting
(default: Default) to Maximise on monitor 1, Maximise on monitor 2, … etc.
Use the Show GUI in language setting (default: blank) to choose the language used in mAirList
menus, dialogs, etc. If this setting is blank, mAirList auto-detects your computer’s default language
from the Regional and Language Options in Windows Settings (or Control Panel). You can override
automatic language detection by selecting a language from the drop-down.
To choose an English language from the list, select en_GB for UK English and en for US English.
Use the Global progress bar update interval setting (default: 100 mS = 1/10 second) to choose the
refresh time for the optional global progress bar (see 7.6.4 on page 57). The default value of 100 mS
gives a ‘fluid’ progress bar movement on most computers, without crippling either the CPU or the
video card. For the same reasons, we strongly recommend that you do not reduce this value.
7.6.2
Options
Remember window size and position (default: on)
If this setting is on, the mAirList window size and position are saved in the positions.ini file, and are
restored when mAirList opens.
If this setting is off, the default mAirList window size and position are used when mAirList opens.
Show status bar (default: on)
If this setting is on, the status bar at the bottom of the mAirList window is shown. The status bar
shows the current time as well as some warning and error messages, including messages from
scripts. Double-clicking the status bar opens the mAirList System Log for browsing.
If this setting is off, the status bar at the bottom of the mAirList window is not shown. Note that this
also removes script message displays and the ability to browse the mAirList System Log.
Show save confirmation (default: on)
If this setting is on, an extra confirmation message box is shown before you save any file, and also
when mAirList is closed and any part of the desktop (such as Playlist contents) has changed since
mAirList was opened.
If this setting is off, files are saved immediately and no message box is shown when mAirList is
closed, even if the desktop has changed since mAirList was opened.
Minimise to tray (default: off)
If this setting is off, the mAirList window minimises to a Taskbar button.
If this setting is on, the mAirList window minimises to a System Tray icon.
Open and Save buttons apply to first playlist (default: off)
If this setting is off, the Toolbar Open and Save buttons open and save the ‘desktop’
(see 5.3 on page 32 for more details);
If this setting is on, the Toolbar Open and Save buttons open and save the first Playlist.
Use small icons (default: off)
If this setting is off, the mAirList Toolbar and Browser Toolbar icons are 22×22 pixels in size.
If this setting is on, the mAirList Toolbar and Browser Toolbar icons are 16×16 pixels in size.
Saved at 02:16:00 on 6 Jul 2011
Revision 19
56
mAirList Version 3.1 User Manual (UK English)
7.6.3
Browser
These settings affect the appearance and behaviour of the Browser.
7.6.3.1
Browser Options
Save within desktop files (.mld) (default: on)
If this setting is on, the Browser contents and settings are saved as part of a Desktop file.
Save within desktop templates (.mlt) (default: on)
If this setting is on, the Browser contents and settings are saved as part of a Desktop Template file.
Keep open when starting a new desktop (default: on)
If this setting is on, the Browser is unaffected when the New button on the main Toolbar is clicked.
If this setting is off, the Browser is closed and a new, empty Browser is opened when the New button
on the main Toolbar is clicked.
Always show Recycle Bin (default: on)
If this setting is on, the Browser contains a Recycle Bin pane when it is created (when mAirList
opens, and when the New button on the main Toolbar is clicked).
Show panes as tabs (default: off)
If this setting is on, Browser panes are shown as tabs.
If this setting is off, Browser panes are shown as a stack of coloured panes.
Allow stack of panes to be minimised (default: off)
This setting has no effect if Show panes as tabs is on.
If this setting is on, a splitter bar is shown above the stack of pane names. Drag the splitter bar
downwards to shrink the stack of pane names to a row of icons. This maximises the display area of
the currently Browser pane.
Show file durations (may be slow) (default: on)
If this setting is on, Folder and Folder Tree panes show the Duration of each audio file. Because
mAirList has to open each file to do this, it can cause slow performance, especially if the folder or
folder tree contains a large number of audio files.
Auto update folder contents (default: on)
If this setting is on, Folder panes auto-update to reflect changes to their contents.
If this setting is off, Folder panes are ‘static’ and only update when closed and re-opened.
Keep search history (default: on)
If this setting is on, the Database Search pane in the Browser keeps a history of recent searches.
To repeat a recent search, select it in the dropdown list and press Enter.
Enable autocompletion for search history (default: on)
If this setting is on, the Database Search pane in the Browser uses the history of searches to suggest
search terms as you type. You can accept the suggested term at any time by pressing Enter.
7.6.3.2
Additional File Extensions
mAirList recognises the standard file extension of every audio file format it can play (see 9.1 on
page 93). Files with other file extensions are not recognised as audio files and are not listed in
Browser panes, file open dialogs, database synchronisation, etc., unless you type the extensions,
separated by spaces, into the Additional File Extensions box.
For example, to add .mpg, .mpeg, and .pre file extensions, type mpg mpeg pre into the box.
mAirList determines the audio file format of files with non-standard file extensions when you open
them. You don’t need to ‘associate’ any extension with an audio file format, but you do need to
ensure that all files with a non-standard file extension contain audio in a format which mAirList can
recognise and play (see 9.1 on page 93).
For example, if you save all your pre-recorded programmes, interviews, etc. with a .pre extension, it
doesn’t matter whether those files are in MP3, OGG, or WAV format.
7.6.3.3
Quick Folders
Use the Quick Folders list to add frequently-used folders as items at the end of the Browser Add
menu, so you can quickly open them in a Browser folder pane without having to navigate the folder
tree dialog. When clicked, a Quick Folder menu item opens a folder pane in the Browser.
Use the Add… and Remove buttons to manage the Quick Folders list.
Revision 19
Saved at 02:16:00 on 6 Jul 2011
mAirList Version 3.1 User Manual (UK English)
7.6.4
57
Progress Bar (global progress bar)
Separate progress bars on Playlists, Players, and Cartwall Players can confuse some users.
You can optionally create a ‘global’ progress bar which tracks the most recently started Player.
The settings on this page affect the ‘global’ progress bar, and are identical to those on the
Progress Bar tab for a Player (see 7.2.5 on page 49), with two extra settings:
Auto-hide when inactive (default: off)
If this setting is off, the global progress bar is shown as ‘empty’ when no Players are playing.
If this setting is on, the global progress bar is not shown when no Players are playing.
Ignore cartwall (default: on)
If this setting is on, the global progress bar does not track the progress of Cartwall Players.
If this setting is off, the global progress bar tracks the progress of Cartwall Players.
Saved at 02:16:00 on 6 Jul 2011
Revision 19
58
mAirList Version 3.1 User Manual (UK English)
7.6.5
Custom Screen Objects
As well as the standard mAirList ‘screen objects’ (Toolbar, Players, Playlist, Cartwall, Browser, etc.),
you can optionally add custom screen objects. Custom Screen Objects are shown either above or
below the Browser unless you create a custom layout (see Layout Designer on page 103).
In mAirListConfig, you specify basic settings for each Custom Screen Object, such as font size, show
at top/bottom of Browser, etc. If you create a custom layout (as mentioned above), you can specify
more settings, such as the font colour and style (normal, bold, italic, or bold italic).
There are thirteen types of Custom Screen Objects, which are briefly described in the table below.
You can add as many of each type of object as you wish, but you are unlikely to want (for example)
more than one LED Clock object in the mAirList window.
•
•
•
•
•
To add a Custom Screen Object, click Add…, select the object type from the menu, edit the
object (see below), then click OK or Cancel.
To edit a Custom Screen Object, select it, then click Edit, make changes in the Edit dialog
(see below), and click OK or Cancel. The Edit dialog contains a sample which shows you
how the Custom Screen Object looks with your changes applied.
To delete a Custom Screen Object, select it, then click Remove.
To change the display order of Custom Screen Objects, select an object from the list, then
click Up or Down to move it.
To sort the list so that ‘top’ items are listed above ‘bottom’ items, click Sort.
Screen Object Type
Description
Date or time
The current date and/or time of day.
LED Clock
A clock similar to a hardware LED studio clock.
Countdown to top of the hour
A countdown timer to the next ‘top of the hour’ or ‘o’clock.’
Countdown to next event
A countdown timer to the next scheduled event
(see Event Scheduler on page 29).
Player countdown
A configurable Player countdown timer with more options
than the standard Player countdown overlay.
Comment Viewer
Shows the Comments of any Playlist item dropped on it.
On Air Status
The static text ON AIR or OFF AIR, according to the current
on-air/off-air status of mAirList.
On Air Switch
Same as On Air Status object above, but you can also click
the object to toggle the current on-air/off-air status.
Button
A custom button which runs an Action List when clicked.
Static Text
Any ‘fixed’ text, such as your station name or frequency.
Image
Any image file, such as your station logo.
PFL Player
A ‘mini’ PFL Player which PFLs any item dropped on it.
Streaming encoder status
A small window showing the current encoder status.
Table 7.4: Custom Screen Object Types
Notes:
• On-Air Status and On-Air Switch: The Switch object toggles on-air/off-air status when
clicked, while the Status object is purely a display. If you only use the Status object, you
must use a mAirList Remote Control (see 7.7 on page 59) to toggle on-air/off-air status.
• Image: mAirList stores only the image file name (not the image itself). If you move the image
file to a different folder, it is not shown in mAirList.
7.6.5.1.1 Edit dialog
The Edit dialog box for each type of Custom Screen Object is slightly different, showing only the
appropriate settings for that Custom Screen Object. Most of these settings are obvious, such as the
Change Font… button, Alignment, or the Dot colour setting for an LED Clock object. The settings
which are less obvious are listed below.
Revision 19
Saved at 02:16:00 on 6 Jul 2011
mAirList Version 3.1 User Manual (UK English)
59
7.6.5.1.2 Countdown tab (Player Countdown object only)
Countdown Type: Six Player countdown types are available: Remaining time, Elapsed time,
Duration, Remaining ramp, EOF warning, and Remaining time to outro.
Show only nearest ramp: (Ramp countdown only) Same as the Player setting (see page 48).
Show EOF warning after effective end: (EOF warning countdown only) Continue to display the
warning after the effective end of an item.
7.6.5.1.3 Appearance tab
Time Format: A mAirList time format string (see Table 7.2 on page 44).
Text Format: Any text. %s represents the formatted time and/or date. For example, to show an event
countdown as n:ss to next event, change its Text Format to %s to next event.
When clicked, execute command: (Static text object only) Select the command (or type the
command set) to be executed when the text object is clicked.
7.6.5.1.4 Actions tab (Button object only)
Use this tab to specify the Actions (see 4.1 on page 25) to be executed when the button is clicked.
7.6.5.1.5 Advanced tab
Position (default: Top): Select Top or Bottom to display the object above or below the Browser.
Automatically hide or minimise: Self-explanatory.
Remote ID: A unique arbitrary text name (ID) for the control, which you can use in a mAirList script
to associate the control with script code which is run when the control is clicked.
7.7
Remote Control
You can operate mAirList using only a mouse (or a touch screen), but most users also need various
functions to be operated ‘remotely:’ that is, not directly on your mAirList computer. A classic
example is ‘fader start,’ where lifting a fader on your mixer also starts the associated mAirList Player.
mAirList supports many more types of Remote Controls than this obvious example.
By default, Remote Controls do not work in the mAirListDB and mAirListTag programs, but you can
easily change this (see 0 on page 72 for details).
All Remote Controls in mAirList work in the same way. When you create a Remote Control, you link
it to one or more mAirList commands; when the Remote Control is operated, mAirList processes
those commands. For example, the command START PLAYER 1-2 starts the second Player in the
first (or only) Playlist.
The Remote Control dialogs in mAirListConfig contain dropdowns which list most of the commands
available, but you need to type in some commands yourself. A Remote Control which runs a
mAirList script is an obvious example. Similarly, if you want a Remote Control to run more than one
command, you have to type in the ‘extra’ command(s) yourself.
A list of mAirList commands is in Appendix A, beginning on page 125.
Most Remote Control types allow you to set up multiple items in the same list entry. For example,
you can set up several Hotkeys in a single list entry.
Note that you can add multiple list entries of the same type, allowing you to ‘group’ sets of
Remote Controls. This is useful if you are evaluating a new device such as a custom keyboard: you
can set up an extra list entry containing only the Remote Controls for that device, making it easier to
modify or remove those Remote Controls later. Another use for multiple list entries is to set up
(for example) more than one MIDI port or serial port on your computer for Remote Control.
•
•
•
To add a Remote Control type, click Add…, choose a Remote Control type from the menu,
then configure it as described below.
To modify a Remote Control type, or to add or remove settings within that type of
Remote Control, select it in the list, click Configure, then configure it as described below.
To remove a Remote Control type, select it in the list, then click Remove.
The ten types of Remote Control, and the settings available for each type, are described below.
Saved at 02:16:00 on 6 Jul 2011
Revision 19
60
mAirList Version 3.1 User Manual (UK English)
7.7.1
Hotkeys (local)
A local hotkey is a keyboard key which operates as a mAirList Remote Control only when the
mAirList window is the ‘active’ window: the hotkey is ignored by mAirList if another application is
the ‘active’ window.
The term ‘keyboard key’ includes any switch or key on any device which acts like a computer
keyboard, including custom keyboard devices such as EPOS keyboards.
mAirList treats each shift state and combination of shift states as a separate key, so for example, K,
Shift+K, Ctrl+Shift+K, and Alt+K are all separate keys.
On the Hotkeys Configuration dialog:
•
•
7.7.2
To add a hotkey to the list, click the Shortcut: text box, then press the key or shifted key you
want to add, then click Add.
To delete a hotkey from the list, click the Command column in the row you want to delete,
then click Delete.
Hotkeys (system-wide)
A system-wide hotkey is a keyboard key which operates as a mAirList Remote Control at any time,
regardless of which window is ‘active.’ System-wide hotkeys are otherwise identical to local hotkeys,
and you configure them in exactly the same way.
7.7.3
Serial Port
The Serial Port Remote Control accepts mAirList commands as plain ASCII text sent to one of your
computer’s serial ports (for example, COM1). Each command or set of commands must end with a
CR character (ASCII code 13, or 0D hex).
The only setting on the dialog for the Serial Port Remote Control is a dropdown where you choose
the serial port you want to use. To configure serial port settings such as parity, see 7.12.6 on page 71.
7.7.4
MIDI
The MIDI Remote Control associates mAirList commands with specific MIDI messages sent to one
of your computer’s MIDI IN ports.
On the MIDI Configuration dialog:
•
•
•
Revision 19
Select a MIDI device from the Device dropdown.
To add a MIDI Message to the list, you can type the command manually and then click Add;
but the easier method is to tick the Capture checkbox, then operate your MIDI controller or
other device and allow mAirList to ‘capture’ the MIDI message for you, then click Add.
If you wish—and if you understand MIDI Message formats—you can manually edit the
captured MIDI Message before you click Add. All parameters are in hexadecimal. The Data2
value is preceded by a dropdown where you can choose whether that value is equal to, less
than, or greater than the Data2 value; this is useful for MIDI devices like touch-sensitive
keyboards, which may generate a range of values for Data2.
To delete a MIDI Message from the list, click the Command column in the row you want to
delete, then click Delete.
Saved at 02:16:00 on 6 Jul 2011
mAirList Version 3.1 User Manual (UK English)
7.7.5
61
Joystick/Gamepad
The Joystick/Gamepad Remote Control associates mAirList commands with button presses or
button releases on any joystick or gamepad device installed on your computer. Note that you must
install the device before you open mAirListConfig. We also strongly suggest that you use
Game Controllers in Windows Control Panel to test all the device’s buttons before you open
mAirListConfig.
Most mixers which have external connections to switch contacts for fader start, PFL switching, etc.
can be easily and cheaply interfaced to your computer by connecting them directly to the contacts
on a USB gamepad’s circuit board. Typical gamepads allow eight or ten switches to be interfaced.
On the Joystick/Gamepad Configuration dialog:
•
7.7.6
Select a joystick or gamepad device from the Device dropdown. mAirList automatically
shows all the device’s buttons in the lists on the Button Pressed and Button Released tabs
(you cannot modify these lists). You can then assign commands to any button.
IO-Warrior
IO-Warrior is a USB device made by Code Mercenaries Hard-und Software GmbH. The three models
available provide 16, 32, or 50 input and output ports, making them well-suited to installations
where a converted USB gamepad does not provide enough inputs.
7.7.7
SAS
19
SAS is a proprietary communication protocol provided on digital broadcast mixers manufactured
by Lawo AG, including the diamond, zirkon, and crystal series. SAS allows these devices to ‘connect’
directly to external systems such as mAirList.
The SAS Remote Control refers specifically to SAS when connected via a serial port on your
computer. Note that like any other serial port interface, you must configure the serial port settings in
mAirList. See 7.12.6 on page 71 for details.
If your Lawo mixer is connected to your computer via a network (TCP/IP) port, use the SAS over IP
Remote Control.
7.7.8
SAS over IP
The SAS over IP Remote Control refers specifically to SAS (see 7.7.7 above) when connected to your
computer via a network (TCP/IP) port.
If your Lawo mixer is connected to your computer via a serial port, use the SAS Remote Control.
7.7.9
Window Message Client
The Window Message Client Remote Control associates mAirList commands with incoming
Window Messages: short numeric messages which applications can send to one another internally
within Windows.
7.7.10
Barth D.MAX Serial Interface
D.MAX is a digital broadcast mixer and control surface manufactured by Barth KG. It includes a
serial interface which transmits switch press and fader movement information to external systems
such as mAirList.
Note that like any other serial port interface, you must configure the serial port settings in mAirList.
See 7.12.6 on page 71 for details.
19
Lawo’s English documentation refers to this protocol as RAS. SAS is its (original) name in German.
Saved at 02:16:00 on 6 Jul 2011
Revision 19
62
7.8
mAirList Version 3.1 User Manual (UK English)
Logging
Logging means the log entries which mAirList can create when each item played out is started and
stopped (sometimes also known as ‘playout logging’). This is separate from the mAirList System Log
(see 7.12.10 on page 73), which logs internal events (such as when mAirList is opened and closed).
Almost every station requires a log of all music played, including its actual broadcast duration, to
comply with the requirements of the local music licensing agencies, such as the Harry Fox Agency in
the USA, GEMA in Germany, or PPL and MCPS/PRS in the UK.
Playout logs can also assist in the running of your station. For example, whether a presenter has
played too many songs by the same artist, to quickly answer listener enquiries (‘What was the third
song you played after the news at noon?’), or to ‘prove’ the playout of ads. to clients.
You can also use logging to send ‘now playing’ information to an HTTP location such as a Web site,
or to a text file or database ‘feeding’ an RDS encoder, or to be encoded into mAirList’s Icecast2 audio
output stream. Note that mAirList’s internal Shoutcast and Icecast2 stream encoders automatically
updates Title and Artist information, so you should not use playout logging to do this unless you are
using a Shoutcast or Icecast2 stream encoder outside of mAirList.
7.8.1
Log Types
Note that you can add several log types, so for example, you could have a fully detailed log file,
another log file containing only the last log entry (say, to ‘feed’ a PHP script), Icecast2 logging, and
log records being written to a remote SQL database, all running at the same time.
•
•
•
To add a Logging type: click Add…, choose a Log type from the menu,
then configure it as described below.
To modify a Logging type, or to change its settings: select it in the list,
click Configure, then configure it as described below.
To remove a Logging type: select it in the list, then click Remove.
The simplest and arguably the most flexible type of log output is a plain text file. This is often used to
‘feed’ other processes, such as spreadsheet import, or a process to update a Web site or a database.
The log entries are free-format and you can use logging variables in them (see 7.8.2 on page 63). You
can also use logging variables in the log file name.
You can log direct to a SQL database by sending it executable SQL statements, but subsequent
logging may be delayed if mAirList cannot connect to your database server; therefore you may prefer
to use a log file instead, plus an external process to ‘import’ the log file into the database. If you use
SQL logging, you can use logging variables (see 7.8.2 below) in your SQL statements.
HTTP GET logging requires a suitable ‘receiving process’ to exist, such as a PHP script,
a DHTML page, or an ASP page. You can use logging variables in the parameters you send.
Shoutcast and Icecast2 logging sends Title and Artist update information to the stream server, to be
shown on the listener’s player, but you can use any logging variables in the log entry you send.
Unlike all other logging types, these entries are sent only when an item is started.
Revision 19
Saved at 02:16:00 on 6 Jul 2011
mAirList Version 3.1 User Manual (UK English)
7.8.2
63
Logging Variables
In all log types, you can use variables, which are replaced by their values at the moment a log entry
is written or sent. For example, when an item by Talking Heads starts playing, the variable %a in a
log entry, SQL statement, etc. is replaced by the text Talking Heads. Note that you can also use
variables in the Filename for the Log file type (see 7.8.3 on page 64), and in many other places in
mAirList, such as in Actions (see 4.1 on page 25). A complete list of the variables is shown below.
Log Variable
Description
%t
Tab character (ASCII character code 9)
%Y
Current year (four digits)
%y
Current year (two digits)
%M
Current month (two digits)
%D
Current day of the month (two digits)
%h
Current hour (two digits)
%m
Current minute(two digits)
%s
Current second (two digits)
%T{string}
Restricted to …
Formatted current date/time:
string is a time format string (see Table 7.2 on page 44).
%e
Broadcast duration (seconds and milliseconds)
Stop Entry Format
%d
Broadcast duration (1/10,000,000 second units)
Stop Entry Format
%1
File name including drive and full path
Audio file items
%2
File name and extension (no drive or path)
Audio file items
%3
File name (no extension)
Audio file items
%a
Artist(s)
%b
Title
%i{tag}
Value of a file’s tag: tag is the tag name
(for example: TALB is the MP3 Album tag’s name)
%C
mAirList Comment/Description
%J
mAirList Type (Station ID, Music, Voice Track, etc.)
%I
mAirList internal Type (StationID, Music, Voice, etc.)
%u{attr}
%E
%c{point}
Audio file items
mAirList Attribute value: attr is the attribute name
mAirList Ending Type value
mAirList Cue Marker time in 1/10,000,000 seconds
point is the Cue Marker name (Cue In, Outro, etc.)
%g
mAirList internal GUID of this playout of the item
(items have a different GUID each time they are played)
%U
mAirList DB internal (unique) ID number
mAirListDB items
%X
mAirList DB external ID value
mAirListDB items
Table 7.5: Logging Variables
Notes:
• All variables begin with the % character, followed by a letter or number, and sometimes
followed by more information enclosed in braces { }.
• The case of the letter after % must be typed exactly as shown. For example, %m is the
current minute of the hour, but %M is the current month shown as two digits.
• Variables are usually part of a longer string. Other characters in the string are interpreted
literally, so the string %Y-%M-%D log.txt would become (for example) 2011-11-27 log.txt.
• Use %t (an ASCII tab character) to separate items in the log entry if you want to create
a tab-delimited file suitable for direct import into a spreadsheet or database application.
• The Restricted to … column shows ‘restrictions’ on a log variable. For example, some
variables only have a value when they are in a Stop Entry Logging string, or only when the
item being logged is an audio file.
Saved at 02:16:00 on 6 Jul 2011
Revision 19
64
mAirList Version 3.1 User Manual (UK English)
7.8.3
Log File
This Logging type writes log entries to a plain text file.
Filename is the fully-qualified name of the file, and can include logging variables. A commonly-used
filename is drive:\path\%Y-%M-%D.LOG. This creates a new log file each day.
Overwrite this file each time a log entry is written (default: off): Turn this setting on if you want to
create a new log file each time an entry is written. You may want to do this if, for example, you are
creating a text file which is used to update an RDS encoder or a Web page.
Start Entry Format is the format of the log entry written when an item is started in mAirList.
Stop Entry Format is the format of the log entry written when an item is stopped in mAirList.
This includes items which are ‘stopped’ by reaching EOF.
Entry Formats can (and almost always do) include logging variables. To prevent Start or Stop
20
logging, clear the entry format, making sure that you do not leave any spaces in the box.
7.8.4
SQL Database
Because subsequent mAirList logging may be delayed if mAirList cannot connect to your database
server, you may prefer to write SQL statements to a log file for later processing by your database server
instead of writing direct to the database.
This Logging type submits SQL statements to a SQL database server for immediate processing.
The ZeosLib library used by mAirList to do this supports a number of SQL server types: to view a list
of the supported server types, click the List of supported protocols… button on the dialog. Note that
the version numbers in the list are the version numbers of the client DLL you use to connect to the
server, and not the version of the database server itself.
In a default installation, mAirList only provides PostgreSQL version 7 and SQLite version 3 client
DLLs, because these are the client DLLs required by mAirListDB. If you need to connect to a
different type of database server, you must ensure that you have the correct client DLL installed,
either in your mAirList program folder, or in a folder which is in your computer’s ‘path’ (that is:
accessible by all programs). Please also check that your database server’s licensing allows you to use
the client DLL.
URL defines both the type of database server and the location of the database you want to use, in the
form protocol://host[:port]/database, where:
Protocol is the type of database server: to view a list of the supported server types, click the List of
supported protocols… button on the dialog. So for example, if your database is a SQLite version 3
database, you would type sqlite-3 as the protocol. Note that this is the version of the client DLL you
use to connect to the server, and not the version of the server itself.
Host is the network name of the database server, optionally followed by a port number.
Database is the name of the database within your SQL server.
User and Password are the SQL user name and password you want mAirList to use when connecting
to your database. You can leave these fields blank if your database server does not require a login.
SQL Statements (On Start and On Stop) are the SQL statements you want to write when an item is
started or stopped in mAirList. If you only want one type of logging, leave the other box blank.
Usually, the SQL Statements are either SQL INSERT statements or statements which call a stored
procedure. These statements can (and almost always do) include logging variables. Note that
mAirList adds quotes around each logging variable in the generated statements, so the following
SQL statement in the dialog:
•
INSERT INTO playlist (starttime, artist, title) VALUES (NOW(),%a,%b)
creates a generated SQL statement like:
•
20
Revision 19
INSERT INTO playlist (starttime, artist, title) VALUES (NOW(), ‘Madonna’, ‘Vogue’)
If you leave spaces in the Entry Format box, mAirList writes a log entry containing only spaces.
Saved at 02:16:00 on 6 Jul 2011
mAirList Version 3.1 User Manual (UK English)
65
This means that if you want to combine logging variables into a single value, you must use the SQL
CONCAT function. For example, the following SQL statement in the dialog:
•
INSERT INTO playlist (starttime, song) VALUES (NOW(), CONCAT(%a, ‘ - ‘,%b))
creates a generated SQL statement like:
•
INSERT INTO playlist (starttime, song) VALUES (NOW(), ‘Madonna - Vogue’)
Be careful which logging variables you include in a SQL Statement: ensure that every logging
variable you specify will have a valid value when the SQL statements are generated.
7.8.5
HTTP GET
HTTP GET Playout Logging requires a PHP or similar script; an ASP or DHTML or other ‘scripted’ Web
page or similar; or any other process which can accept parameters specified as part of its URL.
This Logging type uses an HTTP GET call to send information to a Web server. It is often used (for
example) to run a server-side script to update ‘now playing’ information on a public Web site.
Base URL is the URL of the page or script. For example: http://myserver.com/script.php
Parameters is the list of parameters (names and values) to be added to the Base URL when the
HTTP GET call is generated. For example: a name of artist with the value %a, a name of title with the
value %b, and using the example Base URL above, creates an HTTP GET call like:
•
http://myserver.com/script.php?artist=Madonna?title=Vogue.
You can specify as many parameters as you wish. Press Insert or the down-arrow key to add lines;
blank out both Name and Value to delete a line.
Authentication allows you to optionally add a User and Password if you need to use these to access
your Web server. Otherwise, leave these boxes blank.
Tick the Scope checkboxes to specify whether the HTTP GET call is to be made when an item starts,
stops, or both. If you want to use different HTTP GET calls when items start and stop, note that you
need to add two HTTP GET Logging items: one for start and one for stop.
7.8.6
Shoutcast
Shoutcast Playout Logging is only needed if you use an external Shoutcast audio stream encoder (for
example, you use a mixer to mix mAirList output with other sources, then encode the mixer output on
a separate computer). The built-in mAirList Shoutcast encoder streams title updates automatically.
This Logging type sends information to an external Shoutcast audio stream server when an item
starts. Stop logging is not possible in Shoutcast audio streams.
Server URL is the URL of the external Shoutcast audio stream server.
For example: http://myshout.com:8000
Password is the stream or admin password for the external Shoutcast audio stream server. This is
transmitted as a parameter in the URL.
Log Format is the title update information you want to send to the external Shoutcast audio stream
server when an item starts; usually, this information includes logging variables for title, artist, etc.
You can optionally delay these updates by a number of seconds so that they are in sync.
7.8.7
Icecast2
Icecast2 Playout Logging is only needed if you use an external Icecast2 audio stream encoder (for
example, you use a mixer to mix mAirList output with other sources, then encode the mixer output on
a separate computer). The built-in mAirList Icecast2 encoder streams title updates automatically.
This Logging type sends information to an Icecast2 audio stream server when an item starts.
Stop logging is not possible in Icecast2 audio streams.
Server URL is the URL of the external Icecast2 audio stream server.
For example: http://myshout.com:8000
Mount point is the name of the Icecast2 mountpoint for which your encoder is acting as a source
This is needed because Icecast2 supports more than one stream.
For example: /myFM.ogg or /128k.mp3.
User Name and Password is the stream or admin user name and password for the external Icecast2
audio stream server.
Log Format is the title update information you want to send to the external Icecast2 audio stream
server when an item starts; usually, this includes logging variables for title, artist, etc. You can
optionally delay these updates by a number of seconds so that they are in sync.
Saved at 02:16:00 on 6 Jul 2011
Revision 19
66
7.9
mAirList Version 3.1 User Manual (UK English)
Databases
These settings connect one or more audio databases for use by mAirList.
An audio database contains lists of audio files and information (metadata) about the files, such as
title, artist, and album; and it may contain playlists as well. mAirList supports several types of audio
databases, but the built-in mAirListDB database was specifically developed to store all the metadata
used by mAirList; such as Cue Markers, whether a file should be excluded from logging, etc. If you do
not already use an audio database, we strongly recommend that you create a mAirListDB database
as described in mAirListDB Audio Database, beginning on page 105.
You can search any audio database connected to mAirList from the Browser, and you can also add
Browser tabs to show an individual audio database’s contents; for mAirListDB and iTunes audio
databases, you can add a Browser tab to show the stored playlists it contains.
•
•
•
•
To add a database connection: click Add…, choose a database type from the menu,
then configure it as described below.
To remove a database connection: select it in the list, then click Remove.
To modify a database connection, or to change its settings: select it in the list,
click Configure, then configure it as described below.
To test a database connection: select it in the list, then click Test.
The rest of this section contains descriptions of each supported audio database type.
All database connection Configure/Setup dialogs contain two or more tabs, including an Advanced
tab in which you can type a Custom Caption or ‘user-friendly’ name for the database which is
shown by mAirList in (for example) the Browser.
Most of the database connection Configure/Setup dialogs contain a Connection tab, where you
specify the Protocol (server) type, host (computer name) and database name, and login information.
You should be able to obtain this information from your database documentation.
7.9.1
mAirListDB (network mode)
See mAirListDB Audio Database, beginning on page 105.
7.9.2
mAirListDB (local mode)
See mAirListDB Audio Database, beginning on page 105.
7.9.3
Script
In a similar way to a notification script (see 7.10 on page 68), a Script database is a mAirList script
containing procedures that are run when the user (or mAirList) browses, searches, or retrieves data
from the Script ‘database;’ for example, loading a Database playlist. The script can retrieve these
data from any desired source, such as an external SQL database or a music scheduler product.
Describing how to write such a script is outwith the scope of this manual, but a ‘template’ script, and
a working example script to access an eldoDB database, are in the scripts\database folder in your
mAirList root data folder. For further advice or assistance, please use the mAirList Forum.
7.9.4
eldoDB
eldoDB is a now-obsolete database, hosted on a MySQL server, which was shipped with early
versions of mAirList. To connect to an eldoDB database, you need a copy of the appropriate MySQL
client DLL in your mAirList program directory (see the eldoDB documentation for details).
On the Settings tab, you must also specify the Base Folder (‘root directory’) of your eldoDB
Music Archive, as seen from your mAirList computer.
7.9.5
radioDB2
radioDB2 is a database programmed as an add-on for mAirList by Christopher Kramer, and hosted
on a PostgreSQL server. To connect to a radioDB2 database, you need a copy of the appropriate
PostgreSQL client DLL in your mAirList program directory (see the radioDB2 documentation for
details).
On the Settings tab, you can also specify:
•
Revision 19
Base Folder (‘root directory’) of your audio files, as seen from your mAirList computer.
Saved at 02:16:00 on 6 Jul 2011
mAirList Version 3.1 User Manual (UK English)
67
•
If your radioDB2 database contains absolute path names, use Strip Path to specify the part
of the path which mAirList should remove (strip) from the beginning of file names; leave
Strip Path blank if your radioDB2 database contains relative path names. In both cases,
mAirList uses the Base Folder to access your audio files.
•
Type a slash (/) in Path Delimiter if your radioDB2 database was created on Linux. mAirList
substitutes any slash character in file names with backslashes.
•
Leave Encoding blank unless you need to specify a particular character set to communicate
with your radioDB2 database.
7.9.6
SAM Broadcaster V4
SAM Broadcaster V4 (SAM4 for short) is Internet broadcasting software written by Spacial Audio
Solutions LLC. The database server used to host the SAM4 music database depends on the type of
install. To connect to a SAM4 database, you need a copy of the appropriate database client DLL in
your mAirList program directory (see the SAM4 documentation for details).
mAirList can access a subset of the information stored in a SAM4 database, including the title, artist,
comment, duration, and some Cue Marker data.
7.9.7
On The Fly
An on-the-fly (OTF) database is strictly speaking not a database, but an XML file created by mAirList
when it opens, which you can then use in a Database Search pane in the Browser. This ‘database’
format was created before mAirListDB existed, and you should not use OTF ‘databases’ except for
compatibility with existing mAirList installations: create a local mAirListDB instead.
If you use OTF ‘databases,’ expect mAirList startup to be delayed by several minutes. If you have
configured mAirList is to use Auto Cue (this is the default: see 7.13.4 on page 75), creating an OTF
database invokes Auto Cue for all ‘new’ audio files, delaying mAirList startup even more.
On the Settings tab:
•
Specify the Folder to recursively scan for audio files.
•
Tick the Use cache file checkbox (default: cleared) to save the OTF ‘database cache’ file
(OnTheFlyCache.mlp) when you close mAirList. When you next open mAirList, it reads the
cache file instead of examining each audio file; this usually reduces the mAirList startup
delay significantly.
•
Tick the Automatically re-scan at startup checkbox (default: cleared) to update the OTF
‘database cache’ file (OnTheFlyCache.mlp) each time you open mAirList, to remove missing
files and add new ones (including Auto Cue if enabled). This setting has no effect if the
Use cache file checkbox is not ticked.
NOTE: To re-scan an OTF ‘database’ while mAirList is running, open it in the Browser, right-click its
name, then click Disconnect. Right-click its name again and click Connect. This performs the same
processing as at startup (including Auto Cue if enabled), so it may take some minutes to complete.
7.9.8
iTunes
iTunes is a freeware media player and media database written by Apple Corporation, which stores
audio file information and playlists in a ‘database’ which is an XML file. Usually, this file is named
iTunes Music Library.xml.
mAirList can access the iTunes title, artist, and comment fields, and iTunes playlists.
On the Settings tab:
•
Specify your iTunes Music Library.xml File location and name.
•
If you need to substitute paths to audio files (perhaps because the iTunes ‘database’ is on a
different computer), type the drives and paths in the Replace… and With… boxes.
For example: if the path and file name in iTunes is d:\iTunes\Madonna-Vogue, but this
location would be i:\Madonna-Vogue as viewed from your mAirList computer, type
d:\iTunes in the Replace… box and i: in the With… box.
•
If you want to use iTunes playlists in mAirList (for things like a Database Playlist Browser),
you must specify an Hourly Playlist Pattern (see below). You should ensure that each
iTunes playlist you intend to use in mAirList has a total duration of at least sixty minutes.
Saved at 02:16:00 on 6 Jul 2011
Revision 19
68
mAirList Version 3.1 User Manual (UK English)
Because iTunes playlist names are free form, mAirList needs to know the pattern it should look for
to identify hourly playlists: the Hourly Playlist Pattern. The pattern is built using logging variables
(see Table 7.5: Logging Variables on page 43).
The default pattern is: mAirList-%Y-%M-%D-%h, which means for example that the playlist for
0500 on 11th January 2010 would be named in iTunes as mAirList-2010-01-11-05. If you use a
different playlist naming system in iTunes, change the Hourly Playlist Pattern to match; the Sample:
changes as you type, to show you the generated playlist name for the current hour.
7.9.9
audimark
audimark GmbH are a German marketing company who provide pre-packaged hourly commercial
breaks to German and Austrian Internet broadcasters. Subscribing broadcasters are paid fees for
broadcasting the commercials. See the German language mAirList manual for more details.
mAirList can show audimark commercial breaks in the Browser as a ‘database’ containing one item
per commercial break. mAirList assumes that the audimark software is installed on the same
computer as mAirList, so the only information you need to supply on the Settings tab are your
normal or ‘administrator’ audimark User and Password.
7.10
Notification Scripts
These settings specify the names and locations of any ‘notification’ scripts (see 12.1 on page 119)
which you want to run in the background while mAirList is open.
•
•
7.11
To add a notification script: click Add…, navigate to an choose an .mls file from the dialog,
then click Open.
To remove a notification script: select it in the Notification Scripts list, then click Remove.
Actions
These settings specify Actions (see 4.1 on page 25) which are:
21
• shown as items in the Action menu on the mAirList main toolbar,
• run just after mAirList opens,
• run just before mAirList closes,
• run if the playlist ‘runs empty’ during Automation playback,
• run when entering ON AIR mode, and
• run when entering OFF AIR mode.
To modify any of these Action lists, select the list you want to work with from the dropdown, then
use the toolbar below the dropdown to add, configure, or remove items from the list. To change the
order of list items, drag an item to the position you want.
To rename any item, select it, click Configure, then on the Option tab, specify a Custom Caption.
The item’s name in the Action list changes to the Custom Caption you specify.
We especially recommend that you do this for all Action Menu items, because the Custom Caption
you specify is the menu item’s text in the Action menu.
Tip: To specify a keyboard accelerator for an Action Menu item, precede the accelerator letter in the
Custom Caption with an ampersand (&). For example, the Custom Caption: Add &Icons to items
specifies I as the accelerator, so in the Action Menu, the user can press Alt+I to ‘run’ the Action
(in the Action menu, the menu item would display as Add Icons to items).
If you make any changes to any list, all six lists are saved in your mAirList config folder as the files:
• MenuActions.mla for Actions shown as menu items on the mAirList Action menu,
• OffAirActions.mla for When entering OFF AIR mode Actions,
• OnAirActions.mla for When entering ON AIR mode Actions,
• PlaylistEmptyActions.mla for When Playlist runs empty during automation Actions,
• StartupActions.mla for After Startup Actions, and
• ShutdownActions.mla for Before Shutdown Actions.
21
Revision 19
The Action button and menu do not appear in the mAirList toolbar unless the Action Menu list contains at least one entry.
Saved at 02:16:00 on 6 Jul 2011
mAirList Version 3.1 User Manual (UK English)
7.12
69
Miscellaneous
7.12.1
File Import
The first time you open any given audio file in mAirList —whether by adding the file to mAirListDB,
putting the file into a mAirList playlist or player, or opening the file in mAirList’s file tagging
program—mAirList examines the file to determine information such as artist, title, and duration;
and by default (see 7.13.4 on page 75), mAirList automatically determines the file’s Cue In, Fade Out,
and Cue Out Cue Markers. This process is known as ‘importing’ an audio file.
The File Import Options affect various aspects of file import processing.
Import description from file tags (default: on)
If this setting is on, mAirList imports Genre and Comment tags if they exist in the audio file.
Import file tags as attributes (default: on)
If this setting is on, mAirList imports tags such as Genre, Track Number, Album, and Year as
Attributes. If you use mAirListDB, Attributes are automatically shown as nodes in the Library tree.
Import album artwork from file tags (default: off)
If this setting is on, mAirList imports album artwork if it exists in the audio file’s tags. If it exists,
imported album artwork is shown as the item’s icon in Playlists.
Import Date field in Vorbis Comments as Year (default: off)
If this setting is on, mAirList uses the Date field in an OGG or FLAC file to set the Year Attribute.
Import MusiFile Outro markers as Fade Out (default: off)
22
If this setting is on, mAirList uses the MusiFile Outro marker to set a Fade Out Cue Marker.
The next three options provide compatibility with the file naming convention used by Raduga radio
automation software, where file names end in a ~ character followed by a number
(for example: Kiss - Crazy Crazy Nights~5.mp3). This indicates the number of seconds before end of
file where the next track should be started. mAirList can use this number to set Cue Markers.
Import ~ in filename as Start Next (default: off)
If this setting is on, mAirList uses the number to set a Start Next Cue Marker.
Import ~ in filename as Outro (default: off)
If this setting is on, mAirList uses the number to set an Outro Cue Marker.
Import ~ in filename as Fade Out (default: on)
If this setting is on, mAirList uses the number to set a Fade Out Cue Marker; this takes priority over
the standard mAirList Auto Cue processing for Fade Out (see 7.13.4 on page 75).
Strip leading and trailing whitespace from tag data (default: on)
If this setting is off, any leading or trailing spaces in tag information are not removed.
The next three options allow you to control how mAirList uses ReplayGain tags in audio files.
Import ReplayGain as Amplification (default: on)
If this setting is off, any ReplayGain values in file tags are ignored.
Use Album ReplayGain values if available (default: on)
If this setting is off, track ReplayGain values are used in preference to album ReplayGain values.
Prevent clipping when using ReplayGain amplification (default: on)
If this setting is off, ReplayGain values are not checked for clipping during import.
You can optionally use Central folder for MMD files to specify a folder where mAirList stores all
.mmd files (normally, .mmd files are stored in the same folder as the related audio file). You may
wish to do this to secure your .mmd files from accidental amendment or deletion, or to reduce the
total number of files in folders containing audio files for performance reasons.
You can optionally use Default Item Type for Imported Files to specify a default Type for files.
22
MusiFile is an MP2 audio file format developed by DAVID Systems GmbH which contains cue point information.
These files usually (but not always) have the extension .mus.
Saved at 02:16:00 on 6 Jul 2011
Revision 19
70
mAirList Version 3.1 User Manual (UK English)
7.12.2
File Repository
These settings allow you to specify jingles or other audio files which mAirList automatically adds to a
hook container item when you create it (see 3.3.5on page 24 for more details).
You can specify an opener (played before a set of ‘hooks’), a sweeper (played between each ‘hook’ in
a set), and a closer (played after a set of ‘hooks’).
7.12.3
Attributes
These settings allow you to define custom Attribute names and a set of permitted values for each
custom Attribute, which you can use later when tagging files. For example, you could add an
Attribute named Decade and specify permitted values of pre-1950, 1950s, 1960s, etc. Later, if you
manually add the Decades Attribute name to a file’s Properties, a drop-down is shown in the Value
column on the Attributes tab, from which you can select one of the permitted values.
If you use mAirListDB, Attributes are automatically shown as nodes in the Library tree.
Note that removing custom Attributes from this list does not remove the Attributes from your .mmd
files, internal file tags, or mAirListDB database.
7.12.4
File Management
These settings affect the internal management of audio files.
NOTE: Do not use these settings unless mAirList support staff have advised you to do so, because using
any of these settings can adversely affect mAirList performance. These settings exist only to resolve
specific known problems which occur very rarely.
Enable File Management (default: on)
If this setting is on, mAirList handles all audio file I/O, then passes the loaded audio files to the BASS
engine for playout (this resolves a few rare but specific known problems).
If this setting is off, the BASS engine handles all audio file I/O.
Load entire file into RAM if smaller than (0 = disable) (default: 0)
This setting has no effect if Enable File Management is off.
If your audio files are stored on slow media (for example, on a remote Web server), playout can
‘stutter’ or suffer gaps. Performance may be improved by loading entire files into RAM, up to the
maximum file size you specify. The spin buttons increase/decrease this upper limit in 128KB steps,
or you can type a value into the box. Only values between 0 and 32,767 (inclusive) are allowed.
A value of 0 (the default) disables this feature.
For any value above 0, mAirList loads audio files up to that size into RAM, and loads players from the
RAM copies of the files.
Cache network files (default: on)
This setting has no effect if Enable File Management is off.
If your audio files are stored on a slow network (for example, on a geographically remote file server),
playout can ‘stutter’ or suffer gaps. Performance may be improved by caching network files (making
a temporary copy of the file on the mAirList computer).
If this setting is on, mAirList makes temporary copies on the local disk of any audio files stored on a
network, and loads players from the local copies of the files unless you also specify a
Load entire file into RAM if smaller than size, in which case players are loaded from the RAM copies
of the cached files.
If this setting is off, mAirList loads players directly from the network files, unless you also specify a
Load entire file into RAM if smaller than size, in which case players are loaded from the RAM copies
of the network files.
Revision 19
Saved at 02:16:00 on 6 Jul 2011
mAirList Version 3.1 User Manual (UK English)
7.12.5
71
Runtime Features
These settings allow you to disable specific mAirList features, which are described below.
To disable a feature, clear its checkbox; to enable a feature, tick its checkbox.
By default, all these settings are enabled (ticked) except for Popup menus in folder browsers.
Extra PFL Player
When disabled:
• The PFL and This Playlist…, PFL items are not shown in the playlist context menu.
• Clicking a playlist icon opens the Item Properties dialog General tab (not the PFL tab).
• The Extra PFL item is not shown in the cartwall player context menu.
• Clicking the PFL tab in any Item Properties dialog in any mAirList program shows a
Start PFL button instead of beginning PFL immediately.
Item Properties dialog
When disabled, the Properties item is not shown on the playlist context menu or on the cartwall
player context menu. mAirListTag and mAirListDB are unaffected.
Save to Tag in Item Properties and PFL dialogs
When disabled, the File Tag button is not shown in the Export to… box on the Item Properties and
PFL dialogs in any mAirList program.
Save to MMD in Item Properties and PFL dialogs
When disabled, the Metadata File button is not shown in the Export to… box on the Item Properties
and PFL dialogs in any mAirList program.
Save to Database in Item Properties and PFL dialogs
When disabled, the Database button is not shown in the Export to… box on the Item Properties and
PFL dialogs in any mAirList program. Note that even if this setting is disabled, clicking OK on an
Item Properties dialog in mAirListDB does still save the changes to the database.
Mixdown
When disabled, the Mixdown selection and This Playlist…, Mixdown… items are not shown on the
playlist context menu.
Attributes tab in Item Properties dialog
When disabled, the Attributes tab is not shown on the Item Properties dialog in any mAirList
program. Note that even if this setting is disabled, mAirListDB does show Attributes nodes in the
Item tree on the Library tab if any Attributes are stored in the database.
Popup menus in folder browsers
When enabled, right-clicking any item in a folder browser (including the folder tree in mAirListTag)
opens the standard Windows Explorer context menu.
Option menus in playlist context menu
When disabled, the Options, GUI Options, and Progress Bar sub-menus are not shown on the
playlist context menu.
Option menus in player context menu
When disabled, the Options, GUI Options, and Progress Bar sub-menus are not shown on the
player context menu.
Save default desktop in main toolbar
When disabled, the Save desktop as default template item is not shown on the Save button menu
on the main mAirList toolbar.
7.12.6
Serial Ports
These settings allow you to set the parameters for each serial port used by mAirList (for example, for
serial port logging, or for communication with SAS mixers).
mAirList shows a separate tab in the dialog for each serial port on your computer. On each tab, you
can specify the standard serial port parameters of Baud rate, Byte size, Parity, Stop bits, and the sizes
of the transmit and receive buffers (in bytes).
The defaults are the Windows COM port settings, which you can view in Windows Device Manager.
Typically, these settings are 9600, 8, N, 1, 1024, and 1024.
Saved at 02:16:00 on 6 Jul 2011
Revision 19
72
mAirList Version 3.1 User Manual (UK English)
7.12.7
Settings
These settings control some ‘global’ mAirList features and options.
Default automation fade time (default: 5000 mS)
The default duration (in mS) of a fade out in automation mode.
End Mon duration (default: 15 seconds)
mAirList PFL dialogs contain an END MON (ENDing MONitor) button which you click to listen to
the ending (‘last n’ seconds) of an audio file as defined by this setting, which is relative to the
Fade Out Cue Marker if this is set, or relative to EOF if no Fade Out Cue Marker exists.
Process priority (default: Normal)
Do not change this setting unless mAirList support staff have advised you to do so. Changing the
priority of any process can adversely affect your computer’s performance, or lock it up entirely.
The Windows process execution priority of mAirList.
Recycle bin size (0 = unlimited) (default: 100)
23
The maximum number of items which are kept in the mAirList Recycle Bin before being deleted .
Specify 0 if you do not want to limit the number of items in the mAirList Recycle Bin.
File extensions
File name extensions (for example, .mlp) which are ‘registered’ with Windows can be double-clicked
in Explorer to open them with the recommended program (in this case, mAirList).
Click Register to register all mAirList data file types with Windows.
Click Unregister to remove the registration of all mAirList data file types with Windows.
Format for Custom Text Playlist Export (default: blank)
The format string to use when saving a Playlist as a Custom text file. The string usually contains
logging variables (see 7.8.2 on page 63). If the string is blank (empty), an empty text file is created.
7.12.8
Options
These settings define some miscellaneous options.
Regard Start Next marker as EOF (default: off)
If this setting is on, item durations use the Start Next marker point (if it exists) as EOF.
Regard Fade Out marker as EOF (default: on)
If this setting is on, item durations use the Fade Out marker point (if it exists) as EOF.
Use Cue Out marker for end of fade (default: off)
If this setting is on, the default fade duration is ignored and fade duration is the time between the
Fade Out and Cue Out marker points. This setting has no effect if no Cue Out marker exists.
Note that even if this setting is off, the Cue Out marker point will be used for end of fade if the time
between the Fade Out and Cue Out marker points is less than the default fade duration.
Use Outro marker for EOF warning (default: on)
If this setting is on, all Players start their EOF warning at the Outro marker point, if it exists.
Although this setting overrides the individual Player and Cartwall EOF Warning time settings,
those settings are used if an item does not contain an Outro marker.
Allow only one instance of mAirList to run at the same time (default: off)
If this setting is off, more than one instance of mAirList can be opened on the same computer.
Start in ON AIR mode (default: on)
If this setting is off, mAirList opens in OFF AIR mode.
Disable logging when OFF AIR (default: on)
If this setting is off, items are logged while mAirList is in OFF AIR mode.
Show splash screen (default: on)
If this setting is off, mAirList does not show its ‘splash’ screen during startup.
Enable remote controls in mAirListTag and mAirListDB (default: off)
If this setting is on, Remote Controls operate in the mAirListTag and mAirListDB programs.
Debug mode (default: off)
If this setting is on, it enables the detailed reporting of certain errors which would normally only be
reported in the mAirList System Log.
23
Revision 19
Only details of items are deleted from the mAirList Recycle Bin. The audio files are not deleted from disk.
Saved at 02:16:00 on 6 Jul 2011
mAirList Version 3.1 User Manual (UK English)
7.12.9
73
Passwords
These settings allow you to optionally specify passwords to protect mAirList from configuration
changes or accidental shutdown.
The passwords are stored (with a simple encryption) in the passwords.ini file. Deleting this file
removes password protection, so if you use passwords, we recommend that you write-protect the
passwords.ini file after you set the passwords.
Configuration password (default: blank)
If specified, you must type this password to use the mAirList configuration program.
Shutdown password (default: blank)
If specified, you must type this password to shut down mAirList.
7.12.10
System Log
These settings allow you to optionally write mAirList System Log messages to a text file.
Filename (default: blank) is the fully-qualified name of the file, and can include logging variables
(see 7.8.2 on page 63). A commonly-used filename is drive:\path\%Y-%M-%D.SYSTEM.LOG. This
creates a new log file each day. Blank out Filename if you do not want to create system log files.
Message Categories are the message categories to be written to the system log file (default: all).
Tick its checkbox to write a message category to file; clear its checkbox if you do not want to write a
message category to file.
7.13
Modules
You cannot change any settings on this node. This node simply shows the mAirList program
modules which are Enabled or Disabled, according to the type of mAirList licence you purchased. If
a module is in the Disabled Modules list, you cannot use its functions in mAirList.
To read a description of what each module does, see Module Descriptions, beginning on page 126.
You can alter the settings of some modules. These settings have their own nodes in the menu tree.
7.13.1
BASS.DLL
These settings apply to BASS, the audio engine used internally by mAirList.
NOTE: Do not change these settings unless mAirList support staff have advised you to do so, because
changing any of these settings may adversely affect mAirList performance. These settings exist only to
resolve specific known problems which occur very rarely.
Performance tab
Update period (ms) (default: 100 mS)
The time between BASS reports of playback positions, player states, etc.
Network buffer size (ms) (default: 5000 mS)
The time between internal BASS buffer updates when playing audio files stored on a network drive.
Network pre-buffer amount (%) (default: 75%)
The percentage of an audio file which BASS ‘pre-buffers’ when playing audio files stored on a
network drive.
The following two settings apply only to audio fetched or sent via HTTP or FTP, such as an incoming
or outgoing stream. They do not apply to files accessed from a LAN or other non-Internet sources.
Network connection timeout (seconds) (default: 5 seconds)
The time allowed for an external server to respond to a connection request from mAirList.
Network read timeout (seconds) (default: 0 seconds = no timeout; maximum: 32767 seconds)
The time allowed to wait for an external server to deliver more data for a stream. This setting is
useful for detecting ‘stalled’ or disconnected streams, or to force a Player playing a stream to
consider a stream as ‘ended’ after the specified period of time.
The Info tab lists the installed BASS DLLs and their version numbers, as well as information about
any BASS plugins you have installed.
Note: To install BASS plugins, copy the DLL files to the plugins\bass folder in your mAirList root
data folder. (To locate your mAirList root data folder, see 7.14.1 on page 77.)
Saved at 02:16:00 on 6 Jul 2011
Revision 19
74
mAirList Version 3.1 User Manual (UK English)
7.13.2
WDM Audio
These settings apply to audio devices which use standard WDM (Windows Driver Model) drivers.
Most audio devices use this type of driver.
NOTE: We suggest that you do not change these settings unless you are an advanced mAirList user.
Most of these settings can adversely affect mAirList performance or stop audio output completely if
they are changed from their default setting.
To change the settings for a WDM audio device, select it from the dropdown, which lists all detected
WDM audio devices installed on the computer.
Click Info… to open a message box listing basic information about the selected device, such as
number of speakers and sample rate.
Output sample rate (default: 44100) is the sample rate used to send audio output to the device.
Buffer size (default: 500 mS) is the duration of audio BASS keeps in its internal buffer for the device.
Force multichannel output (requires restart) (default: off)
Some multiple output audio device drivers incorrectly report themselves to BASS as single output
devices: changing this setting to on can correct this problem. Note that if you change this setting,
you must close and re-open mAirList for the change to take effect.
Ignore speaker assignment (requires restart) (default: off)
Some multiple output audio device drivers report their speaker outputs incorrectly to BASS:
changing this setting to on can correct this problem. Note that if you change this setting, you must
close and re-open mAirList for the change to take effect.
Disable hardware mixing (BASS_SAMPLE_SOFTWARE) (default: off)
Normally, BASS uses the device driver to perform audio mixing. With some audio device drivers, this
can cause playout problems when two or more items are playing simultaneously. Changing this
setting to on can correct this problem by forcing BASS to mix audio internally, before sending the
mixed output to the device driver.
Use application-level software mixing (default: off)
With some audio device drivers, the Disable Hardware mixing (BASS_SAMPLE_SOFTWARE) setting
does not correct playout problems when two or more items are playing simultaneously. Changing
this setting to on can correct this problem by forcing mAirList to mix audio internally, before
sending the mixed output to BASS.
Use single multichannel link for software mixing (default: off)
When mixing audio output for an audio device with multi-channel outputs, mAirList will by default
use a separate (internal) mixer for each output pair. If you use such an audio device, and it has
problems handling separate streams for each of its output pairs, switch this setting on to have
mAirList use a single (internal) mixer for the entire device instead.
Use floating point data (BASS_SAMPLE_FLOAT) (default: on)
When this setting is on, it enables a BASS option which uses floating-point data internally. Some
audio devices cause BASS to report inaccurate durations unless this setting is on; while some audio
devices cannot handle this sample format. In particular, we recommend that you switch this setting
off if you need to switch the Use single multichannel link for software mixing setting on.
High precision cueing for VBR files (BASS_STREAM_PRESCAN) (default: off)
When this setting is on, it enables a BASS option which pre-scans audio files. BASS almost always
reports inaccurate durations for variable bit rate audio files unless this setting is on.
Pitch and tempo adjustment using BASS_FX.DLL (default: off)
When this setting is on, the PFL tab of the Item Properties dialog in mAirList, mAirListTag, and
mAirListDB show Pitch and Tempo sliders. The settings of these controls are saved in an item’s
Properties. Unless you use pitch or tempo, leave this setting off for best performance.
Keep device open (default: off)
Normally, mAirList closes WDM audio devices when playout ends and re-opens them when playout
begins again. With some audio device drivers, this either causes a noticeable delay when playout
restarts, or ‘cuts off’ the beginning of items. Changing this setting to on keeps the audio device
permanently open, which may correct those problems.
Revision 19
Saved at 02:16:00 on 6 Jul 2011
mAirList Version 3.1 User Manual (UK English)
7.13.3
75
ASIO Audio
These settings control mAirList and BASS settings for audio devices which use ASIO (Audio Stream
Input/Output) drivers. Typically, these are professional and/or digital audio devices.
NOTE: We suggest that you do not change these settings unless you are an advanced mAirList user.
Most of these settings can adversely affect mAirList performance or stop audio output completely if
they are changed from their default setting.
To change the settings for an ASIO audio device, select it from the dropdown, which lists all detected
ASIO audio devices installed on the computer. If the dropdown is empty, no ASIO audio devices are
installed on the computer.
Click Info… to open a message box listing information about the selected device, such as number of
outputs; and minimum, maximum, and default buffer lengths.
Click Config… to open the selected device’s configuration dialog or control panel.
Output sample rate (default: 44100) is the sample rate used to send audio output to the device.
Buffer size (default: 0) is the number of samples sent per buffer to the selected ASIO device, in
increments of 32 samples. Set this to match the device’s buffer size. The smaller the buffer size you
use, the lower the latency of the ASIO device will be.
High precision cueing for VBR files (BASS_STREAM_PRESCAN) (default: off)
When this setting is on, it enables a BASS option which pre-scans audio files. BASS almost always
reports inaccurate durations for variable bit rate audio files unless this setting is on.
Pitch and tempo adjustment using BASS_FX.DLL (default: off)
When this setting is on, the PFL tab of the Item Properties dialog in mAirList, mAirListTag, and
mAirListDB show Pitch and Tempo sliders. The settings of these controls are saved in an item’s
Properties. Unless you use pitch or tempo, leave this setting off for best performance.
7.13.4
Auto Cue
These settings allow mAirList to automatically determine and set Cue Markers when a previously
‘unknown’ audio file is loaded into mAirList or mAirListTag, or added to mAirListDB.
Each setting has a checkbox and a spin control to set the related value.
Automatically determine Cue In for new items (defaults: on and -90dB)
If enabled, Cue In is set to the point when audio level first rises above the level specified.
Automatically determine Fade Out for new items (defaults: on and -30dB)
If Import ~ in filename as Fade Out is on (see 7.12.1 on page 69), it takes priority over this setting.
If enabled, Fade Out is set to the point when audio level last falls below the level specified.
Automatically determine Cue Out for new items (defaults: on and -90dB)
If enabled, Cue Out is set to the point when audio level last falls below the level specified.
Limit time between Fade Out and Cue Out (defaults: off and 0 seconds)
This setting has no effect unless Fade Out and Cue Out are both determined automatically.
If enabled, the time between Fade Out and Cue Out points is limited to the time specified.
Fade Out is determined first, then Cue Out. If the time between the two points exceeds the limit time
you specify, the Cue Out point is moved to bring it within the limit time.
NOTE: Setting a Fade Out/Cue Out limit time may cause the ending of items to be ‘cut off’ when
they are played in assist mode. Therefore, we recommend that you do not use this setting unless you
always play items in automation mode.
Saved at 02:16:00 on 6 Jul 2011
Revision 19
76
mAirList Version 3.1 User Manual (UK English)
7.13.5
Mixdown
These settings allow you to create ‘mixdown profiles’ for the mAirList Mixdown function, if you have
enabled it (see 7.12.5 on page 71).
mAirList can internally mix down and encode a playlist (or parts of it) to a WAV file. To mix down to
any other audio file format, you need an external audio encoder program (such as LAME for MP3
files or OGGENC for OGG files) which can be executed from the Windows Command Prompt; and
you must create one or more mAirList ‘mixdown profiles’ for it. You may wish to create multiple
profiles for an audio encoder, to create (for example) audio files of different bitrates.
The mAirList distribution includes the oggenc.exe audio encoder program, which is installed in the
mAirList program folder.
To add a new mixdown profile:
1.
Click Add…
2.
On the Edit Mixdown Settings dialog, type a Profile name, a File extension for the
generated audio files, and an Encoder command line (see below).
3.
Click OK.
You can Edit, Copy, or Delete an existing mixdown profile by clicking the appropriate button.
Encoder command line
The command line you type must include the full drive and path to the external encoder program, as
well as all necessary command-line parameters for that program.
TIP: If you copy the encoder program’s EXE file into your mAirList program folder, you don’t need to
include a drive and path in the command line.
In the command line, type - where you would normally type the encoder’s input file name, and
"$FILENAME" where you would normally type the encoder’s output file name.
For example, the command lines below create a 128 kbps MP3 and OGG file, respectively:
•
C:\lame\lame.exe -m s -b 128 - "$FILENAME"
•
oggenc.exe -b 128 -o "$FILENAME" -
7.13.6
Encoder
NOTE: Most of these settings have no effect if you use an external audio stream encoder.
These settings control the internal mAirList audio stream encoder, which sends a Shoutcast/Icecast
format audio stream to an external Shoutcast/Icecast audio stream server. To use the internal
mAirList audio stream encoder, you must send the audio from your mAirList Players to the Encoder
device (see 7.5.1 on page 52).
There is also an option to only count listeners to a stream without sending to it. Use this option if
you want to monitor the listener count for a stream created by an external audio stream encoder.
You can also create an encoder ‘server’ which writes to a local MP3, OGG, or WAV audio file. To do
this, add a File (aircheck) encoder to the Server list and configure its settings. Note that you can
request that a new file is created after a specified number of minutes elapses. As the name implies,
this type of ‘encoder’ is useful for ‘aircheck’ recordings.
Use the Metadata tab to set up the stream’s metadata such as Name, URL, title updates, etc.
7.13.7
Regionalisation
mAirList can provide ‘split outputs:’ in other words, it can play two or more different audio streams
(to separate audio outputs) at the same time. Because this is usually done to provide regional
advertising or regional ‘opt-out’ programming, the feature is named Regionalisation.
To set up regional or split outputs, type the name of each region (or split output) on a separate line
in the list. For example: West, East; or Central, North, South.
You can then use Region Containers in your playlist. In a Region Container’s Properties dialog, the
Region Container tab contains a tabbed dialog where each tab’s name is the name of one region,
followed by the total playout time of the items in that region’s container. You then add items to each
region’s container and adjust Cue Markers etc. to ensure that each region’s container has the same
duration, ensuring a smooth switch back to ‘combined’ output after the regional break.
Revision 19
Saved at 02:16:00 on 6 Jul 2011
mAirList Version 3.1 User Manual (UK English)
7.14
77
Advanced
7.14.1
Data Folders
This node shows the locations of the mAirList data and configuration folders, and allows you to open
these folders in Windows Explorer. The locations of these folders depend partly on the version of
Windows installed on your computer, and partly on the way you installed mAirList.
We recommend that you do not open or edit any mAirList data or configuration files manually
unless you are an advanced mAirList user.
Note that you cannot change the locations of these folders in this dialog: you can only view the
locations and—as explained above—open the folders directly in Windows Explorer.
Saved at 02:16:00 on 6 Jul 2011
Revision 19
78
Revision 19
mAirList Version 3.1 User Manual (UK English)
Saved at 02:16:00 on 6 Jul 2011
mAirList Version 3.1 User Manual (UK English)
8.
Advanced Configuration
8.1
skin.ini File
79
Many programs allow you to change their appearance using so-called ‘skin’ files, which contain
information to change, for example, the fonts and colours in the program’s window.
The mAirList file skin.ini, stored in the config folder in your mAirList data folder, allows you to make
exactly those kinds of changes. Please note that skin.ini does not exist until you create the file
manually, and you can use skin.ini to change the appearance of mAirList even if you do not change
the default layout: in other words, the Layout Designer and skin.ini are independent of each other.
To edit mAirList configuration files, you can use any plain text file editor application, including
Windows Notepad, but we strongly recommend that you use a file editor which allows you to edit
several files simultaneously. Many excellent freeware file editor applications are available.
The basic contents and structure of a skin.ini file are shown below.
[MainWindow]
… settings for the main window (background image or colour), one per line …
[Toolbar]
… settings for the main window Toolbar, one per line …
[Browser]
… options for the Browser, one per line …
[Player]
… ‘global’ settings for Players, one per line …
[Player0_0]
… settings for Playlist 1, Player 1, one per line (overrides [Player]) …
[Player0_1]
… settings for Playlist 1, Player 2, one per line (overrides [Player]) …
… other [Playerx_y] sections…
[ExtraPFL]
… settings for the PFL Player and mAirListTag PFL player, one per line (overrides [Player]) …
[Cartwall]
… ‘global’ settings for Cartwall Players, one per line (overrides [Player]) …
[Playlist]
… ‘global’ settings for Playlists, one per line …
[Playlist0]
… settings for Playlist 1 (overrides [Playlist]) …
… other [Playlistx] sections …
[ProgressBar]
… settings for the Global Progress Bar, one per line …
Figure 8.1: Contents and Structure of skin.ini file
Figure 8.1 above shows every possible section you could include in skin.ini, but the basic principle
to bear in mind when creating or editing skin.ini is: if you don’t need a section, don’t add it.
All the settings you can add to a skin.ini file are listed here by section, in the same order as shown in
Figure 8.1 above. We suggest that no matter how many sections you use in your skin.ini file, you
keep the sections you do use in the same order as shown in Figure 8.1above.
If you want the default option for any setting, don’t add it to your skin.ini file. Not only is it
unnecessary, but each redundant entry still has to be processed during mAirList startup.
So please remember: the smaller your skin.ini file is, the faster your mAirList startup will be.
For example, if all you want to change is the colour of all empty cartwall players to a neutral grey,
your skin.ini file would contain exactly two lines:
[Cartwall]
EmptyColor=#666666
More complicated requirements, like using colours to reflect player states in the Players and Playlist,
or highlighting ‘special’ Playlist items or History items by using specific contrasting colours for
them, do of course require quite a number of settings to be added to skin.ini: this is unavoidable.
However, by judicious and careful use of the settings, and by taking advantage of the way mAirList
processes skin.ini and resolves any conflicts (see the next page for details), you can keep the size of
your skin.ini to tithe minimum necessary.
Saved at 02:16:00 on 6 Jul 2011
Revision 19
80
mAirList Version 3.1 User Manual (UK English)
8.1.1
skin.ini Setting Names and Conflicts
Some skin.ini setting names are simple and fixed. They are written like this:
AutoSize=off
Below the setting name is a description, of what it does, like this;
“Add this setting to stop the Browser resizing to fill vacant space when the mAirList window is
resized.”
This implies that the default for this setting is on, so using the ‘least possible lines in skin.ini’
principle, you know that adding AutoSize=on to your skin.ini file would be redundant.
We also give you extra relevant information before or after many setting descriptions:
“This setting has no effect if you use a custom layout created with the Layout Designer.”
Some other settings have a much wider range of choices. In these cases, the setting name is written
like this, with the default shown in ( ) parentheses:
ProgressBarBorderColor=ColourValue (default: #000000 = black)
ColourValue is a mAirList colour value (explained below): you don’t actually type ColourValue in
the setting, you instead type the colour value which represents the colour you want. When you see a
setting value in bold italic, it is always one of the value types explained below, and you must supply
a valid value to replace what is printed: a font name, a colour value, a number, and so on.
Many skin.ini settings, particularly those for text objects, can have a large number of variations, each
with its own setting name. To keep the manual brief, setting names of this type are written like this:
[optionalvariable][Optional]variableFixed=on
(where optionalvariable is one of: One, Two;
and variable is one of: Stop, Start)
How should you read this kind of setting ‘name,’ and what should you type as the setting name?
•
Parts of the name shown in bold are ‘fixed’ text which you must type exactly as shown.
In the example above, this would be optional (if used, see below) and Fixed.
•
Parts of the name shown in bold italic are ‘variables:’ type one of the options listed.
In the example above, you could use Stop and Two or any other combination of options.
•
Anything in square brackets [ ] is optional; this might be fixed text or a variable.
Do not type the square brackets in the setting name.
In the example above, optionalvariable and Optional are both optional.
Again referring to the example setting name above, the shortest valid setting name would be
StopFixed or StartFixed; other valid setting names based on the description above include
OneStopFixed, OptionalStartFixed, and TwoOptionalStopFixed.
A ‘variable’ setting name represents a (perhaps large) number of possible variations based on a
single setting. However, you must type each variation you need to use as a separate line (see below).
For most ‘variable’ setting names, the minimum (shortest) setting name is a ‘master’ setting, which
is only over-ridden by a longer (more specific) setting name of the same type. For example, if you
have FontColor and PlayingFontColor settings in the same section, PlayingFontColor will be used
24
while the object is in the ‘playing’ state and FontColor will be used at all other times.
It’s usually easiest to start by adding the ‘basic’ (shortest name) setting, followed (if you need them)
by the more specific (longer names) settings. Why do we say ‘followed’ and not ‘preceded by?’
Because of the way mAirList decides which setting to use in cases of conflicts: that is, when two or
more settings ‘match’ the screen object’s current state. The rule is simple: the last matching line (the
one ‘furthest down’ skin.ini) is used. For example:
[Playlist]
PlayerNameFontColor=#0000FF
NextPlayerNameFontColor=#800000
When a Player is ‘next,’ the colour #800000 is used; otherwise, the colour #0000FF is used.
24
Revision 19
Unless, of course, you have further state-specific …FontColor settings in the same section, like FadingFontColor.
Saved at 02:16:00 on 6 Jul 2011
mAirList Version 3.1 User Manual (UK English)
8.1.2
81
skin.ini Values
All the types of values you use for various skin.ini settings are described below.
Ranges of values are indicated by …,
for example: 1 … 99. means ‘any whole number between 1 and 99 inclusive.’
8.1.2.1
String Values
When typing a string (text) value, do not put quotes around the string unless the final character is a
space: in which case, you must put double quote characters (") around the string to stop Windows
trimming off the final space. This includes string values which are file names or font names.
Single quote characters (') around string values used for display are displayed as part of the text.
Here are some examples to make these points more clearly:
...
Background="C:\graphics\mairlist BG.png"
Background='C:\graphics\mairlist BG.png'
Background=C:\graphics\mairlist BG.png
...
TimeFont="Segoe UI"
TimeFont='Segoe UI'
TimeFont=Segoe UI
...
RampPrefix="RAMP TIME "
RampPrefix='RAMP TIME '
RampPrefix=RAMP TIME
...
8.1.2.2
;works, but quotes are not needed
;fails
;works
;works, but quotes are not needed
;fails
;works
;displays as RAMP TIME 14.0
;displays as 'RAMP TIME '14.0
;displays as RAMP TIME14.0
Colour Values
To specify a colour value, use strings in the HTML colour format #rrggbb, where:
•
•
•
•
# indicates the following string is a hexadecimal number;
rr is the two-digit hexadecimal red value (00…FF);
gg is the two-digit hexadecimal green value (00…FF); and
bb is the two-digit hexadecimal blue value (00…FF).
For example: magenta is #FF00FF (maximum red + zero green + maximum blue);
cyan is #00FFFF (zero red + maximum green + maximum blue).
This is the same format used to specify colours on Web pages. There are numerous freeware
‘colour picker’ applications which you can use to choose colours visually; these applications show
your chosen colours in the format above, which you can copy and paste into your skin.ini file.
8.1.2.3
Size Values
•
To specify the size of a screen object, such as a button, use size units of pixels.
•
To specify the size of a font, use size units of points.
8.1.2.4
Font Style Values
To specify a text font style, use one of these numbers:
Number
Style
0
normal
1
bold
2
italic
3
bold italic
To add underlining to a font style, add 4 to the font style value;
To add strikethrough to a font style, add 8 to the font style value.
For example, for italic strikethrough text, use the value 10 (2 + 8);
for bold underlined text, use the value 5 (1 + 4).
Saved at 02:16:00 on 6 Jul 2011
Revision 19
82
mAirList Version 3.1 User Manual (UK English)
8.1.2.5
Text Object Settings And Values
The appearance of every mAirList text object (for example, the Title in a Player)
is defined by four separate settings in a skin.ini file:
•
•
•
•
textobjectnameFontName: Font name (e.g. Arial).
textobjectnameFontSize: Font size, in points. Specify a size of 0 to ‘hide’ a text object.
textobjectnameFontStyle: Font style , in FontStyle format (see above).
The default font style of most text objects in mAirList is 0 (normal).
textobjectnameFontColor: Font colour, in ColourValue format (see above).
The default FontColor of most text objects in mAirList is #000000 (black).
where textobjectname is the mAirList name of the text object (as simple examples: Title or Time).
For example, the settings below show the Time in a Player as white 17pt Verdana Bold text:
...
TimeFontName=Verdana
TimeFontSize=17
TimeFontStyle=1
TimeFontColor=#FFFFFF
...
Before changing any font colour, consider how it looks on the background colour underneath it.
Font colours other than black or white can be very difficult to read on some background colours.
Always use strong font colours which contrast well with the background: this avoids potential
problems for users who have mild colour blindness.
We recommend Microsoft’s Segoe UI font, distributed as part of Windows Vista or later, as an
especially good choice for Title fonts. The characters l (lower case L) 1, (numeral 1) and I (capital I)
are very easy to tell apart, and the whole font is easy to read at most sizes.
As with all skin.ini settings, remember that you only need to specify the settings you need to change.
If the only change you want is to make a font bold, add only textobjectnameFontStyle=1.
8.1.2.6
On/Off Values
A few skin.ini settings, typically for toolbars and control bars, have a value of either on or off.
Since one of these will always be the default, in this manual we only describe the ‘other’ value—the
one you would have to add—and what it does.
8.1.2.7
Column Numbers
Some skin.ini Playlist settings use column numbers. These column numbers are always the same,
regardless of any hidden columns, and regardless of the displayed column order in the Playlist:
8.1.2.8
column number
Column Name
0
Icon
1
Time
2
Title
3
Duration
4
Ramp
5
End
6
Link
7
Artist
Line Style Values
The skin.ini Playlist setting GridLineStyle, which sets the style of lines drawn above and below rows
(items) in the Playlist, can have the values dotted (default) or solid.
There is no none setting: to have ‘no’ grid lines, set GridLineStyle=solid and set GridLineColor to
match the Playlist’s BackgroundColor. This makes grid lines transparent. It is not possible to
‘remove’ grid lines completely and have no ‘gaps’ at all between Playlist rows.
Revision 19
Saved at 02:16:00 on 6 Jul 2011
mAirList Version 3.1 User Manual (UK English)
8.1.3
83
Main Window
These settings add a background image to, or change the colour of, the mAirList window.
Background=filename
Add this setting to display an image file ‘under’ all the objects in the mAirList window. The image file
is always displayed actual size: it is never stretched or cropped to fit the mAirList window size.
Color=ColourValue
Add this setting to change the background colour of the mAirList window.
8.1.4
Toolbar
These settings hide buttons in the main mAirList toolbar.
To ‘hide’ the entire toolbar, use the mAirList Layout Designer (page 103 onwards)
to set the Toolbar object’s height and width to zero.
All toolbar buttons are on (shown) by default. Add the settings below to hide toolbar buttons:
•
ShowNew=off
•
ShowOpen=off
•
ShowSave=off
•
ShowInsert=off
•
ShowProperties=off
(The Edit button, which opens the selected item’s Properties dialog.)
•
ShowDelete=off
•
ShowEvents=off
•
ShowActions=off
•
You cannot hide the Cartwall button if the Cartwall is in a separate window.
If the Cartwall is embedded in the mAirList window, you hide or show the button using a
configuration setting and not skin.ini (see 7.3.6.1 on page 51).
•
You hide or show the Database button using a configuration setting and not skin.ini
(see 11.2.1 on page 105 and 11.2.2.4 on page 107).
•
ShowAbout=off
(The mAirList button, which was originally named About.)
8.1.5
Browser Section
The [Browser] settings affect the Browser and its toolbar.
8.1.5.1
Browser Settings
AutoSize=off (default: on)
This setting has no effect if you use a custom layout created with the Layout Designer.
Add this setting to stop the Browser resizing to fill vacant space when the mAirList window is resized.
8.1.5.2
Browser Toolbar Settings
Captions=on (default: off)
Add this setting to display text captions on the Browser toolbar buttons.
List=off (default: on)
Add this setting to show Browser toolbar button text captions to the right of (not below) the button.
ShowRefresh=off (default: on)
Add this setting to hide the Refresh button on the Browser toolbar.
ShowAdd=off (default: on)
Add this setting to hide the Add button on the Browser toolbar.
ShowClose=off (default: on)
Add this setting to hide the Close button on the Browser toolbar.
To hide the Browser toolbar, hide all three Browser toolbar buttons.
Saved at 02:16:00 on 6 Jul 2011
Revision 19
84
mAirList Version 3.1 User Manual (UK English)
8.1.6
Player
These settings affect all Players, including Cartwall Players.
To override some or all of these settings for individual Playlist Players, see 8.1.7 below.
To override some or all of these settings for the Extra PFL Player, see 8.1.8 below.
To override some or all of these settings for Cartwall Players, see 8.1.9 below.
When mAirList draws a Playlist Player, it first applies any settings in this section; it then applies any
settings in that Player’s Playerx_y section, if there is one. Therefore, the settings in the Player section
are the ‘global’ or ‘template’ settings for all Playlist Players, which are overridden by any settings you
add for specific individual Playlist Players.
The same principle applies to the Extra PFL Player and the Cartwall players: settings in this section
are applied first, then settings in the individual section (ExtraPFL or Cartwall) are applied.
Therefore, how you use the Player section depends on whether you want all Players (including the
Cartwall Players and the Extra PFL Player) to have the same ‘look and feel,’ or you want each Player
to have a different ‘look and feel.’
•
If you want all Players to look the same, make changes in the Player section; then if you find
you need to make minor changes to some kinds of Players (for example, reducing font size,
or changing the font used, for Cartwall Players), add the appropriate section or sections after
the Player section and make the appropriate changes in that section or sections.
•
If you want all Players to look different, work out any common elements and make those
changes in the Player section first—remember to always try to minimise the number of lines
in skin.ini—then add the sections for each Player, Cartwall, and the Extra PFL Player after the
Player section and make the appropriate changes in that section or sections.
A Player divides naturally into five main parts: a border, a background, text boxes, a progress bar,
and buttons. Apart from the border and background, every part of a Player is optional; and as you
will see below, there are ways to make the border and background ‘invisible’ as well.
8.1.6.1
Player Border Settings
BorderRadius=0 … (default: 0)
The border width is fixed at a size of one pixel.
Add this setting to draw Players with curved corners. The value is the radius of the corner curves.
You can specify any number from 0 upwards, but values much above or below 10 give near-invisible
results, or cut off text at the Player’s corners, respectively.
BorderColor=ColourValue (default: #FFFFFF = black)
Add this setting to change the border colour drawn around Players. For an ‘invisible’ border, specify
your Windows Application Background colour (not the Player’s BackgroundColor!).
(To learn how to check the colour of your Application Background, type screen appearance into
Windows Help and Support Center.)
8.1.6.2
Player Background Settings
BackgroundColor=ColourValue (default: your Windows Application Background colour)
Add this setting to change the default background colour of Players.
stateColor=ColourValue
(where state is one of: Empty, EOF, Error, Fading, Loaded, Next, Paused, PFL, Playing, Stopped)
Add this setting to set the background colour of Players when in the named state.
8.1.6.3
Player Text Settings
[state]objectFontName=fontname
[state]objectFontSize=size (in points)
[state]objectFontStyle=TextStyle
[state]objectFontColor=ColourValue
(where state is one of Empty, EOF, Error, Fading, Loaded, Next, Paused, PFL, Playing, Stopped;
and object is one of: Title, Artist, Name, State, Time)
Add these settings to change the font settings of the named text object.
Revision 19
Saved at 02:16:00 on 6 Jul 2011
mAirList Version 3.1 User Manual (UK English)
8.1.6.4
85
Player Progress Bar Settings
ProgressBarBorderColor=ColourValue (default: #FFFFFF = black)
Add this setting to change the border colour drawn around progress bars (and ramp progress bars, if
shown as separate progress bars) in Players.
Unlike the player background, you cannot specify a different progress bar border colour for each
Player state; therefore, an ‘invisible’ progress bar border in all Player states is not usually possible.
ProgressBarColor=ColourValue (default: #???)
Add this setting to change the basic background colour of progress bars in Players.
25
(In practice, this colour is rarely shown in progress bars.)
ProgressBarelementColor=ColourValue
(where element is one of: Elapsed, ElapsedRamp, Outro, Ramp1, Ramp2, Ramp3, Remain)
Add this setting to change the colour of the named progress bar element.
ProgressBarHeight=size (default: ??? pixels)
Add this setting to change the height of the progress bar. You cannot change the width of the bar.
8.1.6.5
Player Button Settings
To show or hide specific Player buttons, see 7.2.4 on page 49.
ButtonSize=size (in pixels, default: ??? pixels square)
Add this setting to change the size of Player buttons. Note that you cannot resize individual buttons:
this setting is applied to all Player buttons.
buttonButton[Active]Color=ColourValue (default: #??? = pale blue)
(where button is one of: Close, Fadeout, Hook, Loop, Pause, PFL, Reset, Start, Stop)
Add this setting to change the background colour of the named button when inactive (not selected)
or active (selected). Note that in practice, ActiveColor has no effect on the Close and Reset buttons.
8.1.6.6
Ramp Text Settings
The Ramp prefix is part of the Time text object, so the Time font settings also apply to the Ramp prefix.
RampPrefix=string (default: R)
Add this setting to change the text preceding the Ramp times shown in the Player.
•
If the string ends with a space, you must put double quotes around the string.
For example: RampPrefix="RAMP " or RampPrefix="R "
•
You do not need quotes if the string contains a space but does not end with a space.
For example: RampPrefix=LEAD IN: or RampPrefix=TO VOCAL...
8.1.7
Playerx_y
These settings are identical to the settings you can add in the Players section, but affect only the
Playlist Player specified in the section name.
In the section name, x is the Playlist number and y is the Player number within that Playlist.
Both numbers start at zero, so Player0_0 means ‘the first Player in Playlist 1.’
8.1.8
ExtraPFL
These settings are identical to the settings you can add in the Players section, but affect only the
Extra PFL Player (on the PFL tabs in the Item Properties dialog and in the mAirListTag program).
8.1.9
Cartwall
These settings are identical to the settings you can add in the Players section, but affect only
Cartwall Players. One extra setting, and one changed setting, are available:
PFLModeColor=ColourValue
Add this setting to change the background colour of Cartwall Players when Cartwall PFL mode is on.
buttonButton[Active]Color=ColourValue (default: #??? = pale blue)
(where button is one of:
Close, Fadeout, Hook, Loop, Next, Pause, PFL, Previous, Reset, Start, Stop)
In this setting, two extra (cart Stack) buttons are available in Cartwall Players: Next and Previous.
25
This colour is very occasionally shown at either end of a progress bar, if an item’s cue marker settings are sufficiently
bizarre. Please do let us know of any sightings, ideally with a screenshot.
Saved at 02:16:00 on 6 Jul 2011
Revision 19
86
mAirList Version 3.1 User Manual (UK English)
8.1.10
Playlist
These settings affect all Playlists (if you have more than one Playlist).
If you have only one Playlist, use this section to change its settings.
When mAirList draws a Playlist, it first applies any settings in this section; it then applies any settings
in the [Playlistx] section, if there is one. Therefore, the settings in the [Playlist] section are the
‘global’ or ‘template’ settings for all Playlists, which are overridden by any settings you add for
specific individual Playlists.
Therefore, how you use the Playlist section depends on how many Playlists you have, and also
whether you want all Playlists to have the same ‘look and feel,’ or a different ‘look and feel.’
•
If you have only one Playlist, make changes in the Playlist section. If you later decide to add
more Playlists, your changes will apply to all of them; and if you then want to change any of
them individually, add a Playlistx section or sections after the Playlists section and make the
appropriate changes in that section or sections.
•
If you want all Playlists to look the same, make changes in the Playlist section; then if you
find you need to make minor changes to some Playlists, add a Playlistx section or sections
after the Playlist section and make the appropriate changes in that section or sections.
•
If you want all Playlists to look different, work out any common elements and make those
changes in the Playlist section first—remember to always try to minimise the number of
lines in skin.ini—then add Playlistx sections after the Playlist section and make the
appropriate changes in those sections.
A Playlist divides naturally into four main parts: a toolbar (control bar), a grid of items,
a progress bar, and a countdown overlay. Apart from the grid, every part of a Playlist is optional.
8.1.10.1
Playlist Toolbar (Control Bar) Settings
ToolbarFontName=fontname (default: Arial)
ToolbarFontSize=size (default: 24??? points)
ToolbarFontStyle=TextStyle (default: 1 = bold)
ToolbarFontColor=ColourValue (default: #FF0000 = red)
Add these settings to change the font settings of the toolbar objects.
Change ToolbarFontSize to change the height of the control bar objects; you cannot change the
width or order of the control bar objects.
buttonButton[Active]Color=ColourValue
(where button is one of: Jump (‘next’ button), Start, Stop)
Add this setting to change the background colour of the named button when inactive (not selected)
or active (selected). Note that in practice, ActiveColor has no effect on the Jump button.
8.1.10.2
Playlist Grid Settings
GridLineStyle=solid (default: dotted)
Add this setting to change the gridlines above and below Playlist rows to solid gridlines.
GridLineColor=ColourValue
Add this setting to change the colour of the gridlines above and below Playlist rows.
focusSelection[Border]Color=ColourValue
(where focus is one of Focused, Unfocused)
Add these settings to change the background or border colour of the currently selected Playlist rows.
ColWidths=size,size,size,size,size,size,size,size (in pixels)
(where sizes are the widths of each column, always in this order (regardless of ColumnOrder and
HideColumns settings): Icon, Time, Title, Duration, Ramp, Ending, Link, Artist)
Add this setting to set the width of all Playlist columns. A size of 0 ‘hides’ a column.
HideColumns=column[,column,column …]
(where column is always one of (regardless of ColWidths and ColumnOrder settings):
0=Icon, 1=Time, 2=Title, 3=Duration, 4=Ramp, 5=Ending, 6=Link, 7=Artist)
Add this setting to ‘hide’ one or more Playlist columns without using a ColWidths setting.
Revision 19
Saved at 02:16:00 on 6 Jul 2011
mAirList Version 3.1 User Manual (UK English)
87
ColumnOrder=column,column,column,column,column,column,column,column
(where column is always one of (regardless of ColWidths and HideColumns settings):
0=Icon, 1=Time, 2=Title, 3=Duration, 4=Ramp, 5=Ending, 6=Link, 7=Artist)
Add this setting to change the order of columns in Playlist rows.
[state][type][object]FontName=fontname
[state][type][object]FontSize=size
[state][type][object]FontStyle=TextStyle
[state][type][object]FontColor=ColourValue
(where state is one of Empty, EOF, Error, Fading, Loaded, Next, Paused, PFL, Playing, Stopped;
type is one of: Break, Command, Container, Dummy, File, Other, Stream; and
object is one of: Artist, Backtiming, Comment, Duration, Ending, PlayerName, Ramp, State, Title)
Add these settings to change the font settings of the named text object in Playlist rows.
[state][type]RowColor=ColourValue
(where state is one of Empty, EOF, Error, Fading, Loaded, Next, Paused, PFL, Playing, Stopped;
type is one of: Break, Command, Container, Dummy, File, Other, Stream; and
Add these settings to change the background colour of the named text object in Playlist rows.
HistoryFontName=fontname
HistoryFontSize=size
HistoryFontStyle=TextStyle
HistoryFontColor=ColourValue
Add these settings to change the font settings of History rows in Playlists.
HistoryRowColor=ColourValue
Add this setting to change the background colour of History rows in Playlists.
8.1.10.3
Playlist Progress Bar Settings
These settings are identical to the ProgressBar settings you can add in the Players section
(see 8.1.6.4 on page 85), but affect only the Playlist progress bar, which is shown on Playlist items in
the grid which are currently loaded in Players.
8.1.10.4
Playlist Countdown Overlay Settings
These settings affect the countdown overlay which overlays the Playlist during Ramps and/or
during EOF Warnings. Note that these settings apply to both types of overlay: you cannot have
different settings for the Ramp and EOF Warning overlays.
OverlayFontName=fontname (default: Arial)
OverlayFontSize=size (default: 24??? points)
OverlayFontStyle=TextStyle (default: 1 = bold)
OverlayFontColor=ColourValue (default: #FF0000 = red)
Add these settings to change the font settings of the countdown overlay.
OverlayOutlineWidth=size (default: 2 pixels)
Add this setting to change the width of the coloured outline around the countdown overlay text.
Note that the outline is drawn inside the text (keeping its overall size the same).
OverlayOutlineColor=ColourValue (default: #FFFFFF = white)
Add this setting to change the colour of the coloured outline around the countdown overlay.
OverlayPosition=position (default: centre)
(where position is one of: N, NE, E, SE, S, SW, W, NW; the eight major compass points)
Add this setting to move the countdown overlay to a corner, or the centre of one side, of the Playlist.
8.1.11
Playlistx
These settings are identical to the settings you can add in the Playlists section, but affect only the
Playlist specified in the section name. In the section name, x is the Playlist number, starting at zero,
so Playlist0 means Playlist 1.
In practice, you only need this section if you have more than one Playlist.
8.1.12
ProgressBar
These settings are identical to the ProgressBar settings you can add in the Players section
(see 8.1.6.4 on page 85), but affect only the global progress bar.
Saved at 02:16:00 on 6 Jul 2011
Revision 19
88
8.2
mAirList Version 3.1 User Manual (UK English)
Changing mAirList Icon Graphics
You can easily replace any icon mAirList displays (for example, on Player buttons, in the mAirListDB
database application, or on any toolbar button), with an icon of your choice.
To do this, obtain or create replacement graphics files and save them in PNG format with a
transparent background colour, give the files the names mAirList requires (in lowercase, as shown in
26
the lists below), and add the files to the images folder in your mAirList data folder.
Tips for preparing replacement icon graphics files:
•
Because mAirList resizes icons if necessary to display them, make your replacement
graphics files ‘actual size’ if you know the usual displayed sizes of the icons.
•
Although you can use graphics files with a non-transparent background colour,
we strongly recommend against this.
•
For button icons, you can add skin.ini entries to specify background colours for the button
when it is inactive and when it is active ( see 8.1.6.5 on page 85).
This requires graphics files with a transparent background colour.
•
Player button icon changes affect all players, including Cartwall Players and PFL Players; if
you use more than one Playlist, Playlist icon changes affect all Playlists.
8.2.1
Replacing Common Icon Graphics
To replace the most common icons—in Players, Playlists, mAirListDB, System Log, and the built-in
mAirList stream encoder—place a PNG format file with the appropriate ‘alias’ name (chosen from
the following tables) in your mAirList images folder (see above). For example, to replace the icon on
the PFL button in Players, supply a file named button_pfl.png.
The ‘alias’ filenames, and their corresponding mAirList icons, are listed in the tables below.
8.2.1.1
Player Button Icons (default size: 48×48 pixels)
Filename
Default
button_close.png
Close (eject) button
button_fadeout.png
Fadeout button (not a Nuvola icon)
button_hook.png
Hook button
button_loop.png
Loop button
button_next.png
Next button (Cartwall Players only)
button_pause.png
Pause button
button_pfl.png
PFL button
button_previous.png
Previous button (Cartwall Players only)
button_reset.png
Reset button
button_start.png
Start (play) button
button_stop.png
Stop button
8.2.1.2
Playlist Control bar Button Icons (default size: 48×48 pixels)
Filename
26
Revision 19
Icon for mAirList Player…
Default
Icon for mAirList Playlist Control bar…
button_jump.png
Jump (next) button
button_start.png
Start (play) button
button_stop.png
Stop button
If the images folder does not exist, create it and then copy your image files into it.
Saved at 02:16:00 on 6 Jul 2011
mAirList Version 3.1 User Manual (UK English)
8.2.1.3
89
Playlist Icons (default size: 64×64 pixels, except as stated)
Filename
Default
icon_advertisement.png
Icon for mAirList Playlist …
Advertising (Type) item
icon_attention.png
icon_audimark.png
Audimark item (not a Nuvola icon)
icon_break.png
Break item
icon_command.png
Command item
icon_comment.png
icon_container.png
Container item
icon_dummy.png
Dummy item
icon_endofchain.png
Final linked item (in Link column): 32×32pixels
icon_error.png
Error item (after a This Playlist…, Check for errors)
icon_file.png
File (audio file) item
icon_history.png
History (played) item
icon_linked.png
Linked item (in Link column): 32×32pixels
icon_notlinked.png
Non-linked item (in Link column): 32×32pixels
icon_playlist.png
Playlist item (an item which is itself a playlist)
icon_regioncontainer.png
Region Container item
icon_silence.png
Silence item
icon_stream.png
Stream item
8.2.1.4
mAirListDB And Database Browser Pane Icons (default size: 16×16 pixels)
Filename
Default
Icon in Database Browser pane or mAirListDB …
dbicon_artists.png
Artists node
dbicon_attributes.png
Attributes node
dbicon_connecting.png*
Root while connecting to a database
dbicon_customizeditem.png
Customised item in Playlist
dbicon_database.png
Root
dbicon_disabled.png*
Root when database is disconnected,
or is disabled in Configuration
dbicon_fixedtime.png
Fixed time item in Database Playlist
dbicon_folder.png
Folder
dbicon_folderroot.png
Folders node
dbicon_foreignitem.png
Non-audio or imported item in Database Playlist
dbicon_item.png*
Item
dbicon_originalitem.png
Audio item in Database Playlist
dbicon_storages.png
Storages node
dbicon_types.png
Types node
* These icons are only shown in Database Browser panes: they are not used in mAirListDB.
Saved at 02:16:00 on 6 Jul 2011
Revision 19
90
mAirList Version 3.1 User Manual (UK English)
8.2.1.5
System Log Icons (default size: 16×16 pixels)
Filename
Default
Icon for mAirList System Log …
logicon_debug.png
Debug item
logicon_error.png
Error item
logicon_info.png
Info item
logicon_playlist.png
Playlist item
logicon_status.png
Status item
logicon_unknown.png
Unknown item
logicon_warning.png
Warning item
8.2.1.6
Encoder Icons (default size: 22×22 pixels)
Filename
Default
Icon for mAirList Encoder …
encoder_state_connected.png
Connected state
encoder_state_connecting.png
Connecting state (while trying to connect)
encoder_state_disconnected.png
Disconnected state
encoder_state_error.png
Error state
8.2.2
Replacing Other Icon Graphics
The icons in mAirList are selected icons from the Nuvola project’s icon library. A condition of use of
the Nuvola icons in an application is that the end user has the ability to change any or all of the icons
to any other icons of their choice, and to allow future versions of the Nuvola icons to be used.
In mAirList, you do this by supplying replacement PNG format files in the same folder structure as
27
28
the Nuvola icon library distribution folder structure , in the images folder in your mAirList data
folder. The root of this structure is datafolder\images\nuvola.
Although you can use graphics files with a non-transparent background colour, we strongly
recommend against this. A transparent background colour ensures that your replacement icons will
display correctly in mAirList applications.
Your replacement graphics files must have the same names as the Nuvola files you are replacing
(see Appendix C on page 133). We also strongly suggest that you supply replacement files for all the
Nuvola icon sizes used by mAirList (for example, both 16×16 and 48×48 sizes for a replacement
player_stop.png file).
Note that you need to supply only the graphics files which replace existing icons: you do not need to
supply all the graphics files used by mAirList (if you do, this may increase mAirList startup time).
Revision 19
27
That is, the same folder structure as the extracted version of the full Nuvola icon library.
28
If the images folder does not exist, create it.
Saved at 02:16:00 on 6 Jul 2011
mAirList Version 3.1 User Manual (UK English)
8.3
91
Setting Default Folders For mAirList Dialogs
Many mAirList functions use file Open or Save dialogs. Although these dialogs ‘remember’ the folder
they used when last opened, you can set default folders for many of these dialogs. The default folder
you set will be used when the dialog is first opened during a mAirList session.
To set default folders, manually create a DefaultDirectories.ini file in your mAirList config folder.
An example DefaultDirectories.ini file for a home or ‘hobby’ user of mAirList is shown below.
[DefaultDirectories]
AddDirectoryBrowser=D:\audio
AddDirectoryTreeBrowser=D:\audio
AddPlaylistBrowser=C:\Documents and Settings\User.HOMEPC\My Documents\mAirList
AppendPlaylist=C:\Documents and Settings\User.HOMEPC\My Documents\mAirList
CartwallLoad=C:\Documents and Settings\User.HOMEPC\My Documents\mAirList
CartwallSave=C:\Documents and Settings\User.HOMEPC\My Documents\mAirList
InsertFiles=D:\audio
OpenPlaylist=C:\Documents and Settings\User.HOMEPC\My Documents\mAirList
RunScript=C:\Program Files\mAirList\scripts
SavePlaylist=C:\Documents and Settings\User.HOMEPC\My Documents\mAirList
SchedulerLoadList=C:\Documents and Settings\User.HOMEPC\My Documents\mAirList
SchedulerSaveList=C:\Documents and Settings\User.HOMEPC\My Documents\mAirList
SchedulerSelectFile=D:\audio
SchedulerSelectPlaylist=C:\Documents and Settings\User.HOMEPC\My Documents\mAirList
SchedulerSelectScript=C:\Program Files\mAirList\scripts
SelectIcon=C:\Program Files\mAirList\3\images
Figure 8.2: Contents and Structure of DefaultDirectories.ini file
The first line is always required, and must be the first line in the file.
The other lines are all optional: you can add all or just one of them. Each line sets the default folder
for one type of mAirList file dialog. The setting names are self-explanatory.
Dialogs you don’t set a default for in your DefaultDirectories.ini file will use their mAirList default
when they are first opened during a mAirList session.
Saved at 02:16:00 on 6 Jul 2011
Revision 19
92
Revision 19
mAirList Version 3.1 User Manual (UK English)
Saved at 02:16:00 on 6 Jul 2011
mAirList Version 3.1 User Manual (UK English)
9.
Working With Audio Files
9.1
Planning Your Audio Library
93
If you are moving to mAirList from a different playout system, or using mAirList in addition to
existing playout systems, you will probably already have a substantial music library, and may have
already added ‘properties’ such as Cue Markers to them in another playout system’s database.
If mAirList is your first experience of radio playout systems, be aware that an audio library for radio
playout requires planning, and is harder work to set up and maintain than simply ripping CDs.
In either case, we suggest that you appoint at least one audio librarian, who is responsible for the
initial setup and continuing maintenance of your audio library.
Setting up your audio library requires:
•
Preferably, a 100% ‘clean’ set of audio files (see 9.3).
•
Ideally, a ‘central’ location to store your audio files.
This may be on one or more networked computers: if you map network drive letters to refer
to these locations, map the same network drive letters on all your mAirList computers.
•
Creation of a mAirListDB database, if you plan to use one (see 11.2 on page 105).
If you have an existing audio library and database, it is usually possible to either access and use that
database directly within mAirList, or to convert/import the database into a mAirListDB database.
Even if this is not possible, importing your existing audio library into a mAirListDB database is easy.
9.2
Audio File Formats: BASS Add-Ins
By default, mAirList can play AIFF, MP1, MP2, MP3, OGG, and WAV format audio files.
To play other audio file formats (for example, .flac files), visit the BASS download page at
http://www.un4seen.com/bass.html#addons and download the appropriate BASS add-in DLL file
for that audio format. Note that you must download the add-in for the correct version of BASS. For
mAirList 3.1, use only add-ins for BASS version 2.4. Extract the downloaded file and copy it into the
plugins\bass folder in your mAirList data folder.
When mAirList next opens, all mAirList features which relate to audio files, such as Browser panes
and file open dialogs, automatically recognise and use the new format(s) and file extension(s).
NOTE: If you use non-standard file extensions, see Additional File Extensions on page 56.
Please note that mAirList does not read tag information in audio files unless it is in the ID3v1,
29
ID3v2, or Vorbis comment tag format . Therefore, tags in file formats you have added as described
above will almost certainly not be read by mAirList.
9.3
Importing Files
Although mAirList requires no special preparation of your audio files before ‘importing’ them, there
are three simple actions you should take before importing any audio file. These will make your file
imports faster, easier, and trouble free.
29
•
Do NOT import ANY known faulty audio files.
No matter how rare or ‘loved’ they are, discard any faulty audio files (which stop playing
mid-way through, or have any clicks, jumps, or any other noise or artefacts): import only
fault-free audio files.
•
If you use a tagged file format like MP3 or OGG:
Check and correct at least the artist, title, year, album, and track number tags.
Fill in all of these tags as completely as possible: if any properties/tags need to be changed or
added at a later time, you must do so manually.
If you also plan to use information from genre or comment tags within mAirList, check and
correct those as well. mAirList imports the contents of all these tags.
•
Rename all your audio files in artist - title.xxx format.
If all other methods fail, mAirList will at least be able to read the title and artist correctly
from the filename.
ID3v1 and ID3v2 are the tag formats used in MP3 files; Vorbis comments is the tag format used in OGG files.
Saved at 02:16:00 on 6 Jul 2011
Revision 19
94
mAirList Version 3.1 User Manual (UK English)
You should also consider which method(s) you want to use to store the imported information (plus
any information you add within mAirList, such as Cue Markers):
•
Metadata (.mmd) file
30
A small text file named the same as the audio file followed by .mmd.
•
Tag (only available for audio file formats which support custom tags)
31
A custom mAirList tag within the audio file.
•
Database (not available in all editions of mAirList)
32
A local or remote database .
33
We strongly recommend that you try all three (or both) methods on a few audio files before
deciding which method(s) to adopt for your entire library. All three have advantages and
disadvantages:
•
.mmd files are easy to find and can be opened in Notepad or any editor or viewer which
supports text or XML files. It is also very easy to see which audio files have been imported
and which have not. Using .mmd files means your audio files are not changed in any way.
However, because one .mmd file is needed for each audio file, disk performance may be
adversely affected, especially if you have a large number of audio files in any single folder.
.mmd files are also subject to accidental deletion if not backed up.
•
Tags are not as visually obvious, and are less easy to edit or view outside of mAirList, but you
may prefer to write the information into the audio file itself, to vastly reduce the chances of
accidental deletion. You also don’t double the number of files in each folder of audio files (as
using .mmd files would do). However, if you have a significant number of audio files in a
non-tagged audio format (.wav files, for example), tags are not an option. Another ‘problem’
with tags is that you cannot save a tag while the audio file is loaded in any Player.
•
A database (available in some editions of mAirList) is the usual choice. However, you may
want to consider having the existing information also available in either tags or .mmd files.
That way, if the database ever needs to be rebuilt from scratch, the task is simplified; and the
amount of manual work needed afterwards is also reduced. It also means that the
information is still available to mAirList even if the database is unavailable for any reason.
We do not recommend that you store audio file information in .mmd files and tags, unless you are
very paranoid. One or other is sufficient, especially if you also store the information in a database.
One reason for this is the method mAirList uses to load a file’s information (its properties) each time
you load it into a Playlist, Player, or Cartwall Player:
1. mAirList first looks for a matching database entry. If one exists, its information is used.
2. If no database entry exists, or no database is in use, mAirList looks for a matching .mmd file.
in the same folder (or if you have created one, in the Central Folder for MMD files).
If an .mmd file exists, its information is used.
3. If no .mmd file exists, mAirList looks for a mAirList custom tag within the audio file.
If it exists, its information is used.
4. If no custom tag exists, or the audio file is in a non-tagged format, mAirList imports the file:
title is set to the audio file’s name; its duration is determined; native file format tags are
read; type is set to the default; if a ~ exists in the filename (Raduga format), it is used to
compute Fade Out; Auto Cue is performed (ignoring Fade Out for Raduga files); and. if you
have specified a Default Item Type for Imported Files, the file’s Type is set.
5. If no tags exist, mAirList uses the audio file’s name to set artist and title.
Using both .mmd files and tags is unnecessary; and though .mmd files are marginally faster to read
than tags, in practice you will not notice any difference.
Revision 19
30
To be accurate, the ‘text file’ contains the information in XML format.
31
The mAirList tag contains a text string containing the information in XML format.
32
Much of the information is stored in a text field containing the information in XML format.
33
Using a very small number of audio files allows you to quickly try each method out before committing to any method(s).
Saved at 02:16:00 on 6 Jul 2011
mAirList Version 3.1 User Manual (UK English)
95
A database (naturally, we recommend mAirListDB, but you can use iTunes or other databases with
less functionality: see 7.9 on page 66 for details) is the most efficient way to store your audio file
information, followed by .mmd files and custom mAirList tags, in that order.
If you initially choose to use either .mmd files or custom mAirList tags, then later decide to switch to
using a mAirListDB database instead, your existing information is preserved because mAirListDB
uses the same strategy shown above when it initially adds a file to the database.
9.4
File Tagging And Metadata
‘Tagging’ is the process of adding information about an audio file (data about data, or metadata) and
saving it (in a database, .mmd file, or a tag within the audio file) as a set of properties.
The saved information is displayed in all mAirList applications on an item’s Properties page.
Item Properties are fully listed and described in section 9.6 on page 97.
To tag a file, change and save the item’s Properties, using mAirListDB or mAirListTag (see below),
or directly in the mAirList PFL Player or any Playlist.
9.4.1
Properties in Playlists
You need to be aware that in a mAirList Playlist, each item’s properties are stored separately within
the file or database, in a database playlist, in a Playlist, and within any .mlp files you create by saving
a Playlist. This means that you can change any property of any item in a Playlist without affecting
any item’s saved properties in the database, .mmd file, file tag, or .mlp file. For example, you can
‘shorten’ an item in a Playlist by changing its Cue Markers, and/or add a fixed time to it, or make any
other ‘custom’ changes you need for that one occasion.
Therefore, be aware that when you load a saved Playlist, any item may have ‘customised’ properties
which differ from its ‘standard’ properties in the database, .mmd file, or file tag.
The comments above also apply to mAirListDB Database Playlists (see 11.5 on page on page 111).
9.5
File Tagger Program (mAirListTag)
mAirList includes a File Tagger program (known as mAirListTag), which is built in to the
mAirList.exe program file. Use mAirListTag to tag files separate from the main mAirList program.
mAirListTag is useful if you need to tag a large number of files, especially if you would prefer that the
personnel who tag files do not have access to the full mAirListDB program.
To open mAirListTag, click Start, All Programs (or Programs), mAirList, File Tagger; or navigate to the
mAirList program files folder and open the file mAirListTag.bat. mAirListTag looks similar to a
mAirList Browser and PFL Player (more accurately, an Item Properties dialog) in the same window.
Figure 9.1: The mAirList File Tagging program (mAirListTag) window—empty and loaded
On the left of the mAirListTag window is the Browser, on the right is the Item Properties dialog.
If you resize the window, the Browser fully resizes, but the Item Properties dialog has a fixed width.
When you open an item in mAirListTag, the Item Properties dialog shows the PFL tab and starts
playing the item, ready for you to add Cue Markers; but you can click on any tab in the dialog, and
change any settings, in exactly the same way as you could do on any Item Properties dialog in any
mAirList application.
Saved at 02:16:00 on 6 Jul 2011
Revision 19
96
mAirList Version 3.1 User Manual (UK English)
9.5.1
mAirListTag Browser
Use the Browser to locate and load audio items for tagging. You can load items from a database,
from folders containing audio files, or from a saved mAirList Playlist (.mlp file) or Database Playlist.
Note that you cannot use mAirListTag to save changes to a database, Database Playlist, or .mlp file:
you can only use mAirListTag to save changes to individual items.
Double-click an audio item in the Browser to load it into the Item Properties dialog. Unlike mAirList,
you cannot drag and drop audio files on mAirListTag from a Windows Explorer window.
The dropdown menu on the mAirListTag Browser toolbar’s Add button shows the same list of
Quick Folders as the Browser in mAirList, so you may wish to add the folder(s) where you usually
store ‘new’ audio files to the Quick Folders list (see Quick Folders on page 56).
When you open an audio item, the Item Properties dialog shows the PFL tab and plays the item.
9.5.2
mAirListTag Item Properties Dialog
Use the Item Properties dialog (see below) to tag an audio file and save your changes. When the
dialog opens, the PFL tab is shown and the item plays. You can change any setting on any tab.
Revision 19
Saved at 02:16:00 on 6 Jul 2011
mAirList Version 3.1 User Manual (UK English)
9.6
97
Item Properties Dialog
The Item Properties dialog is a key component of mAirList, available from all mAirList programs.
Use this dialog to tag an audio file and save your changes.
To save your changes, click an Export data to… button: File Tag, Metadata File, or Database.
Note that the Database button is disabled unless the file you are tagging already exists in the
database: in other words, you cannot add files to a database by clicking the Database button.
To cancel your changes, click Cancel. Note that this will not undo any changes you have already
saved by clicking an Export data to… button.
The Item Properties dialog is described below, by tab.
9.6.1
General tab
Title
The item’s Title.
For ‘special’ Playlist items like DUMMY and BREAK, Title is the name of the ‘special’ item.
Artists
The item’s Artist or Artists. If the item has two or more artists, we strongly recommend that you put
each Artist on separate lines: the mAirListDB database can then list the item under each Artist
name. To add a new line in the Artists box, press Enter.
For ‘special’ Playlist items like DUMMY, BREAK, and COMMAND, Artist is always blank.
Ending (default: blank)
Type any ‘code’ you wish to indicate the item’s ending type.
A commonly-used system is to use an Ending code of f for items which fade out, s for items which
‘stop’ or have a definite end, and to leave the Ending code of all other items blank.
An item’s Ending is shown in the Playlist, but has no other function in mAirList.
Duration
The item’s total duration. You cannot change this value.
Type (default: none)
The item’s Type, chosen from a dropdown list of the available Types in mAirList. An item’s Type is
shown in mAirListDB, and can be used as a Filter in the mAirListDB Mini Scheduler.
Tip: Mark all instrumental items with a Type of Instrumental.
External ID (default: blank)
The ID of the item in an external database or music scheduling application (see 11.9 on page 118).
Colour (default: transparent)
The background colour of the item when shown in a Playlist, and—optionally—in mAirListDB.
Icon (default: none)
An optional custom icon for the item when shown in the Playlist; a standard icon (or the item’s
‘album art’ if one is stored in its ID3 tag) is shown if you leave this blank.
By default, only the name and path of the icon file is stored; so if you rename, move, or delete the
icon file, the icon will not be shown in the Playlist and mAirList will display an error message (and
will clear the item’s Icon property) when you next open the item’s Properties dialog in any mAirList
program. However, if you click shift+Select… to open the dialog, the icon’s data is stored instead.
Comment/Description (default: blank)
A comment or description of the item. Although the default is blank, an existing Comment tag in a
supported audio file format (like MP3 or OGG) is imported to this property.
9.6.2
Audio File tab
Filename
The full path and name of the audio file associated with the item.
If you rename or move an audio file, you can ‘re-associate’ the item with the audio file either by
typing the correct path and filename, or (recommended method) clicking Replace File and selecting
the file’s new location and/or file name.
For ‘special’ Playlist items like DUMMY and BREAK, Filename is blank.
Please note that the Open in audio editor and Open in external player buttons on this tab cannot be
used in the current version of mAirList; these planned new features are not yet implemented.
Saved at 02:16:00 on 6 Jul 2011
Revision 19
98
mAirList Version 3.1 User Manual (UK English)
9.6.3
Options tab
Fixed time (default: off)
This option has no effect in Assist mode, even if items are Linked.
To force the item to play out at a fixed time in Automation mode, switch this option on and set the
fixed time using the spinner control. At the fixed time, preceding playing items are faded out early
and preceding unplayed items are dropped (marked as played). If Soft fixed time (see below) is also
on, then at the fixed time: preceding playing items are allowed to play out in full, and are not faded
out early; preceding unplayed items are still dropped (marked as played).
Last played and Planned
If you use a mAirListDB database, these are the dates and times when the item was last played, and
when it is next scheduled to be played, respectively. You cannot change these values.
Fade duration (default: 0 mS = off)
To override the global fade duration, type a non-zero duration. You may wish to set short fade
durations of 750 mS or so for items in the Cartwall (such as beds or looped drones) which are
designed to ‘fast fade out’ when another Cart Player (such as a closing sting) starts.
Special item (default: off)
This option has no effect unless one or more Players have the configuration option
Only auto-load items marked as ‘special’ switched on (see page 46).
If this option is on, the item is only auto-loaded into a Player which has the corresponding
configuration option switched on. Note that you can still manually load the item into any Player.
Exclude from backtiming (default: off)
If this option is on, the item is ignored when calculating backtiming for Playlist items.
Exclude from logging (default: off)
If this option is on, the item is ignored by all logs (see 7.8 on page 62) and is not logged. This is useful
for ‘incidental’ items such as sound effects, DJ idents, and jingles and beds for show features etc.
Skip in automation mode (default: off)
If this option is on, the item is skipped (not played, but marked as played) in Automation mode.
Fade out all other players in automation mode (default: off)
If this option is on, all other Players in the same Playlist are faded out when the item starts playing in
Automation mode. In practice, this option has no effect unless at least two other Players are playing
when the item starts. Note that this option does not affect Cartwall Players.
Set internal clock to fixed time when started (default: off)
This option has no effect unless the item’s Fixed time option is also on.
If this option is on, the internal mAirList clock is set to the item’s fixed time when the item starts.
This can be useful when recording a show ‘as live’ for later playout.
Always fade out on STOP (default: off)
If this option is on, the item fades out (instead of stopping dead) when it is stopped.
Linked to next item (default: off)
If this option is on, the item is Linked to the next item. This option duplicates the function of the
Link column in the Playlist, and is useful if the item is always to be Linked to the following item.
Don’t move to history (default: off)
If this option is on, the item is not moved to the Playlist History when it ends or is stopped.
9.6.4
Attributes tab
Attributes such as Genre, Album, Track (number), Year, and Album Art (as the item’s icon) are
imported automatically from files whose internal tags contain them; but you can add any Attributes
you wish. You can add, change, or delete any value or Attribute, including imported Attributes.
If you use mAirListDB, Attributes are automatically shown as nodes in the Library tree.
Revision 19
To add an Attribute: press Insert to add before the selected Attribute, or press down arrow to
append after the final Attribute in the list; then type the new Attribute’s Name and Value.
If you have created a fixed set of Values for an Attribute (see 7.12.3 on page 70), you can
select a Value from the dropdown list; otherwise, the dropdown list will be empty.
To change an Attribute, type a new Name or Value.
To delete an Attribute, blank out the Name and Value.
Saved at 02:16:00 on 6 Jul 2011
mAirList Version 3.1 User Manual (UK English)
9.6.5
99
Actions tab
Lists of Actions which you want to occur when the item starts or stops. The upper list shows the
Actions on Start; the lower list shows the Actions on Stop. In each list, you can Add, Remove, or
Configure individual Actions, and you can Load and Save entire action lists as .mla files.
You can add Actions to any item except DUMMY and BREAK items,
For more information about Actions, see 4.1 on page 25.
9.6.6
Cue Data tab
A list of the item’s Cue Markers, showing Track Markers (if any) and Cue Markers.
You can add Track Markers by importing them from .cue files (click Import…, Cue Sheet…); or by
clicking Add…, Track Marker and completing the details on the Edit Cue Point dialog.
You cannot add Cue Markers on this tab: instead, use the PFL tab.
To change a Track Marker or Cue Marker, double-click it, or select it and click Edit…
In the edit dialog, you can adjust Cue Markers to millisecond accuracy.
To delete a Track Marker or Cue Marker, select it and click Delete; or select it and press Delete;
or select it, right-click it. and select Delete from the menu.
IMPORTANT: No confirmation dialog is shown: the Cue Marker is deleted immediately.
9.6.7
PFL tab
In mAirListTag, opening an audio file opens the PFL tab and immediately starts playing the file.
Use the PFL tab to add, change, and remove Cue Markers; and—optionally—to change the
amplification (‘replay gain’), the pitch, and the tempo of the audio file.
Figure 9.2: mAirListTag PFL tab and optional controls
Some PFL tab controls are only shown if you select specific configuration settings:
•
Tempo and Pitch sliders are shown if the Pitch and tempo adjustment using BASS_FX.DLL
setting is on (see 7.13.2 on page 74 and 7.13.3 on page 75).
•
Alternative cue point controls (the list box, and the small TEST, ADD, and DELETE buttons)
are shown if the PFL Player setting Enable alternative cue points is on
(see 7.4 on page 52; also see 7.2.3 on page 48 and 7.3.3 on page 51).
Cue Markers are entirely optional: you don’t have to add, adjust, or remove any Cue Markers if you
don’t want to. However, we do suggest that:
•
All jingles and idents use Start Next and not Fade Out.
•
If you use automation, check Fade Out and change where necessary to Start Next.
•
If you have live presenters, add Ramps (one or more) to assist their talkovers and add Outro
so they know when it’s ‘safe’ to fade or start talking over the end of a song.
mAirList uses Auto Cue by default, which usually sets Cue In, Fade Out, and Cue Out Cue Markers.
Again, it’s not required, but it is wise to check these Cue Markers. Tracks with internal silences can
‘fool’ Auto Cue into setting Fade Out much too early, or Cue In too late, and so forth. There may also
be audio at the start or end of the track which you’ll never want to play out; for example, the first few
seconds of Wannabe by the Spice Girls.
Saved at 02:16:00 on 6 Jul 2011
Revision 19
100
mAirList Version 3.1 User Manual (UK English)
9.6.7.1
Cue Markers
The Cue Markers, and their functions, are described below.
The term track is used here to mean ‘the audio file you have opened.’
Cue In
Use this Cue Marker to set the ‘beginning’ of the track.
The track will be played starting from this point, and any audio before this
point will not be played in either Assist or Auto mode.
Ramp 1, Ramp 2, Ramp 3
Use these Cue Markers to set ‘ramp’ points: usually, the points where the
vocals or the ‘main beat’ of the track begin.
Ramps are displayed in progress bars with separate countdowns and in
contrasting colours, but have no other function. Ramps are useful in Assist
mode to help the presenter to ‘talk up’ to the vocal.
Hook In, Hook Fade, Hook Out
A ‘hook’ is a short section of a track, usually the chorus or the most recognisable part of the track,
played on air as a ‘teaser’ for a track which will be played in full later in the same show.
Use these three Cue Markers to set the points where the hook begins, should be faded out, and ends.
To play an item’s hook, click the Hook button in a Player or Cartwall Player, then click Start; but
note that if the track does not have Hook Cue Markers set, the entire item will be played instead.
Note that you cannot play ‘hooks’ in Auto mode.
Outro
Use this Cue Marker to set the point where the vocals have ended, or where it is ‘safe’ for the
presenter to talk over the rest of the track. If the track ends with a ‘repeat and fade’ of the chorus,
many stations define the outro point to be just after the second repetition of the chorus.
The portion of the track after the Outro is displayed in a contrasting colour in progress bars, but the
34
Outro Cue Marker has no other function .
Start Next
Use this Cue Marker to set the point where the next item should start playing in Auto mode (or when
items are linked in Assist mode). In Auto mode, the track will not fade out until the Fade Out
Cue Marker is reached; if the track does not have a Fade Out Cue Marker set, it continues to play to
the end, which will be either the Cue Out Cue Marker (if any) or EOF.
Fade Out
Use this Cue Marker to set the point where the track should fade out in Auto mode (or when items
are linked in Assist mode). The fade duration is usually the time between the Fade Out Cue Marker
and the Cue Out Cue Marker, or the default automation fade time, whichever is shorter; however,
note that some configuration settings can change this behaviour; and if a fade duration is specified
in an item’s Properties (either in a playlist, database playlist, or the item’s Properties in a database,
.mmd file, or in the file’s internal tag), those settings take precedence, and in that order.
35
In Auto mode (or when items are linked in Assist mode), the next playlist item will start playing
when at the Fade Out Cue Marker, unless it has already been started by a prior Start Next
Cue Marker.
Cue Out
Use this Cue Marker to set the ‘end’ of the track. The track will stop at this point (and will usually be
unloaded from a Player), and any audio after this point will not be played in either Assist or Auto
mode. NOTE: Even if it is enabled, ‘stutter’ mode cueing is not used for Cue Out Cue Markers. When
you click TEST, the two seconds of audio before the Cue Out Cue Marker is played instead.
Anchor
Use this Cue Marker to set the ‘reference point’ for backtiming when playing the track at a fixed
time, especially at a ‘hard’ fixed time, in Auto mode only: not when items are linked in Assist mode.
An example of why and how to set an Anchor Cue Marker follows.
If you have a jingle which runs for a few seconds before an effect or drumbeat which must play out
exactly on the hour, set its Anchor Cue Marker at that effect or drumbeat. When playing this jingle in
Auto mode, mAirList backtimes the track so that its Anchor Cue Marker—not its Cue In
Cue Marker—plays out at the fixed time (for example, 12:00:00).
Revision 19
34
Unless the Configuration setting Use Outro marker for EOF warning (see 7.12.8 on page 72) is on.
35
Unless the Configuration setting Auto fade out at Fade Out marker in assist mode (see 7.2.2 on page 47) is on.
Saved at 02:16:00 on 6 Jul 2011
mAirList Version 3.1 User Manual (UK English)
9.6.7.2
101
Alternative Cue Markers
As noted earlier, you can enable ‘alternative’ Cue Markers. This allows you to set several different
‘versions’ of each Cue Marker—for example, more than one Cue In and Fade Out Cue Marker—
which a presenter or scheduler can choose when playing or scheduling the track.
This is particularly useful for tracks recorded live, where you may want the option of playing the full
track; or just the song, without the spoken introduction before it, or the crowd applause following it.
9.6.7.3
Using The PFL Tab
The term track is used here to mean ‘the audio file you have opened.’
Below the PFL player, the default controls on the PFL tab from top to
bottom, then from left to right, are:
Track Position controls
•
Position slider
Drag to move the current track position.
You can also select (click) the control, then use the mouse wheel or
press the up/down arrow keys to move the current track position.
•
PLAY/PAUSE button (toggle)
Click to PLAY or PAUSE the track.
•
0 button
Click to move the current track position to zero (start of the track).
•
END MON button
Click to move the current track position to the Ending Monitor point,
which by default (see 7.12.7 on page 72) is 15 seconds before the end of the track.
36
Cue Marker list
To select a Cue Marker, click its name in the list. The selected Cue Marker and its value is displayed
to the right of the list, and is affected by the Cue Point Adjustment controls (see below).
Cue Marker Adjustment controls
NOTE: DO NOT press keys to adjust Cue Marker times: click buttons or use Remote Controls mapped
to PFL commands. (Holding down a Ctrl or Shift key while clicking the - or + button is fine.)
If ‘stutter’ mode cueing is switched on (this is the default), any change to a Cue Marker time (except
clearing/deleting it) starts ‘stutter’ play at that Cue Marker.
To stop ‘stutter’ play, click PLAY/PAUSE or TEST while the track is ‘stuttering.’
If ‘stutter’ mode cueing is switched off, Cue Markers are not auditioned automatically when you
alter times: you must click TEST to audition the selected Cue Marker.
•
- and + buttons
Click to decrease/increase the Cue Marker time by 1/100th of a second (10 mS)
Shift+click to decrease/increase the Cue Marker time by 1/10th of a second (100 mS).
Ctrl+click to decrease/increase the Cue Marker time by one second.
•
SET button
Click to set the Cue Marker time to the current Elapsed time.
•
0 button
Click to clear (delete) the Cue Marker.
•
TEST button
Click to audition the Cue Marker. The default ‘stutter’ mode cueing, combined with
mouse wheel ‘jog’ adjustments (see below), is a fast, efficient way to set Cue Markers.
NOTE that if Cue Out is the selected Cue Marker, clicking TEST plays the two seconds of
audio before Cue Out: ‘stutter’ mode cueing is never used for the Cue Out Cue Marker.
•
Mouse wheel
Scroll towards you to increase the Cue Marker time or away from you to decrease the
Cue Marker time; by 1/100th of a second (10 mS) per step.
Shift+scroll to change the Cue Marker time by 1/10th of a second (100 mS) per step.
Ctrl+scroll to change the Cue Marker time by one second per step.
36
If you prefer a plain list to a coloured list, switch the Enable cue category colours Configuration setting off
(see 7.2.3 on page 48, 7.3.3 on page 51, and 7.4 on page 52).
Saved at 02:16:00 on 6 Jul 2011
Revision 19
102
mAirList Version 3.1 User Manual (UK English)
Alternative Cue Marker controls (optional)
If the Enable alternative cue points settings in Configuration are on
(see 7.2.3 on page 48, 7.3.3 on page 51, and 7.4 on page 52), you can
store any number of alternative values for each Cue Marker.
This is useful (for example) for live recordings, to quickly find the
start of the artist’s introduction and the start of the music; and to
have the option of alternative fade outs at different points.
The extra list box shows the alternative values (if any exist) for the
selected Cue Markers.
•
To audition an alternative Cue Marker,
select (click) it in the list box,
then click the small TEST button beside the list box.
•
To store (add) an alternative Cue Marker,
first set the ‘main’ Cue Marker to the time you want to store,
then click ADD.
•
To delete an alternative Cue Marker time value,
select (click) it in the list box, then click DELETE.
Before setting an alternative Cue Marker time value, first add the ‘standard’ Cue Marker time value
to the list of alternative Cue Marker time values. This ensures you always have the ‘standard’
Cue Marker time value available in the list, so you can easily re-set the ‘standard’ Cue Marker after
you have added alternative Cue Markers.
Amplification slider
Drag to change the amplification of the track (minimum: -60dB, maximum: +6dB, default: 0dB).
You can also select (click) the control, then use the mouse wheel to move the slider less precisely.
To reset the amplification to 0dB, double-click the value (the large
number beside the slider).
Tempo and Pitch sliders (optional)
If the Pitch and tempo adjustment using BASS_FX.DLL
setting is on (see 7.13.2 on page 74 and 7.13.3 on page 75),
Tempo and Pitch sliders are shown, which you can use
to alter the speed and/or pitch of the track.
•
Drag the Tempo slider to change the speed of the track
without altering its pitch (‘time stretch’)
(minimum: -32%, maximum: +32%, default: 0%).
•
Drag the Pitch slider to change the pitch of the track
without altering its speed (‘change key’)
(minimum: -12 semitones = 1 octave,
maximum: +12 semitones = 1 octave, default: 0).
•
You can also select (click) either slider,
then use the mouse wheel or left/right arrow keys to move it,
though this is less precise than dragging the slider.
•
To reset either slider to zero, double-click its value (the large number beside it).
Export Data controls
Revision 19
•
File Tag button
Click to save the track’s Properties in a custom mAirList tag within the audio file.
At present, this is only supported for MP3 or OGG files.
•
Metadata File button
Click to save the track’s Properties in a mAirList metadata file (.mmd file).
•
Database button
Click to save the track’s Properties in a mAirListDB database.
You cannot use this button to add the track to a mAirListDB database; the track must
already exist in the database before you click the Database button.
Saved at 02:16:00 on 6 Jul 2011
mAirList Version 3.1 User Manual (UK English)
10.
103
Layout Designer
To change the positions and sizes of objects in the mAirList window, including any custom screen
objects you have created (see section 7.6.5 on page 58), you can, if you wish, manually edit the
layout.ini file in your mAirList config folder. However, mAirList provides a built-in Layout Designer
which you can use to make these changes visually.
The mAirList Layout Designer is built in to the mAirList.exe program file. To open the mAirList
Layout Designer, click Start, All Programs (or Programs), mAirList, Layout Designer; or navigate to
the mAirList program files folder and open the file LayoutDesigner.bat.
The Layout Designer is a fully-working copy of mAirList, with square selection ‘handles’ on each
object in the window (main toolbar, Players, Playlist, Browser, etc.). Everything in the window works
exactly as it does normally, so you can test any changes within the Layout Designer.
The first time you open the Layout Designer after installing mAirList, it looks like this:
Figure 10.1: The mAirList Layout Designer window
The Layout Designer dialog lists all the objects in the window, and shows the size and position of
the currently selected object (initially, no objects are selected, and all object ‘handles’ are black).
If a layout.ini file already exists, objects are shown in the sizes and positions specified in the file;
otherwise, all objects are set to 200×100 pixels in size, and are ‘cascaded’ in the window to make
them easier to select using the mouse.
Use the mouse or the dialog to select an object. You can select only one object at a time.
10.1
Using The Mouse
NOTE: When you open the Layout Designer, Enable mouse resizing is selected.
You cannot use the mouse to make layout changes if this checkbox is cleared.
Use the mouse to select, move, and resize objects as described below. Note that you will usually
need to use the Layout Designer dialog as well, to ensure that objects are precisely aligned, and that
objects like Players are identically sized.
•
Select an object by clicking the large ‘handle’ in the centre of the object.
The ‘handles’ of the currently selected object change from black to red,
and its name is selected in the Objects list in the Layout Designer dialog.
•
Move an object by dragging the ‘handle’ in the centre of the object.
•
Resize an object by dragging any ‘handle’ on the edge or corner of the object.
Moving or resizing an object with the mouse automatically selects that object.
You can also move or resize the mAirList window by using the mouse.
Saved at 02:16:00 on 6 Jul 2011
Revision 19
104
10.2
mAirList Version 3.1 User Manual (UK English)
Using The Layout Designer Dialog
Click an object in the Objects list to select it. Use this
method to select an object which is currently ‘under’
other objects, or is too small or otherwise difficult to
select using the mouse. The ‘handles’ of the currently
selected object change from black to red.
Note that Playlists, Player objects, and any custom
screen objects you have created are numbered starting
from zero, so for example, the first Player in the first
Playlist is named Player0_0 in the Objects list.
Use the Position and Size text boxes and spin controls to
make fine adjustments to the currently selected object.
This allows you to precisely align the edges of objects, and to ensure that objects of the same type
(for example, all Players) are all the same size.
Enable mouse resizing is selected by default. Clear this checkbox if you want to prevent accidental
changes, or while testing your layout. Clearing this checkbox removes the ‘handles’ on all objects.
Save layout saves the current layout to the layout.ini file in your mAirList Config folder. When you
next start mAirList, it will use the layout you have saved.
Discard layout ‘resets’ the layout to the way it looked when you opened the Layout Designer, or to
the last layout you saved. In other words, the current layout.ini file is loaded, and all objects are
arranged according to the settings in the file. Any changes made since your last save will be lost.
Automatic layout deletes the layout.ini file, if it exists. The Layout Designer shows a message box
asking you to confirm this action. Clicking Automatic layout has the effect of returning to the
‘no layout’ default position (see Figure 10.1 on page 103).
IMPORTANT: Clicking Yes in the message box will delete your current layout.ini file.
Unless you are starting from the default layout, we strongly suggest that you first make a copy of your
current layout.ini file in another location, by clicking Export…
Export… saves the current layout to a file and location other than the layout.ini file in your mAirList
Config folder. This is useful if you want to save a layout to Import it on another mAirList computer,
and also to backup your current layout before you make any changes to it.
Import… loads a layout you previously saved by using Export…; all objects are arranged according
to the settings in the file you import. Any objects in the window which don’t exist in the imported
layout file will not be affected. Use Import to copy a layout exported on another mAirList computer,
or to restore a previously saved layout.
10.3
Closing The Layout Designer
To close the Layout Designer, close the mAirList window using any of the usual methods.
If you have made changes but have not yet saved them, the Layout Designer displays a message box
asking whether you want to save your changes.
Revision 19
Saved at 02:16:00 on 6 Jul 2011
mAirList Version 3.1 User Manual (UK English)
11.
105
mAirListDB Audio Database
Important Note: mAirListDB is only available in the paid editions of mAirList
(Personal Edition and Professional Edition).
11.1
About mAirListDB
mAirListDB (mAirList database) is a so-called music database or audio database. mAirListDB stores a
list of audio files (but not the actual files) and their properties (Cue Markers, etc.). mAirListDB also
manages playlists you build from the audio files in the list, and allows you to use your entire audio
library as a single browsable, searchable entity: the location of your audio files—local hard disk or
server on the Internet—no longer matters. You can therefore organise the physical storage of your
audio files in any way you wish.
You manage mAirListDB using the database management application, which is built in to the
mAirList.exe program file. To run this application, click Database in your mAirList Start menu folder
or run mAirListDB.bat from your mAirList program folder.
You can set up mAirListDB in two different modes:
•
In local mode, all data is stored in a single SQLite .db file on your computer’s local hard disk.
•
In network mode (available in Professional Edition only), all data is stored on a PostgreSQL
server you can access from anywhere on your network. Use this mode if you want to access
the database from multiple computers. (Please note that you must purchase at least a
mAirList Management licence for each computer you use to access the database.)
After you create a database, you cannot change its mode unless you delete and re-create the
database from scratch, so it is very important that you decide the database mode you want to use
(local or network) before you create a database.
11.2
How To Create A New mAirListDB Database
The steps to create a new mAirListDB database are different for local mode and network mode
databases, as described below.
11.2.1
Local Mode
To create a new mAirListDB database in local mode:
1.
2.
3.
4.
5.
6.
7.
8.
9.
10.
37
Open the mAirList Configuration program (mAirListConfig) and navigate to the Databases node.
Click Add, and in the pop-up menu, click mAirListDB (local mode).
You see the mAirListDB (local mode) Setup dialog.
Click Create new database. and, on the Create New mAirListDB Instance dialog, either accept the
default database file name and location (database.db in your mAirList data folder), or select the
folder and type the File name: you want to use for your new database file. Click Save.
mAirListDB creates the database file. When the database file has been created, you see a
Setup completed successfully message box. Click OK to dismiss the message box.
Optionally, you can change the caption for your database (the default caption is Database).
The caption is the database ‘name’ displayed in mAirList Browser Database panes.
To change the caption, click the Advanced tab and type a Custom Caption.
Optionally, clear the Show database button in playout window checkbox
(if you do not want a Database button in the mAirList toolbar).
Optionally, select the Use external IDs for import and export checkbox
(if you need to synchronise mAirListDB with an external database: see 11.9.1 on page 118).
37
Optionally, set the Synchronous Mode . OFF dramatically improves SQLite performance but
does not use any disk caching, making your database file vulnerable to corruption or data loss in
case of power loss etc.; NORMAL enables disk caching for almost all operations, but has little or
no performance gain compared to FULL, the default setting (cache all disk operations).
Click OK to close the mAirListDB (local mode) Setup dialog.
On the mAirList Configuration window, click Save to save your changes.
See the online SQLite documentation for full details.
Saved at 02:16:00 on 6 Jul 2011
Revision 19
106
mAirList Version 3.1 User Manual (UK English)
11.2.2
Network Mode
11.2.2.1
Obtain and Install PostgreSQL
Before you can create a mAirListDB database in network mode, you must first install PostgreSQL, a
free database management system. If you already have PostgreSQL installed on your computer
network, you can add the mAirListDB database schema and login roles to it: your PostgreSQL
administrator should be able to do this for you after studying the instructions below.
mAirListDB has only been tested with PostgreSQL 8.3 and above, which is available for both
Windows and Linux, as well as for several other Unix-like operating systems. Brief installation and
setup instructions for Windows and Linux are below.
Windows Installation
You can download a ‘one-click’ installer from http://www.postgresql.org/download/windows. This
distribution includes a very useful management application called pgAdmin III.
Download the installer and follow the installation instructions. If you encounter any problems,
please refer to the PostgreSQL documentation.
After you have installed PostgreSQL, open pgAdmin III. In the Object browser pane, double-click the
PostgreSQL 8.3 (localhost:5432) node. PostgreSQL prompts you for the server password you chose
during PostgreSQL setup.
38
Once you are connected, right-click the Login Roles node and click New Login Role. Role names
are case sensitive, and should ideally be all lower case. On the New Login Role dialog, type mairlist
as the role name, and type a password. Leave all other options unchanged, especially the Role
Privileges checkboxes. Click OK to create the role.
Next, right-click the Databases node and click New Database. Like role names, database names
should ideally be all lower case. Type mairlist as the database name.
Important: As Owner, select the mairlist role you created in the previous step.
Make sure Encoding is set to UTF8 and leave all other options unchanged. Click OK to create the
database. When this is complete, close pgAdmin III.
Linux Installation
PostgreSQL 8.3 or later should be included in all recent Linux distributions. If not, you can download
it from http://www.postgresql.org/download/linux and install it separately.
The pgAdmin III configuration tool referred to in the Windows installation instructions above is also
available for Linux, so if you prefer a graphical management application, you can install it and follow
the instructions above.
However, you can easily create the login role and database using the Linux console:
1. Open a console window and become root, usually by entering the su or sudo su command.
2. Change your user ID to the special PostgreSQL management user postgres:
# su postgres
3. The command prompt should now look something like postgres@computername$.
From this user ID, you can create PostgreSQL login roles and databases.
4. Create a new login role named mairlist (in all lower case, as preferred by PostgreSQL):
# createuser -P mairlist
5. Choose a password for the user and enter it twice. Answer all questions with no.
(The user does not need to be a super-user, nor be able to add other users or databases.)
6. Create a database named mairlist (again, all lower case) owned by the user mairlist:
# createdb -O mairlist -E UTF8 mairlist
A few seconds later, your database is ready for use. You can try to log in by typing
# psql -U mairlist -d mairlist -W
38
Revision 19
In PostgreSQL terminology, a login role is the same thing as a database user.
Saved at 02:16:00 on 6 Jul 2011
mAirList Version 3.1 User Manual (UK English)
11.2.2.2
107
Allow Remote Computers To Access PostgreSQL
By default, the Windows and Linux distributions of PostgreSQL only allow connections from the
local PC, and will block any connection attempts from other computers on your network. To allow
other computers to access the PostgreSQL server, edit the pg_hba.conf file. You will also usually
need to add the line listen_addresses='*' to the postgresql_conf file.
On Linux, these files are located somewhere in /etc/postgresql. On Windows, the files are usually in
the C:\Program Files\PostgreSQL\8.3\data folder.
To configure PostgreSQL server to allow other computers to access the database via MD5 password
authentication over your IP network, add a line to the pg_hba.conf file. For example, if your network
39
uses the IP subnet range 192.168.10.nnn, add the appropriate version of this line:
Newer PostgreSQL servers: host mairlist all 192.168.10.0/24 md5
v7.x PostgreSQL servers: host mairlist all 192.168.10.0 255.255.255.0
md5
Don’t forget to restart the PostgreSQL server after you save pg_hba.conf and postgresql_conf.
You must also install the PostgreSQL Client Library on each ‘remote’ mAirList computer (see below).
Finally, we recommend that you select the Management mode requires login option in PostgreSQL.
With this option set, starting the management interface presents a login dialog, requiring the user to
enter their personal credentials. This allows you to track which changes are made by which user.
By default, mAirListDB operates with a single database user (role). Optionally, you can create
multiple login roles and (using PostgreSQL admin tools) assign different privileges to each role.
However, at the moment, we recommend that only advanced users, or those with practical
experience in PostgreSQL administration and rights management, should attempt to do this.
11.2.2.3
Obtain and Install the PostgreSQL Client Library
To access a PostgreSQL server, mAirList uses the PostgreSQL client library (libpq.dll). Starting from
mAirList 3.0.8, the older version (7.4) of the PostgreSQL client library is included in all mAirList setup
packages including the ZIPfile distribution. The client library is a single DLL file named libpq74.dll.
You can use the newer version 8 of the client library if you prefer, but version 8 installs numerous
support DLLs which unnecessarily ‘bloat’ the installation. This is why we recommend the (supplied)
older version libpq74.dll file, which provides all the function required for mAirList and mAirListDB.
If you would still prefer to use a newer version of the PostgreSQL Client Library, download it from
http://www.mairlist.com/download/misc/libpq/. Extract postgresql-libs-version.zip into your
mAirList program folder, preserving the folder structure. Important: You must use this installation
method on every computer which accesses mAirListDB (and PostgreSQL).
11.2.2.4
Set Up mAirList
Configure mAirList to use your new PostgreSQL mAirList database as follows:
1. Open the mAirList Configuration program (mAirListConfig) and navigate to the Databases node.
2. Click Add, mAirListDB (network mode). You see the mAirListDB (network mode) Setup dialog.
3. Click the Connection tab and type the information you use to connect to your PostgreSQL server.
If you followed the instructions above: Database and User are both mairlist; Host is either
localhost or the name/IP address of the computer running your PostgreSQL server; and
Password is the password you chose for the mairlist role during PostgreSQL setup.
4. IMPORTANT! Do not perform this step more than once on the same PostgreSQL database.
Click the Setup tab, and click Perform Initial Setup. When the database setup is complete, you
see a Setup completed successfully message box. Click OK to dismiss the message box.
5. Optionally, change the caption for your database (the database ‘name’ displayed in mAirList
Browser Database panes, default: Database): click the Advanced tab and type a Custom Caption.
6. Optionally, clear the Show database button in playout window checkbox
(if you do not want a Database button in the mAirList toolbar).
7. Optionally, select the Use external IDs for import and export checkbox
(if you need to synchronise mAirListDB with an external database: see 11.9.1 on page 118).
8. Click OK to close the mAirListDB (network mode) Setup dialog.
9. On the mAirList Configuration window, click Save to save your changes.
10. When mAirList starts up, it uses the user credentials you entered on the Connection tab to make
its automated login and connection to PostgreSQL and the mAirListDB database.
39
Compare these lines with the examples in your pg_hba.conf file to decide whether to use CIDR or subnet mask format.
Saved at 02:16:00 on 6 Jul 2011
Revision 19
108
11.3
mAirList Version 3.1 User Manual (UK English)
Managing Your Audio Library
Before we explain how to use mAirListDB to manage your audio library, we recommend that you
appoint at least one member of your station personnel to manage your audio library. If you allow
your audio library to ‘just grow,’ it will quickly become an unmanagable mess.
Your audio library manager will be responsible for:
•
Maintenance of library media and folders.
•
Physically adding new audio files to the library media and folders.
•
Quality-checking all new audio files for clicks, pops, artefacts, and other audio faults.
•
Tagging all new audio (assigning an audio Type, adding cue and ramp points, etc.).
•
Checking that artist and title information is correct, and in a standard format.
•
Checking for duplicate titles which are different songs, and marking these accordingly.
•
Keeping mAirListDB in sync with the library media.
•
Managing mAirListDB folders.
Audio library managers typically have one ore more assistants/staff to assist with these duties.
If you have not already done so, please read (or re-read) section 9.3 on page 93 before continuing,
and make sure that your audio library manager and staff also read section 9.3 and all of this section.
Once you have set up a mAirListDB connection, you can run the mAirListDB database management
program either by selecting Database from the mAirList Start menu group, or by running
mAirListDB.bat from your mAirList program folder.
11.3.1
Adding Storages
Before you can add audio files to mAirListDB, you need to tell mAirListDB where your audio files are
stored. In mAirListDB terminology, the audio file folders on your hard disks or network file servers
are called storages. (The term ‘storage’ was chosen because future versions of mAirList may support
other types of data source: for example, a web server).
Important: If you map network drive letters to refer to locations on network file
servers, map the same network drive letters on all your mAirList computers,
and use the same network drive letters when you add storages to mAirListDB.
Otherwise, your playout computer(s) will not be able to load the audio files.
To add one or more folders as a storage, click Administration, Configuration…, Storages tab, click
Add…, then navigate to the top-level folder you want to add as a new storage and click OK twice.
mAirListDB scans folders recursively, so you don’t need to Add subfolders separately—and if you
did, this would result in unexpected behaviour. The storage is named the same as the folder name.
Please note that adding a storage does not add its audio files to the database. To add audio files to
the database, synchronise the storage as described in 11.3.3 on page 109. A storage will not be listed
under the Storages node of the Library pane tree until you have synchronised it at least once.
11.3.2
Adding Virtual Folders
Within mAirListDB, you can create a hierarchy of virtual folders to help you organize your audio
files. Virtual folders only exist within mAirListDB, and are completely separate from the real file
folders where your audio files are stored.
Once created, virtual folders can contain audio files from any storage, so you do not need
(for example) to store all your ‘oldies’ in the same real folder(s) on disk. You can also add ‘special’
non-audio items to any virtual folder.
To add a new virtual folder, select a folder (or the Folders node) in the tree on the Library page, then
on the toolbar, click New Folder. For example, you might create a virtual folder named Xmas to store
all your Xmas-themed items, a virtual folder named 1950s to store all items recorded in the years
1950–1959, or virtual folders like Ballads, Current Hits, Heavy Rotation, Jingles, Sweepers, etc.
The virtual folder named Unsorted is always present and you cannot delete it. The Unsorted virtual
folder contains all audio files which you have not added or moved to any other virtual folder. If you
Delete an audio file from all other virtual folders, it will ‘move back’ to the Unsorted virtual folder.
Revision 19
Saved at 02:16:00 on 6 Jul 2011
mAirList Version 3.1 User Manual (UK English)
109
Note that you can copy the same audio file (or item) into as many virtual folders as you like.
So for example, you could copy the same station jingle audio file into virtual folders named Jingles,
Station IDs, and Xmas Jingles; or the same song into virtual folders named 1970s, Disco, and
Number Ones. This is especially useful if you plan to use the mAirListDB Mini Scheduler (see 11.5.3
on page 113) to create playlists for automated playout.
On the other hand, if you are purely a live assist station which does not use scheduled playlists at all,
we suggest that you at least create two virtual folders named Music and Jingles, but like everything in
mAirList, that is entirely your decision, based on how your station works.
Important: If you plan to use the Mini Scheduler to create database playlists, we suggest that you
first learn and understand how the Mini Scheduler works (see 11.5.3 on page 113), then create a set
of virtual folders which will best suit your hour templates.
11.3.3
Synchronising a Storage
Once you have added a storage, you can import a list of the audio files it contains and read all the
information (file tags etc.) from the audio file tags and .mmd files in that disk folder and all its
subfolders. In mAirListDB terminology, this import process is called synchronisation.
To synchronise a storage, click Synchronise on the Library tab, then choose the storage you want to
synchronise. Note that you cannot synchronise more than one storage at the same time.
The synchronisation dialog scans the storage and displays the list of ‘new’ files on the left hand side.
Select the files you want to import (by default, all files are selected); decide whether you want to
Disable Auto Cue (the default is Enabled: see below); select the virtual folder where you want to save
the imported files (the default is Unsorted); select the desired Type for the files by selecting it in the
Set type as dropdown (leave this blank unless all files in the storage are the same Type), then click
Import selected files.
Important: If Auto Cue is enabled in the mAirList configuration program,
synchronisation takes longer to run, unless you have previously tagged the files.
The Disable Auto Cue check box in the Synchronisation dialog optionally
‘switches off’ Auto Cue for this one synchronisation. Tick this box only if you do not
want to run Auto Cue for ‘untagged’ files in the storage which are ‘new’ to mAirList.
Regardless of the check box setting, files already present in mAirListDB
will not be Auto-Cued again: their existing Cue Markers are unaffected.
Even if Disable Auto Cue is cleared, no Cue Markers will be set during
synchronisation unless Auto Cue is enabled in the mAirList configuration program.
Depending on the speed of your computer, synchronisation processes at least one thousand items
per 35 minutes; or at least 1,700 items per hour.
During synchronisation, mAirListDB reads all the .mmd files and ID3 (or other) file tags, exactly like
dragging a file into mAirList does (synchronisation uses exactly the same mechanism, which is
described on page 94). You can check the progress of the synchronisation in the status bar at the
bottom of the dialog. As each file is successfully synchronised, it disappears from the New Files list.
To interrupt synchronisation at any time, press Esc.
After your storage is fully synchronised, its audio files appear as items in the virtual folder hierarchy
of the Library pane tree on the Library tab; the storage will be listed in the Storages node of the
Library pane tree; and the audio files will also be listed as items in the storage.
You can synchronise a storage at any time to check for files which have been added to, renamed, or
deleted from it since the last synchronisation. If a file is missing, the dialog gives you the option to
delete the corresponding database items; if a file has been renamed, it will appear in both lists (New
and Missing), and you can select both the old name and the new name, then click Fix renamed file
to rename the file in the database.
11.3.4
VACUUM Command (Compact/Defrag)
Like all database files, a mAirListDB database can become ‘bloated’ over time. To ‘compact’ or
‘defrag’ a mAirListDB database, open its Configure/Setup dialog in the mAirList configuration
program, click the Advanced tab, then click VACUUM: Perform now.
Saved at 02:16:00 on 6 Jul 2011
Revision 19
110
11.4
mAirList Version 3.1 User Manual (UK English)
Working With The Library Tab
The Library tab window in mAirListDB shows the contents of your library using two panes.
The left-hand pane shows a tree whose root is the database name. The ‘first-level’ nodes below the
root are (virtual) Folders, Artists, item Types, item Attributes, and Storages.
The right-hand pane is a list of the contents of the node selected in the left-hand pane.
For example: click an Artist node in the left pane to show all items by that Artist in the right pane.
Revision 19
•
To add a new virtual folder, select a folder (or the Folders node) in the tree on the Library
page, then on the toolbar, click New Folder.
•
To rename a virtual folder, select it, click its name, edit the name, and press Enter.
•
To move a virtual folder within the Folders tree, drag the folder and drop it on the folder you
want to move it to. Drop the folder on the Folders node to make it a ‘top-level’ folder.
•
To delete a virtual folder, select it and, on the toolbar, click Delete Folder. Any items in that
folder which are now no longer in any other virtual folder move to the Unsorted folder.
•
To add item(s) to a virtual folder, select the item(s), then Ctrl+drag/drop them on the folder
to copy the items, or drag/drop them on the folder to move the items.
•
To add ‘special’ items to a virtual folder, select the folder, click New Item on the toolbar,
select the type of item you want to add (for example, Silence or Automation break point)
from the menu, add or change the item’s properties, then click OK.
(This is useful when creating Hour Templates for the Mini Scheduler: see 11.5.3 on page
113.)
•
To search for an item, type any part of the title or artist name in the Search: box and press
Enter. mAirListDB displays all items whose title or artist(s) contain the text you typed.
•
To change sort or column order in the right-hand pane, click a column heading to sort by
that column; drag and drop column headings to change their order.
•
To edit an item’s Properties, double-click the item.
•
To ‘mass edit’ a number of selected items in a single operation, select (Ctrl+click or
Shift+click) the items, right-click, then click Mass edit. On the Mass Edit dialog, make
changes, then click the Apply button beside the box to apply that change to all the items.
Finally, click OK to save all your changes or click Cancel to abandon all your changes.
•
To change an item’s Type, first expand the Types node, then drag/drop the item on the
Type node you want to change it to (for example, Instrumental).
•
To listen to an item, select the item and use the mini-PFL player at the bottom of the
mAirListDB window.
•
To use the mini-PFL Player, select an item, then click the Listen (play) button.
While the item is playing, drag the slider to listen to any part of the item, or click the Jump
(next) button to hear the end of the item (approximately twenty seconds).
Click Stop to stop playback. Unless the double-click action for an item is Playback
(see below), you cannot listen to a different item until you either stop the mini-PFL Player, or
select a different item and then press the Listen (play) button again.
•
To change the double-click action for an item from Properties to Playback, click the
Playback (speaker) button at the bottom right of the mAirListDB window; to change the
double-click action back to Properties , click the Properties (pencil) button at the bottom
right of the mAirListDB window.
•
To export the entire library as a CSV, text, or Raduga file,
click Export, Export Entire Library…, navigate to the desired folder, select the type of file
you want to export, type a File Name, and click OK.
•
To export the items shown in the right-hand pane as a CSV, text, or Raduga file,
click Export, Export Current View…, navigate to the desired folder, select the type of file you
want to export, type a File Name, and click OK.
•
To export selected items as a CSV, text, or Raduga file,
select the item(s), click Export, Export Selection…, navigate to the desired folder, select the
type of file you want to export, type a File Name, and click OK.
Saved at 02:16:00 on 6 Jul 2011
mAirList Version 3.1 User Manual (UK English)
11.5
111
Managing Database Playlists
A database playlist is a normal mAirList playlist which is stored within the mAirListDB database
40
instead of in an external file . Database playlists are especially useful if you regularly run mAirList in
Automation mode for any part of your broadcast day or week.
In mAirList—like most music scheduling applications—a database playlist begins ‘on the hour,’ so
there is one playlist for each hourly ‘slot’ in each day. Database playlists are identified by the hour
and date for which they are scheduled. For example: ‘the 3 a.m. playlist for June 4th, 2010.’
You can easily schedule mAirList events to automatically load a database playlist a few minutes
before every hour; and you can also quickly and easily make last-minute changes to any database
playlist right up to the moment it is automatically or manually loaded into mAirList.
Although each database playlist’s duration represents one hour of airtime, we strongly suggest that
you make each database playlist a few minutes longer than one hour, in case any items in the playlist
fail to play out, or the playlist under-runs for any other reason.
To manage database playlists, click the Playlist tab in the mAirListDB window.
11.5.1
Working With The Playlist Tab
The Playlist tab window in mAirListDB is identical to the Library tab window, but with a playlist
pane above the two Library panes. The playlist pane shows the contents of the database playlist for
the hour and date currently showing in the date and time dropdowns at the left of the toolbar.
On the Playlist tab, the navigation actions are:
•
To jump to a specific slot and view the database playlist in that slot,
set the date and time dropdowns to the day and hour you want to view.
•
To move one slot (hour) back or forward and view the database playlist in that slot,
click Previous to move one hour back; click Next to move one hour forward.
•
To view one week’s slots as a table, click Go To…
The Select Playlist dialog opens, showing all the slots in the current week, and the duration
of each non-empty slot’s database playlist.
Click the left arrow to move one week back; click the right arrow to move one week forward.
Completely empty slots are red; slots which have at least one item in their playlist are green.
Beside each non-empty slot’s duration, a warning icon indicates the slot’s duration is
less than one hour; a green tick indicates the slot’s duration is at least one hour.
To view the contents of the database playlist in a slot, double-click the slot.
On the Playlist tab, the general actions for the database playlist you are currently viewing are:
•
To save the database playlist, click Save.
•
To clear (empty) the database playlist, click Clear. Although the database playlist is cleared
immediately on screen, the change is not permanent unless you click Save, so navigating to
a different slot and back again will ‘restore’ the cleared playlist.
•
To play the entire database playlist, click PFL.
On the Playlist tab, the item-related actions for the database playlist you are currently viewing are:
40
•
To change the database playlist order, drag and drop the items in the playlist pane.
•
To add a specific library item to the database playlist, drag the item from the right-hand
library pane and drop it in the playlist pane.
•
To add a ‘special’ item to the database playlist you are viewing, click Insert, select the type
of item you want to add (for example, Silence), add or change the item’s properties, then
click OK. The item is inserted before the currently selected item in the playlist.
•
To make custom changes to an item’s Properties which apply only to the current playlist,
select an item, right-click it, click Customise Properties… , and make the changes.
•
To play the selected database playlist item, right-click it, click Customise Properties…,
then click the PFL tab in its Properties dialog.
Unless, of course, you choose to Export the playlist to an external file.
Saved at 02:16:00 on 6 Jul 2011
Revision 19
112
mAirList Version 3.1 User Manual (UK English)
On the Playlist tab, the file import and export actions are:
•
To import an external playlist file into the current hour slot,
click Import, Single Playlist…
Note that this replaces the current database playlist contents.
If the current database playlist is not empty, click Yes to save the current database playlist
first, No to allow it to be replaced without saving, or Cancel to cancel the import.
On the Import Playlist dialog, select the file type in Files of type, then navigate to and select
the playlist file you want to import and click Open.
•
To import one or more external playlist files and split them into multiple database
playlists, click Import, Multiple Playlists…
Note that this may replace the current database playlist contents.
If the current database playlist is not empty, click Yes to save the current database playlist
first, No to allow it to be replaced without saving, or Cancel to cancel the import.
On the Import Playlists dialog, select the file type in Files of type, then navigate to and
select the playlist file(s) you want to import and click Open.
On the Playlist Import dialog Output tab, select the start date/time and criteria to use to
split the playlist(s), then click Apply/Generate. To save the results as database playlists in
those slots, click OK; or to cancel the import, click Cancel.
•
To export the database playlist you are viewing to a file, click Export, This Playlist… and
on the Save Playlist dialog, select a file type (.mlp, .m3u, or printable HTML) in Save as type,
navigate to the correct folder, change or accept the File name, and click Save.
•
To export a range of database playlists as separate files, click Export, Multiple Playlists…,
and on the Save Playlists dialog, select the range of database playlists you want to export,
choose the Output folder, type or accept the File name format (using logging variables: see
7.8.2 on page 63), select a File format (.mlp, .m3u, or printable HTML), then click Export to
export the files or Cancel to cancel the export.
The Generate button is described in section 11.5.3 on page 113.
Note that you cannot play items in the playlist pane using the mini-PFL player at the bottom of the
window: the mini-PFL player can only play files in the library pane.
11.5.2
Creating Database Playlists
You can create database playlists manually, or automatically by using the built-in Mini Scheduler
(see section 11.5.3 below), or (as described above) by importing external playlist files (or ‘log files’)
created by music scheduling applications such as Powergold, RCS, Station Playlist Creator (SPC),
Music 1, or DigAS Show.
11.5.2.1
Creating A Database Playlist Manually
To create a database playlist manually, first select a time and date using the toolbar controls, then
drag items from the library browser at the bottom of the window into the playlist at the top of the
window. Items dragged from the library pane (‘database items’) are shown with a green icon.
To move items within the database playlist, drag and drop them. To delete items from the database
playlist, select the item(s), then press Del; or right-click the item(s) and click Delete.
You can customise any item in the database playlist by changing any value or setting in its
Properties (Cue Markers, fade duration, etc.) to a different setting which you want to use in this one
database playlist only. These changes are saved only in that database playlist: the database item is
not affected. Customised items (from the library) are shown with an orange icon.
To customise an item, double-click it (or right-click it and click Customise Properties…) to open its
Properties dialog, make your changes, then click OK.
To insert non-audio items (Silence, Break, etc.) into a database playlist, click Insert in the toolbar,
click the type of item you want to insert, set its Properties (if necessary), and click OK.
Non-audio items are shown with a blue icon (or a green icon, if dragged from the library pane).
To save the database playlist, click Save in the toolbar.
If you change a database playlist and then move to a different slot’s playlist without saving your
changes, mAirList displays a message box: click Yes to save your changes and continue, click No to
abandon your changes and continue, or click Cancel to remain in the database playlist you changed.
Revision 19
Saved at 02:16:00 on 6 Jul 2011
mAirList Version 3.1 User Manual (UK English)
11.5.3
113
Using the Mini Scheduler
Creating database playlists manually quickly becomes a tedious chore. Manually created playlists
also tend to be ‘biased’ towards better-known artists and songs, leaving much of your library
‘unplayed.’ Unless you choose to use (or already use) an external music scheduling application,
sooner or later you will need an automated way to create database playlists.
The Mini Scheduler built into mAirListDB creates ‘random’ playlists by using some very basic rules.
Although the Mini Scheduler uses techniques and concepts similar to those in professional music
scheduling applications, it is not intended to replace them: it lacks many important features such as
detailed selection rules, daypart separation, and ‘exclusions.’ However, the Mini Scheduler is
adequate if all you need to do is create random playlists quickly and with minimum effort.
11.5.3.1
Creating Hour Templates
Although the Mini Scheduler can create playlists by randomly selecting items from your entire
library, it is more usual to set it up to randomly select items from specific virtual folders. This is the
same as using ‘categories,’ ‘groups,’ or ‘rotations’ in a professional music scheduling application.
For example, you might create virtual folders like Pop, Rock’n’roll, and Country; and/or 1950s, 1960s,
1970s, 1980s, etc.: any names which reflect the types of music your station plays, and how you plan
to schedule them. As another example, a CHR station would typically use Heavy, Light, and Oldies.
After you create suitable virtual folders, you can create hour templates for the hours you want to
schedule. An hour template is a list of virtual folder names, and serves the same function as a ‘clock’
or ‘format’ in professional music scheduling applications. When it generates playlists, the
Mini Scheduler selects a file randomly from each virtual folder in the list; and by default (you can
change this behaviour), it then shuffles the files it has selected into a random order.
You can create as many hour templates as you want. For example: templates for your breakfast
show, daytime, drive time, late night, automated overnight playout, and weekend shows; each with a
slightly different list of virtual folders and therefore a different music mix. As you will see in 11.5.3.3
on page 114, you assign hour templates to hourly slots in a weekly ‘template’ to ‘tell’ the
Mini Scheduler which hour template to use to generate each hour’s playlist in the week.
To create a new hour template, click Administration, Manage Hour Templates… to open the
Manage Hour Templates dialog, then click New to open the Edit Hour Template dialog.
The default Name for the template is New template, which is used for every new template unless
you change it. Because this could result in several templates all named ‘New template,’ we suggest
that you first click the General tab and type a Name and Description for your new hour template,
but you may prefer to create the template contents first and name the template later. (If you do
choose to name the template later, please note that you cannot rename templates on the
Manage Hour Templates dialog: you can only do this on the Edit Hour Template dialog.)
The Items tab lists the template contents. Click Add to add a template item, then click the new
41
item’s Folder column to choose a virtual folder to replace the default Unsorted folder. Note that
you cannot add items (such as a specific file or a Dummy item) to a template directly: instead, you
must create a virtual folder, copy (or Insert) only that one item into the virtual folder, then specify
that virtual folder as a template item. This forces the Mini Scheduler to ‘select’ that specific item.
You can optionally click any template item’s Type Filter column to ensure that only items which
match the Type Filter value are selected when the playlist is generated. Similarly, you can optionally
double-click the Attribute Filter column to open the Edit Attribute Filter dialog, where you can add
filters for any Attribute in the database; again, only items whose Attributes match the value(s) you
specify will be selected when the playlist is generated, but you can use ~ as the first character of the
Filter if you want to use partial matches on Attributes. If you specify both types of filter for the same
template item, then an item must match both filters to be selected at playlist generation time.
The fixed? column does not refer to fixed time: if set, it means that the template item’s position in
the generated playlist is fixed. To toggle this setting, double-click the fixed? column (default is off).
A Fixed template item is shown with a pink background.
The optional? column, if set, means that the template item will only be included in the generated
playlist if the playlist duration—after generating all the non-optional template items—is less than
one hour .To toggle this setting, double-click the optional? column (default is off). An Optional
template item is shown with a white background, unless it is also a Fixed template item.
41
You can of course leave the Folder as Unsorted if you do want to pick an item from that folder.
Saved at 02:16:00 on 6 Jul 2011
Revision 19
114
mAirList Version 3.1 User Manual (UK English)
To change the order of template items, drag and drop them in the list (tip: drag the item number).
Te delete a template item, click it, then click Remove or press Del.
You can export a template as a .xml file, and import it into any template later. If you are creating a
number of similar templates, this can save you a lot of time.
To export a template, click Export, choose a location and name for the .xml file, then click OK.
IMPORTANT: Importing a template replaces the template contents and there is no warning dialog.
To import a template, click Import, navigate to and select the .xml file, then click OK.
When you have finished working with the template, click OK to save your changes or click Cancel to
discard all changes.
To edit an hour template, select it in the Manage Hour Templates dialog and click Edit.
To delete an hour template, select it in the Manage Hour Templates dialog and click Delete.
A confirmation dialog is shown: click Yes if you are sure you want to delete the template.
11.5.3.2
Generating Single Playlists From Hour Templates
To generate a single playlist directly from an hour template, navigate to the date/time where you
want to generate the playlist, click the dropdown arrow at the right of the Generate button, then
click the template name in the dropdown.
If the playlist was not previously empty, a confirmation dialog is shown. Click Yes if you want to save
the previous playlist and continue, click No to continue without saving the previous playlist, or click
Cancel to abandon generation of the playlist.
Once it is generated, you can change the generated playlist in the same ways as if you had created it
manually (add, move, or delete items; and/or customise item properties).
11.5.3.3
Template Assignment
We mentioned earlier that you will probably want different hour templates for different times of the
day, or for different days. You will also usually want to generate playlists ‘in bulk,’ typically for an
entire week or month. To be able to do this, the Mini Scheduler, like most other music scheduler
applications, needs to know which hour template to use when generating the playlist for each slot.
In mAirListDB, ‘mapping’ your hour templates on to the week is called template assignment.
To set up your template assignments, click Administration, Template Hour Assignments… to open
the Hour Template Assignments dialog.
The 24×7 grid in the dialog shows each slot (hour) of the week as a separate cell. Each column is a
day (from Monday to Sunday); each row is a slot (from the midnight–0100 slot to the 2300–midnight
slot). No playlists will be generated for empty slots, and you do not have to fill every slot.
To make changes, click one slot or select a block of slots by dragging, then right-click your selection.
On the context menu, click Clear to clear the slot(s) or click the name of the Hour Template you
want to use when generating playlists for the slot(s). Repeat this process until you have selected an
Hour Template for each slot which needs a generated playlist. There is no ‘undo’ function, but you
can click Cancel to abandon all changes made since you opened the dialog.
Each different hour template you add to the grid is shown in a different colour, to make it easier to
check that hour templates are correctly placed in the grid.
We suggest that you click Export… to save a copy of your template assignments. You can then click
Import… later to re-load your assignments. You can use Export and Import to create and use as
many different template assignments as you wish, perhaps for different weeks or quarters.
Click OK to save your current template assignments, or click Cancel to abandon all changes made
since you opened the dialog.
11.5.3.4
Mini Scheduler Configuration—Title/Artist Separation
The Mini Scheduler enforces track, title, and artist separation when generating playlists—that is, it
will not schedule the same track, title or artist closer together than a specified number of hours
(respectively)—and it ‘looks back’ to the hours before those being generated while doing so (note
that it does not ‘look forward’ to hours after the hours being scheduled).
Note that if you generate a single playlist manually from an hour template, this does not check track,
title, or artist separation: you must use the Mini Scheduler if you want to enforce separations.
Revision 19
Saved at 02:16:00 on 6 Jul 2011
mAirList Version 3.1 User Manual (UK English)
115
There is only one set of separation values, which are applied to all database playlists generated by
the Mini Scheduler, so you cannot use different separation rules for different days or parts of days.
To configure the Mini Scheduler track, artist, and title separations,
click Administration, Configuration…, then click the Mini Scheduler tab.
On the Mini Scheduler tab, set the:
•
Track separation (in hours, default: 3) and Penalty (default: 2);
•
Artist separation (in hours, default: 2) and Penalty (default: 1); and the
•
Title separation (in hours, default: 3) and Penalty (default: 1).
separation is the number of hours you want to elapse before the Mini Scheduler is allowed to
schedule the same track, or an item with the same artist or title, respectively.
Penalty is a weighting factor (multiplier) which the Mini Scheduler uses to resolve conflicts where
the only items which can be scheduled in a particular position would break a separation rule. When
an item breaks any separation rule, the Mini Scheduler calculates its penalty score by multiplying
the number of hours it is ‘early’ by the Penalty for each broken rule, adding all three penalty scores
together. In case of conflicts, the item with the lowest total penalty score is scheduled.
This means that when the Mini Scheduler has to break a separation rule, it will break the artist or
title separation rule in preference to breaking the track separation rule.
If you change the default Mini Scheduler separation settings, we suggest that you always make the
track penalty score highest, followed by artist and title, to ensure that when necessary, you will hear
the same artist ‘too often’ and not the same song ‘too often.’
One final note: when generating database playlists, the Mini Scheduler calculates separation times
by ‘hour’ (not by exact scheduled playout time) while choosing items from the virtual folders
specified in the hour template. Therefore, in extreme cases, it is possible for separations to be one
hour ‘closer’ than you request.
For example, with an artist separation of two hours, it is possible for the final artist of the midnight
playlist and the first artist of the 0200 playlist to be the same, and therefore one hour apart instead of
two hours. If separations are particularly important to you, you may want increase all separation
values by one hour to allow for that possibility.
11.5.3.5
Mini Scheduler Configuration—Options
To configure the Mini Scheduler Options, click Administration, Configuration…, then click the
Mini Scheduler tab.
Abort scheduling when no matching item can be found for a slot (default: on)
If this setting is off, scheduling will continue even if no items match the criteria for a slot.
Suppress errors and warnings for optional items (default: on)
If this setting is off, error and warning messages will be shown for ‘optional’ hour template slots.
11.5.3.6
Running the Mini Scheduler
Once you have created and assigned your hour templates and set up your preferred separation
values, you can run the Mini Scheduler to create ‘random’ database playlists ‘in bulk.’
To run the Mini Scheduler, click Generate; or click the dropdown arrow at the right of the Generate
button, then click Mini Scheduler in the dropdown. The Mini Scheduler dialog opens.
Select the period for which you want to generate database playlists by choosing a First Day and
Last Day. The dialog contains some ‘shortcut’ buttons like Today and One Week; but you can select
dates manually by dropping down either date and navigating to the first/last day you want.
Normally, the Mini Scheduler generates database playlists for every hour in the day which has an
hour template assigned to it in the Hour Template Assignments, but you can prevent the generation
of a database playlist for any hour or hours by clearing the appropriate checkboxes in the Hours
section of the dialog. Note that if you do this, it ‘suppresses’ the generation of database playlists for
those hours in every day of the selected period.
To start generating database playlists for the hours and days you selected, click Go! Progress is
displayed in the bottom half of the dialog, including a preview of each playlist as it is generated.
Saved at 02:16:00 on 6 Jul 2011
Revision 19
116
11.6
mAirList Version 3.1 User Manual (UK English)
Using mAirListDB Databases In mAirList
There are three principal ways you can use a mAirListDB database in mAirList:
•
Add a Database, Database Search, or Database Playlist pane to the Browser.
•
Use the Database (playlist) actions to add an event (or events) to the Event Scheduler
to load database playlists automatically.
•
Click Database in the main toolbar to open a mAirListDB window.
42
11.6.1
Browser Database Panes
You can add any of the following types of panes to the mAirList Browser.
11.6.1.1
Database Pane
43
This pane duplicates the tree in the Library tab of mAirListDB as an expandable tree showing titles,
artists, and durations of items in the database. Drag the column headings to resize them.
Like all Browser panes, you can drag items from this pane and drop them into the Playlist.
You can also drag and drop virtual folders: this adds all the items in the virtual folder to the playlist.
Note that you need to drag the name of the virtual folder and not the folder icon.
11.6.1.2
Database Search Pane
This pane duplicates the function of the search box in mAirListDB.
To search for items, type the text to find and click Go. mAirList will search the database and list all
items whose title or artist contains that text. To stop a search in progress, click Stop. When the
search is complete, the Stop button changes back to a Go button.
If you have more than one database, such as mAirListDB and iTunes, or two different mAirListDB
databases (perhaps a ‘pop’ one and a classical one), you can choose a specific database to search by
selecting a database from the dropdown below the search term box (default: (All databases)).
To sort the list of search results, click a column heading. Drag the column headings to resize them;
note that the Title column is automatically sized (resize the Artist column instead).
Like all Browser panes, you can drag items from this pane and drop them into the Playlist.
11.6.1.3
Database Playlist Pane
This pane is similar to the database playlist browser on the Playlist tab in mAirListDB.
It can also display the playlists stored in an iTunes ‘database:’ see 7.9.8 on page 67 for full details.
Choose a database to browse by selecting it from the dropdown, or accept the database shown.
Navigate to the desired database playlist using the date/time dropdowns and previous/next buttons.
To sort a database playlist, click a column heading. Drag the column headings to resize them; note
that the Title column is automatically sized (resize the Artist column instead).
You can drag items to change their order, or even delete them, but these changes are temporary and
are not written to the database.
Like all Browser panes, you can drag items from this pane and drop them into the Playlist.
To insert a database playlist item before the currently selected Playlist item, double-click it.
Note that if an item was ‘customised’ in the database playlist in mAirListDB, the item in the
database playlist browser will contain those customisations.
Click the small ‘gearwheel’ button to show a menu with three items:
Revision 19
•
Load into playlist and Append to playlist are self-explanatory.
•
Copy to clipboard copies the entire database playlist to the Windows clipboard as XML text
which you can paste into a file. The text is in the same format as a mAirList .mlp playlist file.
42
If the button has not been disabled: see 11.2.1 on page 105 and 11.2.2.4 on page 107).
43
Storages are not included in the tree.
Saved at 02:16:00 on 6 Jul 2011
mAirList Version 3.1 User Manual (UK English)
11.6.2
117
Database (Playlist) Actions And Event Scheduling
The Database (playlist) Actions are described in 4.1.2.7 on page 27. You can use these Actions in
scheduled Events as described in 4.2 on page 29 to fully automate your station output for some or all
of your broadcast day.
Note that you must still create the database playlists in advance: manually, or by importing them
from a music scheduling application, or by using the Mini Scheduler.
11.6.3
Database Button (Main Toolbar)
Clicking the Database button on the main toolbar opens a separate mAirListDB window.
All features in this window are fully functional. In copies of mAirList used in ‘live assist’ studios, you
may wish to ‘remove’ the Database button to prevent accidental changes being made to the library,
hour templates, database playlists, etc. This option is on the Advanced tab of the database’s
Configure/Setup dialog in the mAirList configuration program.
11.7
Changing The Appearance Of Library Item Lists
By default, the first column in all mAirListDB Library item lists has the background colour of that
item, if you have set one in the item’s Properties dialog (General tab, Colour). If you prefer, you can
show the entire row using the item’s background colour, or not use item colours at all. On the
mAirListDB menu, click View, Item Colours, then click Full Row, First Column (default), or Off.
You can also select the columns shown in Library item lists by clicking View, Library Columns on
the mAirListDB menu, then selecting or clearing column names. The default is to show all columns.
Note that the Item Colours and Library Columns settings do not affect the playlist (upper) pane on
the Playlist tab, but they do affect the Library (lower) pane.
11.8
Importing Audio File Information From Other Products
If you are switching to mAirList from another radio playout system, you will almost certainly want to
import information from that product’s audio database into mAirListDB. At present, mAirListDB can
directly import information which has been exported from the audio databases of the DRS2006 V3 or
SAM4 products; or a CSV file (created by any application) in the format shown below.
•
To import from DRS2006 V3 (or later), export your HRDat audio database as a .txt file.
•
To import from SAM4 (or later), export your SAM4 audio database as a .csv file.
•
To import from any other product, export your audio database as a .csv file,
using the field layout shown below. Field 1 (ID) must be empty (blank) for an import,
Field 3 (path/file name) requires a value; other fields may be empty (blank).
All time and duration values must be in seconds (decimal values like 47.314 are allowed),
and all Cue Marker values are relative to the start (not end) of the file.
Field
Contents
Field
Contents
1
mAirListDB (internal) ID
11
Ramp 2 Cue Marker
2
External ID (see page 118)
12
Ramp 3 Cue Marker
3
Full path and file name
13
Hook In Cue Marker
4
Title
14
Hook Fade Cue Marker
5
Artist(s)
15
Hook Out Cue Marker
6
Ending
16
Outro Cue Marker
7
Duration
17
Start Next Cue Marker
8
Comment/description
18
Fade Out Cue Marker
9
Cue In Cue Marker
19
Cue Out Cue Marker
10
Ramp 1 Cue Marker
20
Anchor Cue Marker
Figure 11.1: mAirListDB CSV Import And Export File Layout
When you have prepared your import file and created a mAirListDB database, open mAirListDB and
click Database, Import… On the Import Library dialog, select the correct file type (SAM4…,
DRS2006…, or CSV for a CSV file in the format shown in Figure 11.1), navigate to and select your
import file, then click Open.
Saved at 02:16:00 on 6 Jul 2011
Revision 19
118
11.9
mAirList Version 3.1 User Manual (UK English)
ID And External ID Fields
Every item in a mAirListDB database has a unique numeric ID, starting at 1. Items are assigned an ID
when they are initially added to the database, and you cannot alter the ID of any item.
The logging variable %U (for ‘unique ID’) displays this ‘internal’ ID in logs.
If you use another audio database or music scheduling application as well as mAirListDB, you can
use the External ID field in mAirListDB to store the unique ID (or ‘item number’ or ‘foreign key’) of
the corresponding item in the ‘external’ database or application. The External ID field has no other
purpose in mAirListDB, and External IDs do not have to be unique in the mAirListDB database.
The logging variable %X (for ‘external ID’) displays this ‘external’ ID in logs.
To show or hide External ID values as a column in the right-hand pane of the mAirListDB window,
click View, Library Columns and select or clear Ext. ID.
11.9.1
Adding External IDs To mAirListDB Databases
If you are using mAirList in conjunction with another audio database or music scheduling
application, and even if the ‘other’ application uses numeric IDs, the IDs for every item will
definitely not be identical in both applications. mAirList provides a relatively easy way to add
External ID values to items in an mAirListDB database, or to update External ID values.
44
You must first use your other application to export or create a CSV file which contains the ID of
each item in that application (the External ID in mAirListDB), and its full path/filename. It doesn’t
matter at this point whether the file contains other values as well, but if the other application can do
so, ideally you would create the CSV file to match the format shown in the examples below.
To add or update External IDs in mAirListDB without changing any other values, the CSV file needs
to have a specific format and content, as shown in the examples below. Each line must contain only
the External ID value and the full path/file name of each item; all other fields in the CSV file —except
the (internal) ID field, which must be empty for an import—must have the value of a single hyphen
(-), which during an import means ‘don’t change the existing mAirListDB value of this field.’
Having only the file path/file name and External ID present in the CSV file forces the mAirListDB
import process to use only the file path/name to find matching mAirListDB items, then write the
External ID values in the CSV file to the matching items in the mAirListDB database.
For example, if an item has the ID 12345 in the ‘other’ database, its line in the CSV file would look
similar to this:
,12345,"f:\music\1970s\T. Rex - Debora.mp3",-,-,-,-,-,-,-,-,-,-,-,-,-,-,-,-,-
If the ID values in the ‘other’ database contain spaces or commas (for example, T 0470), ensure the
ID values are enclosed in double quotes in the CSV file:
,"T 0470","f:\music\1970s\T. Rex - Debora.mp3",-,-,-,-,-,-,-,-,-,-,-,-,-,-,-,-,-
Even if your other application allows you to export CSV files using a custom format or selected fields,
you will probably need to edit the exported CSV file to match the examples above: to change field
values to single hyphens, or to add/reorder/remove fields until you have exactly twenty fields.
Opening or Importing the CSV file into a database or a spreadsheet application to make these
changes, then saving/exporting the results as a new CSV file, is one easy way to do this. Applications
designed for directly editing CSV files are another option; freeware ‘CSV file editors’ are available.
However you decide to edit it, ensure that the resulting CSV file you will import into mAirListDB
contains exactly twenty fields in each line, as shown in the two examples above.
When your CSV file is ready, open mAirListDB, click Database, Import…, then on the Import Library
dialog, ensure the Files of type: selection is CSV files (*.csv), navigate to and select your CSV file, and
click Open. mAirListDB imports the file, writing the External ID values to items in the database with
matching file paths/names.
Note that you can also use the mAirListDB import process to change existing External ID values in
mAirListDB, because mAirListDB database items are matched using only their file paths/names, and
the External ID value in the CSV file will always be written to matching mAirListDB database item(s).
44
If your ‘other’ application cannot export files in CSV format, use a file format such as fixed-width plain text file which you
can ‘convert’ to CSV by opening/importing it into a database or spreadsheet application, then saving it as a CSV file.
Revision 19
Saved at 02:16:00 on 6 Jul 2011
mAirList Version 3.1 User Manual (UK English)
12.
119
mAirListScript Scripting Language
mAirList contains a powerful scripting language called mAirListScript, which is based on RemObjects
PascalScript. mAirListScript is ideal for performing complex actions within mAirList, or actions
which have no simple manual equivalent, or actions which require an external program to be run.
mAirListScript is a so-called ‘interpreted’ language, which means that once you have written a script,
you can run it immediately: there is no compiler or other processing needed. A script is a plain text
file with the extension .mls (see 5.6 on page 33).
It would be impractical to present a complete programming course within this manual, so we will
instead concentrate on explaining the basic concepts and some possible uses of mAirListScript. Any
programmer—especially one familiar with Pascal or Delphi syntax—should be able to learn the
language fairly quickly. The Delphi Basics site (http://www.delphibasics.co.uk) is a useful resource if
you need a quick introduction to this syntax, but please note that many of the statements available
in Delphi (for example, message boxes) are not available in mAirListScript.
The best resource for examples of scripts, and advice on how to accomplish a particular task using
mAirListScript, is the mAirList online forum.
12.1
Types Of Script: Action Scripts vs. Notification Scripts
All mAirList scripts are one of two types: an action script or a notification script.
•
An action script performs one or more actions, and must be run manually.
An action script performs a specific ‘action,’ such as setting the Type of all the items in the
Playlist; saving the Properties of every item in the Playlist as a .mmd file; or opening/closing
an external feed such as a syndicated news source.
Action scripts are usually saved in the scripts folder under your mAirList folder.
To run an action script, click Open, Run script in the main mAirList toolbar, then on the
Run Script dialog, navigate to the script you want to run and click Open.
You can add frequently-used action scripts to the Action menu in the main mAirList toolbar,
so you can run them easily with a couple of clicks (see 7.11 on page 68).
•
A notification script performs one or more actions when certain ‘events’ occur: for example,
when a Player starts. Notification scripts run in the background while mAirList is open.
A notification script typically performs an action like updating a ‘now playing’ file when a
Player starts or stops, or sending a specific signal to external hardware (such as an IOWarrior
card) to perform an action (such as switching a lamp on or off on some external equipment)
‘in sync’ with Players starting or stopping.
If you need to use notification scripts, it’s usually more efficient to have a single notification
script which contains all your ‘notification’ actions.
Notification scripts are usually saved in the scripts\notification folder under your mAirList
folder. To enable (‘run’) a notification script, add it to the list of Notification Scripts in the
mAirList configuration program (see 7.10 on page 68).
12.2
Basic Script Design and mairlistscript.chm
You can execute (or ‘run’) one script from another, and make calls to external DLLs in scripts.
You can run external programs or batch files (.bat or .cmd files) in scripts, but please note that you
cannot close or ‘exit’ external programs or batch files because once started, they each run as a
separate process thread which cannot be accessed from within a script.
Before deciding that you need to write any script, check that there is no existing mAirList command
or action, or set of commands or actions, which does what you require. Next, decide whether you
need to write an action script or a notification script. The answer will be ‘action script’ unless the
script needs to be ‘triggered’ each time a specific mAirList ‘event’ occurs.
You can now write a script to suit your needs.
If you do not already have an up-to-date copy, we strongly recommend that you download the
mAirListScript Help file (mairlistscript.chm) from the mAirList download site. This file (which is not
included in the standard mAirList setup files) is an essential reference which contains descriptions
of the ‘custom’ mAirList classes, objects, functions, and types you can use in mAirList scripts.
Saved at 02:16:00 on 6 Jul 2011
Revision 19
120
mAirList Version 3.1 User Manual (UK English)
Initially, it can seem difficult to find the information you need in mairlistscript.chm, so here is a
quick guide to its most relevant content:
•
Most objects are in Units, mAirListInterfaces, Classes.
•
Most functions and procedures are in Units, mAirListScript, Functions.
•
Most enumerated types and sets are in Units, mAirListTypes, Types.
There are also some constants in Units, mAirListTypes, TConstants, but few of these are of any
practical use in scripts, as most of them are default values of various mAirList settings.
Getting to know the contents of the Classes, Functions, and Types sections of the help file will help
you write better and more efficient scripts more quickly.
12.3
Writing Action Scripts
Before planning or designing any action script, always bear two things in mind:
•
There is one and only one way to communicate to the user:
the SystemLog statement.
•
There is no way to obtain any kind of input or choice from the user.
This does in some ways limit the kinds of scripts you can write, but think of mAirListScript as
essentially an ‘automation’ language, and you can still create very powerful scripts which automate
tasks which would be enormously time-consuming or near-impossible to perform manually.
For example, scripts can automate the loading of your top-of-hour jingles and ads. to prevent any
possibility of your presenters ‘forgetting’ to load them; or load the correct ‘this is the year’ jingle in
front of the ‘next’ playlist item; or even create a ‘live’-sounding voicetracked show by using a script
to add fades and ducks, and ‘overlay’ music, voicetracks, and beds automatically, ready for playout.
A simple ‘Hello world!’ script would look like this:
begin
SystemLog('Hello world!');
end.
It’s a good idea to add a constant for your script’s name and version, and to prefix your SystemLog
messages with this constant. This makes it clear to the user that the message is from a script and is
not a mAirList message, and makes its entries easier to find in the mAirList System Log file. Using a
const also makes changes of version or script name easier to manage later, especially in messages:
const
SCRIPTNAME = 'MyName V1.0 script: ';
begin
SystemLog(SCRIPTNAME + 'Hello world!');
end.
12.3.1
Understanding mAirList Time Values
Internally, mAirList uses int64 variables for ‘time values’ such as an item’s playback duration, the
position of a Cue Marker, and similar ‘duration’ values. However, in a script, you will almost always
want to handle most values of this type as numbers of seconds.
Therefore, when you use any mAirListScript procedure or function which uses the TTimeValue
variable type (for example, IPlaylistItem.SetFadeDuration), use these conversion functions:
function SecondsToTimeValue (sngValue: single) : TTimeValue
function TimeValueToSeconds (ttvValue: TTimeValue) : single
as shown in this sample script:
begin
SystemLog('The top playlist item plays for ')
+ FloatToStr(TimeValueToSeconds(CurrentPlaylist.GetItem(0).GetPlaybackDuration))
+ ' seconds.';
end.
The default mAirList install contains several sample scripts, so we will concentrate here on showing
you how to use the main mAirListScript objects and functions in practical scripting terms.
Revision 19
Saved at 02:16:00 on 6 Jul 2011
mAirList Version 3.1 User Manual (UK English)
12.3.2
121
Playlists And PlaybackControls
Many scripts work with a Playlist, and several other objects (items in Playlists, Players, event lists,
etc.) are referenced via a Playlist.
•
IPlaylist—which contains a collection of IPlaylistItem objects, and
•
IPlaybackControl—which contains (among others) a collection of IPlayerControl objects.
45
Unless you have more than one Playlist , or you have a particular reason to do otherwise, use
CurrentPlaylist to refer to these objects in your scripts.
For example, to work with the items in the Playlist:
begin
SystemLog('The Playlist contains '
+ IntToStr(CurrentPlaylist.GetCount)
+ ' items.');
end.
Note that you must use IntToStr to display any int… variable’s value using SystemLog. Similarly,
you must use FloatToStr to display floating-point (single or double) values using SystemLog.
You can also work with the Playlist’s playout controls, players, event list, and GUI options using
CurrentPlaylist. For example:
begin
if CurrentPlaylist.GetAutomation = true then
SystemLog('The Playlist is in AUTOMATION mode.')
else
SystemLog('The Playlist is in ASSIST mode.');
end.
12.4
12.3.3
PlaylistItems And FilePlaylistItems
12.3.4
PlayerControls
12.3.5
CartWallControl and CartPlayerControls
Writing Notification Scripts
Notification scripts invariably answer the question ‘What should happen when this occurs?’
where this could be (for example):
•
When mAirList starts up or closes.
•
When PFL is switched on and/or switched off.
•
When a Player and/or Cartwall Player starts or stops.
Almost always, a notification script is used to interact with external hardware or processes in ways
which are not directly possible using mAirList commands or actions. One common use for a
notification script is to send ‘now playing’ information to a web site as Players start and stop.
You will find a ‘template’ file for notification scripts, named Notification Script Template.mls, in
the scripts\notification subfolder of your mAirList program folder. This contains an empty
procedure definition for each event supported by the notification script interface, followed by a final
empty begin … end.: do not add any statements between the final begin … end. statements.
The best way to start writing a notification script is to copy the script template file and give the copy
a new name with a .mls extension. There are also some sample notification scripts in the folder.
Some of these (especially the LogItems… scripts) are purely for example purposes.
45
Use Playlist(0), Playlist(1), etc. to refer to a specific Playlist or PlaybackControl. Numbering is zero-based.
Saved at 02:16:00 on 6 Jul 2011
Revision 19
122
mAirList Version 3.1 User Manual (UK English)
Most of the procedure names in the template are obvious, but three are worth explaining further:
OnPlaylistEmpty: If the required actions can all be achieved using an action list, an action list is the
preferred way to handle this. However, you could use this procedure in addition, perhaps to send a
message or e-mail—or add other ‘advanced’ functionality—when a playlist runs empty.
OnExecuteCommand: This refers to a mAirList command, so you can use this procedure to extend
the functionality of one or more commands.
OnTimer: This is a timer-driven event. This procedure is most often used to ‘poll’ external hardware
(perhaps by calling the hardware’s own DLL) at regular intervals. An example is shown overleaf.
This example of a well-written OnTimer script also demonstrates how to call external DLL routines:
// Notification Script for Velleman K8055 USB Interface
// allowing remote control of mAirList v3.x Players
// Written by Torben Weibert
// Modified by Charlie Davy and Cad Delworth, October 2010
// IMPORTANT: Requires the k8055d.dll file in the mAirList program folder
var
CurrentStatus: array[1..5] of boolean;
i: integer;
function OpenDevice(CardAddress: Longint): Longint;
external '[email protected] stdcall';
procedure CloseDevice;
external '[email protected] stdcall';
function ReadDigitalChannel(Channel: Longint): boolean;
external '[email protected] stdcall';
procedure OnLoad;
begin
for i := 1 to 5 do
CurrentStatus[i]
if OpenDevice(0) <
SystemLog('K8055
else
EnableTimer(50);
end;
:= false;
0 then
device not found!')
// Timer (polling) interval is 50ms
procedure OnUnload;
begin
DisableTimer;
CloseDevice;
end;
procedure OnTimer;
var
newval: boolean;
begin
for i := 1 to 5 do
begin
newval := ReadDigitalChannel(i);
if newval <> CurrentStatus[i] then
begin
CurrentStatus[i] := newval;
if CurrentStatus[i] = true then
// These are for channels ('buttons') 1,
case i of
1 : ExecuteCommand('PLAYER 1-1
2 : ExecuteCommand('PLAYER 1-2
3 : ExecuteCommand('CARTWALL 1
end;
end;
end;
end;
2, and 3
START/STOP');
START/STOP');
START/STOP');
begin
end.
Revision 19
Saved at 02:16:00 on 6 Jul 2011
mAirList Version 3.1 User Manual (UK English)
123
Especially note the following points:
•
Declare and define all the external (DLL) functions and procedures at the start of the code,
before all other functions and procedures.
•
Use the OnLoad procedure to initialise variables, to open devices or drivers,
set the timer duration, and start the timer.
•
Use the OnUnload procedure to stop the timer, to close/terminate the devices or drivers
opened in the OnLoad procedure, and to perform any other ‘clean-up’ tasks.
•
Use the OnTimer procedure to perform the tasks required at each timer interval.
Try to keep this code as brief as possible, especially if you use a short timer duration.
This reduces CPU usage, and is also best programming practice.
If the code in an OnTimer procedure takes longer to execute than the timer interval you
specify, the thread running the procedure will run increasingly slowly as an ever-larger
‘backlog’ of code builds up, all of which must be executed before the code for the following
timer ‘cycle’ can begin executing.
Saved at 02:16:00 on 6 Jul 2011
Revision 19
mAirList Version 3.1 User Manual (UK English)
A.
125
mAirList Commands
mAirList Commands are used in several places in the program:
•
as Action(s) in an Action list which is performed when a mAirList Action menu item is
clicked, or on mAirList startup or shutdown, or when an item Starts or Stops
(see 7.11 on page 68 and 9.6.5 on page 99);
•
as the Command—or set of Commands—performed when a mAirList Remote Control is
activated (see 7.7 on page 59);
•
as the Command—or set of Commands—performed when a COMMAND item in a Playlist is
‘played’ in either Assist or Automation mode.
You can choose Commands from a dropdown, or you can type them in.
Anywhere you can type a Command, you can instead type a set of two or more Commands by typing
in the set of Commands, separating them with a semicolon (;). Do not end the list with a semicolon.
Sets of Commands always performed in the order you typed them.
About The Command List
The complete list of available Commands begins on the next page.
Each Command is listed in bold type, followed by a brief description of the Command.
When you refer to them in a Command, Playlists, Players, and Cartwall Players are numbered from
one upwards.
Many commands which switch the state of a mAirList object or option (for example, the CARTWALL
PFL command) have the options of ON, OFF, or ON/OFF (which toggles the state or option).
A few Commands require a filename, or a volume (positive or negative) expressed in dB.
In the Command list, these numbers and options are represented by the characters shown below:
Character(s) …
represent(s) …
Example
c
a Cartwall Player
6 (Cartwall Player 6)
d
a volume, in dB (can be + or -)
-12 (-12 dB)
f
a filename (can include drive/path)
Day Set 1.mlc (a Cart Set file)
s
ON, OFF, or ON/OFF (toggle) option
ON/OFF (toggle the option)
x or y
a Player (Playlist number is separate)
1 (Player 1)
P
a Playlist
1 (the first or only Playlist)
P-p
a Player within a Playlist
1-2 (Player 2 in Playlist 1)
Where you see any of these characters in a Command, you must replace the ‘placeholder’
character(s) shown above with the appropriate number or text, as shown in the Example column.
For example, to switch the first (or only) Playlist to Automation mode and start automated playout,
you use the AUTOMATION P ON Command followed by the AUTOMATION P PLAY Command.
After replacing P with the Playlist number (1) and putting the Commands together into a set,
the complete Command set you need to type is AUTOMATION 1 ON;AUTOMATION 1 PLAY.
Similarly, if you want to use a Remote Control to toggle Cartwall PFL on/off, you use the command
CARTWALL PFL s, which you type as CARTWALL PFL ON/OFF.
Please note that some Commands contain further ‘placeholder’ characters, which you must replace
with actual names or values in a similar way; these characters and replacements are described
beside those Commands in the list.
Saved at 02:16:00 on 6 Jul 2011
Revision 19
126
mAirList Version 3.1 User Manual (UK English)
ALL PLAYERS Commands
ALL PLAYERS START
Starts all loaded Players in all Playlists.
Note that the following Command does not stop Cartwall Players (see CARTWALL STOP ALL below).
ALL PLAYERS STOP
Stops all Players in all Playlists.
AUTOMATION Commands
AUTOMATION P BREAK
AUTOMATION P NEXT
AUTOMATION P OFF
AUTOMATION P ON
AUTOMATION P ON/OFF
AUTOMATION P START
AUTOMATION P STOP
46
Breaks automated playout of Playlist P.
Starts the Next item in Playlist P.
Switches Playlist P into Assist mode.
Switches Playlist P into Automation mode.
Toggles Playlist P Automation/Assist modes.
Starts automated playout of Playlist P.
Stops automated playout of Playlist P; fades out all Players.
BROWSER Commands
These self-explanatory Commands allow Remote Controls to operate the Browser.
BROWSER CURSOR DOWN
BROWSER CURSOR LEFT
BROWSER CURSOR RIGHT
BROWSER CURSOR UP
BROWSER DESELECT
BROWSER FOCUS
BROWSER NEXT
BROWSER PREVIOUS
BROWSER SELECT
BROWSER TOGGLE SELECT
CARTWALL Player Commands
CARTWALL c CLOSE
CARTWALL c FADEOUT
CARTWALL c NEXT
CARTWALL c OPTION HookMode s
CARTWALL c OPTION LoopAudio s
CARTWALL c OPTION ResetHook s
CARTWALL c OPTION ResetLoop s
CARTWALL c PAUSE
CARTWALL c PAUSE/STOP
CARTWALL c PFL s
CARTWALL c PREVIOUS
CARTWALL c RESET
CARTWALL c START
CARTWALL c START/FADEOUT
CARTWALL c START/PAUSE
CARTWALL c START/PAUSE/STOP
CARTWALL c START/STOP
CARTWALL c STOP
CARTWALL c VOLUME d
46
Revision 19
Closes Cartwall Player c.
Fades out Cartwall Player c.
Loads the Next item in Cartwall Player c’s Stack.
Hook mode switch for Cartwall Player c.
Loop mode switch for Cartwall Player c.
‘Reset Hook mode’ switch for Cartwall Player c.
‘Reset Loop mode’ switch for Cartwall Player c.
Pauses Cartwall Player c.
Toggles Pause/Stop for Cartwall Player c.
PFL mode switch for Cartwall Player c.
Loads the Previous item in Cartwall Player c’s Stack.
Resets Cartwall Player c.
Starts Cartwall Player c.
Toggles Start/Fadeout for Cartwall Player c.
Toggles Start/Pause for Cartwall Player c.
Toggles Start/Pause/Stop for Cartwall Player c.
Toggles Start/Stop for Cartwall Player c.
Stops Cartwall Player c.
Sets the volume (level) of Cartwall Player c to d dB.
Automation is stopped, but any Players currently playing are not stopped, and will continue playing.
Saved at 02:16:00 on 6 Jul 2011
mAirList Version 3.1 User Manual (UK English)
127
CARTWALL General Commands
CARTWALL CLOSE ALL
CARTWALL HIDE
CARTWALL LOAD SET f
CARTWALL NEXT SET
CARTWALL PFL s
CARTWALL PREVIOUS SET
CARTWALL SHOW
CARTWALL SHOW/HIDE
CARTWALL STOP ALL
CARTWALL VOLUME d
Closes all Cartwall Players.
Hides the Cartwall.
Loads the Cart Set (.mlc file) specified.
Loads the ‘next’ Cart Set in Favourite Cart Sets.
‘Global’ PFL mode switch for all Cartwall Players.
Loads the ‘previous’ Cart Set in Favourite Cart Sets.
Shows the Cartwall.
Toggles Show/Hide the Cartwall.
Stops all Cartwall Players.
Sets the volume (level) of all Cartwall Players to d dB.
ENCODER Commands
These Commands allow Remote Controls to operate the Encoder.
ENCODER CONNECT
Connects the Encoder.
ENCODER CONNECT/DISCONNECT Toggles connecting/disconnecting the Encoder.
ENCODER DISCONNECT
Disconnects the Encoder.
ENCODER LIVE s
Toggles the Encoder’s on-air/off-air status.
EXTRAPFL Commands
47
These Commands allow Remote Controls to operate the ‘main’ PFL Player .
EXTRAPFL CLOSE
Closes the PFL Player.
EXTRAPFL SAVE
Saves the settings in the PFL Player.
EXTRAPFL SAVE DATABASE
Saves the settings in the PFL Player to the database.
EXTRAPFL SAVE MMD
Saves the settings in the PFL Player to a .mmd file.
EXTRAPFL SAVE TAG
Saves the settings in the PFL Player to the file’s Tag.
ON/OFF AIR Commands
OFF AIR
ON AIR
ON/OFF AIR
Switches mAirList into OFF AIR status.
Switches mAirList into ON AIR status.
Toggles mAirList ON AIR/OFF AIR status.
PFL Commands
These Commands allow Remote Controls to operate any PFL Player.
PFL 0
Resets the PFL Player (jumps to zero Elapsed).
PFL END MON
Jumps the PFL Player to near the end of the item
(see 7.12.7 on page 72).
PFL PAUSE
Pauses the PFL Player.
PFL PLAY
Starts the PFL Player.
In the following Commands, q represents the name of a Cue Marker, chosen from this list:
ANCHOR, CUEIN, CUEOUT, FADEOUT, HOOKFADE, HOOKIN, HOOKOUT,
RAMP1, RAMP2, RAMP3, OUTRO, STARTNEXT.
PFL q DELETE
PFL q MINUS
PFL q PLUS
PFL q SET
PFL q TEST
47
Deletes (clears) Cue Marker q.
Decreases the value of Cue Marker q by 10 mS.
Increases the value of Cue Marker q by 10 mS.
Sets Cue Marker q to the current Elapsed time.
Tests Cue Marker q (same as clicking TEST).
The ‘main’ PFL Player, as shown on the PFL tab of the Item Properties dialog.
Saved at 02:16:00 on 6 Jul 2011
Revision 19
128
mAirList Version 3.1 User Manual (UK English)
PLAYER Commands
PLAYER P-p CLOSE
Closes Player p in Playlist P.
48
PLAYER P-p EXTRAPFL s
‘Main’ PFL mode switch for Player p in Playlist P.
PLAYER P-p FADEOUT
Fades out Player p in Playlist P.
In the following Command, g represents the name of a Player GUI option (see 7.2.3 on page 48),
chosen from this list: AdvancedPFL, CueAlternatives, CueCategoryColors, CueInSeconds, CueMode,
Dragging, FlashEOFWarning, ItemColor, NearestRamp, NoButtonsInAutomation,
PFLSaveButtons, ShowRampWhenIdle, SwapArtistTitle, TruncateTime.
PLAYER P-p GUIOPTION g s
GUI Option g mode switch for Player p in Playlist P.
PLAYER P-p LOAD f
Loads file f into Player p in Playlist P.
In the following Command, o represents the name of a Player Option (see 7.2.2 on page 46),
chosen from this list: AutoFadeOut, AutoLoad, AutoLoadOnDemand, AutoLoadSingle,
AutoLoadSpecial, AutoPFLOff, AutoReleasePause, AutoStopOnEOF, AutoStopPFL,
AutoUnloadEOF, AutoUnloadStop, HistoryOnClose, HistoryOnCloseLoaded, HookMode,
IndependentPFL, IndependentPFLEndMon, Logging, LoopAudio, PFLOutputPlayback, ResetHook,
ResetLoop, UseInAutomation.
PLAYER P-p OPTION o s
Option o mode switch for Player p in Playlist P.
PLAYER P-p PAUSE
Pauses Player p in Playlist P.
PLAYER P-p PAUSE/STOP
Toggles Pause/Stop for Player p in Playlist P.
49
PLAYER P-p PFL s
‘Player’ PFL mode switch for Player p in Playlist P.
In the following Command, b represents the name of a Player progress bar option
(see 7.2.5 on page 49), chosen from this list: Enabled, NearestRamp, Ramp, Split.
PLAYER P-p PROGRESSBAR b s
Progress bar option b mode switch for Player p in Playlist P.
PLAYER P-p RESET
Resets Player p in Playlist P.
PLAYER P-p START
Starts Player p in Playlist P.
PLAYER P-p START/FADEOUT
Toggles Start/Fadeout for Player p in Playlist P.
PLAYER P-p START/PAUSE
Toggles Start/Pause Player p in Playlist P.
PLAYER P-p START/PAUSE/STOP
Toggles Start/Pause/Stop* for Player p in Playlist P.
PLAYER P-p START/STOP
Toggles Start/Stop for Player p in Playlist P.
PLAYER P-p VOLUME d
Sets the volume (level) of Player p in Playlist P to d dB.
* The Player START/PAUSE/STOP command works as described below.
•
If the Player is not playing or is paused, it is started.
•
If the Player is playing, it is paused.
•
If the Player is at EOF, it is stopped.
It is also (usually) unloaded, depending on the Player’s Configuration settings.
This command is particularly useful when used with a Remote Control connected to a fader on a
mixer. If the associated Player is playing and the fader is accidentally closed, the Player will pause
and can be immediately restarted by lifting the fader again. However, when the player has reached
EOF, closing the fader will stop the Player, unload it, and load the next item.
Setting the Auto release PAUSE when other player is playing or started Configuration setting
(see page 46) to on is useful if you use the START/STOP/PAUSE command. With that setting on, any
Player which you have deliberately faded out early—and is therefore paused—will automatically be
stopped and unloaded when you start any other Player.
Revision 19
48
The ‘main’ PFL Player, shown on the PFL tab of the Item Properties dialog.
49
The ‘small’ PFL Player, shown when you click the PFL button on a Player.
Saved at 02:16:00 on 6 Jul 2011
mAirList Version 3.1 User Manual (UK English)
129
PLAYLIST Commands
PLAYLIST P CHECK
Checks Playlist P for errors.
PLAYLIST P CURSOR DOWN
Moves the selection cursor in Playlist P one item down.
PLAYLIST P CURSOR UP
Moves the selection cursor in Playlist P one item up.
PLAYLIST P DELETE
Deletes the selected item(s) from Playlist P.
PLAYLIST P EDIT
Opens the Properties dialog of the selected item.
PLAYLIST P EVENTS
Opens Playlist P’s Event Scheduler dialog.
50
PLAYLIST P EXTRAPFL s
Opens the selected item in Playlist P in the PFL Player.
In the following Command, g represents the name of a Playlist GUI option (see 7.1.3 on page 41),
chosen from this list: AlwaysShowDuration, AlwaysShowRamp, Backtiming, BreakDuration,
ColumnHeaders, CommentButtons, EOFWarningOverlay, EscapeAutomationBreak,
EscapeAutomationStop, ExpandComments, Extended, FixedItemColors, IconClickPFL, Icons,
NearestRamp, PlayerColors, PlayerName, RampOverlay, ScrollIntoView, ShowPosition,
SpacebarAutomationNext, SwapArtistTitle, TruncateTime.
PLAYLIST P GUIOPTION g s
GUI Option g mode switch for Playlist P.
PLAYLIST P MARKASPLAYED
Marks the selected item in Playlist P as played.
PLAYLIST P MOVE DOWN
Moves the selected item(s) one position down in Playlist P.
PLAYLIST P MOVE UP
Moves the selected item(s) one position up in Playlist P.
PLAYLIST P NEXT
Starts the Next item in Playlist P; fades out other Players.
In the following Command, o represents the name of a Playlist Option (see 7.1.2 on page 40), chosen
from this list: AutomationSinglePlayer, AutoSaveEvents, CleanUpHistory, CleanUpHistoryTop,
CleanUpNonPlayables, HandleFixedTime, LiveBacktiming, SaveEvents, UseRecycleBin.
PLAYLIST P OPTION o s
Option o mode switch for Playlist P.
In the following Command, b represents the name of a Playlist progress bar option (see 7.1.5 on
page 43), chosen from this list: AutoHide, Enabled, IgnoreCartwall, NearestRamp, Ramp, Split.
PLAYLIST P PROGRESSBAR b s
Progress bar option b mode switch for Playlist P.
PLAYLIST P RECYCLE
Recycles the selected item(s) in Playlist P.
PLAYLIST P RECYCLE ALL
Recycles all items in Playlist P.
PLAYLIST P SKIPTOHERE
Marks all items above the selected item as played.
PLAYLIST P SWAP x y
Swaps the contents of Players x and y in Playlist P.
50
If two or more items are selected, the last selected item is opened in the PFL Player.
Saved at 02:16:00 on 6 Jul 2011
Revision 19
130
Revision 19
mAirList Version 3.1 User Manual (UK English)
Saved at 02:16:00 on 6 Jul 2011
mAirList Version 3.1 User Manual (UK English)
B.
131
Module Descriptions
This section contains descriptions of the function of each mAirList program module.
To find out which modules are enabled (licensed) in your copy of mAirList, see 7.13 on page 73.
audimark
Allows the connection to and use of the German audimark system (see 7.9.9 on page 68).
AudioFileTypes
Imports ID3 tags from MP2 and MP3 files.
AutoCue
Performs Auto Cue functions when a ‘new’ audio file is loaded in any mAirList program.
BassASIO
Provides output from the BASS engine used by mAirList to ASIO audio devices.
BassAudio
Provides output from the BASS engine used by mAirList to WDM audio devices.
Also provides playback of incoming streams (cf. BassStreaming).
BassStreaming
Provides an integrated Icecast/Shoutcast compatible streaming encoder for output.
BassVST
Allows VST plugins to be used with the integrated streaming encoder (see BassStreaming).
Core
The core framework of mAirList.
CoreGUI
The core framework of mAirList graphical output and user interaction.
CoreLogging
The core framework of mAirList file logging.
CoreRemote
Allows hotkeys and serial ports to be used as Remote Controls.
DBLite
Allows creation and use of local (SQLite) mAirListDB databases.
DBPro
Allows creation and use of networked (PostgreSQL) mAirListDB databases.
DHD
Allows remote control of DHD mixing consoles and control surfaces.
DigAS
Allows import of DigAS ‘show’ files.
DMAX
Allows remote control of Barth mixing consoles and control surfaces.
Saved at 02:16:00 on 6 Jul 2011
Revision 19
132
mAirList Version 3.1 User Manual (UK English)
DRS2006
Allows import of DRS2006 databases into a mAirListDB database.
HTTP
Provides logging functionality for HTTP GET and POST; and for Shoutcast and Icecast streaming.
InpOut32
Allows mAirListScript to directly read/write hardware ports, such as parallel ports.
IOWarrior
Allows use of IOWarrior devices for remote control and in mAirListScript.
LayoutSkin
The core framework of mAirList skin and layout file support.
MiscDatabases
Allows connection to and use of iTunes and ‘on-the-fly’ databases.
Mixdown
Allows a playlist to be ‘mixed down’ to a single audio file.
Playout
The core framework of mAirList playout automation.
Powergold
Allows connection to and use of Powergold music scheduler databases.
Regions
Allows use of Region containers for split output, such as regional ad. breaks.
REST
Provides support for remote control of mAirList by external REST client programs.
SAS
Allows remote control of Lawo mixing consoles and control surfaces.
Scripting
The core framework of mAirListScript.
SQLDatabases
The core framework of mAirList interaction with SQL databases (including mAirListDB).
WindowsJoystick
Allows connection to and use of joystick and gameport devices for remote control.
WindowsMidi
Allows connection to and use of MIDI devices for remote control and in mAirListScript.
WindowsMixer
Allows connection to and use of Windows audio device mixers/control panels in mAirListScript.
WMClient
Allows use of Windows Message Client as a Remote Control interface.
Revision 19
Saved at 02:16:00 on 6 Jul 2011
mAirList Version 3.1 User Manual (UK English)
C.
133
Nuvola Icon Graphics Files Used By mAirList
The list below contains the names and locations of all the Nuvola icon graphics files used by
mAirList applications, and includes all the graphics files shown in 8.2.1 on page 88.
The folder names shown are relative to the (unpacked) Nuvola distribution root folder.
To replace any (or all) of these icon graphics in mAirList, please see 8.2.2 on page 90.
16x16\actions\1leftarrow.png
16x16\actions\1rightarrow.png
16x16\actions\artsaudiomanager.png
16x16\actions\cancel.png
16x16\actions\connect_creating.png
16x16\actions\edit_add.png
16x16\actions\editdelete.png
16x16\actions\fileclose.png
16x16\actions\filenew.png
16x16\actions\fileopen.png
16x16\actions\filesave.png
16x16\actions\filesaveas.png
16x16\actions\help.png
16x16\actions\kgpg_edit.png
16x16\actions\ledlightblue.png
16x16\actions\ledlightgreen.png
16x16\actions\ledorange.png
16x16\actions\ledred.png
16x16\actions\messagebox_info.png
16x16\actions\messagebox_warning.png
16x16\actions\misc.png
16x16\actions\no.png
16x16\actions\ok.png
16x16\actions\pencil.png
16x16\actions\player_eject.png
16x16\actions\player_end.png
16x16\actions\player_pause.png
16x16\actions\player_play.png
16x16\actions\player_stop.png
16x16\actions\reload.png
16x16\actions\stop.png
16x16\actions\viewmag.png
16x16\apps\amarok.png
16x16\apps\arts.png
16x16\apps\bug.png
16x16\apps\clock.png
16x16\apps\flashkard.png
16x16\apps\kate.png
16x16\apps\kdat.png
16x16\apps\ktimer.png
16x16\apps\ktip.png
16x16\apps\kuser.png
16x16\apps\package_development.png
16x16\devices\hdd_unmount.png
16x16\filesystems\folder.png
16x16\filesystems\folder_sound.png
16x16\filesystems\folder_txt.png
16x16\filesystems\folder_yellow.png
16x16\filesystems\server.png
16x16\filesystems\services.png
16x16\filesystems\trashcan_full.png
16x16\mimetypes\sound.png
16x16\mimetypes\txt.png
Saved at 02:16:00 on 6 Jul 2011
22x22\actions\1leftarrow.png
22x22\actions\1rightarrow.png
22x22\actions\connect_creating.png
22x22\actions\connect_established.png
22x22\actions\connect_no.png
22x22\actions\edit_add.png
22x22\actions\editdelete.png
22x22\actions\fileexport.png
22x22\actions\filenew.png
22x22\actions\fileopen.png
22x22\actions\filesave.png
22x22\actions\folder_new.png
22x22\actions\reload.png
22x22\actions\roll.png
22x22\apps\arts.png
22x22\apps\clock.png
22x22\apps\date.png
22x22\apps\kate.png
22x22\apps\kdat.png
22x22\apps\ktimer.png
22x22\apps\package_development.png
22x22\filesystems\trashcan_full.png
32x32\actions\ledgreen.png
32x32\actions\ledred.png
32x32\apps\bookcase.png
32x32\apps\multimedia.png
32x32\apps\package_editors.png
48x48\actions\cut.png
48x48\actions\finish.png
48x48\actions\kaboodleloop.png
48x48\actions\kmixdocked.png
48x48\actions\player_eject.png
48x48\actions\player_end.png
48x48\actions\player_pause.png
48x48\actions\player_play.png
48x48\actions\player_start.png
48x48\actions\player_stop.png
48x48\actions\start.png
64x64\apps\important.png
64x64\apps\krec.png
64x64\apps\package_development.png
64x64\filesystems\trashcan_full.png
64x64\mimetypes\empty.png
64x64\mimetypes\html.png
64x64\mimetypes\info.png
64x64\mimetypes\kchart_chrt.png
64x64\mimetypes\readme.png
64x64\mimetypes\sound.png
64x64\mimetypes\tar.png
64x64\mimetypes\txt.png
Revision 19