1
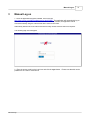
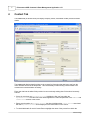
E-Commerce MXP
Contacts & Ports
Management
Application v5.1
MarineXchange
I
E-Commerce MXP Contacts & Ports Management Application v5.1
Table of Contents
Foreword
0
Part I Introduction
3
Part II Installation
4
Part III Manual Log on
6
Part IV Contact Tab
7
1 Add a Contact...................................................................................................................................
Person
9
2 Remove a Contact
...................................................................................................................................
Person
12
Part V Port Detail
14
Part VI Piers
15
1 Pier
................................................................................................................................... 16
2 Address
................................................................................................................................... 18
3 Terminal
................................................................................................................................... 19
4 Gangway
................................................................................................................................... 21
5 Anchorage ................................................................................................................................... 23
6 Tender
................................................................................................................................... 25
7 Bollards
................................................................................................................................... 27
8 Fenders
................................................................................................................................... 29
Part VII Port Questionnaire Tab
31
1 Answering Port
...................................................................................................................................
Questions
32
2 Required fields
................................................................................................................................... 33
3 Answer fields
................................................................................................................................... 34
Dropdown
Memo
String
Yes/No
Integer
Number
.......................................................................................................................................................... 35
.......................................................................................................................................................... 36
.......................................................................................................................................................... 37
.......................................................................................................................................................... 38
.......................................................................................................................................................... 39
.......................................................................................................................................................... 40
Part VIII Log off / Send
41
Part IX FAQ
42
Part X User Manual Change Log
43
MarineXchange
Contents
Index
II
0
MarineXchange
II
3
1
E-Commerce MXP Contacts & Ports Management Application v5.1
Introduction
The E-Commerce MXP Contacts and Ports Management program is an online application accessible
via the internet which allows vendors to easily update their contact details so that the contact database
can be kept up to date. This portal is also used for vendors i.e. port agents to update port details, pier
information and to answer port questionnaires which is sent from the client as a notification requesting
for information to be competed by the vendor.
The client sends a request for information to the vendor via a link, the vendor then simply clicks on the
link and (once installed) is able to complete the information online before sending it back to the client.
The link includes a login, once clicked the application will login automatically. If a contact request has
been sent then only the C ontact tab will be displayed. If a port questionnaire request has been sent,
then the screen will display by default on the Port Detail tab and in addition the Pier tab and Port
Questionnaire tabs will be displayed.
This user manual is designed to assist in the understanding of how the application works and is a
guide in completing the required information from the client.
The Information that is required to be updated by the vendor is always displayed in a white field.
Yellow fields indicate that the information is read only and therefore cannot be changed.
Any data entry or changes to the existing data are automatically saved, therefore once the Log Off
option is taken to exit out of the application the changes will automatically be sent back to the client.
Please note that is the red x button on the top right corner is taken, the changes will also be sent back
to the client, therefore it is important to only enter data that needs to be communicated back.
Please note that the same access code can be used time and time again to make further amendments
in the future. Should this code be forgotten or misplaced, please contact the client who can issue it
again.
Please also note that this on-line application only works with Internet Explorer (Version 5.5 or above).
MarineXchange
Installation
2
4
Installation
Before the on-line application can be accessed, it will need to be installed. This installation will need to
take place once on each computer (i.e. the first time that the link is clicked on). Please make sure to
open and install the on-line application only with Internet Explorer (Version 5.5 or above).
1. To install the software, click on the link that has been sent by the client
http://www.mymxp.com/MXPPortManagement.htm or copy it into Internet Explorer.
The following dialogue box will be displayed:
2. To ensure that this software is automatically installed the next time (when upgrading or reinstalling
after unintentional deleting), click on the More Options drop down box to reveal more options.
3. Click on the option Always install software from "MarineXchange Software Gmbh"
4. Click on the Install button.
MarineXchange
5
E-Commerce MXP Contacts & Ports Management Application v5.1
The following login box will appear:
5. Paste the access code from the e-mail (that the link was sent in) into the Login box and click the
Login button.
MarineXchange
Manual Log on
3
6
Manual Log on
1. Once the application has been installed, click on the link
http://www.mymxp.com/MXPPortManagement.htm[CODE]. The application will automatically log on.
However if the Log off button or the red x has been clicked by mistake, the application can be
accessed manually using the code that has been sent from the client.
Alternatively add the link as an internet favourite for easy access next time the link is required.
The following login box will appear:
2. Enter the access code into the Login box and click the Login button. Please note that this can be
pasted from an e-mail or a document.
MarineXchange
7
4
E-Commerce MXP Contacts & Ports Management Application v5.1
Contact Tab
The Contact tab (as shown below) will display company names, associated contact persons and their
details:
The Contact tab displays details relating to the request for information that has been sent from the
client otherwise known as the Requester. This could already include existing contact details to be
reviewed and corrected where necessary.
Enter new data into the white fields provided or correct already existing data if it has been incorrectly
entered.
· If there is more than one Department/Location, highlight the first one from within the
Department/Location field and check the details against the Location/Department in the Address and
Communication sections of the screen.
· Please note that when a Department/Location has been highlighted the Contact Persons associated
with that Department/Location will be displayed in the lower section of the screen.
· To check/add details for each Contact Person highlight the name of the person from within the
MarineXchange
Contact Tab
8
grid, the details for this person will be displayed in the left hand side of the screen,
amend where necessary.
Contact Persons
· Required fields: if a field needs to be filled out this is displayed with an asterisk (*)
.
MarineXchange
9
4.1
E-Commerce MXP Contacts & Ports Management Application v5.1
Add a Contact Person
If there is a Contact person(s) missing against the Departments/Locations then they can be added into
the Contact tab.
To add a Contact Person, carry out the following steps:
· Highlight the relevant Department/Location name from within the Departments/Locations field.
· From within the Contact Persons section of the screen, click on the Add a Person button
The following screen will be displayed:
MarineXchange
Contact Tab
10
· Complete the known information that is related to the newly added person into the Person Details,
Office and After Hours sections of the screen. Please note that fields marked with an asterisk (*)
are required fields and must be completed.
· Once completed click on the Save button. (Click on the Do Not Save button to exit without saving
the changes)
MarineXchange
11
E-Commerce MXP Contacts & Ports Management Application v5.1
The new contact will be displayed in the Contact tab.
MarineXchange
Contact Tab
4.2
12
Remove a Contact Person
If Contact Persons no longer work for the company or are no longer required to be contacts to the client
then they will need to be removed.
To remove a Contact Person, carry out the following steps:
· Highlight the relevant Department/Location name from within the Departments/Locations field.
· From within the Contact Persons section of the screen, highlight the relevant Contact Person. The
information for that Contact Person will be displayed in the right hand side of the screen.
· To remove the Contact Person, click on the Remove Person button.
Click on the Yes to the confirmation that the new person is to be removed.
Please note that you cannot remove a primary contact, the following message will be displayed:
MarineXchange
13
E-Commerce MXP Contacts & Ports Management Application v5.1
MarineXchange
Port Detail
5
14
Port Detail
The Port Detail tab (as shown below) will display general port information with contact numbers.
Data can be entered as new or updated into the following fields. The fields accept numbers and text.
·
·
·
·
·
·
Medical Emergency
Hospital
Fire rescue
Police
Port Authorities
Coast guard
MarineXchange
15
6
E-Commerce MXP Contacts & Ports Management Application v5.1
Piers
Th Piers tab is used to enter general pier and docking information. The Piers tab is divided into several
sub tabs (refer to the following sub sections for further details of each sub tab).
Highlight the pier name on the left hand side of the screen, complete the detail that is relevant to the
highlighted pier in the sub tabs displayed on the right hand side.
Please note that the fields that are marked with an asterisk (*) are required fields, so therefore must be
answered (refer to Pier Type below)
MarineXchange
Piers
6.1
16
Pier
The Pier tab is used to enter general pier information.
Enter the relevant information into the fields provided. Please refer to the example screen shot below
for more information:
The field types vary depending on which information is required and which information has already
been pre-defined. The field types are as follows:
· Required Field:
Marked with an asterisk (*) which means that an answer is required before
sending the information back to the client e.g. Pier Type*.
· Drop down Menu:
Displays an arrow at the end of the field which indicates that there is a drop
down menu to make a choice from. Click on the arrow and select the menu
option e.g.Pier Type
· Numerical Field:
Allows a number or decimals to be entered. No text can be entered in these
fields e.g. Length
· Text Field:
Allows any text, numbers or decimals to be entered e.g. Pier Condition
· Check box:
Can be checked or unchecked by clicking in the field e.g. Suitable for a
Wheelchair
MarineXchange
17
E-Commerce MXP Contacts & Ports Management Application v5.1
MarineXchange
Piers
6.2
Address
The Address tab is a free text field used to enter the address of the pier. Text, numbers and/or
decimals can be entered into this field.
MarineXchange
18
19
6.3
E-Commerce MXP Contacts & Ports Management Application v5.1
Terminal
The Terminal tab is used to enter general information relating to the terminal address and facilities.
Enter the information as required, refer to the screen shot example below for further details:
The field types vary depending on which information is required and which information has already
been pre-defined. The field types are as follows:
· Text Field:
Allows any text, numbers or decimals to be entered e.g. Terminal Name
· Check box:
Can be checked or unchecked by clicking in the field e.g. Public Phones
MarineXchange
Piers
MarineXchange
20
21
6.4
E-Commerce MXP Contacts & Ports Management Application v5.1
Gangway
The Gangway tab is used to enter general information relating to the gangway suitability and
dimensions.
Enter the information as required, refer to the screen shot example below for further details:
The field types vary depending on which information is required and which information has already
been pre-defined. The field types are as follows:
· Checkbox:
Can be checked or unchecked by clicking in the field e.g. Shore Gangway
Available
· Text Field:
Allows any text, numbers or decimals to be entered e.g. Gangway Length.
MarineXchange
Piers
MarineXchange
22
23
6.5
E-Commerce MXP Contacts & Ports Management Application v5.1
Anchorage
The Anchorage tab is used to enter general anchoring information.
Enter the information as required, refer to the screen shot example below for further details:
The field types vary depending on which information is required and which information has already
been pre-defined. The field types are as follows:
· Checkbox:
Can be checked or unchecked by clicking in the field e.g. Buoy Route
Available
· Text Field:
Allows any text, numbers or decimals to be entered e.g. Comment.
MarineXchange
Piers
MarineXchange
24
25
6.6
E-Commerce MXP Contacts & Ports Management Application v5.1
Tender
The Tender tab is used to enter general Tendering information.
Enter the information as required, refer to the screen shot example below for further details:
The field types vary depending on which information is required and which information has already
been pre-defined. The field types are as follows:
· Checkbox:
Can be checked or unchecked by clicking in the field e.g. Ship Tender
Restriction
· Text Field:
Allows any text, numbers or decimals to be entered e.g. Comment.
MarineXchange
Piers
MarineXchange
26
27
6.7
E-Commerce MXP Contacts & Ports Management Application v5.1
Bollards
The Bollards tab is used to enter general information relating to the bollards that the pier has.
Enter the information as required, refer to the screen shot example below for further details:
The field types vary depending on which information is required and which information has already
been pre-defined. The field types are as follows:
· Text Field:
Allows any text, numbers or decimals to be entered e.g. Bollard Type
· Numerical Field:
Allows a number or decimals to be entered. No text can be entered in these
fields e.g. Distance Between.
· Drop down Menu:
Displays an arrow at the end of the field which indicates that there is a drop
down menu to make a choice from. Click on the arrow and select the menu
option e.g.Distance Between.
MarineXchange
Piers
MarineXchange
28
29
6.8
E-Commerce MXP Contacts & Ports Management Application v5.1
Fenders
The Fenders tab is used to enter general information relating to the fenders that the pier has.
Enter the information as required, refer to the screen shot example below for further details:
The field types vary depending on which information is required and which information has already
been pre-defined. The field types are as follows:
· Checkbox:
Can be checked or unchecked by clicking in the field e.g. Has Fender
· Text Field:
Allows any text, numbers or decimals to be entered e.g. Fender Types
· Numerical Field:
Allows a number or decimals to be entered. No text can be entered in these
fields e.g. Distance Between
· Dropdown Menu:
Displays an arrow at the end of the field which indicates that there is a drop
down menu to make a choice from. Click on the arrow and select the menu
option e.g.Distance Between
MarineXchange
Piers
MarineXchange
30
31
7
E-Commerce MXP Contacts & Ports Management Application v5.1
Port Questionnaire Tab
The Port Questionnaire tab displays questions that have been sent from the client to gather
information about the port and the facilities that are available.
MarineXchange
Port Questionnaire Tab
7.1
32
Answering Port Questions
The questions sent by the client are divided into different categories. These categories and questions
are customized by the clients to meet with their requirements, so they will differ from client to client.
The port questionnaire consists of Main Categories which are then further divided into Sub Categories.
Questions are then linked to each Sub Category.
In the screen shot example below one of the Main Categories is Nautical, the related Sub Categories
within this Main Category are Nautical, Pilots and Tugs. The questions that are linked to the Pilots
Sub Category are 1. Pilots compulsory 2. Pilot boarding position 3. Pilot pick up speed, etc.
Type in the answers to the questions. Refer to Answer Fields for further information on the different
field types. Click on the Save Change button whilst answering the questions. If any fields have been
set up as required i.e. marked with an asterisk (*), these questions must be answered. To identify
these questions please refer to Required fields
Please note that It is not possible to move between the tabs if the Save Change button is showing red.
Changes must be saved first.
MarineXchange
33
7.2
E-Commerce MXP Contacts & Ports Management Application v5.1
Required fields
The questions that are sent by the client can be either be set up as required fields or non required
fields.
Fields that are marked with an asterisk (*) are required fields, so therefore must be answered (refer to
Tugs Available as shown below).
MarineXchange
Port Questionnaire Tab
7.3
Answer fields
The answer fields will vary from client to client depending on how they have created their port
questionnaire, however the following formats may be displayed:
· Drop down
· Memo
· String
· Yes/No
· Integer
· Number
MarineXchange
34
35
7.3.1
E-Commerce MXP Contacts & Ports Management Application v5.1
Dropdown
Drop down menus are answers which have been pre-defined by the client. To answer the question,
select one of the options from the drop down box:
MarineXchange
Port Questionnaire Tab
7.3.2
36
Memo
A memo field will allow any text (numbers and/or letters) to be entered, the size of the field will depend
on the client's requirements. A memo field is usually quite large requiring a more detailed answer.
MarineXchange
37
7.3.3
E-Commerce MXP Contacts & Ports Management Application v5.1
String
A string field will allow any text to be entered (numbers and/or letters) and is usually used for a small
amount of text i.e. shorter answers, one line only:
MarineXchange
Port Questionnaire Tab
7.3.4
Yes/No
The Yes/No fields, require either a Yes or No answer by clicking the relevant radio button.
MarineXchange
38
39
7.3.5
E-Commerce MXP Contacts & Ports Management Application v5.1
Integer
An Integer field allows only numbers to be entered (no text or decimals):
MarineXchange
Port Questionnaire Tab
7.3.6
Number
A Number field only allows numbers and decimals to be entered (no text):
MarineXchange
40
41
8
E-Commerce MXP Contacts & Ports Management Application v5.1
Log off / Send
Once all of the information has been updated, it can then be sent back to the client.
To send the information back to the client, simply click on the Log Off button.
The changes will automatically be sent back and the application will return to the Logon screen. Exit
out of the Internet Explorer in the usual way.
Please note that the same access code can be used again to make further amendments in the future.
Should this code be forgotten or lost, please contact the client who can issue it again.
MarineXchange
FAQ
9
42
FAQ
· Why does it ask for me to install the program every time I click on the link?
· During the installation you will need to select "More Options" from the Security Warning dialogue
box and select the option "Always install software from "MarineXchange Software Gmbh". Refer
to Installation for more information.
· What does it mean when a field is colored yellow?
· Yellow fields are read only and cannot be edited. Fields that can be changed are always white.
· What do I do if I click on the Log off button and I realise that I have more changes to make?
· Simply re-enter the code that has been sent previously by the client and continue making the
changes. Alternatively the link sent by the client (including the code) can be saved to your internet
favourites and accessed from there.
· If I decide to update the information later but have already opened the program, is there
any way to exit out the program without sending?
· The information will only be sent to the client if you have made changes so exit out either by
clicking on the red X or by clicking on the Log Off button. If you have made changes and need to
continue, just re-open the application and continue making the changes.
· What shall I do if all the details are correct, therefore I have nothing to add or change?
· Simply select the Log Off button.
· What shall I do if I lose the code?
· Ask the client to send it again, the code is stored in their MXP system within the contacts and/or
ports screens.
· Do I have to keep checking and updating the details or will the client send reminders?
· It really depends upon the client's procedures, generally the clients tend to send periodic
reminders via e-mail with the access details attached.
· Why can't I enter text into some of the fields in the port questionnaire tab?
· If a field is set up from the client as a number or integer field, only numbers and decimals can be
entered, refer to content Integer and Number
· Sometimes I cannot select another Main or Sub Category in the port questionnaire tab
when I have finished updating one of them, why is that?
· If the save change button still shows as red, then the changes to the existing category need to be
saved first. Click on the Save Changes button before moving to another category.
· I don't see all of the tabs that are listed in this User Manual, why is this?
· The client decides what tabs in the application are applicable to you, i.e. you may be responsible
for updating the contacts but not the port questionnaire, therefore they will send the port
questionnaire tab to another contact. Please contact your client if you are not seeing everything
that you are supposed to.
MarineXchange
43
10
E-Commerce MXP Contacts & Ports Management Application v5.1
User Manual Change Log
Version Date
Author / Reviewer
Section \ Change
1
11/02/07
Becky May
All - Document Creation
2
11/14/07
Michèle Gullick / Becky May
3
11/30/07
Michèle Gullick
4
12/09/07
Becky May
Review and all sections updates with new
functionality
Creating the Port Detail, Piers and Port
Questionnaire tab
Reviewed and updated / all sections.
4.1
01/11/08
Jürgen Rollant
Introduction, Installation
5
03/14/08
Michèle Gullick
Updated screen shots, reviewed all sections
5.1
03/14/08
Becky May
Updated Add a Contact Person and
Remove a Contact person, deleted the
Activate section as this is no longer Ecommerce portal funcationality
MarineXchange