1
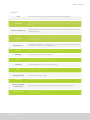
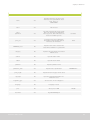
USER
GUIDE
Everything you need to know about
your publication going digital.
Snapplify User Manual 2014
Contents
2.2.3. InDesign tutorials for export to PDF
18
INTRODUCTION
2
1. MANAGING YOUR ASSETS
3
3. ECOMMERCE
20
3
3.1. Vouchers
20
1.1. Let’s get started
1.1.1. Logging in
3
4. REPORTING TOOLS
22
1.1.2. Viewing and uploading your asset
3
5. PROCESSES AND SYSTEMS
23
1.1.3. Assigning your asset to an application
6
5.1. Upload Automation setup
23
1.1.4. Editing an asset
6
5.2. Uploading content to an FTP location
23
1.2. Working with Collections
7
5.3. Uploading Metadata information to an
1.2.1. Managing Collections
7
1.2.2. Assigning assets to Collections
7
5.4. Supplying FTP information to Snapplify
25
8
5.5. Automating Content Stitching
26
9
APPENDIX
27
1.3. Push Notifications
2. GETTING YOUR CONTENT READY
2.1. ePUB formats
9
2.2. PDF format
9
2.2.1. Enhancing your PDF
10
2.2.2. Adobe Acrobat tutorials for PDF
16
CONTENTS
FTP location
23
1
Snapplify User Manual 2014
Introduction
The Snapplify User Guide details
the complete process from getting
your content ready, to adding
enhancements, and getting your
apps into the relevant app stores.
We offer detailed instructions and
tutorials on how to create rich and
engaging content with your choice
of format.
Learn more about how to use the
Snapplify Content Management
System, how to use the handy
reporting tools, and other useful
things such as Content Stitching for
newspapers, content collections,
and monetising your app.
Master our processes and systems
that automatically upload content,
metadata, and more, which will
make your life much easier.
We have also left some handy tips
here and there to ensure everything
goes smoothly!
Don’t hesitate to contact:
[email protected]
for any queries.
* All images and materials are copyright protected and are the property of its respective owners
2
Snapplify User Manual 2014
1
Managing your assets
Snapplify enables clients to
manage and maintain their own
app content using an easy to use
content management system.
The following section details how to
add, edit and manage the content
in your application, as well as how
to manage collections.
1.1. Let’s get started
1.1.1 Logging in
Go to http://admin.snapplify.com
Type in your username and password that has been supplied
to you by a Snapplify team member.
1.1.2. Viewing and uploading your asset
Once on the Dashboard page, select “Assets” on the left
hand toolbar. Select the New button on the top toolbar and fill
IMPORTANT
Illegal characters:
Please note that some
characters are not
allowed in the Snapplify
content management
system and may cause
issues in the app.
Characters to avoid are:
@#$^&*<>\`~/äáâ
èéêë‘“
in the required fields as set out in the tables below.
MANAGING YOUR ASSETS
3
Snapplify User Manual 2014
Assets
TITLE
Fill in the name of the asset as you would like it to appear in the application.
DOCUMENT
Select “Upload Document” and choose the file you wish to add from your computer. Ensure
that the PDF or EPUB file is fully uploaded before clicking on the “OK” button at the bottom of
the page.
PRODUCT DESCRIPTION
This provides the user with a description of the asset before they download it to their device
from within the app.
PUBLISHED
Select “Published” to display the item in the application. “Unpublished” items will not be visible. If you are adding assets that must still be approved as in-app purchases by Apple then
select “Unpublished”
MAGAZINE TYPE
Select “Book”, “Magazine” or “Newspaper”. If you require single page display in both portrait
and landscape view, please select “Newspaper”.
CATEGORY
Choose the most relevant category that your asset falls under.
LANGUAGE
The language of your content e.g. English.
EDITION
PUBLISHER
PAGES
PUBLICATION DATE
COPYRIGHT
DOUBLE PAGE MODE
ON FIRST PAGE
SEARCH ENABLED
MANAGING YOUR ASSETS
The assets edition (eg. 1st Edition / Issue 57)
The assets publisher (eg. Johnson Books / Various).
The number of pages in your asset.
Select the date from the calendar.
Add your copyright infringement or leave blank.
Only select this if you want the first page to be displayed in a double page view.
Tick the button to activate. This is for PDF content only and allows users to search
the text of a publication.
4
Snapplify User Manual 2014
Pricing
TITLE APPLE PRICE TIER
APP SITE PRICE
Select the relevant price tier for this asset. The price that reflects in your app is
changed in iTunes and changing the price tier here will not affect the price in your app.
Contact Snapplify if you want to change the price of existing content in your app.
IMPORTANT: If you select tier 0 here, your content WILL be free to download in your app.
If your Application also has a Web Store, this is the price that will display on the
Web Store for this asset. (ZAR)
IN APP PURCHASE ID
The identifier used when setting up an in-app purchase in iTunes Connect and Google Play.
Leave this blank if the content is free or if you don’t require setting up in-app purchases.
Alternatively, stick to the unique naming convention supplied to you
e.g 2013issue1, 2013issue2.
ANDROID PAID PRODUCT
Tick the box if the asset is for sale on Android and has a corresponding Google Play Store In
app Product.
ANDROID DISPLAY PRICE
Price displayed in Android apps in US$
Jacket Images
JACKET IMAGE
Jacket images for PDF documents are automatically created from PDF but can
be overridden. Ensure that you upload a jacket image for EPUB files, as well
as .snap files. Recommended file type: JPG. Recommended file size: 768 x 1024 pixels.
5
Snapplify User Manual 2014
Once you have filled in all the required information, ensure that
the PDF is fully uploaded before clicking on the “OK” button. Your
added asset is now loaded to the Snapplify content management
system and available to assign to your application.
1.1.3. Assigning your asset to an
application
You need to assign an asset to your application for it to appear
in your application and to ensure that a user can download it.
1
Select the “Applications” section on the left hand toolbar.
2
Select your application by clicking on the application name.
3
At the bottom of the page, click on the “Assign” option to
IMPORTANT
File must be uploaded
before you save.
Please ensure that the
file you are uploading
has fully uploaded before
clicking “OK”.
Failure to do so will result
in the publication not
being available in the app.
assign your assets to the application.
4
Click on the check boxes of the items you would like to
assign to the application and click on the apply button to
save your selection.
1.1.4. Editing an asset
Select the asset you wish to edit by clicking on the title of the
asset. Alternatively select the check- box next to the asset name
and click on the “Edit” option. Edit the relevant fields you wish
to change.
Once updates have been made, click on the “Apply” button to
save your changes.
MANAGING YOUR ASSETS
TIP
Updating an asset
When you want to
replace a PDF or ePUB
for a specific asset, you
do not need to delete the
entire asset.
Simply select the asset,
click “Edit” then “Upload
a file.” The new PDF or
ePUB will replace the
old one. Remember that
if a reader has already
downloaded the previous
file to their mobile
device, it will still be
available in their Library
and must be deleted
from the device.
6
Snapplify User Manual 2014
1.2. Working with Collections
Collections allow content to be stored in groups, which users
can access within the application. These collections can be
named as you require and also allow for multiple levels within
a collection.
1.2.1. Managing Collections
Collections can be edited by clicking on the collection name you
would like to update, assign assets to or assign subcollections
to.
Creating a collection
1
Select the Collections option on the left hand toolbar.
2
Select the “New” button and fill in the relevant collection
information:
PUBLISHED
LABEL
EXAMPLE
How to use collections
“Computer Books”
collection can be created,
and sub-collections called
Linux, Windows and Mac
can be created, with
assets assigned to these
sub-collections.
A magazine can be
separated into a collection
called “2012” with subcollections of each month
of the year).
This will display the collection name in the application. Unpublished collections
will remain hidden however published content assigned to the collection will still
be displayed in the store.
Input the label of the collection to be displayed in the application.
Creating Sub-Collections
Sub-collections are created in the same manner as collections.
You will then be able to assign collections to each other. This
allows for the hierarchical effect.
1
Edit the collection you would like to assign sub-collections
to by clicking on the collection name. Once the screen is
loaded, click on the “Sub-collection” tab.
2
Clicking on the “Assign” button will allow you to select an
existing collection to assign as a sub-collection.
1.2.2. Assigning assets to Collections
Once you have uploaded your assets in the assets module,
you can assign these to relevant collections.
Edit the collection you would like to assign assets to.
Select the assets tab, and clicking on the assign button will
display a list of available assets to assign.
Tick the checkbox next to an asset name and click on the
“Apply” button to assign the asset to the collection.
MANAGING YOUR ASSETS
7
Snapplify User Manual 2014
1.3. Push Notifications
Push Notifications are available for all Enterprise clients with iOS
apps; currently Android does not offer this functionality. Use push
notifications to alert customers of new issues available to download,
billing changes, specials and much more. Once you click send, you
will be shown a total number of recipients who received the push
notification on their device.
Sending your Push Notifications
1
Login to your application’s backend system that you wish to
send the push notification from
2
Open the Push Notifications module
3
Enter your message of no more than 255 characters and select
the Send button to send the notification to your applications
instantly.
MANAGING YOUR ASSETS
TIP
Receiving notifications
Be advised, that only
customers who have
accepted to receive
push notifications from
the application on their
device, will receive the
message.
8
Snapplify User Manual 2014
2
Getting your content ready
Choosing a format that’s right for
you is key; so here are some tips to
help you choose:
PDF is currently the most widely
used electronic document format
worldwide. PDF files give you
control over layout and fonts.
ePUB is designed for reflowable
content, meaning that an ePUB
reader can optimize text for a
particular device display. ePUB
also supports fixed-layout content.
Snapplify supports PDF and ePUB
publications, as well as video and
audio formats. In order for your
content to display properly, please
follow the below requirements:
2.1 ePub formats
In order for your publication to display correctly you will need
to sure your ePub file meets the following specifications:
ePub V2.0.1 file types.
To view the standards which Snapplify adheres to, please
review http://idpf.org/epub/201
2.2 PDF formats
In order for your publication to display correctly you will need
to sure your PDF file meets the following specifications:
IMPORTANT
Changing the style of
buttons in CSS will cause
problems with controls
on Android devices, so to
ensure that your content
works across iOS and
Android devices, please
remove all relevant
styling that may affect
button styles.
An example:
button,
Page size 1536x2048 pixels (optional)
input[type=”button”],
All images at 150 DPI
input[type=”reset”],
Saved as sRGB (failure to do say may result in images
input[type=”submit”] {
not displaying correctly when viewed on the device)
Do not use double page spreads, only single page up
Crop lines must be removed
cursor: pointer;
-webkit-appearance:
button;
PDF must be compatible with Acrobat 7.0 and earlier
GETTING YOUR CONTENT READY
9
Snapplify User Manual 2014
2.2.1. Enhancing your PDF
Creating Snaps
Snaps enable users to download a publication that contains
locally embedded media and to view this interactive content
offline.
Folder Structure
To ensure that your Snap works correctly, you would need to
setup the folder structure and filenames as required.
Rename your PDF file to “content”.pdf
Suggested folders within Base folder:
audio (contains audio files) video (contains video)
html (contains HTML files)
fonts (contains font files)
styles (contains files used for styling, CSS) JS (contains
javascript files)
images (contains image files)
Properties and parameters for Snap links
Keep in mind that all properties and parameters have a default
value. Here is a list of all the properties and their default value:
Popover: Yes or No – No by default
Size: Width x Height – 400 x 200 by default if the popover
is set to yes
Scale: Yes or No – No by default. What this means is when
set to yes the webview will scale the HTML to fit within the
annotation frame or window size. This scales things when
a user moves from portrait to landscape mode (and vice
versa). When set to No it will honour the HTML styling to
allow for the content to display larger than the window size.
Interact: Yes or No - Yes by default. This simply means that
a user is able to scroll, zoom and click on the content if set
to yes.
Some examples of links are given below.
TIP
1. Ensure that any
embedded HTML
references adhere to
the folder structure.
If you would like to keep
your HTML file structure
in one place, that isn’t
a problem, just as long
as the HTML files are all
stored within a single
location (all within the
html folder is perfect) and
that any embedded links
reference the required
files correctly.
2. It is recommended
that images used in
your Snaps are JPEGs,
as PNG’s can be too
large.
IMPORTANT
Changing the style
of buttons in CSS will
cause problems with
controls on Android
devices, so to ensure
that your content
works across iOS
and Android devices,
please remove all
relevant styling that
may affect button
styles.
Creating an “embed” link:
An example:
Reference the Adobe Acrobat Tutorial in this User Guide
(specifically on the embedded window link), but ensure the
following link structure is used in your PDF:
button,
embed://localhost/FOLDERNAME/FILENAME
eg. embed://localhost/html/index.html
embed://localhost/video/video.mp4
Localhost is used as it is a reference the device which the
content is on. This link will ensure that content is played in the
window area you have selected for the link.
GETTING YOUR CONTENT READY
input[type=”button”],
input[type=”reset”],
input[type=”submit”] {
cursor: pointer;
-webkit-appearance:
button;
10
Snapplify User Manual 2014
Creating a “Pop-Up” link
For content to be displayed in a pop up view, ensure the
relevant [popover:YES] tag is implemented before the URL
as per below:
embed://[popover:YES,size:640x480]localhost/html/
popup1.html
Here are some examples of links as reference:
Video Pop-up link:
TIP
The pop-up position as it
will appear in the content
within the application is
determined relative to
the hotspot area, taking
into account the size of
the window and screen
size of the device.
embed://[popover:YES,size:730x410]localhost/video/
VIDEO.mp4
Embedded image slider link:
embed://[scale:YES,Interaction: NO]localhost/html/
HTMLFILE.html
HTML Pop-up link:
embed://[popover:YES,size:416x410]localhost/html/
HTMLFILE.html
Packaging your Snap
Before uploading the Snap file to the Snapplify content
management system, it will need to be packaged as a
“Snap”. This process is as simple as zipping a set of files.
Select the PDF and relevant folders
Right click and select to zip the folder.
IMPORTANT
Technical information
and restrictions:
Asset file sizes: As the
content will now be
embedded within the
Snap file, your asset
files which users will
download will increase
in size. Ensure that video
is optimised to allow
for smallest file sizes
available for download.
Your Snap file is now saved correctly and is ready for
upload to the Snapplify content management system.
Instead of uploading your PDF or ePUB as an asset,
upload the .snap file.
Javascript link
restrictions: iOS webview
does not handle
Javascript links or
Javascript redirects. We
suggest using standard
HTML linking to ensure
that linking works across
all Platforms.
Ensure that you upload a jacket image as well. File
types should be in JPEG format and 768 x 1024 (to
ensure that the best quality file is used for relevant
devices.)
TIP
Once saved, right click on the .zip folder and select
Properties.
Change the .zip file extension to .snap and click OK.
We recommend the
following formats be
used for video and
audio files, to ensure
they work across
platforms:
Video - MP4 in Baseline
Profile
Audio - MP3
GETTING YOUR CONTENT READY
11
Snapplify User Manual 2014
Creating an Audio Read-Along book
If you are creating an audio book, with audio per page, there
must be a separate audio file for each page of the book that
has audio.
The audio filename must correspond with the actual page
e.g. If you have a 8 page PDF with audio on page 4, 5, 6,
7, 8 the .mp3 files must be named: 3.mp3, 5.mp3, 7.mp3,
9.mp3
The audio might be for page 2 of the book, but the actual
PDF page number is 4, the audio file must be named 4.mp3
Rename the PDF file to “content.pdf” and place your audio
files in a folder named “audio”.
Now refer to the above section on “packaging your Snap”
Including Video and Audio
Snapplify supports embedded video and audio content in
multiple formats; for a detailed list for iOS and Android please
refer to Appendix A.
Video
The video module, accessible on the left-hand toolbar, allows
you to upload video content to include in your publication. Be
aware of the video formats supported, to ensure that any video
is encoded at the relevant file specifications.
TIP
We recommend the
following formats be
used for video and
audio files, to ensure
they work across
platforms:
Video - MP4 in Baseline
Profile
Audio - MP3
Refer to the video and audio specifications table in Appendix A.
GETTING YOUR CONTENT READY
12
Snapplify User Manual 2014
Uploading a new video/audio file
1
Select on the video/audio module on the left hand toolbar.
2
Select the New button to add a new video/audio file
3
Fill in the relevant video information
4
Once all the relevant information has been added, and the
file has finished being uploaded, click on the “Apply” button
to save the video.
LABEL
DOCUMENT
PUBLISHED
Fill in the name of the asset as you would like it to appear in the application.
Select on “Upload a file” and choose the file you wish to add from your computer.
Ensure that the video file is fully uploaded before clicking on the “OK” button.
Select “Published” to display the item in the application. “Unpublished” items will
not be visible.
If you are adding assets that must still be approved as in-app purchases by Apple
then select “Unpublished”.
COPYRIGHT
Fill in any relevant copyright information. This field is optional.
CATEGORY
Choose the most relevant category that your video falls under.
PUBLICATION DATE
CODE
PRODUCT DESCRIPTION
GETTING YOUR CONTENT READY
Select the date from the calendar you want your video to display.
ISBN / Product code or reference code for this asset.
This provides the user with a description of the product before they download it to
their device from within the app.
13
Snapplify User Manual 2014
Jacket Images
JACKET IMAGE
Upload an image, which users will see as the image associated with the file
in the application.
Recommended file type: JPG. Recommended file size: 768 x 1024 pixels.
Pricing
APPLE PRICE TIER
APP SITE PRICE
IN APP PURCHASE ID
Select the relevant price tier for this asset. The price that reflects in your app is
changed in iTunes and changing the price tier here will not affect the price in your app.
Contact Snapplify if you want to change the price of existing content in your app.
IMPORTANT: If you select tier 0 here, your content WILL be free to download in your app.
If your Application also has a Web Store, this is the price that will display on the
Web Store for this asset. (ZAR)
The identifier used when setting up an in-app purchase in iTunes Connect and Google Play.
Leave this blank if the content is free or if you don’t require setting up in-app purchases.
Alternatively, stick to the unique naming convention supplied to you
e.g 2013issue1, 2013issue2.
ANDROID PAID PRODUCT
Tick the box if the asset is for sale on Android and has a corresponding Google Play Store
In app Product.
ANDROID DISPLAY PRICE
Price displayed in Android apps in US$
Editing a Video
1
Select the asset you wish to edit by clicking on the title of
the asset, or alternatively selection the checkbox next to the
asset name and clicking on the “Edit” option.
2
Edit the relevant fields you wish to change. When you want to
replace a video for a specific asset, do not delete the entire
asset. Simply select the asset, click “Edit” and “Upload a file.”
The new video will replace the previous one. Remember that
if a reader has already downloaded the previous file to their
mobile device, it will still be available in their Library and
must be deleted from the device. Once updates have been
made, click on the “OK” button to save your changes.
GETTING YOUR CONTENT READY
14
Snapplify User Manual 2014
Assigning Videos to the application
Edit the asset you would like to assign to the application, and
scroll down to the bottom of the assets information. Here you
will see the Applications tab where you can assign your asset
to the relevant application. Be aware that assets which are not
assigned to the application will not be visible by users:
Click on the Assign button to view a list of the available videos.
Click on the checkbox next to the application and click on
apply to assign the video as required:
IMPORTANT
Assigning video to
the application.
The step above must be
completed for your video
to be available in the
Application.
Audio
The audio module allows for uploading of audio content to the
applications. Be aware of the audio formats below, to ensure
that any audio is encoded at the relevant file specifications. We
recommend using MP3 as this will consistently work on all iOS
and Android devices.
Refer to the Appendix B for a full list of formats and files
supported by iOS and Android apps.
Editing a Video/audio file
1
Select the asset you wish to edit by clicking on the title of
the asset, or alternatively selection the checkbox next to the
asset name and clicking on the “Edit” option.
2
Edit the relevant fields you wish to change. When you
want to replace a video for a specific asset, do not delete
the entire asset. Simply select the asset, click “Edit” and
“Upload a file.” The new video will replace the previous one.
Remember that if a reader has already down- loaded the
previous file to their mobile device, it will still be available
in their Library and must be deleted from the device. Once
updates have been made, click on the “OK” button to save
your changes.
Assigning Video/audio to the application
Edit the asset you would like to assign to the application, and
scroll down to the bottom of the assets information. Here
you will see the Applications tab where you can assign your
asset to the relevant application. Be aware that assets which
are not assigned to the application will not be visible by users.
Click on the Assign button to view a list of the available audio.
Click on the checkbox next to the application and click on apply
to assign the audio as required.
GETTING YOUR CONTENT READY
IMPORTANT
Assigning audio to
the application.
The step above must be
completed for your audio
file to be available in the
Application.
TIP
We recommend the
following formats be
used for video and
audio files, to ensure
they work across
platforms:
Video - MP4 in Baseline
Profile
Audio - MP3
15
Snapplify User Manual 2014
2.2.2 Adobe Acrobat tutorials for PDF
The purpose of this section is to explain how to embed media into
a PDF document that will be served to a Snapplify app.
Optimising your PDF
These are the optimal specifications for using a PDF in
a Snapplify app.
Adding links to your content
1
Open your PDF Document in Adobe Acrobat
2
Select the tools menu from the toolbar
Once you have added all the links and embedded
media to your saved PDF, you must save it as an
“Optimised PDF”.
3
Select the content tab in the tools menu to expand it
4
Select the “Link” button on content tab of the tools
menu
All images must be 150 DPI and colours saved as
sRGB. It is very important that your PDF be saved
as an RGB, otherwise some images may not appear
5
Draw a link rectangle on your document where
you would like to place the link, in the case of an
embedded element, this is where it will be displayed
6
After creating the link rectangle you will be presented
with a “Create Link” dialog. To navigate to another
page in your document select the “Go to page view”
link action. To embed media or open media in a
popup window choose the “Open a web page” link
action. Then click next button.
7
Specify the URL for the media you would like to link to
and press “OK”. To embed the media in the document
you need to prefix your URL with “embed://”
8
Your link should now be successfully set up
when viewing the publication in the app.
Do not use double page spreads. The reason for this
is that the app automatically creates double page
spreads when a device is held in landscape mode.
All crop lines must be removed.
Your PDF must be compatible with Acrobat 7.0 and
earlier.
Your PDF size must be 1536 x 2048 (this is optional).
Your PDF is now optimised and ready for use.
GETTING YOUR CONTENT READY
16
Snapplify User Manual 2014
Creating an embedded window link
This type of link will display your media directly in your document
in the area you specified.
To use this feature, follow the steps in “Creating a link in a PDF”
but prefix your URLs with “embed://”
when you get to step 7. e.g. embed://www.mydomain.com/
media/demo.mov
Creating a Pop Up window link
This type of link will display your media in a full screen popup
window.
1
Follow the steps in “Creating a link in a PDF”
2
To use this feature you just specify the standard URL
3
An example can be seen at http://www.mydomain.com/
media/demo.mov
Creating an email link
This type of link will display a new email dialog.
1
Follow the steps in “Creating a link in a PDF”
2
To use this feature you must prefix the destination email
address with “mailto:”
3
For example mailto:[email protected]
Creating a bookmarks link
TIP
Watch that overlay!
Do not select the entire
page as your overlay.
Leave at least a small
open area around the
page as this is needed
for the hand gestures
and navigation in the
app.
TIP
Specify your email
subject and body
To specify the email
subject:
mailto:someone@example.
com?subject=This is the
subject
To specify the email
body:
mailto:someone@example.
1
Select the page you wish to bookmark
com?body=This is the body
2
Go to the bookmark icon on the left hand toolbar and add it
To specify the email
subject and body:
mailto:someone@example.
com?subject=This is the
subject&body=This is the
body
GETTING YOUR CONTENT READY
17
Snapplify User Manual 2014
2.2.3. InDesign tutorials for export to PDF
The purpose of this document is to explain how to embed media
into an InDesign file that will be served to a Snapplify app.
IMPORTANT
Check your version!
Adding Links
You will require Adobe
InDesign CS5 or newer to
use this tutorial.
Creating a hyperlink
1
Use the “select” tool to select the text you wish to link.
2
Then go to “Window”
3
Specify the URL you would like to link to
“Interactive”
“Hyperlinks”
Creating a link to another Page
1
Go to “Window”
new Hyperlink”
“Interactive”
“Hyperlinks”
“Create
2
In the “Edit hyperlink” window, select page and the page
number you wish to link to.
Embedding Content
The following types of
media can be embedded
in your publication:
Web Pages - (google
maps, contact form)
Embedding a Video/webpage/HTML5
1
Select on the “Rectangle Frame Tool” on the left-hand toolbar
to select the area for your embedded media.
2
Go to “Window”
new Hyperlink”
“Interactive”
TIP
Supported Media
Types
“Hyperlinks”
“Create
3
To use the embed feature, prefix your URL’s with “embed://”.
(e.g. embed://www.snapplify.com/demo)
4
Use the “Select” tool to select the text you wish to link.
5
This type of link will display your media directly in your
document in the link rectangle that you specified.
Video - (m3u8, mov, avi,
mpg - formats that are
supported by iOS)
Audio - (mp3, m4a)
IMPORTANT
Watch that overlay!
Do not select the entire
page as your overlay.
Leave at least a small
open area around the
page as this is needed
for the hand gestures and
navigation in the app.
GETTING YOUR CONTENT READY
18
Snapplify User Manual 2014
Creating a send email link in InDesign
This type of link will display a new email dialog. To use this
feature you must prefix the destination email address with
“mailto”.
1
Go to Window
Interactive
Hyperlinks
2
Use the “select” tool to select the text you wish to link. e.g
mailto:[email protected]
Creating a bookmark link in InDesign
This type of link will display the page or section that has been
bookmarked.
1
Go to “Window”
“Interactive”
“Bookmarks”.
2
Select the page you wish to bookmark before creating the
bookmark.
Installing the exporting Snapplify PDF export into InDesign
The Snapplify PDF export file needs to be loaded in InDesign
and contains the optimal export specifications for the PDF to be
used in a Snapplify Application.
1
To install the file, go to “Adobe PDF presets” under “File”.
2
Select “Define”
3
Select “Load”. Now select the export file from your computer.
Select “Done”
4
The export setting has now been loaded.
Exporting your publication from InDesign
1
When your publication is ready to be exported to PDF, you
must use the Snapplify PDF export setting.
2
Go to “Adobe PDF presets” under “File”
3
Select the “Snapplify PDF Export” that you have uploaded
above.
4
Save your PDF using these settings.
GETTING YOUR CONTENT READY
19
Snapplify User Manual 2014
3
eCommerce
3.1. Vouchers
$
Snapplify Enterprise clients can user their web store to
set up vouchers to sell and distribute content.
Creating a voucher
In the ‘e-Commerce’ drop-down menu on the left-hand
toolbar select ‘Product Vouchers’ and add a ‘New
voucher’.
$
PUBLISHED
CODE
Select “Published” to make the voucher live, “Unpublished” will make the voucher
unredeemable.
This is the voucher code that the user needs to enter in order to redeem the voucher. This
can be any sequence of letters and/or numbers e.g free000123. The voucher codes are not
case sensitive. Here is a list of characters not to use: @,#,$,^,&,*,<,>,\,`,~,/,ä,á,â,è,é,ê,ë,’,”
MAXIMUM USES
Select the amount of times this voucher may be redeemed. If you select 0, the voucher
can be redeemed an unlimited amount of times. If you select 3, the voucher code can be
redeemed 3 times. You can edit this limit at any time.
TOTAL VOUCHER
REDEMPTIONS
You do not need to fill in anything here. This field will automatically be populated by the
amount of times a voucher is redeemed.
E COMMERCE
20
Snapplify User Manual 2014
Assigning assets to a voucher
You can load multiple assets on one voucher code,
which is useful for selling entire collections or syllabi
to schools or students. It is much more efficient to
provide one code with many titles, than many codes for
as many titles. Assigning multiple assets or products to
a code will not change the code.
1
Scroll down “Assign” underneath “Products”
2
Assign the relevant products for this particular voucher and “Apply”
3
The voucher code can now be redeemed by a user on the web store, which will give them access to the
products assigned to the code.
Voucher Redemption Report
To view a detailed report on how many of your vouchers were redeemed and when, visit the Product Vouchers
section in the eCommerce module.
1
Select ‘Redemption Reports’
2
Select a particular voucher code or leave blank for a blanket report on all vouchers
3
Select the time period for which you would like to track
4
Export the report
E COMMERCE
21
Snapplify User Manual 2014
4
Reporting tools
Accessing reporting tools in the CMS
Snapplify provides clients with an account with
appfigures.com. This account will provide you with
access to the sales and download statistics for content
within your app.
You are also able to access reports from the Snapplify
Content Management System. These reports can be
accessed by selecting the “Assets” tab on the left hand
toolbar in the Content Management System.
Once in the Assets tab, you will see the “Download
Reports” option displayed at the top of the page.
Select the “Download Reports” option and then select
the dates for which you would like to view the statistics.
This will generate and download a CSV file to your
machine.
Download Date: The date on which the download
occurred
Product: This is the unique identifier of the file in
the Content Management System
Label: This is the title of the file e.g. January 2013,
or Issue 1
Total Downloads: The total downloads of that file
for the specified date. This includes downloads
across all devices on which your application is
available on (iOS, Android, Web- where applicable).
Adding a new voucher
If you have a Snapplify webstore and make use of
vouchers, you can also access redemption reports
from the content management system. You can
specify a single voucher code or download a report
of all voucher codes redeemed for a specific period.
Once in the Product Vouchers tab, you will see the
“Download Reports” option displayed at the top of the
page. Select the “Redemption Reports” option. Select
the dates for which you would like to view the statistics.
This will generate and download a CSV file to your
machine.
REPORTING TOOLS
22
Snapplify User Manual 2014
5
Processes and Systems
5.1. Upload Automation setup
Content that is available for download from within the app
can be uploaded to the Snapplify con- tent management
system in two ways:
Manual upload of content into the Snapplify CMS
This is the process outlined earlier in this User Guide.
The Snapplify content management system is accessed
via sign in details and content is uploaded (PDFs, ePUBs,
video and audio and Snap files), which can then be
published to the apps
Once all content has been uploaded to an FTP location,
Snapplify will then run an import script on the location
in order to populate the Snapplify content management
system. Once the assets have been uploaded, client is
required to notify Snapplify on completion of upload.
Please ensure that the assets are uploaded into a folder
on the server called “assets” (ensure that this folder
name is in lowercase)
All PDF files should be the book titles EAN or ISBN
number to ensure that these items are unique:
Example: 093738318X.pd
Automated upload of content into the Snapplify CMS
The following steps will detail the requirements for clients
in order for the Snapplify team to import and update the
content management system (CMS) which manages all
client assets.
5.2. Uploading content to an
FTP location
Clients are required to upload all of the relevant content
to be added into the Snapplify content management
system to a FTP location. This FTP location can be client
side, but should it be required Snapplify can supply a
location for the assets to be uploaded to.
PROCESSES AND SYSTEMS
Please ensure that filenames of PDFs do not contain the
following characters when uploading to the server:
/\?%*:|“<>&
5.3. Uploading Metadata
information to an FTP
location
A meta data file in CSV file format will also be required,
to ensure that assets uploaded into the Snapplify content
management system will have relevant information
associated with it. Any field which does not have
information in it will appear blank when the item is viewed
in the application (not all information is required).
23
Snapplify User Manual 2014
FIELD NAME IN CSV FILE
REQUIRED FIELD?
INFORMATION
name
Yes
Filename (minus the extension .pdf)
This must correspond with the document name e.g.
093738318X
label
Yes
Title of asset
label
published
Yes
True will ensure that the asset is available to be viewed in the application
if the app is live. False will ensure the
asset is not visible by users.
true/false
price_tier
Yes
Select the price tier for which this
asset will be sold in the App. Assets
marked as “0” will be free.
0-85
REVERSE_asset
No
Input the name of the collection the
asset will be available in e.g. Grade 10
category
No
Input the category which is associated
with the asset
authors
No
Input the author name
edition
No
Input the book edition
publisher
No
Input the publisher name
publication_date
Yes
Input the date of publication
print_length
No
Input the amount of pages for the asset
copyright
No
Input the copyright information relevant to the asset.
magazine_type
Yes
“0” for books, “2” for newspapers
language
No
Language of asset
price
No
Asset price in ZAR
document
Yes
E.g. 093738318X.pdf
PROCESSES AND SYSTEMS
AVAILABLE OPTIONS
DD-MM-YYYY
145.99
24
Snapplify User Manual 2014
Upload the .csv file into a folder called “metadata” (ensure that this
folder name is in lowercase) which will sit on the server in the same
folder as the “assets” folder.
The very first line of the metadata csv file (the above column names)
will be skipped on import and all assets from line 2 till the end of the
document will be imported into the Snapplify content management
system.
Final FTP folder structure:
Root\
assets
Book_Title_1.pdf
Book_Title_2.pdf
Book_Title_3.pdf
metadata
example_20120521_134000.csv
IMPORTANT
CSV file format
The file must be saved in
CSV format and not as an
Excel sheet.
5.4. Supplying FTP information to
Snapplify
Once all content (assets and metadata) has been successfully
uploaded, Snapplify would require the following information to
perform the import:
FTP information:
Host name: FTP location host name Port: FTP location port
number Username: FTP username Password: FTP password
Asset folder name
Metadata folder name
Please ensure that this is normal FTP as SFTP will not work. All
assets will be removed from the client server once the import has
been completed and verified.
PROCESSES AND SYSTEMS
25
Snapplify User Manual 2014
5.5. Automating Content Stitching
Content stitching is designed for publications such as newspapers
and magazines that are designed to be printed in a particular order,
however when distributed as a digital publication they need to be
re-organised, what content stitching does is automatically re-order
them for you if you set it up correctly:
Folder structure needs to be:
/
--Publication
-----file for each page of each section
We also need is the “embargo” date for each publication. This is
the time that client can en- sure that all files for the publication
have been uploaded and we can commence the stitching and
import of the content.
Automated upload of content that does not require
stitching
The filename convention for periodical content (e.g. newspapers
and magazines) which do not require stitching are required to be
structured as follows:
[title_identifier]_[edition_identifier]_[date]
E.g:
Sunday Times First Edition for 20th May 2012: ST_E1_201205-20.pdf
If edition irrelevant, then always E1. Complete PDFs that do
not require stitching, can be located in a single directory.
Automated upload of content which requires
stitching
The filename convention for all items which need to be stitched are
required to be structured as follows:
[title_identifier]_[section_identifier]_[edition_identifier]_[date]_
[page_number]
E.g:
Sunday Times News Section Page 1 First Edition for 20th
May 2012:
ST_NWS_E1_2012-05-20_01.pdf
If stitching is required, must be stored in subdirectory
matching [title_identifier]
PROCESSES AND SYSTEMS
26
Snapplify User Manual 2014
Appendix
Video specifications for iOS:
FORMAT
H.264 video up
to 1080p
FRAMES / SEC
PIXELS
AUDIO
-
High Profile level 4.1
AAC-LC audio up to
160 Kbps
30 frames / sec
FILE FORMATS
48kHz stereo
audio in .m4v
MPEG-4 video up
to 2.5 Mbps
30 frames / sec
Motion JPEG
(M-JPEG) up to
35 Mbps
30 frames / sec
640 x 480
pixels
Simple Profile with
AAC-LC audio up to 160
Kbps per channel
48kHz stereo
audio in .m4v
.mp4 and .mov
file formats
.mp4 and .mov
file formats
Audio in ulaw
1280 x 720
pixels
-
PCM stereo audio
in .avi file format
Video specifications for Android:
FORMAT/CODEC
ENCODER
DECODER
DETAILS
SUPPORTED FILE TYPES/
CONTAINER FORMATS
H.263
X
X
-
3GPP (.3gp)
MPEG-4 (.mp4)
H.264 AVC
X (Android 3.0+)
X
Baseline Profile
(BP)
3GPP (.3gp); MPEG-4 (.mp4)
MPEG-TS (.ts, AAC aduio only,
not seekable, Android 3.0+)
MPEG-4 SP
-
X
-
3GPP (.3gp)
VP8
-
X (Android
2.3.3+)
Streamable only
in Android 4.0
and above
WebM (.webm)
Matroska (.mkv,
Android 4.0+)
APPENDIX
27
Snapplify User Manual 2014
Audio specifications for iOS:
ENCODER
DECODER
DETAILS
SUPPORTED FILE TYPES/
CONTAINER FORMATS
HE-AAC (V1 and V2)
-
-
-
-
AAC (8 to 320 Kbps)
-
-
-
-
Protected AAC
(from iTunes Store)
-
-
-
-
MP3 (8 to 320 Kbps)
-
-
-
-
MP3 VBR
-
-
-
-
Audible (formats 2,
3, and 4, Audible
Enhanced Audio, AAX,
and AAX+)
-
-
-
-
Apple Lossless
-
-
-
-
AIFF
-
-
-
-
WAV
-
-
-
-
FORMAT/CODEC
APPENDIX
28