1
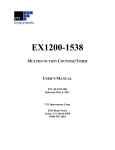
VTEXSWITCH DRIVER PROGRAMMER’S MANUAL P/N: 82-0117-000 Released February 18th, 2014 VTI Instruments Corp. 2031 Main Street Irvine, CA 92614-6509 (949) 955-1894 VTI Instruments Corp. TABLE OF CONTENTS INTRODUCTION TABLE OF CONTENTS ................................................................................................................................................ 2 PROGRAMMING EXAMPLES....................................................................................................................................... 4 Certification .......................................................................................................................................................... 5 Warranty ............................................................................................................................................................... 5 Limitation of Warranty ......................................................................................................................................... 5 Restricted Rights Legend ...................................................................................................................................... 5 SUPPORT RESOURCES ............................................................................................................................................... 6 SECTION 1 .................................................................................................................................................................... 7 INTRODUCTION ......................................................................................................................................................... 7 Background........................................................................................................................................................... 7 Glossary ................................................................................................................................................................ 7 Basic Concepts ..................................................................................................................................................... 8 ADDRESSING INSTRUMENTS & COMPONENTS........................................................................................................... 9 Introduction .......................................................................................................................................................... 9 Platforms and Instruments .................................................................................................................................... 9 Channels ............................................................................................................................................................... 9 Relays and Coils ................................................................................................................................................... 9 Parallel TTL/IO Ports (EX7000 Only) ................................................................................................................. 9 INITIALIZATION ...................................................................................................................................................... 10 Option Strings ............................................................................................................................................... 10 DCF Information ................................................................................................................................................ 11 Slots .................................................................................................................................................................... 11 Multiple Mainframes .......................................................................................................................................... 12 IndividualRelayMode ......................................................................................................................................... 14 INSTRUMENT SPECIFIC INTERFACE ......................................................................................................................... 16 Introduction ........................................................................................................................................................ 16 Repeated Capabilities ......................................................................................................................................... 16 Channels ........................................................................................................................................................ 16 ListOfChannels ...................................................................................................................................... 16 SerialNumber ................................................................................................................................................ 16 User-defined Relay Configurations .................................................................................................................... 16 External Connections .......................................................................................................................................... 17 Odometers........................................................................................................................................................... 18 Exclude Lists ...................................................................................................................................................... 18 Path-level exclude lists .................................................................................................................................. 18 Relay Specific Interfaces .................................................................................................................................... 19 Close Relays .................................................................................................................................................. 19 Open Relays .................................................................................................................................................. 19 Get Relay State .............................................................................................................................................. 19 Verify Relay State ......................................................................................................................................... 20 Function Call Logging ........................................................................................................................................ 21 Open log file .................................................................................................................................................. 21 Close log file ................................................................................................................................................. 21 EX7000 SPECIFIC INTERFACE ................................................................................................................................. 22 Introduction ........................................................................................................................................................ 22 Repeated Capabilities ......................................................................................................................................... 22 ParallelIOs ..................................................................................................................................................... 22 OutputEnableMask ................................................................................................................................. 22 Data ........................................................................................................................................................ 22 2 VTEX Switch Driver Programmer’s Manual www.vtiinstruments.com ListOfParallelIOs .......................................................................................................................................... 23 Attenuators .................................................................................................................................................... 24 Setting .................................................................................................................................................... 24 ListOfAttenuators .......................................................................................................................................... 25 SECTION 2 .................................................................................................................................................................. 26 APPLICATION EXAMPLES ........................................................................................................................................ 26 Introduction ........................................................................................................................................................ 26 Setup Example............................................................................................................................................... 26 Using Relays ................................................................................................................................................. 33 VTEX Switch Driver Programmer’s Manual 3 VTI Instruments Corp. PROGRAMMING EXAMPLES Connecting to slots 1, 2, and 3 using dash separation.................................................................................................. 12 Connecting to slots 1, 2, and 3 using comma separation ............................................................................................. 12 Connect to slots and verify model type ....................................................................................................................... 12 Simulate a system with two switch modules ............................................................................................................... 13 Implicitly request all containing switch cards ............................................................................................................. 13 Connect to three slots with the same model type ......................................................................................................... 13 Connect to multiple cards on multiple mainframes ..................................................................................................... 13 Invalid – First slot number is greater than the second slot number ............................................................................. 13 Invalid – Module not specified in simulation mode .................................................................................................... 14 Invalid – Slot numbers not specified with module ID in simulation mode.................................................................. 14 Control slots 1, 2, and 3 using Individual Relay Mode................................................................................................ 15 Using IndividualRelayMode during a simulation ........................................................................................................ 15 Invalid – True or False not indicated for Individual Relay Mode................................................................................ 15 ListOfChannels Usage ................................................................................................................................................. 16 SerialNumber Usage .................................................................................................................................................... 16 Setting Usage ............................................................................................................................................................... 17 ExternalConnection Usage .......................................................................................................................................... 17 Odometers Usage......................................................................................................................................................... 18 Defining a path-level exclude list ................................................................................................................................ 18 Deleting a path-level exclude list ................................................................................................................................ 19 CloseRelays Usage ...................................................................................................................................................... 19 OpenRelays Usage....................................................................................................................................................... 19 GetRelayState Usage ................................................................................................................................................... 19 VerifyRelayState Usage .............................................................................................................................................. 20 OpenLogFile Usage ..................................................................................................................................................... 21 CloseLogFile Usage .................................................................................................................................................... 21 ParallelIOs reference pointer initialization .................................................................................................................. 22 OutputEnableMask & Data Usage............................................................................................................................... 23 ListofParallelIOs Usage ............................................................................................................................................... 23 Attenuator Initialization ............................................................................................................................................... 24 Setting Usage ............................................................................................................................................................... 24 ListOfAttenuators Usage ............................................................................................................................................. 25 IVI-C Example ............................................................................................................................................................ 26 IVI-Com Example ....................................................................................................................................................... 29 C++ Linux Example .................................................................................................................................................... 31 4 VTEX Switch Driver Programmer’s Manual www.vtiinstruments.com CERTIFICATION VTI Instruments Corp. (VTI) certifies that this product met its published specifications at the time of shipment from the factory. WARRANTY The product referred to herein is warranted against defects in material and workmanship for a period of one year from the receipt date of the product at customer’s facility. The sole and exclusive remedy for breach of any warranty concerning these goods shall be repair or replacement of defective parts, or a refund of the purchase price, to be determined at the option of VTI. VTI warrants that its software and firmware designated by VTI for use with a product will execute its programming when properly installed on that product. VTI does not however warrant that the operation of the product, or software, or firmware will be uninterrupted or error free. LIMITATION OF WARRANTY The warranty shall not apply to defects resulting from improper or inadequate maintenance by the buyer, buyersupplied products or interfacing, unauthorized modification or misuse, operation outside the environmental specifications for the product, or improper site preparation or maintenance. VTI Instruments Corp. shall not be liable for injury to property other than the goods themselves. Other than the limited warranty stated above, VTI Instruments Corp. makes no other warranties, express or implied, with respect to the quality of product beyond the description of the goods on the face of the contract. VTI specifically disclaims the implied warranties of merchantability and fitness for a particular purpose. RESTRICTED RIGHTS LEGEND Use, duplication, or disclosure by the Government is subject to restrictions as set forth in subdivision (b)(3)(ii) of the Rights in Technical Data and Computer Software clause in DFARS 252.227-7013. VTI Instruments Corp. 2031 Main Street Irvine, CA 92614-6509 U.S.A. VTEX Switch Driver Programmer’s Manual 5 VTI Instruments Corp. SUPPORT RESOURCES Support resources for this product are available on the Internet and at VTI Instruments customer support centers. VTI Instruments World Headquarters VTI Instruments Corp. 2031 Main Street Irvine, CA 92614-6509 Phone: (949) 955-1894 Fax: (949) 955-3041 VTI Instruments Cleveland Instrument Division 5425 Warner Road Suite 13 Valley View, OH 44125 Phone: (216) 447-8950 Fax: (216) 447-8951 VTI Instruments Lake Stevens Instrument Division 3216 Wetmore Avenue, Suite 1 Everett, WA 98201 Phone: (949) 955-1894 Fax: (949) 955-3041 VTI Instruments, Pvt. Ltd. Bangalore Instrument Division 75/76, Millers Road Bangalore – 560 052 India Phone: +91 80 4040 7900 Phone: +91 80 4162 0200 Fax: +91 80 4170 0200 Technical Support Phone: (949) 955-1894 Fax: (949) 955-3041 E-mail: [email protected] Visit http://www.vtiinstruments.com for worldwide support sites and service plan information. 6 VTEX Switch Driver Programmer’s Manual www.vtiinstruments.com SECTION 1 INTRODUCTION BACKGROUND The intent of the programmer’s manual is to describe the IVI-compliant VTEX switch driver and to introduce its concepts, structure, and capabilities to software and test application engineers by providing examples of recommended code usage. The reader is expected to be familiar with instrumentation drivers, in particular IVI-COM and IVI-C specifications; COM and C programming terminology; and switch instrumentation concepts.. Understanding IVI driver specifications will significantly help the reader follow the VTEX switch driver’s design and the code examples provided. For more information regarding the required and optional parts of IVIcompliant switch drivers as well as IVI driver capabilities and operation, please refer to IVI-4.6: IviSwtch Class Specification and IVI-3.2, Inherent Capabilities Specification which are available on the IVI Foundation website. This guide provides instruction for programming both the EX1200, SMX, and the EX7000. GLOSSARY Throughout this document, the following terms will be used: Attenuator Controller DCF Drive Line EX-based EX7000 IVI Latching Relay Module Module ID NISE a device that reduces an input signal’s amplitude while maintaining most of its other characteristics. a single-board computer, hosting the CPU, RAM, Flash, real time software (i.e. firmware) and other devices that enable its operation as an intelligent, LXI platform. acronym for Device Configuration File; a collection of information describing a specific device (e.g. a plug in card) or an entire system (e.g. an EX7000). a physical line used to drive one coil in a switch/relay. VTI Instruments, Inc’s modular instruments developed for the EX platforms. Synonymously used with “Next Generation System” and “system”. an LXI-based radio frequency (RF) switch system which is part of VTI Instruments’ Next Generation line of products. acronym for Interchangeable Virtual Instruments; a collection of specifications that create a common programming model for several classes of instruments. a switch that remains in the last commanded position, by magnetic force, until it receives a reset signal. any instrument installed in an EX system slot. a string identifying the module; “ex1200-3048”, for example. acronym for National Instruments Switch Executive; a client software package that can aggregate multiple switch modules and make them behave as one integrated system provided they comply fully with the IVI Switch specification. VTEX Switch Driver Programmer’s Manual 7 VTI Instruments Corp. RDB SFP Soft Parallel Port SPxT User Defined Port Virtual Instrument an acronym for Relay Driver Board; hardware that interfaces between the controller and the actual microwave switches on an EX7000. acronym for Soft Front Panel; an application running on a host computer (either a Windows or Linux PC) that provides an graphic user interface (GUI) to monitor and control the instrument. a named, user-defined collection of consecutive relay drive lines that are accessed as one unit i.e. by writing / reading arbitrary numerical values to / from them. acronym for Single Pole x Throw relay; a device connecting an input (the pole) to one of several outputs (the x throws). Each such connection is achieved by controlling a separate coil, one per throw. a synonym for Soft Parallel Port. a collection of plug-in modules and other system resources controlled together by a client application session. The EX systems support concurrent and independent control of up to four virtual instruments on the same physical platform. BASIC CONCEPTS 1) The driver complies with the IVISwitch specification. On Windows platforms, it supports both IVI-COM and IVI-C interfaces. On Linux platforms, it supports a C++ programmatic interface that is nearly identical to the COM interface. 2) The IVI Switch specification treats every switch module as a collection of channels which can be connected or disconnected by opening/closing relays. It does not provide for direct control of the relays themselves. The VTEX switch driver recognizes that customers may prefer this programming paradigm versus the path-level switching included in IVI Switch. To provide the maximum flexibility to end users, the driver provides both control mechanisms: path-level switching and individual relay control. These two modes are mutually exclusive due to the conflicting requirements they create for the underlying driver logic. The mode is selected via the Initialize call. This mode is then maintained until the program calls the Close method. Note that the test program can immediately Initialize another session and use the other mode, if needed. 3) The VTEX switch driver was designed to work equally well with all types of switch modules made or envisioned by VTI. This includes plug-in switch cards for the EX1200 series, SMX series and the EX7000 platforms. 4) An EX7000 platform provides a generic collection of relay drive lines and reset lines intended to drive RF switch coils. While some client applications may prefer to control coils individually, others may wish to combine coils in order to control different device types. The VTEX switch driver provides this flexibility by supporting three programmatic concepts: i. ii. Each drive line can be turned on or off individually. A sequence of drive lines can be combined and used collectively as a “user-defined port,” also known as “soft parallel IO port”. Once defined, the application program can simply write arbitrary numerical values to such a port, where each ‘1’ bit turns the corresponding line on, and each ‘0’ bit turns it off. The program can also read the port’s value which are the inputs provided by external devices connected to the read back lines. Using this feature, the customer can connect any arbitrary device to the system, control its operation, and monitor its status. iii. Attenuators – these are implemented as simple user-defined [parallel] ports which accept a short list of values (bit patterns) to achieve specific attenuations. 5) The IVI specification allows for extensions. The VTEX switch driver includes VTI Instruments Corp. value-added methods and properties in the InstrumentSpecific interface. See the Instrument Specific Interface section for more details. 8 VTEX Switch Driver Programmer’s Manual www.vtiinstruments.com ADDRESSING INSTRUMENTS & COMPONENTS INTRODUCTION Addressing instruments and components is similar for the EX1200, SMX, and the EX7000s series mainframes. Both will be addressed in the following section. PLATFORMS AND INSTRUMENTS A Next Generation platform has one or more individual slots, numbered from 1 to n, with the exception of the EX7000, which is treated as a single-slot platform. References to channels and relays typically need to be prefixed by the slot number followed by an exclamation point (eg. for CH1_1 on slot 1 the notation would be “1!CH1_1”). The only exception is when a single slot is initialized. This may occur when a mainframe contains only one plug-in or, as is the case for the EX7000, when the platform has only one slot. In this case, the slot number can be omitted. CHANNELS For the EX1200, SMX, and factory configured EX7000s, channel names are predefined. The channel names are visible for both platforms via the online webpage. These names are also available in the user’s manuals of the EX1200 and SMX series switch cards. For multiplexers and matrices, conventions also exist for creating 2- and 4-wire channel names as well. For more information on 2- and 4-wire channel names, refer to the EX1200 Switch Card User’s Manual/SMX Switch Card User’s Manual. It should be noted for the EX7000 that the user has the ability configure the mainframe using the DCF configurator. When this is done, channel names are defined by the user. RELAYS AND COILS On an EX1200 or SMX switch card, each relay has a unique, predefined name. For plug-in switch cards, the names are provided in a “K<number>” format, such as K1, K2, K1015, etc. The card’s logical diagram indicates the relays’ K-number and provides channel connectivity information. On an EX7000, each relay driver board (RDB) is a collection of 72 relay/coil drive lines plus 12 high-current reset lines. The names of the relay drive and reset lines are “K<rdb#>_<linenumber>” and “R<rdb>_<linenumber>”, respectively. For example, The predefined names for the first RDB are K1_1 through K1_72 and R1_1 to R1_12. The predefined names for the second RDB are K2_1 to K2_72 and R2_1 to R2_12. The predefined names for the eighth RDB are K8_1 to K8_72 and R8_1 to R8_12. PARALLEL TTL/IO PORTS (EX7000 ONLY) Each RDB on the EX7000 includes a 32-bit, parallel TTL port. Their predefined names are “TTL<rdb#>”. For example, TTL1 to TTL8 denote the ports on RDB 1 to RDB 8 respectively. VTEX Switch Driver Programmer’s Manual 9 VTI Instruments Corp. INITIALIZATION The resource string of the IVI Initialize method identifies all EX platforms by their IP address. For an overview of the standard options available to IVI drivers, a description of resource strings and the Initialize method’s syntax, please refer to the IVI Foundation’s IVI-3.2, Inherent Capabilities Specification. The VTEX switch driver provides additional options, as part of the “DriverSetup” string. For the code examples in this document, the application program (if written in C++/COM) needs to instantiate a copy of the driver, using the following syntax: C++/COM: IVTEXSwitchPtr driver(__uuidof(VTEXSwitch)); Once the driver is instantiated, the user can initialize a session with one or more mainframes by using the Initialize method. A simple example follows: C++/COM: driver->Initialize ("TCPIP::10.1.0.87::INSTR", queryID, reset, "Simulate=TRUE"); In this example, “TCPIP::10.1.0.87::INSTR” identifies the mainframe on the network and is referred to as the resource string. The “Reset” parameter stops any scan that may be in progress and brings all relays to a known state. The “QueryID” parameter, although part of the standard IVI interface, is not used by any EX platform. The “Simulate=TRUE” statement specifies additional initialization options, including standard IVI options, such as “Simulate”, as well as instrument specific options specified by the “DriverSetup” option. Options that can be specified in the “DriverSetup” include “Slots” and “IndividualRelayMode”, which are discussed below. Option Strings The VTEX drivers provide option strings that can be used when Initializing an instrument. The option string values exist to change the behavior of the driver. The following options strings are available on VTI IVI drivers: 10 Simulate: Allows the user to run a program without commanding switch card or instruments. This option is useful as a debugging tool. Cache: Per the IVI specification, this option “specifies whether or not to cache the value of attributes.” Caching allows IVI drivers to maintain certain instrument settings to avoid sending redundant commands. The standard allows for certain values to be cached always or never. In VTI IVI-drivers, all values used are of one of these types. As such, any values entered have no effect. QueryInstrumentStatus: Queries the instrument for errors after each call is made. As implemented in the VTI IVI drivers, instruments status is always queried regardless of the value of this property. DriverSetup: Must be last, and contains the following properties: o IndividualRelayMode: This option is applicable to the VTEXSwitch driver and allows the user to switch individual relays. This is further discussed in the IndividualRelayMode discussion below. o Logfile: Allows the user to specify a file to which the driver can log calls and other data. o Logmode: Specifies the mode in which the log file is opened. The allowed modes are: w: truncate s the file to zero length or creates a text file for writing. a: opens the file for adding information to the end of the file. The file is created if it does not exist. The stream is positioned at the end of the file. o LogLevel: Allows the user to determine the severity of a log message by providing a level-indicator to the log entry. VTEX Switch Driver Programmer’s Manual www.vtiinstruments.com Slots: This is the most commonly used option and it allows for a slot number or a slot number and a card model to be specified. This option is further discussed in the Slots discussion below. "Slots=(2)" - Just slot 2. "Slots=(2=EX1200_3048)" - slot and card model, in simulation mode "Slots=(2,3)" - Multiple slots InterchangeCheck: Boolean option that enables/disables IVI Interchangeability checking. As implemented in the VTI IVI drivers, values entered for this property have no effect. RangeCheck: Boolean option that enables or disables driver validation of user-submitted values. As implemented in the VTI IVI drivers, validation of user inputs is always performed at the firmware level regardless of this property’s value. RecordCoercions: Boolean option that enables driver recording of coercions. As implemented in the VTI IVI drivers, coercions are handled in the firmware and cannot be recorded. o DCF INFORMATION For its operation, the switch driver relies on a Device Configuration File (DCF) which describes the geometry and properties of the device, in this case, the switch module. The DCF can describe a single device, such as a plug-in card, or an entire system, such as the EX7000. Each switch module carries its own DCF and the driver retrieves it when it first connects to the instrument as part of the Initialize method call. Please note, the DCF’s content and syntax are beyond the scope of this document and will not be discussed. NOTE An EX7000 system is described by a single DCF which is part of its firmware. In simulation mode, a DCF file describing the system needs to be installed on the host. For more information on Simulation Mode, please reference the IVI Foundation’s IVI-3.2, Inherent Capabilities Specification. To support simulation mode, the driver installer installs the appropriate DCF files in a directory on the host computer. The file name should be <switch_card_model>.dcf. A DCF file for an EX1200-3048, for example, would be EX1200_3048.dcf. In addition, the driver installer sets an environment variable named LIBVTEX_DIR to point to the directory that contains the DCF files. For the EX7000, a Configurator utility creates an appropriate DCF from a GUI-oriented user description of the system components. The resulting file can be saved to a local drive (e.g. for simulation sessions) or downloaded to an actual system. SLOTS This option is used to request plug-in slots for a particular driver session. All acquired slots are logically grouped together to form a virtual instrument. If this option is not specified, the driver will attempt to connect to all switch slots in the instrument. The application program indicates the instruments it controls by listing their respective slots. In simulation mode, the switch modules’ IDs are also listed. The requested slot list can be a numerical range, a comma separated list, or a combination of both, as illustrated by the examples below: A numerical slot range consists of two numbers separated by a dash, such as “1-3”, where the first slot number must be less than the second. A comma-separated list consists of a sequence of slot numbers, “4,5,6” for example, which can be specified in any order. VTEX Switch Driver Programmer’s Manual 11 VTI Instruments Corp. In simulation mode, it is necessary to specify a module ID because there is no communication between the application and the instrument. The syntax for specifying a module ID is “‘slotNumber’= ‘moduleID’”. For example, “Slots=(5=ex1200-3048)” informs the driver that there is an EX1200-3096 module in slot 5 and that a file named ex1200-3048.dcf is located in the directory to which LIBVTEX_DIR points. This form should only be used in simulation mode. It should not be used when working with real hardware. EX 1 200 3 0 48 ACC EX 1 200 3 0 48 AC C E X 12 00 30 48 1588 AC C PWR HI EX 1 200 3 0 48 ACC EX 1 200 3 0 48 AC C E X 12 00 30 48 I FUSE EX12 66 3A, 250V CAT-I 450V LAN LO HI 450 VDC 450 VAC ! I LO 3A RMS AC C SENSE 4 WIRE INPUT V INPUT I 450 Vpk FIGURE 1-1: THREE VIRTUAL INSTRUMENTS IN A SINGLE EX-BASED SYSTEM If only one slot is controlled, the application program can be simplified. In this case, the slot number does not need to be specified in subsequent driver calls. It is implied that the user is referring to the only switch slot being controlled. MULTIPLE MAINFRAMES When multiple mainframes are connected on a network, the user can initiate the mainframes simultaneously by specifying multiple comma-separated resource strings in the Initialize method call. In the case of multiple mainframes, references to slot numbers are incremented by 100 for each consecutive mainframe. For example, if three mainframes are initiated and use slots 1 through 16 in each mainframe, the slots would be referenced as follows: 1-16, 101-116, 201216. The slot number increment follows the order of the resource strings in the Initialize method call. Connecting to slots 1, 2, and 3 using dash separation C++/COM: driver->Initialize ("TCPIP::10.1.0.87::INSTR", queryID, reset, "DriverSetup= Slots=(1-3)"); C: status = vtex_InitWithOptions ("TCPIP::10.1.0.87::INSTR", queryID, reset, "DriverSetup= Slots=(13)", &viClassSessionHandle); Connecting to slots 1, 2, and 3 using comma separation C++/COM: driver->Initialize ("TCPIP::10.1.0.87::INSTR", queryID, reset, "DriverSetup= Slots=(1,3,2)"); C: status = vtex_InitWithOptions ("TCPIP::10.1.0.87::INSTR", queryID, reset, "DriverSetup= Slots=(1,3,2)", &viClassSessionHandle); Connect to slots and verify model type C++/COM: // Connect to slots 1 and 5. The driver verifies that slot 1 has a module // of type EX1200-3096, and that slot 5 has a module of type EX1200-3048 driver->Initialize ("TCPIP::10.1.0.87::INSTR", queryID, reset, "DriverSetup= Slots=(1= ex12003096, 5= ex1200-3048)"); C: 12 VTEX Switch Driver Programmer’s Manual www.vtiinstruments.com // Connect to slots 1 and 5. The driver verifies that slot 1 has a module // of type EX1200-3096, and that slot 5 has a module of type EX1200-3048 status = vtex_InitWithOptions ("TCPIP::10.1.0.87::INSTR", queryID, reset, "DriverSetup= Slots=(1= ex1200-3096, 5= ex1200-3048)", &viClassSessionHandle); Simulate a system with two switch modules C++/COM: // Simulate a system with one EX1200-3096 module in slot 7 and one EX1200-3048 module in // slot 9. driver->Initialize ("TCPIP::10.1.0.87::INSTR", queryID, reset, "Simulate = true, DriverSetup= Slots=(7 = EX1200-3096, 9 = EX1200-3048)"); C: // Simulate a system with one EX1200-3096 module in slot 7 and one EX1200-3048 module in // slot 9. status = vtex_InitWithOptions ("TCPIP::10.1.0.87::INSTR", queryID, reset, "Simulate = true, DriverSetup= Slots=(7 = ex1200-3096, 9 = ex1200-3048)", &viClassSessionHandle); Implicitly request all containing switch cards C++/COM: // Implicitly requesting all slots that contain switches. driver->Initialize ("TCPIP::10.1.0.87::INSTR", queryID, reset, ""); C: // Implicitly requesting all slots that contain switches. status = vtex_InitWithOptions ("TCPIP::10.1.0.87::INSTR", queryID, reset, "", &viClassSessionHandle); Connect to three slots with the same model type C++/COM: // Connect to slots 7, 8 and 9, each of which contains a EX1200-3048 module driver->Initialize ("TCPIP::10.1.0.87::INSTR", queryID, reset, "DriverSetup= Slots=(7-9 = ex12003048)"); C: // Connect to slots 7, 8 and 9, each of which contains a EX1200-3048 // module status = vtex_InitWithOptions ("TCPIP::10.1.0.87::INSTR", queryID, reset, "DriverSetup= Slots=(79 = ex1200-3048)", &viClassSessionHandle); Connect to multiple cards on multiple mainframes C++/COM: // Connect to cards 1-3 on IP 10.1.0.87, cards 1-3 on IP 10.1.0.88, and cards 5-10 on IP 10.1.0.100. driver->Initialize("TCPIP::10.1.0.87::INSTR|TCPIP::10.1.0.88::INSTR|TCPIP::10.1.0.100::INSTR", queryID, reset, "DriverSetup= Slots=(1-3, 101-103, 205-210)"); C: // Connect to cards 1-3 on IP 10.1.0.87, cards 1-3 on IP 10.1.0.88, and cards 5-10 on IP // 10.1.0.100. status = vtex_InitWithOptions ("TCPIP::10.1.0.87::INSTR|TCPIP::10.1.0.88::INSTR|TCPIP::10.1.0.100::INSTR ", queryID, reset, "DriverSetup= Slots=(1-3, 101-103, 205-210)", &viClassSessionHandle); Invalid – First slot number is greater than the second slot number C++/COM: driver->Initialize ("TCPIP::10.1.0.87::INSTR", queryID, reset, "DriverSetup= Slots=(3-1)"); VTEX Switch Driver Programmer’s Manual 13 VTI Instruments Corp. C: status = vtex_InitWithOptions ("TCPIP::10.1.0.87::INSTR", queryID, reset, "DriverSetup= Slots=(31)", &viClassSessionHandle); Invalid – Module not specified in simulation mode C++/COM: driver->Initialize ("TCPIP::10.1.0.87::INSTR", queryID, reset, "Simulate = true, DriverSetup= Slots=(7, 9)"); C: status = vtex_InitWithOptions ("TCPIP::10.1.0.87::INSTR", queryID, reset, "Simulate = true, DriverSetup= Slots=(7, 9)", &viClassSessionHandle); Invalid – Slot numbers not specified with module ID in simulation mode C++/COM: driver->Initialize ("TCPIP::10.1.0.87::INSTR", queryID, reset, "Simulate = true"); C: status = vtex_InitWithOptions ("TCPIP::10.1.0.87::INSTR", queryID, reset, "Simulate = true", &viClassSessionHandle); INDIVIDUALRELAYMODE If this Boolean option is True, IVI-compliant “path-level” methods will not be available for the session. Instead, several “relay-level” methods, such as OpenRelays, CloseRelays, and others, are available. These methods provide a means to directly toggle individual relays. The default value for this Boolean is False. The table below lists the methods and properties that are restricted to one mode or the other. All other methods and properties in the driver are always available. IndividualRelayMode = False IndividualRelayMode = True Path InstrumentSpecific OpenRelays (…) CloseRelays (…) CanConnect (…) Connect (…) Disconnect (…) GetPath (…) SetPath (…) Scan Abort (…) ConfigureList (…) ConfigureTrigger (…) Initiate (…) WaitForScanComplete (…) AdvancedOutput Continuous Delay Input IsScanning List Mode InstrumentSpecific ExternalConnection (…) AddPathLevelExcludeList (…) RemovePathLevelExcludeList (…) TABLE 1-1: METHODS AND PROPERTIES AVAILABLE IN EACH MODE 14 VTEX Switch Driver Programmer’s Manual www.vtiinstruments.com Control slots 1, 2, and 3 using Individual Relay Mode C++/COM: driver->Initialize ("TCPIP::10.1.0.87::INSTR", queryID, reset, "DriverSetup= slots=(1-3), IndividualRelayMode = True"); C: status = vtex_InitWithOptions ("TCPIP::10.1.0.87::INSTR", queryID, reset, "DriverSetup= slots=(13), IndividualRelayMode = True", &viClassSessionHandle); Using IndividualRelayMode during a simulation C++/COM: driver->Initialize ("TCPIP::10.1.0.87::INSTR", queryID, reset, "Simulate=true, DriverSetup= slots=(1-3 = ex1200-3096), IndividualRelayMode = True"); C: status = vtex_InitWithOptions ("TCPIP::10.1.0.87::INSTR", queryID, reset, "Simulate=true, DriverSetup= slots=(1-3 = ex1200-3096), IndividualRelayMode = True", &viClassSessionHandle); Invalid – True or False not indicated for Individual Relay Mode C++/COM: driver->Initialize ("TCPIP::10.1.0.87::INSTR", queryID, reset, "DriverSetup= slots=(1-3), IndividualRelayMode = 2"); C: status = vtex_InitWithOptions ("TCPIP::10.1.0.87::INSTR", queryID, reset, "DriverSetup= slots=(13), IndividualRelayMode = 2", &viClassSessionHandle); VTEX Switch Driver Programmer’s Manual 15 VTI Instruments Corp. INSTRUMENT SPECIFIC INTERFACE INTRODUCTION In addition to the interfaces in the standard IVI Switch class definition, the VTEX switch driver implements an instrument specific interface. The following capabilities are shared by the EX1200, SMX, and EX7000 systems. The EX7000 includes additional calls specific to its operation. For more information, please refer to the EX7000 Specific Interface section. REPEATED CAPABILITIES See IVI-3.1, Driver Architecture specification for an explanation of repeated capabilities. Channels This repeated capability is part of the standard IVI Switch class definition. As a convenience to the user, the VTEX switch driver also provides the ListOfChannels method to list all of the channels defined for the instrument. ListOfChannels This is a read-only string property that returns a comma-separated list of all switch channels known to the system. ListOfChannels Usage C++/COM: _bstr_t myChannels = driver->InstrumentSpecific->ListOfChannels; C: ViChar myChannels[10240]; // Reserve a sufficiently large buffer status = vtex_GetAttributeViString (viSessionHandle, “”, VTEX_ATTR_INSTRUMENTSPECIFIC_LIST_OF_CHANNELS, 10240, myChannels); After these calls have been made, myChannels will contain a complete channel list, including both true “channels” and “configuration channels”, e.g. “1!CH1,1!CH2,1!CH3,2!CHA, 2!CHB,5!INT1,5!INT2”, etc. SerialNumber This is a read-only string property. It returns the switch card’s serial number or, if the session controls multiple switch cards, a comma separated list of their serial numbers. SerialNumber Usage C++/COM: _bstr_t thisSerialNumber = driver->InstrumentSpecific->SerialNumber; C: ViChar thisSerialNumber[512]; // Reserve a sufficiently large buffer status = vtex_GetAttributeViString (viSessionHandle, “”, VTEX_ATTR_INSTRUMENTSPECIFIC_SERIAL_NUMBER, 512, thisSerialNumber); USER-DEFINED RELAY CONFIGURATIONS EX-platform based switch modules support multiple user-defined configurations, numbered from 0. Each configuration is a bitmap, with each bit corresponding to one relay, or one coil, in the case of multi-coil relays. A ‘0’ indicates an open relay, ‘1’ indicates a closed relay. 16 VTEX Switch Driver Programmer’s Manual www.vtiinstruments.com Configuration #0 is the “power up” state. If it is defined and downloaded to the instrument, the switch module’s relays will be set, as required, by this configuration when power is first applied. Configuration #1 is the “reset” state. If it is defined and downloaded to the instrument, the switch module’s relays will be set, as required, by this configuration when the instrument is reset. The total number of available configurations depends on the specific switch module. The client application can command the module to change all its relays to any predefined (and downloaded) configuration by using the LoadState method. Configurations are defined and downloaded via the instrument’s SFP. Example of usage: Setting Usage C++/COM: driver->InstrumentSpecific->LoadState (12); // Set all relays per configuration #12 C: status = vtex_InstrumentSpecificLoadState (viSessionHandle, 12); EXTERNAL CONNECTIONS By using this capability, an application program can indicate that one switch module channel is physically connected to another switch module’s channel via an external wire. As an example, an EX-based system has two matrix cards installed as follows: Slot Number Front Panel Channels 3 5 CH1, CH2, CH3, CH4 CH_A, CH_B, CH_C, CH_D, CH_E Here, it is possible to connect any channel to any other channel within the same module. The user connects a physical wire from CH4 to CH_B. Using ExternalConnections, it becomes possible to connect any channel from slot #3 to any channel in slot #5, extending the matrix size. The client program notifies the driver of this connection by using the ExternalConnection method. Examples of usage: ExternalConnection Usage C++/COM: driver->InstrumentSpecific->ExternalConnection (“3!CH4”, “5!CH_B”); driver->InstrumentSpecific->ExternalConnection (“3!CH1,3!CH2,3!CH4”, “5!CH_C,5!CH_D,5!CH_E”); // 1-wire connection // 3-wire bus connection C: status = vtex_InstrumentSpecificExternalConnection (viSessionHandle, “3!CH4”, “5!CH_B”); // 1-wire connection status = vtex_InstrumentSpecificExternalConnection (viSessionHandle, “3!CH1,3!CH2,3!CH4”, “5!CH_C,5!CH_D,5!CH_E”); // 3-wire bus connection NOTES 1) ExternalConnection implements the same capability as the NISE “hardwire” concept. 2) This method has two string parameters, each of which is a comma separated list of channel names. Each channel in the first list is considered externally connected, or hardwired, to the corresponding channel in the second list. 3) Both lists must specify the same number of channels or an error will result. 4) An external connection, once defined, remains valid for the duration of the session, since in normal usage wires are not typically disconnected during a test run.. VTEX Switch Driver Programmer’s Manual 17 VTI Instruments Corp. ODOMETERS EX-based switch cards maintain individual odometers for each relay, or coil, as is the case of multi-coil relays. The odometer counts closures, or cycles, which include pairs of open and close operations. The following example shows how to read the odometers of multiple relays. Odometers Usage C++/COM: // Read the odometers for relays 5 and 102 in slot 3 plus relay 14 in slot 5 SAFEARRAY *odometersArray = NULL; driver->InstrumentSpecific->GetOdometers (“3!K5,3!K102,5!K14”, &odometersArray); C: ViInt32 odometersArray [10]; ViInt32 arrayActualSize; // Allocate a sufficiently large buffer // Returned by the driver // Read the odometers for relays 5 and 102 in slot 3 plus relay 14 in slot 5 status = vtex_InstrumentSpecificGetOdometers (viSessionHandle, “3!K5,3!K102,5!K14”, 10, odometersArray, &arrayActualSize); NOTES 1) The string argument is a comma separated list of relay names. 2) The returned array includes one integer for each relay specified in the list, in the same order. EXCLUDE LISTS The IVI Switch specification provides a way for the application to avoid connecting two incompatible channels, e.g. a 120 V source and a 5 V source. This is achieved by designating them as “source channels”. The driver will refuse to connect two source channels. This is a safety mechanism to be used as needed by the client application. The VTEX switch driver provides more flexibility by extending this mechanism with two types of exclude lists: path-level and relay-level exclude lists. Path-level exclude lists A path-level exclude list is a named collection of physical channels in the instrument. Once this collection is defined during a session, the driver will prevent the application from connecting any two channels listed in the same exclude list. The list can include any channels, whether in one switch card (one slot) or multiple switch cards. Multiple exclude lists can be defined for the session, as long as their names are unique. Two methods are provided: one to define a new exclude list, the other to remove it from the current session. Defining a path-level exclude list C++/COM: // // Two channels in slot 3 and one channel in slot 5 are mutually exclusive // driver->InstrumentSpecific->AddPathLevelExcludeList (“3!CH1,3!CH2,5!CH_D”, “Protect_power_sources”); C: // // Two channels in slot 3 and one channel in slot 5 are mutually exclusive // status = vtex_InstrumentSpecificAddPathLevelExcludeList (viSessionHandle, “3!CH1,3!CH2,5!CH_D”, “Protect_power_sources”); 18 VTEX Switch Driver Programmer’s Manual www.vtiinstruments.com Deleting a path-level exclude list C++/COM: driver->InstrumentSpecific->RemovePathLevelExcludeList (“Protect_power_sources”); C: status = vtex_InstrumentSpecificRemovePathLevelExcludeList (viSessionHandle, “Protect_power_sources”); RELAY SPECIFIC INTERFACES The VTEX switch driver provides several features that allow controlling and monitoring the individual relays in an EX-based system. In the Initialize call, customers can choose this methodology instead of the IVI standard path-level programming. These features include three methods and one property. Close Relays The client application can close any number of relays, identified by their names. The relays can be in any switch module on the same system. This method closes all the relays in the list, or activates the respective coils, in the case of a multi-coil relay. CloseRelays Usage C++/COM: driver->InstrumentSpecific->CloseRelays (“2!K5,2!K15,4!K17,6!K100,6!K102”); C: status = vtex_InstrumentSpecificCloseRelays (viSessionHandle, “2!K5,2!K15,4!K17,6!K100,6!K102”); Open Relays The client application can open any number of relays, identified by their names. The relays can be in any switch module on the same system. This method opens all the relays in the list, or deactivates the respective coils, in the case of a multi-coil relay. OpenRelays Usage C++/COM: driver->InstrumentSpecific->OpenRelays (“2!K5,2!K15,4!K17,6!K100,6!K102”); C: status = vtex_InstrumentSpecificOpenRelays (viSessionHandle, “2!K5,2!K15,4!K17,6!K100,6!K102”); Get Relay State At any point in time, the client application may need to know the current state (i.e. closed or open) of a relay or coil. This may be particularly useful at power up, or in high-integrity applications. This method provides the user the best information it has about a relay/coil’s state in both pathlevel and relay-level modes. Some relays have readable confidence indicators which provide confirmation of the contact state. Others, however lack this ability. GetRelayState Usage C++/COM: // // // // // Ask the state of K2_12. One of 4 answers is possible: VTEXSwitchRelayStateOpen VTEXSwitchRelayStateClosed VTEXSwitchRelayStateCommandedOpen VTEX Switch Driver Programmer’s Manual 19 VTI Instruments Corp. // // VTEXSwitchRelayStateCommandedClosed VTEXSwitchRelayStateEnum openOrClosed; openOrClosed = driver->InstrumentSpecific->GetRelayState (“K2_12”); C: // // // // // // Ask the state of K2_12. One of 4 answers is possible: VTEX_VAL_RELAY_STATE_OPEN VTEX_VAL_RELAY_STATE_CLOSED VTEX_VAL_RELAY_STATE_COMMANDED_OPEN VTEX_VAL_RELAY_STATE_COMMANDED_CLOSED ViInt32 openOrClosed; status = vtex_InstrumentSpecificGetRelayState (viSessionHandle, “K2_12”, &openOrClosed); NOTES 1) The string argument should include only one relay name. 2) The method returns “open” or “closed” when it has positive indication of the actual state of the relay or coil. 3) The method returns “commanded open” or “commanded closed” when it lacks positive indication of the relay or coil state. In this case, it can only return the last commanded position. Verify Relay State To provide more flexibility to the client application, and reduce the amount of coding required, the VTEX switch driver can automate the process of verifying relay states for high-integrity applications. This Boolean property, when set, causes the instrument to always read back the relay’s state and compare them to the commanded values. This is performed without application intervention. If the instrument detects a mismatch, it records an error in its internal queue. IVI specifications include automatic notification of such errors through the use of the inherent property QueryInstrumentStatus. VerifyRelayState Usage C++/COM: // // Turn on automatic error notification // driver->QueryInstrumentStatus = true; // // … and turn on automatic relays state verification // driver->InstrumentSpecific->VerifyRelayState = true; C: // // Turn on automatic error notification // status = vtex_SetAttributeViBoolean (viSessionHandle, “”, VTEX_ATTR_QUERY_INSTRUMENT_STATUS, VI_TRUE); // // … and turn on automatic relays state verification // status = vtex_SetAttributeViBoolean (viSessionHandle, “”, VTEX_ATTR_INSTRUMENTSPECIFIC_VERIFY_RELAY_STATE, VI_TRUE); 20 VTEX Switch Driver Programmer’s Manual www.vtiinstruments.com NOTES 1) VerifyRelayState can be set to True or False multiple times during a session. The default value is False. 2) The instrument operation will slow down when this Boolean is set to true. After commanding the relays to a new state, the system has to wait for them to debounce and only then read the confidence indicators. In effect, this injects a WaitForDebounce call after each method that closes or opens any relay. The slowdown may become apparent and the application program should be ready for this effect. FUNCTION CALL LOGGING Two methods are provided to aid in debugging application programs. With logging enabled, the driver records all function calls, parameter values and errors or warnings. Open log file This method initiates logging to a specified file. OpenLogFile Usage C++/COM: // // Turn on logging, append to existing file // driver->InstrumentSpecific->OpenLogFile (“Log_July_7”, “a”); C: // // Turn on logging, append to existing file // status = vtex_InstrumentSpecificOpenLogFile (viSessionHandle, “Log_July_7”, “a”); NOTES 1) The second string argument is “a” to append or “w” to overwrite an existing file. If the file does not exist, it is created. 2) The client program must have write access to the file and/or to the directory containing it. Close log file This method stops the logging process. CloseLogFile Usage C++/COM: // // Turn logging off // driver->InstrumentSpecific->CloseLogFile (); C: // // Turn logging off // status = vtex_InstrumentSpecificCloseLogFile (viSessionHandle); VTEX Switch Driver Programmer’s Manual 21 VTI Instruments Corp. EX7000 SPECIFIC INTERFACE INTRODUCTION The following calls are specific to the EX7000 and includes the use of the parallel IO and configuration of attenuators. REPEATED CAPABILITIES Two repeated capability collections are available: ParallelIOs and Attenuators. See IVI-3.1, Driver Architecture specification for an explanation of repeated capabilities. ParallelIOs This repeated capability is only defined for EX7000 systems. It provides access to two types of parallel IO ports: predefined (or built-in) and user-defined (or ‘soft’). The application program handles both types in similar manner. The following code examples refer to a hypothetical EX7000 system with three RDBs, where the following soft ports were defined by the user: Port name Number of lines Relay drive lines Motor_control Range_finder Azimuth 6 10 14 K1_11 to K1_16 K2_1 to K2_10 K3_31 to K3_44 The application program is presumed to have initialized a reference pointer to the ParallelIOs interface, using the following syntax: ParallelIOs reference pointer initialization C++/COM: IVTEXSwitchParallelIOsPtr pParallelIOs = driver->InstrumentSpecific->ParallelIOs; C: ViSession viSessionHandle; status = IviSwtch_GetSpecificDriverCHandle (viClassSessionHandle, &viSessionHandle); OutputEnableMask The application program can write any value to the built-in, 32-bit TTL ports. The hardware provides a mask that allows only some bits to be sent out, while not affecting the others. The OutputEnableMask read/write property lets the user define which part of the 32-bit value will be written to an external device. This way, multiple devices can be controlled individually while connected to different parts of the TTL port. NOTE OutputEnableMask is not supported for the soft (user-defined) parallel IO ports since these are always enabled. Data This read/write property is the value written to the port. Note in the example below how the driver treats predefined and user-defined ports in the same manner: 22 VTEX Switch Driver Programmer’s Manual www.vtiinstruments.com OutputEnableMask & Data Usage C++/COM: long position; long angle; pParallelIOs->Item["TTL2"]->OutputEnableMask = 0x3ff; pParallelIOs->Item["TTL2"]->Data = 934; // Enable bits 9–0 // TTL<9-0> on RDB1 gets 934 pParallelIOs->Item["Motor_control"]->Data = 103; position = pParallelIOs->Item["Motor_control"]->Data; // Move the motor // … and read its position angle = pParallelIOs->Item["Azimuth"]->Data; // Read the azimuth C: ViInt32 position; ViInt32 angle; status = vtex_SetAttributeViInt32 (viSessionHandle, “TTL2”, VTEX_ATTR_PARALLELIO_OUTPUT_ENABLE_MASK, 0x3ff); // Enable bits 9–0 status = vtex_SetAttributeViInt32 (viSessionHandle, “TTL2”, VTEX_ATTR_PARALLELIO_DATA, 934); // TTL<9-0> on RDB1 gets 934 status = vtex_SetAttributeViInt32 (viSessionHandle, “Motor_control”, VTEX_ATTR_PARALLELIO_DATA, 103); // Move the motor status = vtex_GetAttributeViInt32 (viSessionHandle, “Motor_control”, VTEX_ATTR_PARALLELIO_DATA, &position); // … and read its position status = vtex_GetAttributeViInt32 (viSessionHandle, “Azimuth”, VTEX_ATTR_PARALLELIO_DATA, &angle); // Read the azimuth ListOfParallelIOs This is a read-only string property, applicable to EX7000 systems. It returns a comma separated list of all parallel IO ports configured in the system. ListofParallelIOs Usage C++/COM: _bstr_t myPorts = driver->InstrumentSpecific->ListOfParallelIOs; C: ViChar myPorts[512]; // Reserve a sufficiently large buffer status = vtex_GetAttributeViString (viSessionHandle, “”, VTEX_ATTR_INSTRUMENTSPECIFIC_LIST_OF_PARALLEL_I_OS, 512, myPorts); After these calls, myPorts will have the value: “TTL1,TTL2,TTL3,Motor_control, Range_finder,Azimuth”. VTEX Switch Driver Programmer’s Manual 23 VTI Instruments Corp. Attenuators This repeated capability is only defined for EX7000 systems. It provides access to one or more attenuators controlled through the drive lines. The user could control an attenuator’s operation by defining a soft parallel port, and then writing correct bit patterns to it to achieve the required attenuation. However, the Attenuators interface provides a more intuitive and readable way to program attenuators whose control patterns are already known (i.e. are defined in the DCF). The following code examples refer to a hypothetical EX7000 system with two RDBs, where the user has defined the following attenuators: Port name Number of lines Relay drive lines Allowed settings Signal2_reducer Signal3_reducer 6 8 K1_11 to K1_16 K2_1 to K2_8 0 dB – 90 dB, 10 dB steps 1 dB – 11 dB, 1 dB steps The application program is presumed to have initialized a reference pointer to the Attenuators interface, using the following syntax: Attenuator Initialization C++/COM: IVTEXSwitchAttenuatorsPtr pAttenuators = driver->InstrumentSpecific->Attenuators; Setting The application program can set the required attenuation and read the current setting by using this read/write property. Note that all attenuators are accessed the same way, regardless of their type or the relay drive lines to which they are connected. Setting Usage C++/COM: double setting; pAttenuators->Item["Signal2_reducer"]->Setting = 20.0; setting = pAttenuators->Item["Signal2_reducer"]->Setting; pAttenuators->Item["Signal3_reducer"]->Setting = 10.0; // Set this one to 20 dB // … and read it back // Set that one to 10 dB C: ViReal64 setting; status = vtex_SetAttributeViReal64 (viSessionHandle, “Signal2_reducer”, VTEX_ATTR_INSTRUMENTSPECIFIC_ATTENUATOR_SETTING, 20.0); // Set this one to 20 dB status = vtex_GetAttributeViReal64 (viSessionHandle, “Signal2_reducer”, VTEX_ATTR_INSTRUMENTSPECIFIC_ATTENUATOR_SETTING, &setting); // and read it back status = vtex_SetAttributeViReal64 (viSessionHandle, “Signal3_reducer”, VTEX_ATTR_INSTRUMENTSPECIFIC_ATTENUATOR_SETTING, 10.0); //Set that one to 10 dB 24 VTEX Switch Driver Programmer’s Manual www.vtiinstruments.com ListOfAttenuators This is a read-only string property, applicable to EX7000 systems. It returns a comma separated list of all attenuators configured in the system. Examples of usage: ListOfAttenuators Usage C++/COM: _bstr_t myAttenuators = driver->InstrumentSpecific->ListOfAttenuators; C: ViChar myAttenuators[512]; // Reserve a sufficiently large buffer status = vtex_GetAttributeViString (viSessionHandle, “”, VTEX_ATTR_INSTRUMENTSPECIFIC_LIST_OF_ATTENUATORS, 512, myAttenuators); After the calls above have been made, myAttenuators “Signal2_reducer,Signal3_reducer”. VTEX Switch Driver Programmer’s Manual will have the value 25 VTI Instruments Corp. SECTION 2 APPLICATION EXAMPLES INTRODUCTION The following section provides some practical examples of how some methods/properties can be used together to meet certain user requirements. Situations will be provided and an appropriate programming example will follow. Setup Example In this example, the correct resource descriptor and driver-specific initialization string is set and then the logic is filled in at the indicated place. This example will be show in three different programming languages. IVI-C Example // // // // // Sample IVI-C program using the VTEXSwitch driver. Just set the correct resource descriptor and driver-specific initialization string then fill in the 'real' logic at the indicated place. #include #include #include #include "stdio.h" "tchar.h" "IviSwtch.h" "vtex.h" /////////////////////////////////////////////////////////////////////////////////// // // Utility to print errors reported by the driver operation or // by the instrument. // /////////////////////////////////////////////////////////////////////////////////// #define MESSAGE_SIZE (10240) ViSession driverHandle = NULL; // Used by the utility and by the main test program void CheckForError (ViStatus status) { ViStatus localStatus, errorCode; ViChar errorMessage[MESSAGE_SIZE]; // // Print the received error message. // if (status < VI_SUCCESS) { localStatus = vtex_error_message (VI_NULL, status, errorMessage); printf ("Received error code 0x%x : %s\n", status, errorMessage); } // // If it indicated an instrument error print that one, too // if ((driverHandle != NULL) && (status == IVI_ERROR_INSTRUMENT_STATUS)) 26 VTEX Switch Driver Programmer’s Manual www.vtiinstruments.com { localStatus = vtex_error_query (driverHandle, &errorCode, errorMessage); printf ("Error code from instrument was 0x%x : %s\n", errorCode, errorMessage); } // // If any error was reported, just bail out - fix the error first, then try again; // equivalent to the COM 'catch' block operation. // if (status < VI_SUCCESS) { printf ("Type any key to exit : "); fflush (stdout); getchar(); exit (-1); } } /////////////////////////////////////////////////////////////////////////////////// // // Main example program // /////////////////////////////////////////////////////////////////////////////////// int _tmain(int argc, _TCHAR* argv[]) { ViInt32 value = 0; ViReal64 realValue = 0.0; ViRsrc resourceName = "TCPIP::169.254.1.2::INSTR"; ViChar text[MESSAGE_SIZE]; ViString strDriverOptions = "Simulate=True, QueryInstrStatus=True, DriverSetup= Model=EX7000, Trace=false, slots=(1=MySwitchCard), IndividualRelayMode=True"; // // Initialize and print some driver attributes. // CheckForError ( vtex_InitWithOptions (resourceName, VI_TRUE, VI_FALSE, strDriverOptions, &driverHandle) ); // IdQuery // Reset // Options string // Driver revision CheckForError (vtex_GetAttributeViString (driverHandle, "", IVI_ATTR_SPECIFIC_DRIVER_REVISION, MESSAGE_SIZE, text)); printf ("Driver revision: %s\n", text); // Driver vendor CheckForError (vtex_GetAttributeViString (driverHandle, "", IVI_ATTR_SPECIFIC_DRIVER_VENDOR, MESSAGE_SIZE, text)); printf ("Driver vendor: %s\n", text); // Driver vendor CheckForError (vtex_GetAttributeViString (driverHandle, "", IVI_ATTR_SPECIFIC_DRIVER_DESCRIPTION, MESSAGE_SIZE, text)); printf ("Driver description: %s\n", text); // Supported group capabilities CheckForError (vtex_GetAttributeViString (driverHandle, "", IVI_ATTR_GROUP_CAPABILITIES, MESSAGE_SIZE, text)); printf ("Supported IVI group capabilities: %s\n", text); // Instrument model CheckForError (vtex_GetAttributeViString (driverHandle, "", IVI_ATTR_INSTRUMENT_MODEL, MESSAGE_SIZE, text)); printf ("Instrument model: %s\n", text); // Instrument firmware revision CheckForError (vtex_GetAttributeViString (driverHandle, "", IVI_ATTR_INSTRUMENT_FIRMWARE_REVISION, MESSAGE_SIZE, text)); printf ("Instrument firmware revision: %s\n", text); VTEX Switch Driver Programmer’s Manual 27 VTI Instruments Corp. // Instrument manufacturer CheckForError (vtex_GetAttributeViString ( driverHandle, "", IVI_ATTR_INSTRUMENT_MANUFACTURER, MESSAGE_SIZE, text)); printf ("Instrument manufacturer: %s\n", text); // Supported instrument models CheckForError (vtex_GetAttributeViString (driverHandle, "", IVI_ATTR_SUPPORTED_INSTRUMENT_MODELS, MESSAGE_SIZE, text)); printf ("Supported instrument models: %s\n", text); ////////////////////////////////////////////////////////////////////////////// // Insert the actual application code here. Some example code follows // // List all the channels in this switch card CheckForError (vtex_GetAttributeViString ( driverHandle, "", VTEX_ATTR_INSTRUMENTSPECIFIC_LIST_OF_CHANNELS, MESSAGE_SIZE, text)); printf ("Defined channels : %s\n", text); // // List the attenuators CheckForError (vtex_GetAttributeViString ( driverHandle, "", VTEX_ATTR_INSTRUMENTSPECIFIC_LIST_OF_ATTENUATORS, MESSAGE_SIZE, text)); printf ("Defined attenuators : %s\n", text); // // List the parallel IO ports CheckForError (vtex_GetAttributeViString (driverHandle, "", VTEX_ATTR_INSTRUMENTSPECIFIC_LIST_OF_PARALLEL_I_OS, MESSAGE_SIZE, text)); printf ("Defined parallel IOs: %s\n", text); // // Set a few bits in one 'soft' parallel I/O port CheckForError (vtex_SetAttributeViInt32 (driverHandle, "BAND_LED", VTEX_ATTR_PARALLELIO_DATA, 0x2A)); // // Read back and print current its value CheckForError (vtex_GetAttributeViInt32 (driverHandle, "BAND_LED", VTEX_ATTR_PARALLELIO_DATA, &value)); printf("\nRead back data from BAND_LED: 0x%x\n", value); // // Set an attenuator value CheckForError (vtex_SetAttributeViReal64 (driverHandle, "AT1", VTEX_ATTR_INSTRUMENTSPECIFIC_ATTENUATOR_SETTING, 10.0)); // // Read back and print current its value CheckForError (vtex_GetAttributeViReal64 (driverHandle, "AT1", VTEX_ATTR_INSTRUMENTSPECIFIC_ATTENUATOR_SETTING, &realValue)); printf("Attenuator 1 setting is: %f\n", realValue); // // Close some relays, open others CheckForError (vtex_InstrumentSpecificCloseRelays (driverHandle, "K1_3, K1_5, K1_6")); CheckForError (vtex_InstrumentSpecificOpenRelays (driverHandle, "K1_2, K1_3, K1_4")); // // ////////////////////////////////////////////////////////////////////////////// printf ("Type any key to exit : "); fflush (stdout); getchar(); return(0); } 28 VTEX Switch Driver Programmer’s Manual www.vtiinstruments.com IVI-Com Example // // // // // Sample IVI-COM program using the VTEXSwitch driver. Just set the correct resource descriptor and driver-specific initialization string then fill in the 'real' logic at the indicated place. #include "stdafx.h" #include <atlstr.h> int _tmain(int argc, _TCHAR* argv[]) { ::CoInitialize(NULL); try { // // Instantiate the specific driver, get a pointer to it // IVTEXSwitchPtr RFSwitching(__uuidof(VTEXSwitch)); // // Get some interface pointers - they come in handy, to shorten lines of code // IIviDriverIdentityPtr pIdentity = RFSwitching->Identity; IVTEXSwitchParallelIOsPtr pParallel = RFSwitching->InstrumentSpecific>ParallelIOs; IVTEXSwitchInstrumentSpecificPtr pSpecific = RFSwitching->InstrumentSpecific; IVTEXSwitchAttenuatorsPtr pAttenuator = RFSwitching>InstrumentSpecific->Attenuators; try { // // IIviDriverIdentity properties - Initialize not required // wprintf (L"Driver identifier: %s\n", pIdentity->Identifier.GetBSTR()); wprintf (L"Driver revision: %s\n", pIdentity->Revision.GetBSTR()); wprintf (L"Driver vendor: %s\n", pIdentity->Vendor.GetBSTR()); wprintf (L"Driver description: %s\n", pIdentity->Description.GetBSTR()); // // Setup VISA resource descriptor: a real address or an IVI logical name e.g. // CString strResourceDesc = "VTEXSwitchTarget"; // CString strResourceDesc = "TCPIP::169.254.1.2::INSTR"; CString strDriverOptions = "Simulate=True, QueryInstrStatus=True, DriverSetup= Model=EX7000, Trace=false, slots=(1=MySwitchCard), IndividualRelayMode=True"; RFSwitching->Initialize(LPCTSTR(strResourceDesc), VARIANT_TRUE, // IdQuery VARIANT_FALSE, // Reset LPCTSTR(strDriverOptions)); // // IIviDriverIdentity properties - Initialize required // wprintf (L"Supported IVI group capabilities: %s\n", pIdentity>GroupCapabilities.GetBSTR()); wprintf (L"Instrument model: %s\n", pIdentity->InstrumentModel.GetBSTR()); wprintf (L"Instrument firmware revision: %s\n", pIdentity>InstrumentFirmwareRevision.GetBSTR()); wprintf (L"Instrument manufacturer: %s\n", pIdentity>InstrumentManufacturer.GetBSTR()); wprintf (L"Supported instrument models: %s\n", pIdentity>SupportedInstrumentModels.GetBSTR()); VTEX Switch Driver Programmer’s Manual 29 VTI Instruments Corp. ////////////////////////////////////////////////////////////////////////////// // Insert the actual application code here. Some example code follows // wprintf (L"Defined channels : %s\n", pSpecific->ListOfChannels.GetBSTR()); wprintf (L"Defined attenuators: %s\n", pSpecific->ListOfAttenuators.GetBSTR()); wprintf (L"Defined parallel IOs: %s\n", pSpecific->ListOfParallelIOs.GetBSTR()); pParallel->Item["BAND_LED"]->Data = 0x2A; printf ("\nRead back data from BAND_LED: 0x%x\n", pParallel->Item["BAND_LED"]>Data); pAttenuator->Item["AT1"]->Setting = 10.0; printf ("Attenuator 1 setting is: %f\n", pAttenuator->Item["AT1"]->Setting); pSpecific->CloseRelays ("K1_3, K1_5, K1_6"); pSpecific->OpenRelays ("K1_2, K1_3, K1_4"); // // ////////////////////////////////////////////////////////////////////////////// // Check instrument for errors long lErrorNumber = -1; _bstr_t bstrErrorMessage; printf ("\n"); while (lErrorNumber != 0) { RFSwitching->Utility->ErrorQuery(&lErrorNumber, bstrErrorMessage.GetAddress()); printf ("ErrorQuery: %d, %s\n", lErrorNumber, bstrErrorMessage); } } // // This catch block will intercept errors returned from the driver while it is // operating. // catch (_com_error& error1) { ::MessageBox(NULL, error1.Description(), error1.ErrorMessage(), MB_ICONERROR); } if (RFSwitching != NULL && RFSwitching->Initialized) { // Close driver RFSwitching->Close(); } } // // This catch block will intercept errors returned while trying to instantiate the // driver itself. // catch (_com_error& error2) { ::MessageBox(NULL, error2.Description(), error2.ErrorMessage(), MB_ICONERROR); } ::CoUninitialize(); printf("\nDone - Press Enter to Exit"); getchar(); return 0; } 30 VTEX Switch Driver Programmer’s Manual www.vtiinstruments.com C++ Linux Example // // // // // Sample C++ program (Linux Client) using the VTEXSwitch driver. Just set the correct resource descriptor and driver-specific initialization string then fill in the 'real' logic at the indicated place. #include "libSwitch.h" #include <iostream> using namespace std; int main (int argc, char** argv) { try { // // Instantiate the specific driver, get a pointer to it // LibSwitch* RFSwitching = new LibSwitch(); // // Get some interface pointers - they come in handy, to shorten lines of code // LibInherentCapabilityIdentity* pIdentity = RFSwitching->Identity; LibSwitchInstrumentSpecific* pSpecific = RFSwitching->InstrumentSpecific; try { // // IIviDriverIdentity properties - Initialize not required // string temp = pIdentity->Identifier; printf ("Driver identifier: %s\n", temp.c_str()); temp = pIdentity->Revision; printf ("Driver revision: %s\n", temp.c_str()); temp = pIdentity->Vendor; printf ("Driver vendor: %s\n", temp.c_str()); temp = pIdentity->Description; printf ("Driver description: %s\n", temp.c_str()); // // Setup VISA resource descriptor: a real address or an IVI logical name e.g. // string strResourceDesc = "VTEXSwitchTarget"; // string strResourceDesc = "TCPIP::10.1.0.56::INSTR"; string strDriverOptions = "Simulate=false, QueryInstrStatus=True, DriverSetup= slots=(1 = boeing_smdp_ex7000), IndividualRelayMode=True"; RFSwitching->Initialize(strResourceDesc, true, false, strDriverOptions); // IdQuery // Reset // // IIviDriverIdentity properties - Initialize required // temp = pIdentity->GroupCapabilities; printf ("Supported IVI group capabilities: %s\n", temp.c_str()); temp = pIdentity->InstrumentModel; printf ("Instrument model: %s\n", temp.c_str()); temp = pIdentity->InstrumentFirmwareRevision; printf ("Instrument firmware revision: %s\n", temp.c_str()); temp = pIdentity->InstrumentManufacturer; printf ("Instrument manufacturer: %s\n", temp.c_str()); temp = pIdentity->SupportedInstrumentModels; printf ("Supported instrument models: %s\n", temp.c_str()); VTEX Switch Driver Programmer’s Manual 31 VTI Instruments Corp. ////////////////////////////////////////////////////////////////////////////// // Insert the actual application code here. Some example code follows // temp = pSpecific->ListOfChannels; printf ("Defined channels : %s\n",temp.c_str() ); temp = pSpecific->ListOfAttenuators; printf ("Defined attenuators: %s\n", temp.c_str()); temp = pSpecific->ListOfParallelIOs; printf ("Defined parallel IOs: %s\n", temp.c_str()); LibSwitchAttenuators* LibSwitchParallelIOs* pAttenuator = RFSwitching->InstrumentSpecific->Attenuators; pParallel = RFSwitching->InstrumentSpecific->ParallelIOs; pParallel->Item("BAND_LED")->Data = 0x2A; unsigned int data= pParallel->Item("BAND_LED")->Data; printf ("\nRead back data from BAND_LED: 0x%x\n", data); pAttenuator->Item("AT1")->Setting = 10.0; double setting = pAttenuator->Item("AT1")->Setting; printf ("Attenuator 1 setting is: %f\n", setting); pSpecific->CloseRelays ("K1_3, K1_5, K1_6"); pSpecific->OpenRelays ("K1_2, K1_3, K1_4"); // // ////////////////////////////////////////////////////////////////////////////// // Check instrument for errors long lErrorNumber = -1; string bstrErrorMessage; printf ("\n"); while (lErrorNumber != 0) { RFSwitching->Utility->ErrorQuery(&lErrorNumber, bstrErrorMessage); printf ("ErrorQuery: %d, %s\n", lErrorNumber, bstrErrorMessage.c_str()); } } // // This catch block will intercept errors returned from the driver while it is // operating. // catch (VTEXException& error1) { printf("Exception: %s\n", error1.errorMessage.c_str()); } if (RFSwitching != NULL && RFSwitching->Initialized) { // Close driver RFSwitching->Close(); } delete(RFSwitching); } // // This catch block will intercept errors returned while trying to instantiate the // driver itself. // catch (VTEXException& error2) { printf("Exception: %s\n", error2.errorMessage.c_str()); } printf("\nDone - Press Enter to Exit"); getchar(); return 0; } 32 VTEX Switch Driver Programmer’s Manual www.vtiinstruments.com Using Relays This example demonstrates how to use SPST relay cards using the switch driver. This example connects and disconnects the first two of SPST cards using two different methods. // / This is the main project file for Visual C++ application project generated using an Application Wizard. *Requirements 1. A EX1200 mainframe with DMM 2. A discrete switching card such as the EX1200-5001 or -5002. Setup. 1. IP address of the EX1200 mainframe is 10.30.1.11 in this example. The IP address must be changed in the program if the EX1200 mainframe has a different address. 2. Discrete Switching card is in the slot No:2. This can be confirmed in SFP. If not, change the 2! in the Switch->Path->Connect to the appropriate slot number 3. This example uses IVI switch drivers, which can be downloaded from http://www.vtiinstruments.com/Downloads.aspx Description: This example demonstrates how to use SPST relay cards using switch drivers. This example connects and disconnect first two relays of an SPST card using two different methods. */ #include "stdafx.h" #using <mscorlib.dll> #import "IviDriverTypeLib.dll" no_namespace #import "VTEXSwitch.dll" no_namespace using namespace System; int _tmain() { ::CoInitialize(NULL); //Start the COM layer /*Instantiate a pointer to the driver in a try/catch block so that the instrument fails gracefully if the driver is not found in the COM registry.*/ try { IVTEXSwitchPtr Switch(__uuidof(VTEXSwitch)); /*Perform an Initialization using a try/catch block so that our test code doesn't run if the instrument fails to initialize.*/ try { /*Here, the driver is given an empty options string. The option string may be given option. Note that the Reset bit is set to provide a “clean start”.*/ Switch->Initialize("TCPIP::10.30.1.11::INSTR",VARIANT_TRUE,VARIANT_TRUE, ""); Switch->Path->DisconnectAll();// Disconnects all the switches //Next, the first channel and second channel of the switch are closed using the Connect method. Switch->Path->Connect("2!CH_1COM", "2!CH_1NO"); Switch->Path->Connect("2!CH_2COM", "2!CH_2NO"); Sleep(2000); //Individual channels can be disconnected using Disconnect method. Switch->Path->Disconnect("2!CH_1COM", "2!CH_1NO"); Switch->Path->Disconnect("2!CH_2COM", "2!CH_2NO"); Sleep(2000); //Now we are going to close the channels using alternate, Setpath method. //Creates a path given a PathList of comma separated channel pairs. //However, for Individual SPST (Form-A) switch cards closing a relay, and closing a single path means the same. //Hence, the "Connect" and "SetPath" function will yield the same results. Switch->Path->SetPath("2!CH_1COM->2!CH_1NO"); Switch->Path->SetPath("2!CH_2COM->2!CH_2NO"); Sleep(2000); VTEX Switch Driver Programmer’s Manual 33 VTI Instruments Corp. //channels can be disconnected once at all using DisconnectAll method. Switch->Path->DisconnectAll(); //Close the initialized session Switch->Close(); } catch(_com_error &e) { ::MessageBox(NULL, e.Description(), e.ErrorMessage(), MB_ICONERROR); } } catch(...) { /*This will catch any error the program generated.*/ //Handle the errors } } 34 VTEX Switch Driver Programmer’s Manual