Transcript
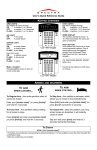
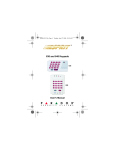
Connecting to the Listen-In module
While all users can access Level 8 or the Arm/Disarm menu, each user
will only be able to perform the functions that they are permitted as
programmed in the system’s control panel such as arming or disarming
areas assigned to that user. Only users with access to the Listen-In
features, as programmed in the Listen-In module, will have access to
levels 0, 2 and 3 or to the Listen-In user menu.
User Guide
DGP-LSN4
DGP-SUB1
Monitoring Menus:
Table 2: Connection Level 0
780 Industriel Blvd., Saint-Eustache
(Quebec) J7R 5V3 CANADA
Tel.: (450) 491-7444 Fax: (450) 491-2313
www.paradox.ca
PRINTED IN CANADA - 03/2006
DGP-LSN4-EU00
Overview
The Listen-In module allows users to access features previously unavailable.
• Access from an outside phone line.
-Arm or disarm the system
-Listen to what is happening inside the area through a substation
• Page other substations
-Broadcast messages to all substations
-Limit the communication between substations through installer settings and
have substations be able to page a limited number of substations.
• Generate Panics straight from the substations
-Generate panics of one of these three types: Police, Medical or Fire
-Link different substations to different panic types, or have only a limited
number of substations with the Panic option turned on
• Program personalized audio labels
• Hear system status updates
• Listen to background music
Table 1: Glossary
Two-way
Listen and talk on a substation.
Communication:
Key
Action
Key
[00] or [0]
[#0]
Arms or disarms all Areas in the system (assigned to this user)
Activates or deactivates the siren bypass relay (if the system siren
is connected through the Listen-In module relay)
[01] or [1]
Arms or disarms Area 1 of the system
[02] or [2]
Arms or disarms Area 2 of the system
[03] or [3]
Arms or disarms Area 3 of the system
[04] or [4]
Arms or disarms Area 4 of the system
[05] or [5]
Arms or disarms Area 5 of the system
[06] or [6]
Arms or disarms Area 6 of the system
[07] or [7]
Arms or disarms Area 7 of the system
[08] or [8]
Arms or disarms Area 8 of the system
[#0]
Activates or deactivates the siren bypass relay (if the system siren
is connected through the Listen-In module relay)
Key
[1]
Activates high gain talk to the premises for all activated speakers
[1]
Activates Listen-In on Substation 1
[2]
Activates two-way voice communication
[2]
Activates Listen-In on Substation 2
[3]
Activates high gain listen-in from the premises for all activated
microphones
[3]
Activates Listen-In on Substation 3
[4]
Activates Listen-In on Substation 4
[5]
Activates Listen-In on all Substations
[6]
Plays the Alarm Recorded Audio or skip the next 10 seconds of
recording when listening (if enabled).
Table 6: Listen-In
Action
Initiates a timed interval
[5]
Plays the last Alarm Recorded Audio or skip the next 10 seconds
of recording when listening (if enabled).
[6]
Activates low gain listen-in from the premises for all activated
microphones
[7]
Toggle between Listen-In and Two-Way Communication
Initiates a timed interval and plays an audio tone
[8]
Toggle between high and normal phone volume
[9]
Toggle between high and normal on-site speaker volume
[*]
Switches to Arm/Disarm menu
[*]
Table 3: Connection Level 2
Key
[#][#]
End communication
[#][0]
Activates or deactivates the siren bypass relay (if the system siren
is connected through the Listen-In module relay)
Action
[0]
Activates two-way communication with all substations
Listen-In
Listen only on a substation.
Communication:
[#0]
Activates or deactivates the siren bypass relay (if the system siren
is connected through the Listen-In module relay)
Connection
Levels:
[1]
Activates two-way communication with Substation 1 only
[1]
Arms or disarms Area 1 of the system
[2]
Activates two-way communication with Substation 2 only
[2]
Arms or disarms Area 2 of the system
[3]
Activates two-way communication with Substation 3 only
[3]
Arms or disarms Area 3 of the system
[4]
Activates two-way communication with Substation 4 only
[4]
Arms or disarms Area 4 of the system
Initiates a timed interval and play error message
[5]
Arms or disarms Area 5 of the system
[6]
Arms or disarms Area 6 of the system
[7]
Arms or disarms Area 7 of the system
[8]
Arms or disarms Area 8 of the system
[0]
Arms or disarms the entire systems
[*]
Switches to Listen-In menu
Timed Interval:
The connection’s 90 second duration.
Alarm Recorded Option that allows the system to make an audio recording of
Audio:
surrounding sounds before and after the alarm. The duration
is set by the installer.
User Menu:
Monitoring
Menus:
A set of options divided into Arm/Disarm and Listen-In
menus including audio listing to facilitate the navigation
through the various options.
A set of menus divided into levels. No audio help is provided.
This menu is recommended for advanced users or for
monitoring stations.
Note that background noise can reduce the quality of the Alarm
Recorded Audio. For that reason, if the siren is connected through the
Listen-In module, and if the Continuous Recording and Siren Bypass
options are enabled, no siren or messages will be heard during the
Post-Alarm Recording period. This will ensure the maximum quality
possible in the Alarm Recorded Audio.
Listen-In Module Connection
Depending on your settings or if an answering machine is connected to the same
phone line, the procedure may vary. The following instructions will use default
values for the system.
[5] to [8]
[99] or [#9] Terminates communication with the Listen-In module
[*]
Followed by [0] will take you to Level 0; followed by [3] will take
you to Level 3; followed by [8] will take you to Level 8
Table 4: Connection Level 3
Key
Action
Table 7: Arm/Disarm
Key
Action
[0]
Activates Listen-In on all Substations (you can only listen)
[#0]
Activates or deactivates the siren bypass relay (if the system siren
is connected through the Listen-In module relay)
[1]
Activates Listen-In on Substation 1 only
[2]
Activates Listen-In on Substation 2 only
Substation Features
[3]
Activates Listen-In on Substation 3 only
[4]
Activates Listen-In on Substation 4 only
There are three buttons on each Listen-In substation, one at each corner of the
triangle (see Figure 1). At the bottom of the substation is a volume dial that can
be used to adjust audio volume.
[5] to [8]
Initiates a timed interval and play error message
[99] or [#9] Terminates communication with the Listen-In module
[*]
Followed by [0] will take you to Level 0; followed by [2] will take
you to Level 2; followed by [8] will take you to Level 8
[#][#]
[#]0
The Panic button is located at the top of the triangle (see Figure 1). To generate
a panic, press and hold the Panic button for two seconds (the red LED will glow
brighter when it is pressed). When a Panic is generated, the substation will
inform you that a panic has been generated (only if the Panic audible feedback
feature has been enabled by the installer). Only one panic can be generated
within a 20 second period per sub-station. If you press the Panic button for a
second time after 20 seconds has elapsed, a second panic will be generated.
Each of the four Listen-In substations can be programmed to either generate one
type of panics (police, medical or fire). By default, the Panic option is OFF and
must be enabled by your installer.
Mute Button Functions
The Mute button mutes the substation as well as controls the background
music. It is located on the bottom left corner of the Listen-In substation
(see Figure 1). By default, the background music is OFF.
The music’s source must be connected to the RCA connector on the
Listen-In module in order for the background music to be heard on any
of the Listen-In substations.
Table 8: Mute Button Functionality.
If the music is:
Stop and restart menu options
[0]
The various menus used in phone interaction with the
system.
Volume control dial
Panic Button Options
User Menus:
[4]
Followed by [2] will take you to Level 2; followed by [3] will take
you to Level 3; followed by [8] will take you to Level 8
Microphone
Page Button
1. Press and hold to
page other
substations.
2. Speak.
3. Release to end
page.
In order to use any of the buttons on the Listen-In Substation, the antitamper switch (located on the inside back of the substation) must be
held closed, regardless of whether the anti-tamper switch has been
disabled by the installer.
Followed by [0] will take you to Level 0; followed by [2] will take
you to Level 2; followed by [3] will take you to Level 3
Returns to initial session settings when an alarm is tripped (this
includes the microphone and audio settings)
[99] or [#9] Terminates communication with the Listen-In module
Mute button
• Toggles
background music
on and off.
• Press to mute.
(see Table 8)
• Press and hold 5
seconds to record
audio labels.
[99] or [#9] Terminates communication with the Listen-In module
[*]
Panic Button
• Press and hold two
seconds to
generate a panic
(must be enabled by
the installer).
Action
[0]
[7]
Figure 1 : Substation Overview
Table 5: Connection Level 8
1. Call the Listen-In module’s phone line number, it will pick up after the number
of rings determined at the installation. (Default 6 rings) If you have an
answering machine connected on the phone line, let it ring between one and
three times, wait 10 seconds then call back, the module will answer on the
first ring.
2. Enter your [USER CODE] to establish a connection.
3. Select an option available to you. Refer to the appropriate tables, in either
Monitoring or User menus sections to view the options available to you.
End communication
Activates or deactivates the siren bypass relay (if the system siren
is connected through the Listen-In module relay)
ON
To turn OFF: Press Mute once.
To mute: Press Mute twice within 5 seconds.
OFF
To turn ON: Press Mute once.
To mute: Press Mute three times within 5 seconds.
Muted (Red LED on)
To turn ON: Press Mute once.
To turn OFF: Press Mute twice within 5 seconds.
If the Background Music Input is disabled, the mute button will only
toggle the Mute option.
Recording Audio Labels
Use the Mute button to record audio labels for the system, all eight areas
and eight users. To record new labels for an area or user, press and hold
the Mute button for 5 seconds. Follow the voice prompts to modify the
labels.
Page Button Functions
Use the Page button to send a page from one substation to any of the
other three substations (depending on how the page options are
programmed by the installer). The Page button is located on the bottom
right corner of the Listen-In substation, to the right of the volume control
dial (see Figure 1).
The page function will be disabled during Listen-In mode, Installer
programming or when an audio message is played.
To initiate a page, press and hold the Page button. You will hear two
beeps and the Page button LED will glow brighter. Speak into the ListenIn substation’s microphone. When you are done, end the page by
releasing the Page button. If this is not done, the page will end
automatically after 4 minutes.