1
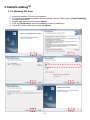
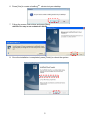
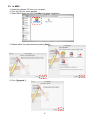
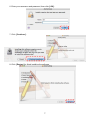
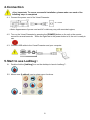
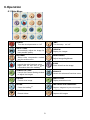
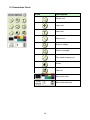
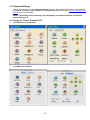
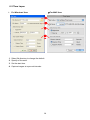
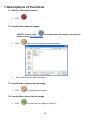
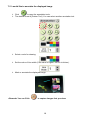
LadibugTM Visual Presenter Image Software User Manual 1 Contents 1. Introduction .................................................................................. 3 2. System requirement ..................................................................... 3 3. Install LadibugTM .......................................................................... 4 3.1 In Windows XP/ Vista ................................................................................4 3.2 In MAC ......................................................................................................6 4. Connection ................................................................................... 8 5. Start to use Ladibug™ ................................................................. 8 6. Operation ..................................................................................... 9 6.1 Main Menu ................................................................................................9 6.2 Annotation Tools ...................................................................................... 10 6.3 Camera Settings ..................................................................................... 11 6.3.1 Apply to "Visual Presenter V2" .............................................................................. 11 6.3.2 Apply to "UAC/UVC" (DC120 Use) ....................................................................... 12 6.4 Options ....................................................................................................13 6.5 Time Lapse.............................................................................................. 14 7. Descriptions of Functions .......................................................... 15 7.1 Start the Document Camera ....................................................................15 7.2 I would like to capture images .................................................................15 7.3 I would like to display the live image ........................................................ 15 7.4 I would like to freeze the live image ......................................................... 15 7.5 I would like to annotate the displayed image ........................................... 16 7.6 I would like to add textual annotation to images ......................................17 7.7 I would like to record video ......................................................................18 8. Troubleshooting ......................................................................... 19 8.1 Black screen is displayed in live image after LadibugTM was re-installed. 19 8.2 LadibugTM can not be used with DC120 in Windows operation system. ...19 2 1. Introduction After installing the LadibugTM application, you can use the software to: Control the Visual Presenter. Capture and record images. Annotate images, highlight important details and save them for later use. 2. System requirement Windows XP CPU: P4 1.8 GHz and above Memory: 512MB Support Direct X 9 Resolution: 1024x768 100MB Min Disc Space Windows XP SP2 and above Windows Vista / 7 Min CPU: P4 2.4 Ghz Min Memory: 1GB (32-bits)/2GB(64-bits) Direct X 9 Compatible Min Resolution: 1024x768 100MB Min Disc Space MAC OS X 10.4 / 10.5 / 10.6 (32-bits Kernel) Min CPU: PowerPC G4 866MHz or Intel Pentium® 1.83GHz Intel Core 2 Duo Min Memory: 512MB Min resolution 1024x768 24-bit color display monitor 1GB Min Disc Space Min QuickTime 7.4.5 3 3. Install LadibugTM 3.1 In Windows XP/ Vista 1. Insert the software CD into your computer. 2. The software installation program will automatically launch. Please select [ Install Ladibug] to begin install action. 3. Please read instructions then press [Next]. 4. Click the [Setup.exe] to start the installation wizard of LadibugTM. 5. Follow the screen instructions and press [Next]. 4 6. Press [Yes] to create a LadibugTM shortcut at your desktop. 7. Follow the screen instructions and press [Next]. <NOTE> The step is not available for DC120. 8. Once the installation is completed, press [Finish] to reboot the system. 5 3.2 In MAC 1. Insert the software CD into your computer. 2. Click the CD icon when appears.. 3. Select MAC folder and click [ Ladibug.] to begin installation. 4. Please follow the instructions and press [ Next ]. 5. Click [ Upgrade ]. 6 6. Enter your username and password, then click [ OK ]. 7. Click [ Continue ]. 8. Click [ Restart ] to finish installing the software. 7 4. Connection <Very Important> To ensure successful installation, please make sure each of the following steps is completed 4.1. Connect the power cord of the Visual Presenter. AC Outlet <Note> Appearance of power cord and AC outlet may vary with countries/regions. 4.2. Turn on the Visual Presenter by pressing the [POWER] button on the unit or the remote control for several seconds. When the light next to the power button is lit, the unit is ready to use. 4.3. Connect USB cable to the Visual Presenter and your computer. 5. Start to use Ladibug™ 5.1. Double-click the [Ladibug] icon on the desktop to launch Ladibug™.. 5.2. Mouse over [Ladibug] icon to select menu functions 8 6. Operation 6.1 Main Menu POWER: LAMP: Turn the visual presenter on / off Turn the lamp on / off AUTO TUNE: PREVIEW: Automatically adjust the image for best possible quality. Display live images OPTIONS: BRIGHTNESS: Select video compression method and the audio source. Adjust image brightness MAIN: ZOOM: Launch the main functions menu Right click on this icon to show information about the LadibugTM. Zoom in/out from the image CAMERA SETTING: ADVANCE: Launch the Camera Setting window to adjust live images Launch the advanced functions menu FREEZE: ANNOTATION: Freeze a live image Display annotation tools CLOSE: TIME LAPSE PHOTOGRAPHY: Close the LadibugTM. Capture images at a pre-set intervals RECORD: CAPTURE: Record videos Capture still images 9 6.2 Annotation Tools ICON Description Pointer tool Laser tool Insert text Draw a line Draw an ellipse Draw a rectangle Free-hand drawing tool Eraser Clear all Select pen color Select line thickness 10 6.3 Camera Settings Control the live image via the Camera Settings interface. The operating procedure is the same as the remote control and control panel of the Visual Presenter. Refer to the Visual Presenter user manual for more information. <Note> The display of the button may vary depending on product functions. An inactive button will grey out. 6.3.1 Apply to "Visual Presenter V2" For Windows’ User Interface For MAC User Interface 11 6.3.2 Apply to "UAC/UVC" (DC120 Use) For Windows’ User For MAC User 1. Auto Focus:Automatically adjust focal length on an object. 2. Focus:Manually adjust focal length on an object. 3. Auto Exposure:Set on/off. 4. Auto White Balance:Set on/off. 5. Rotate:Rotate the image by 0/180 degree. 6. output resolution:Set output resolution. 7. Power frequency:The power frequency may vary with countries. Please check it before using. <Note> In most parts of the world this is 50 Hz, although in the Americas it is typically 60 Hz. 12 6.4 Options For Windows’ User For MAC User 1. Factory Reset:Activate the factory reset. 2. Video Compress Codec Format:Set the video format. <Note> You need to enable the [Enable Video Compress] before setting in Windows OS. 3. Enable Audio Recorder:Enable the audio record device and set the audio source. 13 6.5 Time Lapse For Windows’ User For MAC User 1. Select file directory to change the default. 2. Specify a file name. 3. Set the start time. 4. Capture images at a pre-set intervals. 14 7. Descriptions of Functions 7.1 Start the Document Camera Click 7.2 I would like to capture images <NOTE> You can click to change time lapse setting, more details please refer to 6.5 Time Lapse. Click then a Save As window will be displayed. Key in the file name then click [Save]. 7.3 I would like to display the live image Click to display the live image. 7.4 I would like to freeze the live image Click to freeze the live image of Ladibug™. 15 7.5 I would like to annotate the displayed image Click The default mode is [Pointer Tool]. You can select another annotation tool. Select a color for drawing. Set the value of Line width (If the value is higher, the line is thicker). Mark or annotate the displayed image. to open the annotation tools. <Remark> You can Click to capture images that you draw. 16 7.6 I would like to add textual annotation to images Click Select [Text Tool]. The [Text Tool] window will pop up when you click the screen for the text to be added in. Enter the text in blank fields and click [OK]. Click [T] to change font’s settings (size/color/effect). to open the annotation tools. <Remark> You can Click to capture images that you draw. 17 7.7 I would like to record video Click to open the video tool. <NOTE> You can click to change video format and audio source setting, more details please refer to 8.4 Options. Click [Record] then a window will be displayed. Key in the file name then click [Save] to start recording. <insert image> Click [Stop] to stop recording. Click to close the record tool. 18 8. Troubleshooting 8.1 Q: Black screen is displayed in live image after LadibugTM was re-installed. Solution: 1. Remove the LadibugTM then restart the computer. 2. Re-install the LadibugTM . 8.2 Q: LadibugTM can not be used with DC120 in Windows operation system. Solution: 1. Please check the Windows OS version is Windows XP SP2 or above otherwise please upgrade to Windows XP SP2 or above. 8.3 Q: When running the LadibugTM , no image is displayed and get a Ladibug error message. “System video limitation reached. Please refer to the troubleshooting section of the Ladibug user’s manual.” Solution: 1. Please check if you are using an extended desktop (two monitors) hooked up to the computer. If so, please try to move the LadibugTM shortcut to the extended desktop and launch it. 2. If step 1 still doesn’t work, please turn off extended desktop. 3. If step 2 still doesn’t work, please reduce the resolution of desktop. 4. If step 3 still doesn’t work, please reinstall LadibugTM software. 19


![DC120 Visual Presenter User Manual [Important]](http://vs1.manualzilla.com/store/data/005845319_1-bd6fa75798b576fdb4accb3798bb8932-150x150.png)