1
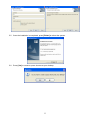
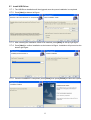
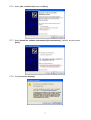
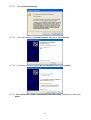
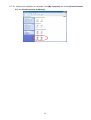
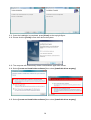
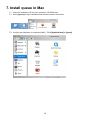
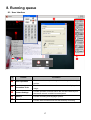
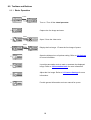
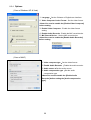
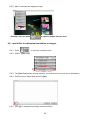
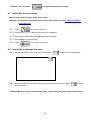
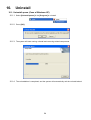
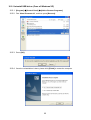
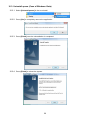
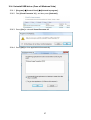
Visual Presenter Software
queue User’s Guide
1
Contents
1.
Introduction .............................................................................................................................. 3
2.
queue’s key features ................................................................................................................. 3
3.
4.
5.
6.
7.
8.
System requirement ................................................................................................................. 3
Before install ............................................................................................................................. 4
Install queue in Windows XP .................................................................................................. 4
Install queue in Vista.............................................................................................................. 12
Install queue in Mac............................................................................................................... 16
Running queue........................................................................................................................ 17
8.1.User Interface ........................................................................................................................ 17
8.2.Toolbars and Buttons............................................................................................................. 18
9.
Descriptions of Functions ...................................................................................................... 21
9.1. Start the Visual Presenter...................................................................................................... 21
9.2. I would like to capture images ............................................................................................. 21
9.3. I would like to display the live image .................................................................................. 21
9.4. I would like to freeze the live image .................................................................................... 21
9.5. I would like to annotate the displayed image ....................................................................... 21
9.6. I would like to add textual annotation to images. ................................................................ 22
9.7. I would like to record video ................................................................................................. 23
9.8. I would like to display full screen ........................................................................................ 23
10. Uninstall .................................................................................................................................. 24
10.1.Uninstall queue (Case of Windows XP).............................................................................. 24
10.2.Uninstall USB driver (Case of Windows XP) ..................................................................... 25
10.3.Uninstall queue (Case of Windows Vista)........................................................................... 26
10.4.Uninstall USB driver (Case of Windows Vista).................................................................. 27
2
1. Introduction
The software CD contains:
1.1.
queue Mac
1.2.
queue PC and USB driver which support WIA and TWAIN standards.
2. queue’s key features
2.1.
Remote control the Visual Presenter
2.2.
Capture and record images.
2.3.
Annotate the image, highlight important details and save it.
2.4.
Supports the full screen function.
2.5.
Video post processing on computer
2.6.
Export pictures in the Visual Presenter to a computer
2.7.
Change the setting of visual presenter and capture photos
3. System requirement
Operating
Minimum System Requirements
System
Windows XP
z
z
z
z
z
CPU: 2.8 GHz
Memory: 512MB
Support Direct X 9
Resolution: 1024x768
Minimum Hard Disc Space Required: 100MB
Windows Vista
z
z
z
z
z
CPU: 2.8 GHz
Memory: 1GB
Support Direct X 9
Resolution: 1024x768
Minimum Hard Disc Space Required: 100MB
MAC OS X
v10.4.10, v10.5
z CPU: PowerPC G4 866MHz or Intel Pentium® 1.83GHz Intel Core 2
z
z
z
z
Duo processor
Memory: 512MB
1,024x768 screen resolution and 24-bit color display
Minimum Hard Disc Space Required: 1GB
QuickTime 7.4.5 above
3
4. Before install
4.1. Connect the power cord of the Visual Presenter.
4.2. Turn on the Visual Presenter.
4.3. Connect USB cable to the Visual Presenter and your computer. Then, as shown below, the
computer will automatically detect new hardware.
4.4. Press Cancel to skip the [Found New Hardware]
5. Install queue in Windows XP
5.1. Insert the software CD in your computer’s CD-ROM.
5.2. The “Auto run” program will be shown automatically, if you would like to install queue please
press [queue PC ] / [Start to install ] to install.
5.3. Select the preferred language and press [Next].
5.4. Follow the screen instructions and press [Next].
4
5.5. Once the installation is completed, press [Finish] to reboot the system.
5.6. Press [Yes] to create a queue shortcut at your desktop.
5
5.7. Install USB Driver
5.7.1. The USB Driver installation will be triggered once the queue installation is completed
5.7.2. Press [Next] as bottom left figure.
5.7.3. After selecting the installation folder to be installed, press [Next] as the top right figure.
5.7.4. Press [Next] to confirm installation as the bottom left figure. Installation will proceed as the
bottom right figure.
5.7.5. Once the installation is completed, press [Close] then press [Finish] to reboot the system.
6
5.7.6. Select [ No, not this time] and press [Next].
5.7.7. Select [Install the software automatically (Recommended) ] (Default), and then press
[Next].
5.7.8. Press [Continue Anyway].
7
5.7.9. Found new hardware and press [Finish].
5.7.10.
Select [No, not this time] and press [Next].
5.7.11. Install [Visual Presenter V1], Select [Install the software automatically
(Recommended) ] (default), and then press [Next].
8
5.7.12.
Press [Continue Anyway].
5.7.13.
Once the installation of [Visual Presenter V1] is done, press [Finish].
5.7.14.
Found new hardware, select [ No, not this time], and then press [Next].
5.7.15. Select [Install the software automatically (Recommended) ] (default), and then press
[Next].
9
5.7.16.
Press [Continue Anyway].
5.7.17.
Once the installation of [Visual Presenter V1 Memory] is done, press [Finish].
10
5.7.18. Verifying the installation is completed. Click [My Computer] and find the [Visual Presenter
V1 ] and [Visual Presenter V1 Memory].
11
6. Install queue in Vista
6.1. Insert the software CD in your computer’s CD-ROM.
6.2. The “Auto run” program will be shown automatically, if you would like to install queue please
press [queue PC ] / [Start to install ] to install.
6.3. Select the preferred language and press [Next].
6.4. Follow the screen instructions and press [Next].
12
6.5. Once the installation is completed, press [Finish] to reboot the system.
6.6. Press [Yes] to create a queue shortcut at your desktop.
6.7. The USB Driver installation will be triggered once the queue installation is completed
6.8. Press [Next] as bottom left figure.
6.9. After selecting the installation folder to be installed, press [Next] as the top right figure.
6.10. Press [Next] to confirm installation as the bottom left figure. Installation will proceed as the
bottom right figure.
13
6.11. Once the installation is completed, press [Close] as the top right figure.
6.12. Please click the [Finish] button then reboot the system.
6.13. The computer will automatically detect new hardware again after reboot.
6.14. Select [Locate and install driver software] then select [Install this driver anyway].
6.15. Select [Locate and install driver software] then select [Install this driver anyway].
14
6.16. Select [Install this driver anyway] again then the driver is ready.
6.17.Click the “Your devices are ready to use” as top right figure then three USB drivers are shown.
15
7. Install queue in Mac
7.1. Insert the installation CD into your computer’s CD-ROM drive.
7.2. Select [queue] to begin installation and follow the screen instructions.
7.3. Verifying the installation is completed (MAC) : Click [Applications] > [queue]
16
8. Running queue
8.1. User Interface
q
p
o
r
n
#
Toolbar
Functions
Functions such as capture images, freeze images, live images
n
Basic Operation
o
Annotation Tools
p
Camera Settings
q
Options
Provide recording and language options.
r
Video Tools
Provide video functions such as start and stop recording.
and etc.
Provide annotation tools to mark or annotate the displayed
image.
Provide operation functions which are the same with keys on
the remote control / machine’s control panel.
17
8.2. Toolbars and Buttons
8.2.1. Basic Operation
Press
1
Turn on / Turn off the visual presenter.
2
Capture the live image and save.
Press
3
Open / Close the video tools.
Press
4
5
6
7
8
Display the live image. / Freeze the live image of queue.
Open the dialogue box of options setting. Refer to 2.4 Options
for more information.
It provides annotation tools to mark or annotate the displayed
image. Refer to 2.2 Annotation tools for more information.
Adjust the live image. Refer to 2.3 Camera Settings for more
information.
Provide general information and user manual for queue.
18
8.2.2. Annotation Tools
1. This is the default mode.
2. Draw a small color dot.
3. Draw free-handedly.
4. Add text.
5. Draw a straight line.
6. Draw an oval or circular graph.
7. Draw a square or rectangle.
8. Erase the drawing.
9. Clear the drawing altogether.
10. Choose the color for the selected drawing
11. Increase or decrease the thickness of the
lines. (If the value is higher, the line is thicker).
8.2.3. Camera Settings
Control the live image via the Camera Settings interface. The
operating procedure is the same as the remote control and control
panel of the Visual Presenter. Refer to the user manual for more
information.
<Note> The display of the button may vary depending on
product functions. An inactive button will grey out.
19
8.2.4. Options
(Case of Windows XP & Vista)
1. Language:Set the Chinese or English user interface.
2. Video Compress Codec Format:Set the video format.
<Note>You need to enable the [Enable Video Compress]
before setting.
3. Enable Video Compress:Enable the video format
setting.
4. Enable Audio Recorder:Enable the MIC record device.
5. MIC Record Device:Set the MIC record device.
<Note>You need to enable the [Enable Audio Recorder]
before setting.
(Case of MAC)
6.
1.
2.
3.
4.
Video compress type:Set the video format.
Enable Audio Recorder:Enable the audio recorder.
Audio source:Set the audio source.
Audio compression type:Set the audio
compression type.
<Note>You need to enable the [Enable Audio
Recorder] before setting the [Audio compression
type].
20
9. Descriptions of Functions
9.1. Start the Visual Presenter
9.1.1. Press
9.2. I would like to capture images
9.2.1. Press
then a Save As window will be displayed.
9.2.2. Key in the file name then press [Save].
9.3. I would like to display the live image
9.3.1. Press
to display the live image.
9.4. I would like to freeze the live image
9.4.1. Press
to freeze the live image of queue.
9.5. I would like to annotate the displayed image
9.5.1. Press
to open the annotation tools.
9.5.2. The default mode is [Pointer Tool]. You can select another annotation tool.
9.5.3. Select a color for drawing.
9.5.4. Set the value of Line width (If the value is higher, the line is thicker).
21
9.5.5. Mark or annotate the displayed image.
<Remark> You can press
to capture images that you draw.
9.6. I would like to add textual annotation to images.
9.6.1. Press
to open the annotation tools.
9.6.2. Select [Text Tool ]
9.6.3. The [Text Tool] window will pop up when you click the screen for the text to be added in.
9.6.4. Enter the text in blank fields and click [OK].
9.6.5. Click [T] to change fonts settings (size/color/effect).
22
<Remark> You can press
to capture images that you draw.
9.7. I would like to record video
<Note> Please make sure the mode is live image.
<Remark> If you want to record audio at the same time, please refer to 2.4 Options, Enable
Audio Recorder
9.7.1. Press
to open the video tool
9.7.2. Press [Record] then a Save As window will be displayed.
9.7.3. Key in the file name then press [Save] to start recording.
9.7.4. Press [Stop] to stop recording.
9.7.5. Press
to close the record tool.
9.8. I would like to display full screen
9.8.1. Moving the mouse to the upper right corner, press
to enter the full screen display.
9.8.2. Moving the mouse to the upper right corner while in full screen mode, press
to exit full
screen display.
<Remark>While in the full screen display mode, right-clicking can activate Annotation Tools.
23
10.
Uninstall
10.1. Uninstall queue (Case of Windows XP)
10.1.1. Select [Uninstall queue] in the [Program] to uninstall.
10.1.2. Press [OK].
10.1.3. The system will start running uninstall and removing related components.
10.1.4. The uninstallation is completed, and the system will automatically exit the uninstall wizard.
24
10.2. Uninstall USB driver (Case of Windows XP)
10.2.1. [Program] Æ [Control Panel] Æ [Add or Remove Programs].
10.2.2. Find Visual Presenter V1, and then press [Remove].
10.2.3. Press [OK].
10.2.4. Once the uninstallation is done, please click [Finish] to restart the computer.
25
10.3. Uninstall queue (Case of Windows Vista)
10.3.1. Select [Uninstall queue] in the to uninstall.
10.3.2. Press [Yes] to completely remove the application.
10.3.3. Press [Finish] once the uninstallation is completed.
10.3.4. Press [Finish] to reboot the system.
26
10.4. Uninstall USB driver (Case of Windows Vista)
10.4.1. [Program] Æ [Control Panel] Æ [Uninstall a program].
10.4.2. Find [Visual Presenter V1] , and then press [Uninstall].
10.4.3. Press [Yes] to uninstall Visual Presenter V1
10.4.4. Press [OK] to close applications automatically.
27


![DC120 Visual Presenter User Manual [Important]](http://vs1.manualzilla.com/store/data/005845319_1-bd6fa75798b576fdb4accb3798bb8932-150x150.png)