1
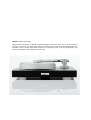
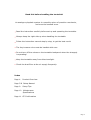
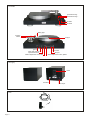
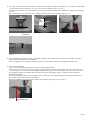
Model Magne
Manual
Magne> Nordic Mythology
Magne means “strength”. In Nordic mythology Magne is the super baby, son of Thor, the God of
Thunder, and when he is three days old he is so strong that he can lift a dead giant away from
his father, who is pinned underneath. Magne is one of the few gods, who survive Ragnerok, the
nordic armageddon, and rebuilds the new world
Read this before handling the turntable!
An analogue playback system is a sensitive piece of precision mechanics,
and must be handled as so.
Read the instruction carefully before set up and operating the turntable.
Allways keep the right side up when handling the turntable.
Follow the instruction manual step by step, to get the best result.
The tiny tonearm wire must be handlet with care.
Do not turn off the valves on the turntable backpanel when the airsupply
is operating!
Keep the turntable away from direct sunlight.
Check the dust filter at the air supply frequently.
Index
Page 4
Product Overview
Page 5-8 Setup Manual
Page 9
Setup Tips
Page 10
Maintenance
Specifications
Page 11 CE Confirmation
Page 3
Turntable
speed finetuning speed finetuning +
45 RPM
33 RPM
sliding pipe
armtube
armlift
air pipe
ground
input right channel
input left channel
airflow adjustment valve, arm
input PSU
air input
airflow adjustment valve, platter
Airsupply
on/off
dust filter
PSU
Page 4
air output
Setup Manual.
1. Place the turntable on a stable, adjustable rack or shelf.
2. Add oil to the bearing, appr. half full. See Pic. 1.
Mount the subplatter in the bearing. The flat side upside, Pic. 2, and let it sink. Remove the subplatter again.
If oil is pressed out of the bearing, the amount is correct, Pic. 3. Wipe away the surplus of oil.
Note: Be aware the oil does not flow into the airbearings air hole.
Mount the subplatter again.
Note: The airbearing and subplatter must be absolutely clean to avoid friction and noise.
Pic. 1.
Pic. 2.
Pic. 3.
surplus of oil
3. Mount the belt around the subplatter and motor pulley, Pic. 4 and 5.
Mount the platter, Pic. 6, and adjust the rack or shelf in level.
Pic. 4.
Pic. 5.
Pic. 6.
4. Install the airsupply in a horizontal position.
Connect the airtube: one end to the airsupply, and one end to the turntable air input, Pic. 7.
Plug in the powercord, to the airsupply and the outlet.
Note: It is very important, to place the airsupply in an indoor environment, to prevent condense to enter
the system!
Pic. 7.
5. Turn on the airsupply, and start the platter. If any noise is caused by the bearing, an airflow adjustment is
required. Adjust the airflow at the backpanel.
Important: Do not turn off the adjustments valves on the turntable when the airsupply is operating.
Page 5
6. Finetune the speed by the small push buttons, Pic. 8.
finetune finetune +
Pic. 8.
7. Mount the cartridge in the headshell, and just tighten slightly, such it is possible to turn the cartridge.
Connect the cartridge clips to the cartridge pins. (Note the colour!). Pic. 9.
Note: The cartridge clips must be handled with the greatest care!
Pic. 9.
8. Mount the counter weight.
Turn on the airsupply.
Adjust the tracking force. See the cartridge manual for recommended tracking force.
Note: The tonearm must slide frictionless on the airpipe, when adjusting the tracking force.
9. Turn of the airsupply. (To ensure the platter do not turn).
Place the alignment tool on top of the platter, and make sure the groove is completely parallel to the
tonearm airpipe. It is recommended to use a calliper for exact measuring. Pic. 10.
Measure both end, Pic. 11 and 12.
Pic. 10.
groove
Pic. 11.
Pic. 12.
10. Adjust the VTA:
Loosen the screw on the tonearm backside. Adjust the VTA, such as the armtube is parallel to the alignment
tool, Pic. 13. Tighten the screw.
Pic. 13.
Page 6
parallel
11. Turn the cartridge such as the stylus is parallel to the alignment tools`crossline, Pic. 14. Tighten the cartridge
( If the cartridge has a flat front, you can use any non magnetic device, Pic. 15.)
Untighten the 2 screws on the armbase, and move the tonearm forward or backward to adjust the overhang,
Pic. 16.
Move the tonearm, so the styles tip is exactly in the groove of the alignment tool, Pic. 17.
Pic. 14.
cross line
Pic. 15.
Pic. 16.
Pic. 17.
12. The headshell on Magne tonearm is complete parallel to the sliding pipe, such as the cartridge azimuth is
perfect when mounted on the headshell.
Note: If adjustment is required, it must be done by using spacers between cartridge and head shell.
13. Turn on the airsupply.
The 2 screws on the tonearm base is also for leveling the tonearm.
Depending on how much the left or the right screw is tighten, the tonearm airpipe can be tilted to the left
or to the right. Ex: Tilt to the left by slightly untighten the right screw- tighten the left screw, and visa versa.
The adjustment pipe is a helpfull tool to ease the level of the airpipe, which is vital for a linear tracking
airbearing tonearm.
Draw the adjustment pipe onto the airpipe, Pic 18. Make sure the adjustment pipe is sliding frictionless on
the airpipe. Adjust the airflow if necessary.
When the adjustment pipe float and remain on the same point, the level is correct.
Pic. 18.
adjustment pipe
Page 7
14. Note: The tonearm must slide absolutely frictionless on the airpipe.
To obtain this effect, slightly move the tonearm on the airtube, Pic. 19, at the same time gently adjust
the airflow if necessary.
Note: The armlift must be at the down position, when finetuning the airflow.
Warning: Be aware of the stylus when you do the adjustment.
When you feel the tonearm is sliding unhindered (on an airfilm), the airflow is correct.
Adjust the airflow at the turntable backpanel.
adjust the airflow
Pic. 19.
Playing records
Turn on the airsupply.
When moving the tonearm, push carefully the sliding pipe. (Do not push the headshell).
Turn down the armlift slowly until the stop.
It is recommended to turn off the platter when changing records.
Enjoy
Page 8
Set up tips
To ensure an airbearing turntable/tonearm to work perfect, there are some important
parameters that is vital to succeed.
On the Bergmann turntables and tonearms the parameters are as follows:
The platter:
1. The platter must be in level, as every other turntables.
2. the amount of airflow must be correct! That means just enougth air to lift the platter to
obtain a frictionless airfilm between the airbearing and the subplatter.
3. The airbearing and subplatter must be absolutely clean to avoid friction and noise.
The tonearm:
1. The airpipe must be in level.
Bergmann tonearms can be tilted independed of the plinth.
2. The airpipe and the sliding pipe must be absolutely clean.
3. The tracking force must be correct.
4. The airflow must be correct:
The airflow is correct when the sliding pipe is floating unhindered on the airpipe. An airfilm
must create a space between the airpipe and the sliding pipe. That means just enougth
airflow to lift the sliding pipe from the airpipe, but not so much as a friction is caused at the
underside between the sliding pipe and the airpipe!
Page 9
Maintenance
Turntable
It is recommende to check the adjustments yearly. If necessary, finetune.
Check the amount of oil in the bearing yearly.
Clean carefully with a soft cloth wriged in mild soapy water.
Airsupply
Check the dust filter frequently, and clean or replace if necessary. A dirty filter can cause damage to
the pump!
Clean carefully with a soft cloth wriged out in mild soapy water.
Specifications
Turntable
Airbearing design.
Record flatten by a heavy clamp.
DC motor. Beltdriven.
Plinth:
High density composite material.
Platter/Bearing:
Aluminium platter/Polycarbonate mat, supported by air, and centred by
steel spindel/hardweared low friction polymer bearing.
Platter weight: 6,0kg.
Subplatter:
Aluminium, weight: 1.4kg.
Dimensions:
440 x 495 x 165 (D x W x H).
Total weight:
18,5kg.
Tonearm
Linear tracking airbearing tonearm. Aluminium/carbon.
Armtube damped inside.
Counter weight decoupled from armtube.
Wire: High quality copper litz.
Clips: Gold plated copper.
Connectors: CMC rca connectors. Gold plated super copper.
Neutrik XLR connectors. Gold plated.
Cardas DIN connectors. Gold plated.
Effectiv mass:
11 gr.
Motorcontrol:
Seperate plug-in power supply.
33 & 45 rpm. Speed finetuning.
Airsupply
Silent, clean, dry and smooth airflow. Replaceable dust filter.
Dimensions:
300 x 190 x 175 (D x W x H).
Weight:
5,4kg.
Page 10
Registered Trademark
Handcrafted in Denmark
www.bergmannaudio.com