1
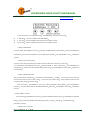
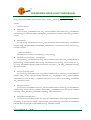
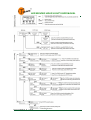
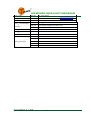
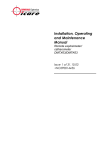
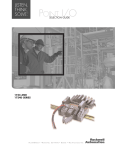
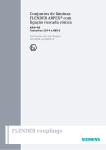
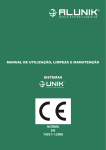
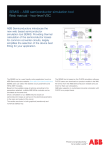
www.theonelights.com
LED MOVING HEAD LIGHT
USER MANUAL
CE RoHS
MODE NO.
NAME
TH-103
LED MOVING HEAD LIGHT
(4IN1 10W×36)with zoom
LED MOVING HEAD LIGHT USER MAUAL
www.theonelights.com
CONTENT
1.
GENEARAL…………………………………………………………………..1
2.
FEATURE……………………………………………………………………...2
3.
OPERATIONS………………………………………………………………..4
4.
CHANNEL CHART……………………………………………………………7
5.
SAFETY INSTRUCTIONS…………………………………………………..10
6.
MAINTANCE…………………………………………………………………..12
THE-ONE OPTRONICS CO.,LIMITED
1
LED MOVING HEAD LIGHT USER MAUAL
GENEARAL
www.theonelights.com
please read this user manual carefully before installing the device.
This product is designed for indoor use. It is suitable for indoor, building, disco, stage and etc. as large or small wash or effect
lighting. This product can be operated as a single unit or in multiple units for large applications. Direct input of DMX512 signal to
unit to allow it be controlled by any DMX512 controller. Powerful internal programs and friendly & convenient operation interface
allow customers to program freely to any different lighting project requirements for installation or shows.
IMPORTANT
BEFORE OPERATION PLEASE CONFIRM THAT THE POWER SUPPLY STATED ON THE REAR PANEL OF THIS UNIT IS
THE SAME AS THE SUPPLIED MAINS POWER IN YOUR AREA.
。
This led moving head light has gotten the nice sculpt, efficient, save electricity and durable
This product complies with the following standards:
EN61000-3-2:2006+A2:2009
EN60598-1:2008+A11:2009
Unpacking Instructions
Immediately upon receiving a fixture, carefully unpack the carton, check the contents to ensure that all parts are present, and have
been received in good condition. Notify the shipper immediately and retain packing material for inspection if any parts appear
damaged from shipping or the carton itself shows signs of mishandling. Save the carton and all packing materials. If the item has
to be sent back to the factory to repair or change, It is import that the fixture be returned in the original factory box and packing.
THE-ONE OPTRONICS CO.,LIMITED
2
LED MOVING HEAD LIGHT USER MAUAL
FEATURE
www.theonelights.com
• DMX-512 LED signal
• 0~100% linear dimming; Special function
• Built-in program for a variety of lighting effects
• Zoom: from 15-60 degree
• Run simultaneously from sound control without controllers;
• Optical system: Combination of high-precision quartz lens
• Optical loss is reduced to a minimum;Protection: all intelligent
• Temperature thermal protection and high-interference with electronic circuits
• 100000 hours LED life,Energy-Saving and environment-protective
• Pan: 540°,8/16bit, adjustable
• Tilt: 270°, 8/16bit, adjustable
•XLR mate socket data output ,locking 3-pin
•XLR temale socket data pin configuration :pin 1 shield pin2(-),pin3(+)
•The housing is made of streamline fashionable PC engineering plastic after once casting
•Infinite RGB color mixed system
•The light beam angle is adjustable ranging 15° - 45°
•High speed electronic strobe reaches 1-18 times/second
•The digital display on the control panel can be reversed for 180° , applicable for horizontal or vertical use of moving head
Technical parameter
•Input Voltage: AC90-2600V
50-60Hz
•LED Quantities: 36PCS 10W Quad LEDs
•Control Signal:DMX512, master-slave and sound activated or auto operation
•Control Channel: 15 DMX Channels
•Power Consumption: 460W
•Packing Dimensions: 405x290x520mm
•N. W: 10kg
•G. W:12kg
THE-ONE OPTRONICS CO.,LIMITED
3
LED MOVING HEAD LIGHT USER MAUAL
OPERATIONS
www.theonelights.com
,
1. In the main window ,in turn press “ESC” button select DMX mode
、auto mode or sound mode,
: press “UP” “DOWN”to select DMX address;
In Auto mode:press “UP”“DOWN”to select the device to be a Master or Slave
In sound mode:press“UP”“DOWN”to select the device to be a Master or Slave
In DMX mode
1.1 setting up DMX address
,
,
In the main window, press“ENTER” into main menu press“UP” or“DWON”selection“1.DMX Address” and then press“ENTER”into
,
,
parameter set then press“UP”or“DOWN”to can be set DMX address parameter then press“ENTER” to save
,press“ESC”to
surrender.
1.2 setting up device working mode
;
The device can be working the following three modes of either one: DMX mode, auto mode or sound mode
,
, then press“ENTER” into
parameter saving, and then press“UP”or“DOWN”to select working mode, then press“ENTER”can be save setting, press“ESC”to
In the main window, press“ENTER”into main menu press“UP”or“DWON” to select “2.Work Mode”
surrender setting.
1.3 setting up Master/Salve mode
,
, as Master, the unit in the Auto at the same tine
will be sent to the other asynchronous data. In Slave, the unit is not sent the data to others,and do not affect the same line of the
normal work of the other light,setting as below:
In the main window, press“ENTER” into main menu,press“UP”or“DWON” to select“3.Master”,then press“ENTER”into
parameter, then press“UP”or“DOWN” to select Mater/Slave mode,after setting,press“ENTER”to salve setting,press“ESC”to
surrender。
When the unit is AUTO or SOUND mode can be setting unit as Master/Salve
1.4 setting up PAN run direction
,
,
,
In the main window press“ENTER”into main menu press“UP”or“DWON”to select“4.Pan Invert” press“ENTER”into parameter
,
setting and then press“UP”or“DOWN”to select PAN forward rotating or inversion
press“ESC”to surrender.
1.5 setting up TILT run direction
THE-ONE OPTRONICS CO.,LIMITED
4
,after setting,press“ENTER”to save,
LED MOVING HEAD LIGHT USER MAUAL
In the main window,press“ENTER”into main menu,press“UP”or“DWON”to select“5.Tilt Invert”,press“ENTER”into parameter
www.theonelights.com
,
setting and then“UP”or“DOWN”to select TILT forward rotating or inversion
,after setting,press“ENTER” to save,press“ESC”to
surrender.
1.6 Reset or parameter
Reset system
,
,press“UP”or“DWON”to select“7.Reset System”,press“ENTER”into
parameter setting,then press“UP”or“DOWN”to select“[DEVICE]”,press“ENTER” can immediately reset the device,press“ESC”to
In the main window press“ENTER”into main menu
surrender.
Reset parameter
,
,
,
parameter setting,press“UP”or“DOWN”to select“[PARAM]”,press“ENTER”the unit can be reset to factory parameter value,
In the main window press“ENTER”into main menu press“UP”or“DWON”to select“7.Restem System” press“ENTER”into
press“ESC”to surrender.
1.7 Senior parameter setting
,
:
Senior parameter is not commonly used parameters can set up as below
(
Setting LED mixing color proportion color temperature
,
)
,
,
parameter setting,press“UP”or“DOWN”to select“COL MIX”,press“ENTER”into color mix setting,press“UP”to select color(R、
G、B or W)
,press“DOWN”to adjust the brightness of corresponding color proportion ,after setting,press“ENTER” to save set,
In the main window press“ENTER”into main menu pree“UP”or“DWON”to select“6.Advance Cfg” then press“ENTER”into
press“ESC”to surrender.
Setting up cool fan working mode
,
,
,
parameter setting , and then press“UP”or“DOWN”to select“FAN CTL” , press“ENTER”into setting , press“UP”or“DOWN”to
select“[ALWAYS]” to star the fan always or as“[AUTO]”according to the unit on to start the fan,after setting,press“ENTER”to
save,press“ESC”to surrender.
In the main window press“ENTER”into main menu press“UP”or“DWON”to select“6. Advance Cfg” then press“ENTER”into
Setting PAN rotation rate
,
,
In the main window, press“ENTER”into main menu press“UP”or “DWON”to select “6. Advance Cfg” then press“ENTER”into
,
,
parameter setting and then press “UP”or "DOWN" to select“X ANGLE” press“ENTER”to set,and then press“UP”or “DOWN”to
,
,
,
select “[540]” or“[630]” after setting press“ENTER”to save setting press “ESC”to surrender.
Setting PAN the initial offset position
,
In the main window, press “ENTER”into main menu, press “UP”or “DWON”to select“6. Advance Cfg” then press“ENTER”into
,
,
,
parameter set and then press “UP”or “DOWN” to select “Pan Offset” press “ENTER”to set and then press “UP”or “DOWN”to set
,
PAN initial offset in after reset, after set, press“ENTER”to save set press“ESC”to surrender.
THE-ONE OPTRONICS CO.,LIMITED
5
LED MOVING HEAD LIGHT USER MAUAL
www.theonelights.com
THE-ONE OPTRONICS CO.,LIMITED
6
LED MOVING HEAD LIGHT USER MAUAL
DMX CHANNEL CHART
Channel/Function
CH1
:Horizontal
VALUS
www.theonelights.com
FUNCTIONS
scanner
000-255
PAN from 0-54 or 630 degree scanner
CH2
000-255
TILT from 0-280°scanner
000-255
Zoom scanner
000-009
no strobe (light on)
010-059
Strobe from slow to fast
060-064
No strobe (light on)
065-114
Random strobe from slow to fast
115-119
No strobe(light on)
120-169
From slow to fast strobe bright gradually
170-174
No strobe (light on)
175-224
From slow to fast strobe dark gradually
225-234
No strobe(light on)
235-244
No strobe, light off, after 3sec. Reset unit
245-255
No strobe (light on)
000-002
R
003-004
RW
005-007
RG
008-009
RGW
010-012
G
013-014
GW
015-017
GB
018-019
GBW
020-022
B
023-024
BW
025-027
RB
028-029
RBW
030-039
W
040-049
RGBW
050-083
R on, G on gradually, B off
084-117
R off gradually G on
118-151
R off
:Vertical scanner
CH3:Zoom
CH4
CH5
:Strobe/Reset
:Macro
:total dimmer
CH7:Red
CH6
、
、B off
152-185
、G on、B on gradually
R off、G off gradually、B on
186-218
R on gradually, G off, B on
219-252
R on, G off, B off gradually
253-255
RGBW
000-255
0%-100% dimmer
000-256
0%-100% dimmer
THE-ONE OPTRONICS CO.,LIMITED
7
:Green
CH9:Blue
CH8
CH10: White
CH11
:Color changing
automatic
:Horizontal fine
CH13:Vertical fine
CH12
CH14: scanner speed
CH15
:Run mode
LED MOVING HEAD LIGHT USER MAUAL
000-257
0%-100% dimmer
000-258
0%-100%dimmer
000-259
0%-100% dimmer
000-005
RGBW
006-127
Color gradual changing from slow to fast
128-255
Color jumping from slow to fast
,color decided by CH5
000-255
000-255
000-255
from fast to slow scanner
000-049
DMX mode
050-099
Pan auto
100-149
Tilt auto
150-199
Pan/Tilt auto
200-255
Sound
THE-ONE OPTRONICS CO.,LIMITED
www.theonelights.com
8
LED MOVING HEAD LIGHT USER MAUAL
Connections :
www.theonelights.com
DMX-512 CONTROL CONNECTIONS
1)
Connect the male connector of the DMX cable to the female connector(output) on the controller
2)
Connect the female connector of the DMX cable to the first fixture’s male connector(input). Note: It
doesn’t matter which fixture address is the first one connected. We recommend connecting the fixtures
in terms of their proximity to the controller, rather than connecting the lowest fixture number first, and so
on.
3)
Connect other fixtures in the chain from output to input as above. Place a DMX terminator on the output
to input of the final fixture
to ensure best
communication
FIXTURE LINKING (Master/Slave mode)
1)
Connect the (male) 3 pin connector side of the DMX cable to the output (female) 3 pin connector of the
first fixture.
2)
Connect the end of the cable coming from the first fixture which will have a (female) 3 pin connector to
the input connector of the next fixture consisting of a (male) 3 pin connector. Then, proceed to connect
from the output as stated above to the input of the following fixture and so on.
THE-ONE OPTRONICS CO.,LIMITED
9
LED MOVING HEAD LIGHT USER MAUAL
www.theonelights.com
A quick note: Often, the setup for Master/Slave and standalone operation requires that the first fixture in the
chain be initialized for this purpose via either settings in the control panel, the fixtures that follow may also
require a slave setting.
THE-ONE OPTRONICS CO.,LIMITED
10
LED MOVING HEAD LIGHT USER MAUAL
SAFTY INSTRUCTIONS
THE-ONE OPTRONICS CO.,LIMITED
www.theonelights.com
11
LED MOVING HEAD LIGHT USER MAUAL
www.theonelights.com
ATTENTIONS:
1)This product must be installed by a qualified professional
2) All operation and maintenance must be carried out in accordance with this user manual.
3)Always disconnect the power before attempting to open the equipment housing or carrying out any
maintenance.
4) Avoid looking directly into the light source (especially those who suffer from epileptic fits).
5)DO NOT connect power cable of other electric products with this unit.
6) DO NOT connect DMX512 Signal cable of other electric products with this unit.
7) Make sure power socket is connected with earth cable well when connect to AC110-240V power.
8) The fixture can be mounted in an upright or sitting position using the supporting brackets, the lamp angle
can be adjusted discretionarily using the two adjustment knobs located on the side of the fixture.
9)When suspending the fixture above ground level, verify that the structure can hold at least 10 times the
weight of all installed devices.
10)Verify that all external covers and rigging hardware are securely fastened and use an
approved means of secondary of attachment such as safety cables.
MAINTENANCE
1)In order to make sure the LED moving head light operate steadily, it should keep clean. Suggest clean
lighting body every 15 days. Lens and dichroic filter should be cleaned at stated time to assure the best light
effect.
2)Don’t dismounting or refit led moving head light.
3)Don’t touch water and other kind of liquid and metal substance (IP20).
4)Don’t install in a high wettest condition.
5)Don’t illuminate on tinderbox, led moving head light must keep 5M away from tinderbox.
6)Led moving head light should keep 0.5M away the surface of adjacent object.
7)Don’t look beam in the face, or it may injure your eyes.
THE-ONE OPTRONICS CO.,LIMITED
12